IAN 102614 - Lighting Livarno Lux - Free user manual and instructions
Find the device manual for free IAN 102614 Livarno Lux in PDF.



| Product type | LED ceiling light |
| Brand | Livarno Lux |
| Model | IAN 102614 |
| Supply voltage | 230 V~, 50 Hz |
| Rated power | 11.5 W |
| Bulb type | 20 SMD-LED (non-replaceable) |
| Number of spots | 1 (adjustable) |
| Vertical adjustment angle | 90° |
| Horizontal adjustment angle | 330° |
| Protection class | II |
| Use | Dry indoor |
| Minimum distance to illuminated objects | 0.5 m |
| Package contents | LED ceiling light, 2 screws, 2 wall plugs ∅6 mm, 2 covers, 2 textile tubes, mounting instructions |
| Warranty | 3 years |
| Article numbers | Z31708A (chrome triangle), Z31708B (titanium triangle), Z31708C (chrome rail), Z31708D (titanium rail) |
| Cleaning | Dry lint-free cloth |
| Housing material | Metal |
| Electrical connection | By a professional electrician |
| Safety instructions | Cut off power before installation/cleaning; maintain 0.5 m distance |
Frequently Asked Questions - IAN 102614 Livarno Lux
User questions about IAN 102614 Livarno Lux
0 question about this device. Answer the ones you know or ask your own.
Ask a new question about this device
Download the instructions for your Lighting in PDF format for free! Find your manual IAN 102614 - Livarno Lux and take your electronic device back in hand. On this page are published all the documents necessary for the use of your device. IAN 102614 by Livarno Lux.
USER MANUAL IAN 102614 Livarno Lux
Assembly and safety advice
SE
LEDTAKLAMPA
GB / IE Operation and Safety Notes Page 3
This light is suitable only for use in dry rooms. The light is not intended to be used for commercial purposes.
- Parts description
1 Dowel
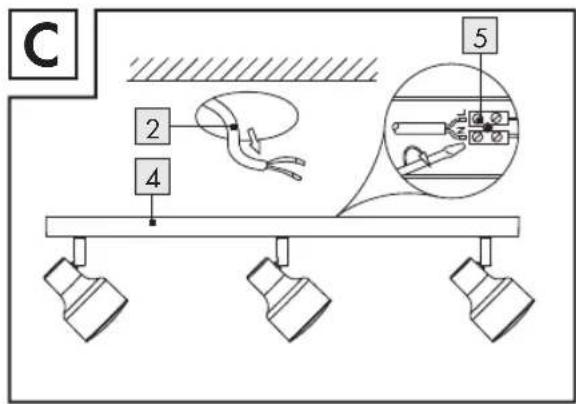
2 Mains power lead (external)
3 Fabric tube
4 Lamp housing
5 Terminal block
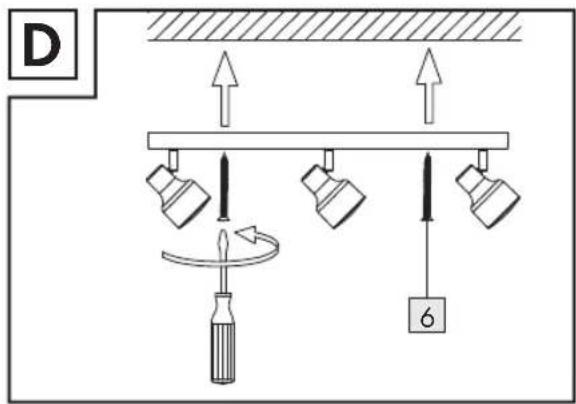
6 Screw
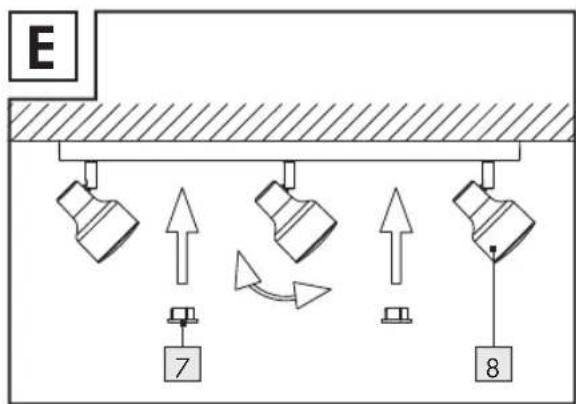
7 Protective cap
8 Spotlight
- Technical Data
Operating voltage: 230V\~50Hz
Light bulb: 20 SMD-LED's per spotlight (LEDs not replaceable)
Rated output: max. 11.5 W
Protection category: ☐
Model number: Z31708A (triangle, chrome-plated), Z31708B (triangle, titanium-coloured), Z31708C (rail, chrome-plated), Z31708D (rail, titanium-coloured)
- Scope of delivery
1 LED Ceiling Light
2 Screws
2 Dowels ∅ 6 mm
2 Protective caps
2 Fabric tubes
1 Installation instructions

Safety information
PLEASE READ THE ASSEMBLY INSTRUCTIONS BEFORE USE! PLEASE KEEP THE ASSEMBLY INSTRUCTIONS IN A SAFE PLACE!
This appliance may be used by children age 8 years and up, as well as by persons with reduced physical, sensory or mental capacities, or lacking experience and / or knowledge, so long as they are supervised or instructed in the safe use of the appliance and understand the associated risks. Children should not be allowed to play with the appliance. Cleaning and user maintenance should not be performed by children without supervision.
This lamp is suitable only for use indoors.
FIRE HAZARD! Fit the light so that it is at least 0.5 m away from the material illuminated. Fire can result from the development of too much heat.

Danger to life by electric shock
Always check lamp for damage before connecting it to power. Never use the light if it shows any signs of damage.
Before assembly, ensure that the available mains voltage corresponds to the operating voltage necessary for the light (230 V\~).
Do not connect the lamp if this is not the case. Mount the light so that it is protected from spray water and moisture.
CAUTION! DANGER OF BURN INJURIES! To prevent burns, verify the light is switched off and has cooled down for at least 5 min before touching it. Lamps can become very hot.
- Before installation
Important: The electrical connection must be performed by a qualified electrician or a person trained in electrical installations. This person must be familiar with the properties of the light and the connection regulations.
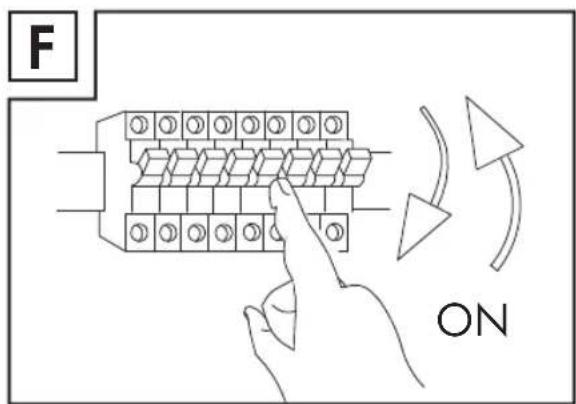
Before installation ensure that the circuit, to which the light will be connected, is not energised. To do so, remove the fuse or switch off the circuit breaker in the fuse box (0 position).
■ Use the voltage tester to verify the de-energised status.
The included mounting material is suitable for ordinary solid concrete or masonry construction. Check whether the mounting material is suitable for your chosen mounting surface. Also check whether the chosen mounting surface is suitable for supporting the lamp. If necessary, seek expert advice.
- Installation
Note: the installation steps are identical for all the lamp models mentioned in these instructions.
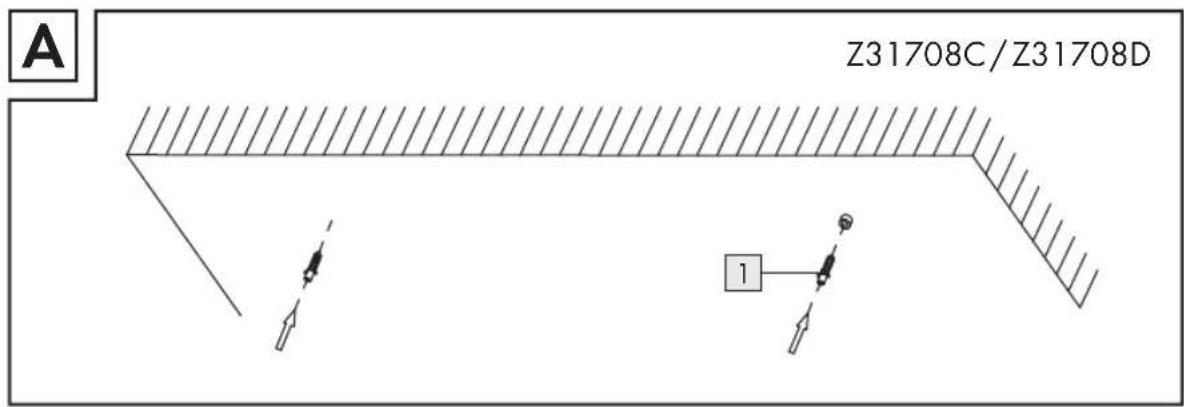
☐ Hold the housing of the light against ceiling and mark the drill holes (see fig. A).
Now drill the mounting holes ( 6 mm). Ensure that you do not damage the supply line.
☐ Insert the dowells into the holes.
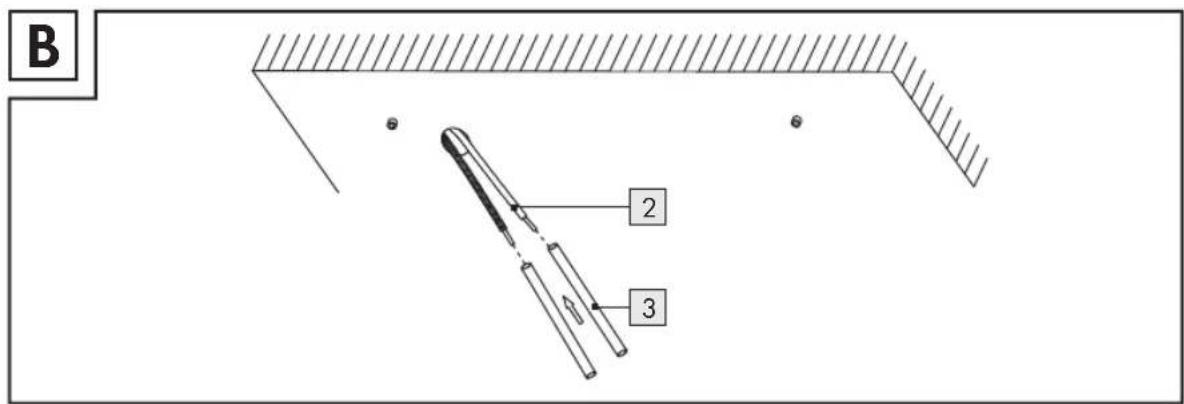
☐ Then pull the fabric tube over the strands of the external main power lead 2 (see fig. B).
☐ Connect the terminal block of the lamp with the strands of the external main power lead (see fig. C). Pay attention to the markings on the terminal block (L for live, N for Neutral).
☐ Then secure the lamp housing to the ceiling using the screws 6 (see fig. D).
☐ Attach the protective caps to the openings in the lamp casing (see Fig. E).
After the fuse has been inserted or the circuit breaker is engaged in the fuse panel, your lamp is ready for use.
- Directing the spotlights
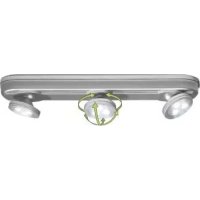
The spotlights 8 can be adjusted to approx. 90° vertically and approx. 330° horizontally in order to place targeted light accents (see fig. E).
WARNING: The spotlights become hot during operation. Switch them off and allow to cool down for at least 5 minutes before touching them.
- Cleaning and Care
Before cleaning and caring for your lamp, disconnect the lamp from the mains (remove the fuse or disable the circuit breaker in the fuse panel - 0-position) and let it cool for at least 5 minutes! For electrical safety, never clean the light with water or other fluids, or immerse it in water.
Do not use solvents, petrol etc. Otherwise the light will be damaged.
☐ Use a dry fluff-free cloth when cleaning.
- Disposal

The packaging is made of environmentally friendly materials, which may be disposed through your local recycling facilities.
Contact your local authorities for information on how to dispose of the product at the end of the product's life.
Never dispose of the product in your regular household rubbish.

The device / article should be disposed of at an officially approved disposal centre or at your local communal disposal facility.
Observe the applicable regulations. In case of doubt, please contact your waste disposal centre.
Warranty
The device has been manufactured to strict quality guidelines and meticulously examined before delivery. In the event of product defects you have legal rights against the retailer of this product. Your legal rights are not limited in any way by our warranty detailed below.
The warranty for this device is 3 years from the date of purchase. Should this device show any fault in materials or manufacture within 3 years from the date of purchase, we will repair or replace it – at our choice – free of charge to you.
The warranty period begins on the date of purchase. Please keep the original sales receipt in a safe location. This document is required as your proof of purchase. This warranty becomes void if the device has been damaged or improperly used or maintained.
The warranty applies to faults in material or manufacture. This warranty does not cover product parts subject to normal wear, thus possibly considered consumables (e.g. batteries) or for damage to fragile parts, e.g. switches, rechargeable batteries or glass parts.
CE
LED-kattovalaisin
natural_image
Blank grid paper with a color palette bar at the top and corner (no text or symbols on the grid)
natural_image
Blank grid paper with a color palette bar at the top and corner (no text or symbols)
natural_image
Blank grid paper with a color palette bar at the top and corner (no text or symbols on the grid)



natural_image
Pure vertical line diagram without any text, numbers, or symbolsOWIM GmbH & Co. KG
Stiftsbergstraße 1
D-74167 Neckarsulm
Model-No.: Z31708A/Z31708B/
Z31708C/Z31708D
Version: 09/2014
Last Information Update - Tietojen tila - Informationsstatus
Tilstand af information · Version des informations
Stand van de informatie · Stand der Informationen:
08/2014·Ident.-No.: Z31708A/B/C/D082014-3
IAN 102614
3

Brand : Livarno Lux
Model : IAN 102614
Category : Lighting