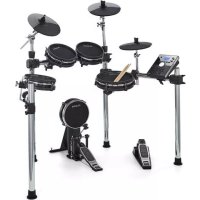
DM10 MKII Pro Kit - Musical instrument ALESIS - Free user manual and instructions
Find the device manual for free DM10 MKII Pro Kit ALESIS in PDF.
User questions about DM10 MKII Pro Kit ALESIS
0 question about this device. Answer the ones you know or ask your own.
Ask a new question about this device
Download the instructions for your Musical instrument in PDF format for free! Find your manual DM10 MKII Pro Kit - ALESIS and take your electronic device back in hand. On this page are published all the documents necessary for the use of your device. DM10 MKII Pro Kit by ALESIS.
USER MANUAL DM10 MKII Pro Kit ALESIS
User Guide (English)
Introduction
Box Contents
DM10 MKII Pro Module
Power Adapter
User Guide
Safety & Warranty Manual
Support
For the latest information about this product (system requirements, compatibility information, etc.) and product registration, visit alesis.com.
For additional product support, visit alesis.com/support.
Features
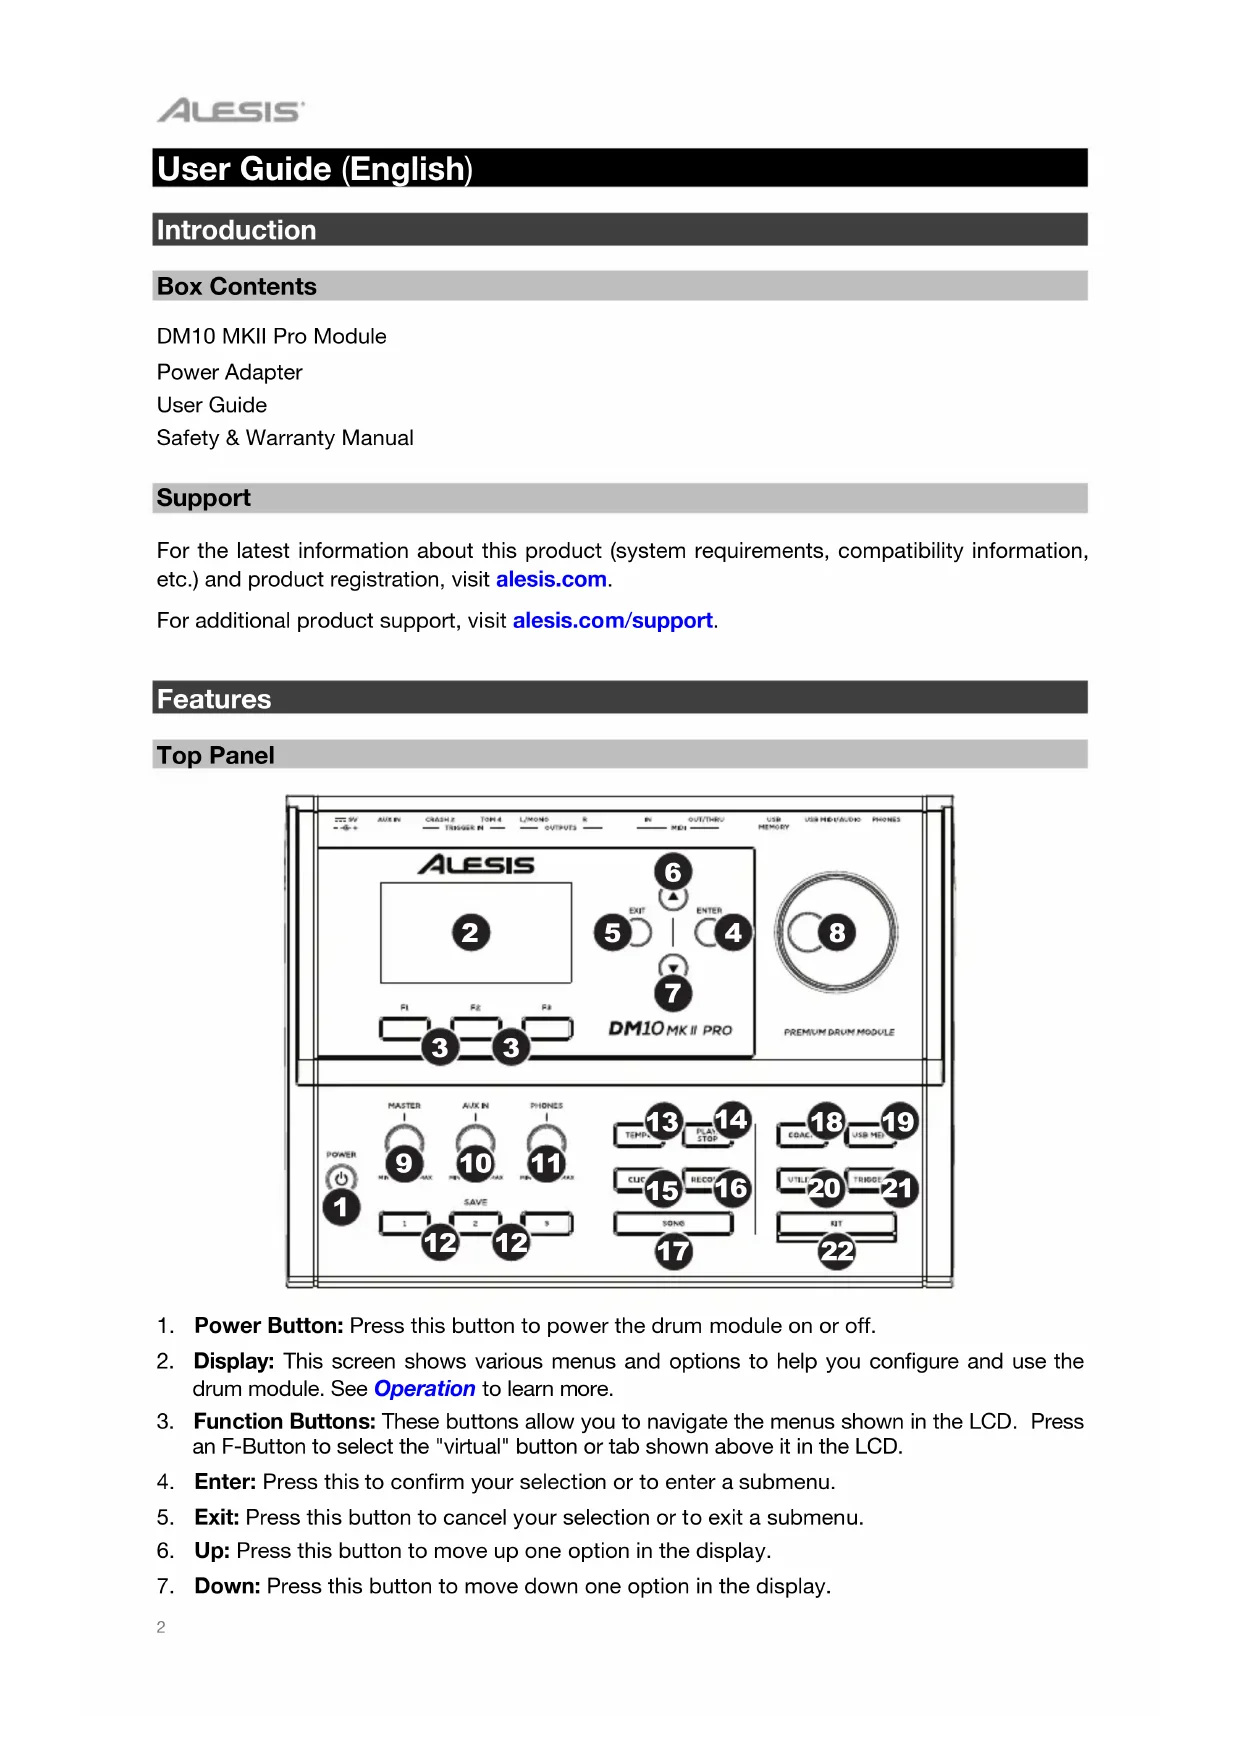
Top Panel
- Power Button: Press this button to power the drum module on or off.
- Display: This screen shows various menus and options to help you configure and use the drum module. See Operation to learn more.
- Function Buttons: These buttons allow you to navigate the menus shown in the LCD. Press an F-Button to select the "virtual" button or tab shown above it in the LCD.
- Enter: Press this to confirm your selection or to enter a submenu.
- Exit: Press this button to cancel your selection or to exit a submenu.
- Up: Press this button to move up one option in the display.
-
Down: Press this button to move down one option in the display.
-
Dial: Turn this dial to adjust the setting of the currently selected item in the display (number values, kits, songs, etc.). Alternatively, use the Up and Down buttons.
- Master Volume: Turn this knob to adjust the volume level of the outputs on the rear panel.
- Aux Volume: Turn this knob to adjust the volume of an external sound source connected to the Aux Input on the rear panel.
- Phones Volume: Turn this knob to adjust the volume level of the phones output on the rear panel.
- Save Buttons: Press and hold these buttons for 2 seconds to save a favorite or frequently used menu. Briefly press these buttons to jump directly to the saved page. See Operation >Memory to learn more.
- Tempo: Press this button to view the current tempo in the display. See Operation > Metronome to learn more.
- Play/Stop: Press this button to play or stop a song. When the drum module is record-armed, press this button to start recording.
- Click: Press this button to activate or deactivate the built-in metronome ("click"). When you activate it, the Metronome settings will also appear in the display, which you can adjust. See Operation > Metronome to learn more.
- Record: Press this button to record-arm the drum module. To start recording, hit a drum pad, press Enter, or press Play/Stop. To cancel recording, press Exit or Record.
- Song: Press this button to access the Song Selection page in the display. This lets you play along with MP3, WAV, and MIDI songs on the module or an external USB drive.
- Coach: Press this button to access the Coach mode in the display. See Operation > Coach to learn more.
- USB Memory: Press this button to access the USB Memory page in the display. See Operation > USB Drive to learn more.
- Utility: Press this button to access the Utility page in the display. See Operation > Utility to learn more.
- Trigger: Press this button to access the Trigger settings page in the display. See Operation > Trigger Settings to learn more.
- Kit: Press this button to access the Kit Selection page in the display. See Operation > Kits to learn more.
Rear Panel
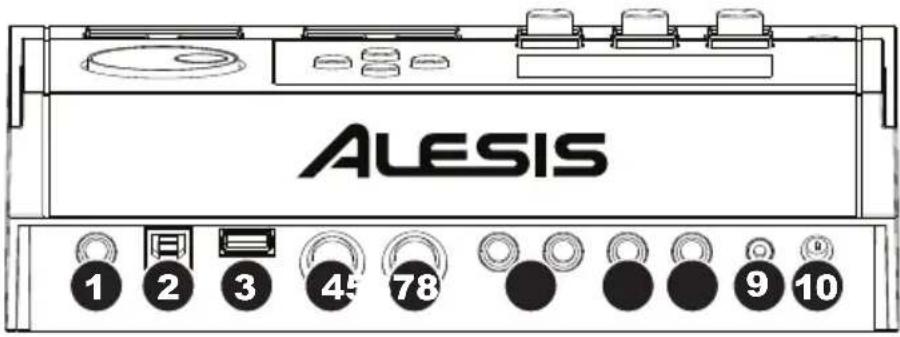
- Phones Output: Connect 1/4" (6.35 mm) stereo headphones (sold separately) to this output. Control the volume by turning the Phones Volume knob on the top panel.
- USB MIDI/Audio Port: Connect this USB port to a computer using a standard USB cable. The drum module will send MIDI messages and audio to and from your computer over this connection.
- USB Port: Connect a USB flash drive to this USB port to record songs to it, load samples from it, or save and load kits, songs, and triggers. See Operation > USB Drive to learn more.
Important: Your USB flash drive must use a FAT32 file system to work properly with the drum module.
- MIDI Out/Thru: Connect an external MIDI device (synthesizer, sound module, etc.) to this output using a standard 5-pin MIDI cable.
- MIDI In: Connect an external MIDI device (sequencer, drum machine, etc.) to this input using a standard 5-pin MIDI cable.
- Outputs: Connect your audio interface, mixer, powered monitors, etc. to these outputs using standard 1/4" (6.35 mm) TS cables.
- Tom 4 Trigger Input: Connect the Tom 4 drum pad to this input. Refer to the Assembly Guide for more information.
- Crash 2 Trigger Input: Connect the Crash 2 cymbal pad to this input. Refer to the Assembly Guide for more information.
- Aux Input: Connect an additional audio player (smartphone, tablet, etc.) to this input using a standard 1/8" (3.5 mm) stereo/TRS cable. The sound will be mixed with the drum module's sounds.
- Power Input: Connect this input to a power outlet using the included power adapter.
Setup
Items not listed in Introduction > Box Contents are sold separately.
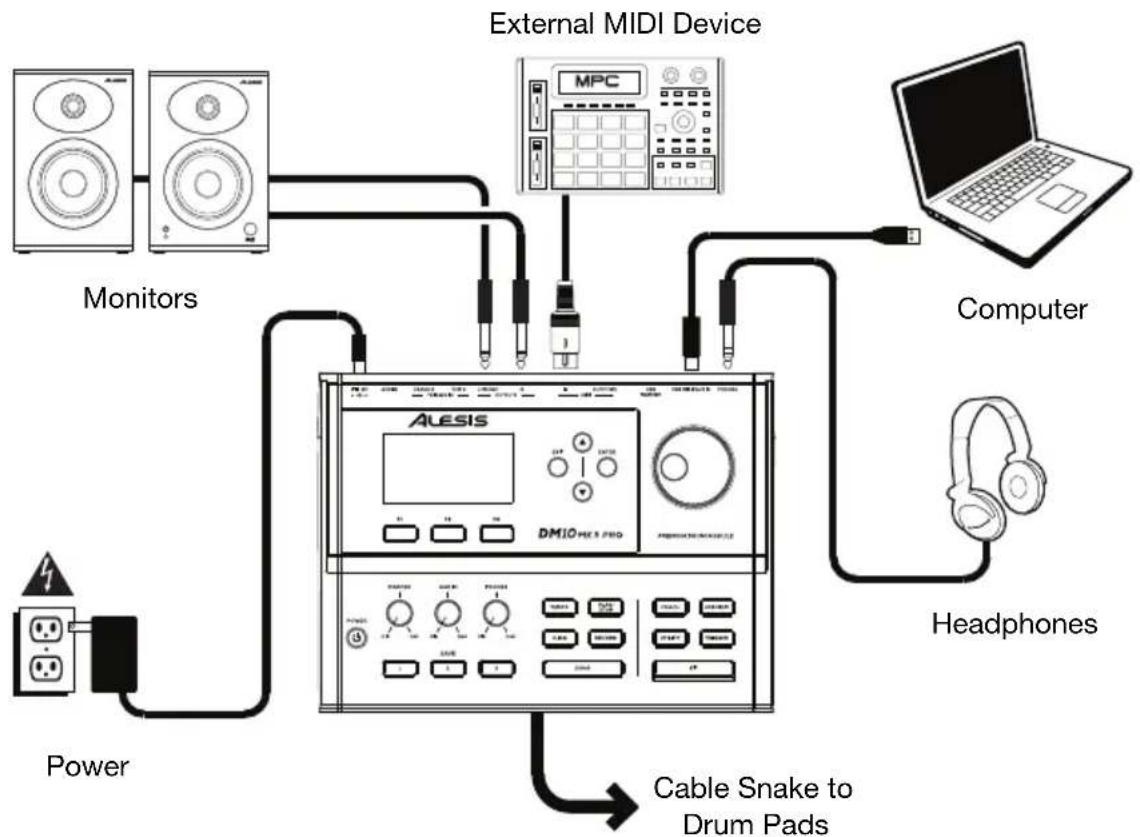
Getting Started
- Make sure all devices are off and all volume knobs are set to "zero."
- Connect the cable snake to the port on the bottom of the DM10 MKII Pro module (using the two screws to secure it), and then connect the 1/4" ends of the cables to their respective pads.
- Connect any input sources (CD player, smartphone, etc.) to the Aux input on the DM10 MKII Pro.
- Connect output devices (amplifier, mixer, etc.) to the Outputs on the DM10 MKII Pro.
-
Plug all devices into power sources, and turn on devices in proper order:
-
When starting a session, turn on (1) input sources, (2) DM10 MKII Pro, (3) output devices.
-
When ending a session, turn off (1) output devices, (2) DM10 MKII Pro, (3) input sources.
-
Use the Down and Up buttons to select a kit, and use the dial to adjust the volume of the kit.
- Hit the pads and slowly adjust the master volume and/or phones volume until an appropriate level is reached.
- When finished, be sure to set all volume knobs back to "zero" before powering off DM10 MKII Pro.
Note: DM10 MKII Pro will automatically power off if no activity is detected for 30 minutes. You can enable or disable this function in the Utility page.
Operation
Kits
A kit in the drum module is a selection of sounds that you can play with the pads of your electronic drum kit. Kits 01-50 are Presets, and kits 51-80 are User Kits. You can edit the parameters of all drum kits (01-80) and save them into user kits (51-80).
Selecting a Kit
Press Kit to enter the Kit Interface page. There are two parameters on the main kit interface-kit number and kit volume. From here, use the Down and Up buttons to select a kit, and use the dial to adjust the volume of the kit.
On this page:
- Press the F1 button to enter the Kit List menu.
- Press the F2 button to enter the Kit Edit menu.
- Press the F3 button to switch the X-stick on or off.
To select a kit:
- Press Kit to enter the Kit Interface page (if you are not already viewing it).
- Press the F1-List button to display the Kit List menu.
- Use the Dial or Down and Up buttons to scroll through the list of kits. Press the F1-Preset button to quickly jump to the Preset kits, or press the F3-User button to quickly jump to the User Kits. The LED under the Kit button will indicate the type of kit selected.
- To preview a kit, press the F2-PRW button and play.
- Kits will automatically be loaded as they are selected. Press Exit to return to the Kit Interface page.
Note: To learn how to select a kit on a USB flash drive, see the USB Drive chapter.
Editing a Kit
You can change certain parameters of each kit, letting you customize its overall sound. Kit parameters include the voices and effects for each trigger. When any parameter is changed, you must save the kit before exiting the Kit Menu to keep the changes.
To edit a kit:
- Press Kit to enter the Kit Interface page (if you are not already viewing it).
- Press the F2 button to enter the Kit Edit menu.
- On this page:
Press the F1 button to enter the Voice Edit menu.
Press the F2 button to enter the Effect Edit menu.
Press the F3 button to enter the Save menu. See Saving a Kit to learn how to do this.
In a kit, each sound is called a "voice." You can change each voice and set some of its parameters, letting you customize the collection of sounds in a kit.
To edit a voice:
- Enter the Kit Edit menu (if you are not already viewing it).
- Press the F1-Voice button to enter the Voice Edit menu.
- Hit the pad whose voice you want to edit. The pad's name will appear at the top of the display.
-
The display will show the pad's current voice and its parameters. On this page:
-
To select a parameter that you want to edit, use the Down and Up buttons:
Voice Number: The pad's current voice (001-758) and User Voices, up to 99).
Volume: The pad's volume (000-127).
Pitch: The pad's pitch offset in semitones (-08 to +08).
Pan: The pad's position in the stereo field (L8 to C to R8).
o Decay: The amount of time it takes for the pad's sound to decay (-05-00). 00 is the default and the longest amount of time. -05 is a very short time.
Reverb Level: The amount of reverb effect applied to the pad's sound (000-127).
FX Level: The amount of effects applied to the pad's sound (000-127).
○ MIDI Note: When the drum module's USB MIDI port or MIDI Out is connected to a computer or external MIDI device, the pad will send this MIDI note to it. If you are not using those connections, this setting will not affect the trigger or its sound.
| Kick Drum 36 Tom 3 (Rim) 58 Crash 2 57 | ||||||||
| Snare Drum (Center) 38 Tom 4 (Center) 41 Crash 2 (Edge) 52 | ||||||||
| Snare Rim 40 Tom 4 (Rim) 39 Hi-Hat Open 46 | ||||||||
| Tom 1 (Center) 48 Ride Bow 51 Hi-Hat Open (Edge) 26 | ||||||||
| Tom 1 (Rim) 50 Ride Edge 59 Hi-Hat Closed 42 | ||||||||
| Tom 2 (Center) 45 Ride Bell 53 Hi-Hat Closed (Edge) 22 | ||||||||
| Tom 2 (Rim) 47 Crash 1 49 Hi-Hat Pedal 44 | ||||||||
| Tom 3 (Center) 43 Crash 1 (Edge) 55 Hi-Hat Splash 21 | ||||||||
- Pad Pattern: The song that starts when you hit the pad. The song will stop when you hit it again.
Min Velocity: The minimum velocity needed to trigger the pad's sound.
Strainer: The tightness of the snare wires on the snare drum (Off, Loose, Low, Medium, or Tight).
Note: Not all instruments have a snare strainer effect.
Muffling: The muffling effect of the snare, toms, and kick only (Off, 1 to 4).
Head Tuning: The tuning of the pad's head (-63 to +63).
Size: The size of the cymbal (-63 to +63). This setting only applies to cymbals.
Sustain: The amount of sustain of the cymbal (-63 to +63). This setting only applies to cymbals.
To edit the parameter's setting or value, use the dial.
- When you are done editing, you must save the kit before exiting the Kit Edit menu. See below to learn how to do this.
You can apply effects such as reverb or EQ to your kit, as well as to up to 3 individual triggers.
To edit effects parameters:
- Enter the Kit Edit page (if you are not already viewing it).
- Press the F2-Effect button to enter the Effect Edit page.
- Use the Down or Up buttons to select your desired item: Kit FX, Kit Reverb, Kit EQ, Kit Compress, or Voice FX. Press Enter to continue.
- To select a parameter that you want to edit, use the Down and Up buttons. To edit the parameter's setting or value, use the dial. See Appendix > Effects Parameters > Kit Effects for more information on kit parameters.
- When you are done editing, we recommend saving the kit. See below to learn how to do this.
Saving a Kit
You can also save the current sounds and settings as a user kit.
To save a kit:
- Press Kit to enter the Kit Interface page (if you are not already viewing it).
- Press F2-Edit to enter the Kit Edit page.
- When you have finished editing your parameters, press F3-Save to enter the Kit Save menu.
- Use the dial or Up or Down buttons to select the kit you want to save.
- Press F3-Enter to continue, or press F2-Exit to return to the previous menu. Rename will appear at the top of the display.
-
Optional: On this page:
-
To change the currently selected character, turn the dial.
- To move to the next or previous character, press the Up or Down buttons.
To insert a character, press F1-Insert. -
To delete a character, press F2-Delete.
-
After entering the name of the new kit, press F3-Enter to continue saving the kit, or F2-Exit to cancel and return to the Kit Selection page.
- If the save operation is successful, Save OK! will appear briefly in the display. To cancel the operation at any point, press Exit.
Note: To learn how to save a kit to a USB flash drive, see the USB Drive chapter.
Trigger Settings
The drum module also lets you customize the settings of each trigger (drum pad or cymbal pad). You can change its parameters, letting you customize your kit to your playing style. These settings are "global" and therefore apply to all kits. DM10 MKII Pro has a set of preset trigger settings and 5 user adjustable trigger settings.
To edit your trigger setting:
- Press Trigger to enter the trigger interface page.
- Hit the pad whose voice you want to edit. The pad's name will appear at the top of the display. Alternatively, use the Down or Up buttons to select the pad's name at the top of the display, and then use the dial to change it.
-
The display will show the current trigger and its parameters. On this page:
-
To select a parameter that you want to edit, use the Down and Up buttons (not all parameters are available for all pads):
Threshold: The amount of force required to trigger the sound.
○ Head Sensitivity: The sensitivity of the head (center) of a drum pad. Higher values let you produce louder sounds with less force. Lower values require more force to produce quieter sounds.
o Rim Sens: The sensitivity of the rim of a drum pad. Higher values let you produce louder sounds with less force. Lower values require more force to produce quieter sounds.
○ X-Stick Level: The amount of cross-stick produced when the rim is struck. Higher values increase the probability that the cross-stick sound will play when the rim is hit. When set to 0, only the rimshot sound will play when the rim is hit.
○ Head-Rim Adj: The amount of crosstalk reduction between the head (center) and rim of a drum pad. Higher values reduce the probability that the pad's rim sound will be triggered when you play its head only and vice versa (due to the force being transferred through the pad). Don't set this value too high, though! If this value is too high, you may not be able to trigger its sound if you intentionally play both the head and rim at the same time; it may be silenced because the module incorrectly interprets the hit as crosstalk.
o Curve: The velocity curve of the pad. This controls the relationship between the amount of playing force and the volume level of the pad's sound.
○ X-Talk: The amount of crosstalk reduction. Higher values reduce the probability that the pad's sound will be triggered when you play another pad (due to the force being transferred through a rack, through the floor, etc.). Don't set this value too high, though! If this value is too high, you may not be able to trigger its sound if you play another pad at the same time; it may be silenced because the module incorrectly interprets the hit as crosstalk.
- Retrig Cancel: The required amount of time between successive hits of the pad to produce the sound for both hits. If the value is too low, you may hear multiple hits (or "flams") occur after striking the trigger once. If the value is too high, you may hear missed notes when playing faster or rolling.
To edit the parameter's setting or value, use the dial.
-
To save your changes, press F3-Save. Otherwise, your changes will be lost when you power off the drum module. See below to learn how to do this.
-
Press Exit to return to the previous page.
To save your trigger setting:
- While viewing the Trigger Interface page, press F3-Save.
- Select one of the five user trigger slots. An asterisk (*) next to a setting indicates that the trigger is unused.
- Press F3-Enter to select to continue, or press F2-Exit to return to the previous menu. Rename will appear at the top of the display.
- Optional: On this page, you can rename the trigger using the same process as Kit Rename.
- After entering the name of the new trigger setting, press F3-Enter to continue saving the trigger setting, or F2-Exit to cancel and return to the trigger interface page.
Note: To learn how to save a trigger setting to a USB flash drive, see the USB Drive chapter.
To load a trigger setting:
- Press Trigger to enter the trigger interface page (if you are not already viewing it).
- While viewing the trigger interface page, press F2-Load.
- Choose the trigger setting that you want to load using the dial or Down and Up buttons.
- Press F3-Enter to load the trigger setting, or press F2-Exit to cancel and return to the trigger interface page.
- If the load operation is successful, Load OK! will appear briefly in the display. You will then be returned to the trigger interface page.
Note: To learn how to load a trigger setting to a USB flash drive, see the USB Drive chapter.
Metronome
The built-in metronome (or "click track") can help you keep a steady tempo while playing.
To activate or deactivate the metronome, press Click.
When you activate the metronome, its settings will also appear in the display, which you can adjust.
-
To select a parameter that you want to edit, use the Down and Up buttons:
-
Voice: the sound played for the metronome (Click, Clave, Stick, CoClick, FmClick, Voice1, or Voice2).
Volume: The volume of the click (000-127).
Time Sig: The time signature of the click (0/2-9/2; 0/4-9/4; 0/8-9/8; or 0/16-9/16). - Interval: How often the metronome clicks (1/2, 3/8, 1/4, 1/8, 1/12, or 1/16)
- Output: Sets whether the metronome plays through all of the module's outputs (All) or just the phones output (Phones).
To change the setting or value, use the dial.
- To exit the page, press Exit, or press Click to deactivate the metronome.
To change the tempo:
- Press Tempo. The current tempo will appear in the display.
- Use the dial set the tempo.
- Press Exit or Tempo to return to the previous page.
Record
You can record on the DM10 MKII Pro in two ways, MIDI and MP3. When no USB drive is connected, only MIDI recording is available.
To record MIDI or USB files:
- Press the Record button. By default, this will enter MIDI record mode.
To record MP3 when a USB drive is connected, press the F2-USB button.
-
To select a parameter that you want to edit, use the Down and Up buttons:
-
Pattern: Select a preset pattern (001-100) or turn off.
- Tempo: The tempo of the recording (30-280 BPM).
- Time-Signature: The time signature of the recording (0/2-9/2; 0/4-9/4; 0/8-9/8; or 0/16-9/16). This parameter is only adjustable when Pattern is set to off.
- Precount: Play a one measure introduction before recording (on) or start recording immediately (off).
To change the setting or value, use the dial.
- Press F3-Start or hit a pad to start recording. The Metronome will turn on automatically when you want to record. To turn off the Metronome, press the Click button. If you do record with the Metronome on, only the background music and drum voices will be recorded.
Note: During recording, only the F3-Stop, Click, and Start/Stop buttons are available.
- When you have finished recording, press the F3-Stop or Start/Stop buttons to stop recording and proceed to the rename page. Rename will appear at the top of the display.
- Optional: On this page, you can rename the recording using the same process as Kit Rename.
Note: Filenames can be a maximum of 12 characters.
- When you have finished, press the F3-Enter or Enter buttons to save the recording. Press Exit to exit the naming menu and return to the previous page.
Note: To learn how to save and load songs from a USB flash drive, see the USB Drive chapter.
Coach
The Coach function lets you develop your timing, accuracy, and speed skills with three different practice modes.
(F1) Quiet Count
In Quiet Count mode, a drum loop will repeat, alternating between (1) the drum pattern itself, and (2) a metronome track of the same length during which you play the drum pattern yourself. To use Quiet Count:
- Press Coach to enter Coach mode, then press F1-Quiet to enter Quiet Count.
- To select a parameter that you want to edit, use the Down and Up buttons: Beat Type (half note, quarter note, eighth note, eighth note triplet, or sixteenth note), Mode (how many measures alternate; 1-1, 2-2, or 1-3), and Measure Hint (turns on or off the accent hint). To change the setting or value, use the dial.
- Press Play/Stop to start practice. The display will show the accuracy of your playing, indicating if you are behind, on, or ahead of the beat.
- Press Play/Stop again to stop practice.
(F2) Beat Check
Beat Check mode evaluates your sense of time and how accurately you play along with the metronome. To use Beat Check:
-
Press Coach to enter Coach mode, then press F2-Beat to enter Beat Check.
-
To select a parameter that you want to edit, use the Down and Up buttons: Beat Type (001-015, see right), Score (turns on or off the score function, which grades your performance), and Measure Hint (turns on or off the accent hint). To change the setting or value, use the dial.
山
月 月
- Press Play/Stop to start practice. The display will show the accuracy of your playing, indicating if you are behind, on, or ahead of the beat.
- Press Play/Stop again to stop practice.
(F3) Change Up
Change Up mode helps you practice changing rhythms while still maintaining accurate time. To use Change Up:
- Press Coach to enter Coach mode, then press F3-Change to enter Change Up.
- To select a parameter that you want to edit, use the Down and Up buttons: Beat Type (001-003, see right), Score (turns on or off the score function, which grades your performance), and Measure Hint (turns on or off the accent hint). To change the setting or value, use the dial.
- Press Play/Stop to start practice. The display will show the accuracy of your playing, indicating if you are behind, on, or ahead of the beat.
- Press Play/Stop again to stop practice.
Utility
The Utility menu lets you configure various settings for the module itself. Press the Utility button to enter the Utility menu, and use the Down and Up buttons to select from the options below. Press Exit to return to the previous page.
Master Effect
Use this page to adjust the Master EQ and Master Compressor effect settings. These will be applied to all kits and songs. See Appendix > Effects Parameters > Master Effects to learn more.
Master Setup
Use this page to adjust the MIDI and Power settings.
- Soft Through: Allows the MIDI In data to be passed through to the MIDI Out.
-
Local Control: When activated (On), playing the pads connected to the drum module will trigger the drum module's internal sounds. When deactivated (Off), playing the pads will send MIDI notes from the drum module to a connected computer or MIDI device.
-
GM Mode: When activated (On), MIDI messages sent into the drum module's MIDI In will trigger sounds from the General MIDI (GM) specification. When deactivated (Off), MIDI messages sent into the drum module's MIDI In will trigger the module's internal sounds (the ones played by each kit).
- Prog Change RX: Turn On to receive Program Change MIDI data in Channel 10, or turn Off to ignore.
- Prog Change TX: Turn On to send Program Change MIDI data on Channel 10 when changing kits, or turn Off to not send.
- Auto Power Off: This feature sets the drum module to power off automatically if it is not used for a certain amount of time. You can set this to 30 minutes, 60 minutes, or turn it off (Off).
User Voice
Use this page to manage the module's internal memory.
- Delete Voice: Use this menu to delete a user voice.
i. Select Voice Delete and press Enter.
ii. Use the Down and Up buttons to select the voice that you want to delete, and then press Enter.
iii. The display will show a warning that the memory will not be released immediately when the voice is deleted. Press Enter again to continue and delete the voice, or press Exit to return to the previous page.
- Clear Deleted Voices: When a user voice has been deleted, the corresponding memory space cannot be released right away. Use the Clear Deleted Voices menu to clear this memory so you can add more user samples.
i. Select Clear Deleted Voices and press Enter.
ii. The display will show a warning that clearing the deleted user voices can take a long time. Press Enter again to continue the process, or press Exit to return to the previous page.
iii. After the voice clearing has finished, the module will restart automatically.
Factory Set
Use this page to reset user drum kits, songs, voices, and trigger settings to factory defaults. Select an option below using the Down and Up buttons and then press Enter to perform a reset. Press Exit to return to the previous page.
- Kit: Resets only the user kit settings.
Song: Resets only the user songs.
Voice: Resets only the user voices. - Trigger: Resets only the user trigger settings.
- All: Resets all user settings.
USB Drive
You can use the drum module with a USB flash drive save and load your data. Your USB flash drive can have a capacity of 4-64 GB, and it must use a FAT32 file system to work properly with the drum module.
IMPORTANT: We recommend plugging your USB flash drive into the module before loading any files to it. This will create new folders to store Kits, Songs, Triggers, and Voices. When adding files, make sure they are placed in the correct folder so they can be recognized by the module. For instance, place WAV files in the Voice folder when loading your own samples.
Load
You can load four types of data from a USB flash drive—Kits, Songs, Triggers, and Voices. The process for loading kits, songs, and triggers is the same. For songs and triggers, follow the directions for loading kits below, but replace "kit" with "song" or "trigger."
To load a kit from a USB flash drive:
- Press USB Mem to enter the USB Memory menu.
- Press the F1-Load button to enter the loading page (if you are not already viewing it).
- Use the Down or Up buttons to select Kit, then press Enter to open the loading menu. A list of your kits will appear in the display.
- Use the Down and Up buttons to select a kit, and then press Enter.
- Use the Down and Up buttons to select the desired "destination" user kit number. An asterisk (*) next to a user kit name indicates that the kit is unused.
- Press Enter to select the "destination" user kit number, or press Exit to return to the previous menu. Rename will appear at the top of the display.
- Optional: On this page, you can rename the kit using the same process as Kit Rename.
- Press F3-Enter to load the kit or F2-Exit to cancel. You may need to wait a minute for the kit to load, depending on its size.
You can also load your own samples to use as voices within a kit. Each sample must be a 16-bit WAV file, with a total maximum size of 16 MB. It can have a sampling rate of 48, 44.1, 32, 22.05, or 11.025 kHz.
To load a sample from a USB flash drive and create a user voice:
- Press USB Mem to enter the USB Memory menu.
- Press the F1-Load button to enter the loading page (if you are not already viewing it).
- Use the Down or Up buttons to select Voice, then press Enter to open the loading menu. A list of your samples will appear in the display.
- Use the Down and Up buttons to select a sample, and then press Enter.
-
Use the Down and Up buttons to select from the options below:
-
Velo Point: The velocity point separates Layer A and Layer B. Values above the point will activate Layer A, and values below the point will activate Layer B. If the velocity point is set to 127, the voice is only one layer and Wave B will be unselectable.
Wave A: The sample for the first layer of the voice.
Wave B: The sample for the second layer of the voice.
To edit the parameter's setting or value, use the dial.
-
Press F3-Enter to confirm loading the sample, or press F2-Exit to return to the previous menu. You may need to wait a minute for the sample to load, depending on its size. When the sample has successfully loaded, the display will show Load OK and enter the renaming menu. Rename will then appear at the top of the display.
-
Optional: On this page, you can rename the sample using the same process as Kit Rename.
- After entering the name of the voice, press F3-Enter to save the voice to the module.
- Restart the module by powering it off and then back on using the power button to make the new voice available to use.
Save
There are three types of data you can save to a USB flash drive—Kits, Songs, and Triggers. The process is the same for all three. For songs and triggers, follow the directions for saving kits below, but replace "kit" with "song" or "trigger."
To save a kit to a USB flash drive:
- Press USB Mem to enter the USB Memory menu.
- Press the F2-Save button to enter the saving page.
- Use the Down and Up buttons to select the kit number you want to save. An asterisk (*) next to a user kit name indicates that the kit is unused.
- To save the kit to the selected number, press F3-Enter. Press F2-Exit to return to the previous page. Rename will appear at the top of the display.
- Optional: On this page, you can rename the kit using the same process as Kit Rename.
- After entering the name of the kit, press F3-Enter to save the kit to the USB drive. The display will then return to the USB Memory menu.
To cancel, press Exit.
Format
To erase all data from your USB flash drive, use the format function.
To format a connected USB flash drive:
- Press USB Mem to enter the USB Memory menu.
- Press the F3-Format button to format the USB flash drive.
- The display will show Format the USB Memory! Exit/Enter?
To format the drive (which will also erase its contents), press Enter. The display will show Waiting! while the card is being formatted.
To cancel formatting, press Exit.
Memory
The Save buttons let you store some of your favorite or frequently used menus so you can quickly access them with the press of a button.
Note: The Save buttons cannot be used in the Click, Record, Rename, and Tempo menus.
To save a menu to memory, navigate to the menu you wish to save and then press and hold one of the Save buttons for 2 seconds. The display will show M1 function has saved to indicate the save was successful.
Note: When Save is used in the Song or Kit menus, the selected song or kit number will also be saved.
To load a saved menu from memory, briefly press the corresponding Save button.
Alternatively, you can use the following two methods to get a list of all the sound types in your database.
Para guardar un kit:
| Kick Drum 36 Tom 3 (Rim) 58 Crash 2 57 | |||||||
| Snare Drum (Center) 38 Tom 4 (Center) 41 Crash 2 (Edge) 52 | |||||||
| Snare Rim 40 Tom 4 (Rim) 39 Hi-Hat Open 46 | |||||||
| Tom 1 (Center) 48 Ride Bow 51 Hi-Hat Open (Edge) 26 | |||||||
| Tom 1 (Rim) 50 Ride Edge 59 Hi-Hat Closed 42 | |||||||
| Tom 2 (Center) 45 Ride Bell 53 Hi-Hat Closed (Edge) 22 | |||||||
| Tom 2 (Rim) 47 Crash 1 49 Hi-Hat Pedal 44 | |||||||
| Tom 3 (Center) 43 Crash 1 (Edge) 55 Hi-Hat Splash 21 | |||||||
| Parameter | Range |
| Reverb Type | M Basic Hall, M Hall, M Room 1-3 |
| Reverb Level | 0 – 127 |
| Reverb Time | 0.00 – 30.00 s |
| Pre Delay 0.0 | – 200 ms |
| HPF Cutoff 0.02 – 8 kHz | |
| LPF Cutoff 1.0 – 22 kHz | |
EQ:
| Parameter Range | |
| Low Freq. 0.03 – 2.00 kHz | |
| Low Gain -12 | - +12 dB |
| Mid Freq. 0.08 – 16.00 kHz | |
| Mid Gain -12 | - +12 dB |
| Mid Q 0.1 – 12 | |
| High Freq. 0.5 – 18.00 kHz | |
| High Gain -12 | - +12 dB |
Compression:
| Parameter | Range |
| Threshold | -64 - 0 |
| Attack 1 – 400 ms | |
| Release 5 – 680 ms | |
| Low PreGain | 0 – 512 |
| Mid PreGain | 0 – 512 |
| High PreGain | 0 – 512 |
Delay:
| Parameter Range | |
| Type | Echo, LR Delay, LCR Delay, Cross Delay, Tempo Delay, Tempo Echo, Tempo Cross |
| Main Delay 0 – 14.50 s | |
| Feedback -64 – 64 | |
| Dry/Wet (Voice FX only) | -64 – 64 |
Chorus:
| Parameter | Range |
| Type | Chorus1, Chorus2, Chorus3, Chorus4 |
| LFO Freq. 0.1 | -20 Hz |
| LFO Depth | 0 - 127 |
| Feedback | -63 - 63 |
| Phase Diff. | -180 - +180 |
| Dry/Wet (Voice FX only) | -64 - 64 |
Flanger:
| Parameter Range | |
| Type | Flanger1, Flanger2, Flanger3 |
| LFO Freq. 0.1 | -20 Hz |
| LFO Depth | 0 - 127 |
| Feedback -63 | -63 |
| Phase Diff. | -180 - +180 |
| Dry/Wet (Voice FX only) | -64 - 64 |
Phaser:
| Parameter | Range |
| Type Phaser1 | , Phaser2, Phaser3 |
| LFO Freq. 0.1 | -30 Hz |
| LFO Depth 0 | -127 |
| Feedback | -63 - 63 |
| Phase Diff. -1 | 80 - +180 |
| Dry/Wet (Voice FX only) | -64 - 64 |
Overdrive:
| Parameter Range | |
| Type | Overdrive1, Overdrive2, Overdrive3, Overdrive4 |
| Drive | 0 - 127 |
| Low Gain -12 | - +12 dB |
| LPF Cutoff 1.0 - 22k | |
| Output Level | 0-512 |
| Dry/Wet (Voice FX only) | -64 - 64 |
Tremolo:
| Parameter | Range | |
| Type | Tremolo, | Vibrato |
| LFO Freq. 0.1 | -20 Hz | |
| AM Depth 0 | 127 | |
| PM Depth 0 | 127 | |
| Phase Diff. -180 | +180 | |
| Dry/Wet (Voice FX only) | -64 | -64 |
Pan:
| Parameter Range | |
| Type Auto Pan1, Auto Pan2 | |
| LFO Freq. 0.1 | -20 Hz |
| AM Depth 0 | 127 |
| PM Depth 0 | 127 |
| Phase Diff. -180 | +180 |
| Dry/Wet (Voice FX only) | -64 - 64 |
Auto Wah:
| Parameter | Range |
| Type Auto Wah, Tempo Auto Wah | |
| LFO Freq. 0.1 | -20 Hz |
| Depth 0 - 127 | |
| Cutoff 0 - 127 | |
| Resonance 1.0 | -12.0 |
| Dry/Wet (Voice FX only) | -64 - 64 |
Sens Wah:
| Parameter Range | ||
| Type Sens Wah1, Sens Wah2 | ||
| Depth | 0 | - 127 |
| Cutoff | 0 | - 127 |
| Resonance 1.0 - 12.0 | ||
| Sensitivity | 0 - 127 | |
| Dry/Wet(Voice FX only) | -64 - 64 | |
PitchChange:
| Parameter | Range |
| Type PitchChange 1, PitchChange 2, PitchChange 3 | |
| Pitch | -24 - +24 |
| Cent | -100 - +100 |
| Feedback | -63 - 63 |
| Dry/Wet (Voice FX only) | -64 - 64 |
Lo-Fi:
| Parameter Range | |
| Type Lo-Fi 1, | Lo-Fi 2 |
| Sampling Freq. | 1 – 256 |
| Filter Type Thru, PwrBass, Radio, Tel, Clean, Low | |
| LPF Resonance | 1 – 12 |
| Dry/Wet (Voice FX only) | -64 – 64 |
Voice Effects
For effects not listed below, refer to Kit FX.
Reverb:
| Parameter | Range |
| Reverb Type | M Room1, M Room2, M Room3, M Hall1, M Hall2, M Hall3, Church, Cave, Garage |
| Reverb Time | 0.00 – 30.00 s |
| Pre Delay 0.0 | -200 ms |
| HPF Cutoff 0.02 – 8 k | |
| LPF Cutoff 1.0 – 22 k | |
| Dry/Wet -64 – 64 | |
EQ:
| Parameter | Range |
| Low Gain -12 | - +12 dB |
| Mid1 Gain 0.08 – 2.00 kHz | |
| Mid2 Gain -12 | - +12 dB |
| Mid3 Gain 0.1 – 12 | |
| High Gain -12 | - +12 dB |
Compression:
| Parameter Range | ||
| Type | Bypass, | Standard, Limiter, |
| Ratio 1.0 – 2.0 | ||
| Threshold -48 | -0 dB | |
| Attack 1 – 400 ms | ||
| PreGain | 0 | - 512 |
Master Effects
EQ:
| Parameter | Range |
| Low Freq. 0.03 – 2.00 kHz | |
| Low Gain -12 | - +12 dB |
| Mid Freq. 0.08 – 16.00 kHz | |
| Mid Gain -12 | - +12 dB |
| Mid Q 0.1 – 12 | |
| High Freq. | 0.5 – 18.00 kHz |
| High Gain -12 | - +12 dB |
Compression:
| Parameter Range | |
| Threshold -64 | -0 |
| PreGain | 0 - 512 |
| Attack 1 - 400 ms | |
| Release | 5 - 680 ms |
Velocity Curves

01

02
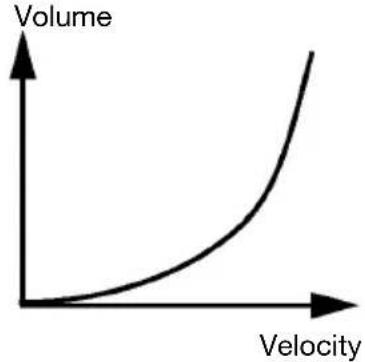
03
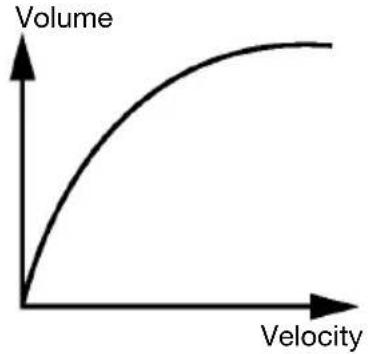
04
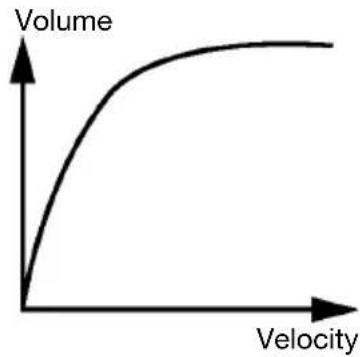
05 06

Volume
Technical Specifications
| Maximum Polyphony | 256 voices |
| Kits | 80 (50 preset + 30 user) |
| Sounds | 758 sounds/voices (drum, percussion, effect) Up to 99 user-loaded samples, 16 MB total |
| Sequencer | 100 preset patterns 20 preset hits 30 preset taps 5 user songs Up to 99 user songs in 1 folder on USB flash drive (MP3 or WAV) 192 ticks per beat Real-time record Approx. 15000 notes per user song |
| Tempo | 30–280 BPM |
| Display | 64 x 128 pixel, monochrome, backlit display |
| Connectors | (1) DB-25 cable snake (1) 1/4" (6.35 mm) TRS input (Crash 2) (1) 1/4" (6.35 mm) TRS input (Tom 4) (2) 1/4" (6.35 mm) TRS main outputs (1) 1/4" (6.35 mm) stereo headphone output (1) 1/8" (3.5 mm) stereo auxiliary input (1) 5-pin MIDI input (1) 5-pin MIDI output (1) USB Audio/MIDI port (1) USB host port |
| Power | 9 VDC, 500 mA, center-positive |
| Dimensions (width x depth x height) | 9.8" x 7.3" x 3.0" 249 x 186 x 76 mm |
| Weight | 2.05 lbs. 0.93 kg |
Specifications are subject to change without notice.
Trademarks & Licenses
Alesis is a trademark of inMusic Brands, Inc., registered in the U.S. and other countries.
All other product names, company names, trademarks, or trade names are those of their respective owners.