
Fiesta Popcorn Maker - Popcorn machine RUSSELL HOBBS - Free user manual and instructions
Find the device manual for free Fiesta Popcorn Maker RUSSELL HOBBS in PDF.
| Product Type | Meat Grinder with Cookie Attachment |
| Brand | Russell Hobbs |
| Model | Fiesta Popcorn Maker |
| Power Supply | Electric, mains plug |
| Speeds | Multi-speed (recommended minimum: 4) |
| Maximum Continuous Use Time | 10 minutes |
| Recommended Rest Time | At least 10 minutes before reuse |
| Body Material | Durable plastic |
| Blades | Sharp stainless steel blades |
| Included Grinding Discs | Fine disc, coarse disc, cookie disc |
| Cookie Attachment | Included, with shapes (circles, squares, triangles) |
| Tube Capacity | Suitable for meat pieces up to 25 mm side |
| Cleaning | Removable parts washable in warm soapy water (except motor) |
| Safety | Locking latch, motor cover, manual stop |
| Usage | Household use only, under adult supervision |
| Appliance Code | 18553-56 |
| Weight | Approximately 2 kg (estimate) |
| Dimensions (L x W x H) | Approximately 30 x 15 x 25 cm (estimate) |
Frequently Asked Questions - Fiesta Popcorn Maker RUSSELL HOBBS
User questions about Fiesta Popcorn Maker RUSSELL HOBBS
0 question about this device. Answer the ones you know or ask your own.
Ask a new question about this device
Download the instructions for your Popcorn machine in PDF format for free! Find your manual Fiesta Popcorn Maker - RUSSELL HOBBS and take your electronic device back in hand. On this page are published all the documents necessary for the use of your device. Fiesta Popcorn Maker by RUSSELL HOBBS.
USER MANUAL Fiesta Popcorn Maker RUSSELL HOBBS
natural_image
Line drawing of a stainless steel feedstock with a circular funnel and central hub (no text or symbols)125g Butter/Margarine
150g Butter/Margarine
300g Weizenmehl
1 ⑤0
125g Butter/Margarine
BEHANDLING OG VEDLIKEHOLD
40g migdale măcinate
50g zahăr pudră
½ 5 praf de copt
250g făină simplă
Read the instructions, keep them safe, pass them on if you pass the appliance on.
Remove all packaging before use.

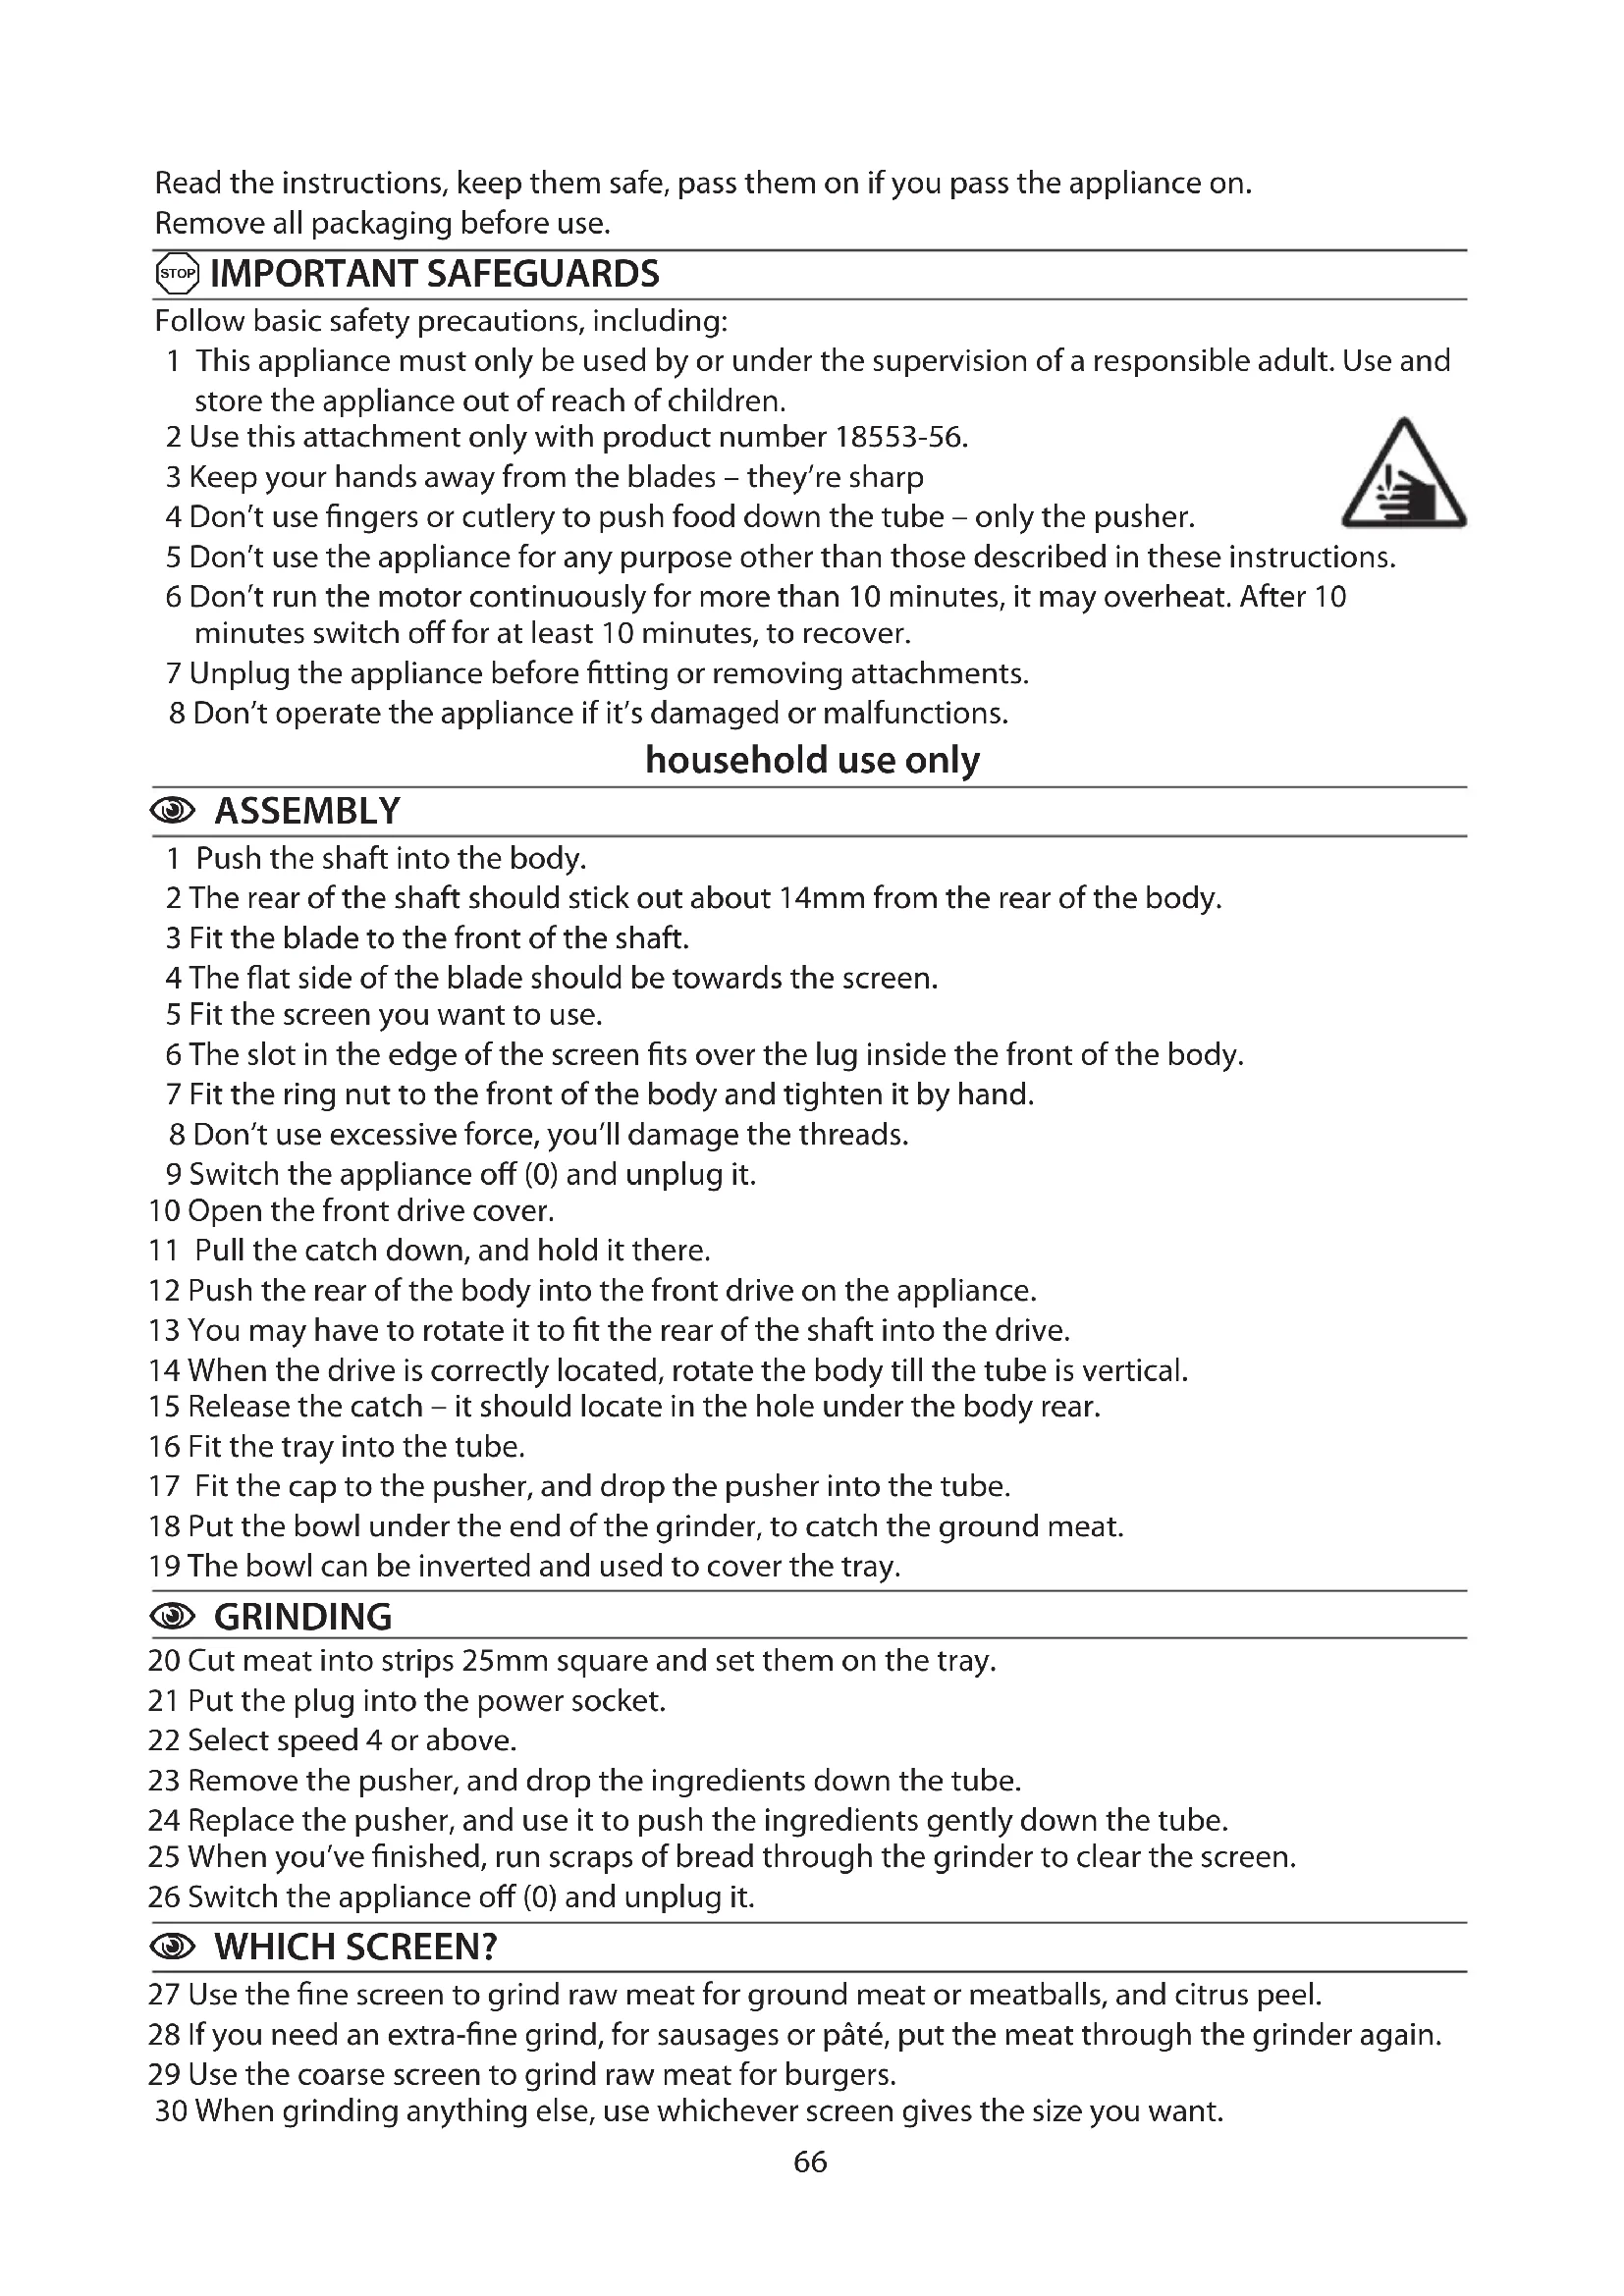
IMPORTANT SAFEGUARDS
Follow basic safety precautions, including:
1 This appliance must only be used by or under the supervision of a responsible adult. Use and store the appliance out of reach of children.
2 Use this attachment only with product number 18553-56.
3 Keep your hands away from the blades – they're sharp
4 Don't use fingers or cutlery to push food down the tube – only the pusher.
5 Don't use the appliance for any purpose other than those described in these instructions.
6 Don't run the motor continuously for more than 10 minutes, it may overheat. After 10 minutes switch off for at least 10 minutes, to recover.
7 Unplug the appliance before fitting or removing attachments.
8 Don't operate the appliance if it's damaged or malfunctions.

household use only

ASSEMBLY
1 Push the shaft into the body.
2 The rear of the shaft should stick out about 14mm from the rear of the body.
3 Fit the blade to the front of the shaft.
4 The flat side of the blade should be towards the screen.
5 Fit the screen you want to use.
6 The slot in the edge of the screen fits over the lug inside the front of the body.
7 Fit the ring nut to the front of the body and tighten it by hand.
8 Don't use excessive force, you'll damage the threads.
9 Switch the appliance off (0) and unplug it.
10 Open the front drive cover.
11 Pull the catch down, and hold it there.
12 Push the rear of the body into the front drive on the appliance.
13 You may have to rotate it to fit the rear of the shaft into the drive.
14 When the drive is correctly located, rotate the body till the tube is vertical.
15 Release the catch – it should locate in the hole under the body rear.
16 Fit the tray into the tube.
17 Fit the cap to the pusher, and drop the pusher into the tube.
18 Put the bowl under the end of the grinder, to catch the ground meat.
19 The bowl can be inverted and used to cover the tray.

GRINDING
20 Cut meat into strips 25mm square and set them on the tray.
21 Put the plug into the power socket.
22 Select speed 4 or above.
23 Remove the pusher, and drop the ingredients down the tube.
24 Replace the pusher, and use it to push the ingredients gently down the tube.
25 When you've finished, run scraps of bread through the grinder to clear the screen.
26 Switch the appliance off (0) and unplug it.

WHICH SCREEN?
27 Use the fine screen to grind raw meat for ground meat or meatballs, and citrus peel.
28 If you need an extra-fine grind, for sausages or pâté, put the meat through the grinder again.
29 Use the coarse screen to grind raw meat for burgers.
30 When grinding anything else, use whichever screen gives the size you want.
| diagrams | 9 pusher | 18 cookie screen |
| 1 body (rear) | 10 tray | 19 blade |
| 2 shaft (rear) | 11 tube | 20 shaft |
| 3 hole | 12 body | 21 seal |
| 4 front drive cover | 13 spanner | 22 lug |
| 5 catch | 14 ring nut | 23 bowl |
| 6 slot | 15 fine screen | dishwasher safe |
| 7 flat | 16 coarse screen | |
| 8 cap | 17 cookie mount |
COOKIE MOUNT
31 Fit the cookie mount without the blade.
32 Slide the cookie screen through the front of the cookie mount, and use it to keep the cookie mount straight while tightening the ring nut.
33 Move the shape you want to the centre of the cookie mount.
34 Form the cookie dough into shapes (circles, square, triangles ...) as it falls from the screen on to the work surface.
35 Press the dough lightly, to ensure the strands of dough stick together to form the final cookie shape.
DISASSEMBLY
36 Switch the appliance off (0) and unplug it.
37 Pull the catch down, and pull the body out of the front drive.
38 Close the front drive cover.
39 Remove the tray from the tube
40 Unscrew the ring nut (if it's tight, use the spanner).
41 Lay the body down on the work surface.
42 Hold the body with one hand, and push the rear of the shaft with the other.
43 Insert the corner of the spanner handle behind the first thread of the shaft, and pull it out of the body.
44 Use a spoon to ease the screen and blade off the shaft.
CARE AND MAINTENANCE
45 Clean the holes in the screen with a cocktail stick or toothpick.
46 Wash everything in hot soapy water, rinse and dry.
JAMMING
47 Sinew and gristle may jam the blade.
48 Switch the appliance off (0) and unplug it.
49 Jump to point 37. Dismantle the attachment, clean it, assemble it, and start again.
★ Any meat removed from the screen can be dropped into the tube.
cookie dough recipes
5 = teaspoon (5ml)
g = grams
⑤0 = egg, small (up to 53g)
plain cookies
150g butter/margarine 300g plain flour
1 ⑤ lemon essence (optional)
150g caster sugar
Put the butter and sugar in a bowl. Beat at medium speed till fluffy (1-2 minutes). Beat in the egg(s). Fold in the remaining ingredients.
almond cookies
125g butter/margarine 40g ground almonds
50g caster sugar 12 5—baking powder
250g plain flour lemon essence (optional)
1 ⑤0
Put the butter and sugar in a bowl. Beat at medium speed till fluffy (1-2 minutes). Beat in the egg(s). Fold in the remaining ingredients.
chocolate cookies
150g plain flour 25g cocoa powder
200g caster sugar 2 ⑤0
125g butter/margarine
Put the butter and sugar in a bowl. Beat at medium speed till fluffy (1-2 minutes). Beat in the egg(s). Fold in the remaining ingredients.
baking
Pass the mixture through the attachment. Shape into cookies. Lay on a greased baking sheet.
Bake in a pre-heated oven at 200°C for 6-10 minutes.
الانحثار
-
- Textured conscriptional information