
Premium PR:O Move 8 - Speaker HK AUDIO - Free user manual and instructions
Find the device manual for free Premium PR:O Move 8 HK AUDIO in PDF.
User questions about Premium PR:O Move 8 HK AUDIO
0 question about this device. Answer the ones you know or ask your own.
Ask a new question about this device
Download the instructions for your Speaker in PDF format for free! Find your manual Premium PR:O Move 8 - HK AUDIO and take your electronic device back in hand. On this page are published all the documents necessary for the use of your device. Premium PR:O Move 8 by HK AUDIO.
USER MANUAL Premium PR:O Move 8 HK AUDIO
Battery-powered PA-System
Manual 1.1
Important Safety Instructions! Read before connecting!
This product has been built by the manufacturer in accordance with IEC 62368-1 and left the factory in safe working order. To maintain this condition and ensure non-risk operation, the user must follow the advice and warning comments found in the operating instructions. If this product shall be used in vehicles, ships or aircraft or at altitudes exceeding 2000m above sea level, take care of the relevant safety regulations which may exceed the IEC 62368-1 requirements. WARNING: To prevent the risk of fire and shock hazard, do not expose this appliance to moisture or rain. Do not open case - no user serviceable parts inside. Refer service to qualified service personnel.

This symbol, wherever it appears, alerts you to the presence of a regulated dangerous voltage inside the enclosure - voltage that is sufficient to constitute a risk of shock.

This symbol, wherever it appears, alerts you to the presence of a fully accessible hazardous voltage. External wiring connected to terminal marked with this symbol must be a "ready made complying with the manufacturers recommendations, or must being installed by instructed persons only.

This symbol, wherever it appears, alerts you to important aging and maintenance instructions in the accompanying text. Read the manual.

This symbol, wherever it appears, tells you: Take care! Hot To prevent burns you must not touch.

All electrical and electronic products including batteries are disposed of separately from the municipal waste stream via a closed collection facilities appointed by the government or the authorities.

Read these instructions. Keep these instructions. Follow all steps and instructions marked on the product and in this manual.
- Do not use this product near water. Do not place the product near water, baths, wash basins, kitchen sinks, wet areas, swimming pools or damp rooms.
- Do not place objects containing liquid on the product - vases, glasses, bottles etc.
Clean only with dry cloth. - Do not remove any covers or sections of the housing.
- The set operating voltage of the product must match the local mains supply voltage. If you are not sure of the type of power available consult your dealer or local power company.
- Before connecting the device, please ensure that the mains supply you are using is equipped with adequate protection against short circuiting and grounding faults when the device is plugged in.
To reduce the risk of electrical shock, the grounding of this product must be maintained. Use only the power supply cord provided with this product, and maintain the function of the center (grounding) pin of the mains connection at any time. Make sure the mains outlet used provides a proper protective ground connection. - Do not defeat the safety purpose of the polarized or grounding-type plug. A polarized plug has two blades with one wider than the other. A grounding type plug has two blades and a third grounding prong. The wide blade or the third prong are provided for your safety. If the provided plug does not fit into your outlet, consult an electrician for replacement of the obsolete outlet.
- Protect the power cord from being walked on or pinched particularly at plugs, convenience receptacles, and the point where they exit from the device! Power supply cords should always be handled carefully. Periodically check cards for cuts or sign of stress, especially at the plug and the point where the cord exits the device.
- Never use a damaged power cord.
- Unplug this product during lightning storms or when unused for long periods of time.
- This product can be fully disconnected from mains only by pulling the mains plug at the unit or the wall socket. The product must be placed in such a way at any time, that disconnecting from mains is easily possible.
Fuses are to be replaced exclusively by qualified personnel, and then only with fuses of the proper type and rating.
- Refer all servicing to qualified service personnel. Servicing is required when the unit has been damaged in any way, such as: - When the power cord or plug is damaged or frayed.
If liquid has been spilled or objects have fallen into the product.
If the product has been exposed to rain or moisture.
If the product does not operate normally when the operating instructions are followed.
- If the product has been dropped or the cabinet has been damaged.
- Do not connect external speakers to this product with an impedance lower than the rated impedance given on the product or in this manual. Use only cables with sufficient cross section according to the local safety regulations.
- Keep away from direct sunlight.
- Do not install near heat sources such as radiators, heat registers, stoves or other devices that produce heat.
- This apparatus is for moderate climates areas use, not suitable for use in tropical climates countries.
- Do not block any ventilation openings. Install in accordance with manufacturer's instructions. This product must not be placed in a built-in installation such as a rack unless proper ventilation is provided.
- Always allow a cold device to warm up to ambient temperature, when being moved into a room. Condensation can form inside it and damage the product, when being used without warming up.
- Do not place naked flame sources, such as lighted candles on the product.
The device must be positioned at least 20 cm/8" away from walls.
- Use only with the cart, stand, tripod, bracket or table specified by the manufacturer or sold with the product. When a cart is used, use caution when moving the cart/product combination to avoid injury from tip-over.
- Use only accessories recommended by the manufacturer, this applies for all kind of accessories, for example protective covers, transport bags, stands, wall or ceiling mounting equipment. In case of attaching any kind of accessories to the product, always follow the instructions for use, provided by the manufacturer. Never use fixing points on the product other than specified by the manufacturer.
- This appliance is NOT suitable to be used by any person or persons (including children) with limited physical, sensorial or mental ability, or by persons with insufficient experience and/or knowledge to operate such an appliance. Children under 4 years of age must be kept away from this appliance at all times.
- Never push objects of any kind into this product through cabinet slots as they may touch dangerous voltage points or short out parts that could result in risk of fire or electric shock.
- This product is capable of delivering sound pressure levels in excess of 90 dB, which may cause permanent hearing damage. Exposure to extremely high noise levels may cause a permanent hearing loss. Wear hearing protection if continuously exposed to such high levels.
- The manufacturer only guarantees the safety, reliability and efficiency of this product if:
Assembly, extension, re-adjustment, modifications or repairs are carried out by the manufacturer or by persons authorized to do so.
- The electrical installation of the relevant area complies with the requirements of IEC (ANSI) specifications.
- The unit is used in accordance with the operating instructions.
- This product is optimized for use with music and speech signals. Using this product with sine wave, square wave or other kind of measuring signals at higher level may lead to severe damage of the product.
General Notes on Safety for Loudspeaker Systems

- Mounting systems may only be used for those loudspeaker owners authorized by the manufacturer and only with the mounting systems specified by the manufacturer in the installation actions. Read and heed the manufacturer's installation actions. The indicated load-bearing capacity cannot be guaranteed. The manufacturer will not be liable for damages in the event of per installation or the use of unauthorized mounting accessories. System's load-bearing capacity cannot be guaranteed and manufacturer will not be liable for damages in the event that speakers, mounting accessories, and connecting and attaching components are modified in any way. Onsets affecting safety may only be repaired by the manufacturer. Authorized agents, otherwise the operating permit will be voided.

Installation may be performed qualified personnel only, and only at pick-points with sufficient load-carrying capacity and compliance with local building regulations. Use only the mounting are specified by the manufacturer in the installation instructions, anchors, etc.). Take all the precautions necessary to ensure connections and other threaded locking devices will not loosen.

Fixed and portable installations (in this case, speakers and using accessories) must be secured by two independent safeties to let them from falling. Safeties must be able to catch accessories that are loose or may become loose. Ensure compliance with given national regulations when using connecting, attaching, rigging devices. Factor potential dynamic forces (jerk) into the load when determining the proper size and load-bearing capacity of ties.

1 Be sure to observe speaker stands' maximum load-bearing capacity. Note that for reasons of design and construction, most center stands are approved to bear centric loads only; that is, the speakers' mass has to be precisely centered and balanced. Ensure center stands are set up stably and securely. Take appropriate added measures to secure speaker stands, for example when:
- the floor or ground surface does not provide a stable, secure base.
- they are extended to heights that impede stability.
-
high wind pressure may be expected.
-
there is the risk that they may be knocked over by people. Special measures may become necessary as precautions against unsafe audience behavior. Do not set up speaker stands in evacuation routes and emergency exits. Ensure corridors are wide enough and put proper barriers and markings in place when setting speaker stands up in passageways. Mounting and dismounting are especially hazardous tasks. Use aids suitable for this purpose. Observe the given national regulations when doing so.


- Wear proper protection (in particular, a helmet, boots) and use only suitable means of ascent (e.g.) during installation. Compliance with this rule responsibility of the company performing the


WARNING! After installation, inspect the system comprised of the mounting fixtures and loudspeakers to ensure it is properly secured.
The operator of loudspeaker systems (fixed or portable) must regularly inspect or task a third party to regularly inspect all system components in accordance with the given country's regulations and have possible defects repaired immediately.
We also strongly recommend maintaining a logbook or the like to document all inspections.
Also be sure to provide sufficient safety margins for the rigging points used for flow systems. Observe the given national regulations when doing so.

Professional loudspeaker systems can produce harmful levels. Even prolonged exposure to seemingly harmless levels (e.g. at about 95 dB SPL) can cause permanent hearing damage! Here we recommend that everyone who is exposed to high volume production by loudspeaker systems wears professional hearing protection (earplugs or earmuffs).
Manufacturer: Stamer Musikanlagen GmbH, Magdeburger Str. 8, 66606 St. Wendel, Germany
PREMIUM PR:0
MOVE 8
Welcome to the HK Audio family!
Thank you for choosing a brand-name product made by our company. Rest assured, we engineered and built it with the greatest care so it will serve you well for many tomorrows to come.

Even if your experience with sound systems runs deep, some things about this product are sure to be new to you. This is why we ask that you do not set this manual aside without reading it first. Be sure to keep it in a safe place for later reference.
Here's wishing you the best sound at every occasion!
Your HK Audio team

Strong electromagnetic interference or electrostatic discharge
may prevent the product from functioning normally. If this happens, the product may be returned to normal operation by powering off and on again. Should this not result in the product functioning normally again, please move the product away from the source of disturbance and try again.
Warranty
Use the convenient online registration option at www.hkaudio.com.

http://warranty.hkaudio.com
The registration is only valid if the device is registered within 30 days of the date of purchase.
HK Audio
Technischer Service
Postfach 1509
66595 St. Wendel, Germany
Fax: +49 6851 905 100
1 General Information
1.1 Unpacking and Inventorying
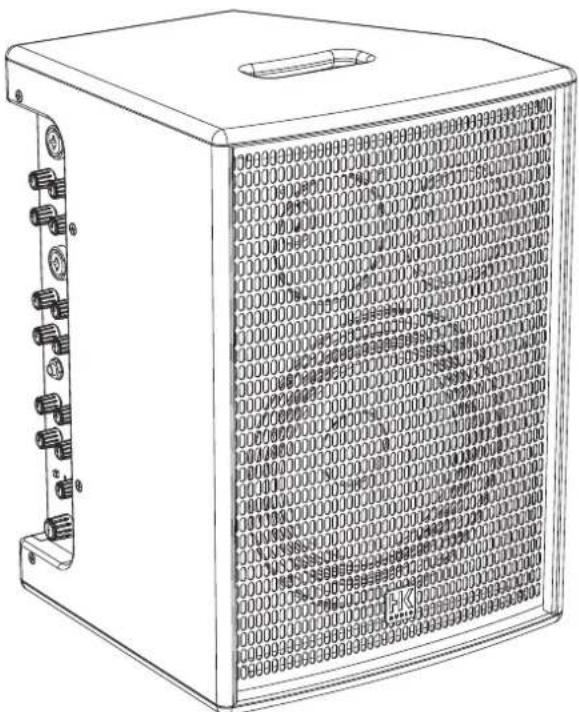
When you first unpack your MOVE 8, take a quick inventory to make sure the package comes complete with all the contents. A power supply unit, two batteries are included.
1.2 Powering Up
With the External Power Supply Unit

First connect the external power supply unit to the DC In socket 20 on the rear of the MOVE 8, and then connect the mains cord to a power outlet. Press the Power button 21 to switch on the device. The green Power LED lights up; the device is now ready to operate.
For the First Time with Batteries
Heads up: Be sure to charge both batteries fully before using them for the first time.
To do this, unfasten the wing screw on the rear battery compartment by turning it counterclockwise. Remove the cover. Slide the two included batteries into the compartment, pins first in the direction indicated by the shape of the housings until you feel them click firmly into place. Close the cover of the battery compartment again.
The two batteries will start charging as soon as you connect MOVE 8 to a power supply. This is done successively. The battery in slot A is charged first; the battery in slot B comes second. See section 3, Operating MOVE 8 on Battery Power, for more on this. The control LEDs for the two battery compartments progressively indicate the state of charge until both batteries are fully charged. Then the two LEDs light up green continuously.
MOVE 8 immediately switches over to battery-operated mode when the power supply unit is disconnected. One of the two control LEDs on the battery compartment will flash slowly to indicate which battery is currently in use.
Standby Mode
MOVE 8 features a Standby function that triggers automatically, switching the MOVE 8 off if it is left to idle for 20 minutes without receiving a signal or having a device connected via Bluetooth. You can adjust the time until standby activates in the app from 20 to 60 or 120 minutes or deactivate this feature altogether. However, auto-standby does save energy if the device is left on or switched on by mistake, which is very handy when it is running on battery power.
Press the Power button to switch Standby mode off and the system on.
2 Connections and Control Features
2.1 Control Panel
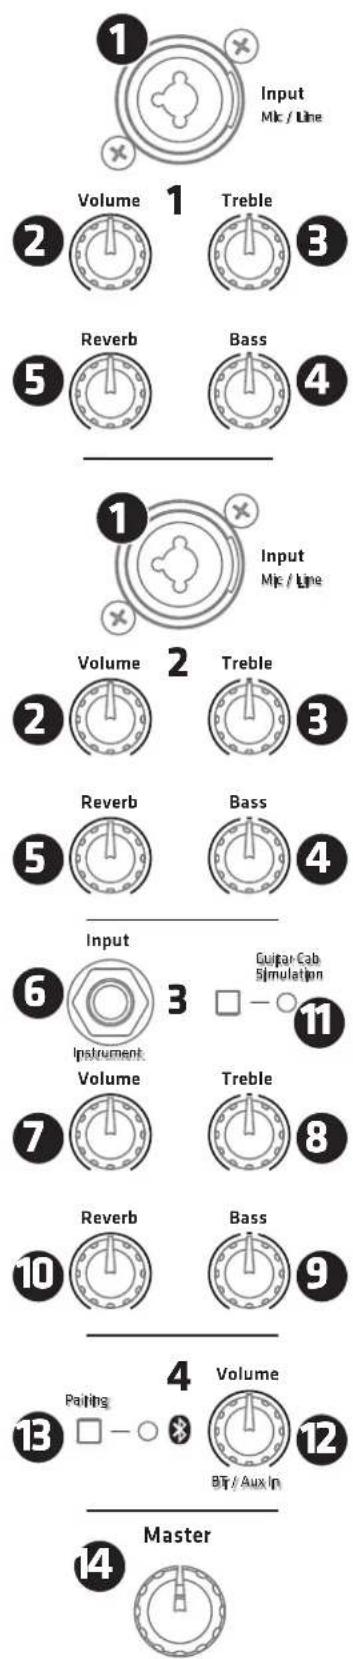
- Channel 1 and 2
Input Mic/Line
Use this balanced combo input [XLR/1/4" (6.3 mm)] to patch in a microphone or line signal.
Volume
The Volume control adjusts the level of the signal sent to Channels 1 and 2. Please note that you will have to adjust the level when switching from microphone to line signals.
3 Treble
This rotary knob adjusts the input signal's high frequencies.
4 Bass
This rotary knob adjusts the input signal's low frequencies.
5 Reverb
The Reverb knob controls the amount of signal sent to the internal reverb effect.
- Channel 3
6 Input Instrument
Use this unbalanced 1 / 4^ (6.3 mm) jack to connect an instrument with a high-impedance output such as a guitar or guitar effects device.
Volume
The Volume control adjusts the level of the signal sent to Channel 3. Please note that if you patch in a line signal, its high level may cause distortion. If you connect a line-level device such as a keyboard, guitar effect device or a preamp, you may have to back off the connected device's output level.
8 Treble
Use this rotary knob to adjust the input signal's high frequencies.
Bass
Use this rotary knob to adjust the input signal's low frequencies.
10 Reverb
The Reverb knob controls the amount of signal sent to the internal reverb effect.
11Guitar Cab Simulation
This button switches on the Celestion Impulse Response guitar cabinet simulator when you wish to use guitar effect devices and preamps. Its LED indicator lights up green when the simulator is on.
Heads up: MOVE 8 does not feature amp modeling. Instead, the cabinet simulator authentically recreates the sound of a guitar cabinet. This lets you use battery-powered floor effects, guitar modelers and the like that are usually connected to the clean channel of an electric guitar amp.
The free MOVE 8 REMOTE app offers three types of Celestion loudspeakers:
- Celestion Greenback
Celestion Blue
Celestion Vintage 30
The factory default is the Celestion Greenback.
- Channel 4
Volume
This knob adjusts the level of the Bluetooth signal and that of the signal sent to the rear Aux In jack.
Heads up: The MOVE 8 REMOTE app also provides two tone controls for Channel 4.
B Pairing
This button activates the pairing process that connects MOVE 8 to Bluetooth-enabled devices so you can stream audio and/or control the device remotely via the MOVE 8 REMOTE app. The blue LED indicator alongside the button lights up continuously when a Bluetooth connection is active. See section 4, Bluetooth, for more on this.
14 Master
This knob determines MOVE 8's overall level. We recommend making a habit of turning it all the way down to the far left before powering up the device.
2.2 Rear Panel
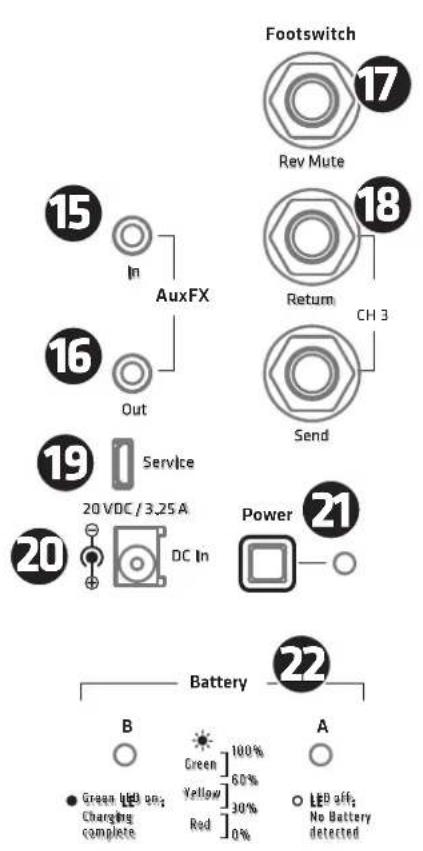

DC In
The included external power supply unit's cord connects to this socket.

Power
This button switches MOVE 8 on and off. The Power LED lights up green when the device is on. To switch MOVE 8 off, press the Power button for around three seconds until the LED extinguishes.

Battery B/A
This LED indicates the two batteries' state of charge. See the next section, Operating MOVE 8 on Battery Power, for more on this.

Aux In
Use this stereo mini jack to patch in a stereo line signal, for instance, from a multimedia player, mixing console or keyboard (with an appropriate cable). The Channel 4 Volume knob adjusts this input's level.

Aux Out
Use this stereo mini jack to patch out the summed stereo signal. The Master Volume knob controls this signal's level.

Footswitch Rev Mute
This 1/4'' (6.3 mm) jack accepts a standard one-way footswitch serving to switch the internal Reverb on and off. It is a very convenient tool for muting the effect, for instance, for announcements.

FX CH 3 (Send/Return)
These unbalanced 1/4'' (6.3 mm) jacks serve to connect an effects unit. This serial effects loop sends the signals from Channel 3 through an external effect device. To this end, connect MOVE 8's FX Send to the effects unit's input and the effects unit's output to MOVE 8's FX Return. Set the wet/ dry mix - that is, the relative amount of source and effect signals - on the external effects unit.

Service
This USB interface is there strictly for service purposes.
Caution: Do not use this port to charge mobile devices, smartphones or tablets! Please do not connect devices of any kind to it.
3 Operating MOVE 8 on Battery Power
MOVE 8 can operate for up to 11 hours on two fully charged batteries, depending on the volume and signal, and 5.5 hours on one battery. The battery in slot A always has priority over the battery in slot B. This means that the battery in slot A is always drained or charged first when the device is connected to mains power with two batteries installed.
MOVE 8 promptly switches to the battery in slot B when the charge of battery in slot A is depleted. The choice of slot is irrelevant when operating the device on just one battery.
Charging Batteries
Batteries may be charged in the slot on MOVE 8 or in an optional quick charger. It takes around five hours to fully charge one completely empty battery in the MOVE 8 slot and around ten for both, regardless of whether MOVE 8 is on or off. In other words, you can operate MOVE 8 at full power using the mains adapter and charge the batteries at the same time. The optional quick charger charges the battery in around two 2 hours.
Hot Swap Option
You can change batteries on the fly while MOVE 8 is up and running. If MOVE 8 switches to battery B because battery A is depleted, you can remove battery A without severing the signal and insert a third fully charged battery, optionally available as an accessory, into slot A. If necessary, you can also change battery B once the device detects battery A. The Bluetooth link remains up during a hot swap, so the device can run on batteries for as long as you care to keep swapping them.
Good to know: You can hot-swap batteries even if you only have just the factory-included rechargeable batteries. If the device indicates the charge is running low while you are operating it with just one battery, first insert the second fully charged battery into the free slot, wait until it is detected, and then remove the drained battery. Then you can charge it at the nearest power outlet using the external quick charger.
LED Indicators
The two LEDs on the battery slot serve two purposes:
When operating MOVE 8 on battery power: When batteries are inserted and MOVE 8 is switched on, the LEDs indicate which battery is currently supplying voltage and is being drained. Just one LED flashes as just one battery provides power at any one time. The other LED for the battery that is on standby lights up continuously to indicate it is ready to operate. The LED does not light up if the slot is empty or a battery has not been detected.
When operating MOVE 8 on mains power: A flashing LED indicates which battery is currently being charged. The flashing stops and the LED lights up continuously when the battery is fully charged.

The LEDs' color indicates the state of charge. This applies in both cases when the device is receiving mains power and the batteries are charging, and when it is running on battery power. Green: 100 - 60% Yellow: 60 - 30% Red: 30 - 0%
4 Bluetooth
Pairing a Bluetooth-Enabled Device
- Press the Channel 4 Pairing button
- The blue Bluetooth LED flashes slowly and MOVE 8 shows up in the Bluetooth-enabled device's selection list for 60 seconds
- Select "HK Audio MOVE 8" on the Bluetooth device to pair the devices
After 60 seconds you have to restart the pairing process if the connection failed
The Channel 4 Bluetooth LED on MOVE 8 lights up blue as soon as the devices are paired and remains illuminated.
Pairing a Bluetooth Device Automatically
The next time you power up MOVE 8, the system will automatically search for the most recently paired device for 10 seconds and, once found, connect to it. This way, you do not have to pair the Bluetooth-enabled device manually. If the 10 seconds elapse without MOVE 8 discovering the device, you can relaunch the search by switching MOVE 8 off and on again or pair the Bluetooth-enabled device manually.
Switching to Another Bluetooth Device
You cannot switch to another Bluetooth device while a Bluetooth device is still connected or the MOVE 8 is searching for the most recently connected device. You will have to repeat the steps to pair a Bluetooth-enabled device, disconnect the currently paired device, and connect the other Bluetooth device.
Heads up: Every attempt to pair a Bluetooth-enabled device creates a fresh Bluetooth connection and severs any existing link!
Range
MOVE 8 supports Bluetooth 5. Bluetooth 5-enabled devices' range can extend up to 40 meters. Devices that do not support Bluetooth 5 typically run up to 10 meters, but that depends on factors such as the given device's quality, transmission power and current environment. For example, walls obstructing the transmission path or a protective cover on the Bluetooth device impede radio communication.
The sound drops out if the device moves out of range or behind walls that interfere with the signal. The connection re-establishes automatically if you bring the Bluetooth device back in range within 60 seconds, in which case the Bluetooth LED will light up continuously.
Bluetooth Audio Stream Stutters or Drops Out
A cable is less susceptible to interference than Bluetooth, which has to send a constant stream of audio data via a radio frequency. To get a good audio stream without any glitches, it is best to align MOVE 8 and the source device in line of sight of one another.
Good to know: Your source device may be set up to issue ringtones, notifications and system sounds. The speakers will render these sounds along with the audio stream if they arrive via Bluetooth, so be sure to disable these functions on your Bluetooth device.
To learn more about Bluetooth, visit www.bluetooth.org.
5 MOVE 8 REMOTE App

HK Audio offers a free app for iOS and Android that lets you control MOVE 8 remotely from your smartphone or tablet.

This app is more than merely a remote control; it also adds on the following DSP functions:
- Feedback cancellation for Channel 1 and Channel 2
Additional effects for Channel 3: Chorus, Flanger and Tremolo - Karaoke functions (transpose, vocal cancellation) for Channel 4 (Bluetooth audio and Aux In)
- Dual band EQ for Channel 4 (Bluetooth/Aux In)
- Three original Celestion Impulse Responses (IR) for the Channel 3 Guitar Cabinet Simulation – Celestion Greenback, Celestion Blue, Celestion Vintage 30
- Save and load presets

Get the free app MOVE 8 REMOTE
https://hkaudio.com/produkt/move8remote
6 Factory reset
A factory reset is a seldom-needed feature. Nonetheless, please read these instructions carefully to ensure you don't accidentally delete your settings. You can perform a factory reset by doing the following: Press and hold both Speaker Cabinet Simulation and BT Pairing button for at least two seconds. Both LEDs will flash to indicate the factory reset and MOVE 8 will switch off automatically.
7 Technical Specifications
| MOVE 8 | |
| Max. SPL peak @ 10% THD 123 dB half-space | |
| Frequency response +/- 3 dB 65 Hz - 18 kHz | |
| Frequency response -10 dB 55 Hz - 20 kHz | |
| Power output 60 W Class D | |
| Total battery operating time Up to 11 h (with two fully charged batteries) | |
| Active protective circuits Peak and RMS sound limiter (one each for HF und LMF) | |
| LMF woofer 1x 8", 1" voice coil | |
| HF driver 1", 1" voice coil | |
| Horn directivity 70° x 70° | |
| Active X-over 2.5 kHz | |
| Audio in ports 2x combo XLR/ 1/4" (6.3 mm) in (Mic/ Line), 1x 1/4" (6.3 mm) (Instr.), 1x stereo mini jack (Aux) | |
| Audio out ports 1x stereo mini jack (Aux) | |
| Tone controls 2-band EQ for Channels 1 to 3 | |
| Filter presets | Guitar Cab Simulation for Channel 3 |
| Bluetooth | 5.0 |
| Angles up | 33° |
| Pole mount | 1x 35 mm |
| Handles | 1x SingleGrip, integrated |
| Housing | MDF |
| Finish | Black acrylic enamel |
| Front grille | 1,5 mm metal grille backed with black acoustic foam |
| Dimensions (WxHxD) | 29 x 41 x 28 cm 11-27/64 x 16-5/32 x 11-3/64" |
| Weight | 8.5 kg / 18.7 lbs |
| Battery | |
| Battery capacity | 5,200 mAh |
| Dimensions (WxHxD) | 8 x 3 x 8.3 cm 3-5/32 x 1-3/16 x 3-17/64" |
| Weight | 0.25 kg / 0.6 lbs |
| Charging time in MOVE 8 | Around 5 hours |
| Charging time in optional quick charger | Around 2 hours |
Apple iPad, iPad Air and iPad Pro are trademarks of Apple Inc., registered in the U.S. and other countries.
Bluetooth
The Bluetooth® word mark and logos are registered trademarks owned by Bluetooth SIG, Inc. and any use of such marks by Stamer Musikanlagen GmbH is under license.
All mentioned trademarks and copyrights belong to their respective owners.
For USA:
This device complies with part 15 of the FCC Rules. Operation is subject to the following two conditions: (1) This device may not cause harmful interference, and (2) This device must accept any interference received, including interference that may cause undesired operation.
This equipment complies with FCC radiation exposure limits set forth for an uncontrolled environment. End users must follow the specific operating instructions for satisfying RF exposure compliance. This transmitter meets both portable and mobile limits as demonstrated in the RF Exposure Analysis. This transmitter must not be co-located or operating in conjunction with any other antenna or transmitter except in accordance with FCC multi-transmitter product procedures.
For Canada:
Under Industry Canada regulations, this radio transmitter may only operate using an antenna of a type and maximum (or lesser) gain approved for the transmitter by Industry Canada. To reduce potential radio interference to other users, the antenna type and its gain should be so chosen that the equivalent isotropically radiated power (e.i.r.p.) is not more than that necessary for successful communication.
CAUTION: Risk of explosion if the battery is replaced by an incorrect type.
Warning: Disposal of a battery into fire or a hot oven, or mechanically crushing or cutting of a battery, that can result in an explosion. Leaving a battery in an extremely high temperature surrounding environment that can result in an explosion or the leakage of flammable liquid or gas. A battery subjected to extremely low air pressure that may result in an explosion or the leakage of flammable liquid or gas.
The MAX operate temperature: 45^
This device contains licence-exempt transmitter(s)/receiver(s) that comply with Innovation, Science and Economic Development Canada's licence-exempt RSS(s). Operation is subject to the following two conditions:
-
This device may not cause interference.
-
This device must accept any interference, including interference that may cause undesired operation of the device.
This equipment has been tested and found to comply with the limits for a Class B digital device, pursuant to part 15 of the FCC Rules. These limits are designed to provide reasonable protection against harmful interference in a residential installation. This equipment generates, uses and can radiate radio frequency energy and, if not installed and used in accordance with the instructions, may cause harmful interference to radio communications. However, there is no guarantee that interference will not occur in a particular installation. If this equipment does cause harmful interference to radio or television reception, which can be determined by turning the equipment off and on, the user is encouraged to try to correct the interference by one or more of the following measures:
Reorient or relocate the receiving antenna.
-
Increase the separation between the equipment and receiver.
-
Connect the equipment into an outlet on a circuit different from that to which the receiver is connected.
-
Consult the dealer or an experienced radio/TV technician for help.
Changes or modifications not expressly approved by the party responsible for compliance could void the user's authority to operate the equipment.
The equipment complies with FCC/IC R55-102 radiation exposure limits set forth for an uncontrolled environment. The equipment should be installed and operated with minimum distance 20 cm between the radiator & your body.

Verified Energy Performance Performance Energétique Verifiee
Guitar Cab Simulation

Get the free app MOVE 8 REMOTE
https://hkaudio.com/produkt/move8remote
3 Pairing (Appalrage)
Guitar Cab Simulation
- Celestion Greenback
Celestion Blue
Celestion Vintage 30

Get the free app MOVE 8 REMOTE
https://hkaudio.com/product/move8remote
6 II ripristino (Factory-Reset)
Guitar Cab Simulation
Celestion Greenback
Celestion Blue
Celestion Vintage 30

Get the free app MOVE 8 REMOTE
https://hkaudio.com/product/move8remote