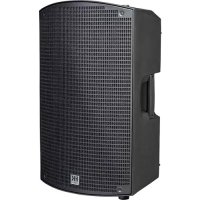
Premium PR:O 210 Sub A - Speaker HK AUDIO - Free user manual and instructions
Find the device manual for free Premium PR:O 210 Sub A HK AUDIO in PDF.

User questions about Premium PR:O 210 Sub A HK AUDIO
0 question about this device. Answer the ones you know or ask your own.
Ask a new question about this device
Download the instructions for your Speaker in PDF format for free! Find your manual Premium PR:O 210 Sub A - HK AUDIO and take your electronic device back in hand. On this page are published all the documents necessary for the use of your device. Premium PR:O 210 Sub A by HK AUDIO.
USER MANUAL Premium PR:O 210 Sub A HK AUDIO
- Read all of these instructions!
- Save these instructions for later use!
- Follow all warnings and instructions marked on the product!
- Do not use this product near water, i.e. bathtub, sink, swimming pool, wet basement, etc.
- Do not place this product on an unstable cart, stand or table. The product may fall, causing serious damage to the product or to persons!
- Slots and openings in the cabinet and the back or bottom are provided for ventilation; to ensure reliable operation of the product and to protect it from overheating, these openings must not be blocked or covered. This product should not be placed in a built- in installation unless proper ventilation is provided.
- This product should not be placed near a source of heat such as a stove, radiator, or another heat producing amplifier.
- Use only the supplied power supply or power cord. If you are not sure of the type of power available, consult your dealer or local power company.
- Do not allow anything to rest on the power cord. Do not locate this product where persons will walk on the cord.
- Never break off the ground pin on the power supply cord.
- Power supply cords should always be handled carefully. Periodically check cords for cuts or sign of stress, especially at the plug and the point where the cord exits the unit.
- The power supply cord should be unplugged when the unit is to be unused for long periods of time.
- If this product is to be mounted in an equipment rack, rear support should be provided.
- This product should be used only with a cart or stand that is recommended by HK AUDIO
- Never push objects of any kind into this product through cabinet slots as they may touch dangerous voltage points or short out parts that could result in risk of fire or electric shock. Never spill liquid of any kind on the product.
- Do not attempt to service this product yourself, as opening or removing covers may expose you to dangerous voltage points or other risks. Refer all servicing to qualified service personnel.
- Clean only with dry cloth.
- Do not defeat the safety purpose of the polarized or grounding-type plug. A polarized plug has two blades with one wider than the other. A grounding type plug has two blades and a third grounding prong. The wide blade or the third prong are provided for the safety. If the provided plug does not fit into your outlet, consult an electrician for replacement of the obsolete outlet.
- Place the product always in a way that the mains switch is easily accessible.
- Unplug this product from the wall outlet and refer servicing to qualified service per- sonnel under the following conditions:
- When the power cord or plug is damaged or frayed.
- If liquid has been spilled into the product.
- If the product has been exposed to rain or water.
- If the product does not operate normally when the operating instructions are followed.
- If the product has been dropped or the cabinet has been damaged.
- If the product exhibits a distinct change in performance, indicating a need of service!
- Adjust only these controls that are covered by the operating instructions since impro- per adjustment of other controls may result in damage and will often require extensive work by a qualified technician to restore the product to normal operation.
- Exposure to extremely high noise levels may cause a permanent hearing loss.
- Individuals vary considerably in susceptibility to noise induced hearing loss, but nearly everyone will lose some hearing if exposed to sufficiently intense noise for a sufficient time. The U.S. Government´s Occupational Safety and Health Administration (OSHA) has specified the following permissible noise level exposures: Duration Per Day In Hours Sound LeveldBA, Slow Response
- According to OSHA, any exposure in excess of the above permissible limits could result in some hearing loss.
- Ear plug protectors in the ear canals or over the ears must be worn when operating this amplification system in order to prevent a permanent hearing loss if exposure is in excess of the limits as set forth above. To ensure against potentially dangerous exposure to high sound pressure levels, it is recommended that all persons exposed to equipment capable of producing high sound pressure levels such as this amplification system be protected by hearing protectors while this unit is in operation.
- Fuses: Replace with IEC 127 (5x 20 mms) type and rated fuse for best performance only. TO PREVENT THE RISK OF FIRE AND SHOCK HAZARD, DO NOT EXPOSE THIS APPLIANCE TO MOISTURE OR RAIN. DO NOT OPEN CASE; NO USER SERVICE-ABLE PARTS INSIDE. REFER SERVICING TO QUALIFIED SERVICE PERSONNEL. Version 1.1 11/2006
- The unit has been built by HK AUDIO
in accordance with IEC 60065 and left the factory in safe working order. To maintain this condition and ensure non-risk opera- tion, the user must follow the advice and warning comments found in the operating instructions. The unit conforms to Protection Class 1 (protectively earthed).
- Assembly, extension, re-adjustment, modifications or repairs are carried out by HK AUDIO
or by persons authorized to do so.
- The electrical installation of the relevant area complies with the requirements of IEC (ANSI) specifications.
- The unit is used in accordance with the operating instructions.
- The unit is regularly checked and tested for electrical safety by a competent technician.
- If covers are opened or sections of casing are removed, except where this can be done manually, live parts can become exposed.
- If it is necessary to open the unit this must be insulated from all power sources. Please take this into account before carrying out adjustments, maintenance, repairs and before replacing parts.
- The appliance can only be insulated from all power sources if the mains connection is unplugged.
- Adjustment, maintenance and repairs carried out when the unit has been opened and is still live may only be performed by specialist personnel who are authorized by the manuf- acturer (in accordance with VBG 4) and who are aware of the associated hazards.
- Loudspeaker outputs which have the IEC 417/5036 symbol (Diagram 1, below) can carry voltages which are hazardous if they are made contact with. Before the unit is switched on, the loudspeaker should therefore only be connected using the lead recommended by the manufacturer.
- Where possible, all plugs on connection cables must be screwed or locked onto the casing.
- Replace fuses only with IEC127 type and specified ratings.
- It is not permitted to use repaired fuses or to short-circuit the fuse holder.
- Never interrupt the protective conductor connection.
- Surfaces which are equipped with the "HOT" mark (Diagram 2, below), rear panels or covers with cooling slits, cooling bodies and their covers, as well as tubes and their covers are purposely designed to dissipate high temperatures and should therefore not be touched.
- High loudspeaker levels can cause permanent hearing damage. You should therefore avoid the direct vicinity of loudspeakers operating at high levels. Wear hearing protection if continuously exposed to high levels. MAINS CONNECTION:
- The unit is designed for continuous operation.
- The set operating voltage must match the local mains supply voltage.
- The unit is connected to the mains via the supplied power unit or power cable.
- Power unit: Never use a damaged connection lead. Any damage must be rectified by a competent technician.
- Avoid connection to the mains supply in distributor boxes together with several other power consumers.
- The plug socket for the power supply must be positioned near the unit and must be easily accessible. PLACE OF INSTALLATION:
- The unit should stand only on a clean, horizontal working surface.
- The unit must not be exposed to vibrations during operation.
- Place the product always in a way that the mains switch is easily accessible.
- Keep away from moisture and dust where possible.
- Do not place the unit near water, baths, wash basins, kitchen sinks, wet areas, swim- ming pools or damp rooms. Do not place objects containing liquid on the unit - vases, glasses, bottles etc.
- Ensure that the unit is well ventilated.
- Any ventilation openings must never be blocked or covered. The unit must be positi- oned at least 20 cm away from walls. The unit may only be fitted in a rack if adequate ventilation is ensured and if the manufacturer's installation instructions are followed.
- Keep away from direct sunlight and the immediate vicinity of heating elements and radiant heaters or similar devices.
- If the unit is suddenly moved from a cold to a warm location, condensation can form inside it. This must be taken into account particularly in the case of tube units. Before switching on, wait until the unit has reached room temperature.
- Accessories: Do not place the unit on an unsteady trolley, stand, tripod, base or table. If the unit falls down, it can cause personal injury and itself become damaged. Use the unit only with the trolley, rack stand, tripod or base recommended by the manufacturer or purchased together with the unit. When setting the unit up, all the manufacturer's instructions must be followed and the setup accessories recommended by the manuf- acturer must be used. Any combination of unit and stand must be moved carefully. A sudden stop, excessive use of force and uneven floors can cause the combination of unit and stand to tip over.
- Additional equipment: Never use additional equipment which has not been recommended by the manufacturer as this can cause accidents.
- To protect the unit during bad weather or when left unattended for prolonged periods, the mains plug should be disconnected. This prevents the unit being damaged by lightning and power surges in the AC mains supply. Diagram 1 Diagram 2
1 Gain This knob adjusts the input level. 2 Tone (not available on the PR:O 12 MA) The Tone knob lets you optimize your active speaker cabinet for music or speech applications. It uses a special filtering setup that adapts frequency response to suit the given requirements. Room acoustics vary as does the cabinet’s position, so we recommend you find the optimum position by piping in a full-fledged music signal, using a microphone, and twisting the knob. Turning it towards Speech boosts vocal signals, and turning it towards Music conjures a bigger, bolder sonic image with more low end and less midrange frequencies. The Tone knob lets you tune the speaker cabinet to suit music or public address applications. Its special filtering circuit adapts its frequency response to the given requirements. Note: Twisting the Tone knob counterclockwise to- wards Music gradually attenuates a broad midrange frequency band with a center frequency of 1500 Hz (2500 Hz -PR:O 10 XA, 2600 Hz - PR:O 8 A). The maximum cut is 2 dB, achieved by setting the knob to the far left position. At the same time, this ad- justment boosts bass frequencies in the range of 80 to 100 Hz in equal measure by up to 2 dB. Twisting the Tone knob counterclockwise towards Speech achieves the opposite effect, boosting the midrange frequency band and cutting bass frequencies accor- dingly by up to 2 dB. A special corrective circuit compensates for this EQ effect so that the perceived volume level remains the same despite the change in tone. Setting the knob to the center position defeats the filter. 3 Mic/Line Switch (not on the PR:O 12 MA) When patching in a microphone, adjust the input gain by setting the Line/Mic button to Mic. This provides a 30-dB gain boost, thereby optimizing the input for microphone signals. 4 Input This electronically balanced XLR/ 1/4" combi input accepts mixer signals (pin 1= ground, 2= +, 3= -). 5 Through This parallel output patches the incoming line signal through, for example, to other PREMIUM PR:O active speakers or monitors. 6 Limiter Status LED This dichromic LED indicates the signal level and limiter status. Green means the signal level is okay; red means the limiter has engaged and is respon- ding to high-volume signal peaks. CAUTION! This is not a clip LED. It’s okay if it lights up red briefly every now and then; this merely indicates the RMS Limiter is operating. If the signal LED remains constantly in the red at signal peaks, check the source signal’s input level and back off the speaker’s Gain knob. A status LED that lights up red continuously indicates there is a fault in the speaker system. 7 Power Switch This is the PREMIUM PR:O powered cabinet’s on/off button. The signal LED lights up green to indicate the cab is powered up. Note: The Power button is embedded to prevent unintentional actuation. When set to POWER ON, the button sits almost flush with the connector pa- nel. This ensures it is not engaged accidentally, yet remains readily accessible.
8 Mains Input Use the factory-included locking power cord to con- nect this socket to a mains outlet. The catch holds the cord in place, preventing accidental unplugging. You must release the yellow catch on the bottom of the plug before you can remove the cord. Note: This socket also accepts a standard Euro mains cable, but it will not lock it in place. 9 Parallel Speaker Out Use this Speakon NL4 output to connect another passive PREMIUM PR:O enclosure or another manufacturer’s passive cabinet. Be sure to watch the impedance rating, connecting no more than one enclosure with an impedance no lower than 8 ohms. The power amp delivers up to 300 watts to this output.
1.2 Setting Up and Connecting
Cabinets Connect cords routed from your mixer (monitor out, line out, or a similar output) to the balanced Input sockets using a cord equipped with standard XLR microphone connectors. Make sure the XLR connectors’ terminals are configured as follows: 1= ground, 2= +, 3= -. If you wish to connect a microphone directly to the PREMIUM PR:O active cabinet without going into a mixer first, plug it into the balanced Input socket and set its input sensitivity to Mic. Use a standard XLR microphone cord to do this. Make sure the XLR connectors’ terminals are configured as follows: 1= ground, 2= +, 3= -.
1.3 Operating Speakers
- First make sure the powered cabinet is off. CAUTION! Make sure the local mains voltage mat- ches the PREMIUM PR:O active cabinet’s specified voltage. If you connect the PREMIUM PR:O cab to the wrong mains voltage, you may destroy its elec- tronic components.
- Back the Gain and Line/Mic knobs all the way off, turning them counterclockwise as far as they will go. When connecting line signals, be sure to first switch on all other connected components first; that is, the connected mixer and signal sources patched into it, such as keyboards, instrument amps, effects and so forth. Confirm that the PREMIUM PR:O powered enclosure’s Mic/Line control is set to the correct mode, the standard mode being Line. Again, always switch on the PREMIUM PR:O active cabinet last, that is, after you switch on all con- nected devices. After you power the system up by engaging the Power switch, a system check prompts the fan to briefly kick on and back off again in about five seconds. The fan is temperature-controlled, ac- tuating only at very high volumes and temperatures requiring cooling. After you power up the cab by engaging the Power switch, the Power LED lights up green when the cabinet receives mains power. Set the Gain Line In knob to the center or 12 o’clock position (= 0 dBV). This is the preferred level if you have connected a mixer to the PREMIUM PR:O active cabinet. If you are patching a CD player or keyboard straight into the cab, turn the Gain Line In knob clockwise all the way to the far right to achieve maximum volume. If the input signal is still too weak, boost the level at the signal source, for instance, by adjusting an MP3 player’s volume knob. If necessary, you can turn the PREMIUM PR:O powered enclosure’s Gain knob counterclockwise to the far left position and then press the Mic/Line button. This boosts the input signal by 30 dB. Then adjust the input gain by slowly turning the Gain knob to the right until you attain the desired volume. For the best audio results, ensure the Limiter LED (red) does not light up continuously.
Adjusting volume with the Gain knob Twist this knob and engage the Mic/Line switch line to adjust microphone and line signal levels. If you hear distortion or saturated signals, first check the signal sources and, if possible, reduce the out- put signal level there. If you cannot adjust the level of the signal routed to the PREMIUM PR:O active cabinet at the source, match it to the power amps by backing off the Gain Line In knob. CAUTION: Never tape over the plug’s ground terminal - this endangers lives! Tone (not available on the PR:O 12 MA) Starting at the center or 12 o’clock position, you can EQ the sonic image by turning the knob to the right or left. Set it to MUSIC to attenuate midrange frequencies somewhat and boost the low range fre- quencies for live or CD signals. Setting the knob to SPEECH enhances intelligibility for public address purposes. A corrective circuit automatically compensates for EQ, balancing out the overall volume for each setting.
HK Audio DuoTilt™ (apart from the PR:O 12 MA, HK Audio Mono Tilt™ with a 3° angle tilt for the PR:O 8 A) The HK AUDIO DuoTilt™ pole mount lets you align PREMIUM PR:O active cabinets along the horizon- tal plane to prevent or reduce troublesome ceiling reflections. The front aperture of the HK AUDIO DuoTilt™ provides a 3° angle, the rear aperture a 7° angle of tilt. If you set the full-range cabinets on a fully extended cabinet tripod or mounting pole, opt for the 7° ang- le. This setting works especially well when addres- sing fewer listeners standing close to the speakers. If you wish to address more listeners further from the speakers, opt for the 3° angle on the HK AUDIO DuoTilt™. EnglishPREMIUM PR:O Active 1.4 Curving cable (for the PR:O 8 A only) Included you’ll find a curving cable. It aligns the PR:O 8 A vertically, for instance, if you wish to install the enclosure or mount it to a from a truss. Simply attach it using the bolts at the bottom of the cabinet’s housing. 45° Attaching the curving cable: The curving cable lets you precisely aim the flown PR:O 8 A cab. It attaches to the back of the PR:O 8 A.
- Remove the bottom two bolts from the connector panel.
- Place the washers over the two holes.
- Insert the bolts to fasten the two plates attached to the curving cable to the cabinet at a 45° angle (refer to the diagram). Note: The plates must be aligned to a 45° angle to ensure safe operation!
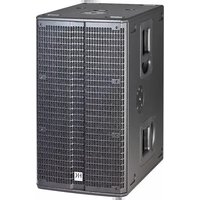
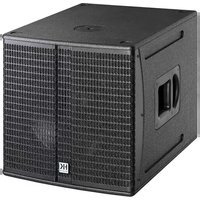
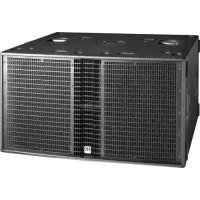
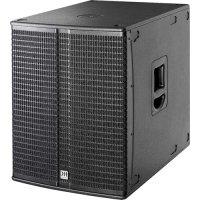
- Tighten the bolts. The cable kit includes: - two washers - two 5x25 mm recessed hex-head bolts - one cable with mounting plates Caution: The curving cable serves solely to tilt the cabinet; it is not a rigging point! 2 PR:O 18 Sub A, PR:O 210 Sub A
2.1 Control Features
1 Out L / Out R (Line Out Mid / High) These two electronically balanced XLR inputs serve to connect PREMIUM PR:O satellites (pin 1= ground, 2= +, 3= -). 2 Input L / Input R These two electronically balanced XLR / 1/4" combi inputs accept signals from mixing consoles (pin 1= ground, 2= +, 3= -). 3 Through L / Through R These two parallel outputs patch incoming line signals through, for example, to other PREMIUM PR:O active speakers or monitors (pin 1= ground, 2= +, 3= -). 4 Gain Bass This knob adjusts the input level (center position = 0 dBV). The 12 o’clock position is the ideal starting point when operating the subwoofer in combination with a PREMIUM PR:O active cabinet. Then you can simply twist the knob to the left or right to cut and boost bass frequencies. If you connect a PREMIUM PR:O satellite, first set the Gain knob to the center detent and then adjust the level to suit the given sound reinforcement situation. 5 X-Over-Bass The active crossover can serve to vary the top cu- toff frequency of the subwoofer with a range of 75 to 150 Hz. The best cutoff frequency for the given application depends on the surroundings and satellite, so you will have to experiment. Note: If you set the cutoff to a frequency higher than 110 Hz, the subwoofer will render mostly the lower frequencies of signals generated by bass guitars, kick drums, and low-end keyboard sounds. If you set the cutoff to a frequency higher than 110 Hz, the subwoofer will also render the lower frequencies of voices and other sound sources. 6 Phase The Phase switch changes the subwoofer’s phase position to match it to the connected satellite’s phase position (0° – 180°). Set the switch to 0° when operating the PR:O 18 Sub A in combination with a PREMIUM PR:O active cabinet. The PR:O 210 Sub A's phase has to be reversed 180° to ensure it is in phase with PREMIUM PR:O mid-/high-range units. You may have to invert the phase for combinations with other enclosures. If you are unsure, simply try the 180° setting. If the bass response changes and the signal sounds weak and washed out, the phase setting is incorrect. 7 Limiter Status LED This dichromic LED indicates the signal level and limiter status. Green means the signal level is okay; red means the limiter has engaged and is respon- ding to high-volume signal peaks. CAUTION! This is not a clip LED. It’s okay if it lights up red briefly every now and then; this merely indicates the RMS Limiter is operating. If the signal LED remains constantly in the red at signal peaks, check the source signal’s input level and back off the speaker’s Gain knob. A status LED that lights up red continuously indicates there is a fault in the speaker system. 8 Power Switch This is the PREMIUM PR:O powered cabinet’s on/off button. The signal LED lights up green to indicate the cab is powered up. Note: The Power button is embedded to prevent unintentional actuation. Set to Power On, the button sits almost flush with the connector panel. This ensures it is not engaged accidentally, yet remains readily accessible. 9 Mains Input Use the factory-included locking power cord to con- nect this socket to a mains outlet. The catch holds the cord in place, preventing accidental unplugging. You must release the yellow catch on the bottom of the plug before you can unplug the cord. Note: This socket also accepts a standard Euro mains cable, but it will not lock it in place.9
2.2 Setting Up and Connecting
the Cabinet Connect cords routed from your mixer (monitor out, line out, or a similar output) to the balan- ced Input sockets using a cord equipped with standard XLR microphone connectors. Then connect the active satellites to the XLR outputs labeled X-Over Out. Use the two Through ports to feed the fullrange signal to other enclosures. Make sure the XLR connectors’ terminals are configured as follows: 1= ground, 2= +, 3= -. If only one Input signal is available, select “Input L”. To get full power out of the system, connect “Through L” with “Input R” via XLR cords.
2.3 Operating Speakers
- First make sure the powered cabinet is off. CAUTION! Connect the cabinet to the mains supply only after you are certain the local mains voltage matches the voltage specified on the rear panel. If you connect the system to the wrong mains voltage, you may destroy the electronic components of the PREMIUM PR:O active cabinet.
- Back the Gain knobs all the way off, turning them counterclockwise as far as they will go. Ensure you first switch on all other connected components, for example, a connected mixing console as well as all signal sources patched into it, such as keyboards, instrument amps, effects and so forth. Always connect PREMIUM PR:O active cabinets to Line Out Mid/High, and always switch them on last; that is, after you switch on all other connected components. When you powering down, first turn the Gain knobs to the far left and switch active cabinets off first, before switching off any connected devices. After you power the system up by engaging the Power switch, a system check prompts the fan to briefly kick on and back off again in about five seconds. The fan is temperature-controlled, actuating only at very high volumes and tempe- ratures requiring cooling.
- The Power LED lights up green when the cabi- net receives mains power. Set the Gain Line In knob to the center or 12 o’clock position (= 0 dBV). This is the preferred level if you have connected a mixer to the PRE- MIUM PR:O active cabinet. You can boost the input level 6 dB by turning up the Gain knob For the best audio results, ensure the Limiter LED (red) does not light up continuously.
Adjusting volume with the Gain knob Twist this knob to adjust microphone and line signal levels. CAUTION: Never tape over the plug’s ground terminal – this endangers lives! If you hear distortion or saturated signals, first check the signal sources and, if possible, red- uce the output signal level there. If you cannot adjust the level of the signal routed to the PRE- MIUM PR:O active cabinet at the source, match it to the power amps by backing off the Gain knob to lower the input level. English
9PREMIUM PR:O Active 1.4 3 Tips and Tricks 1 Do not expose electronic circuitry to moisture! Protect cabinets against rain when you set them up outdoors. Keep soft drinks, beer, and any other liquids away from the electronic components to prevent short circuits. 2 PREMIUM PR:O active enclosures provide opti- mum sound to you, so be sure to provide optimum input signals to them! Noise such as humming is generally caused by defective cables, the wrong type of cords, or unbalanced signals routed into the mixing console. Check all signal and mains cables. 3 Prevent distortion! Not only is it unpleasant to your audience’s ears, it also endangers your equipment. Make sure all components that are connected directly and indirectly to PREMIUM PR:O active cabinets have sufficient power ratings, and that they don’t distort because they‘re running at their respective limits. Ensure all sources deliver clean audio signals. 4 Avoid ground loops! Annoying humming can arise even within audio systems with balanced circuits, for example, when the mixing console’s mains cord isn’t connected and grounded to the same mains circuit as PREMIUM PR:O active enclosures. Using two different ground circuits can create a ground loop. To prevent this problem, always connect PREMIUM PR:O active enclosures and the mixing console to the same electrical circuit; that is, the same phase! CAUTION: Never tape over the plug’s ground terminal - this endangers lives! 4 Troubleshooting The POWER LED does not light up when switched on.
- Check if the mains cord is plugged into the Mains Input.
- Check if the mains power supply is providing current. The Power LED lights up red, flashing intermittently.
- The Limiter has actuated; lower the input level if necessary. The Power LED lights up red continuously, but no sound is issuing from the cabinet.
- The enclosure’s protective circuit has tripped. Please contact your authorized dealer. The rendered music sounds distorted.
- Check your mixing console’s LED meters. They should not be constantly in the red. If necessary, back off the volume at the mixer.
- If the LED displays on your mixer are in the green, back off the PREMIUM PR:O active cabinet’s Gain knob.
- Observe the Limiter LEDs on the PREMIUM PR:O active enclosure’s control panel. These may light up red, but only intermittently. The red light may not illuminate continuously. If it does, turn down the Gain knob. This is to certify that PR:O 8 A, PR:O 10 XA, PR:O 12 A, PR:O 12 MA, PR:O 15 A, PR:O 15 XA, PR:O 18 Sub A, PR:O 210 Sub A complies with the provisions of the Directive of the Council of the European Communities on the appro- ximation of the laws of the Member States relating to electromagnetic compatibility according to EMC directive 2004/108/EC and low voltage directive 2006/95/EC. This declaration of conformity of the European Com- munities is the result of an examination carried out by the Quality Assurance Department of STAMER GmbH in accordance with European Standards EN61000-6-1, EN61000-6-2, and EN 60065 for low voltage. Magdeburger Str. 8, 66606 St. Wendel Lothar Stamer Dipl.Ing. Managing Director St. Wendel, 01/08/2008 Version 2.0 08/2008 PREMIUM PR:O active System Configurations 2 x PR:O 8 A or 2 x PR:O 10 XA or 2 x PR:O 12 A or 2 x PR:O 15 A or 2 x PRO 15 XA 2 x PR:O 8 A or 2 x PR:O 10 XA or 2 x PR:O 12 A or 2 x PR:O 15 A + 2 x PR:O 18/210 Sub A PR:O 8 A + PR:O 8 or PR:O 10 XA + PR:O 10 XA or PR:O 12 A + PR:O 12 or PR:O 15 A + PR:O 15 or PR:O 15 XA + PR:O 15 X PR:O 10 XA + PR:O 10 X