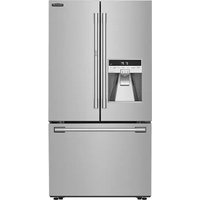
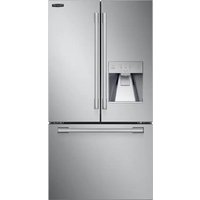
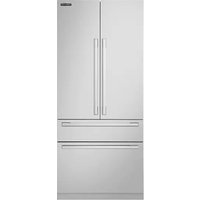
UPSXB2627S - Fridge SIGNATURE - Free user manual and instructions
Find the device manual for free UPSXB2627S SIGNATURE in PDF.

| Product type | Integrated side-by-side refrigerator |
| Brand | Signature |
| Model | UPSXB2627S |
| Power supply | 115 V, 60 Hz, 15/20 A |
| Required water pressure | 138 - 827 kPa (20 - 120 psi) |
| Operating ambient temperature | 0.6 °C to 38 °C (33 °F to 100 °F) |
| Dispenser | Water, cubed ice, crushed ice |
| Ice maker | Automatic, capacity 70-120 cubes/day |
| Water filter | Replacement every 6 months, model ADQ36006101 |
| Lighting | LED (replacement by qualified technician) |
| Auto door close | Yes, up to 60° opening |
| Door alarm | Yes, after 60 seconds of opening |
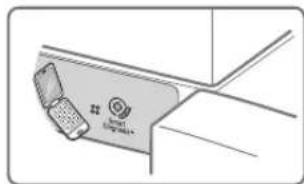
| Smart functions | Wi-Fi, Signature Kitchen Suite app, Smart Diagnosis |
| Control panel | Touch LED with lock |
| Refrigerator capacity | Not specified (estimated ~500 L) |
| Freezer capacity | Not specified (estimated ~180 L) |
| Adjustable shelves | Yes |
| Vegetable crisper | Yes |
| Dairy compartment | Yes |
| Cleaning | Unplug before cleaning; interior: warm soapy water; exterior: mild detergent |
| Safety | Anti-tip bracket, dispenser lock, child safety |
| Warranty | 2 years parts and labor; linear compressor: 10 years parts |
Frequently Asked Questions - UPSXB2627S SIGNATURE
User questions about UPSXB2627S SIGNATURE
0 question about this device. Answer the ones you know or ask your own.
Ask a new question about this device
Download the instructions for your Fridge in PDF format for free! Find your manual UPSXB2627S - SIGNATURE and take your electronic device back in hand. On this page are published all the documents necessary for the use of your device. UPSXB2627S by SIGNATURE.
USER MANUAL UPSXB2627S SIGNATURE
Please read this owner's manual thoroughly before operating and keep it handy for reference at all times.
UPSXB2627*
| SAFETY INSTRUCTIONS | TABLE OF CONTENTS When Connecting the Power 4 When Using the Refrigerator 6 |
| PRODUCT OVERVIEW | Product Overview 11 |
| OPERATION | Starting 12 Adjusting the Temperatures and Functions 12 Control Panel 13 Shelf 19 Freezer Door Bin 19 Dairy Corner 20 Adjustable Door Bin 20 Refrigerator Gallon Bin 21 Refrigerator/Freezer Drawers 21 Upper/Lower Roller Covers 22 Replacing the Water Filter 22 |
| STORING FOOD | Food Storage Guide 24 |
| SMART FUNCTIONS | Smart Functions 26 |
| CARE AND MAINTENANCE | General Information 31 Cleaning 32 Troubleshooting Guide 33 Before Calling for Service 48 |
IMPORTANT SAFETY INSTRUCTIONS
This guide contains many important safety messages. Always read and obey all safety messages.
This is the safety alert symbol. It alerts you to safety messages that inform you of hazards that can kill or hurt you or others or cause damage to the product. All safety messages will be preceded by the safety alert symbol and the hazard signal word DANGER, WARNING, or CAUTION. These words mean:
DANGER
You may be killed or seriously injured if you don't follow instructions immediately.
WARNING
You may be killed or seriously injured if you don't follow instructions.
CAUTION
Indicates an imminently hazardous situation which, if not avoided, may result in minor or moderate injury, or product damage only.
All safety messages will identify the hazard, tell you how to reduce the chance of injury, and tell you what can happen if the instructions are not followed.

WARNING
TIP-OVER HAZARD
Use two or more people to move and install the refrigerator. To prevent the refrigerator from tipping over, install anti-tip brackets (provided). Failure to follow the refrigerator installation instructions can result in serious injury or death.


WARNING
This product contains chemicals known to the State of California to cause cancer and birth defects or other reproductive harm. Wash hands after handling.

WARNING
To reduce the risk of fire, electric shock, or personal injury when using your product, basic safety precautions should be followed, including the following. Read all instructions before using this appliance.
1. When Connecting the Power
Use a dedicated outlet.
- Using several devices at one outlet may cause a fire.
Plug in the power plug with the power cord facing downward.
Failure to do so could damage the plug or cord, resulting in fire or electric shock.
When moving the refrigerator away from the wall, be careful not to roll over or damage the power cord. Do not squeeze or crush the cord or plug when pushing the refrigerator back in.
Doing so could result in fire or electric shock.
Do not allow the power cord to be bent, crushed, or damaged. Do not run the power cord under heavy objects like furniture, other appliances, or through high-traffic areas.
Doing so may damage the power cord and result in fire or electric shock.
Do not extend or modify the length of the power cord.
Use only an exact factory replacement part to avoid electrical issues, fire, or electric shock.
Unplug the power cord or turn off the power when cleaning or moving the refrigerator.
- Failure to do so may cause electric shock or injury.
- Press the POWER button for 3 seconds to turn off the power at display panel.
Do not pull out the cord or touch the power plug with wet hands.
Doing so may cause electric shock or injury.
Remove water or dust from the power plug and insert it securely into the wall socket.
Dust, water, or a loose connection may cause a fire or electric shock.
Do not unplug the refrigerator by pulling on the cord.
Doing so may cause electric shock or short circuit resulting in a fire.
Do not use the power cord or the power plug if it is damaged or if the outlet is damaged.
Doing so may cause electric shock or short circuit resulting in a fire.
Wait for 5 minutes or longer when reconnecting the plug.
Give the compressor time to cycle before re-starting.
If the supply cord is damaged, it must be replaced by the manufacturer or its service agent or a similarly qualified person in order to avoid a hazard.
2. When Using the Refrigerator
Do not place heavy or dangerous objects on the refrigerator.
Opening or closing the door may cause objects to fall, resulting in injury, fire, or electric shock.
Do not install the refrigerator in a damp location or where it will be exposed to running water.
Deterioration of the insulation on electrical parts may result, causing risk of electric shock.
Do not allow children to hang on the refrigerator doors, shelves or drawers.
Doing so may cause serious injury.
Do not allow children to climb into the product.
A child's life could be endangered if the child climbs into the refrigerator.
Opening and closing the door of the refrigerator vigorously may cause the stored food in the door bins to fall.
Do not use or store flammable materials like ether, benzene, alcohol, medicine, LP gas, sprays, or cosmetics near or in the refrigerator.
Doing so may cause explosion or fire.
Do not use a hair drier to dry the inside, nor light a candle to remove odor.
Doing so may cause explosion or fire.
Do not use combustible sprays (including cooking sprays, oils and other aerosol products) on or near the refrigerator.
Doing so may cause a fire.
Do not install the refrigerator near a gas stove, water heater or other source of ignition that may possibly leak gas.
Turn off the refrigerator if you will not be using it for an extended period of time, or in the event of a severe electrical storm.
Press the POWER button for 3 seconds to turn off the power at the control panel.
If your refrigerator is leaking, have it checked by an authorized service technician before operating it.
Failure to follow this warning may cause electric shock or fire.
Do not spray water inside or outside the refrigerator, do not clean it with benzene or thinner.
If the insulation around electrical parts deteriorates, it can result in electric shock or fire.
If a strange smell or smoke is detected from the refrigerator, turn off the refrigerator and contact the service center.
Failure to follow this warning may result in a fire.
Do not allow any person except an authorized servicer to disassemble, repair, or alter the refrigerator.
Doing so may cause injury, electric shock or fire.
This product is not to be used for special purposes such as the storage of medicine or test materials or for use on ships, vehicles, aircraft, etc.
Doing so may cause an unexpected risk such as fire, electric shock, deterioration of stored material, chemical reaction.
When disposing of the refrigerator, remove the packing materials from the door or take off the doors but leave the shelves in place so that children may not easily climb inside.
Child entrapment generally results in death by suffocation.
This appliance is not intended for use by persons (including children) with reduced physical, sensory, or mental capabilities, or lack of experience and knowledge, unless they have been given supervision or instruction concerning use of the appliance by a person responsible for their safety.
Children should be supervised to ensure that they do not play with the appliance.
Install the refrigerator on a solid and level floor.
If the refrigerator tips when opening or closing the door, it could fall over, causing property damage and personal injury.
Do not put hands, feet, or metal objects into the air vents or cover, or below or behind the refrigerator.
Doing so may result in electric shock or injury.
Do not step on the pipe under the freezer door.
Doing so may cause electric shock or injury.
Supply the automatic icemaker with drinkable water.
Non-potable water can cause health risks.
If connected to a circuit protected by fuses, use time delay fuse.

CAUTION
Do not insert hands into the ice bucket or the ice dispenser.
Doing so may cause injury.
Do not touch food or containers in the freezer with wet hands.
Doing so may cause frostbite.
Do not put ice in a thin crystal cup or ceramic ware.
The glass may shatter and present a hazard.
If power goes out, remove ice from ice bin.
Ice will melt and water will leak onto floor. Dump ice if power is out for a long period.
Do not remove the cover of the automatic ice dispenser.
The internal mechanism of the icemaker can cause injury if handled.
Place food items and containers carefully on the shelves in the refrigerator.
Opening and closing the door may cause food to fall, resulting in injury.
Do not put glass bottles or containers in the freezer.
Contents may break the bottle when frozen, causing risk of injury.
Do not stick your hands under the refrigerator.
Sharp edges, fans, and wires may cause an injury.
Close the door carefully when children are near.
Keep fingers out of pinch point areas; clearances between the doors and cabinets are necessarily small.
Do not put live animals into the refrigerator.
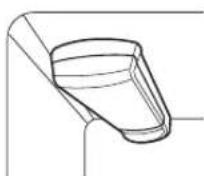
Product Overview
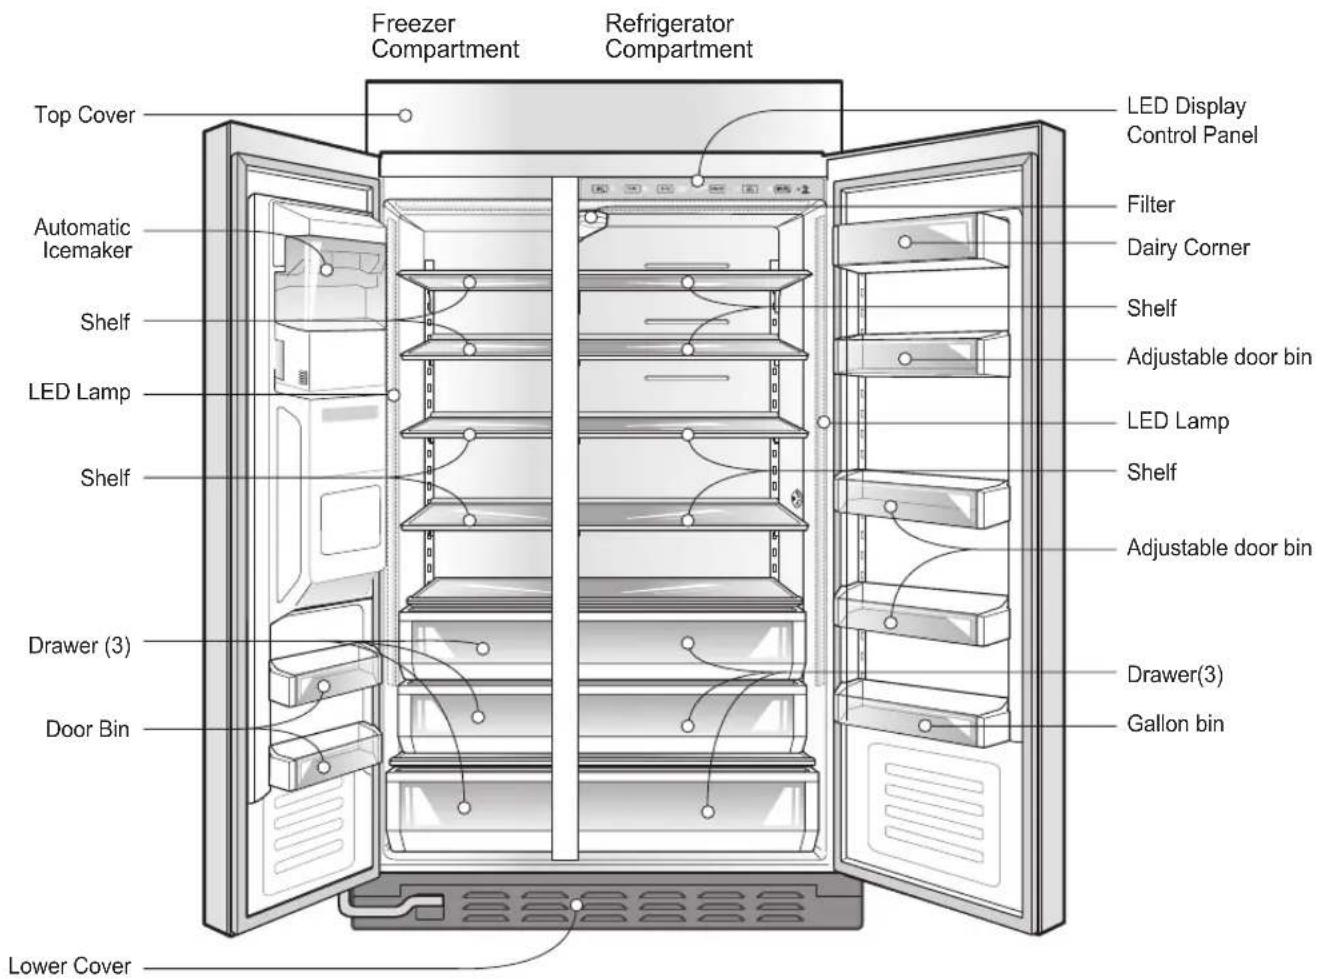
Starting
When the refrigerator is first installed, allow it to stabilize at normal operating temperatures for 2-3 hours prior to filling it with fresh or frozen foods. If operation is interrupted, wait 5 minutes before restarting.
Adjusting the Temperatures and Functions

LED Display Control Panel
Control Panel
LED Display Control Panel
| ① Power ① ② Ice Plus ③ Freezer Refrigerator 37°F Refrigerator 37°F | The Power button turns off all electrical power to the unit. Press and hold the Power button for 3 seconds to turn off the power. When the power is off, the indicator light is off. There is no need to turn off power at the circuit breaker or wall receptacle. Use this function for service or extended vacations. Press the Ice Plus button once to activate the Ice Plus function. The Ice Plus icon on the display panel illuminates when activated. The Ice Plus function runs the freezer compartment at the coldest setting for a 24-hour period to increase icemaking by up to 20%, and then turns off automatically. NOTE • Press the button again to cancel the Ice Plus function. To adjust the temperature in the freezer compartment, press the Freezer button to cycle through the range of available settings. To adjust the temperature in the refrigerator compartment, press the Refrigerator button to cycle through the range of available settings. NOTE • The actual inner temperature varies depending on the food status, since the indicated temperature setting is the target temperature and not the actual temperature within the refrigerator. Initially set the REFRIGERATOR CONTROL at 37 °F and the FREEZER CONTROL at 0 °F. Leave them at these settings for 24 hours (one day) to stabilize. Then adjust the compartment temperature as illustrated above. • To change temperature display from Fahrenheit to Celsius press and hold the Freezer and Refrigerator buttons simultaneously for approximately 5 seconds. Do the same to convert back to Fahrenheit. |
| Operation | |
| ⑤ Door Alarm | The Door Alarm sounds three times at 30-second intervals when a compartment door is left open for more than 60 seconds. The alarm stops sounding when the door is closed. Press the Door Alarm button once to activate or deactivate the door alarm function. |
| NOTE • Contact your local service center if the alarm continues to sound after the doors are closed. | |
| ⑥ Water Filter | Press and hold the Water Filter button for approximately 3 seconds to reset the filter indicator after the water filter has been replaced. |
| NOTE • Replace the water filter approximately every 6 months, when the water filter indicator light reaches 0 or if the ice or water starts to taste bad. | |
| ⑦ Smart Diagnosis | Use during the Smart Diagnosis™ feature. |
⑧ Connect
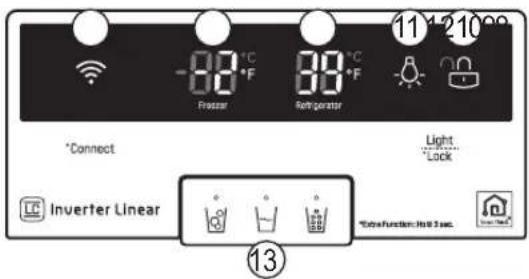
Dispenser Control Panel
⑩ Refrigerator
⑨ Freezer
⑪ Light
12 Lock
Dispenser Selection Indicator
Dispensing Cubed Ice
Dispensing Water
Dispensing Crushed Ice
Use the Connect button with the Signature Kitchen Suite Smart Refrigerator smart phone app to connect the refrigerator to a home Wi-Fi network. Refer to the Smart Features section of the manual for information on the initial setup of the application. The Connect icon displays the status of the refrigerator's network connection. When the refrigerator is connected to the network, the Connect icon is illuminated. Press and hold the Connect button for 3 seconds to connect to the network. The icon blinks while the connection is being made, then turns on once the connection is successfully made. To disconnect, press and hold the button again.
Freezer temperature indicator.
Refrigerator temperature indicator.
When Light is pressed the dispenser light turns on and the indicator appears on the LED display.
Press and hold the Lock button for three seconds to lock the dispenser and all of the other control panel functions. Press and hold again for 3 seconds to unlock.
Displays whether the dispenser is set to dispense water, cubed or crushed ice.
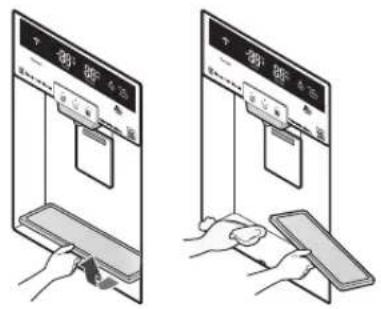
Press the dispenser selection button repeatedly until the cubed ice icon illuminates. Press the dispenser switch with a glass or other container to dispense cubed ice.
Press the dispenser selection button repeatedly until the water icon illuminates. Press the dispenser switch with a glass or other container to dispense water.
Press the dispenser selection button repeatedly until the crushed ice icon illuminates. Press the dispenser switch with a glass or other container to dispense crushed ice.
CAUTION
NOTE
-
Hold the glass or other container in place for a couple of seconds after dispensing ice or water to catch the last few cubes or drops. The dispenser is designed to not operate while either refrigerator door is open.
-
Hold the container as close to the ice or water chute as possible to avoid spilling and splashing.
- Do not dispense ice into fine china or crystal glasses. China or crystal can be broken.
Cleaning
The water collector has no self-drainage function, so it should be cleaned regularly. Remove the cover by pulling the front of the water collector cover and dry it with a cloth.
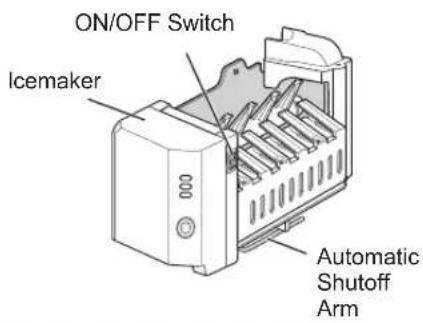
Automatic Icemaker
- The automatic icemaker can automatically make 6 cubes at a time, 70 120 pieces per day. This quantity may vary by circumstance, including ambient temperature, door opening, freezer load, etc.
- Icemaking stops when the ice storage bin is full.
- To turn the icemaker off, turn the icemaker switch to OFF. To turn the icemaker back on, turn the switch to ON.
Icemaker Not Working Properly
NOTE
- It is normal to hear noise when ice drops into the ice storage bin.
- Occasionally shake the ice storage bin so that the ice does not pile higher on one side. If the ice piles up high next to the ice maker, ice production will stop.
Ice is Lumped Together
- When ice is lumped together, take the ice lumps out of the ice storage bin, break them into small pieces, and return the pieces to the ice storage bin.
- When the ice produced by the icemaker is too small or is lumped together, the amount of water supplied to the icemaker may need to be adjusted. Contact the service center.
If ice is not used frequently, it may lump together.
Power Failure
- Ice may drop into the freezer compartment. Take the ice storage bin out and discard all the ice. Dry the ice bin and place it back in the freezer.
The Refrigerator is Newly Installed
- It takes about 12 hours for a newly installed refrigerator to make ice.
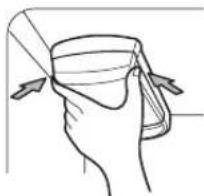
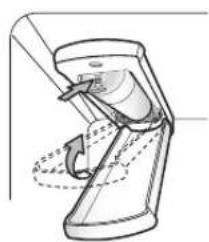
How to remove and reinstall the ice storage bin
Remove
- Grip the handle as shown in the figure 1.
BIN
- Lift the lower part slightly
Take the Ice Storage bin out slowly
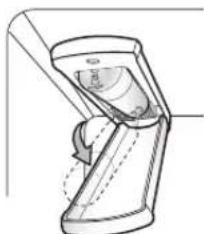
Cover
- Lift up the cover
Watch the hooks inside of cover.
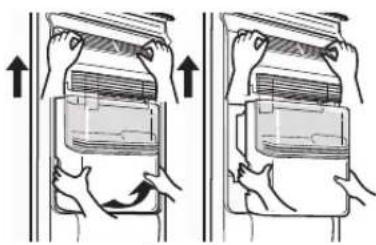
figure 1
Reinstall (Bin&Cover)
Assembly is the reverse order of disassembly.
- You will hear the bin snap into place when it is in the correct position.
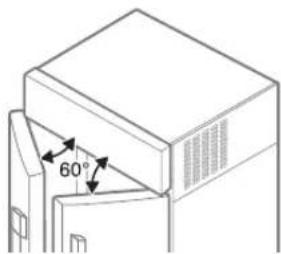
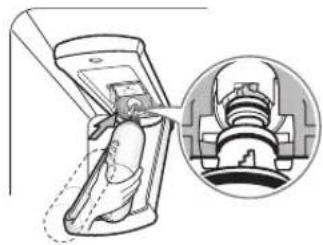
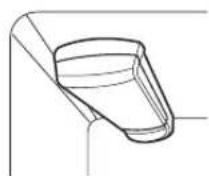
Auto-Closing Door System
WARNING
- Do not dismantle the ice storage bin unless it is necessary.
- Use both hands to remove the ice bin to avoid dropping it.
- Do not touch the ejector mechanism with hands or tools. It may damage the icemaker or hurt your hands (figure 2).
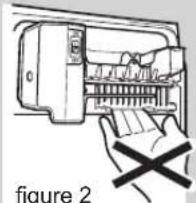
figure 2
The doors automatically close when in the 60 degree position.
NOTE
- This function is performed by a spring-damper mechanism. Closing speed and strength depends on the ambient temperature, frequency of door opening/closing and contents of the door bins.
Other Functions
Open Door Alert
- A warning tone will sound 3 times at thirty-second intervals if the refrigerator or freezer door is left open for more than sixty seconds.
- Please contact a local service center if the warning continues to sound after the door is closed.

CAUTION
Throw away the first few batches of ice (about 24 cubes) and water (about 7 glasses) first made after refrigerator installation.
The first ice and water may include particles or odor from the feed water pipe or feed water box. This is also necessary if the refrigerator has not been used for a long time.
Children should be supervised when using the dispenser.
Be careful that frost does not block the ice passage.
The ice passage may become blocked with frost if only crushed ice is used.
Remove the frost that accumulates by removing the ice bin and clearing the passage with a rubber spatula. Dispensing cubed ice can also help prevent frost buildup.
Never store beverage cans or other items in the ice bin for the purpose of rapid cooling.
Doing so may damage the icemaker or the containers may burst.
Never use thin crystal glass or crockery to collect ice.
Such containers may chip or break resulting in glass fragments in the ice.
Dispense ice into a glass before filling it with water or other beverages.
Splashing may occur if ice is dispensed into a glass that already contains liquid.
To avoid personal injury, keep hands out of the ice door and passage.
Part breakage or injury may occur.
Never remove the icemaker cover.
If discolored ice is dispensed, check the water filter and water supply. If the problem continues, contact service center. Do not use the ice or water until the problem is corrected.
Never use a glass that is exceptionally narrow or deep.
Ice may jam in the ice passage and refrigerator performance may be affected.
Keep the glass at a proper distance from the ice outlet.
A glass held too close to the outlet may prevent ice from dispensing.
| Operation | |
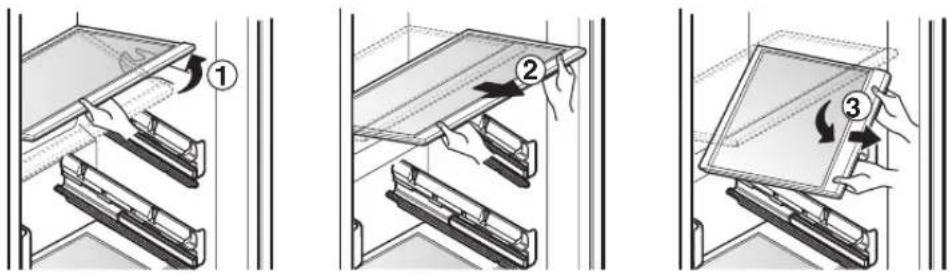
| Disassembling | Shelf The shelves in the refrigerator are adjustable to meet individual storage needs. 1. Lift the front of the shelf slightly. 2. While supporting the shelf, tilt it and pull it out. Tilt the front of the shelf up and guide the shelf hooks into the slots at a desired height. Then, lower the front of the shelf so that the hooks drop into the slots. Make sure that shelves are level from one side to the other. Failure to do so may result in the shelf falling or food spilling. Freezer Door Bin Use to store small packaged frozen food. Do not use door bins to store ice cream or for long-term food storage. |
| Reassembling | |
| CAUTION | |
| Disassembling | Hold the bin with both hands and slightly lift up the front part to pull the bin out. Hold the bin with both hands and slightly lift up the front part to pull the bin out. Hold the bin with both hands and slightly lift up the front part to pull the bin out. |
| Reassembling |
Dairy Corner
Use to store dairy goods like butter and cheese.
Disassembling
To remove the dairy corner, simply lift it up and pull straight out.
- Close the dairy corner completely after use. The refrigerator door may not close properly if the dairy corner is left open.
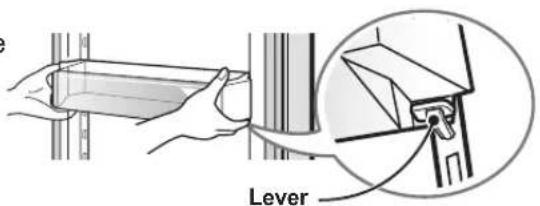
Adjustable Door Bins
Disassembling
Use to store small, packaged refrigerated food or beverages such as milk, canned drinks, etc. The adjustable door bins are removable for easy cleaning and adjustment.
You must remove the dairy corner before disassembling the adjustable door bin.
To remove the door bin, pull the levers on each side and pull the bin up off of the rail.
Reassembling
Before reassembling the adjustable door bin, remove the dairy corner.
Hold the door bin with both hands and place it on top of the rail. Push the basket down while holding the lever under the bin. The bin clicks when it is in the correct position.

CAUTION
- Always disassemble/assemble the adjustable door bin using two hands.
Make sure that the adjustable door bins are empty before disassembling/ assembling them.
| Operation | Refrigerator Gallon Bin For storing larger containers, such as gallons of milk. Hold the bin with both hands, lift up and pull out. Holds the bin with both hands and click it into place, one side at a time. Refrigerator/Freezer Drawers For convenient storage of items like fruits, vegetables and packaged frozen food. |
| Disassembling | |
| Reassembling | |
| Disassembling | |
| CAUTION | 1. Hold the front handle of the drawer and pull it out until it stops. 2. When you cannot pull out the drawer any more, lift it up slightly to pull it out. 3. The lower compartment under the drawer is also removable. The drawer is reassembled in the reverse order. - Always disassemble the drawers using two hands. Make sure that the drawers are empty before removing them. |
| Reassembling the Lower Compartment | 1. Slide both rails in simultaneously. 2. Hook the support ① into the rail tabs ② on both sides. 3. Lower the front of the compartment. The compartment clicks when it is in the correct position. |
Disassembling
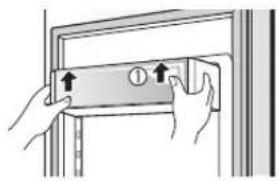
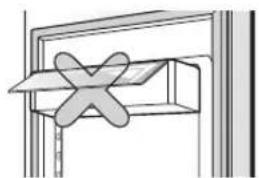
Upper/Lower Drawing Covers
- Lift the front of the cover slightly, then lift the back of the cover from below.
- Pull the cover forward firmly.
- Tilt the cover up 45^ and remove it.
The cover is reassembled in the reverse order.

CAUTION
Never wash the inside accessories of the appliance in the dishwasher. They must be cleaned by hand.
Replacing the Water Filter
Replace the water filter:
- Approximately every six months.
- When the water filter indicator turns on.
- When the water dispenser output decreases.
- When the ice cubes are smaller than normal.
-
Remove the old water filter.
-
Lower or remove the top left shelf to allow the water filter to rotate all the way down.
- Press the push button to open the water filter cover.
NOTE
- Replacing the water filter causes a small amount of water (around 1 oz. or 25 cc) to drain. Place a cup under the front end of the water filter cover to collect any leaking water. Hold the water filter upright, once it is removed, to prevent any remaining water from spilling out of the water filter.
- Pull the water filter downward and pull out.
Make sure to rotate the filter down completely before pulling it out of the manifold hole.
-
Replace with a new water filter.
-
Take the new water filter out of its packing and remove the protective cover from the o-rings. With water filter tabs in the horizontal position, push the new water filter into the manifold hole until it stops.
- Rotate the water filter up into position and close the cover. The cover clicks when closed correctly.
-
After the water filter is replaced, dispense 2.5 gallons of water (flush for approximately 5 minutes) to remove trapped air and contaminants from the system. Do not dispense the entire 2.5 gallon amount continuously. Depress and release the dispenser pad for cycles of 30 seconds ON and 60 seconds OFF.
-
Water Filter Bypass Plug
-
Keep the water filter bypass plug. You MUST use the water filter bypass plug when a replacement water filter cartridge is not available.

CAUTION
DO NOT operate refrigerator without water filter or water filter bypass plug installed.
NOTE
-
To purchase a replacement water filter:
-
Visit your local dealer or distributor
-
Web: Find Parts & Accessories from Support section of the signaturekitchen.com
-
Call: 1-855-790-6655 (USA)
-
Part number of the replacement water filter: ADQ36006101
Freezer Compartment Shelf
Freezer Compartment Door Bin
Freezer Compartment Printer
Dairy Corner
Refrigerator Compartment Shelf
Refrigerator Compartment Door Bin
VegetableDrawer
Food Storage Guide
(Refer to the Product Overview for identification of parts.)
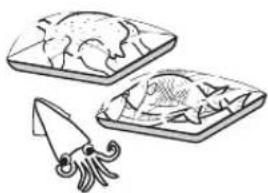
Store various frozen foods such as meat, fish, ice cream, frozen snacks, etc.
-
Store small packed frozen food.
-
The temperature in the door bins is likely to increase as the door opens; therefore, do not store long-term foods such as ice cream in the door bins.
-
Store meat, fish, chicken, etc. after wrapping them with thin foil.
-
Store dry.
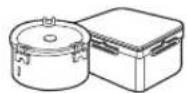
Store dairy products such as cheese and butter.
Store side dishes or other foods at a proper distance.
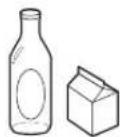
Store small packed food or beverages such as milk, juice, etc.
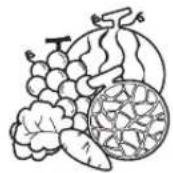
Store vegetables or fruits.
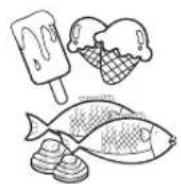

Freezer compartment
Refrigerator compartment
Food storage guide
- Store fresh food in the refrigerator compartment. How food is frozen and thawed is an important factor in maintaining its freshness and flavor.
- Do not store food that spoils quickly, such as bananas and melons, at low temperatures.
- Allow hot food to cool prior to storing it in the refrigerator. Placing hot food in the refrigerator could spoil other food and lead to a higher energy consumption.
- Tightly wrap food or store it in a container with a lid.
- Do not block air vents with food. Smooth circulation of chilled air keeps refrigerator temperatures even.
- Do not open the door frequently. Opening the door lets warm air enter the refrigerator and causes temperatures to rise.
-
Do not overfill the door bins.
-
Do not store bottles or glass in the freezer compartment. They may break or shatter.
- Do not refreeze food that has been thawed. This causes loss of taste and nutrients.
- When storing frozen food for an extended period of time, such as ice cream, keep it on a shelf, not in a door bin.
- Do not touch frozen containers made of metal with wet hands.
- Always clean food prior to refrigerating. Vegetables and fruits should be washed and dried. Packed food should be wiped to prevent adjacent food from spoiling.
- When storing eggs in their storage rack or box, ensure that they are fresh, and always store them in an upright position.
NOTE
- If you keep the refrigerator in a hot and humid place, frequent opening of the door or storing a lot of vegetables in it may cause condensation to form which has no effect on its performance. Remove the condensation with a paper or kitchen towel.
Application Installation
Product Registration
Smart Functions
Search for the SIGNATRE KITCHEN SUITE application from the Google Play Store on a smart phone. Follow instructions to download and install the application.
- Run the SIGNATRE KITCHEN SUITE application on a smart phone.
- Create an account and sign in.
- Select Register.
- Select Refrigerator.
-
Follow the instructions on the smart phone to register the appliance and connect it to a Wi-Fi network.
-
To verify the Wi-Fi connection, check the Wi-Fi icon on the control panel is lit.
NOTE
- SIGNATRE KITCHEN SUITE is not responsible for any network connection problems or any faults, malfunctions, or errors caused by network connection.
- The machine supports 2.4 GHz Wi-Fi networks only.
- If the appliance is having trouble connecting to the Wi-Fi network, it may be too far from the router. Purchase a Wi-Fi repeater (range extender) to improve the Wi-Fi signal strength.
- The Wi-Fi connection may not connect or may be interrupted because of the home network environment.
- The network connection may not work properly depending on the internet service provider.
- The surrounding wireless environment can make the wireless network service run slowly.
- This information is current at the time of publication. The application is subject to change for appliance improvement purposes without notice to users.
Using the Wi-Fi Function
Communicate with the appliance from a smart phone using the convenient smart features.
Using the Application
- Select the appliance in the application and connect it to a Wi-Fi network.
- Select the menu on the upper right side to access settings and features.
Firmware Update
Keep the appliance performance updated.
Manage Food
This feature helps track items in the refrigerator and freezer, sends alerts when items are near their use by dates, generates grocery lists, and links to related recipes.
Smart DiagnosisTM
This function provides useful information for diagnosing and solving issues with the appliance based on the pattern of use.
Settings
Allows you to set various options on the refrigerator and in the Application.
Open Source Software Notice Information
To obtain the source code under GPL, LGPL, MPL, and other open source licenses, that is contained in this product, please visit http://opensource.thesignaturekitchen.com. In addition to the source code, all referred license terms, warranty disclaimers and copyright notices are available for download.
SIGNATURE KITCHEN SUITE will also provide open source code to you on CD-ROM for a charge covering the cost of performing such distribution (such as the cost of media, shipping, and handling) upon email request to opensource@ thesignaturekitchen.com. This offer is valid for three (3) years from the date on which you purchased the product.
| Wireless module (LCW-003) Specifications | |
| Frequency Range 2412~24 | 62 MHz |
| Output Power (max.) IEEE | 802.11 b : 14 dBm IEEE 802.11 g : 15 dBm IEEE 802.11 n : 14 dBm |
FCC Notice (For transmitter module contained in this product)
with the limits for a Class B digital device, pursuant to Part 15 of the FCC Rules. These limits are designed to provide reasonable protection against harmful interference in a residential installation. This equipment generates, uses, and can radiate radio frequency energy and, if not installed and used in accordance with the instructions, may cause harmful interference to radio communications. However, there is no guarantee that interference will not occur in a particular installation. If this equipment does cause harmful interference to radio or television reception, which can be determined by turning the equipment off and on, the user is encouraged to try to correct the interference by one or more of the following measures:
- Reorient or relocate the receiving antenna.
- Increase the separation between the equipment and the receiver.
- Connect the equipment to an outlet on a circuit different from that to which the receiver is connected.
This device complies with part 15 of the FCC Rules. Operation is subject to the following two conditions:
1) this device may not cause harmful interference and
2) this device must accept any interference received, including interference that may cause undesired operation of the device.
Any changes or modifications in construction of this device which are not expressly approved by the party responsible for compliance could void the user's authority to operate the equipment.- Consult the dealer or an experienced radio/TV technician for help.
- Reorient or relocate the receiving antenna.
FCC RF Radiation Exposure Statement
This equipment complies with FCC radiation exposure limits set forth for an uncontrolled environment. This transmitter must not be co-located or operating in conjunction with any other antenna or transmitter.
This equipment should be installed and operated with minimum distance 20cm (7.8 inches) between the antenna and your body. Users must follow the specific operating instructions for satisfying RF exposure compliance.
Smart Functions
Industry Canada Statement (For transmitter module contained in this product)
This device complies with Industry Canada's licence-exempt RSSs. Operation is subject to the following two conditions:
1) this device may not cause interference; and
2) this device must accept any interference, including interference that may cause undesired operation of the device.
This Class B digital apparatus complies with Canadian ICES-003.
IC Radiation Exposure Statement
This equipment complies with IC radiation exposure limits set forth for an uncontrolled environment. This equipment should be installed and operated with minimum distance 20~cm (7.8 inches) between the antenna & your body.
NOTE
- The manufacturer is not responsible for any radio or TV interference caused by unauthorized modifications to this equipment. Such modifications could void the user's authority to operate the equipment.
Using Smart DiagnosisTM
Should you experience any problems with the appliance, it has the capability of transmitting data to a smart phone using the SIGNATRE KITCHEN SUITE application or via the phone to the Signature Kitchen Suite call center.
Smart Diagnosis™ can not be activated unless the appliance is connected to power. If the appliance is unable to turn on, then troubleshooting must be done without using Smart Diagnosis™.
Smart Diagnosis™ Using a Smart Phone
- Open the SIGNATRE KITCHEN SUITE application on the smart phone.
- Select the appliance and then the menu on upper right side.
- Select the Smart Diagnosis, then press Start Smart Diagnosis button.
NOTE
-
If the diagnosis fails several times, use the following instructions.
-
Select the Audible Diagnosis.
- Follow the instructions on the smart phone.
- Keep the phone in place until the tone transmission has finished. View the diagnosis on the phone.
NOTE
The Smart DiagnosisTM function depends on the local call quality.
- The communication performance will improve and you can receive better service if you use the home phone.
- If the Smart Diagnosis™ data transfer is poor due to poor call quality, you may not receive the best Smart Diagnosis™ service.
Smart Diagnosis™ Through the Customer Information Center
- Call the Signature Kitchen Suite call center at: 1-855-790-6655
-
Open the right refrigerator door.
-
If the door has been opened for over one minute, close all refrigerator doors and open the right refrigerator door again.
-
Hold the mouthpiece of the phone in front of the speaker that is located on the right hinge of the refrigerator door, when instructed to do so by the call center.
-
Make sure the microphone of the handset is facing the speaker hole.
-
Press and hold the Freezer button for three seconds while continuing to hold the phone to the speaker.
-
After the display screen goes off, release the freezer button.
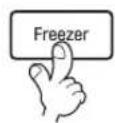

- Keep the phone in place until the tone transmission has finished.
This takes about 3 seconds, and the display will count down the time. Once the countdown is over and the tones have stopped, resume your conversation with the specialist, who will then be able to assist you in using the information transmitted for analysis.
NOTE
- For best results, do not move the phone while the tones are being transmitted.
- If the call center agent is not able to get an accurate recording of the data, you may be asked to try again.
| Vacation Time | General information If you choose to leave the refrigerator on while you are away, follow these steps to prepare the refrigerator before you leave. 1. Use up any perishables and freeze other items. 2. Turn off the icemaker and empty the ice bin. If you choose to turn the refrigerator off before you leave, follow these steps. 1. Remove all food from the refrigerator. 2. Depending on your model, set the thermostat control (refrigerator control) to OFF. 3. Clean the refrigerator, wipe it and dry well. 4. Tape rubber or wood blocks to the tops of both doors to prop them open far enough for air to get in. This stops odor and mold from building up. |
| Power Failure | 1. If the power will be out for 24 hours or less, keep all refrigerator doors closed to help foods stay cold and frozen. 2. If the power will be out for more than 24 hours, remove all frozen food and store it in a frozen food locker. |
| Anti-Condensation Pipe | The outside wall of the refrigerator cabinet may sometimes get warm, especially just after installation. This is due to the anti-condensation pipe, which pumps hot refrigerant to prevent sweating on the outer cabinet wall. |
| Replacing LED Lighting | Check to make sure that the LED lamp is turned on. - LED lamp is not a user-serviceable item. If the LED array fails, contact Signature Kitchen Suite call center for service. |
| Care and Maintenance | |
| WARNING | Cleaning Keep the refrigerator clean to prevent undesirable odors. Wipe up spilled food immediately, since it may acidify and stain plastic surfaces if allowed to settle. |
| Always unplug the refrigerator prior to cleaning. Wipe up excess moisture with a sponge or cloth to prevent water or liquid from getting into any electrical part and causing an electric shock. Never use metallic scouring pads, brushes, coarse abrasive cleaners, strong alkaline solutions, or flammable or toxic cleaning liquids on any surface. Do not touch frozen surfaces with wet or damp hands, because skin could stick to extremely cold surfaces. | |
| Exterior | Use a lukewarm solution of mild soap or detergent to clean the durable finish of the refrigerator. Wipe with a clean damp cloth and then dry. |
| Interior | Clean the interior regularly. Wash all compartments using a baking soda solution or a mild detergent and warm water. Rinse and dry. |
| After Cleaning | NOTE ·Do not clean the lower drawers in a dishwasher. The high temperature may damage the bins and make them unusable. |
| Verify that the power cord is not damaged or overheated. Insert power plug completely into outlet. | |
Troubleshooting Guide
COOLING
Before conducting troubleshooting, make sure that the following basic requirements are met:
| Service Flow | 0.5 gpm (1.9 lpm) |
| Water Supply | Potable Water |
| Water Pressure | 20-120 psi (138 - 827 kPa) |
| Operating Ambient Temperature Limits | 33°F - 100°F (0.6 °C - 38 °C) |
| Electrical Ratings | 115 Volts, 60 Hz, AC only, and fused at 15 or 20 amperes. |
Problem Possible Causes Solutions
Refrigerator and Freezer section are not cooling.
The refrigerator control is set to OFF (some models).
Turn the control ON. Refer to the Setting the Controls section for proper temperature settings.
Refrigerator is set to demo mode.
Demo Mode allows the lights and control display to work normally while disabling cooling to save energy while on the showroom floor. Refer to the Setting the Controls section for instructions on how to disable Demo Mode.
Refrigerator is in the defrost cycle.
During the defrost cycle, the temperature of each compartment may raise slightly. Wait 30 minutes and confirm the proper temperature has been restored once the defrost cycle has completed.
Refrigerator was recently installed.
It may take up to 24 hours for each compartment to reach the desired temperature.
Refrigerator was recently relocated.
If the refrigerator was stored for a long time or moved on its side, it is necessary for the refrigerator to stand upright for 24 hours before connecting it to power.
Problem Possible Causes Solutions
| Cooling System runs too much. | Refrigerator is replacing an older model. | Modern refrigerators require more operating time but use less energy due to more efficient technology. |
| Refrigerator was recently plugged in or power restored. | The refrigerator will take up to 24 hours to cool completely. | |
| Door opened often or a large amount of food / hot food was added. | Adding food and opening the door warms the refrigerator, requiring the compressor to run longer in order to cool the refrigerator back down. In order to conserve energy, try to get everything you need out of the refrigerator at once, keep food organized so it is easy to find, and close the door as soon as the food is removed. (Refer to the Food Storage Guide.) | |
| Doors are not closed completely. | Firmly push the doors shut. If they will not shut all the way, see the Doors will not close completely or pop open section in Parts & Features Troubleshooting. | |
| Refrigerator is installed in a hot location. | The compressor will run longer under warm conditions. At normal room temperatures (70°F) expect your compressor to run about 40% to 80% of the time. Under warmer conditions, expect it to run even more often. The refrigerator should not be operated above 110°F. | |
| Condenser / back cover is clogged. | Use a vacuum cleaner with an attachment to clean the condenser cover and vents. Do not remove the panel covering the condenser coil area. |
Refrigerator or Freezer section is too warm.
Problem Possible Causes Solutions
| Refrigerator was recently installed. | It may take up to 24 hours for each compartment to reach the desired temperature. |
| Air vents are blocked. | Rearrange items to allow air to flow throughout the compartment. Refer to the Airflow diagram in the Using Your Refrigerator section. |
| Doors are opened often or for long periods of time. | When the doors are opened often or for long periods of time, warm, humid air enters the compartment. This raises the temperature and moisture level within the compartment. To lessen the effect, reduce the frequency and duration of door openings. |
| Unit is installed in a hot location. | The refrigerator should not be operated in temperatures above 110°F. |
| A large amount of food or hot food was added to either compartment. | Adding food warms the compartment requiring the cooling system to run. Allowing hot food to cool to room temperature before putting it in the refrigerator will reduce this effect. |
| Doors not closed correctly. | See the Doors will not close correctly or pop open section in Parts & Features Troubleshooting. |
| Temperature control is not set correctly. | If the temperature is too warm, adjust the control one increment at a time and wait for the temperature to stabilize. Refer to the Setting the Controls section for more information. |
| Defrost cycle has recently completed. | During the defrost cycle, the temperature of each compartment may raise slightly and condensation may form on the back wall. Wait 30 minutes and confirm the proper temperature has been restored once the defrost cycle has completed. |
Problem Possible Causes Solutions
| Interior moisture buildup. | Doors are opened often or for long periods of time. | When the doors are opened often or for long periods of time, warm, humid air enters the compartment. This raises the temperature and moisture level within the compartment. To lessen the effect, reduce the frequency and duration of door openings. |
| Doors not closed correctly. | See the Doors will not close correctly section in the Troubleshooting section. | |
| Weather is humid. | Humid weather allows additional moisture to enter the compartments when the doors are opened leading to condensation or frost. Maintaining a reasonable level of humidity in the home will help to control the amount of moisture that can enter the compartments. | |
| Defrost cycle recently completed. | During the defrost cycle, the temperature of each compartment may raise slightly and condensation may form on the back wall. Wait 30 minutes and confirm that the proper temperature has been restored once the defrost cycle has completed. | |
| Food is not packaged correctly. | Food stored uncovered or unwrapped, and damp containers can lead to moisture accumulation within each compartment. Wipe all containers dry and store food in sealed packaging to prevent condensation and frost. |
COOLING/ICE & WATER
Problem Possible Causes Solutions
| Food is freezing in the refrigerator compartment. | Food with high water content was placed near an air vent. | Rearrange items with high water content away from air vents. |
| Refrigerator temperature control is set incorrectly. | If the temperature is too cold, adjust the control one increment at a time and wait for the temperature to stabilize. Refer to the Setting the Controls section for more information. | |
| Refrigerator is installed in a cold location. | When the refrigerator is operated in temperature below 41°F (5°C), food can freeze in the refrigerator compartment. The refrigerator should not be operated in temperature below 55°F (13°C). | |
| Frost or ice crystals form on frozen food (outside of package). | Door is opened frequently or for long periods of time. | When the doors are opened often or for long periods of time, warm, humid air enters the compartment. This raises the temperature and moisture level within the compartment. Increased moisture will lead to frost and condensation. To lessen the effect, reduce the frequency and duration of door openings. |
| Door is not closing properly. | Refer to the Doors will not close correctly or pop open section in the Troubleshooting section. | |
| Refrigerator or Freezer section is too cold. | Incorrect temperature control settings. | If the temperature is too cold, adjust the control one increment at a time and wait for the temperature to stabilize. Refer to the Setting the Controls section for more information. |
| Frost or ice crystals on frozen food (inside of sealed package). | Condensation from food with a high water content has frozen inside of the food package. | This is normal for food items with a high water content. |
| Food has been left in the freezer for a long period of time. | Do not store food items with high water content in the freezer for a long period of time. |
Problem Possible Causes Solutions
Icemaker is not making enough ice.
Demand exceeds ice storage capacity.
The icemaker will produce approximately 100 cubes in a 24 hour period.
House water supply is not connected, valve is not turned on fully, or valve is clogged.
Connect the refrigerator to a cold water supply with adequate pressure and turn the water shutoff valve fully open.
Water filter has been exhausted.
If the problem persists, it may be necessary to contact a plumber.
It is recommended that you replace the water filter:
- Approximately every six months.
- When the water filter indicator turns on.
- When the water dispenser output decreases.
- When the ice cubes are smaller than normal.
Low house water supply pressure.
The water pressure must be between 20 and 120 psi on models without a water filter and between 40 and 120 psi on models with a water filter.
If the problem persists, it may be necessary to contact a plumber.
Reverse Osmosis filtration system is used.
Reverse osmosis filtration systems can reduce the water pressure below the minimum amount and result in icemaker issues. (Refer to Water Pressure section.)
Tubing connecting refrigerator to house supply valve is kinked.
The tubing can kink when the refrigerator is moved during installation or cleaning resulting in reduced water flow. Straighten or repair the water supply line and arrange it to prevent future kinks.
ICE & WATER
Problem Possible Causes Solutions
| Icemaker is not making enough ice (continued). | Doors are opened often or for long periods of time. | If the doors of the unit are opened often, ambient air will warm the refrigerator which will prevent the unit from maintaining the set temperature. Lowering the refrigerator temperature can help, as well as not opening the doors as frequently. |
| Doors are not closed completely. | If the doors are not properly closed, ice production will be affected. See the Doors will not close completely or pop open section in Parts & Features Troubleshooting for more information. | |
| The temperature setting for the freezer is too warm. | The recommended temperature for the freezer compartment for normal ice production is 0°F. If the freezer temperature is warmer, ice production will be affected. | |
| Dispensing water slowly. | Water filter has been exhausted. | It is recommended that you replace the water filter: ·Approximately every six months. ·When the water filter indicator turns on. ·When the water dispenser output decreases. ·When the ice cubes are smaller than normal. |
| Reverse osmosis filtration system is used. | Reverse osmosis filtration systems can reduce the water pressure below the minimum amount and result in icemaker issues. If the problem persists, it may be necessary to contact a plumber. | |
| Low house water supply pressure. | The water pressure must be between 20 and 120 psi on models without a water filter and between 40 and 120 psi on models with a water filter. If the problem persists, it may be necessary to contact a plumber. |
Problem Possible Causes Solutions
Not dispensing ice.
Doors are not closed completely.
Ice will not dispense if any of the refrigerator doors are left open.
Infrequent use of the dispenser.
Infrequent use of the ice dispenser will cause the cubes to stick together over time, which will prevent them from properly dispensing. Check the ice bin for ice cubes clumping/sticking together. If they are, break up the ice cubes to allow for proper operation.
The delivery chute is clogged with frost or ice fragments.
Eliminate the frost or ice fragments by removing the ice bin and clearing the chute with a plastic utensil. Dispensing cubed ice can also help prevent frost or ice fragment buildup.
The dispenser display is locked.
Press and hold the Lock button for three seconds to unlock the control panel and dispenser.
Ice bin is empty.
It may take up to 24 hours for each compartment to reach the desired temperature and for the icemaker to begin making ice. Make sure that the shutoff (arm/ sensor) is not obstructed.
Once the ice supply in the bin has been completely exhausted, it my take up to 90 minutes before additional ice is available, and approximately 24 hours to completely refill the bin.
Problem Possible Causes Solutions
Icemaker is not making ice.
Refrigerator was recently installed or icemaker recently connected.
It may take up to 24 hours for each compartment to reach the desired temperature and for the icemaker to begin making ice.
Icemaker not turned on.
Locate the icemaker on/off switch and confirm that it is in the ON (I) position.
The ice detecting sensor is obstructed.
Foreign substances or frost on the ice-detecting sensor can interrupt ice production. Make sure that the sensor area is clean at all times for proper operation.
The refrigerator is not connected to a water supply or the supply shutoff valve is not turned on.
Connect refrigerator to the water supply and turn the water shutoff valve fully open.
Icemaker shutoff (arm or sensor) obstructed.
If your icemaker is equipped with an ice shutoff arm, make sure that the arm moves freely. If your icemaker is equipped with the electronic ice shutoff sensor, make sure that there is a clear path between the two sensors.
Reverse osmosis water filtration system is connected to your cold water supply.
Reverse osmosis filtration systems can reduce the water pressure below the minimum amount and result in icemaker issues. (Refer to the Water Pressure section.)
Problem Possible Causes Solutions
Not dispensing water.
New installation or water line recently connected.
Dispense 2.5 gallons of water (flush for approximately 5 minutes) to remove trapped air and contaminants from the system. Do not dispense the entire 2.5 gallon amount continuously. Depress and release the dispenser pad for cycles of 30 seconds ON and 60 seconds OFF.
The dispenser panel is locked.
Press and hold the Lock button for three seconds to unlock the control panel and dispenser.
The dispenser is not set for water dispensing.
The dispenser can be set for ice or water.
Make certain that the control panel is set for the proper operation. Press the Water button on the control panel to dispense water.
Refrigerator or freezer doors are not closed properly.
Water will not dispense if any of the refrigerator doors are left open.
Water filter has been recently removed or replaced.
After the water filter is replaced, dispense 2.5 gallons of water (flush for approximately 5 minutes) to remove trapped air and contaminants from the system. Do not dispense the entire 2.5 gallon amount continuously. Depress and release the dispenser pad for cycles of 30 seconds ON and 60 seconds OFF.
Tubing connecting refrigerator to house supply valve is kinked.
The tubing can kink when the refrigerator is moved during installation or cleaning resulting in reduced water flow. Straighten or repair the water supply line and arrange it to prevent future kinks.
The house water supply is not connected, the valve is not turned on fully, or the valve is clogged.
Connect refrigerator to the water supply and turn the water shutoff valve fully open.
If the problem persists, it may be necessary to contact a plumber.
Problem Possible Causes Solutions
| Ice has bad taste or odor. | Water supply contains minerals such as sulfur. | A water filter may need to be installed to eliminate taste and odor problems. NOTE: In some cases, a filter may not help. It may not be possible to remove all minerals / odor / taste in all water supplies. |
| Icemaker was recently installed. | Discard the first few batches of ice to avoid discolored or bad tasting ice. | |
| Ice has been stored for too long. | Ice that has been stored for too long will shrink, become cloudy, and may develop a stale taste. Throw away old ice and make a new supply. | |
| The food has not been stored properly in either compartment. | Rewrap the food. Odors may migrate to the ice if food is not wrapped properly. | |
| The interior of the refrigerator needs to be cleaned. | See the Care and Cleaning section for more information. | |
| The ice storage bin needs to be cleaned. | Empty and wash the bin (discard old cubes). Make sure that the bin is completely dry before reinstalling it. | |
| Dispensing warm water. | Refrigerator was recently installed. | Allow 24 hours after installation for the water storage tank to cool completely. |
| The water dispenser has been used recently and the storage tank was exhausted. | Depending on your specific model, the water storage capacity will range from approximately 20 to 30 oz. | |
| Dispenser has not been used for several hours. | If the dispenser has not been used for several hours, the first glass dispensed may be warm. Discard the first 10 oz. | |
| Refrigerator is connected to the hot water supply. | Make sure that the refrigerator is connected to a cold water pipe. WARNING: Connecting the refrigerator to a hot water line may damage the icemaker. |
Problem Possible Causes Solutions
| Water has bad taste or odor. | Water supply contains minerals such as sulfur. | A water filter may need to be installed to eliminate taste and odor problems. |
| Water filter has been exhausted. | It is recommended that you replace the water filter: • Approximately every 6 months. • When the water filter indicator turns on. • When the water dispenser output decreases. • When the ice cubes are smaller than normal. | |
| Refrigerator was recently installed. | Dispense 2.5 gallons of water (flush for approximately 5 minutes) to remove trapped air and contaminates from the system. Do not dispense the entire 2.5 gallon amount continuously. Depress and release the dispenser pad for cycles of 30 seconds ON and 60 seconds OFF. | |
| Icemaker is making too much ice. | Icemaker shutoff (arm/sensor) is obstructed. | Empty the ice bin. If your icemaker is equipped with an ice shutoff arm, make sure that the arm moves freely. If your icemaker is equipped with the electronic ice shutoff sensor, make sure that there is a clear path between the two sensors. Reinstall the ice bin and wait 24 hours to confirm proper operation. |
NOISE
Problem Possible Causes Solutions
| Clicking | The defrost control will click when the automatic defrost cycle begins and ends. The thermostat control (or refrigerator control on some models) will also click when cycling on and off. | Normal Operation |
| Rattling | Rattling noises may come from the flow of refrigerant, the water line on the back of the unit, or items stored on top of or around the refrigerator. | Normal Operation |
| Refrigerator is not resting solidly on the floor. | Floor is weak or uneven or leveling legs need to be adjusted. See the Door Alignment section. | |
| Refrigerator with linear compressor was jarred while running. | Normal Operation | |
| Whooshing | Evaporator fan motor is circulating air through the refrigerator and freezer compartments. | Normal Operation |
| Air is being forced over the condenser by the condenser fan. | Normal Operation | |
| Gurgling | Refrigerant flowing through the cooling system. | Normal Operation |
| Popping | Contraction and expansion of the inside walls due to changes in temperature. | Normal Operation |
| Sizzling | Water dripping on the defrost heater during a defrost cycle. | Normal Operation |
Problem Possible Causes Solutions
| Vibrating | If the side or back of the refrigerator is touching a cabinet or wall, some of the normal vibrations may make an audible sound. | To eliminate the noise, make sure that the sides and back cannot vibrate against any wall or cabinet. |
| Refrigerator vibrates after you close the door. | Door is closing too hard due to damaged hinges. | Solution: Please contact the service center. |
| Compressor is vibrating. | The compressor is vibrating because the door is being closed too hard. | |
| Dripping | Water running into the drain pan during the defrost cycle. | Normal Operation |
| Pulsating or High-Pitched Sound | Your refrigerator is designed to run more efficiently to keep your food items at the desired temperature. The high efficiency compressor may cause your new refrigerator to run longer than your old one, but it is still more energy efficient than previous models. While the refrigerator is running, it is normal to hear a pulsating or high-pitched sound. | Normal Operation |
PARTS & FEATURES
Problem Possible Causes Solutions
| Doors will not close correctly or pop open. | Food packages are blocking the door open. | Rearrange food containers to clear the door and door shelves. |
| Ice bin, crisper cover, pans, shelves, door bins, or baskets are out of position. | Push bins all the way in and put crisper cover, pans, shelves and baskets into their correct positions. See the Using Your Refrigerator section for more information. | |
| The doors were removed during product installation and not properly replaced. | Remove and replace the doors according to the Removing and Replacing Refrigerator Handles and Doors section. | |
| Refrigerator is not leveled properly. | See Door Alignment in the Refrigeration Installation section to level refrigerator. | |
| The door hinges are damaged. | Please contact to the service center. | |
| Doors are difficult to open. | The gaskets are dirty or sticky. | Clean the gaskets and the surfaces that they touch. Rub a thin coat of appliance polish or kitchen wax on the gaskets after cleaning. |
| Door was recently closed. | When you open the door, warmer air enters the refrigerator. As the warm air cools, it can create a vacuum. If the door is hard to open, wait one minute to allow the air pressure to equalize, then see if it opens more easily. | |
| Refrigerator wobbles or seems unstable. | Leveling legs are not adjusted properly. | Refer to the Leveling and Door Alignment section. |
| Floor is not level. | It may be necessary to add shims under the leveling legs or rollers to complete installation. | |
| Refrigerator lights do not work. | The refrigerator compartment lamp is LED interior lighting, and service should be performed by a qualified technician. | Refer to the Light Bulb Replacement section. |
| Freezer lights do not work. | The freezer compartment light bulb may need to be changed. | Refer to the Light Bulb Replacement section. |
Before Calling for Service
The following occurrences are normal.
| Occurrence | Solution | |
| Noise | Ticking or clicking sound | This is the sound of various parts expanding/contracting or various control devices operating depending on the temperature change within the refrigerator. |
| Whirring or motor sound | This is the sound of compressor or fan operating when the operation of the refrigerator is starting or ending. This is similar to the sound generated when starting or turning off the engine of a car. | |
| Sound of water flowing | This is the sound of refrigerant changing its state from liquid to gas or vice versa. | |
| Whooshing sound when opening or closing door | This is the sound generated when the internal pressure is temporarily lowered when the warm air entered through the refrigerator or freezer is cooled fast. | |
| Vibrating sound | If the refrigerator is installed on a wooden floor or next to a wooden wall, or if the refrigerator is not leveled properly, the sound can be loud from the vibration. | |
| Loud sound after first installing | When you operate the refrigerator for the first time, the refrigerator will operate at high speed to cool quickly and the sound can seem louder. When the internal temperature falls below a certain level, the noise will subside. | |
| Door open | Door bounces open slightly after being closed | Depending on the force or speed of closing the refrigerator or freezer door, the door can be bumped open from the pressure. Be careful not to close the door too hard. |
| Icing/Condensation | Icing or condensation formed on the inner or outer side of the refrigerator | When external air flows into the cool inner surface of the refrigerator, icing/condensation can be formed. This will happen more easily when you open and close the refrigerator door more frequently. Also, if the humidity of the installed location is high or during the rainy season or on a rainy day, condensation can form on the outer side of the refrigerator. This is a natural phenomenon that occurs during the humid weather. Wipe the water drops with a dry cloth. |
| Temperature | The front of the refrigerator is warm | Heat pipes are installed around the front part of the refrigerator and on the divider of the freezer and refrigerator to prevent the condensation from forming. The refrigerator may feel warmer just after installation or during the hot summer, but this is not a problem. |
Performance Data Sheet
Model: ADQ36006108-S
Use Replacement Cartridge: ADQ36006108
The concentration of the indicated substances in water entering the system was reduced to a concentration less than or equal to the permissible limit for water leaving the system as specified in NSF/ANSI Standard 42 and Standard 53.

System tested and certified by NSF International against NSF/ANSI Standard 42 and Standard 53 for the reduction of substances listed below.
| Substance Reduction | Average Influent | NSF specified Challenge Concentration | Avg % Reduction | Average Product Water Concentration | Max Permissible Product Water Concentration | NSF Reduction Requirements | NSF Test Report |
| Chlorine Taste and Odor | 1.9 mg/L 2.0 | mg/L ± 10% 84.9% | 0.29 mg/L N/A ≥ 50% J-00126243 | ||||
| Nominal Particulate Class I, ≥ 0.5 to < 1.0 μm | 6,866,667 pts/mL | At least 10,000 particles/mL | 99.7% 23,417 pts/ml N/A ≥ 85% J-00117747 | ||||
| Asbestos 260 MFL | 107 to 108 MFL; fibers greater than 10 μm in length | >99% < 1MLF N/A ≥ 99% J-00126246 | |||||
| Atrazine 0.0010 mg/L | 0.009 mg/L ± 10% | 95.0% 0.005 mg/L 0.003 mg/L N/A J-00117748 | |||||
| Benzene 0.014 mg/L | 0.015 mg/L ± 10% | 96.6% 0.005 mg/L 0.005 mg/L N/A J-00117749 | |||||
| Carbofuran 0.09 mg/L | 0.08 mg/L ± 10% | 98.9% 0.002 mg/L 0.001 mg/L N/A J-00117751 | |||||
| Lindane | 0.002 mg/L | 0.002 mg/L ± 10% | 99.1% 0.0002 mg/L 0.0002 mg/L N/A J-00126254 | ||||
| P-Dichlorobenzene | 0.23 mg/L | 0.225 mg/L ± 10% | 99.8% 0.0005 mg/L 0.075 mg/L N/A J-00126248 | ||||
| Toxaphene | 0.014 mg/L | 0.015 mg/L ± 10% | 93% | 0.001 mg/L | 0.003 mg/L N/A | J-00126249 | |
| 2,4-D | 0.222 mg/L | 0.210 mg/L ± 10% | 94.5% 0.02 mg/L 0.070 mg/L N/A J-00126247 | ||||
| Lead pH @6.5 | 0.147 mg/L | 0.15 mg/L ± 10% | >99.3% | 0.001 mg/L | 0.010 mg/L N/A | J-00126252 | |
| Lead pH @8.5 | 0.150 mg/L | 0.15 mg/L ± 10% | >99.3% | 0.001 mg/L | 0.010 mg/L N/A | J-00126253 | |
| Mercury @ pH 6.5 | 0.0059 mg/L | 0.006 mg/L ± 10% | 96.1 | 0.0002 mg/L 0.002 mg/L N/A J-00126253 | |||
| Mercury @ pH 8.5 | 0.006 mg/L | 0.006 mg/L ± 10% | 92.6 | 0.0005 mg/L 0.002 mg/L N/A J-00126251 | |||
| Cyst* | 97,500 cysts/L | Minimum 50,000 cysts/L | 99.99% | 13 cyst/L | N/A | ≥ 99.95% | J-00123282 |
- Based on the use of Cryptosporidium parvum oocysts.
State of California Department of Public Health
Water Treatment Device Certificate Number 09-2018
Date Issued: December 15, 2009
Trademark/Model Designation
ADQ36006101-S
Replacement Elements
ADQ36006101
Manufacturer: Cuno Inc.
The water treatment device(s) listed on this certificate have met the testing requirements pursuant to Section 116830 of the Health and Safety Code for the following health related contaminants:
Microbiological Contaminants and Turbidity
Cysts
Inorganic/Radiological Contaminants
Asbestos
Lead
Mercury
Organic Contaminants
2,4-D Reduction
Atrazine
Benzene
Carbofuran
Lindane
p-Dichlorobenzene
Toxaphene
Rated Service Capacity: 200 gal
Rated Service Flow: 0.5 gpm
Conditions of Certification:
SIGNATURE KITCHEN SUITE
REFRIGERATOR LIMITED WARRANTY - U.S.A
Should your Signature Kitchen Suite Refrigerator ("Product") fail due to a defect in materials or workmanship under normal home use, during the warranty period set forth below, Signature Kitchen Suite will at its option repair or replace the product. This limited warranty is valid only to the original retail purchaser of the product and applies only when purchased and used within the United States including U.S. Territories. Proof of original retail purchase is required to obtain warranty service under this limited warranty.
| WARRANTY PERIOD | |||
| Refrigerator | Sealed System(Condenser, Dryer, Connecting Tube, Refrigerant and Evaporator) | Linear Compressor | |
| Three (3) years from the date of original retail purchase | Three (3) years from the date of original retail purchase | Seven (7) years from the date of original retail purchase | Ten (10) years from the date of original retail purchase |
| Parts and Labor(internal/functional parts only) | Parts and Labor | Parts only(Consumer will be charged for labor) | Part only(Consumer will be charged for labor) |
Noises associated with normal operation and failure to follow instructions found in the use and care and installation guides or operating the unit in an unsuitable environment will not be covered under this warranty.
Replacement products and parts are warranted for the remaining portion of the original warranty period or ninety (90) days, whichever is greater.
Replacement products and parts may be new or remanufactured.
THIS WARRANTY IS IN LIEU OF ANY OTHER WARRANTY, EXPRESS OR IMPLIED, INCLUDING WITHOUT LIMITATION, ANY WARRANTY OF MERCHANTABILITY OR FITNESS FOR A PARTICULAR PURPOSE. TO THE EXTENT ANY IMPLIED WARRANTY IS REQUIRED BY LAW, IT IS LIMITED IN DURATION TO THE EXPRESS WARRANTY PERIOD ABOVE. NEITHER THE MANUFACTURER NOR ITS U.S. DISTRIBUTOR SHALL BE LIABLE FOR ANY INCIDENTAL, CONSEQUENTIAL, INDIRECT, SPECIAL, OR PUNITIVE DAMAGES OF ANY NATURE, INCLUDING WITHOUT LIMITATION, LOST REVENUES OR PROFITS, OR ANY OTHER DAMAGE WHETHER BASED IN CONTRACT, TORT, OR
OTHERWISE. Some states do not allow the exclusion or limitation of incidental or consequential damages or limitations on how long an implied warranty lasts, so the above exclusion or limitation may not apply to you. This warranty gives you specific legal rights and you may also have other rights that vary from state to state.
THIS LIMITED WARRANTY DOES NOT COVER:
- Service trips to deliver, pick up, install, or repair the product; instruct the customer on operation of the product; repair or replace fuses or correct wiring or plumbing, or correction of unauthorized repairs/installation.
- Failure of product to perform during power failures and interruptions or inadequate electrical service.
- Damage caused by leaky or broken water pipes, frozen water pipes, restricted drain lines, inadequate or interrupted water supply or inadequate supply of air.
- Damage resulting from operating the product in a corrosive atmosphere or contrary to the instructions outlined in the product owner's manual.
- Damage to the product caused by accidents, pests and vermin, lightning, wind, fire, floods, or acts of God.
- Damage resulting from misuse, abuse, improper installation, repair, or maintenance. Improper repair includes use of parts not approved or specified by Signature Kitchen Suite.
- Damage or failure caused by unauthorized modification or alteration, or if it is used for other than the intended purpose, or any water leakage where the unit was not properly installed.
-
Damage or failure caused by incorrect electrical current, voltage, or plumbing codes, commercial or industrial use, or use of accessories, components, or consumable cleaning products that are not approved by Signature Kitchen Suite.
-
Damage caused by transportation and handling, including scratches, dents, chips, and/or other damage to the finish of your product, unless such damage results from defects in materials or workmanship and is reported within one (1) week of delivery (Call: 1-855-790-6655).
- Damage or missing items to any display, open box, discounted, or refurbished product.
- Products with original serial numbers that have been removed, altered, or can not be readily determined. Model and Serial numbers, along with original retail sales receipt, are required for warranty validation.
- Increases in utility costs and additional utility expenses.
- Replacement of light bulbs, filters, or any consumable parts.
- Repairs when your product is used in other than normal and usual household use (e.g. commercial use, offices, and recreational facilities) or contrary to the instructions outlined in the product owner's manual.
- Costs associated with removal of your product from your home for repairs.
- The removal and reinstallation of the product if it is installed in an inaccessible location or is not installed in accordance with published installation instructions, including Signature Kitchen Suite's owner's and installation manuals.
- Shelves, door bins, drawers, handles, accessories, and other parts besides those that were originally included with this particular model.
The cost of repair or replacement under these excluded circumstances shall be borne by the consumer.
For complete warranty details and customer assistance, please call or visit our website:
Call 1-855-790-6655 (24 hours a day, 365 days a year) and select the appropriate option from the menu, or visit our website at www.thesignaturekitchen.com
Or by mail: Signature Kitchen Suite Customer Information Center:
P. O. Box 240007, 201 James Record Road Huntsville, Alabama 35813
ATTN: CIC
Write your warranty information below:
Product Registration Information:
Model:
Serial Number:
Date of Purchase:
SIGNATURE
KITCHENSUITE
GUIDE D'UTILISATION
RéFRIGÉRATEUR AMÉRICAIN ENCASTRABLE
Dispensing Cubed Ice
Dispensing Crushed Ice
Compartment congélateur
Smart Diagnosis (diagnostic intelligent)
State of California Department of Public Health
Water Treatment Device Certificate Number 09-2018
Date Issued: December 15, 2009
Trademark/Model Designation
ADQ36006101-S
Replacement Elements
ADQ36006101
Manufacturer: Cuno Inc.
The water treatment device(s) listed on this certificate have met the testing requirements pursuant to Section 116830 of the Health and Safety Code for the following health related contaminants:
Microbiological Contaminants and Turbidity
Cysts
Inorganic/Radiological Contaminants
Asbestos
Lead
Mercury
Organic Contaminants
2,4-D Reduction
Atrazine
Benzene
Carbofuran
Lindane
p-Dichlorobenzene
Toxaphene
Rated Service Capacity: 200 gal
Rated Service Flow: 0.5 gpm
Conditions of Certification:
SIGNATURE KITCHEN SUITE
GARANTIE LIMITÉE DES RÉFRIGÉRATEURS - U.S.A
No permitted to his children.
Dispensing Cubed Ice
Dispensing Crushed Ice
State of California Department of Public Health
Water Treatment Device Certificate Number 09-2018
Date Issued: December 15, 2009
Trademark/Model Designation
ADQ36006101-S
Replacement Elements
ADQ36006101
Manufacturer: Cuno Inc.
The water treatment device(s) listed on this certificate have met the testing requirements pursuant to Section 116830 of the Health and Safety Code for the following health related contaminants:
Microbiological Contaminants and Turbidity
Cysts
Inorganic/Radiological Contaminants
Asbestos
Lead
Mercury
Organic Contaminants
2,4-D Reduction
Atrazine
Benzene
Carbofuran
Lindane
p-Dichlorobenzene
Toxaphene
Rated Service Capacity: 200 gal
Rated Service Flow: 0.5 gpm
Conditions of Certification: