MediaSmart SL4278N - TV HP - Free user manual and instructions
Find the device manual for free MediaSmart SL4278N HP in PDF.
| Product type | LCD HDTV 1080p |
| Brand | HP |
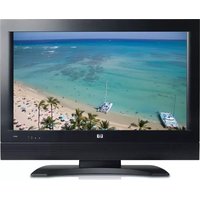
| Model | MediaSmart SL4278N |
| Screen size | 42 inches (106 cm) |
| Resolution | Full HD 1080p (1920 x 1080) |
| Display technology | HP Visual Fidelity Engine, 3D color optimizer |
| Input connectors | 3 x HDMI, 2 x component (Y, Pb, Pr), 1 x PC VGA, 2 x AV (S-video and composite), 1 x antenna/cable |
| Output connectors | 1 x optical digital audio, 1 x analog audio (L/R) |
| Network | Built-in Wi-Fi 802.11 a/b/g/n, Ethernet RJ-45 |
| Multimedia functions | Photo, music and video playback via home network (UPnP), online services |
| Approximate weight | Approximately 22 kg (with stand) |
| Approximate dimensions (W x H x D) | 100 cm x 65 cm x 25 cm (with stand) |
| Power supply | AC, power cord included |
| Power consumption | Not specified |
| Recommended cleaning | Slightly damp microfiber cloth, no solvents |
| Safety | Kensington lock, antenna grounding, important safety instructions |
| Repairability | No user-serviceable parts, contact technical support |
| Warranty | 1 year free in-home service (HP Total Care) |
| Included accessories | Universal remote control, Ant/Cable adapter, power cord, cable ties, documentation, installation CD |
Frequently Asked Questions - MediaSmart SL4278N HP
User questions about MediaSmart SL4278N HP
0 question about this device. Answer the ones you know or ask your own.
Ask a new question about this device
Download the instructions for your TV in PDF format for free! Find your manual MediaSmart SL4278N - HP and take your electronic device back in hand. On this page are published all the documents necessary for the use of your device. MediaSmart SL4278N by HP.
USER MANUAL MediaSmart SL4278N HP
HP MediaSmart 108Op LCD HDTV User Guide
HP SL4778N 47-Inch MediaSmart 1080p LCD High-Definition Television
HP SL4278N 42-Inch MediaSmart 1080p LCD High-Definition Television

i n v e n t
The only warranties for HP products and services are set forth in the express warranty statements accompanying such products and services. Nothing herein should be construed as constituting an additional warranty. HP shall not be liable for technical or editorial errors or omissions contained herein.
HP assumes no responsibility for the use or reliability of its software on equipment that is not furnished by HP.
This document contains proprietary information that is protected by copyright. No part of this document may be photocopied, reproduced, or translated to another language without the prior written consent of HP.
Hewlett-Packard Company
P.O. Box 4010
Cupertino, CA 95015-4010
USA
Copyright © 2007 Hewlett-Packard Development Company, L.P.
This product incorporates copyright protection technology that is protected by U.S. patents and other intellectual property rights. Use of this copyright protection technology must be authorized by Macrovision, and is intended for home and other limited pay-per-view viewing uses only unless otherwise authorized by Macrovision. Reverse engineering or disassembly is prohibited.
DOLBY Manufactured under license from Dolby Laboratories. DIGITAL "Dolby" and the double-D symbol are trademarks of Dolby Laboratories.
HDMI, the HDMI logo and High-Definition Multimedia Interface are trademarks or registered trademarks of HDMI Licensing LLC.

DivX, DivX certified, and associated logos are trademarks of DivXNetworks, Inc. and are used under license.
Microsoft, Windows Vista, and Windows XP are U.S. registered trademarks of Microsoft Corporation.
The Windows logo and Windows Vista are trademarks or registered trademarks of Microsoft Corporation in the United States and/or other countries/regions.
HP supports lawful use of technology and does not endorse or encourage the use of our products for purposes other than those permitted by copyright law.
The information in this document is subject to change without notice.

Text set off in this manner indicates information you need.
Text set off in this manner indicates important information you need.


CAUTION: Text set off in this manner indicates that failure to follow directions could result in damage to equipment or loss of information.

WARNING: This symbol is intended to alert the user to the presence of important operating and maintenance (servicing) instructions in the literature accompanying the appliance.

DANGEROUS VOLTAGE: Text set off in this manner indicates the presence of uninsulated voltages within the product enclosure that may be of sufficient magnitude to constitute a risk of electrical shock to persons.
Important Safeguards
WARNING: TO REDUCE THE RISK OF FIRE OR ELECTRICAL SHOCK, DO NOT EXPOSE THIS APPLIANCE TO RAIN OR MOISTURE.
CAUTION: RISK OF ELECTRICAL SHOCK DO NOT OPEN
CAUTION: TO REDUCE THE RISK OF ELECTRICAL SHOCK, DO NOT REMOVE COVER (OR BACK). NO USER-SERVICEABLE PARTS INSIDE. REFER SERVICING TO QUALIFIED SERVICE PERSONNEL.

THIS SYMBOL IS INTENDED TO ALERT THE USER TO THE PRESENCE OF UNINSULATED "DANGEROUS VOLTAGES" WITHIN THE PRODUCT'S ENCLOSURE THAT MAY BE OF SUFFICIENT MAGNITUDE TO CONSTITUTE A RISK OF ELECTRICAL SHOCK TO PERSONS. REFER SERVICING TO QUALIFIED SERVICE PERSONNEL.

THIS SYMBOL IS INTENDED TO ALERT THE USER TO THE PRESENCE OF IMPORTANT OPERATING AND MAINTENANCE (SERVICING) INSTRUCTIONS IN THE LITERATURE ACCOMPANYING THE APPLIANCE.
CAUTION: DO NOT PLACE THIS PRODUCT ON AN UNSTABLE CART, STAND, TRIPOD, BRACKET, OR TABLE. THE PRODUCT MAY FALL CAUSING SERIOUS PERSONAL INJURY AND SERIOUS DAMAGE TO THE PRODUCT. USE ONLY WITH A CART, STAND, TRIPOD, BRACKET, OR TABLE RECOMMENDED BY THE MANUFACTURER OR SOLD WITH THE PRODUCT. FOLLOW THE MANUFACTURER'S INSTRUCTIONS WHEN INSTALLING THE PRODUCT AND USE MOUNTING ACCESSORIES RECOMMENDED BY THE MANUFACTURER. A PRODUCT AND CART COMBINATION SHOULD BE MOVED WITH CARE. QUICK STOPS, EXCESSIVE FORCE, AND UNEVEN SURFACES MAY CAUSE THE PRODUCT AND CART COMBINATION TO OVERTURN.

Federal Communication Commission Interface Statement
This equipment has been tested and found to comply with the limits for a Class B digital device, pursuant to Part 15 of the FCC Rules. These limits are designed to provide reasonable protection against harmful interference in a residential installation. This equipment generates, uses, and can radiate radio frequency energy and, if not installed and used in accordance with the instructions, may cause harmful interference to radio communications. However, there is no guarantee that interference will not occur in a particular installation. If this equipment does cause harmful interference to radio or television reception, which can be determined by turning the equipment off and on, the user is encouraged to try to correct the interference by one or more of the following measures:
■Reorient or relocate the receiving antenna.
Increase the separation between the equipment and receiver.
- Connect the equipment into an outlet on a circuit different from that to which the receiver is connected.
■Consult the dealer or an experienced radio/TV technician for help.
Closed caption notice
This television receiver provides display of television closed captioning in accordance with § 15.119 of the FCC Rules.
FCC Radiation Exposure Statement
This equipment complies with FCC radiation exposure limits set forth for an uncontrolled environment. This equipment should be installed and operated with a minimum distance of 20cm between the radiator and your body.
This transmitter must not be co-located or operating in conjunction with any other antenna or transmitter.
Operations in the 5.15-5.25GHz band are restricted to indoor usage only. IEEE 802.11b or 802.11g operation of this product in the U.S.A. is firmware-limited to channels 1 through 11.
Modifications
Caution: Pursuant to 47CFR15.21 of the FCC Rules, any changes or modifications to this equipment not expressly approved by the Hewlett-Packard Company may cause harmful interference and void the FCC authorization to operate this equipment.
This device complies with Part 15 of the FCC Rules. Operation is subject to the following two conditions: (1) This device may not cause harmful interference, and (2) this device must accept any interference received, including interference that may cause undesired operation.
Industry of Canada Radio Statement
This device has been designed to operate with the antennas listed below, and having a maximum gain of 5.1 dB. Antennas not included in this list or having a gain greater than 5.1 dB are strictly prohibited for use with this device. The required antenna impedance is 50 ohms.
Wireless LAN Antennas (internal to the TV):
SL4278N: Wistron NeWeb Corp. 50.3YJ09.001
■SL4778N: Wistron NeWeb Corp. 50.3YK05.001
Canadian Regulatory Notice
This device complies with RSS-210 of the Industry Canada Rules. Operation is subject to the following two conditions:
1) this device may not cause interference and
2) this device must accept any interference, including interference that may cause undesired operation of the device.
Caution: The device for the band 5150-5250 MHz is only for indoor usage to reduce potential for harmful interference to co-channel mobile satellite systems.
IC Radiation Exposure Statement
This equipment complies with IC radiation exposure limits set forth for an uncontrolled environment. This equipment should be installed and operated with minimum distance 20~cm between the radiator and your body.
Cables
Connections to this device must be made with shielded cables with metallic RFI/EMI connector hoods in order to maintain compliance with FCC Rules and Regulations.
RESPONSIBLE PARTY
Hewlett-Packard Company
Attn: Product Regulations Manager
10955Tantau Avenue
Cupertino, CA 95014-0770 USA
Important Safety Instructions
Electricity is used to perform many useful functions, but it can also cause personal injuries and property damage if improperly handled. This product has been engineered and manufactured with the highest priority on safety. However, improper use can result in electric shock and/or fire. In order to prevent potential danger, please observe the following instructions when installing, operating, and cleaning the product. To ensure your safety and prolong the service life of your television, please read the following precautions carefully before using the product.
1 Read these instructions.
2 Keep these instructions.
3 Heed all warnings.
4 Follow all instructions.
5 Do not use this apparatus near water.
6 Clean only with a soft cloth. If needed, dampen cloth with water. Never use solvents or abrasive cleaning solutions to clean this product or permanent damage may result.
7 Do not block any ventilation openings. Install in accordance with the manufacturer's instructions.
8 Do not install near any heat sources such as radiators, heat registers, stoves, or other apparatus (including amplifiers) that produce heat.
9 Do not defeat the safety purpose of the polarized or grounding-type plug. A polarized plug has two blades with one wider than the other. A grounding-type plug has two blades and a third grounding prong. The wide blade or the third prong are provided for your safety. If the provided plug does not fit into your outlet, consult an electrician for replacement of the obsolete outlet.
10 Protect the power cord from being walked on or pinched particularly at plugs, convenience receptacles, and the point where they exit from the apparatus.
11 Only use attachments/accessories specified by the manufacturer.
12 Use only with the cart, stand, tripod, bracket, or table specified by the manufacturer, or sold with the apparatus. When a cart is used, use caution when moving the cart/apparatus combination to avoid injury from tip-over.

13 Unplug this apparatus during lightning storms or when unused for long periods of time.
14 Refer all servicing to qualified service personnel. Servicing is required when the apparatus has been damaged in any way, the power-supply cord or plug is damaged, liquid has been spilled or objects have fallen into the apparatus, the apparatus has been exposed to rain or moisture, does not operate normally, or has been dropped.
15 Power Sources—This product should be operated only from the type of power source indicated on the marking label. If you are not sure of the type of power supply to your home, consult your product dealer or local power company. For products intended to operate from battery power, or other sources, refer to the operating instructions.
16 Overloading—Do not overload wall outlets, extension cords, or integral convenience receptacles as this can result in a risk of fire or electric shock.
17 Replacement Parts—When replacement parts are required, be sure the service technician has used replacement parts specified by the manufacturer or have the same characteristics as the original part. Unauthorized substitutions may result in fire, electric shock, or other hazards.
18 Safety Check—Upon completion of any service or repairs to this product, ask the service technician to perform safety checks to determine that the product is in proper operating condition.
19 The apparatus shall not be exposed to dripping or splashing and no objects filled with liquids, such as vases, shall be placed on the apparatus.
20 WARNING: Plug the power cord into a power outlet where access to the power cord connector is readily accessible in case power disconnection is required.
21 Servicing: The user should not attempt to service the appliance beyond that described in the operating instructions. All other servicing should be referred to qualified service personnel.
Water and Moisture—Do not use this product near water; for example, near a bath tub, wash bowl, kitchen sink, or laundry tub; in a wet basement; or near a swimming pool; and the like.
- Stand—Do not place the product on an unstable cart, stand, tripod, or table. Placing the product on an unstable base can cause the product to fall, resulting in serious personal injuries as well as damage to the product. Use only a cart, stand, tripod, bracket, or table recommended by the manufacturer or sold with the product.
■ Ventilation—The vents and other openings in the cabinet are designed for ventilation. Do not cover or block these vents and openings since insufficient ventilation can cause overheating and/or shorten the life of the product. Do not place the product on a bed, sofa, rug, or other similar surface, since they can block ventilation openings. This product is not designed for built-in installation; do not place the product in an enclosed place such as a bookcase or rack, unless proper ventilation is provided or the manufacturer's instructions are followed.
The display panel used in this product is made of glass. Therefore, it can break when the product is dropped or applied with impact. Be careful not to be injured by broken glass pieces in case the panel breaks.
- Heat—The product should be situated away from heat sources such as fireplaces, chimneys, radiators, heat registers, stoves, or other products (including amplifiers) that produce heat.
Lightning—For added protection for this television equipment during a lightning storm, or when it is left unattended and unused for long periods of time, unplug it from the wall outlet and disconnect the antenna. This will prevent damage to the equipment due to lightning and power-line surges.

■Power Lines—An outside antenna system should not be located in the vicinity of overhead power lines or other electric light or power circuits, or where it can fall into such power lines or circuits. When installing an outside antenna system, extreme care should be taken to keep from touching such power lines or circuits as contact with them might be fatal.
- Outdoor Antenna Grounding—If an outside antenna is connected to the television equipment, be sure the antenna system is grounded so as to provide some protection against voltage surges and built-up static charges. Article 810 of the National Electrical Code, ANSI/NFPA 70, provides information with regard to proper grounding of the mast and supporting structure, grounding of the lead-in wire to an antenna discharge unit, size of grounding conductors, location of antenna-discharge unit, connection to grounding electrodes, and requirements for the grounding electrode.
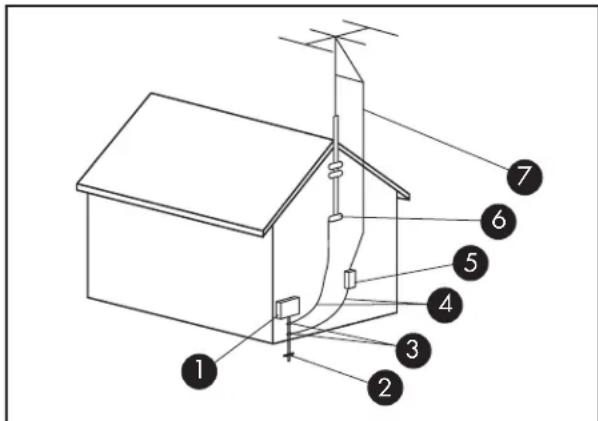
Antenna Grounding
Antenna Grounding
| Reference | Grounding Component |
| 1 | Electric Service Equipment |
| 2 | Power Service Grounding Electrode System (NEC Art 250, Part H) |
| 3 | Ground Clamps |
| 4 | Grounding Conductors (NEC Section 810-21) |
| 5 | Antenna Discharge Unit (NEC Section 810-20) |
| 6 | Ground Clamp |
| 7 | Antenna Lead in Wire |
To prevent fire, never place any type of candle or flames on the top or near the TV set.
To prevent fire or shock hazard, do not expose this product to dripping or splashing. No objects filled with liquids, such as vases, should be placed on the product.
To prevent fire or shock hazard, do not place the AC power cord under the TV set or other heavy items.
Turn off the main power and unplug the AC cord from the wall outlet before handling.
Important Information
The TV must be serviced by an authorized service technician. The TV is not user-serviceable.
Changes can damage your TV and void your warranty. Changes or modifications not expressly approved by the manufacturer could void the user's authority to operate the equipment.
Recycling Information
For information about how to recycle this product through HP, see:
http://www.hp.com/recycle
Other recycling options may also be available in your area. If located within the U.S. and Canada, you may also call (1) (888) 485-1849.
Materials disposal
This HP product contains the following materials that might require special handling at end-of-life:
■Mercury in the fluorescent lamp in the LCD.
Disposal of mercury may be regulated because of environmental considerations. For disposal or recycling information, please contact your local authorities or the Electronic Industries Alliance (EIA) (http://www.eia.org).
Cleaning precautions
Unplug the TV before cleaning the screen.
Using solvents, such as alcohol, or abrasive materials, such as a premoistened or chemically treated towel, may affect the TV or bezel paint.
Do not expose the product to volatile gases or fluids such as pesticides.
Do not put the TV in contact with vinyl or rubber products for an extended period of time. Extended contact may result in the removal of or degradation of the surface.

To maintain the high-gloss finish on your new HDTV, HP recommends cleaning the TV only with a Microfiber cloth.
Lifting precautions
The TV is heavy; be sure to use ergonomically correct lifting procedures when moving the TV.
Due to the size and weight of the TV, it is recommended that a minimum of two people move it.
To transport the TV, grasp the left and right ends of the panel in the areas below and above the screen. Do not lift the TV by the attached stand.
Never place the display with the glass screen facing downward, unless it is protected with pads.
Table of Contents
Important Safeguards. iii
Federal Communication Commission
Interface Statement .iv
Important Safety Instructions.
Important Information
Getting to Know Your TV. 1
Identifying Items in the Box 2
Locating TV Controls and Connectors 3
Cleaning 6
Cleaning precautions
Cleaning the TV.
Setting Up the TV 7
Selecting a Good Location 7
Lifting the TV 8
Connecting to the TV. 9
Choosing the AV connection to use. 9
Connecting the TV signal sources. 10
Connecting the cable TV or air
broadcast antenna 10
Connecting cable or satellite with
a set-top box. 11
Connecting a DVD player, VCR, DVR,
game console, or camcorder 13
Connecting a VCR for recording. 16
Connecting a PC 16
Connecting an external sound system. 17
Connecting the TV to your home
network (LAN) 19
Connecting power to the TV.
Removing or attaching the stand. 21
Turning On the TV 23
Turning the TV On and Off 23
Using the First-Time Setup Wizard 24
Setting Up the TV for
Digital Media. 25
Verifying the TV connections. 25
Completing the initial TV setup. 25
Setting up a wired or wireless connection 25
Operating the TV 29
Using the Remote Control. 29
Using universal remote controls. 29
Installling or replacing remote control batteries. 29
Identifying the remote control buttons. 30
Selecting a Device to Control 35
Selecting the Input Source 35
Selecting the last source. 36
Adjusting the Volume 36
Muting the sound 36
Changing Channels 36
Selecting the last channel. 36
Selecting a favorite channel 37
Displaying program information. 37
Changing the View by Using the Aspect Button ....38
Turning On Captions 39
Setting the SAP/MTS Stereo Mode. 39
Setting the Sleep Timer 39
Adjusting the TV Settings. 39
Opening and closing the OSD. 39
Operating a DVD Player or Other Device 40
Programming the Remote Control for a
Home Entertainment Device. 43
Programming the device code 44
Programming the device code using auto
setup mode 45
Manufacturer's codes 46
Changing the TV Settings. 51
Using the OSD Menus. 51
Using the Picture Menu. 52
Adjusting the picture image 53
Using the Audio Menu 54
Adjusting the audio. 54
Using the Channel Menu 56
Using the Parental (Control) Menu 56
Using the Password. 57
Setting Parental Controls. 57
Temporarily releasing a blocked program..... 61
Reactivating parental controls after a temporary release. 61
Using the Setup Menu 62
Using the Time Menu 62
Using the Caption (Closed Caption) Menu. 63
Caption menu 63
Selecting the OSD Language 64
Starting the Setup Wizard 64
Changing the Input Labels 64
Setting the Standby Mode 65
Returning to Default Settings 65
Using Digital Media. 67
Using the Main Digital Media Menu 67
Identifying Media remote control buttons 68
Using context buttons 71
Searching. 71
Viewing Photos 71
Changing slideshow options 72
Watching Video Files. 72
Changing videos options. 73
Listening to Music 73
Using Media Services 74
Selecting Servers 74
Changing Settings 75
Viewing current network settings. 75
Changing network settings 75
Using the Demo option. 76
Changing the Language option 76
Viewing the DivX registration code 77
Using the Reset Options. 77
Changing Slideshow options. 77
Changing Videos options. 77
Changing the Servers option 78
Updating software 78
Using Help. 78
Finding Answers to Questions 79
Understanding TV Terms. 79
What are analog TV, digital TV, and high-definition TV (HDTV)? 79
What is the difference between progressive and interlaced signal formats for digital TVs? ...79
What is variable aspect ratio? 80
What is HDMI? 80
Identifying Cable Usage 81
Answering MediaSmart TV frequently
asked questions. 83
Do I need a Media Center PC to use my MediaSmart TV? 83
Why does MediaSmart TV use Windows Media Player? 83
What version of Windows Media Player works with the MediaSmart TV? 83
Can my MediaSmart TV software be updated? 83
Can MediaSmart TV play AAC format and other music file types? 83
What is the wireless type to use to stream video to my MediaSmart TV? 83
Can I play recorded TV shows or downloaded shows or movies from my Media Center PC on my MediaSmart TV? 83
Can I stream a DVD movie from my PC to the MediaSmart TV? 84
How do I create an account for my online service? 84
Specifications 85
PC Compatibility Chart. 88
Supported Media File Types. 89
Digital media formats: CODECs versus file containers. 89
Supported media 90
Troubleshooting 93
Getting to Know Your TV
Congratulations!
Your MediaSmart HDTV not only features exceptional picture quality, but also brings your digital entertainment and your treasured photo and music libraries from your PC to your TV. By delivering exceptional visual performance and a digital media experience that is uniquely personal, we hope the HP MediaSmart HDTV will forever change your expectation of what a television should be.
HP Visual Fidelity Engine
Your MediaSmart HDTV features the HP Visual Fidelity Engine, which delivers unparalleled performance in beautiful 1080p full-HD resolution. The HP 3D Color Enrichment System generates rich colors and deep blacks while our Photorealistic Sharpness Enhancement delivers superior detail. Complimented with three HDMI inputs, the HP MediaSmart HDTV delivers the utmost picture quality from next generation HD game consoles and video players.
Your World in High Definition
The HP MediaSmart HDTV enables browsing of your entire library of digital photos, music, and HD video—even across multiple PCs—with unprecedented ease. The HP MediaSmart TV also provides online access to thousands of movies available to rent or own—and HP's simple interface enables you to begin watching movies moments after downloading has begun.
The Next Generation of Wireless Networking
Your MediaSmart TV also features integrated 802.11n wireless networking, which enables the streaming of high-definition video while providing compatibility to existing 802.11b/g/a Wi-Fi networks. An industry first, having 802.11n in your HDTV future proofs your investment for many years to come.
HP Legendary Quality and Unmatched Support
We're proud that you selected the HP MediaSmart television, and we'll continue to stand by you with HP award-winning support. HP Total Care includes 24 × 7 telephone assistance and one full year of free in-home service, should you ever need it.
All specifications represent the typical specifications provided by HP's component manufacturers; actual performance may vary either higher or lower.
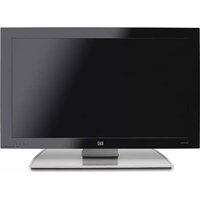
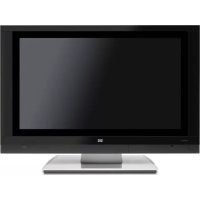
Identifying Items in the Box
| Television with stand attached | |
| Universal remote control | |
| Ant/Cable adapter | |
| AC power cord | |
| Cable clamp | |
| Documentation and Installation CD |
Locating TV Controls and Connectors
The TV contains controls (indicators and buttons) and connectors.
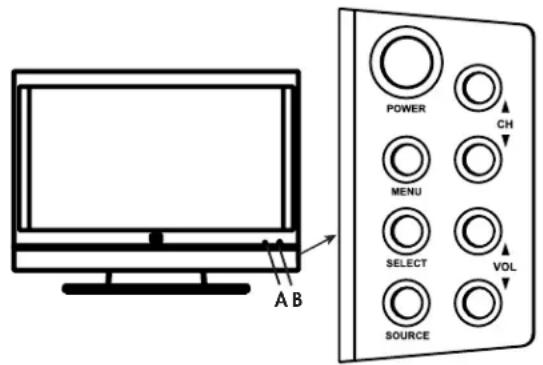
TV Controls
The TV indicators are located on the front of the TV, and the buttons are located on the right side.
| TV button Description | |
| A: Power light Power light shows whether the TV is on or off. The light is blue when TV is plugged in but turned off. The light is amber while the TV is powering up after you turn it on, and then it goes off after about 30 seconds. The light is off when the TV is not plugged in. | |
| B: Remote control sensor | Remote control sensor is the location where you point the remote control. |
| POWER Power turns the TV on or off. | |
| MENU Menu opens (or closes) the onscreen display (OSD). | |
| SELECT [PC Auto Sync] | Select starts the Auto Sync function for a connected PC signal source (PC Input). In an OSD menu, selects the highlighted item. |
| SOURCE | Source selects the input source: Press Source to open the list of input sources. Press the Channel buttons to select the input source, and press Select. Press Source to close the list. In an OSD menu, functions as the Back button, or moves up one item or menu level. |
| ▲CH▼ | Channel buttons select the next lower or higher channel. In an OSD menu, move up or down in the menu. |
| ▲VOL▼ | Volume buttons increase or decrease the sound level. In an OSD menu, move right or left in the menu, or adjust an item. |
TV connectors
The connectors are located on the left side (A), center (B), and right side (C) of the rear of the TV.
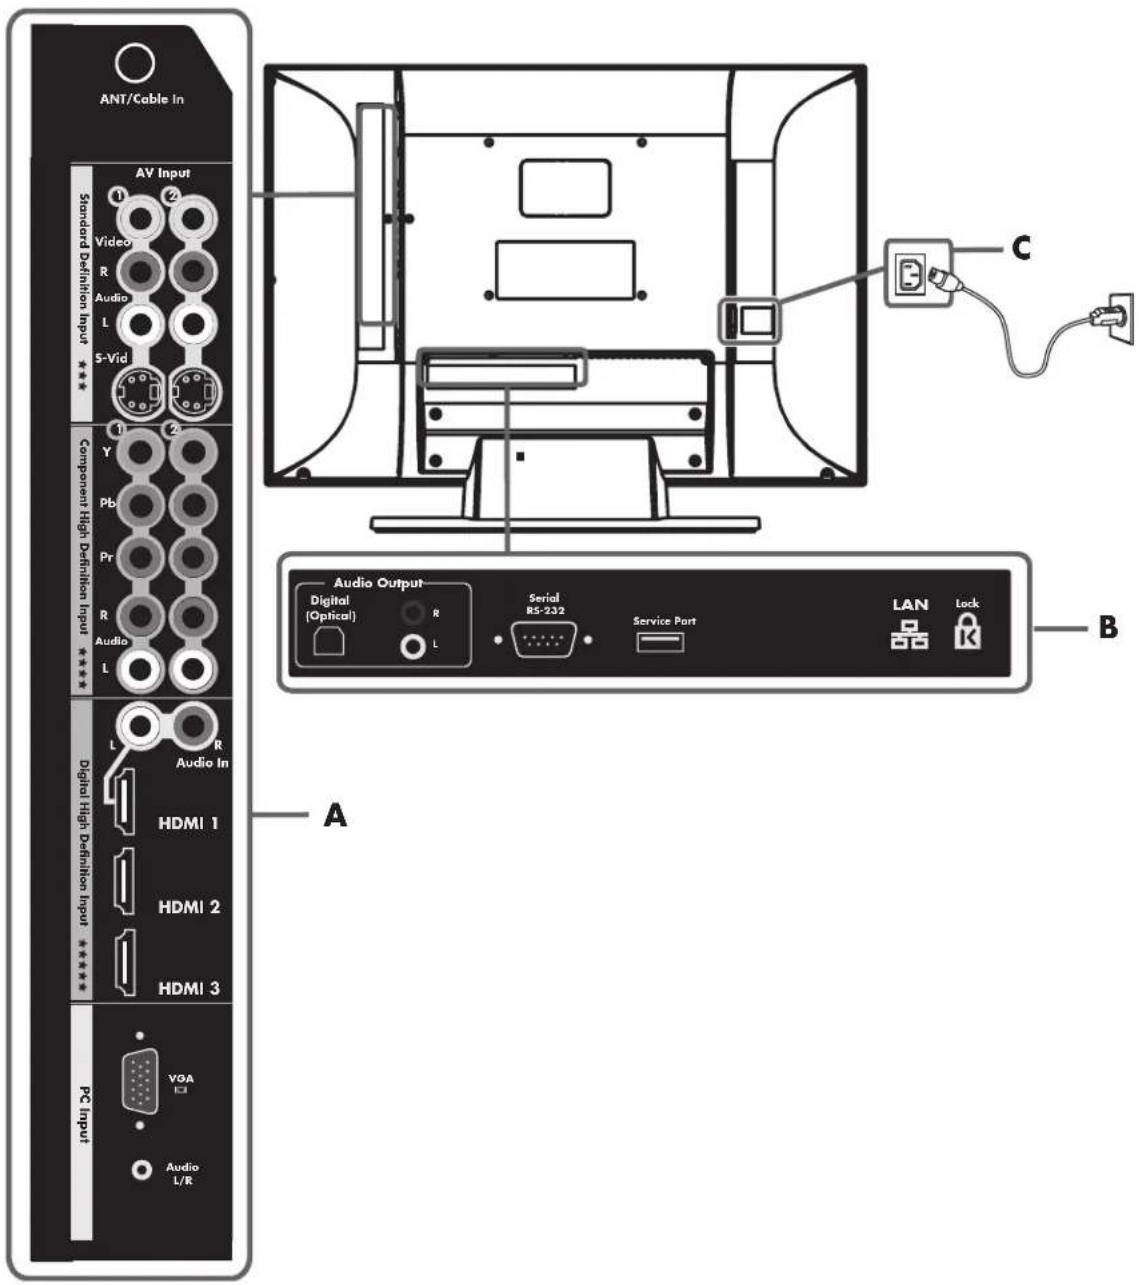
| Left side TV labels (A) Description | |
| ANT/Cable In Connect | a coaxial cable from an off-air antenna or cable signal source. |
| Standard Definition Input: ■AV Input 1: S-Vid, Video, Audio L and R ■AV Input 2: S-Vid, Video, Audio L and R | For each AV Input connector set: Connect an S-Video cable and left-right audio cables from optional equipment. Or Connect a composite video cable and left-right audio cables from optional equipment. (Audio L and R connectors are shared within the AV connector set.) |
! Both the S-Vid and Video connectors share Audio L and R connectors. (The AV Input 1 set of S-Vid and Video connectors share Audio connectors; the AV Input 2 S-Vid and Video connectors share Audio connectors.)
Do not connect video cables to both the S-Vid and Video connectors in a set.
| Left side TV labels (A) Description | (Continued) |
| Component High Definition Input: ■1: Y, Pb, and Pr, and Audio L and R ■2: Y, Pb, and Pr, and Audio L and R | Connect component video cables and left-right audio cables from optional equipment. Supports 480i, 480p, 720p, and 1080i analog standard and high-definition format inputs. The TV automatically determines what has been connected. Some set-top boxes must be set for a specific output resolution. |
| Digital High Definition Input: ■HDMI 1 (with Audio In L and R) ■HDMI 2 ■HDMI 3 | Supports 480i, 480p, 720p, 1080i, and 1080p digital format inputs. The TV automatically determines what has been connected. Some set-top boxes must be set for a specific output resolution. For each HDMI (High-Definition Multimedia Interface) connector: Connect an HDMI cable from optional digital, high-definition equipment. For HDMI 1 with Audio In L and R: Connect a DVI cable and DVI-to-HDMI converter and left-right audio cables from optional DVI equipment. |
| PC Input: ■VGA ■Audio L/R | Connect a VGA (video graphics array) cable and an audio cable from your PC (Line out) to use the TV as a monitor. |
| Center TV labels (B) Description | |
| Audio Output: ■Digital (Optical) ■Audio Output L and R | For sound to an external audio system: ■Connect an optical cable for digital sound out to an optional external digital audio system. ■Connect left-right audio cables for stereo sound out to an optional external (analog) audio system. Use the left (white) connector for mono sound (single cable). |
| Serial RS-232 Used | for control purposes only. |
| Service Port Used | for service purposes only. |
| LAN (Wired) Connect an Ethernet cable to your wired home network. | |
| Kensington Lock slot | Use to attach a lock to secure your TV. |
! Wireless local area network (LAN) antennas (not shown) are internal to the TV and can be used to connect the TV to your wireless home network.
| Right side TV label (C) Description | |
| AC In Connect the | included AC power cord. NOTE: Use only the provided power cord. |
Cleaning
Cleaning precautions
Unplug the TV before cleaning the screen.
The TV screen has a special antiglare coating. Using solvents, such as alcohol, or abrasive materials, such as a premoistened or chemically treated towel, may affect the screen coating or bezel paint.
Do not expose the product to volatile gases or fluids such as pesticides.
Do not put the TV in contact with vinyl or rubber products for an extended period of time. Extended contact may result in the removal of the coating or degradation of the surface.
Cleaning the TV
To maintain the high-gloss finish on your new HDTV, HP recommends cleaning the TV only with a Microfiber cloth.
Microfiber cloths contain a blend of synthetic fibers designed to clean the surface of the TV without scratching. All cloths specifically labeled as "Microfiber" on the packaging are suitable for use on this TV and can be purchased at a variety of retail outlets.
To clean the screen, spray a soft lint-free cloth with water to lightly moisten it. Gently wipe the screen, but without pressing on it.
To clean the outer cabinet, use the same method.
Do not use liquid or aerosol cleaners.

To maintain the high-gloss finish on your new HDTV, HP recommends cleaning the TV only with a Microfiber cloth.
Setting Up the TV
HP recommends professional installation from an authorized installer to ensure maximum enjoyment of your TV. Be sure to read all the safety information and precautions before starting installation. See the following topics:
"Important Safeguards" on page iii
"Important Safety Instructions" on page v
"Important Information" on page viii
Selecting a Good Location
When selecting the location for your TV, consider the following conditions:
■Power cord length: Choose a location with easy access to an AC power outlet.
Cable lengths and distances to attached units: Check that cables can reach the TV.

To view high-definition programming, you must have connected to the TV a high-definition signal source, such as an off-the-air high-definition antenna or cable HD signal, a cable or satellite provider HD set-top box, or an HD-DVD player. All sources, except an HD antenna or cable HD signal, must connect to one of the High Definition Input connector sets on the TV.
You may view high-definition digital media through your home network.
Do not install the TV on an unstable cart or stand; the unit may fall over and cause injury.
- Do not install the TV where it has a protruding edge, such as on a small table where the display overhangs the table surface.
Do not hang the TV from the ceiling; the unit may fall and cause injury.
Avoid direct sunlight that may damage the display or interfere with the operation of the remote control.
- Avoid areas of high humidity or damp conditions that may cause fire or electrical shock.
■Do not install TV near appliances, such as a microwave, or near a heat source, such as a fireplace or radiator.
Do not place the TV on a sloped or unstable surface.
■Provide a minimum of 4 inches (10 cm) of ventilation clearance around the TV.
■Wall-mounting: Your TV can be wall-mounted by using an HP-approved wall-mounting kit (sold separately):
LCD TV Flat Mount, Model PY043AA#ABA
LCD TV Tilting Mount, Model PY044AA#ABA
To remove the TV stand, see "Removing or attaching the stand" on page 21. Then follow the installation instructions provided with the wall-mounting kit. HP recommends professional installation if you want to wall-mount your TV.
Lifting the TV
The TV is heavy; be sure to use ergonomically correct lifting procedures when moving the TV.
Due to the size and weight of the TV, it is recommended that a minimum of two people move it.
To transport the TV, grasp the left and right ends of the panel in the areas below and above the screen. Do not lift the TV by using the attached stand.
Move the TV gently. Never place the TV with the glass screen facing downward, unless it is protected with pads.

CAUTION: Do not lift or move the TV by using the attached stand. Instead, grasp the left and right ends of the panel in the areas below and above the screen.
Connecting to the TV
Set up the TV by connecting cables and connecting the AC power cord.
Choosing the AV connection to use
When connecting optional audiovisual (AV) equipment as signal sources, the connectors on the equipment may limit the type of connection you can use.
When your optional equipment has more than one type of output connector, choose the connection that provides the best-quality playback image.
The following table lists the available optional AV equipment connections on the TV.
| AV connection to use, in order of decreasing video playback quality (best to good) | ||
| Connection description TV connector Cable plug | ||
| HDMI (High-Definition Multimedia Interface) transmits an all-digital signal. This is the recommended choice for high-definition signals, and for playback from a digital set-top box, DVD player, or DVR device. For a DVI-D device, you can use a DVI cable with a DVI-to-HDMI converter to connect video to the HDMI 1 connector on the TV, and an audio cable to connect audio from the source to the Audio In L and R connectors on the TV. Use this connection for standard or high-definition video signals in 480i, 480p, 720p, 1080i, or 1080p input format from a set-top box, DVD player, or other device. This TV does not support Dolby Digital audio input over HDMI. When connecting a set-top box, DVD player, or other device by means of the HDMI connector, set the device audio output to PCM format. | ||
| Component video (Y, Pb, and Pr) transmits video as separate red, green, and blue signals. Use this connection for standard or high-definition video signals in 480i, 480p, 720p, or 1080i format from a DVD player or other equipment. | ||
| S-Video transmits standard video as separate color and black-and-white image signals, and delivers a sharper image than a composite video connection. | ||
| Video In (composite video) transmits standard video as a single signal. | ||
The procedures that follow describe how to connect optional equipment for each type of AV connection, including the audio connections when applicable.
Connecting the TV signal sources

WARNING: Before connecting the TV to any other electronic device, unplug the TV and electronic device AC power cords from the AC power outlet.
The following is an explanation of the types of connections that are used for a coaxial cable.
If your outdoor antenna uses a 75-ohm coaxial cable with an F-type connector, screw it onto the ANT/Cable In connector at the rear of the TV set.
A 75-ohm system is generally a round cable with an F-type connector that can easily be attached to a connector without tools (sold separately).
A 300-ohm system is a flat, twin-lead cable that can be attached to a 75-ohm connector through a 300/75-ohm adapter (sold separately).

An F-type connector should be finger-tightened only. When connecting the RF cable to the TV, do not use tools to tighten the F-type connector, because this may cause damage to the TV.
A 75-ohm coaxial cable, round
B 300-ohm twin-lead cable, flat
C F-type connector

To connect an external sound system, see "Connecting an external sound system" on page 17.
Connecting the cable TV or air broadcast antenna
Use standard 75-ohm coaxial cable to connect a ground antenna or cable TV input source to the TV. Use shielded coaxial cable to reduce radio frequency (RF) interference.
Optional equipment, cable TV service, and all cables are sold separately.

CAUTION: Unplug power for the TV and all connected components before connecting the antenna or cable.
1 Connect a coaxial cable to the input source.
2 Connect the input source coaxial cable to the ANT/Cable In connector on the rear of the TV.
If you find it difficult to screw the coaxial cable onto the TV connector, use the Ant/Cable Adapter from the box; screw the threaded end of the
adapter into the input source coaxial cable, and then push the adapter onto the ANT/Cable In connector on the rear of the TV.
3 Connect power to the TV; see "Connecting power to the TV" on page 21.
4 Turn on the TV; see "Turning the TV On and Off" on page 23.
5 Select the input source to view, as well as the Aspect, and other options; see "Operating the TV" on page 29.
Connecting cable or satellite with a set-top box
Connecting your TV directly to the audio and video output of your set-top box ensures a more vivid picture and enhances your viewing enjoyment. See "Choosing the AV connection to use" on page 9 for connector and cable information.
Optional equipment and all cables are sold separately. You can connect a digital TV set-top box (air or cable), and other AV equipment, by using a connector set from one of the following inputs:
Digital High Definition Input: Connect an HDMI cable from the digital, high-definition cable or satellite set-top box to any of the HDMI connectors.
Or
Connect a DVI-D cable and DVI-to-HDMI converter from the digital, high-definition cable or satellite set-top box with a DVI connector to HDMI 1, and left-right audio cables to Audio In L and R.
HDMI supports 480i, 480p, 720p, 1080i, and 1080p input formats. The TV automatically determines what has been connected. Some set-top boxes must be set for a specific output resolution. The HDMI connectors are:
HDMI 1 (with Audio In L and R)
HDMI2
HDMI3
■Component High Definition Input: Connect component video cables and left-right audio cables from the high-definition cable or satellite set-top box.
Component supports 480i, 480p, 720p, and 1080i input formats. The TV automatically determines what has been connected. Some set-top boxes must be set for a specific output resolution.
The Component connectors are:
1:Y,Pb,and Pr,and Audio L and R
2:Y,Pb,and Pr,and Audio L and R
Standard Definition Input: Connect an S-Video cable, or a composite video cable, and left-right audio cables from the cable or satellite set-top box. (Audio L and R connectors are shared within the AV connector set.)
The AV Input connectors are:
1: S-Vid or Video, and Audio L and R
2: S-Vid or Video, and Audio L and R

The Standard Definition Input (S-Vid, or Video) connectors do not pass high-definition TV signals.
To connect the set-top box:

CAUTION: Unplug power for the TV and all connected components before connecting the set-top box.
1 Connect the set-top box input source cable(s) to the rear of the TV, using one of the connector sets:
Digital High Definition Input: Connect an HDMI cable to any of the HDMI connectors: HDMI 1, HDMI 2, or HDMI 3. Or
Connect a DVI-D cable and DVI-to-HDMI converter (from digital, high-definition cable or satellite set-top box with a DVI connector) to HDMI 1, and left-right audio cables to Audio In L and R.
■Component High Definition Input:
Connect component video cables and left-right audio cables to the Component connectors:
1:Y,Pb,and Pr,and Audio L and R Or
2: Y, Pb, and Pr, and Audio L and R
Standard Definition Input: Connect an S-Video cable, or a composite video cable, and left-right audio cables to the AV Input connectors:
1: S-Vid or Video, and Audio L and R Or
2: S-Vid or Video, and Audio L and R
S-Vid connection
Video connection
!
Both the S-Vid and Video connectors share Audio L and R connectors. (The AV Input 1 set of S-Vid and Video connectors share Audio connectors; the AV Input 2 S-Vid and Video connectors share Audio connectors.)
Do not connect video cables to both the S-Vid and Video connectors in a set.
2 Connect the cables to the set-top box.
3 Turn on the set-top box.
4 Connect power to the TV; see "Connecting power to the TV" on page 21.
5 Turn on the TV; see "Turning the TV On and Off" on page 23.
6 Select the input source to view, as well as the Aspect, and other options; see "Operating the TV" on page 29.
Connecting a DVD player, VCR, DVR, game console, or camcorder
You can connect optional equipment to the TV, such as an HD-DVD, Blu-ray or other HD equipment, DVD player, VCR, DVR, and so on, including an external sound system. Optional equipment and all cables are sold separately.
To connect a VCR for playback, you can use either S-Vid or Video (composite video) connections. The TV does not have video output connectors.

CAUTION: Unplug power for the TV and all connected components before connecting optional equipment. Ensure that the optional equipment is powered off.
Connecting digital, high-definition equipment by using an HDMI cable
This is the recommended connection for HD video and audio. The HDMI cable is sold separately.
1 Connect an HDMI cable to any of the HDMI connectors on the rear of the TV: HDMI 1, HDMI 2, or HDMI 3. (There are no separate audio inputs required for HDMI.)
2 Connect the cable to the DVD player or source equipment.
3 Turn on the DVD player, and start play.
4 Connect power to the TV; see "Connecting power to the TV" on page 21.
5 Turn on the TV; see "Turning the TV On and Off" on page 23.
6 Select the input source to view, as well as the Aspect, and other options; see "Operating the TV" on page 29.
Connecting digital, high-definition equipment by using a DVI cable
The DVI-D cable, DVI-to-HDMI converter, and the audio cable are sold separately.
1 Connect a DVI-D cable and DVI-to-HDMI converter to HDMI 1 on the rear of the TV, and left-right audio cables to Audio In L and R.
2 Connect the DVI cable to the DVI-D connector on the DVD player.
3 Connect the audio cable to the audio out connectors on the DVD player.
4 Turn on the DVD player, and start play.
5 Connect power to the TV; see "Connecting power to the TV" on page 21.
6 Turn on the TV; see "Turning the TV On and Off" on page 23.
7 Select the input source to view, as well as the Aspect, and other options; see "Operating the TV" on page 29.
Connecting high-definition equipment using component cables
There are two sets of high-definition Component connectors you can use:
1:Y,Pb,and Pr,and Audio L and R
2:Y, Pb, and Pr, and Audio L and R
1 Connect component video cables and left-right audio cables to the Component connectors on the rear of the TV.
2 Connect the cables to the DVD player.
3 Turn on the DVD player, and start play.
4 Connect power to the TV; see "Connecting power to the TV" on page 21.
5 Turn on the TV; see "Turning the TV On and Off" on page 23.
6 Select the input source to view, as well as the Aspect, and other options; see "Operating the TV" on page 29.
Connecting standard-definition equipment by using S-Video or Video cables
Connect a standard-definition DVD player, VCR, game console, camcorder, or other AV equipment by using S-Vid or Video (composite video) connectors. These connectors do not pass high-definition signals.
! The S-Vid and Video connectors share the audio connectors in the set. Do not connect video cables to both the S-Vid and Video connectors in a set.
1 Connect an S-Video cable, or a composite video cable, by using the AV Input connector sets on the rear of the TV:
1: S-Vid or Video, and Audio L and R
■2: S-Vid or Video, and Audio L and R
S-Vid connection
Video connection
2 Connect the video cable to the DVD player or other source equipment:
For a DVD player, VCR, DVR, or other source equipment that has a S-Video connector, use a S-Video cable.
Or
For a DVD player, VCR, DVR, or other source equipment that has a composite connector, use a composite cable.
3 Connect the audio cable to the left and right audio connectors on the TV for the connector set.
4 Connect the audio cables to the DVD player.
5 Turn on the DVD player, and start play.
6 Connect power to the TV; see "Connecting power to the TV" on page 21.
7 Turn on the TV; see "Turning the TV On and Off" on page 23.
8 Select the input source to view, as well as the Aspect, and other options; see "Operating the TV" on page 29.
Connecting a VCR for recording
The TV does not output a signal for recording.
Connecting a PC
Use the following instructions when connecting a PC or other source equipment to the PC Input (VGA and Audio L/R) connectors on the rear of the TV. The PC Input is a selectable input source (PC in the source list). Cables are sold separately.

Refer to "PC Compatibility Chart" on page 88 for a list of PC signals compatible with the TV.
You can also connect a PC with a DVI connector:
For a PC with a DVI-D connector, connect a DVI-D cable and DVI-to-HDMI converter to HDMI 1, and left-right audio cables to Audio In L and R.
For a PC with a DVI-I connector, connect a DVI-I cable and a DVI-to-VGA converter to the PC Input (VGA) connector and audio to the PC Input Audio L/R connector.

Only the HDMI input connectors support 1080p format input.
To connect a PC by using the PC Input connectors:

CAUTION: Unplug power for the TV and all connected components before connecting a PC. Ensure that the PC is powered off.
1 Connect the PC or source equipment video cable to the TV by using the PC Input (VGA) connector.
2 Connect the source equipment audio cable to the PC Input Audio L/R connector.
3 Connect the VGA and audio cables to the PC or source equipment.
4 Connect power to the TV; see "Connecting power to the TV" on page 21.
5 Turn on the TV; see "Turning the TV On and Off" on page 23.
6 Connect the power to, and turn on, the PC or source equipment.
7 Select the input source to view, as well as the Aspect, and other options; see "Operating the TV" on page 29.
8 Adjust the picture, including Auto Sync, by using the onscreen display (OSD) Picture menu PC Screen option; see "Adjusting the PC Screen image" on page 53.
You can also start Auto Sync for the PC image by pressing the Select button on the TV.
Connecting an external sound system
You can connect an external sound system to the TV by using the Audio Output connectors for a digital audio or analog audio signal:
Use an optical audio cable and the Audio Output Digital (Optical) connector on the rear of the TV to provide a digital audio signal to an external sound system, such as a digital receiver or a surround sound system.
Use an audio cable and the Audio Output Left and Right connectors on the rear of the TV to provide an analog audio signal to an external sound system, such as an analog amplifier or stereo system.
The input source signal and the Audio menu settings in the onscreen display determine the type of audio output. This TV does not support Dolby Digital audio input over HDMI. When connecting a set-top box, DVD player, or other device by means of the HDMI connector, set the device audio output to PCM format. See "Understanding audio output" on page 54 for information on the audio output type.
Selecting the type of sound system
The external sound system can determine how you connect the video/ audio input sources to the TV and the TV to the external audio system. Select:
Home theater system, see "Home theater system (without video pass-through)" on page 17.
A/V receiver system, see "A/V receiver system (with video pass-through)" on page 18.
■Powered speakers or Amplifier, see "Powered speakers or amplifier" on page 18.
Home theater system (without video pass-through)
When you have a home theater system without video pass-through, do the following:
■Route the audio from all source devices to the home theater.
■Route the video from all source devices to the TV.
Use the TV remote control to select the input source (Source button).
Use the home theater remote control to select the audio input.
Use the source device remote control to control playback.
If using the TV ANT/Cable connector:
Connect the signal source to the ANT/Cable connector. See "Connecting the cable TV or air broadcast antenna" on page 10.
Connect audio cables from the TV Audio Output (either digital optical or analog stereo, or both) to the home theater input.
If the home theater does not support Digital Dolby, set the digital audio format in the onscreen display Audio menu Digital Audio option to PCM. See "Choosing the digital audio output mode" on page 54.
To program the TV universal remote to control all the devices, see "Programming the Remote Control for a Home Entertainment Device" on page 43.
A/V receiver system (with video pass-through)
When you have an A/V receiver system with video pass-through, do the following:
■Route the audio and video from all source devices to the A/V receiver.
For HDMI source devices, you may need to use a separate digital audio cable in addition to the HDMI cable.
Use a single video cable from the A/V receiver to the TV.
Use the TV remote control to select the input source (Source button) where you've connected the A/V receiver.
Use the A/V receiver remote control to select the video source device.
Use the source device remote control to control playback.
If using the TV ANT/Cable connector:
Connect the signal source to the ANT/Cable connector. See "Connecting the cable TV or air broadcast antenna" on page 10.
Connect cables from the TV Audio Output (either digital optical or analog stereo, or both) to the A/V receiver input.
If the A/V receiver does not support Digital Dolby, set the digital audio format in the onscreen display Audio menu Digital Audio option to PCM. See "Choosing the digital audio output mode" on page 54.
To program the TV universal remote to control all the devices, see "Programming the Remote Control for a Home Entertainment Device" on page 43.
Powered speakers or amplifier
When you have powered speakers or a stereo amplifier, do the following:
■Route the audio and video from all source devices to the TV.
Connect audio cables from the TV Audio Output (either digital optical or analog stereo, or both) to the powered speakers or amplifier input.
Use the TV remote control to select the input source (Source button).
Set the digital audio format in the onscreen display Audio menu Digital Audio option to PCM. See "Choosing the digital audio output mode" on page 54.
■Select the input on the powered speakers or amplifier.
Use the source device remote control to control playback.
If using the TV ANT/Cable connector:
Connect the signal source to the ANT/Cable connector. See "Connecting the cable TV or air broadcast antenna" on page 10.
■If the powered speakers or amplifier does not support Digital Dolby, set the digital audio format in the onscreen display Audio menu Digital Audio option to PCM. See "Choosing the digital audio output mode" on page 54.
For HDMI source devices, connect a separate digital audio cable from the source device directly to the powered speakers or amplifier. If the powered speakers cannot access a second input, use analog output from the TV. This TV does not support Dolby Digital audio input over HDMI, and does not output a digital audio signal from HDMI input.
To program the TV universal remote to control all the devices, see "Programming the Remote Control for a Home Entertainment Device" on page 43.
Connecting the external sound system
△
CAUTION: Unplug power for the TV and all connected components before connecting an external sound system. Ensure that the external sound system is powered off.
1 Connect the external sound system to the TV:
For a digital connection, connect an optical audio cable to the Audio Output Digital (Optical) connector on the rear of the TV and to the external sound system, such as a digital receiver or a surround sound system.
For an analog connection, connect an audio cable to the Audio Out L and R connectors on the rear of the TV and to the external sound system, such as an analog amplifier or stereo system.
2 Connect power to the TV; see "Connecting power to the TV" on page 21.
3 Turn on the TV; see "Turning the TV On and Off" on page 23.
4 Connect power to, and turn on, the external sound system.
5 Define the digital audio format in the onscreen display Audio menu Digital Audio option; see "Choosing the digital audio output mode" on page 54.
6 If desired, you can turn off the TV speakers by using the onscreen display Audio menu Speakers option; see "Using the Audio Menu" on page 54.
Connecting the TV to your home network (LAN)
Connect the TV to the router in your PC local area network (LAN) by connecting an Ethernet cable for a wired connection, as described in this procedure. For a wireless connection, the TV has internal wireless antennas, which are ready to use; no antenna or other connection is necessary.
The TV requires use of a router for connection to your established home network (LAN).
A wired connection (Ethernet 802.3) uses an Ethernet cable and connects through a router.
■A wireless connection (Wi-Fi 802.11a/b/g/n) must use the TV internal wireless antennas and connect through a router.

HP recommends use of dual-band 802.11n Wi-Fi for best wireless performance.
A
B
A PC with LAN connection through a wired router to the TV

B PC with LAN connection through a wireless router to the TV
The TV internal wireless antennas do not function as a TV antenna for air-broadcast television signal reception.

You can connect your TV using both a wired and a wireless LAN connection to your PC router, but only one network connection is supported at a time.
To switch, select the network type by using the Media button, selecting the Settings menu, and then selecting Network; see "Changing network settings" on page 75.
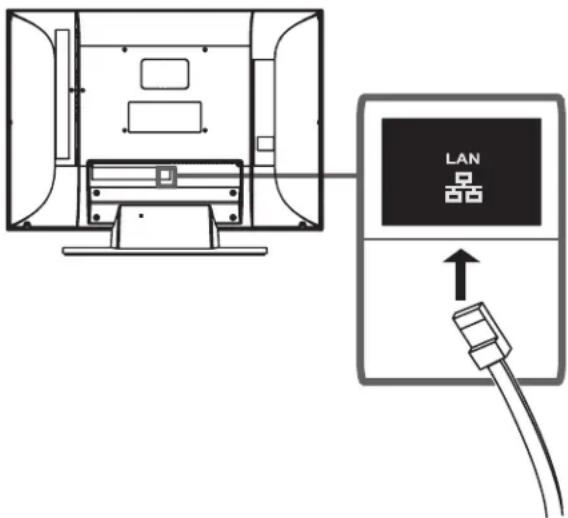
Connect the Ethernet cable
Use these steps to connect the Ethernet cable for a wired connection to your home network:

CAUTION: Unplug power from the wall for the TV and all connected components before connecting to your network.
1 Connect the Ethernet cable to your network router and to the Ethernet LAN connector on the rear of the TV. The LAN connector is beneath the edge of the TV LAN label.
2 Connect power to the TV; see "Connecting power to the TV" on page 21.
3 Turn on the TV; see "Turning the TV On and Off" on page 23.
Connecting power to the TV
1 Connect the AC power cord to the connector on the rear of the TV.

2 Connect the AC power cord into the AC power outlet.
3 Insert the cable clamp from the box into the square hole on the rear of the TV.
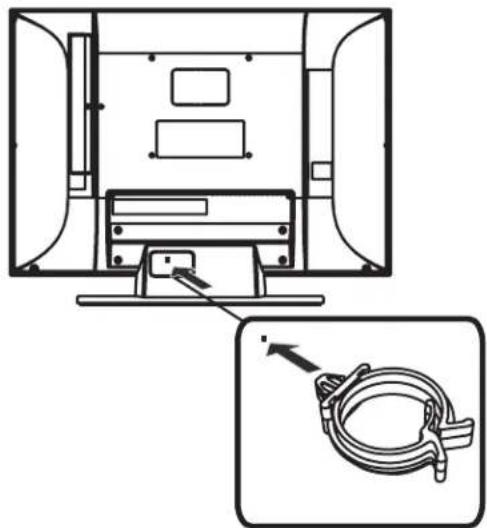
4 Route the cables through the cable clamp.
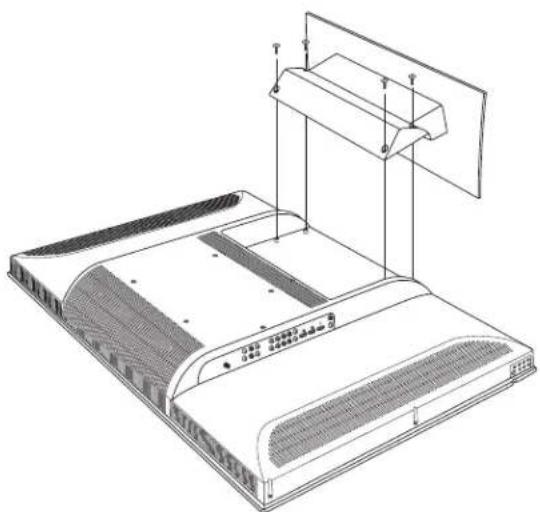
Removing or attaching the stand
Your TV comes with the stand attached. Reverse these steps to attach the stand.

CAUTION: Use two people to disassemble or assemble the TV.
Before removing the stand, unplug the AC power cord from the AC power outlet, and remove any cabling.
Carefully place the TV panel with the glass screen facing downward on a padded, stable table with the TV stand extended over the edge of the table.

WARNING: Do not allow the stand to drop onto the TV panel.
2 Remove four long screws that secure the stand (pedestal) to the rear of the TV, and then lift off the stand.
3 To disassemble the stand, turn the stand over and remove four short screws that secure the base to the pedestal.
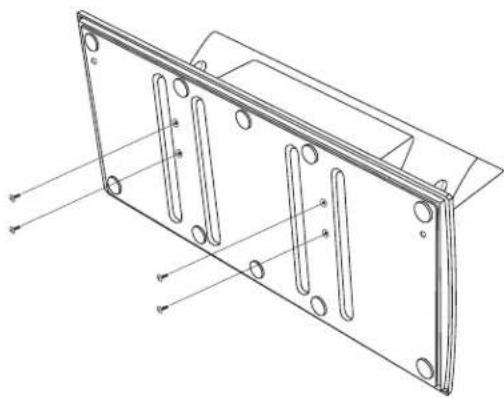
4 Set the stand upright. Hold the base in place and pull up on the pedestal to take the two pieces of the stand apart. (When assembling the stand, press the pedestal into the base until it is completely seated.)
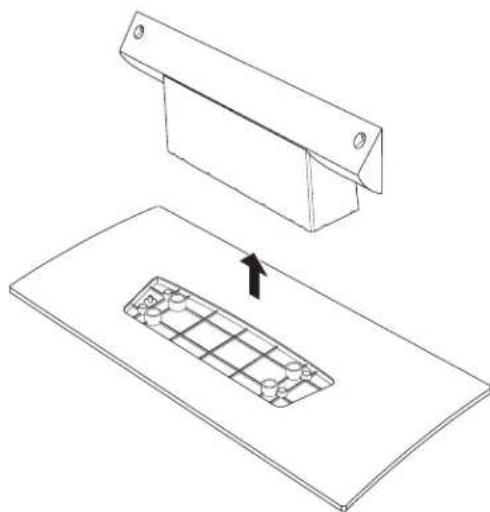
5 Store the stand and screws for future use.
Turning On the TV
Turning the TV On and Off
The TV has a Power button on the right side of the panel. You can also use the Power button on the remote control to turn on the TV.
Pressing the Power button turns the TV either on or off.
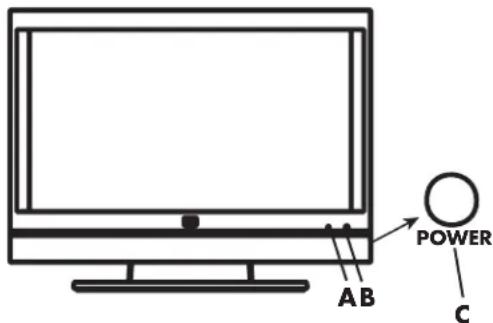
A Power light
B Remote control sensor
C Power button
The Power light shows whether the TV is on or off.
| Power light TV status | |
| Lights blue TV is off but plugged into the power source | |
| Lights amber TV is power- ing on (light turns off after about 30 seconds) | |
| Off TV is on, or the AC power cord is disconnected | |
| Flashing amber or flashing blue | Startup diagnostics are in progress or an error occurred |

The initial TV setup starts when the TV powers on for the first time. If the TV has been turned on before, the Setup Wizard does not start. To start the Setup Wizard from the onscreen display (OSD) Setup menu, see "Starting the Setup Wizard" on page 64.
When you will not be using the TV for an extended period of time, press the Power button to turn off the TV, and then unplug the AC power cord.
Using the remote control to turn the TV on or off
Point the remote control at the remote control sensor on the front of the TV, and press the remote control Power button. The TV turns on or off.
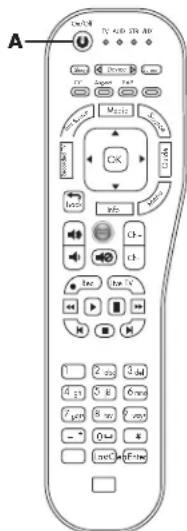
A Remote Control Power button
Using the First-Time Setup Wizard
Initial TV Setup
When you turn on the TV for the first time, a first-time Setup Wizard guides you through the following tasks:
Setting the onscreen display language.
Setting the clock mode (if manual, enter the time zone, date, and time).
Selecting a signal source.
- Searching the TV signal source (antenna or cable) and memorizing the available TV channels. (Wait while the channel search operation automatically searches for a signal from all available channels on the ANT/Cable connector).
You can start the Setup Wizard by using the Setup menu in the onscreen display; see "Starting the Setup Wizard" on page 64.
Preparing
Complete the following steps before you press the Power button on the remote control:
1 Insert the batteries into the remote control.
2 Connect the signal source antenna or cable to the TV.
3 Plug in the AC power cord into the AC outlet.
4 Turn on the TV.
Selecting or entering items during Initial TV Setup
Press the Arrow buttons on the remote control to select the desired item, and then press the OK button.

To view high-definition programming, you must have connected to the TV a high-definition signal source, such as an off-the-air high-definition antenna or cable HD signal, a cable or satellite provider HD set-top box, or an HD-DVD player. All sources, except an HD antenna or cable HD signal, must connect to one of the High Definition Input connector sets on the TV.
You may view high-definition digital media through your home network.
Next steps
This completes the initial TV setup.
To prepare the TV for using digital media (the Media button on the remote control), continue with "Setting Up the TV for Digital Media" on page 25.
Setting Up the TV for Digital Media
The MediaSmart TV (using the Media button on the remote control) provides you a simple way to connect to your PC or online services to do the following:
View photos
Watch videos
■Listen to music
■Access online services for music, video, or photos
When you press the Media button on
the remote control for the first time, a
wizard opens to guide you through the
setup for the network at the TV and at the PC.
Media
Before you can enjoy digital media, you must complete these actions in the following order:
Complete initial setup of the TV; see "Using the First-Time Setup Wizard" on page 24.
Use the remote control to select settings for wired or wireless connection to your network, as described in this section.
Install the Installation CD software on your PC, as described in this section.
Complete the software setup, as described in this section.
The Microsoft® Windows Media Player (WMP) software uses your home network to stream photos, videos, and music to your TV. You select which media folders on your PC you would like to share with your TV. Windows Media Player must be installed, and the TV must be allowed to display the media shared from your PC. These steps occur during the software installation.
You can use any UPnP-compliant program to stream media to the TV. HP recommends and supports Windows Media Player 11.

You can install Microsoft Windows Media Player on multiple PCs to access the media files stored on the PCs. The TV and all PCs must be connected to your LAN and be powered on.
Verifying the TV connections
Before starting, check that the TV is connected to the LAN router, and the TV and network equipment are both powered on. Refer to "Connecting the TV to your home network (LAN)" on page 19 for instructions to connect the TV to a wired network.
Completing the initial TV setup
The initial TV setup must be completed on your TV before proceeding with the Media settings. If you canceled the wizard when you turned on the TV for the first time, start the TV Setup Wizard again using the Setup menu; see "Starting the Setup Wizard" on page 64.
Setting up a wired or wireless connection
Follow the steps for your connection:
See "Setting up a wired connection" on page 26.
See "Setting up a wireless connection" on page 26.
Setting up a wired connection
1 Point the remote control at the remote control sensor on the display and, if necessary, press the Device button to light the TV indicator.
On/OFF

TV AUD STB AM
0 0 0
Device
2 Press the Media button.
Media
When you press the Media button on the remote control for the first time, a wizard guides you through the network setup at the TV and at the PC (by using the Installation CD).
3 Follow the onscreen instructions. For a wired connection, the wizard checks for the network, the IP address, and then for access to the Internet across the network.
If the TV shows an error message:
Check that the wired LAN (Ethernet) cable is properly connected at the TV and the router.
Check that the computer, router, and other network equipment are all turned on.
4 The TV shows a message when it is time to set up the PC using the Installation CD, which is included in the box. Insert the Installation CD into a CD drive on your PC.
5 Follow the onscreen instructions to:
Install and set up Windows Media Player 11, and then authorize your MediaSmart TV and add media folders to the Windows Media Player Library.
Set up Online Services.

The Installation CD installs the MediaSmart software on your PC. This software supports playback of some files that Windows Media Player 11 may not; see "Supported Media File Types" on page 89.
6 Click Finish when the installation is complete at your PC.
7 Go to your TV and press OK on the remote control.
Wait while the TV looks for authorized servers on the network.
Press the Media button to display the main digital media menu. To use the menu, refer to "Using Digital Media" on page 67.

The TV Standby Mode is Power Saver by default. To start quickly from the standby state, especially when using digital media, change the Standby Mode to Fast Start in the OSD Setup menu; see "Setting the Standby Mode" on page 65.
Setting up a wireless connection
1 Ensure that the wireless network is working.
2 Point the remote control at the remote control sensor on the display and, if necessary, press the Device button to light the TV indicator.
On/Off
TV AUD STB AM

000
000
Device
3 Press the Media button.
Media
When you press the Media button on the remote control for the first time, a wizard guides you through the network setup at the TV and at the PC (by using the Installation CD).

For a wireless network, you need the network name or SSID (service set identifier), and the network security information (the WEP passphrase, or the WPA key).
4 Follow the onscreen instructions. To use the onscreen keyboard:
Press the Arrow buttons on the remote control to select an item, and then press OK to enter it. Or
Press a number button on the remote control as needed to scroll through and select a character, and then press Enter.
5 The TV shows a message when it is time to set up the PC using the Installation CD, which is included in the box. Insert the Installation CD into a CD drive on your PC.
6 Follow the onscreen instructions to:
Install and set up Windows Media Player 11, and then authorize your MediaSmart TV and add media folders to the Windows Media Player Library.
Set up Online Services.

The Installation CD installs the MediaSmart software on your PC. This software supports playback of some files that Windows Media Player 11 may not; see "Supported Media File Types" on page 89.
7 Click Finish when the installation is complete at your PC.
8 Go to your TV and press OK on the remote control.
Wait while the TV looks for authorized servers on the network.
9 Press the Media button to display the main digital media menu. To use the menu, refer to "Using Digital Media" on page 67.

The TV Standby Mode is Power Saver by default. To start quickly from the standby state, especially when using digital media, change the Standby Mode to Fast Start in the OSD Setup menu; see "Setting the Standby Mode" on page 65.
Operating the TV
Using the Remote Control
The remote control operates the TV. To use the remote control, point the remote control at the remote control sensor on the front of the TV.
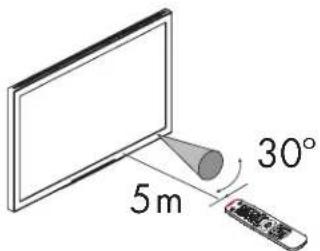
Use the remote control within a distance of 16.4 feet (5 meters) from the front of the TV remote control sensor window, and within the maximum horizontal and vertical angles of 30 degrees.
Using universal remote controls
When you want to program a universal remote control to operate your HP TV, if HP is not listed in the supported brand codes, use a Philips TV code. The HP remote control transmits Philips-licensed remote control codes.
After programming your universal remote control with a Philips TV code, it can operate your HP TV functions for: volume, mute, power, and input source.
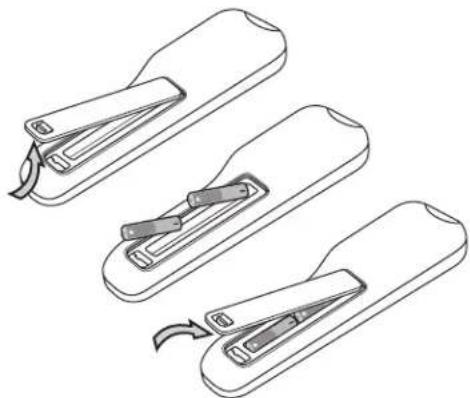
Installing or replacing remote control batteries
Insert two non-rechargeable AAA batteries into the remote control, ensuring that you place them with the proper polarity.
1 Press and open the cover on the rear of the remote control.
2 Insert the batteries into the remote control, and make sure that you match polarities.
3 Close the cover.
Do not mix together different types of batteries (for example, alkaline and carbon-zinc), or old batteries with fresh ones.
Be sure to follow the correct polarity when installing the batteries as indicated in the battery compartment. Reversed batteries may cause damage to the device.
When not using the remote control for a long period of time, remove the batteries to prevent damage or injury from possible battery leakage.
Do not try to recharge batteries that are not intended to be recharged; they can overheat and rupture. Follow the battery manufacturer's directions for the batteries you are using.
Always remove batteries as soon as they become weak. Weak batteries can leak and severely damage the unit. The battery life depends on how much the remote control is used. Replace the batteries when remote control operation becomes erratic.
Do not take apart the batteries, heat them, or throw them into a fire.
Identifying the remote control buttons
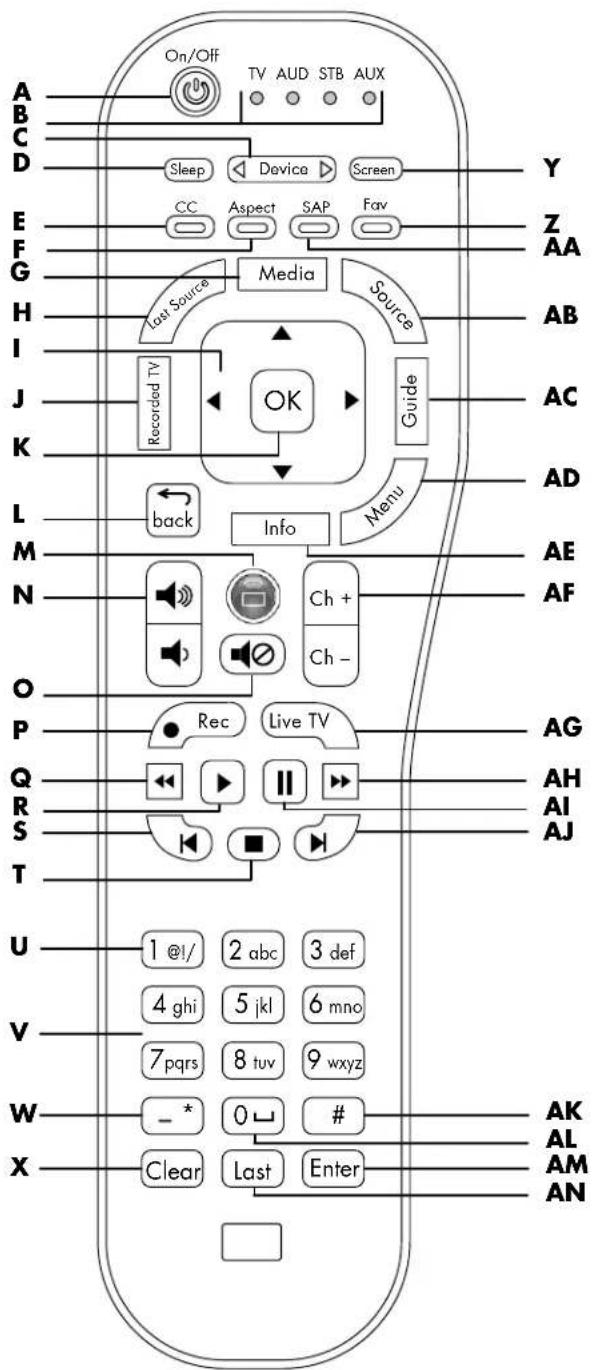
| Name | Description | Icon |
| A Pow e r Press Power to turn the TV on or off. | ||
| B l n d i c a t o r s Sh o w a t h e d e v i c e that is controlled by the remote control: TV, audio system (AUD), set-top box (STB), or auxiliary (AUX) such as a DVD player or other device. Press the Device button (C) to select the device. | ||
| C Device Press Device as needed to select the device that is controlled by the remote control; an indicator (B) lights to show the current device. | ||
| D Sleep Press Sleep to set the timer in this order: Off, 15, 30, 60, 120, or 150 minutes. | ||
| E CC or Red (context) Press CC to select a closed caption mode: Off, On, On Mute. In the digital media menus, press Red (context) to cause an action specific to the current menu or item. |
| Name | Description(Continued) | Icon |
| F A s p e Green(context) | PressAs pect to select an option for the dimensions of the TV picture image: Auto, 16:9, 4:3, Zoom 1, Zoom2, Panorama. The available options depend on the input source. In the digital media menus, press Green(context) to cause an action specific to the current menu or item. | Aspect |
| G M e d i a | Press Media to open the main digital media menu. If the TV is off, Media also turns on the TV. | Media |
| H L a s t Source | Press Last Source to change the input source to the last viewed source. | Last Source |
| I Up/ down/ left/right arrows | Press an Arrow button to move the cursor in the menu screens. | |
| J R e c TV | Press Recorded TV to open a list of recorded television programs for the device that is controlled by the remote control, if the device supports the button. | Recorded TV |
| K O K P ress OK to choose the highlighted menu option. | OK | |
| Name | Description (Continued) | Icon |
| L b a c | Press Back to go back one level in the menu. | back |
| M Connect (green round) | Press Connect to open the Online Media menu in the digital media menus. If the TV is off, Connect also turns on the TV. | |
| N V o l u | Press a Volume button to increase (or decrease) the sound level. | |
| O M u t e | Press Mute to turn sound off or on. | |
| P Rec | Press Record to begin recording on the device that is controlled by the remote control, if the device supports the button. | Rec |
| Q R e w i | Press Rewind to rewind the device that is controlled by the remote control. In the digital media menus, press Rewind to rewind (fast-reverse) the current video. | |
| R P I a y | Press Play to start the play of the device that is controlled by the remote control.In the digital media menus,press Play to stop Fast-Forward (AH) or Rewind (Q) during full-screen video,or to resume from Pause (A1) in music.To start play of an item when browsing media,select the item and press the OK (K) button. | |
| S Previous Press | Press Previous to go to the previous item for the device that is controlled by the remote control.In the digital media menus,press Previous to jump to the previous item in music or photos. | |
| T S t o p | Press Stop to stop play of the device that is controlled by the remote control.In the digital media menus,press Stop to stop play of the current media selections. |
| Name | Description (Continued) | Icon |
| U 1 @ ! / | Press 1 number button to directly select a channel and then press Enter (AM). In the digital media menus, press 1 for the number one, or for @, !, or / (slash). | 1 @! / |
| V N u m b e r s Press the number of buttons (0-9) to directly select channels, and then press Enter (AM). In the digital media menus, press a number button to enter a number. Press a number button as needed to scroll through and select a character, and then press Enter. Press 1 (U) for the number one, and at-sign, exclamation sign, or slash. Press 0 (AL) for the number zero or a space. Press Clear (X) to backspace and erase a character. | number : 3de 4 q : 5i : 5ee 7 w : 8w : 9w : - ? : 0w : # Clear : Last : Ervert | |
| W - ( D a s or * (star) | hPpress - (dash) to enter a dash for a digital channel. For example, channel 14-2. In the digital media menus, press - (dash) to enter a dash or a * (star). | - * |
| X Cle a | In the digital media menus, when entering characters, press Clear to backspace and erase one character. | Clear |
| Y S c r e n | Press Screen to off the video when playing music only. Press Screen again to show the video. | turn Screen |
| Z F a v o Blue (context) | Press Fav to view a list of your favorite channels. Press an Arrow button (I) to select a channel from the list, and then press OK (K). To add a channel to the Fav list: View the channel, press Fav to open the list on an empty line (or, press an Arrow to select an entry that you want to change), and then press Ch+ (AF). The new channel is now in the Fav list. In the digital media menus, press Blue (context) to cause an action specific to the current menu or item. | Fav |
| Name | Description(Continued) | Icon |
| AASAP/MTS or Yellow (context) | Press SAP/MTS to select from the available Secondary Audio Program (SAP) and Multi-channel Television Sound (MTS) options.In the digital media menus, press Yellow (context) to cause an action specific to the current menu or item. | SAP |
| ABSource Press | Source to open a list of the input sources. Press an Arrow button (I) to select the input source to view, and then press OK (K). Or, press Source again to close the list without changing the source. | Source |
| AC Guide Press | Guide to display the guide for the device that is controlled by the remote control, if the device supports the button. | Guide |
| ADMenu Press | Menu to open the onscreen display (OSD).Press Menu again to exit the menu and return to your TV display. | Menu |
| AE Info | Press Info to view a channel banner that contains information about the current program. | Info |
| AF Ch+Ch- | Press Ch+ (or Ch-) to select the next higher (or lower) channel.In the digital media menus, press Ch to move one page up or down in the listing. | Ch+Ch- |
| AG Live TV Press | Press Live TV to select live television for the device that is controlled by the remote control, if the device supports the button. | Live TV |
| AH Fast-Forward | Press FF to fast-forward play of the device that is controlled by the remote control.In the digital media menus, press FF to fast-forward play of the current media selection. | ▶ |
| AI Pause Press | Pause to suspend play of the device that is controlled by the remote control.In the digital media menus, press Pause to suspend play of the current media selection. | II |
| Name | Description(Continued) | Icon |
| AJ Next Press | Next to go to the next item for the device that is controlled by the remote control.In the digital media menus, press Next to jump to the next item in music or photos. | |
| AK# In the digital media menus, press # to enter the pound sign. | # | |
| AL 0 (space) | Press the 0 number button to directly select a channel and then press Enter (AM).In the digital media menus, press 0 for the number zero, or for a space. | |
| AM Enter Press | Enter after entering a channel number.In the digital media menus, press Enter to select or perform an action on the current media selection, or after entering a number. | Enter |
| AN Last Press | Last to recall the previous channel that you viewed. | Last |
Selecting a Device to Control
Perform these steps to select and operate the TV, or another device after programming a home entertainment device into your remote control for the devices AUD, STB, or AUX.
If necessary, press the Device button to light the indicator for the device you want to control.
On/Off
T
AU
D.STI
AIX

C
。
O
Device
To operate the TV, point the remote control at the TV remote control sensor window near the lower-right corner of the front of the TV display.
To operate another device, point the remote control at the device remote control sensor window.
2 If necessary, press the Power button to turn on the device.
| Device light Description | |
| TV Remote control controls your TV (already programmed). | |
| AUD Remote control controls your audio receiver (external sound system). No default manufacturer. | |
| STB Remote control controls your set-top box (for digital satellite, cable, or personal video recorder [PVR]). Motorola is the default STB. | |
| AUX Remote control controls your DVD or other entertainment device. Panasonic DVD is the default AUX. |
3 Operate the TV or device using the remote control.
For the TV, see the remaining topics in this section.
For a device other than the TV, use the device buttons supported by the device. Press the Record (Rec), Rewind, Play, Pause,
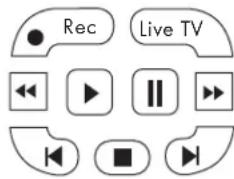
Fast-Forward (FF), and Stop buttons to operate a DVD or other connected device. The Previous and Next buttons work with DVD players. The Live TV button works with PVR and STB devices.
For information on how to program a device into your remote control, see "Programming the device code" on page 44.
For a list of the buttons available to operate a programmed device, see "Operating a DVD Player or Other Device" on page 40.
Selecting the Input Source
1 Press the Source button on the remote control, or on the TV, to open the list of input sources.
2 Press the Up or Down Arrow button on the remote control, or press the Channel buttons on the TV, to select the input source to view.
3 Press OK on the remote control, or press Select on the TV.
Or
Press the Source button again to close the list of input sources without changing the source.
The list of input sources identifies a connector set on the rear of the TV:
Antenna or Cable is the ANT/Cable In connector. The label shows the scan source selection (Antenna or Cable) of the last channel scan performed by either the Setup Wizard or the Channel menu.
■AV1 is the Standard Definition Input AV Input 1 connector set of S-Vid or Video.
■AV2 is the Standard Definition Input AV Input 2 connector set of S-Vis or Video.
■Component 1 is the Component High Definition Input 1 connector set.
■Component 2 is the Component High Definition Input 2 connector set.
HDMI 1 is the Digital High Definition Input connector HDMI 1.
HDMI 2 is the Digital High Definition Input connector HDMI 2.
HDMI 3 is the Digital High Definition Input connector HDMI 3.
PC is the PC Input (VGA) connector set.
MediaSmart shows the digital media menus as if you pressed the Media button.
You can change all the labels except Antenna (or Cable) and MediaSmart. Use the onscreen display Setup menu to change the label in the source list; see "Changing the Input Labels" on page 64.
Selecting the last source
Press the Last Source button on the remote control to change the input source to the last viewed source.
Adjusting the Volume
To increase or decrease the sound, press:
The remote control Volume buttons.

Or
The TV Volume buttons. VOL
The indicator bar on the TV shows the increase or decrease in volume.
36 HP MediaSmart HDTV User Guide
Muting the sound
Press the Mute button on the remote control to temporarily turn off the sound.
2 Press the Mute button again to restore the sound back to the previous level.
Changing Channels
To change to the next higher or lower channel, press:
The remote control Ch+ or Ch- buttons.

Or
The TV Channel buttons.
To change to another channel, enter a one-digit, two-digit, or three-digit number, or press the channel up or down buttons.
To select a specific channel number (for example, channel 25), complete the following procedure within four seconds:
1 Press the 2 button on the remote control.
2 Press the 5 button.
3 Press Enter.
To select a specific digital channel number (for example, 14-2) complete the following procedure within four seconds:
1 Press the 1 button on the remote control.
2 Press the 4 button.
3 Press the - (dash) button.
4 Press the 2 button.
5 Press Enter.
Selecting the last channel
Press the Last button on the remote control to view the previous channel that you viewed.
Selecting a favorite channel
You can quickly select a favorite channel by using the Fav button on the remote control.
Press the Fav button on the remote control to view a list of your favorite channels. Press an Arrow button to select a channel from the list, and then press OK.
The first time you open the favorites list, or after using the Setup Wizard or Auto Scan in the onscreen display Channel menu, the Fav list is empty. During the first-time Setup Wizard, or an Auto Scan, the TV searches for the TV antenna or cable signal sources, finds all the available channels, and adds them to the channel list. If you skipped or canceled during the initial setup, and have not run the Setup Wizard or the Auto Scan, there are no channels in the channel list. To be able to add channels to the favorites list, the channel must be in the channel list.
To add a channel to the Fav list:
If necessary, first run the Setup Wizard or Auto Scan in the Channel menu; see "Starting the Setup Wizard" on page 64 or see "Searching for channels" on page 56.
1 Press the Ch+ or Ch- buttons to select the channel to view.
2 Press the Fav button. The list of favorite channels opens on an empty line, if available.
3 Press Ch+ to use the empty line, or press an Arrow button to select a favorite channel entry that you want to change, and then press Ch+. The current channel is now in the Fav list.


Displaying program information
Press the Info button on the remote control to display a banner with information about the program that you are currently viewing.

Sometimes the name of the program is not included in the broadcast. In that case, the program name is not displayed.
Changing the View by Using the Aspect Button
Press the Aspect button on the remote control to select an option for the dimensions of the TV picture image. The options that are available for selection depend on the current input source.

When the input source is HDMI, the Panorama mode is not available. When the input source is PC, the Zoom1, Zoom2, and Panorama modes are not available.
| Input signal | TV image (Aspect) | ||||
| 4:3 16:9 Zoom | 1 Zoom2 Panorama | ||||
| 4:3 | |||||
| 16:9 Not available | |||||
The Aspect options are:
Auto automatically shows the correct aspect ratio, based on the content.
16:9 shows widescreen TV in its recorded format, or a 4:3 ratio image stretched to fit the screen with no center aspect correction.
4:3 shows the standard 4:3 ratio image in the center of the TV, with dark bars on the left and right of the screen, or shrinks widescreen pictures horizontally.
Zoom1 stretches the image vertically. Suitable for stretching widescreen DVD movies to reduce or eliminate horizontal dark stripes at the top and bottom of the screen.
Zoom2 stretches the image both vertically and horizontally, and may clip the top, bottom, and sides of the image.
Panorama stretches the picture horizontally, if necessary, to fill the screen; the center of the screen has aspect correction. Suitable for stretching a normal 4:3 ratio image to fill the screen.

Some stations transmit Standard-definition programming directly in 16:9 aspect ratio so that the image has embedded dark side bars. For that type of input signal, the Panorama mode is not available, and the Zoom1 and Zoom2 modes do not eliminate the side bars.
Use the Aspect Ratio option in the onscreen display Picture menu to set the default aspect; see "Using the Picture Menu" on page 52.
Turning On Captions
Press the CC button on the remote control to select the caption option:
On: Turns on captions.
Off:Turns off captions.
On Mute: Displays captions while the sound is muted (the Mute button is pressed).
To assign your preferences for captions, see "Using the Caption (Closed Caption) Menu" on page 63.
Setting the SAP/MTS Stereo Mode
Press the SAP/MTS button on the remote control to show the currently selected Secondary Audio Programs (SAP)/Multi-channel Television Sound (MTS) option. Keep pressing the button to view the available options.
SAP receives mono sound, stereo sound, and Secondary Audio Programs. The MTS feature enables a TV station to broadcast other information, such as another language or weather information.
For analog channels, the SAP/MTS options are Stereo, Mono, and SAP (when available). For Digital channels, the SAP/MTS options are English, French, and Spanish (when available).
You can enjoy hi-fi stereo sound or SAP broadcasts where available:
■Stereo broadcasts: Hear programs such as live sporting events, shows, and concerts in dynamic stereo sound.
SAP broadcasts: Select to hear either Main or SAP sound:
Main sound: Listen to the normal program sound track in either mono or stereo sound.
SAP sound: Listen to a second language, supplementary commentary, and other information, in mono sound.
If stereo sound is difficult to hear, you may obtain a clearer sound by manually switching to fixed mono-sound mode.

MTS operates only while the TV is in TV mode.
Setting the Sleep Timer
Press the Sleep button on the remote control to start a timer to automatically turn off the TV. Keep pressing the Sleep button until you reach the desired time.
Setting the Sleep Timer to 30 means your TV automatically turns off in 30 minutes.
| Minutes Description |
| 15 Sets the timer to 15 minutes. |
| 30 Sets the timer to 30 minutes. |
| 60 Sets the timer to 60 minutes. |
| 120 Sets the timer to 120 minutes. |
| 150 Sets the timer to 150 minutes. |
| Off Turns off the sleep timer. |
Adjusting the TV Settings
Use the onscreen display to adjust the picture, audio, and other settings. For more information, see "Using the OSD Menus" on page 51.
Opening and closing the OSD
Press the Menu button on the remote control, or on the TV, to display the OSD menu. Press the Menu button again to close the current menu and return to the TV display. Within a submenu, pressing the Back button on the remote control, or the Source button on the TV, takes you back one menu level.
Operating a DVD Player or Other Device
After programming a home entertainment device into your remote control, press the Device button on the top of your remote control as needed to select the device to control. Refer to "Selecting a Device to Control" on page 35.
The tables that follow list the buttons available to operate the selected, programmed device. Your device may not operate in response to all of these buttons.
Remote control AUD buttons
| AUD button | Description | Icon |
| Power Press the Device button, if needed, to select the device. Point the remote control at the device, and then press Power to turn the selected device on or off. | ||
| Vol Press a Volume button to raise (or lower) the sound. | ||
| Mute Press Mute to turn sound off or on. | ||
Remote control STB device buttons
| STB button | Description | Icon |
| Power Press the Device button, if needed, to select the device. Point the remote control at the device, and then press Power to turn the selected device on or off. | ||
| Media | ■Satellite or cable box: The Media button is not valid. ■PVR: Press Media to go to the top page. | Media |
| Last Source | Press Last Source to change the input source to the last viewed source. | Last Source |
| Up/down/left/right arrows | Press an Arrow button to move the cursor. | |
| Recorded TV | Press Recorded TV to open a list of recorded television programs for the device that is controlled by the remote control, if the device supports the button. | Recorded TV |
| OK Press OK to select the current option. | OK | |
| STB button | Description (Continued) Icon | |
| back | ■Satellite or cable box: Press Back to exit. ■PVR: Press Back to exit or clear an option. | back |
| Rec Press Record to begin recording, if the STB supports the button. | Rec | |
| Rewind Press | Rewind to rewind (fast-reverse). | |
| Play Press Play to start play. | ||
| Previous Press Previous to go to the previous item. | ||
| Stop Press Stop to stop play. | ||
| Numbers Press the number buttons (0-9) to directly select channels, and then press Enter. | 1w7 2z8 3z9 4w7 5u6 6vr 7p28 8xv 9yoy -5w7 8x7 -xxC6x8x8x8x8x8x8x8x8x8x8x8x8x8x8x8x8x8x8x8x8x8x8x8x8x8x8x8x8x8x8x8x8x8x8x8x8x8x8x8x8x8x8x8x8x8x8x8x8x8x8x -5w7 8x7 -xxC6x8x8x8x8x8x8x8x8x8x8x8x8x8x8x8x8x8x8x8x8x8x8x8x8x8x8x8x8x8x8x8x8x8x8x8x8x8x8x8x8x8x8x - (*) - * | |
| -(Dash) or * (star) | Press - (dash) to enter a dash for a digital channel. For example, channel 14-2. | - * |
| Clear Press Clear to backspace and erase one character. | Clear | |
| Guide Press Guide to display the guide for the STB, if the device supports the button. | Guide | |
| STB button | Description (Continued) Icon | |
| Menu | ■Satellite or cable box: Press Menu to open the device menu. ■PVR: Press Menu to open the PVR setup menu or the Top Page. | Menu |
| Info Press Info | to view a channel banner that contains information about the current program. | Info |
| Ch+ Ch- | Press Ch+ (or Ch-) to select the next higher (or lower) channel. | Ch+ Ch- |
| Live TV | Press Live TV to select live television for the STB, if the device supports the button. | Live TV |
| Fast- Forward | Press FF to fast-forward play. | → |
| Pause | Press Pause to suspend play. | II |
| Next | Press Next to go to the next item. | → |
| Enter | Press Enter after entering a channel number. | Enter |
| Last Press Last | to recall the previous channel that you viewed. | Last |
Remote control AUX device buttons
| AUX button | Description | Icon |
| Power Press the Device button, if needed, to select the device. Point the remote control at the device, and then press Power to turn the selected device on or off. | ||
| Last Source | Press Last Source to change the input source to the last viewed source. | Last Source |
| Up/down/left/right arrows | Press an Arrow button to move the cursor in the device menu screens. | |
| Recorded TV | Press Recorded TV to open a list of recorded television programs for the device that is controlled by the remote control, if the device supports the button. | Recorded TV |
| OK Press OK to select the current option. | OK | |
| back Press Back to go back one level in the menu. | back | |
| Connect (green round) | Press Connect to turn on the device controlled by the remote control, if the device supports the button. | |
| AUX button | Description (Continued) | Icon |
| Rec Press Record to begin recording on the DVD, if the DVD supports the button. | Rec | |
| Rewind Press | Rewind to rewind (fast-reverse) the DVD. | |
| Play Press Play to start the play of the DVD. | ||
| Previous Press Previous to go to the previous item on the DVD. | ||
| Stop Press Stop to stop play of the DVD. | ||
| Numbers Press the number buttons (0-9) to directly select the chapter, and then press Enter. | 1st2nd3rd4th5th6th7th8th9th10th4th5th6th7th8th9th10th4th5th6th7th8th9th10th4th5th6th7th8th9th10th4th5th6th7th8th9th10th4th5th6th7th8th9th10th4th5th6th7th8th9th10th4th5th6th7th8 | |
| Guide Press Guide to display the guide for the DVD, if the device supports the button. | Guide | |
| Menu Press Menu to open the DVD player setup menu. Press Menu again to exit the menu. | Menu | |
| Info Press Info to view information about the DVD. | Info | |
| Live TV Press Live TV to select live television for the device that is controlled by the remote control, if the device supports the button. | Live TV | |
| AUX button | Description (Continued) Icon | |
| Fast-Forward | Press FF to fast-forward play of the DVD. | |
| Pause Press Pause to suspend play of the DVD. | ||
| Next Press Next to go to the next item on the DVD. | ||
| Enter Press Enter after entering a channel number. | ||
Programming the Remote Control for a Home Entertainment Device
Your HP remote control is programmable. Program the remote control to operate other home entertainment devices, such as your audio receiver, DVD player, PVR, or set-top box. Manufacturer codes for compatible brands are listed at the end of this chapter.

If the brand of your device is not listed in the "Manufacturer's codes" on page 46, then try programming the device code using the steps in "Programming the device code using auto setup mode" on page 45.
Programming the device code
Use the following steps to program a device button if your brand is listed.

Read all the steps completely before proceeding. Highlight or write down the codes and device you wish to program before performing step 4. If your Manufacturer is not listed in the "Manufacturer's codes" on page 46, then try programming the device code using the steps in "Programming the device code using auto setup mode" on page 45.
1 Locate the brand of your device and the manufacturer's codes (see listings in "Manufacturer's codes" on page 46).
2 Turn on the TV. Turn on the device you would like to program.
3 Press Device button on the remote control as needed to select AUD, STB, or AUX to program. Wait until the device indicator light on the remote control goes out.
4 Press and hold down the Device button on the remote control for 5 seconds until the device indicator light blinks, and then release the Device button. The device light blinks one more time and then remains lit, indicating the remote control is in programming mode.
5 Enter the first four-digit code. If the code is accepted, the device light flashes twice. If the code is not accepted, the device light flashes three times.

If the device indicator light did not blink twice, then repeat steps 4 and 5, entering either the same code or the next code, if available.
!
Enter code 9, 9, 9, 9 to reset the selected device to the factory default manufacturer value.
Enter code 1, 1, 1, 1 to enter auto setup mode; see "Programming the device code using auto setup mode" on page 45.
■Pressing the 1, 3, and 0 buttons on the remote control at the same time resets all three programmable devices to factory values.
6 Aim the remote control at the device, and press the Power button once. The device should turn off. If it does not respond, repeat steps 4 and 5, trying each code for your brand until you find one that works. If it still does not work, try searching for the code using auto setup mode; see "Programming the device code using auto setup mode" on page 45.

If the device does not have a Power button, press Play.
7 Repeat steps 1 through 6 for each device you want to control with the remote control.
Programming the device code using auto setup mode
If your device does not respond to the remote control after trying all the codes listed for your brand, try searching for your code using these steps for auto setup mode.
1 Turn on the TV. Turn on the device you would like to program.
2 Press Device button on the remote control as needed to select AUD, STB, or AUX to program. Wait until the device indicator light on the remote control goes out.
3 Press and hold down the Device button on the remote control for 5 seconds until the device light blinks, and then release the device button. The device light blinks one more time and then remains lit, indicating the remote control is in programming mode.
4 Enter 1, 1, 1, 1, and the device light blinks once and then remains lit.
5 Press and release the Power button once on the remote control. Wait until the device light stops blinking.
If the device turns off, continue with step 6.
If the device does not turn off, continue to press and release the Power button, waiting each time for the device light to stop blinking, until the home entertainment device turns off.

Each time you press the Power button, the auto setup is trying a different code. Be sure to wait until the device light stops blinking before pressing the Power button again. You may need to press the Power button several times before the correct code is found.
6 Once the home entertainment device turns off, press the OK button on the remote control to save the code.

If you cannot find a code that controls your device and your device is not listed in the "Manufacturer's codes" on page 46, then your device cannot be programmed into this universal remote control.
Manufacturer's codes
The following tables include manufacturer codes for these home entertainment devices:
Audio receiver/amplifier used with the AUD device button.
DVD used with the AUX device button.
Digital satellite box used with the STB device button.
Digital cable box used with the STB device button.
■PVR used with the STB device button.
Audio receiver/amplifier manufacturer codes
| Brand Code | Brand Code Brand Code | ||||
| ADC 3073 Kenwood 3019, 3020, 3022, 3025, | 3026, 3027, 3030, 3031, 3037, 3041, 3042, 3047, 3064 | Sansui 3061, | 3071, 3072 | ||
| Aiwa 3052, 3061 KLH 3074 Sanyo | 3075 | ||||
| Akai | 3076 Koss 3058 Scott | 3071 | |||
| Alco | 3074 Linn 3061 Sears | 3071 | |||
| Audiovox | 3074 Luxman 3070 Sherwood | 3067 | |||
| Bose | 3006 LXI 3071 Shure | 3077 | |||
| Capetronic | 3073 | Magnavox | 3061, 3071, 3073 | Sony | 3000, 3001, 3002, 3003, 3004, 3007, 3009, 3011, 3012, 3014, 3016, 3018, 3021, 3024, 3029, 3040, 3050 |
| Carver | 3061 | Marantz | 3056, 3061 | Soundesign | 3069 |
| Denon 3048, | 3062 MCS 3072 Symplonic 3071 | ||||
| Emerson | 3071 | Mitsubishi | 3055 | Teac | 3074 |
| Fisher | 3060 | NEC | 3077 | Technics | 3010, 3046, 3049, 3068 |
| GE | 3069 | Onkyo | 3028, 3033, 3038 | Toshiba | 3059 |
| Genexxa | 3071 | Optimus | 3065, 3071, 3073 | Venturer | 3074 |
| Harman Kardon | 3054, 3061, 3063 | Panasonic | 3017, 3068 | Wards | 3061, 3069 |
| Hitachi | 3060 | Philips | 3057, 3061 | Yamaha | 3023, 3035, 3039, 3051 |
| JBL | 3053, 3063 Pioneer | 3005, 308, 3013, 3015, 3032, 3071, 3073 | |||
| JVC | 3036, 3043, 3044 | RCA 3045, 3066, 3071, 3072, 3073, 3074 | |||
DVD manufacturer codes
| Brand Code Brand Code | |||||
| Aiwa 2056 JVC 2019, 2037, 2038 Procan 2051 | |||||
| Apex 2002, 2007 | Kenwood 2059 Qwestar 2081 | ||||
| Audiovox 2049 Konka 2073 RCA | |||||
| Bose | 2069 Koss | 2048, 2071 | Sampo 2094 | ||
| Clarion 2085 Lasonic 2077 Samsung | 2010, 2012, | 2013, 2021,2022, 2024,2026 | |||
| Classic | 2086 Magnavox 2050 Sansui | 2095 | |||
| CyberHome 2000 Marantz 2057 Sanyo | 2074 | ||||
| Daewoo | 2043 Memorex 2078 Sharp | 2041 | |||
| Denon | 2052 | Mintek | 2079 | Sherwood | 2090 |
| Emerson | 2075, 2076 Mitsubishi | 2042 | Sony 2003, 3004, | 2005, 2011,2015, 2016,2017, 2018,2020, 2025,2028, 2031,2034, 2036,2062, 2063,2067 | |
| Fisher | 2087 NAD 2075, 2084 | Sylvania 2047, 2076 | |||
| Funai | 2076 | Nakamichi | 2089 | Teac | 2091 |
| GE | 2055 | Norcent | 2080 | Technics | 2060 |
| Go Video 2045 Onkyo 2053 Techwood | 2092 | ||||
| GPX | 2088 | Oritron | 2081 | Toshiba | 2001, 2014,2033, 2035,2039, 2066 |
| Harman Kardon | 2058 Panasonic | 2006, 2008, | 2027,2029, 2030, 2061 | Venturer | 2072 |
| Hitachi | 2046 | Philips | 2032, 2065 | Yamaha | 2054 |
| Irradio | 2093 | Pioneer | 2023, 2040, 2068 | Zenith | 2044 |
| JBL | 2070 Polaroid | 2083 | |||
Digital satellite box manufacturer codes
| Brand Code | Brand Code | Brand Code | |||
| Alphastar 4018 | Hitachi 4025 RCA 4002, 4007, | 4008, 4028 | |||
| Chaparral | 4019 | Hughes | 4001, | 4002, | 4017 |
| DirecTV 4017, 4002 Hughes Network | 4017 Samsung | 4002, 4011 | |||
| DISH Network | 4003, 4022 Hughes Networks Systems | 4017 Sony | 4000, 4004, | 4005, 4009 | |
| Dishnet | 4020 JVC | 4026 Star Choice | 4030 | ||
| Drake | 4021 | Mitsubishi | 4010, 4012 | STS | 4031 |
| Echostar | 4003, 4022 | Panasonic | 4013 | Toshiba | 4014, 4032 |
| Express Vu | 4023 | Philips | 4002, 4006 | Uniden | 4033, 4034 |
| GE | 4016, 4028 | Primestar | 4027 | Zenith | 4015 |
| General Instruments | 4024 Proscan | 4028 | |||
Realistic
Digital cable box manufacturer codes
| Brand Code | Brand Code Brand | Code | |||
| ABC 4035, 4047, 4057, 4058 | Magnavox 4049 Signature 4047 | ||||
| Adelphia 4036 | Motorola 4041, 4042 | 4044, | 4050 | Sony 4039 | |
| Antronix 4037 | Movie Time 4051 Sprucer | 4053 | |||
| Archer | 4037 NEC 4052 | Standard | Component | 4055 | |
| Cable Vision | 4039 NSC 4051 | Starcom 4046, 4058 | |||
| Cableview | 4038 Oak | 4043 Stargate | 4046 | ||
| Comcast | 4040, 4041, 4042 | Panasonic | 4053 Starquest 4046 | ||
| Contec | 4043 | Philips | 4049 | Time Warner | 4056 |
| Cox | 4044 | Pioneer | 4054 | Tocom | 4057 |
| Eastern | 4045 | Proscan | 4035, 4047 | Tusa | 4046 |
| GC Electronics | 4037 | RCA | 4038, 4053 | TV86 | 4051 |
| GE | 4035, 4047 | Realistic 4037 Unika | 4037 | ||
| Gemini | 4046 | Regency | 4045 | United Cable | 4058 |
| General Instruments | 4040, 4047 | Rembrandt 4047 Universal | 4037 | ||
| Hamlin 4048 | Samsung 4054 Viewstar | 4043, 4049, | 4051 | ||
| Hitachi | 4047 | Scientific Atlanta | 4036 | Zenith | 4059 |
| Jerrold | 4046, 4047, 4058 | Signal | 4046 | ||
PVR manufacturer codes
| Brand Code | Brand Code Brand | Code | |||
| ABS 5020 Humax 5007 ReplayTV 5008 | 5009 | ||||
| Alienware 5020 | Hush 5020 Sonic Blue 5008, 5009 | ||||
| CyberPower 5020 iBuypower 5020 Son | 5001, 5011, | 5020 | |||
| Dell | 5020 | JVC | 5014, 5015 | Stack 9 | 5020 |
| DirecTV 5007, 5016, 5017, 5019 | Linksys | 5020 Systemax 5020 | |||
| DISH Network | 5014, 5015, 4022 | Media Center PC | 5020 | Tagar Systems | 5020 |
| Dishpro | 5014 | Microsoft | 5020 | Tivo | 5000, 5007, 5010, 5011 |
| Echostar | 5014, 5015 | Mind | 5020 | Toshiba | 5013, 5020, 2001 |
| Express Vu | 5014 | Niveus Media | 5020 | Touch | 5020 |
| Gateway | 5020 | Northgate | 5020 | Ultimate TV | 5019 |
| GOI | 5014 | Panasonic | 5004, 5009 | Viewsonic | 5020 |
| Hewlett-Packard | 5020 Philips | 5002, 5007, 5010, 5016 | Voodo | 5020 | |
| Howard Computers | 5020 Pioneer | 5006 Zenith | 5005 | ||
| HP | 5020 Proscan 5017 ZIT Group 5020 | ||||
| HTS | 5014 RCA | 5000, 5012, 5017, 5019 | |||
| Hughes | 5007, 5016 | Replay TV | 5003 |
Changing the TV Settings
You can change the TV settings by using the onscreen display (OSD) menus.
Using the OSD Menus
To operate the OSD menus, use the buttons on the TV, or on the remote control, to highlight, adjust, and enter items, as described in this section.
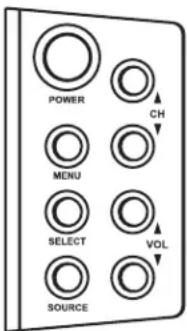
| TV (side) Description | |
| MENU Menu | opens (or closes) the OSD. |
| SELECT Select | selects the highlighted item in the OSD. |
| SOURCE Source | selects the input source. Press Source to open the list of input sources. Press the Channel (CH) buttons to select the input source to view, and then press Select. Press Source to close the list. Select the input source before you open the OSD. In an OSD menu, this button functions as the Back button to move up one item or menu level. |
| ▲CH▼ | Channel buttons move up or down in the menu. |
| ▲VOL▼ | Volume buttons move right or left in the menu, or adjust an item. |
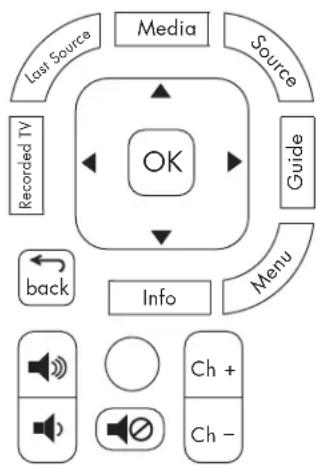
| Remote control Description | |
| Menu | Menu opens (or closes) the OSD. |
| OK | OK selects the highlighted item in the OSD. |
| Arrow buttons move up, down, left, or right in the menus. | |
| Volume buttons adjust the sound level or an item. | |
| Ch+Ch- | Channel buttons move the channel up or down. |
| Remote control Description | (Continued) |
| Source | Source selects the input source. Press Source to open the list of the input sources. Press an Arrow button to select the input source to view, and then press OK. Select the input source before you open the OSD. |
| back | Back moves up one item or menu level. |
You operate the OSD menus by using the buttons on the remote control or the TV; refer to the previous tables for descriptions of the buttons.
Press the Source button to select the input signal source for the TV. The OSD menus and options that you see depend on the current input source.
2 Press the Menu button to open the OSD. The available menus appear as a list.
3 Press the direction buttons (the Arrow buttons on the remote control, or the Channel and Volume buttons on the TV) to highlight the menu that you want, and then press the OK button on the remote control, or the Select button on the TV.
4 Press the direction buttons to move within the menu and highlight an option, and then press the OK button on the remote control, or the Select button on the TV, to move into the option.
5 Continue using the direction buttons to highlight and adjust an item, and the OK button or the Select button to enter the change. To move out of an option, or to move up one menu level, press the Back button on the remote control, or the Source button on the TV.
6 When you are finished, press the Menu button to close the OSD.
The OSD menus are:
Picture
Audio
Channel
Parental (Control)
Setup (including Closed Caption)
MediaSmart
SimpleMenu/Full Menu
Note that MediaSmart opens the main digital media menu.
Note that SimpleMenu appears in the menu list when the full list of menu items is displayed.
Select SimpleMenu to view a reduced menu that shows only the most frequently used menu items. (When you do so, Full Menu appears in the menu list. Select it to again display the full list of menu items.)
Using the Picture Menu
The Picture menu controls the look of the image on the screen for the selected input source. For example, when you adjust Brightness, the screen image changes as you adjust the scale.
Because the Picture menu maintains settings for each input, select (view) the input source, and then make Picture menu changes.
The following table shows the Picture menu. When a PC is the input source, use the PC menu to adjust the picture settings, including Auto Sync.
| Picture menu Options | |
| Mode Vivid/Standard/Movie/User | Dard/Movie/User |
| User mode options: | |
| ■Brightness | |
| ■Contrast | |
| ■Saturation | |
| ■Hue | |
| ■Sharpness | |
| Color Temperature | Cool/Standard/Warm |
| Aspect Ratio Auto | 16:9/4:3/Zoom1/Zoom2/Panorama |
| PC | ■H Size (horizontal size) |
| ■H Position (horizontal position) | |
| ■V Size (vertical size) | |
| ■V Position (vertical position) | |
| ■Phase Adjust | |
| ■Clock Adjust | |
| ■Auto Sync | |
| ■Default |
Adjusting the picture image
Adjusting the AV picture image
The following options adjust the AV picture image that you are watching, so select the correct AV input source before you change the values.
Mode sets the picture adjustments to preset values of Standard, Movie, Vivid, or User. User mode enables individual adjustment of:
■Brightness: Sets the image brightness.
Contrast: Sets the image contrast.
Saturation: Sets the image color intensity.
Hue: Sets image tones; decrease the value to make tones more red, or increase it to make tones more blue.
Sharpness: Sets the image sharpness.
Color Temperature selects different color temperature settings: Cool, Standard, and Warm.
■Aspect Ratio sets the default dimensions of the TV picture image. For more information, see "Changing the View by Using the Aspect Button" on page 38.
PC provides options to adjust the image from the PC Input connector. See "Adjusting the PC Screen image" on page 53.
Adjusting the PC Screen image
The PC menu is not available if a PC is not connected. The following options adjust the image from the PC Input connector:
H Size adjusts the horizontal size of the image.
H Position adjusts the horizontal position of the image.
mV Size adjusts the vertical size of the image.
IV Position adjusts the vertical position of the image.
Phase Adjust adjusts the phase of the clock used to synchronize the image.
Clock Adjust adjusts the clock used to synchronize the image.
Auto Sync button starts automatic synchronization of the image.
Default button resets all PC menu options to the default values.
Using the Audio Menu
The Audio menu sets the sound levels, the mode for the digital audio output signal, and sound items.
| Audio menu Options | |
| Mode Voice/Standard/Music/User mode options: ■Treble ■Bass | |
| Balance (Left-to-right) sound adjustment | |
| Auto Volume On/Off | |
| SAP/MTS | ■Mono/Stereo/SAP ■English/French/Spanish |
| Digital Audio Dolby | Digital/PCM |
| Virtual Surround Off/Theater/Music Hall | |
| Speaker On/Off | |
Adjusting the audio
■Mode sets the audio adjustments to preset values of Voice, Standard, Music, or User. User mode enables individual adjustment of the treble and bass values.
Balance sets the distribution of sound between the speakers.
Auto Volume turns automatic volume adjustment on or off.
SAP/MTS selects the default mode and language for secondary audio programs. See "Setting the SAP/MTS Stereo Mode" on page 39.
Digital Audio sets the mode for the signal provided on the digital audio output connector. See "Choosing the digital audio output mode" on page 54.
■Virtual Surround selects an option for emulated surround sound from the TV speakers. "Selecting virtual surround sound" on page 54.
■Speaker turns the TV speakers on or off. You may want to turn off the TV speakers when you connect an optional external sound system. Refer to "Understanding audio output" on page 54.
54 HP MediaSmart HDTV User Guide
Choosing the digital audio output mode
You must be watching a digital TV channel to access the Digital Audio option in the Audio menu. This option sets the format for the signal provided on the Digital (Optical) Audio Output connector on the rear of the TV: Dolby Digital or PCM. Select PCM if your external digital audio system does not support surround sound. See "Understanding audio output" on page 54.
Selecting virtual surround sound
You can enjoy emulated surround sound from the TV speakers. To do so, for the Virtual Surround option in the Audio menu, select the mode that you want to hear: Theater or Music Hall.
Understanding audio output
The input source signal and the Audio menu settings for Digital Audio and Speaker determine the type of audio output that you hear from the TV speakers, or from the external sound system that is connected to the TV.
For example, if you connect an external sound system by using the Digital (Optical) connector, you hear digital sound from the connected external audio system when you watch a digital TV program. The format of the digital signal that the TV provides depends on the Digital Audio setting (Dolby Digital or PCM).
This TV does not support Dolby Digital audio input over HDMI. When connecting a set-top box, DVD player, or other device by means of HDMI, set the device audio output to PCM format.
The following table shows the audio output dependencies and the resulting output.
| Input source | Audio output at TV speakers (Audio menu/ Speaker: On) | Audio output at Digital (Optical) connector: (Audio menu/Digital Audio) | Audio output at Analog L and R connectors |
| TV tuner, analog channel Stereo | Stereo 2-channel PCM Stereo | 2-channel | |
| TV tuner, digital channel Stereo | Stereo 2-channel PCM or Dolby Digital Stereo | 2-channel | |
| HDMI, PCM format Stereo | 2-channel None Stereo | 2-channel | |
| HDMI, Dolby Digital format | None None None | ||
| Component Stereo 2-channel PCM Stereo | PCM Stereo 2-channel | ||
| AV (S-Video or Video) Stereo | 2-channel PCM Stereo | 2-channel | |
| PC Audio Stereo 2-channel | PCM Stereo 2-channel |
Using the Channel Menu
If you skipped the Setup Wizard, or if the initial setup did not find all the available channels, use the Channel menu to automatically scan and find the channels. The scan continues until every channel is either found or confirmed as having no signal.
Use this menu to edit the program channel list to skip a channel when you use the Channel buttons on the remote control or the TV.
| Channel menu Options |
| Auto Scan Antenna/Cable |
| Channel List Show/Hide |
| Signal Strength Shows the signal strength of a digital channel as a bar graph. |
Searching for channels
In the Auto Scan menu, start an automatic search for channels by selecting the scan source, Antenna or Cable, and then pressing the OK button. Next, select Yes, and then press OK to begin the channel scan.
The scan continues until every channel is either found or confirmed as having no signal. You can stop the search by choosing the Cancel button on the screen, and then pressing the OK or Back button on the remote control.
Editing the channel listing
Use the Channel List menu to edit the program channel list to skip (hide) a channel when you use the Channel buttons on the remote control or the TV.
To edit the channel listing to skip a channel:
1 In the Channel menu, press the Arrow buttons to select Channel List, and then press OK.
2 Press the Arrow buttons to select the channel. You can press a Channel button to move one page forward or backward in the listing.
3 Press OK. The TV tunes to the channel.
4 Press the Sleep button. The channel listing for the channel now lists the channel as Hide, and the channel is skipped when you select the channel by using the Channel buttons.
To edit the channel listing to show a channel that is currently hidden, complete the same procedure selecting a hidden channel and pressing the Sleep button to show it.
Using the Parental (Control) Menu
The Parental (Control) menu enables and defines parental controls for TV and movies. Use it to select a password, and set the values for parental controls by TV rating, TV content, and movie ratings.
| Parental menu Options | |
| Change Password | ■Password ■Confirm Password |
| Enable On/Off | |
| MPAA (movie ratings by the Motion Picture Association of America) | ■G ■PG ■PG-13 ■R ■NC-17 ■X ■NR |
| US TV Rating Table of age-based guidelines and content values | |
| Parental menu Options (Continued) | |
| Canadian English | ■E ■C ■C8+ ■G ■PG ■14+ ■18+ |
| Canadian French | ■E ■G ■8ans + ■13ans + ■16ans + ■18ans + |
Using the Password
The Parental (Control) menu enables you to use a password to protect certain settings from being accidentally changed.
IMPORTANT: The following conditions must be met to enable parental controls:
■Password is set.
■Rating settings have been made.
Enter the password when prompted.
Setting a password
In the main OSD menu select Parental (Control) and then press the OK button. (If a password was previously set, enter the password when prompted.)
2 Select Change Password, and then press OK.
3 Enter a (new) four-digit password number by using the 0-9 buttons on the remote control. Enter the same digits for Confirm Password, and then press OK.

As a precautionary measure, write down your password and keep it in a familiar place.
In the Parental (Control) menu, select Enable, press OK, select On, and then press OK. You can now access the other menus and set the parental controls. See "Setting Parental Controls" on page 57.

IMPORTANT: If you lose or forget your password, enter the Master Password: MTS, 4, 8, 1
Setting Parental Controls
The parental controls use a V-Chip, which is an electronic filtering device built into your TV. This tool gives parents a high degree of control over the broadcasts that their children can access. It enables parents to allow those programs that are judged suitable for child viewing, while blocking those that are judged not suitable. It does this automatically, once you select a password and set the values for parental controls.
The U.S. has two rating systems for viewing content:
TV Parental Guidelines help parents screen out television shows that are unsuitable for their children to view.
■ Movie ratings are used for original movies rated by the Motion Picture Association of America (MPAA) that are aired on cable TV and not edited for television. Options can also be set to block MPAA-rated movies.
Voluntary movie rating system (MPAA)
In the Parental (Control) menu, highlight MPAA, and then press OK. Adjust the item.
The setting automatically blocks any program with ratings that are higher than your selection.
| MPAA rating Description | |
| Age G | General audiences. All ages admitted. |
| PG Parental guidance suggested. Some material may not be suitable for children. | |
| PG-13 Parents strongly cautioned. Some material may be inappropriate for children under 13. | |
| R Restricted. Under 17 requires accompanying parent or adult guardian (age varies in some jurisdictions). | |
| NC-17 No one 17 and under admitted. | |
| X X is an older rating that is unified with NC-17 but may be encoded in the data of older movies. | |
| NR Not rated. | |
Example:
If you select PG-13, this also automatically blocks the higher ratings R, NC-17, and X.

The voluntary movie rating system uses only an age-based rating.
US TV Rating
In the Parental (Control) menu, highlight US TV
Rating, and then press OK. Adjust the item.
The setting automatically blocks any ratings that are higher than your selection.
You can set an individual content-based rating item.
| TV rating | Content | |||||
| FV (Fantasy violence) | S (Sexual situation) | L (Adult language) | V (Violence) | D (Sexually suggestive dialogue) | ||
| Suggested Age | TV-Y (All children) | |||||
| TV-Y7 (Directed to older children) | Rating can be set. | |||||
| TV-G (General audience) | ||||||
| TV-PG (Parental guidance suggested) | Rating can be set. | Rating can be set. | Rating can be set. | Rating can be set. | ||
| TV-14 (Parents strongly cautioned) | Rating can be set. | Rating can be set. | Rating can be set. | Rating can be set. | ||
| TV-MA (Mature audience only) | Rating can be set. | Rating can be set. | Rating can be set. | |||
Canadian rating systems
The TV rating systems in Canada are based on the Canadian Radio-Television and Telecommunications Commission (CRTC) policy on violence in television programming.
While violence is the most important content element to be rated, the rating also takes into consideration other program content, such as language, nudity, sexuality, and mature themes.
When setting controls on the Canadian rating systems, you can choose either the Canadian English ratings or the Canadian French ratings.
Canadian English ratings
| Rating | Canadian English rating description | |
| Age | E | Exempt: Includes news, sports, documentaries, and other information programming. |
| C Children: Intended for younger children under the age of 8 years. Pays careful attention to themes that could threaten their sense of security and well-being. | ||
| C8+ | Children over 8 years old: Contains no portrayal of violence as the preferred, acceptable, or only way to resolve conflict; does not encourage children to imitate dangerous acts that they may see on the screen. | |
| G General: Considered acceptable for all age groups. Appropriate viewing for the entire family; contains very little violence—physical, verbal, or emotional. | ||
| PG Parental guidance: Intended for a general audience, but may not be suitable for younger children (under the age of 8), because it could contain controversial themes or issues. | ||
| 14+ Over 14 years: Could contain themes where violence is one of the dominant elements of the storyline, but it must be integral to the development of plot or character. Language usage could be profane and nudity present within the context of the theme. | ||
| 18+ | Adults: Intended for viewers 18 years and older, and might contain depictions of violence, which, while related to the development of plot, character, or themes, are intended for adult viewing. Could contain graphic language and portrayals of sex and nudity. | |
Canadian French rating
| Rating Canadian French rating description | |
| Age E | Exempt programming. |
| G General: All ages and children; contains minimal direct violence, but may be integrated into the plot in a humorous or unrealistic manner. | |
| 8ans + General but inadvisable for young children: May be viewed by a wide public audience, but could contain scenes disturbing to children under 8 who cannot distinguish between imaginary and real situations. Recommended for viewing with parent. | |
| 13ans + Over 13 years: Could contain frequent violent scenes and therefore recommended for viewing with parent. | |
| 16ans + Over 16 years: Could contain frequent violent scenes and intense violence. | |
| 18ans + Over 18 years: Only for adult viewing. Could contain frequent violent scenes and extreme violence. | |
Temporarily releasing a blocked program
When the parental controls rating blocks a program, a message displays.
To release a blocked program:
1 Press OK. The password setting menu displays.
2 Enter your four-digit password to temporarily release the program block.
Reactivating parental controls after a temporary release
You can reactivate the parental controls for a temporarily released program by using either of the following:
In the Parental (Control) menu, select the rating setting (MPAA, US TV Rating, Canadian English, or Canadian French).
Switch off the TV power.
Using the Setup Menu
You can use the Setup menu to set time and closed caption options, select the language for the OSD menus, start the Setup Wizard, return OSD settings to default values, and to change the input labels for the Source list.
| Setup menu Options | |
| Time | ■Clock Mode: Auto/ Manual ■Clock Set ■Time Zone (for Auto mode only) ■Daylight Saving (for Auto mode only) ■Sleep Timer: Off/ 15 min/30 min/ 60 min/120 min/ 150 min |
| Caption (closed caption) | ■Mode ■Service Analog ■Service Digital ■Style |
| OSD Language English | /French/Spanish |
| Setup Wizard Start | |
| Input Labels | ■Default (original input label), AVR, DVD, PVR, Cable, DEC, Aux, SAT, VCR |
| Standby Mode | ■Fast Start ■Power Saver |
| Default Settings Press OK to recover all settings to default values. | |
Using the Time Menu
The Time menu sets the mode for the date and time, and sets the sleep timer.
| Time menu Options | |
| Clock Mode Auto/Manual | |
| Clock Set | ■Month, Day, Year ■Hour, Min, AM/PM |
| Time Zone (for Auto mode only) | NST/AST/EST/CST/ MST/PST/AKST/HST |
| Daylight Saving (for Auto mode only) | On/Off |
| Sleep Timer Off/15 min | 30 min/ 60 min/120 min/ 150 min |
■Clock Mode sets the clock mode to Auto or Manual. You set the initial date and time for the TV during the Setup Wizard, or in this menu by selecting the Manual Clock Mode, and then pressing the OK button.
Clock Set sets the date and time for Manual clock mode only. To change between AM and PM, press the Left Arrow button, and then press the Down Arrow button.
■Time Zone sets the time zone for Auto clock mode, such as Central Standard Time (CST) or Pacific Standard Time (PST).
Daylight Saving sets an option for the Auto Clock Mode.
- Sleep Timer sets the minutes before the TV turns off. You can also set the sleep timer by using the Sleep button on the remote control.
Using the Caption (Closed Caption) Menu
Caption menu
You can use the Caption (Closed Caption) menu to turn captioning on or off, and to select options. You can also turn captioning on or off using the CC button on the remote control.
| Caption (Closed Caption) menu Options | |
| Mode Off/On/On Mute | |
| Basic (Analog Service) | ■CC1/CC2/CC3/CC4 ■Text1/Text2/Text3/ Text4 |
| Advanced (Digital Service) | Service1/Service2/ Service3/Service4/ Service5/Service6 |
| Style | ■Font Style ■Font Size ■FG (Foreground) Color ■BG (Background) Color ■FG (Foreground) Opacity ■BG (Background) Opacity ■Edge Style |
Your TV is equipped with an internal closed caption decoder that enables you to view conversations, narration, and sound effects as subtitles on your TV. Closed captions are available on some TV programs, and on some VHS home video tapes, at the election of the program provider.
Digital Closed Caption is a caption service available only on digital TV programs (also at the election of the program provider). It is a more flexible system than the original closed caption system, because it allows a variety of font sizes and styles in the captions.
Not all programs and VHS videotapes offer closed captioning. Look for the symbol to ensure that captions appear.

If the signal source equipment is connected to the TV at an HDMI or a component video connection, closed caption information may not always be available, because the source equipment may not pass the information to the TV across these connections.
In the closed caption system, more than one caption service can be provided. Each is identified by its own number. CC1 through CC4 services display subtitles of TV programs superimposed over the program picture.
The Text1 through Text4 services display text that is unrelated to the program being viewed, such as weather or news. These services are also superimposed over the program currently being viewed.
Depending on the number of caption services in the signal being received, you will see information such as 1/2 or 1/4 displayed. 1/2 means "the first of two services."
Example: If a program has three services (Digital CC(ENG), CC1, and Text1), the closed caption display toggles in sequence.
The CC button stores in memory a record of the last service selected. If the last closed caption mode that you selected is not available for the next program, or on another channel, the closed caption service that is available is automatically selected, and this service appears in parentheses. Closed caption services that appear in parentheses are not retained in the CC button memory as your last selected service. Only services that you have selected with the CC button are retained.

If the language code, such as ENG, is not found on a digital TV programs, "--" displays.
All types of closed caption service (CC1, Text1, and so on) are potentially available, but a broadcast may contain none or only some of these services, at the election of the program provider.
The defaults for closed caption may be specified by the broadcasting station.
Using the Style option
The Style option sets the appearance of closed caption text:
Font Size sets the caption size: Small, Standard, or Large.
■Font Style sets a preset or user-defined caption style.
FG (Foreground) Color sets the text color.
BG (Background) Color sets the background color.
FG (Foreground) Opacity sets the text opacity.
BG (Background) Opacity sets the background opacity.
■Edge Style sets a preset edge style.
Selecting the OSD Language
You can use the OSD Language option to set the language for the onscreen display.
Starting the Setup Wizard
You can start the Setup Wizard to be guided to select the OSD language, the date and time, the TV signal source (antenna or cable), and scan for the available TV channels.
In the Setup Wizard menu, select Start, and then press the OK button.
Changing the Input Labels
You can use the Input Labels option to change the input labels, except Antenna (or Cable) and MediaSmart, that appear when you press the Source button on the remote control or the TV.
The list of input sources identifies a signal source (a connector set on the rear of the TV):
Antenna or Cable is the ANT/Cable In connector. The label shows the scan source selection (Antenna or Cable) of the last channel scan performed by either the Setup Wizard or the Channel menu. This label cannot be changed.
■AV1 is the Standard Definition Input AV Input 1 connector set of S-Vid or Video.
■AV2 is the Standard Definition Input AV Input 2 connector set of S-Vid or Video.
■Component 1 is the Component High Definition Input 1 connector set.
■Component 2 is the Component High Definition Input 2 connector set.
HDMI 1 is the Digital High Definition Input connector HDMI 1.
HDMI 2 is the Digital High Definition Input connector HDMI 2.
HDMI 3 is the Digital High Definition Input connector HDMI 3.
PC is the PC Input (VGA) connector set.
MediaSmart is the input from the Media function, as if you press the Media button on the remote control. This label cannot be changed.
The input labels that you can assign are:
Default (original input label)
■AVR
DVD
■PVR
Cable
■DEC
■Aux
SAT
VCR
To change an input label by using the remote control:
Press the Menu button to open the OSD. The available menus appear as a list.
2 Press the Down Arrow button to highlight the Setup menu, and then press the OK button.
3 Press the Down Arrow button to move within the menu and highlight the Input Labels option, and then press OK to move into the option.
4 Press the Down Arrow button to highlight the input source that you want to change, and then press the Right Arrow button. Press the Down Arrow button to select the new label, and then press OK to enter the change.
5 When you are finished, press the Menu button to close the OSD.
Setting the Standby Mode
You can use the Standby Mode option to set the TV mode for standby:
Fast Start: Starts quickly from standby.
■Power Saver: Power consumption is low while on standby, conserving energy.

The TV Standby Mode is Power Saver by default. To start quickly from the standby state, especially when using digital media, change the Standby Mode to Fast Start.
Returning to Default Settings
You can use the Default Settings menu to return all settings, including the input labels, to the default value. Select Default Settings, and then press the OK button.
This option does not reset the channels in the Fav and the channel list. These items are cleared only when you run a new channel scan.
Using Digital Media
The Media button on the remote control provides you a simple way to connect your TV to your PC or online services. This allows you to do the following:
View photos
Watch videos
■Listen to music
■Access online services for music, video, or photos
The TV appears as a digital media receiver in the Microsoft Windows Media Player networking software program. This program, installed on your PC, provides networking services by streaming music, video, or picture files to the local area network (LAN) connected TV. To initially set up to use the Media function, including installing Windows Media Player, see "Setting Up the TV for Digital Media" on page 25.
Using the Main Digital Media Menu
1 Point the remote control at the remote control sensor on the display and, if necessary, press the Device button to light the TV indicator.
On/Off

TV AUD STB AUK

Device
2 Press the Media button.
Media
The main digital media menu opens.
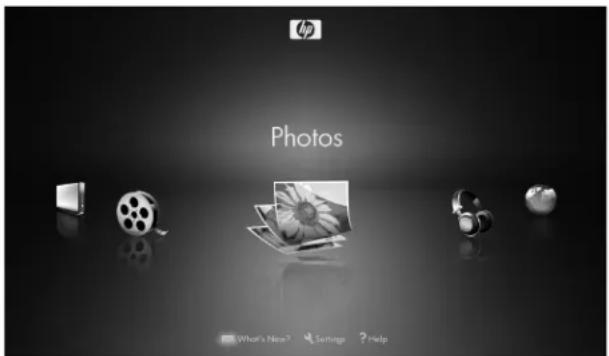
The main digital media menu lists these options:
Photos (pictures icon)
■Music (headphones icon)
Online Media ( globe icon)
Servers (PC icon)
Videos (movie reel icon)
What's New? (envelope icon)
Settings (wrench icon)
Help (question mark icon)
To access the photos, videos, music, or Online Media shown in the main digital media menu, your TV must successfully connect to the network.
3 Press an Arrow button as needed to select an option, and then press the OK button.
The selected option menu displays.
4 Continue by selecting items within the displayed menu.
Press an Arrow button as needed to select an item, and then press OK.
Press the Back button to go back one menu or to stop play.
Press the Info button to see information about the photo, video, or music file.
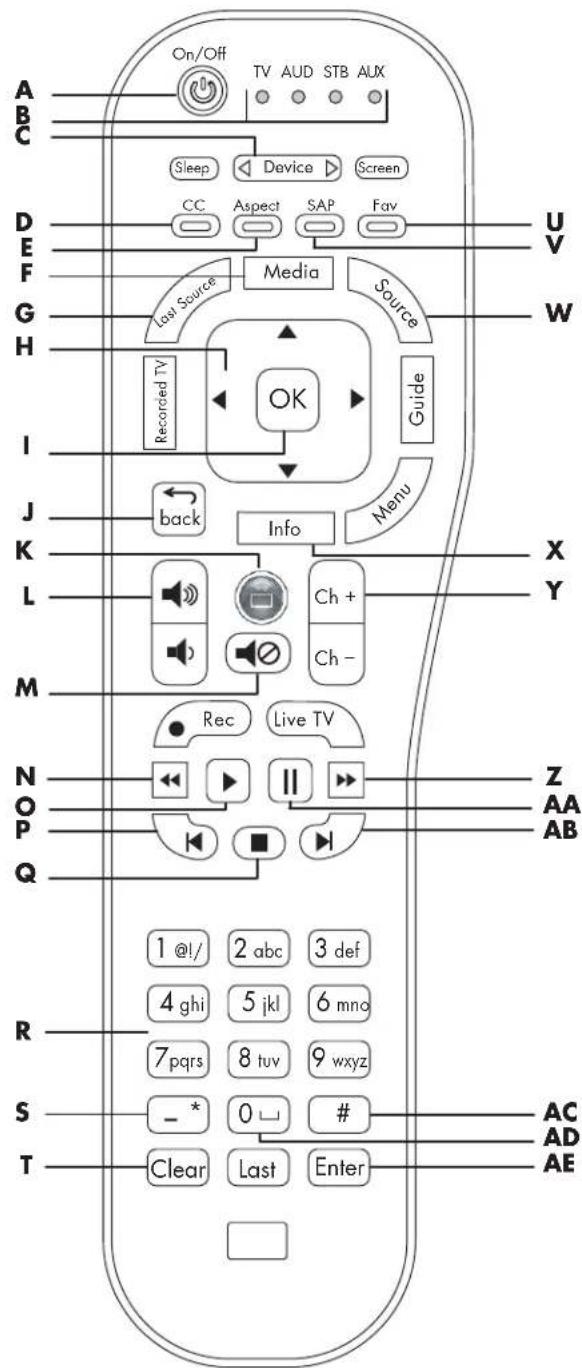
Identifying Media remote control buttons
| Remote button | Description | Icon |
| A P O W | er Press the Devi button (C), if needed, to select TV. Point the remote control at the TV, and then press Power to turn on the TV. Press Media (F) to use the digital media buttons. | vice |
| B I N d | ic a t o r is controlled by the remote control: TV, audio system (AUD), set-top box (STB), or auxiliary (AUX) such as a DVD player or other device. Press the Device button (C) to select the TV. | s Show t TV AUD STB AUX 0 0 0 |
| C D e v | i c e Press Devi needed to select the device that is controlled by the remote control; an indicator (B) lights to show the current device. | Device as Device |
| D Red (CC) context | Press Red (context) to cause an action specific to the current menu or item. | CC |
| E Green (Aspect) context | Press Green (context) to cause an action specific to the current menu or item. The Aspect button is not valid when viewing digital media. | Aspect |
| Remote button | Description (Continued) | Icon |
| F M e d i a Press Media to open media | ||
| G L a s Source | Press Last Source to change the input source to the last viewed source. | Last Source |
| H Up/ down/left/right arrows | Press an Arrow button to move the cursor in the menu screens. | OK |
| I O K | Press OK to choose the highlighted menu option. | go back back |
| J b a c k | Press Back to one level in the menu. | |
| K Connect (green round) | Press Connect to open the Online Media menu in the digital media menus. | |
| L Vo I u m e Press a Vol m e button to increase (or decrease) the sound level. | ||
| M Mute | Press Mute to turn sound off or on. | |
| N Rewind | Press Rewind to rewind (fast-reverse) the current video. | |
| Remote button | Description(Continued) Icon | |
| O P I a | Press Play to stopFast-Forward (Z) orRewind (N) duringfull-screen video, or toresume from Pause(AA) in music. To startplay of an item whenbrowsing media,select the item andpress the OK (I)button. | ▶ |
| P P r e | v i o u s Press Previousto the previous item inmusic or photos. | ▲ |
| Q S t o p | Press Stop to stopplay of the currentmedia selections. | ■ |
| R N u m | b e r s Pressbuttons (0-9) to entera number.Press a number buttonas needed to scrollthrough and select acharacter, and thenpress Enter. Press 0(AD) for the numberzero or a space. PressClear (T) tobackspace and erasea character. | the number4.15556789999999999999999999999999999999999999999999999999999999999999999999999999999999999999999999999999999 |
| S - (Dor* (star) | Press (dash) toenter a dash ora *(star). | - * |
| T C l e | a r Press Clearbackspace and eraseone character. | to Clear |
| U Blue(Fav)context | Press Blue(context) tocause an actionspecific to the currentmenu or item. | Fav |
| Remote button | Description (Continued) Icon | |
| V Y e I (SAP/MTS) context | Press Yellow (context) to cause an action specific to the current menu or item. | SAP |
| W Source | Press Source to open a list of the input sources. Press an Arrow button (H) to select the input source to view, and then press OK (I). Or, press Source again to close the list without changing the source. Select MediaSmart as an alternate to pressing the Media button when viewing TV or another source. If you are playing media and select a different source, the media play stops streaming. | Source |
| X I nf o | Press Info to view information about the current media selection. | Info |
| Y C h+ Ch- | Press Ch to move one page up or down in the listing. | Ch+ Ch- |
| Z Fa st- Forward | Press FF to fast-forward play of the current media selection. | → |
| AA Pause | Press Pause to suspend play of the current media selection. | II |
| AB Next Press | Next to jump to the next item in music or photos. | |
| AC # Press # to | enter the pound sign. | |
| AD 0 (space) | Press 0 for the number zero, or for a space. | |
| AE Enter Press | Enter to select or perform an action on the current media selection, or after entering a number. |
Using context buttons
Pressing a context button causes an action specific to the current digital media menu or item. The button function appears at the bottom of the screen.


Generally:
Red starts play or rotates a photo.
■Green opens the listing as a list or as thumbnails, or shuffles play.
Yellow opens the Search panel.
Blue adds the item to Favorites.
Searching
You can search by these criteria for the search type:
Photos: Name, Date, Keyword
Videos: Title, Actor, Date
■Music: Artist, Album, Song
In the Photos, Videos, or Music media lists, press the Yellow context button to open a search panel.
2 Enter the search criteria using the onscreen keyboard for entries. To use the onscreen keyboard:
Press the Arrow buttons on the remote control to select an item, and then press OK to enter it. Or
Press a number button on the remote control as needed to scroll through and select a character, and then press Enter.
The search criteria you enter is not case sensitive. Also, the search criteria can be a single character or a partial word.
To change the Search By criteria, press the Green context button.
3 Click the OK button to conduct the search.
4 Press the Back button to go back to the original screen.
Viewing Photos
Press the Media button on your remote control to open the main digital media menu.
2 Press an Arrow button to select Photos, and then press OK.
3 Press an Arrow button to select a listing option, and then press OK. You can see photos by these listings:
All Photos
Keywords
Date
Playlists
Folders
■Favorites
The screen shows your photos as thumbnail images or as a list.
4 Press an Arrow button to select a photo. Press a Channel button to show the next page of photos.
5 With a photo selected, you can:
a Press the Left Arrow and Right Arrow buttons to move to the previous or next photo.
b Press the Red context button to start a slideshow from this photo.
In a slideshow:
Press Play to start or resume a slideshow or a slideshow and music.
Press Stop to stop music, a slideshow or a slideshow and music.
Press Pause to pause music, a slideshow, or a slideshow and music.
Press Next to skip to the next photo when playing music in a slideshow.
Press Previous to play the previous photo when playing music in a slideshow.
Press OK to view the photo as a full-screen image. Press Back or Stop to return to the thumbnails.
In full-screen photo view:
The Left Arrow and Right Arrow buttons jump to the previous and next photo.
The Previous and Next buttons jump to the previous or next photo.
The Red context button plays a slideshow.
The Green context button rotates the photo.
The Yellow context button zooms (enlarges) the photo. Pressing the Yellow button again steps through zoom modes. While in zoom, press an Arrow button to pan within the photo.
The Blue context button adds the item to Favorites.
Changing slideshow options
Choose slideshow options in the Settings menu for Slideshow; see "Changing Slideshow options" on page 77.
Watching Video Files
Press the Media button on your remote control to open the main digital media menu.
2 Press an Arrow button to select Videos, and then press OK.
3 Press an Arrow button to select a listing option, and then press OK. You can see videos by these listings:
All Videos
■Genre
■Actors
- Downloaded (videos you've downloaded to the PC)
Online (movies available through Online Services)
Playlists
Folders
■Favorites
The screen shows your videos as thumbnail images or as a list.
4 Press an Arrow button to select a video, and press the Red context button or OK to play it. Press a Channel button to show the next page of videos.
5 With a video selected, you can:
a Press OK or the Red context button to start play of this video. Press Back or Stop to stop play and return to the list.
b Press the Yellow context button to open a search.
c Press the Green context button to open the listing as a list or as thumbnails.
d Press the Blue context button to add the item to Favorites.
e To control background music that is playing, press a device operation button (Pause, Previous, Stop, Next).

While viewing a video, press Info to open a window of information for the video file. Press Info again to close the window.

Genre and actor information appears only for files that provide such information for the video file. All other videos appear as "Unknown" in these lists.

When playing back Digital Rights Management (DRM) protected content, license acquisition may delay play for several seconds.
6 During video play:
Press the Green context button to switch the video between Full Screen and Original size.
Press Stop to stop the video.
Press Pause to pause the video.
Press FF to advance the video.
Press Rew to rewind the video.
Press Next to go to the next video.
Press Previous to go to the previous video.
Changing videos options
Choose video options in the Settings menu; see "Changing Videos options" on page 77.
Listening to Music
Use this feature to play music, or to listen to background music while playing a photo slideshow.
Press the Media button on your remote control to open the main digital media menu.
2 Press an Arrow button to select Music, and then press OK.
3 Press an Arrow button to select an option for music listings, and then press OK. The options are:
■All Music
■Genre
■Artist
■Albums
Playlists
Folders
Favorites
The screen shows all your music as thumbnail images or as a list.
4 Press an Arrow button to select a music file. Press a Channel button to show the next page of the listing.
5 In the All Music view:
The Red context button selects the Repeat option for the music.
The Green context button select the Shuffle options.
The Yellow context button opens a search.
The Blue context button adds the item to Favorites.
6 In the music listing, you can press Play to start play. During music play:
The Pause button pauses the song until you press Play.
The Previous button plays the previous song in the list.
The Next button plays the next song in the list.
FF advances music play.
Rew reverses music play.

While playing a song, press Info to open a window of information for the music file. Press Info again to close the window.

When only playing music, you can turn off the video to the TV display by pressing the Screen button on the remote control.
Be sure to press the Screen button to show the video again.

Albums, artists, and genre information appears only for files that provide the information in the music file.

When playing back Digital Rights Management (DRM) protected content, license acquisition may delay play for several seconds.
Using Media Services
Online Media menu lists the various media service providers. Check back periodically as new services become available.
Prior to use, the media service provider may require subscription purchase, or account or other setup that is performed directly from your PC. This is usually set up during installation using the Installation CD that came in the box. Or, you can use your PC to access the Internet and go to:
http://www.hp.com/go/mediasmart
To use media services:
Press the Media button on your remote control to open the main digital media menu.
2 Press an Arrow button to select Online Media, and then press OK.
3 The list of services appears. Press an Arrow button to select a service name.
4 Press OK.
5 The TV connects to the service.

To access the service, your TV must successfully connect to your home LAN and have a broadband connection to the Internet.
For specific information on using the service you select, use the help information for that service provided at: http://www.hp.com/go/mediasmart
Selecting Servers
To set the type of servers that are displayed, use the Servers option in the Settings menu; see "Changing the Servers option" on page 78.
To select a server and view or play its media:
Press the Media button on your remote control to open the main digital media menu.
2 Press an Arrow button to select Servers, and then press OK.
3 Press an Arrow button to select a server, and then press OK.
The TV shows the available media on the server.
■You can select and play the media.
■ You can delete a server or refresh the list. When you delete a server, it and its contents are hidden. The server is again viewable after you restart MediaSmart. To restart MediaSmart, see "Using the Reset Options" on page 77.
Changing Settings
Press the Media button on your remote control to open the main digital media menu.
2 Press an Arrow button to select Settings, and then press OK.
3 Press an Arrow button to select an option:
Network
■Demo
■Language
DivX Registration Code
Reset Options
■Slideshow
Video
Servers
Software Update
4 Press OK.
Viewing current network settings
To view the current network settings:
Press the Media button on your remote control to open the main digital media menu.
2 Press an Arrow button to select Settings, and then press OK.
3 Press an Arrow button to select Network, and then press OK.
4 Press an Arrow button to select View Network Settings, and then press OK.
The current network settings display.
Changing network settings
In the Network menu, you can select the network settings for the wired or wireless connection, using an automatically assigned IP address, or manually assign a static IP address. If your router does not use DHCP, then manually assign a static IP address.
To initially set up the use of digital media, including installing Windows Media Player 11 and the MediaSmart software, see "Setting Up the TV for Digital Media" on page 25.
To change network settings:
Press the Media button on your remote control to open the main digital media menu.
2 Press an Arrow button to select Settings, and then press OK.
3 Press an Arrow button to select Network, and then press OK.
4 Press an Arrow button to select the type of network connection you have:
Connect to a Wireless Network Connect to a Wired Network
5 Press OK.
■For a wireless connection, continue with Step 9.
For a wired connection, continue with Step 6.
If the wired connection is not found, the router may not assign the IP address automatically: select Manually enter IP Address, press OK, and then follow the onscreen instructions to enter the IP address and other network items.
Setting up a wired connection
6 Follow the onscreen instructions. For a wired connection, the wizard checks for the network, the IP address, and then for access to the Internet across the network.
If the TV shows an error message:
Check that the wired LAN (Ethernet) cable is properly connected at the TV and the router.
Check that the computer, router, and other network equipment are all turned on.
7 Click Finish.
Wait while the TV looks for authorized servers on the network.
8 This completes the wired network settings. Press the Media button to display the main digital media menu. To use the menu, refer to "Using Digital Media" on page 67.
Setting up a wireless connection
9 Ensure that the wireless network is working.

For a wireless network, you need the network name or SSID, and the network security information (the WEP passphrase, or the WPA key).
10 Follow the onscreen instructions. To use the onscreen keyboard:
Press the Arrow buttons on the remote control to select an item, and then press OK to enter it. Or
Press a number button on the remote control as needed to scroll through and select a character, and then press Enter.
11 Press OK.
Wait while the TV looks for authorized servers on the network.
12 This completes the wireless network settings. Press the Media button to display the main digital media menu. To use the menu, refer to "Using Digital Media" on page 67.
Using the Demo option
In the Settings menu, select Demo, and then press OK.
The Demo provides a demonstration of the Photos, Videos, and Music menus. You can navigate through the Photos in thumbnail view (All Photos), through a Music list of songs (All Music), or through a Video list of videos (All Videos). You can play an example video.
While in the Demo:
Press an Arrow button to select an option in the Demo, and then press OK.
Press the Back button to exit an option.
After a period of no interaction with the TV, Demo shows a movie and continuously repeats it. Press any remote control button to return to the Demo mode.
If you turn off the TV while in Demo mode, when you turn on the TV again, it again shows the Demo mode.
To exit the Demo, press Media, select Settings and press OK, select Demo Mode, and then select Exit Demo, and press OK.
Changing the Language option
Press the Media button on your remote control to open the main digital media menu.
2 Press an Arrow button to select Settings, and then press OK.
3 Press an Arrow button to select Language, and then press OK.
4 Press an Arrow button to select an option, and then press OK to enter it:
■English
Francais
Espanol

This Language setting sets the language for the digital media menus. To change the language for the TV OSD menus, see "Selecting the OSD Language" on page 64.
Viewing the DivX registration code
DivX Video-on-Demand (VOD) is a protected video service. You must have a valid account, connect to the video provider, and register the TV or your DivX DVD player to buy or rent, download, and play videos protected by DivX VOD.
To view your DivX VOD registration code information, select DivX Registration Code in the Settings menu, and then press OK. Follow the onscreen instructions.
Using the Reset Options
Use this option to restart the TV or to restore the media settings to original values (factory reset). Restore also removes all user preferences (media server, network type, and so on), all user personal information (cookies, services passwords, and so on), if any, and all network settings.
Press the Media button on your remote control to open the main digital media menu.
2 Press an Arrow button to select Settings, and then press OK.
3 Press an Arrow button to select Reset Options, and then press OK.
4 Press an Arrow button to select Restart System or Restore Factory Settings, and then press OK.
5 Press an Arrow button to select Next, and then press OK.
Changing Slideshow options
Select photo slideshow options in the Settings menu for Slideshow:
Press the Media button on your remote control to open the main digital media menu.
2 Press an Arrow button to select Settings, and then press OK.
3 Press an Arrow button to select Slideshow, and then press OK.
4 Press an Arrow button to select a slideshow time interval, and then press OK.
5 Press an Arrow button to select a slideshow transition, and then press OK.
6 Press an Arrow button to select a slideshow order (chronology), and then press OK.
Changing Videos options
Press the Media button on your remote control to open the main digital media menu.
2 Press an Arrow button to select Settings, and then press OK.
3 Press an Arrow button to select Videos, and then press OK.
4 Press an Arrow button to select an option, and then press OK to enter it:
Repeat On (or Off)
Repeat One
Repeat All
Changing the Servers option
Select HP Approved Servers to show only servers that HP has confirmed meet requirements for use with MediaSmart.
Use these steps to set the type of servers to connect to and display.
Press the Media button on your remote control to open the main digital media menu.
2 Press an Arrow button to select Settings, and then press OK.
3 Press an Arrow button to select Servers, and then press OK.
4 Press an Arrow button to select the type of servers (All Servers or HP Approved Servers), and then press OK.
5 Select the server, and then press OK.
6 Press the Red context button to exit Settings.
Updating software
Use this option regularly to check the HP server for the TV software updates. You can choose to download and install the update, or you can roll back the firmware after installing an update.
Press the Media button on your remote control to open the main digital media menu.
2 Press an Arrow button to select Settings, and then press OK.
3 Press an Arrow button to select Software Update, and then press OK.
4 Press an Arrow button to select an option, and then press OK. Follow the onscreen instructions.
Using Help
Press the Media button on your remote control to open the main digital media menu.
2 Press an Arrow button to select Help, and then press OK.
3 Press an Arrow button to select an option, and then press OK. Help information displays. Press the Back button to exit.
Finding Answers to Questions
Understanding TV Terms
What are analog TV, digital TV, and high-definition TV (HDTV)?
Devices such as monitors, tuners, and integrated monitor/tuner combinations are designed to handle any of the 18 formats officially sanctioned by the industry-led standard setter, Advanced Television Systems Committee (ATSC), for the digital transmission of video signals. There are three subgroups of digital televisions depending on their capabilities: high-definition (HDTV), enhanced-definition (EDTV), and standard-definition (SDTV).
In contrast, U.S. analog television has been available for over 50 years in the single National Television Standards Committee (NTSC) format. This is the signal format that has been broadcast over the air and through cable systems. NTSC television offers slightly more than 480 interlaced lines of resolution.
To view high-definition programming, your TV must receive high-definition signals by means of a high-definition signal source connected to the television. The source can be an off-the-air high-definition antenna or cable HD signal, or an HD source, such as a cable or satellite provider HD set-top box, an HD-DVD player, and so on. All sources, except an HD antenna or cable HD signal, must connect to one of the High Definition Input connector sets on the rear of the TV. Your cable or satellite provider may require additional purchase for high-definition programming; off-the-air high-definition broadcasts may not be available in all areas.
What is the difference between progressive and interlaced signal formats for digital TVs?
There are 18 standard digital TV signal formats. Each provides a different picture quality. The names of these digital TV formats consist of a number followed by either p (progressive) or i (interlaced). The letter refers to the way the TV uses the signals to create the picture:
Progressive (p) scanning presents all the horizontal lines of the picture in one frame. This provides a sharper picture to the eye, and looks much better than an interlaced image of the same resolution.
■Interlaced (i) means that the picture appears in two segments; every other horizontal line of the picture is displayed in one frame, and the other half of the horizontal lines are displayed in the next frame. This works because it happens so fast that the eye is deceived into believing that only one picture is being shown.
The number in the names of the formats refers to the number of lines of resolution. Generally speaking, the higher the number, the better the picture. For example, with digital TV (DTV), there are two progressive formats for broadcasters to choose from: 480p and 720p. 480p has 480 horizontal scan lines. Although the 480p image is much sharper than a regular TV broadcast, it is considered only a DTV signal and not a true high-definition signal. 720p has 720 horizontal scan lines and is considered to be true HDTV. 720p can rival a 1080i picture, in which 1080 horizontal scan lines are displayed as an interlaced image. The sharper and more accurate (progressive) 720p picture looks better, even though a 1080i picture has many more scan lines and a much higher resolution.
What is variable aspect ratio?
The aspect ratio describes the relationship of screen width to screen height. Standard TV signals are based on an aspect ratio of 4:3 (four units wide by three units high). HDTV signals are based on an aspect ratio of 16:9, making the image 33 percent wider than a normal TV, and enabling you to view TV and movies as if you were watching them in a theater.
In addition, many DVD movies look better on the widescen display, because most of the movies made in the last 50 years were filmed in an aspect ratio of either 1.85:1 (very close to 16:9, which is equal to 1.78:1) or 2.35:1 (even wider than 16:9).
Variable aspect ratio support enables the scaling of 4:3 and anamorphic video so that the image fills the screen.
What is HDMI?
High-Definition Multimedia Interface (HDMI) is the first industry-supported, uncompressed, all-digital audio/video interface. HDMI components can transmit both digital audio and digital video over a single cable, with improved quality over traditional analog connections because of an all-digital transmission. Transferring digital sources, such as DVDs and HDTV programming, can now be accomplished without analog conversions that can degrade the original signal.
Identifying Cable Usage
The following table lists all of the cable types that are available for the TV. It shows a side view of each, along with its connector.
| Cable type/ connection Description | |
| HDMI | Capable of transmitting both uncompressed digital audio and digital video signals, because it has video, audio, and control signals. |
| DVI | DVI requires use of a separate audio cable. DVI-D transmits digital video signals. DVI-D can be used with a DVI-to-HDMI converter to connect to an HDMI connector on the TV. DVI-I transmits both digital and analog video signals. DVI-I can be used only with a DVI-to-VGA converter to connect a PC to the PC Input (VGA) connector on the TV. |
| DVI-D | |
| DVI-I | |
| Component | Three-headed or five-headed cable: One for Pr signal (red), one for Y signal (green), and one for Pb signal (blue). Some component cables also have red and white audio cables attached. Used for HDTV receivers, DVD players, and other devices with YPbPr component output connectors. |
| S-Video | Used with equipment such as DVD players, VCRs, cable or satellite tuners and decoders, camcorders, and digital cable boxes. |
| Composite Used with equipment such as VCRs and DVD players. | |
| Cable type/ connection Description | (Continued) |
| Coaxial antenna | RF or coaxial used for antennas or cable connections. Often used with a cable or a satellite decoder (set-top box), if no other choice is available. |
| VGA Interface used with PCs and monitors. | |
| Digital audio | High-resolution optical audio cable used for optional external audio systems, such as 5.1 channel surround sound. |
| RCA | Red and white audio connectors that connect to the red and white (L and R) audio inputs. |
| RS-232 Serial interface used for control purposes only. | |
| Power cord Connects the TV to the AC power outlet. | |
Answering MediaSmart TV frequently asked questions
Do I need a Media Center PC to use my MediaSmart TV?
No, a Media Center PC is not required. Your MediaSmart TV works with any PC that supports Windows Media Player 11 or other UPnP-compliant program. The MediaSmart TV has its own interface and can connect directly to many Internet services. Also, the MediaSmart TV shows television or content from a connected DVD or other device just like a regular TV does.
However, the MediaSmart TV works well with a Media Center PC, and can play recorded HDTV shows and protected content.
Why does MediaSmart TV use Windows Media Player?
Windows Media Player file sharing is based on Industry standards (UPnP) and is widely used. It is easy to install, set up, and use, and it supports digital rights management, which enables access to premium online content.
What version of Windows Media Player works with the MediaSmart TV?
The MediaSmart TV supports Windows Media Player 11.0. If you have an earlier version of WMP, you can get a free download of version 11.0 from the Microsoft Windows Media Player Web site.
Can my MediaSmart TV software be updated?
Yes, MediaSmart TV firmware (software) is automatically updated as needed when the TV has access to the Internet.
Can MediaSmart TV play AAC format and other music file types?
Yes, your MediaSmart TV can play music files in a variety of formats, including unprotected AAC files. For supported music file types, see "Supported Media File Types" on page 89.
What is the wireless type to use to stream video to my MediaSmart TV?
The quality of streaming video over wireless depends on many factors, such as the bitrate of the original video, the reception quality, and the access point. For best quality over wireless, HP recommends using an access point that supports IEEE 802.11n.
IEEE 802.11a or 802.11g are the second choice. IEEE 802.11b access points work well for audio and picture streaming, but are not recommended for video because of bandwidth limitations.
Can I play recorded TV shows or downloaded shows or movies from my Media Center PC on my MediaSmart TV?
Microsoft Media Center PCs record TV programs in a proprietary format called dvr-ms. Your MediaSmart TV supports playback of dvr-ms files. If you do not see your dvr-ms files in the Windows Media Player Library, you may need to install the MediaSmart software from the Installation CD; see "Setting up a wired or wireless connection" on page 25. For supported video file types, see "Supported Media File Types" on page 89.
Can I stream a DVD movie from my PC to the MediaSmart TV?
No, because the MediaSmart TV can only access digital media exported by the media server (Windows Media Player). Due to copyright and legal issues, WMP does not export the VOB files used in DVDs.
However, if you have the DVD disc, you can play it through a DVD player you connect directly to the MediaSmart TV. See "Connecting a DVD player, VCR, DVR, game console, or camcorder" on page 13 for more information.
How do I create an account for my online service?
Use your PC to access the Internet to create all your online accounts before you log in for the first time using your MediaSmart TV. Go to:
http://www.hp.com/go/mediasmart
Specifications
| Display | |
| TV panel TFT LCD television | |
| Dimensions in inches (mm) | |
| HP SL4778N: W: 44.4 (1128), H: 31.7 (804), A: 26.8 (680), B: 29.3 (744), T: 5.4 (138), D: 11.0 (279), C: 15.6 (395) HP SL4278N: W: 40.0 (1015), H: 29.0 (737), A: 22.0 (558), B: 26.6 (676), T: 5.3 (135), D: 11.0 (279), C: 14.0 (355) | |
| Panel resolution HP SL4778N: | 1920 x 1080 (for 1080p input) HP SL4278N: 1920 x 1080 (for 1080p input) |
| Brightness Up to 500 cd/m | 2 |
| Contrast ratio HP SL4778N: 1200:1 HP SL4278N: 1500:1 | |
| Response time (typical) HP SL4778N: 6 ms HP SL4278N: 6 ms | |
| Panel life Up to 60,000 hours | |
| Audio | ■10 watts per channel (two internal speakers) ■HP Virtual Surround Sound: Theater, Music Hall ■Analog output: 2-channel stereo ■Digital (optical) output: Dolby Digital Out, PCM |
| Display (Continued) | |
| OSD language English/French | Spanish |
| Power requirement AC 120 V, | 60 Hz ~ |
| Power consumption HP SL4778 | N: 330 W HP SL4278N: 300 W |
| TV function | |
| TV standard (CCIR) American TV | Standard ATSC/NTSC/Clear-QAM system |
| Receiving channel VHF: 2-13 | UHF: 14-69 CATV: 1-125 Digital Terrestrial Broadcast (8VSB): 2-69 Digital cable (64/256 Clear-QAM): 1-135 |
| Audio multiplex BTSC system | |
| Supported Inputs 480i, 480p, 720p, 1080i, 1080p (HDMI only) | |
| Connectors | |
| Digital High Definition Input HDMI | input (Type A) connectors with HDCP: ■HDMI 1 (with Audio In L and R) ■HDMI 2 ■HDMI 3 |
| Component High Definition Input | ■1: Y, Pb, and Pr, and Audio L and R ■2: Y, Pb, and Pr, and Audio L and R |
| Standard Definition Input | ■AV Input 1: S-Vid, Video, and Audio L and R ■AV Input 2: S-Vid, Video, and Audio L and R |
| PC Input VGA monitor input with Audio L/R (Line In) | |
| Audio Output | ■Digital (Optical) in Dolby Digital or PCM format ■Audio Output L and R stereo analog (RCA) |
| ANT/Cable In (RF input) 75-ohm | Unbalance, F-Type for VHF/UHF/CATV in |
| Connectors (Continued) | |
| LAN (RJ-20 Ethernet) 10/100 Ethernet (802.3) full-duplex 10/100 Mbps with MDx detection (straight or crossover) | |
| Serial RS-232 Serial Input (Control use only) | |
| Service Port USB (Service use only) | |
! Wireless LAN antennas are internal to the TV and connect the TV to your wireless home network (802.11 a/b/g/n).
| Weight | |
| TV panel (no stand) HP SL4778N: | 68.0 lb. (31.0 kg) HP SL4278N: 55.0 lb. (25.0 kg) |
| TV with stand HP SL4778N: 78.0 | lb. (35.0 kg) HP SL4278N: 64.0 lb. (29.0 kg) |
| Environment |
| Operating temperature at humidity 32°F to 95°F (0°C to 35°C) at 20% to 80% RH |
| Storage temperature at humidity -4°F to +122°F (-20°C to +50°C) at 10% to 90% RH |
| Accessories | |
| In the box Documentation with installation | on disc, remote control, Ant/Cable adapter, cable clamp, and AC power cord |
| Certification and compliance UL, C-UL, | FCC, BETS-7 |
All specifications represent the typical specifications provided by HP's component manufacturers; actual performance may vary either higher or lower.
The panel life is determined as the time at which luminance is 50% compared to that of initial value at the typical lamp current on condition of continuous
operation at 25 + / - ^ 60,000 hours equates to more than twenty-three years at seven hours a day viewing.
PC Compatibility Chart
| Preset | Pixel format | Horiz. freq. (kHz) | Horiz. polarity | Vert. freq. (Hz) | Vert. polarity | Pixel clk. (MHz) Source | |
| 1640 x 480 31.5 - 59.9 | 25.2 VGA | ||||||
| 2640 x 480 37.5 - 75.0 | 31.5 VESA | ||||||
| 3720 x 400 31.5 - 70.1 | + 28.3 VGA | ||||||
| 4800 x 600 37.9 + 60.3 | + 40.0 VESA | ||||||
| 5800 x 600 46.9 + 75.0 | + 49.5 VESA | ||||||
| 61024 x 768 48.4 - 60.0 | - 65.0 VESA | ||||||
| 71024 x 768 56.5 - 70.1 | - 75.0 VESA | ||||||
| 81024 x 768 60.0 - 75.0 | - 78.8 VESA | ||||||
| 91280 x 768 47.4 + 60.0 | - 68.3 VESA | ||||||
| 101280 x 1024 64.0 + 60.0 | 0.0 + 108.0 | VESA | |||||
| 111360 x 768 47.7 + 60.0 | 0 + 85.5 VESA | ||||||
| 121920 x 1080 65.0 + 30.0 | 0.0 + 74.25 | EIA |
Supported Media File Types
Digital media formats: CODECs versus file containers
Despite international efforts to create standard-based audio and video formats, many format types are incompatible.
The Codec (compressor and decompressor) is the method used to compress and decompress digital media files. Audio/video streams usually incorporate two separate codec: one for the compressed video and one for the compressed audio. The MPEG codec include profiles and levels, which are the minimum processing requirements for a compliant decoder. Examples of codec are:
■JPEG: Used by almost all digital cameras to compress digital images.
■MPEG-1, MPEG-2, and MPEG-4: Audio and video codes developed by International Standards Technical committees.
VC-1: A video codec developed by Microsoft.
Dolby Digital: An audio codec used in DVD movies and in high-definition broadcasting.
The File container is the type of file that the digital bit stream is stored in, regardless of the codec used. File containers have a specific structure, which helps decoders identify the codecs necessary for playback. File containers may support multiple codecs, and may also include media metadata, DRM (digital rights management) keys, and other stream-related parameters. Examples of file containers are:
AVI
Quicktime (.mov)
MP4(.mp4)
WMV(.wmv)
DivX {.divx}
Mpeg (.mpg)
Popular codes
MPEG CODECS. The Motion Pictures Experts Group (MPEG) has developed a variety of A/V codec, including:
MPEG-1, which is used in VCD movies.
MPEG-2, which includes the audio codec s MPEG-2 Layer II (MP2) and MPEG-2 Layer III MP3),and which is used in DVDs,in HDTV, and in many movie download services.
■MPEG-4, part 2, which is the basis for DivX, Xvid, and other low bit-rate codecs.
■MPEG-4, part 10, or H.264, or Advanced Video Codec (AVC), which is the basis for HD-DVD and Blu-ray formats. It is also the default video codec in iTunes.
■AAC (Advanced Audio Codec, also known as MPEG-2, part 7, or MPEG-4, part 3), is the default audio codec in iTunes.
With MPEG-2, MPEG introduced for the first time the concept of profiles and levels. Profiles and levels define the minimum processing requirements for a compliant decoder. For example:
DVD movies use MPEG-2 at Main profile and Main Level (or MPEG-2 MP@ML).
HDTV uses a subset of Main profile at High Level (MP@HL).
Two of the most common profiles for MPEG-4, part 2, are the Simple Profile (SP) and the Advanced Simple Profile (ASP).
Windows Media CODEcs. Microsoft has developed a number of CODEcs, including:
WMV7 and WMV8, which are early versions of the Microsoft video codec.
WMV9, which is the current version of the Microsoft video codec.
VC-1, which is the Advanced Profile of the WMV9 codec, and which is needed for support by both Blu-ray and HD-DVD players.
WMA (Windows Media Audio), including WMA Pro, which is a multi-channel audio codec.
Dolby Digital. Also known as AC3, Dolby Digital forms the basis of multichannel audio coding in HDTV and DVD movies.
Divx, Xvid. Popular video codec based on the MPEG-4, part 2 video standard. Divx includes video codec rev. 3, 4, 5, and 6.
Popular file containers
■AVI is a popular Audio/Video file format in PC systems. It supports multiple audio and video codec, including DV, Divx, and MPEG-1/2/4.
MP4 file format is based on the Apple Quick Time file format, but is part of the MPEG-4 standard (MPEG-4, part 14). MP4 files use the .mp4 extension and support a variety of codec, including the audio AAC codec and MPEG-4 (part 2 or part 10) codec.
WMV (Windows Media Video) or ASF (Advanced Streaming Format) are also popular Microsoft media file containers. They support mostly Microsoft-based codecs, such as WMV7/8/9, Windows Media audio (WMA), and VC-1.
DVR-MS is a Microsoft file container for storing broadcast TV programming that is recorded by Media Center PCs.
Divx is a file container developed by the DivX Corporation. It supports the Divx video CODEcs (versions 3.0 to 6) that are based on the MPEG-4, part 2 video codec, and a variety of audio CODEcs, including MP2, MP3, Dolby Digital, and raw LPCM data. The divx file format can also support metadata, subtitle tracks, and DRM.
■Quick Time (.mov or .qt) is a file container developed by Apple. It provided the basis for the MP4 file format that is currently used by iTunes and other media service providers.
MPG (.mpg) is the simplest possible file container for an MPEG video with associated audio. It usually supports MPEG-2 video (MP@ML or MP@HL) and MPEG-2, Layer II or Dolby Digital audio.
Video Object files, VOB (.vob), are used in DVDs. They include audio, video, menu, and subtitle information. In most cases, renaming a .vob file to an .mpg file is all that is needed to play the file by an MPEG-compliant decoder (without the menu or subtitle information, however).
Supported media
Your MediaSmart TV does not support all possible codec. The Table of Supported Media that follows provides details on the codec and file containers that the MediaSmart TV supports.
The UPnP-compliant program you use to stream media to your TV can limit the files that you can stream. Windows Media Player 11 does not show media files that it does not support or that it does not recognize, such as iTunes audio files in MP4 (AAC) format, photos in Bitmap format (.bmp) or Graphics Interchange Format (.gif), or Media Center recorded TV programs in Microsoft Video Recording format (.dvr-ms).
For example, your MediaSmart TV supports the playback of dvr-ms files, but Windows Media Player 11 may not. If you do not see your dvr-ms files in the Windows Media Player Library, you may need to install the MediaSmart software from the Installation CD; see "Setting up a wired or wireless connection" on page 25.
| Table of Supported Media | |||
| File extension Video/picture codec Audio CODES | DRM support | ||
| Photos only | |||
| .jpg JPEG N/A | |||
| .png PNG N/A | |||
| .bmp BMP N/A | |||
| .tif TIF N/A | |||
| .gif GIF N/A | |||
| Music only | |||
| .m4a N/A AAC No Fairplay | |||
| .mp3 N/A MP3 | |||
| .wma | N/A WMA, WMA Pro | Yes | |
| .wav | N/A LPCM | ||
| .ogg | N/A Vorbis OGG | ||
| Audio/video | |||
| .avi | Divx, xvid (MPEG-4, ASP) | MP2, MP3, Dolby Digital (2ch, 5.1ch) | Divx DRM |
| .divx | Up to rev. 6.0 (MPEG-4 ASP) | MP2, MP3, Dolby Digital (2ch, 5.1ch) | Divx DRM |
| .dvr-ms | MPEG-2 video | MP2, Dolby Digital (2ch, 5.1ch) | |
| .mp4 MPEG-4, part 2, | H.264 (BP@L3) up to 720p 30 MP@L4 up to 720p 60 | AAC, MP2, MP3 No Fairplay | |
| .mov | MPEG-4, part 2, H.264 | ||
| .mpg MPEG-1, MPEG-2 | (up to MP@HL) | MP2, LPCM, Dolby Digital | |
| .wmv/asf | WMV9, VC-1 | WMA, WMA Pro | MS DRM |
| .m2t/.ts | MPEG-2 (TS) (up to MP@HL) | MP2, LPCM, Dolby Digital | |
Troubleshooting
Refer to this section if you have startup, viewing, picture, sound, or remote control problems with your TV.
Startup questions
| Symptom Remedy | |
| I do not hear sound at power-on, even though there is an image. | ■Is the volume too low? Press the Volume button. ■Is mute turned on? Press the Mute button, or the Volume button. ■Are the TV speakers turned off in the onscreen display (OSD) menu? Press the Menu button to open the OSD; press the Down Arrow button to select Audio, and then press the OK button; press the Down Arrow button to select Speaker, and then press OK; press the Down Arrow to select On, and then press OK. Press the Menu button to close the OSD. |
| I do not hear sound from an HDMI connected set-top box, DVD player, or other device. | Check that the device outputs audio over HDMI in PCM format. Change the device setting if needed. This TV does not support audio input over HDMI in Dolby Digital format; for more information, see “Understanding audio output” on page 54. To use Dolby Digital output from your digital source device, connect the digital output of your device directly to the input of your AV receiver or external sound system that supports Dolby Digital. For more information, see “Selecting the type of sound system” on page 17. |
| I do not see an image at power-on. | ■Are the connections to the input signal source component correct? Double-check that the cables are properly inserted into the color-coded connectors. ■Is the input signal source powered on? Turn on the set-top box, DVD player, or other device that you are trying to view. ■Is the correct input signal source selected? Press the Source button on the remote control, and confirm that the source is selected. ■Press the Menu button on the remote control, or on the TV: ■If the OSD appears, check the cables to the input source, and then press the Source button on the remote control, or on the TV, to select the input source. ■If the OSD does not appear, see the next symptom, “There is no power.” |
| Symptom Remedy (Continued) | |
| There is no power. | ■Press the Power button on the remote control. ■If the Power light on the TV is on (blue), press the Power button on the TV. ■Is the AC power cord disconnected? Make sure that both ends of the power cord are plugged in. ■Is there power coming from the outlet? Plug a functional lamp or other electrical device into the same outlet as the TV to make sure that power is coming from the outlet. ■If you are using a power strip, make sure that it is turned on. |
| The unit cannot be operated. | ■External influences, such as lightning and static electricity, may cause improper operation. In this case, operate the unit after first turning on the power of the TV, or after unplugging the AC power cord and plugging it back in after 1 or 2 minutes. |
| The color is strange, faded, or misaligned. | ■Adjust the picture tone. ■Is the room too bright? The picture may look dark in a room that is too bright. ■Check the input signal setting. ■If you are watching a component device, make sure that the red, blue, and green cables are fully inserted into the proper connectors at both ends. |
| The power suddenly turned off. | ■Is the sleep timer set? ■The internal temperature of the TV has increased. Remove any objects that are blocking the vent, or clean the vent. |
Viewing questions
| Symptom Remedy | |
| I get a poor picture with video signal input. | Check the following: improper control setting, local interference, cable interconnections. Adjust the picture control as needed. Try another location for the TV. Make sure that all connections are secure. |
| There is no picture, and I have an external device controlling the TV. | ■Press the Source button on the remote control, and confirm that the source is selected. ■Verify that the external device or PC power is turned on. ■Make sure that the source device is connected. ■Check the power management function of the source device. Is it in standby mode? ■Connect the source to the TV. Operate the external device or PC (move the mouse or press a key). |
| The picture, with a component input source connected, is too red, blue, or green, or it has black that is too black or washed out. | ■Make sure that each cable is plugged into the correct color-coded connector on the TV and on the input source device. ■Make sure that the cables are fully inserted at both ends. ■See “Adjusting the picture image” on page 53. |
| I press Media but nothing happens. Is TV the selected device on the remote control? | |
Picture quality questions
| Symptom Remedy | |
| Part of the picture is cut off, or the picture is not centered. | Check the position adjustment settings, and adjust the screen settings accordingly. |
| The picture image is too large or too small. | Press the Aspect button on the remote control to select a different picture image size. |
| The picture is unstable. | Verify that the external device or PC resolution setting is correct. Adjust to the appropriate resolution. |
| The picture has dark side bars and I cannot remove the bars by choosing a different aspect ratio. | Press the Info button on the remote control and read the station transmission mode. Some stations transmit standard-definition programming directly in 16:9 aspect ratio, so that the image has embedded dark side bars. For that type of input signal, the Panorama mode is not available, and the Zoom1 and Zoom2 modes do not eliminate the side bars. |
| When watching a DVD, the image has dark stripes at the top and bottom of the screen. | Film may be captured in many different widescreen ratios. When the original film ratio does not match the TV ratio, the stripes appear above and below the image. |
Remote control questions
| Symptom Remedy | |
| The remote control does not work. Check the following, and try the proposed solution: ■Make sure that the batteries are inserted with the polarity properly aligned. ■Make sure that the remote control batteries are fresh. If they are worn out, replace them with new batteries. ■Make sure that the remote control is within correct operating range. ■Make sure that the remote sensor window on the front of the TV is not under too much light, direct sunlight, or strong artificial light. ■Make sure that no obstacles are between the remote control and the sensor window on the front of the TV. ■Make sure that the remote control is aimed at the TV and is not farther than 16.4 feet (5 meters) away. | To be able to add a channel to the Fav button favorites list, the channel must be in the channel list. The Setup Wizard, or the Auto Scan in the OSD Channel menu, creates the channel list when it searches for channels. Run the Setup Wizard or the Auto Scan; see "Starting the Setup Wizard" on page 64 or "Searching for channels" on page 56. |
| The remote control does not control other home entertainment equipment. | Try all listed codes for the equipment brands you are trying to set up, or try programming the remote control using the auto setup mode. Refer to "Programming the Remote Control for a Home Entertainment Device" on page 43. Make sure the equipment can be operated with an infrared remote control. |
| The remote control does not blink the selected device button (TV, AUD, STB, AUX) when I push a button. | Replace the batteries in the remote control. |
| Symptom Remedy (Continued) | |
| My universal remote control does not find an HP TV code. | If you want to program a universal remote control to operate your HP TV, and HP is not listed in the supported brand codes, use a Philips TV code. The HP remote control transmits Philips-licensed remote control codes. After programming your universal remote control with a Philips TV code, it can operate your HP TV functions for: volume, mute, power, and input source. |
| What is the remote code for HP TVs? | There is no ‘universal’ remote code because each manufacturer of universal remote controls uses different databases and different codes. If HP TVs are not listed among the supported modes in your universal remote control, use a Philips TV code. After programming your universal remote control with a Philips TV code, it can operate your HP TV functions for volume, mute, power, and input source. |
| I press Media but nothing happens. Is TV the selected device on the remote control? | |
Media questions
| Media symptom Remedy | |
| I press Media but nothing happens. Is TV the selected device on the remote control? | |
| Connection is not established. | ■Check the cable connections from your PC to the TV. ■For a wired connection, make sure you are using the proper cable; use an Ethernet LAN cable to connect from the TV to the PC network router. ■For a wireless connection, check that the TV has the correct security settings; see “Viewing current network settings” on page 75. ■Check your IP settings. ■Make sure a firewall is not blocking Windows Media Player from the network. Reset the Microsoft firewall settings in Windows Media Player, or, if you are using another firewall program, make Windows Media Player a trusted program and make your whole home network a trusted device. For additional help with firewalls, use your PC to access the Internet and go to: http://www.hp.com/go/mediasmart ■Check your network connection by opening a browser on your PC and viewing a Web page on the Internet. If a Web page does not display, check your Internet connection. ■Check at your PC that you accepted the HP MediaSmart TV as one of the client devices in Windows Media Player. ■Check that your home network is a“private network,” because broadcast services and some UPnP programs may not work through a Virtual Private Network (VPN). See the Remedy for “My MediaSmart TV can see my Windows Vista computer, but I cannot stream any content” for the steps to change your home network to “private.” |
| My MediaSmart TV can see my Windows Vista computer, but I cannot stream any content. | The Windows VistaTM operating system requires that your home network be in a secure “private network” before it allows any content to stream to an allowed device. You can change your network from “public” to “private” by using these steps: 1 Click the Windows Start Button® and then click Network. 2 Click the Network and Sharing Center tab. 3 To change your network to private, click Customize. 4 Click Private, and then click Next. 5 Click Close. |
| Media symptom Remedy (Continued) | |
| I cannot find the media files from the TV that I know are in the folders I share on my computer. | Your MediaSmart TV only displays supported media files that are in the shared folders on your network computer for Windows Media Player or for the UPnP-compliant program you use to stream media to the TV. The Windows Media Player does now show media files that it does not support or that it does not recognize, such as iTunes audio files in MP4 (AAC) format, photos in Bitmap format (.bmp) or Graphics Interchange Format (.gif), or Media Center recorded TV programs in Microsoft Video Recording format (.dvr-ms). Your MediaSmart TV supports the playback of some files that Windows Media Player 11 alone may not. If you do not see such files in the Windows Media Player Library, you may need to install the MediaSmart software from the Installation CD; see “Setting up a wired or wireless connection” on page 25. For supported video file types, see “Supported Media File Types” on page 89. |
| When viewing steaming video from my PC, I see the video, but hear no audio. | ■ If you connected a digital external audio system to the Digital (Optical) Audio Output connector on the TV, make sure the audio system is on and that the Digital Audio Output mode is PMC in the OSD menu; see “Choosing the digital audio output mode” on page 54. ■ If you have not connected a digital external audio system to the Digital (Optical) Audio Output connector on the TV, make sure the setting for Speakers is On in the Audio menu in the OSD menu; see “Adjusting the audio” on page 54. |
| When viewing steaming video from my PC using a wireless LAN, the video is choppy. | The quality of streaming video over wireless depends on many factors, such as the bitrate of the original video, the reception quality, and the access point. For best quality over wireless, HP recommends using an access point that supports IEEE 802.11n or IEEE 802.11a. IEEE 802.11g is the second choice. IEEE 802.11b access points work well for audio and picture streaming, but are not recommended for video because of bandwidth limitations. |
| When viewing streaming video of a downloaded or recorded TV show or movie, the Pause, Fast-forward, and other device trick-play buttons do not work. | Microsoft Media Center PCs record TV programs in a proprietary format called dvr-ms. Your MediaSmart TV supports the playback of dvr-ms files, but it does not support the use of the device trick-play buttons. Many video download sites do not allow or support use of the device trick-play buttons on their pay-per-view video files. |
| When viewing or playing media, the screen freezes. | Turn off the TV and then turn it back on.During high transfer rates, as when streaming videos, your firewall may be blocking Windows Media Player from working properly with your HP MediaSmart TV. Reset the Microsoft firewall settings in Windows Media Player, or, if you are using another firewall program, make Windows Media Player a trusted program and make your whole home network a trusted device. For additional help with firewalls, use your PC to access the Internet and go to:http://www.hp.com/go/mediasmart |
| The TV turned itself off and then on. | The TV sensed an internal communication error and turned off to reset itself. |
| My TV can't play certain .wmv files (.mov, .avi, and so on). | See "Digital media formats: CODECs versus file containers" on page 89 for an explanation of file containers. A file container, such as wmv, may support multiple CODECs that may not be supported by your TV. For a detailed list of supported media types, see "Supported media" on page 90. |
| How can I find what codec is being used in my media file? | It may not always be possible to find this information, but you can try this:Play the file on your PC using Windows Media Player. While the file is playing, if possible, right-click the file in the library, and then click Properties. On the File tab, look at the Audio codec and the Video codec sections for the information. |
Copyright © 2007 Hewlett-Packard Development Company, L.P.
Attn: Product Regulations Manager
AVI
Quicktime (.mov)
MP4 (.mp4)
WMV(.wmv)
DivX (divx)
■Mpeg (.mpg)
Codec courants
Copyright © 2007 Hewlett-Packard Development Company, L.P.
http://www. hp.com/recycle
No permitted that the television center is located in the same area. No permit to use the television center in any other area.
A Cable coaxial de 75 ohmios (redondo)
B Cable bifilar de 300 ohmios (plano)
C Conector tipo F

1:Y,PbyPr,yAudioLyR
2:Y,PbyPr,yAudioLyR
1:Y,PbyPr,yAudioLyR
2:Y,PbyPr,yAudioLyR
Si useselconectorANT/Cable del televator:
■AVR
DVD
PVR
Cable
■DEC
■Aux
SAT
VCR
| Peso | |
| Panel de televisor (sin base) HP SL4778N: 68,0 libras (31,0 kg) HP SL4278N: 55,0 libras (25,0 kg) | |
| TV con base HP SL4778N: 78,0 | libras (35,0 kg) HP SL4278N: 64,0 libras (29,0 kg) |
AVI
Quicktime (.mov)
MP4 (.mp4)
WMV(.wmv)
DivX (divx)
Mpeg (.mpg)