Series 9000 S9152 - Shaver PHILIPS - Free user manual and instructions
Find the device manual for free Series 9000 S9152 PHILIPS in PDF.

User questions about Series 9000 S9152 PHILIPS
0 question about this device. Answer the ones you know or ask your own.
Ask a new question about this device
Download the instructions for your Shaver in PDF format for free! Find your manual Series 9000 S9152 - PHILIPS and take your electronic device back in hand. On this page are published all the documents necessary for the use of your device. Series 9000 S9152 by PHILIPS.
USER MANUAL Series 9000 S9152 PHILIPS
Congratulations on your purchase and welcome to Philips! To fully benefit from the support that Philips offers, register your product at www.philips.com/welcome. Please read this user manual, as it contains information about the features of this shaver as well as some tips to make shaving easier and more enjoyable.
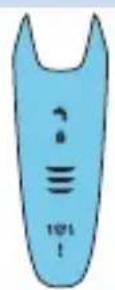
General description (Fig. 1)
1 Comb for beard styler attachment
2 Click-on beard styler attachment
3 Click-on trimmer attachment
4 Click-on shaving unit
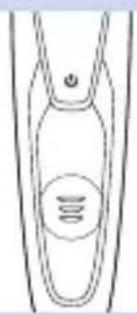
5 On/off button
6 Socket for small plug
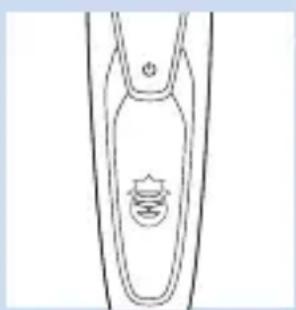
7 Exclamation mark
8 Replacement reminder
9 Battery charge indicator
10 Travel lock symbol
11 Cleaning reminder
12 Replacement symbol
13 SmartClean system
14 Cap of SmartClean system
15 On/off button
16 Cleaning symbol
17 Drying symbol
18 Ready symbol
19 Charge symbol
20 Cleaning cartridge for SmartClean system
21 Adapter
22 Small plug
23 Retaining ring holder
24 Pouch
Important
Read this user manual carefully before you use the shaver and the SmartClean system. Save this user manual for future reference.
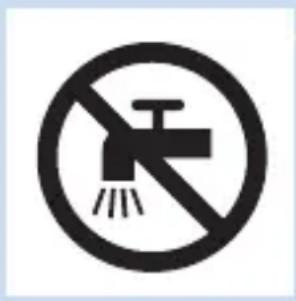
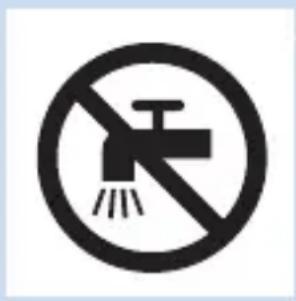
Danger
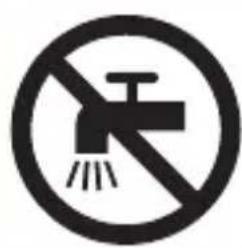
- Keep the adapter dry.
Warning
- The adapter contains a transformer. Do not cut off the adapter to replace it with another plug, as this causes a hazardous situation.
- The shaver and the SmartClean system are not intended for use by persons (including children) with reduced physical, sensory or mental capabilities, or lack of experience and knowledge, unless they have been given supervision or instruction concerning use of these appliances by a person responsible for their safety.
- Children should be supervised to ensure that they do not play with the shaver and the SmartClean system.
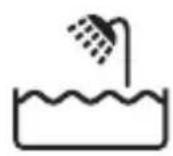
- Always unplug the shaver before you clean it under the tap.
Caution
- Never immerse the SmartClean system in water nor rinse it under the tap.
- Never use water hotter than 80^ C to rinse the shaver.
- Do not use the shaver, SmartClean system, adapter or any other part if it is damaged, as this may cause injury. Always replace a damaged adapter or part with one of the original type.
- Only use the SmartClean system with the original cleaning cartridge.
- Always place the SmartClean system on a stable, level and horizontal surface to prevent leakage.
- Always make sure that the cartridge compartment is closed before you use the SmartClean system to clean or charge the shaver.
- When the SmartClean system is ready for use, do not move it to prevent leakage of cleaning fluid.
- The SmartClean system thoroughly cleans but does not disinfect your shaver, therefore do not share the shaver with others.
- Never use compressed air, scouring pads, abrasive cleaning agents or aggressive liquids such as petrol or acetone to clean the appliance.
- Water may leak from the socket at the bottom of the shaver when you rinse it. This is normal and not dangerous because all electronics are enclosed in a sealed power unit inside the shaver.
Compliance with standards
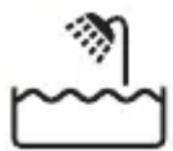
- This shaver is waterproof and complies with the internationally approved safety regulations. It is suitable for use in the bath or shower and for cleaning under the tap. For safety reasons, the shaver can therefore only be used cordlessly.
- The shaver and the SmartClean system comply with all applicable standards and regulations regarding exposure to electromagnetic fields.
General
- The adapter is equipped with an automatic voltage selector and is suitable for mains voltages ranging from 100 to 240 volts.
- The adapter transforms 100-240 volts to a safe low voltage of less than 24 volts.
- Maximum noise level: Lc = 69dB( A)
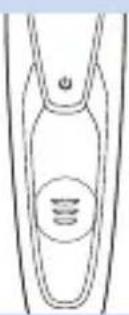
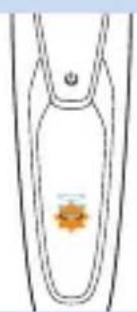
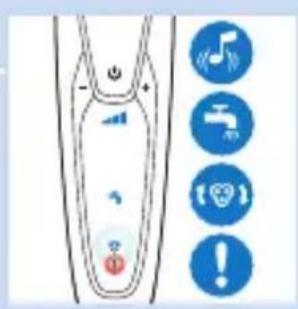
The display
Note: Before you use the shaver for the first time, remove the protective foil from the display.
The various shaver types have different displays, which are shown in the figures below.
- S91XX/S90XX

Charging
- Charging takes approx. 1 hour.
Note: This appliance can only be used cordlessly.
- When the shaver is connected to the mains, you hear a sound. First the bottom light flashes white then lights up white continuously. Then the second light flashes and then lights up continuously, and so on until the shaver is fully charged.
- Quick charge: When the bottom light stops flashing and lights up continuously, the shaver contains enough charge for one shave.
Battery fully charged
Note: This appliance can only be used cordlessly.
Note: When the battery is full, the display switches off automatically after 30 minutes. When you press the on/off button during or after charging, you hear a sound to indicate that the shaver is still connected to the mains.
- When the battery is fully charged, all lights of the battery charge indicator light up white continuously.
Battery low
- When the battery is almost empty, the bottom light flashes orange and you hear a sound.
Remaining battery capacity
- The remaining battery capacity is indicated by the lights of the battery charge indicator that light up continuously.
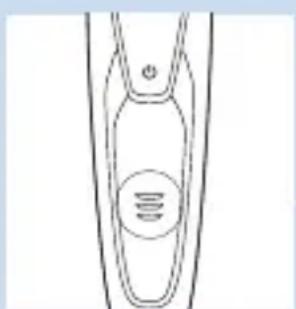
Cleaning reminder
For optimal shaving performance, we advise you to clean the shaver after every use.
- When you switch off the shaver, the cleaning reminder flashes to remind you to clean the shaver.
Travel lock
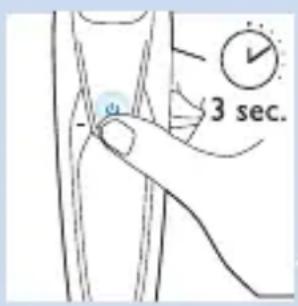
You can lock the shaver when you are going to travel. The travel lock prevents the shaver from being switched on by accident.

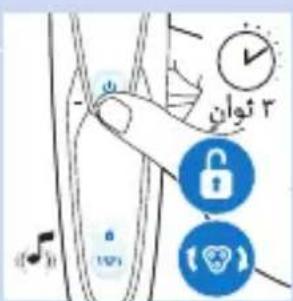
Activating the travel lock
1 Press the on/off button for 3 seconds to enter the travel lock mode.
While you activate the travel lock, the travel lock symbol lights up white continuously. When the travel lock is activated, the shaver produces a sound and the travel lock symbol flashes.
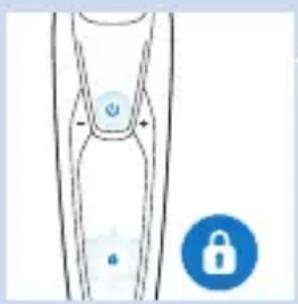
Deactivating the travel lock
1 Press the on/off button for 3 seconds.
The travel lock symbol flashes and then lights up continuously.
The shaver is now ready for use again.
Note: You can also deactivate the travel lock by connecting the appliance to the mains.
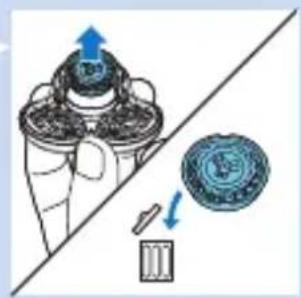
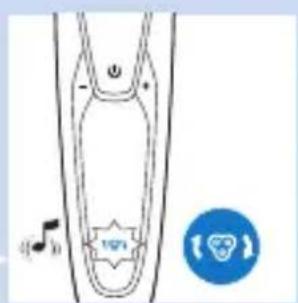
Replacing shaving heads
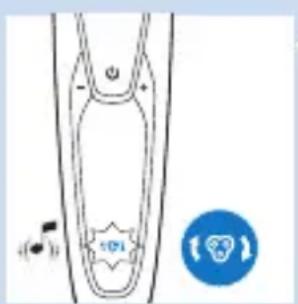
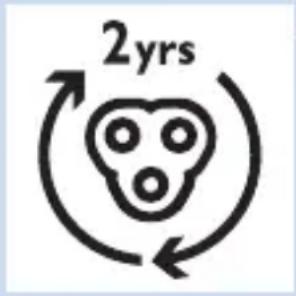
For maximum shaving performance, we advise you to replace the shaving heads every two years.
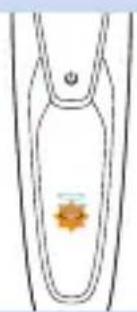
- The appliance is equipped with a replacement reminder which reminds you to replace the shaving heads. The replacement reminder lights up white continuously and the arrows flash white. You hear a beep to indicate you have to replace the shaving heads.
Note: After replacing the shaving heads, you need to reset the shaver by pressing the on/off button for 7 seconds.
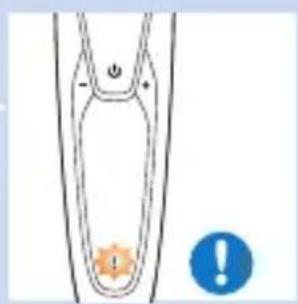
Exclamation mark
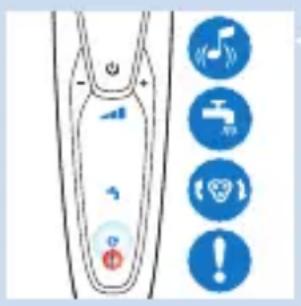
Blocked shaving heads
- If the shaving heads are blocked, the exclamation mark lights up orange continuously. The replacement reminder and the cleaning reminder flash white alternately and you hear a sound. In this case, the motor cannot run because the shaving heads are soiled or damaged.
- When this happens, you have to clean the shaving heads or replace them.
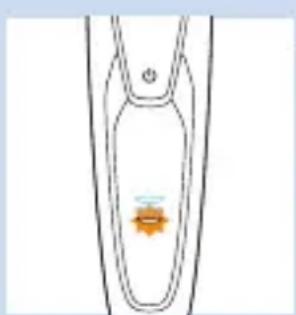
Overheating
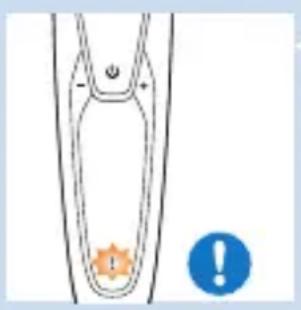
- If the appliance overheats during charging, the exclamation mark flashes orange.
- When this happens, the shaver automatically switches off. Charging continues once the appliance is back to the normal temperature.
Charging
Charging takes approx. 1 hour.
A fully charged shaver has a shaving time of up to 50 minutes.
Note: You cannot use the appliance while charging. Charge the shaver before you use it for the first time and when the display indicates that the battery is almost empty.
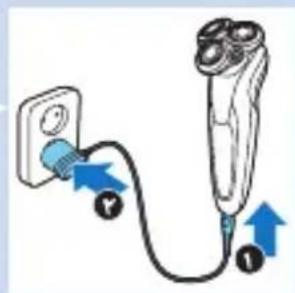
Charging with the adapter
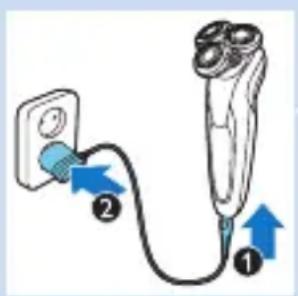
1 Make sure the appliance is switched off.
2 Insert the small plug into the appliance (1) and put the adapter in the wall socket (2).
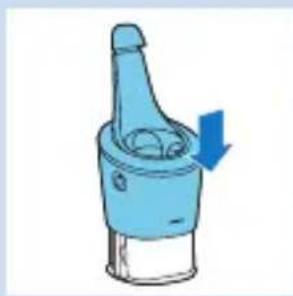
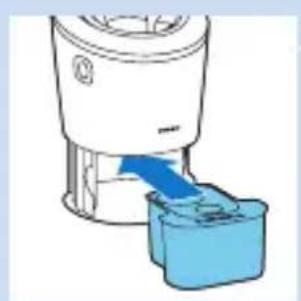
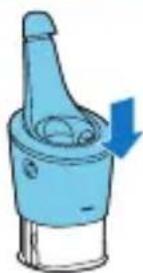
Charging in the SmartClean system
1 Put the small plug in the SmartClean system.
2 Put the adapter in the wall socket.
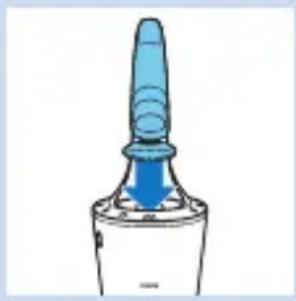
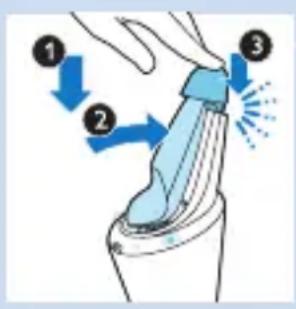
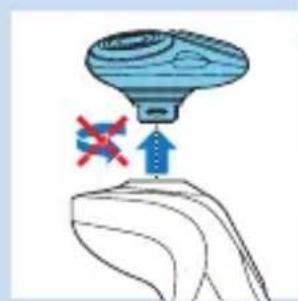
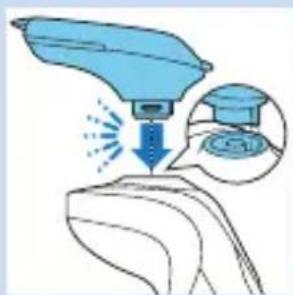
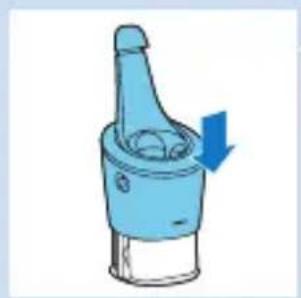
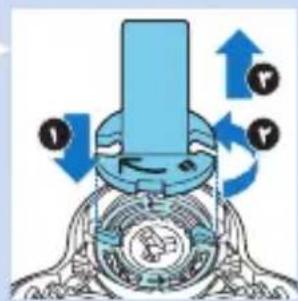
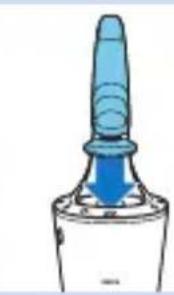
3 Hold the shaver upside down above the holder. Make sure the front of the shaver points towards the SmartClean system.
4 Place the shaver in the holder (1), tilt the shaver backwards (2) and press down the top cap to connect the shaver ('click') (3).
Note: The battery symbol lights up to indicate the appliance is charging.
Using the shaver
Shaving
Skin adaptation period
Your first shaves may not bring you the result you expect and your skin may even become slightly irritated. This is normal. Your skin and beard need time to adapt to any new shaving system.
We advise you to shave regularly (at least 3 times a week) with this shaver for a period of 3 weeks to allow your skin to adapt to the new shaver.
Tip: To ensure the best result, we advise you to pre-trim your beard if you have not shaved for 3 days or longer.
Note: This appliance can only be used cordlessly.
1 Press the on/off button once to switch on the shaver.
The display lights up for a few seconds.
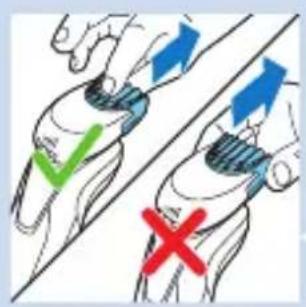
2 Move the shaving heads over your skin in circular movements.
- Do not make straight movements.
3 Press the on/off button once to switch off the shaver.
The display lights up for a few seconds and then shows the remaining battery charge.
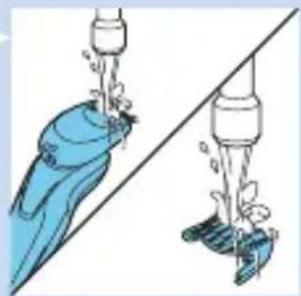
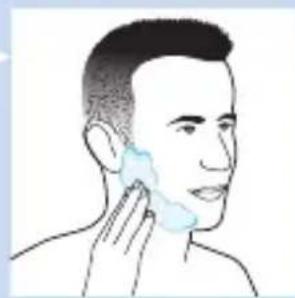
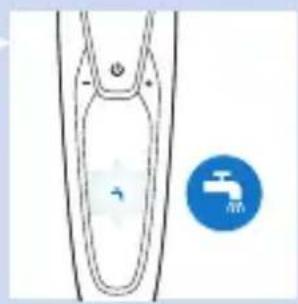
Wet shaving
You can also use this shaver on a wet face with shaving foam or shaving gel.
To shave with shaving foam or shaving gel, follow the steps below:
1 Apply some water to your skin.
2 Apply shaving foam or shaving gel to your skin.
3 Rinse the shaving unit under the tap to ensure that the shaving unit glides smoothly over your skin.
4 Press the on/off button once to switch on the shaver.
5 Move the shaving heads over your skin in circular movements.
Note: Rinse the shaver under the tap regularly to ensure that it continues to glide smoothly over your skin.
6 Dry your face and thoroughly clean the shaver after use (see chapter 'Cleaning and maintenance').
Note: Make sure you rinse all foam or shaving gel off the shaver.
Using the click-on attachments

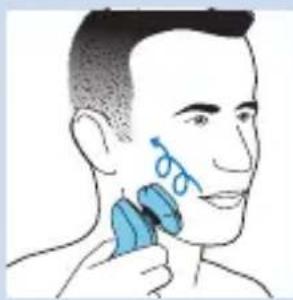
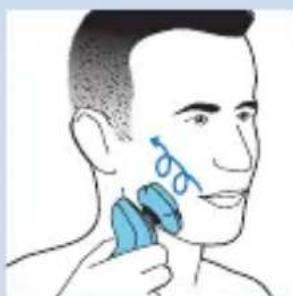
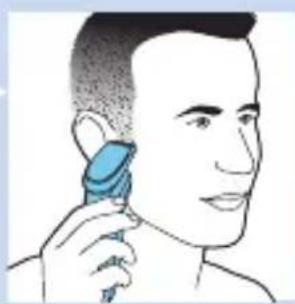
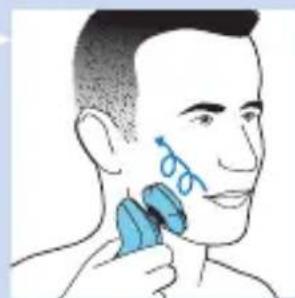
Using the trimmer attachment
You can use the trimmer attachment to groom your sideburns and moustache.
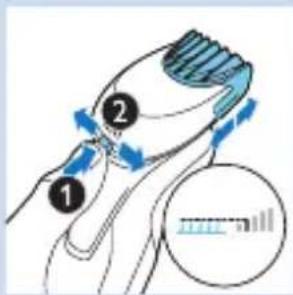
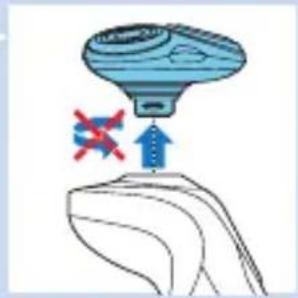
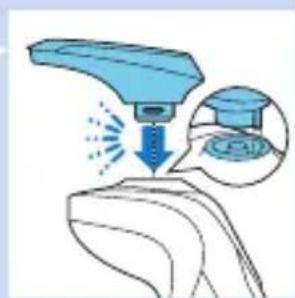
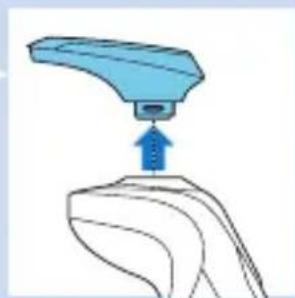
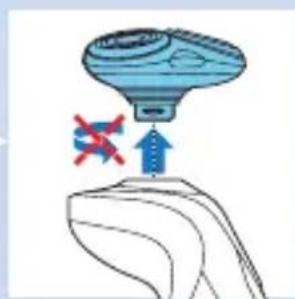
1 Pull the shaving unit straight off the appliance.
Note: Do not twist the shaving unit while you pull it off the appliance.
2 Insert the lug of the trimmer attachment into the slot in the top of the shaver. Then press down the trimmer attachment to attach it to the appliance ('click').
3 Press the on/off button once to switch on the appliance.
The display lights up for a few seconds.
4 You can now start trimming.
5 Press the on/off button once to switch off the appliance.
The display lights up for a few seconds to show the remaining battery charge.
6 Pull the trimmer attachment straight off the appliance.
Note: Do not twist the trimmer attachment while you pull it off the appliance.
7 Insert the lug of the shaving unit into the slot in the top of the appliance. Then press down the shaving unit to attach it to the appliance ('click').
Using the beard styler attachment
1 Make sure the appliance is switched off.
2 Pull the shaving unit straight off the appliance.
Note: Do not twist the shaving unit while you pull it off the appliance.
3 Insert the lug of the beard styler attachment into the slot in the top of the appliance. Then press down the beard styler attachment to attach it to the appliance ('click').
Using the beard styler attachment with comb
You can use the beard styler attachment with the comb attached to style your beard at one fixed setting, but also at different length settings. The hair length settings on the beard styler attachment correspond to the remaining hair length after cutting and range from 1 to 5mm .
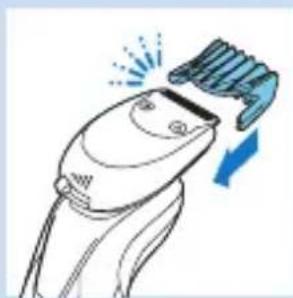
1 Slide the comb straight into the guiding grooves on both sides of the beard styler attachment ('click').
2 Press the length selector and then push it to the left or right to select the desired hair length setting.
3 Press the on/off button once to switch on the appliance.

4 You can now start styling your beard.
ENGLISH22
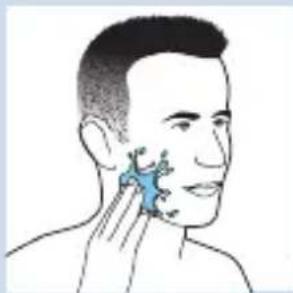
Using the beard styler attachment without comb
You can use the beard styler attachment without the comb to contour your beard, moustache, sideburns or neckline.
1 Pull the comb off the beard styler attachment.
Note: Grab the comb in the centre to pull it off the beard styler attachment. Do not pull at the sides of the comb.
2 Press the on/off button once to switch on the appliance.
3 You can now start contouring your beard, moustache, sideburns or neckline.
Cleaning and maintenance
Cleaning the shaver in the SmartClean system
The SmartClean system comes in two types:
- SmartClean system Basic has one phase: the rinsing phase.
- SmartClean system Plus has two phases: the rinsing phase and the drying phase.
Preparing the SmartClean system for use
Do not tilt the SmartClean to prevent leakage.
Note: Hold the SmartClean while you prepare it for use.
1 Put the small plug in the back of the SmartClean system.
2 Put the adapter in the wall socket.
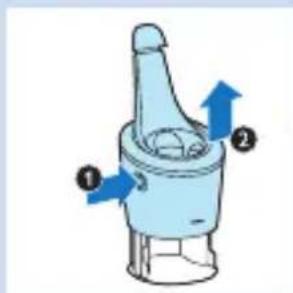
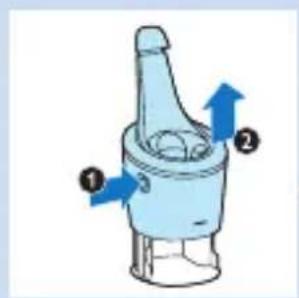
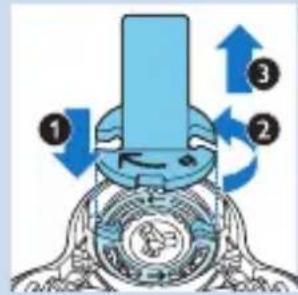
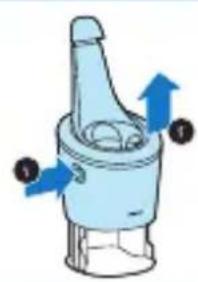
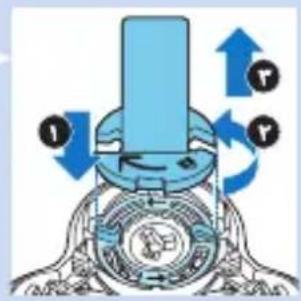
3 Press the button on the side of the SmartClean system (1) and lift the top part of the SmartClean system (2).
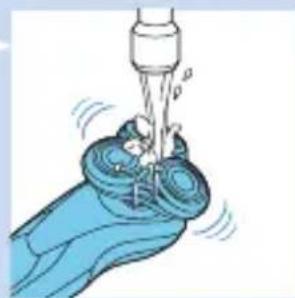
4 Pull the seal off the cleaning cartridge.
5 Place the cleaning cartridge in the SmartClean system.
Push the top part of the SmartClean system back down ('click').

Using the SmartClean system
Always make sure to shake excess water off the shaver before you place it in the SmartClean.
ENGLISH24
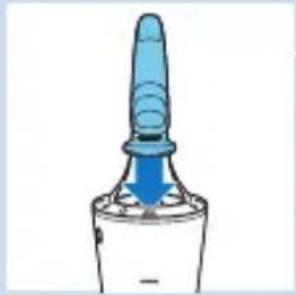
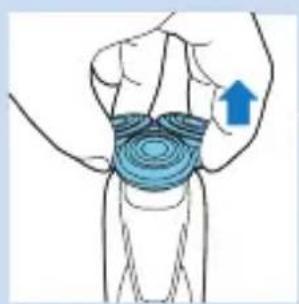
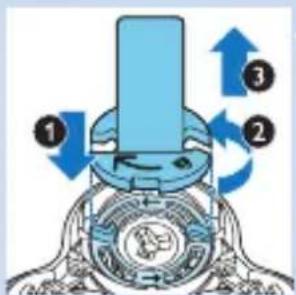
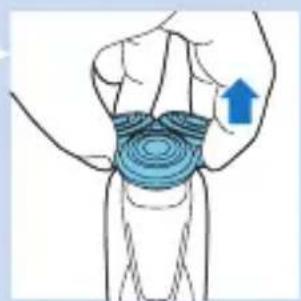
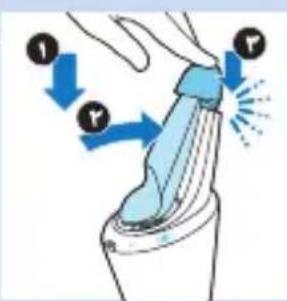
1 Hold the shaver upside down above the holder. Make sure the front of the shaver points towards the SmartClean system.

2 Place the shaver in the holder (1), tilt the shaver backwards (2) and press down the top cap to connect the shaver ('click') (3).
The battery symbol and the on/off button start to flash, which indicates that the shaver is charging.

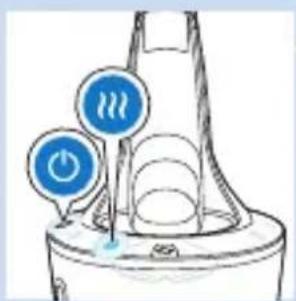
3 Press the on/off button on the SmartClean system to start the cleaning program.
The on/off button and the rinsing symbol both light up continuously.
Note: The rinsing phase takes approx. 10 minutes.
SmartClean systems Plus only:
During the drying phase, the drying symbol lights up continuously.

Note: The drying phase takes approx. 4 hours.
- When the cleaning program has been completed, the ready symbol lights up continuously.
The battery symbol lights up continuously to indicate that the shaver is fully charged.
Note: Charging takes approx. 1 hour.
Note: If you press the on/off button of the SmartClean system during the cleaning program, the program aborts. In this case, the rinsing or drying symbol stops flashing.
Note: If you remove the adapter from the wall socket during the cleaning program, the program aborts.
Note: 30 minutes after the cleaning program and charging have been completed, the SmartClean switches off automatically.
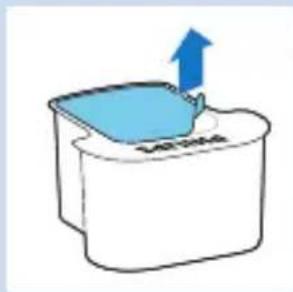
Replacing the cartridge of the SmartClean System
- Replace the cleaning cartridge when the replacement symbol flashes orange or when you are no longer satisfied with the result.
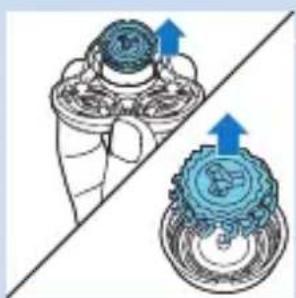
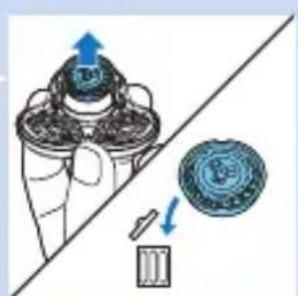
1 Press the button on the side of the SmartClean system (1) and lift the top part of the SmartClean system (2).
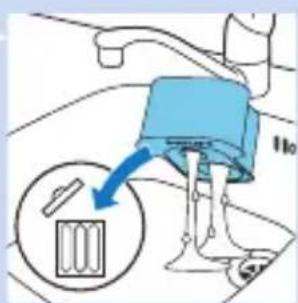
2 Take the empty cleaning cartridge from the SmartClean system and pour any remaining cleaning fluid out of the cleaning cartridge.
You can simply pour the cleaning fluid down the sink.
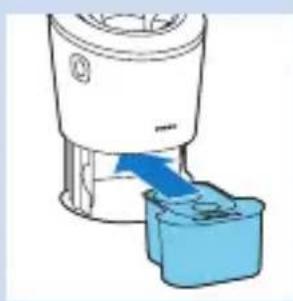
3 Throw away the empty cleaning cartridge.
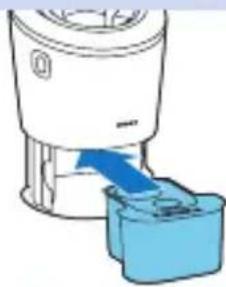
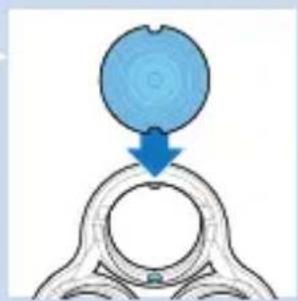
4 Unpack the new cleaning cartridge and pull the seal off the cartridge.
5 Place the new cleaning cartridge in the SmartClean system.
Push the top part of the SmartClean system back down ('click').

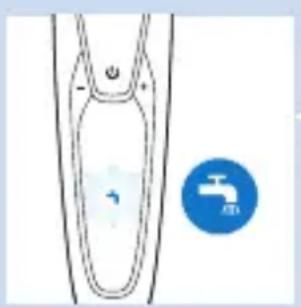
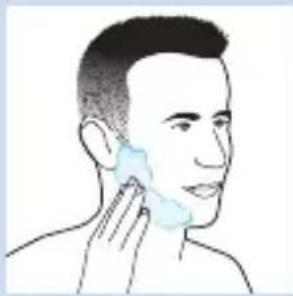
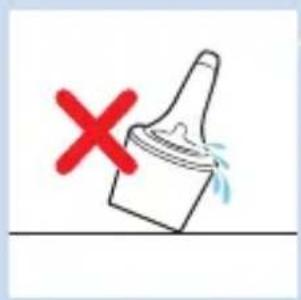
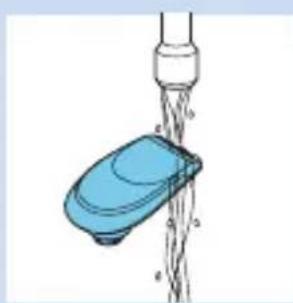
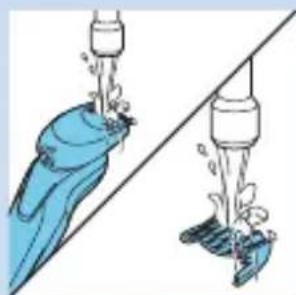
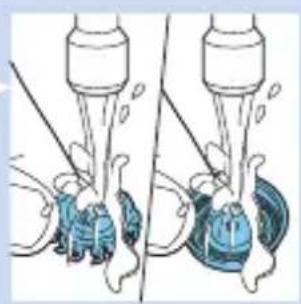
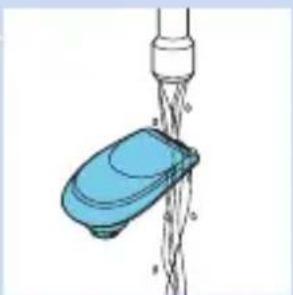
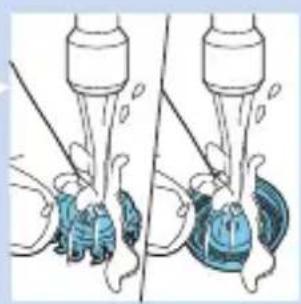
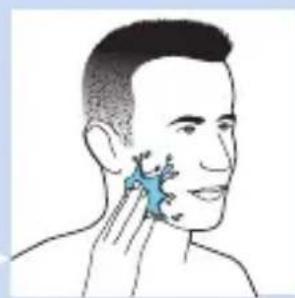
Cleaning the shaver under the tap
Clean the shaver after every shave for optimal shaving performance.
Be careful with hot water. Always check if the water is not too hot, to prevent your hands from getting burnt.
Never dry the shaving unit with a towel or tissue, as this may damage the shaving heads.
1 Switch off the shaver.
2 Rinse the shaving unit under a warm tap for sometime.
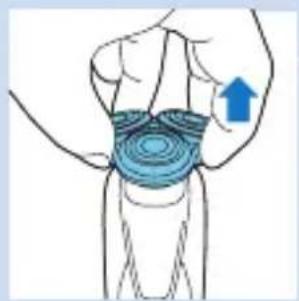
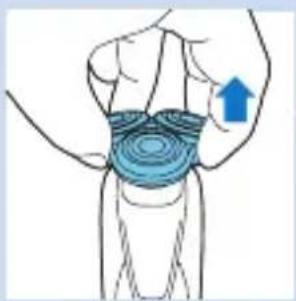
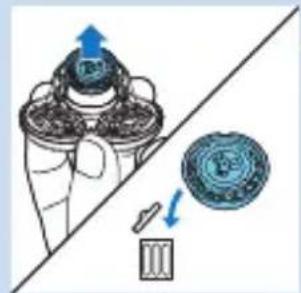
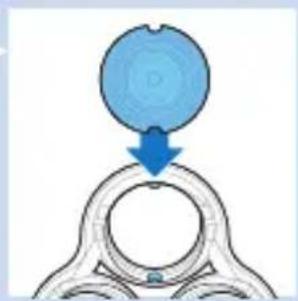
3 Pull the shaving head holder off the bottom part of the shaving unit.
4 Rinse the shaving head holder under a warm tap.
5 Carefully shake off excess water and let the shaving head holder dry.
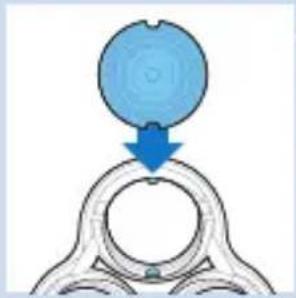
6 Reattach the shaving head holder to the bottom part of the shaving unit ('click').
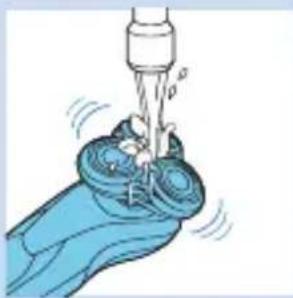
Thorough cleaning method
Make sure the appliance is switched off.
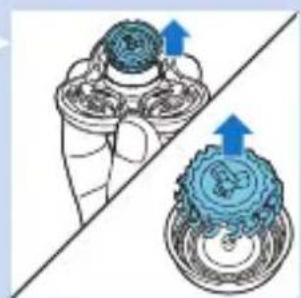
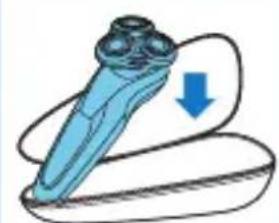
1 Pull the shaving head holder off the bottom part of the shaving unit.
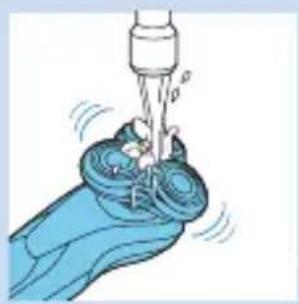
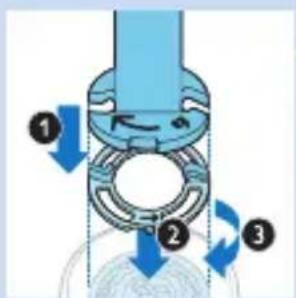
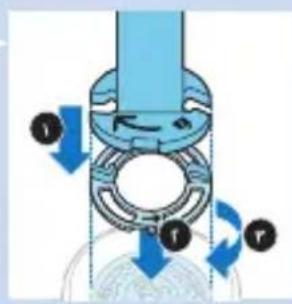
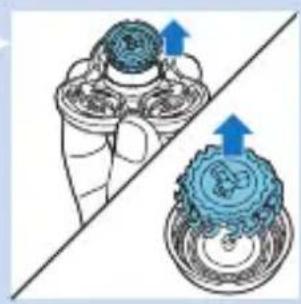
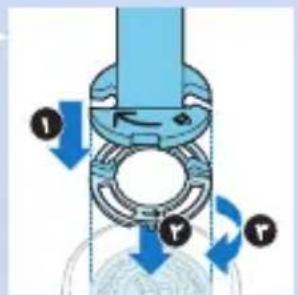
2 Place the retaining ring holder on the retaining ring (1), turn it anticlockwise (2) and lift it off the shaving head (3).
Remove the retaining ring from the retaining ring holder and repeat this process for the other retaining rings.
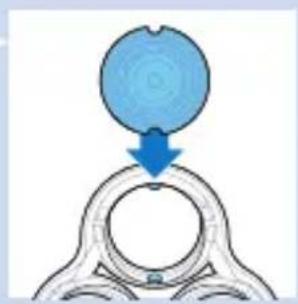
3 Remove the shaving heads from the shaving head holder. Each shaving head consists of a cutter and guard.
Note: Do not clean more than one cutter and guard at a time, since they are all matching sets. If you accidentally put a cutter in the wrong shaving guard, it may take several weeks before optimal shaving performance is restored.
4 Clean the cutter and guard under the tap.
5 After cleaning, place the cutter back into the guard.
6 Put the shaving heads back into the shaving head holder.
Note: Make sure the projections of the shaving heads fit exactly into the recesses.
ENGLISH28

7 Place the retaining ring holder on the retaining ring (1), place it on the shaving head (2) and turn it clockwise (3) to reattach the retaining ring.
Repeat this process for the other retaining rings.
8 Reattach the shaving head holder to the bottom part of the shaving unit.
Cleaning the click-on attachments
Cleaning the trimmer attachment
Clean the trimmer attachment every time you have used it.
1 Switch on the appliance with the trimmer attachment attached.
2 Rinse the trimmer attachment under a hot tap for some time.
3 Carefully shake off excess water and let the trimmer attachment dry.
4 After cleaning, switch off the appliance.
Tip: For optimal trimmer performance, lubricate the trimmer teeth with a drop of sewing machine oil every six months.
Cleaning the beard styler attachment
Clean the beard styler attachment every time you have used it.
1 Pull the comb off the beard styler attachment.
2 Rinse the beard styler attachment and the comb separately under a hot tap for some time.
3 Carefully shake off excess water and let the beard styler attachment and comb dry.
4 Lubricate the teeth with a drop of sewing machine oil every six months.
Storage
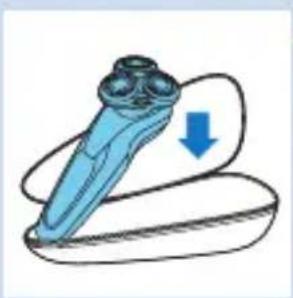
1 Store the shaver in the pouch supplied.
Note: We advise you to let the shaver dry before you store it in the pouch.
Replacement
Replacing the shaving heads
For maximum shaving performance, we advise you to replace the shaving heads every two years.
Replacement reminder
The shaving unit symbol lights up to indicate that the shaving heads need to be replaced. Replace damaged shaving heads right away.
Only replace the shaving heads with original SH90 Philips shaving heads.
1 The shaving unit symbol lights up continuously, the arrows flash white and you hear a beep when you switch off the shaver.
2 Pull the shaving head holder off the bottom part of the shaving unit.
3 Place the retaining ring holder on the retaining ring (1), turn it anticlockwise (2) and lift it off the shaving head (3).
Remove the retaining ring from the retaining ring holder and repeat this process for the other retaining rings.

4 Remove the shavings heads from the shaving head holder and throw them away.
5 Place new shaving heads in the holder.
Note: Make sure the projections of the shaving heads fit exactly into the recesses.
6 Place the retaining ring holder on the retaining ring (1), place it on the shaving head (2) and turn it clockwise (3) to reattach the retaining ring.
Repeat this process for the other retaining rings.
7 Reattach the shaving head holder to the bottom part of the shaving unit.
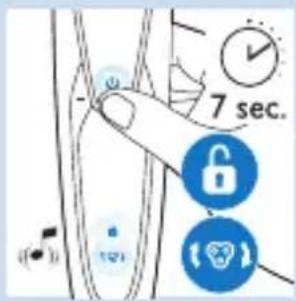
8 To reset the shaver, press and hold the on/off button for approx. 7 seconds. Wait until you hear two beeps.
Ordering accessories
To buy accessories or spare parts, visit www.shop.philips.com/service. or go to your Philips dealer. You can also contact the Philips Consumer Care Centre in your country (see the worldwide guarantee leaflet for contact details).
The following parts are available:
- HQ8505 adapter
- SH90 Philips shaving heads
- HQ110 Philips Shaving Head Cleaning Spray
- RQ111 Philips beard styler attachment
- RQ585 Philips cleansing brush attachment
- RQ560/RQ563 Philips cleansing brush heads
- JC301/JC302/JC303/JC304/JC305 cleaning cartridge
Shaving heads
- We advise you to replace your shaving heads every two years. Always replace the shaving heads with original SH90 Philips shaving heads.
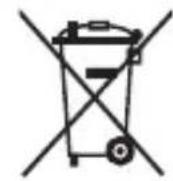
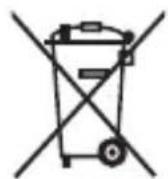
Environment
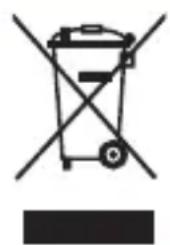
- Do not throw away the shaver and the SmartClean system with the normal household waste at the end of their life, but hand them in at an official collection point for recycling. By doing this, you help to preserve the environment.
- The built-in rechargeable shaver battery contains substances that may pollute the environment. Always remove the battery before you discard or hand in the shaver at an official collection point. Dispose of the battery at an official collection point for batteries. If you have trouble removing the battery, you can also take the shaver to a Philips service centre. The staff of this centre will remove the battery for you and will dispose of it in an environmentally safe way.
Removing the rechargeable shaver battery
Only remove the rechargeable battery when you discard the shaver. Make sure the battery is completely empty when you remove it.
Be careful, the battery strips are sharp.
1 Insert the screwdriver into the slot between the front and back panel in the bottom of the appliance. Remove the back panel.
2 Remove the front panel.
3 Unscrew the two screws at the top of the inner panel and remove the inner panel.
4 Remove the rechargeable battery with a screwdriver.
Guarantee and support
If you need information or support, please visit www.philips.com/support or read the separate worldwide guarantee leaflet.
Guarantee restrictions
The shaving heads (cutters and guards) are not covered by the terms of the international guarantee because they are subject to wear.
Troubleshooting
This chapter summarises the most common problems you could encounter with the appliance. If you are unable to solve the problem with the information below, visit www.philips.com/support for a list of frequently asked questions or contact the Consumer Care Centre in your country.
Problem Possible cause Solution
The shaver does not work when I press the on/off button.
The shaver it still attached to the mains. For safety reasons, the shaver can only be used cordlessly.
Unplug the shaver and press the on/off button to switch on the shaver.
The rechargeable battery is empty.
Recharge the battery (see chapter 'Charging').
The travel lock is activated.
Press the on/off button for 3 seconds to deactivate the travel lock.
The shaver does not shave as well as it used to.
The shaving heads are damaged or worn.
Replace the shaving heads (see chapter 'Replacement').
Hairs or dirt obstruct the shaving heads.
Clean the shaving heads (see chapter 'Cleaning and maintenance').
I replaced the shaving heads, but the replacement reminder is still showing.
You have not reset the shaver.
Clean the shaver thoroughly before you continue shaving (see chapter 'Cleaning and maintenance').
A shaving head symbol has suddenly appeared on the display.
This symbol is a replacement reminder.
Reset the shaver by pressing the on/off button for approx. 7 seconds (see chapter 'Replacement').
An exclamation mark has suddenly appeared on the display while charging.
The shaver is overheated.
Disconnect the shaver from the mains for approx. 10 minutes.
| Problem Possible cause Solution | ||
| An exclamation mark, replacement reminder and the cleaning reminder have suddenly appeared on the display. | The shaving heads are soiled or damaged. | Replace (see chapter ‘Replacement’) or clean the shaving heads (see chapter ‘Cleaning and maintenance’). |
| Water is leaking from the bottom of the shaver. | During cleaning, water may collect between the inner body and the outer shell of the shaver. | This is normal and not dangerous because all electronics are enclosed in a sealed power unit inside the shaver. |
| The SmartClean system does not work when I press the on/off button. | The SmartClean system is not connected to the mains. | Put the small plug in SmartClean system and put the adapter in the wall socket. |
| The shaver is not entirely clean after I clean it in the SmartClean system. | You have not placed the shaver in the SmartClean system properly, so there is no electrical connection between the SmartClean system and the shaver. | Press down the top cap ('click') to ensure a proper connection between the shaver and the SmartClean system. |
| The cleaning cartridge needs replacement. | Replace the cleaning cartridge (see chapter ‘Cleaning and maintenance’). | |
| The cleaning cartridge is empty. The replacement symbol flashes to indicate you have to replace the cleaning cartridge. | Place a new cleaning cartridge in the SmartClean system (see chapter ‘Cleaning and maintenance’). | |
Problem Possible cause Solution
| You have used another cleaning fluid than the original Philips cleaning cartridge. | Only use the Philips cleaning cartridge. | |
| The drain of the cleaning cartridge might be blocked. | Push the hairs down the drain with a toothpick. | |
| The shaver is not fully charged after I charge it in the SmartClean system. | You have not placed the shaver in the SmartClean system properly. | Press down the top cap ('click') to ensure a proper connection between the shaver and the SmartClean system. |
Einführung
Commanded accessoires
www.philips.com/support
y
www.shop.philips.com/service
JC301/JC302/JC303/JC304/JC305
#
sloal slesw gea
21ol s4jw d5 p55 0 aog,21ol clln jy
15
sas d ccl coslc s g uo n g jy csle 1gj l yu
1
SH90 Philips
115 0gej
jogg wu w g pui yol gl cosle
wg5 a ggsuusugolsj y jy
.1j 1gSaaJn Jn Jn Jn Jn Jn Jn
2olgslqil 1JooI,2slojw oJlq
.15 J0g
100000000000000000000000000000000000000000
1
.(r) 15
1 1 1 1 1 1 1 1 1 1 1 1 1 1 1
15
1 1
uJU


J 1
uJyJz
J. 1 J. 1 J. 1 J. 1 J. 1 J. 1 J. 1 J. 1 J. 1 J. 1 J. 1 J. 1 J. 1 J. 1 J. 1 J. 1 J. 1 J. 1 J. 1 J. 1 J. 1 J. 1 J. 1 J. 1 J. 1 J. 1
JyI yI yI yI yI yI yI yI yI yI yI yI yI yI yI yI yI yI yI yI yI yI yI yI yI yI yI yI yI yI yI yI yI yI yI yI yI yI yI yI yI yI yI yI yI yI yI yI yI yI yI
1
J 1 J 1 J 1 J 1 J 1 J 1 J 1 J 1 J 1 J 1 J 1 J 1 J 1 J 1 J 1 J 1 J 1 J 1 J 1 J 1 J 1 J 1 J 1 J 1 J 1 J 1 J 1 J 1 J 1 J 1 J 1 J 1 J 1 J 1 J
J (1) auiuui i dai s g j uuiui i dai ouiiui 5 V J I nssw. (r) uuiui buiu w s g j uoiu dauu dai li (r) uuiui ciu w sla aiaac csiu cip .uioo l uioo l
J 1


jui jai jie 1 Jaiw w y d g y jol o jy .
.
. 1
J 1
auiy i yi y 1 1 1 1 1 1 1 1 1 1 1 1
J 1
Jolss
.
J 1
Jg JgJgJgJgJgJgJgJgJgJgJgJgJgJgJgJgJgJgJgJgJgJgJgJgJgJgJgJgJgJgJgJgJgJgJgJgJgJgJgJgJgJgJgJgJgJgJgJgJgJgJg
j1 j5 jai aolij jgiil
gooagiooljugos
j5 jw g w s jai colij plil j w aq r:ag
Sgswuogol Sjlogil 3SmartClean
SmartClean
j 5 j 1
y j 1
gugge
J (1) JSmartClean
.(r)SSmartClean
SmartClean
J 1 J 1 J 1 J 1 J 1 J 1 J 1
b
J 1
1
SmartClean
.
JSmartClean
( 52,152)
slln sclj 15, 1y j Jls 15 syl as o
10g 1y
#
jli 5j d lgl j, lly Jx Lj yd s o
Jg

$$ \left. \omega \omega \omega \omega \omega \omega \omega \omega \omega \omega \omega \omega \omega \omega \omega \omega \omega \omega \omega \omega \omega \omega \omega \omega \omega \omega \omega \omega \omega \omega \omega \omega \omega \omega \omega \omega \omega \omega \omega \omega \omega \omega \omega \omega \omega \omega \omega \omega \omega \omega \right] $$
$$ \therefore \text {i} _ {j} \text {i} _ {l} \text {i} _ {j} \text {i} _ {l} \text {i} _ {l} \text {i} _ {l} \text {i} _ {l} \text {i} _ {l} \text {i} _ {l} \text {i} _ {l} \text {i} _ {l} \text {i} _ {l} $$
$$ l o l \quad s i s \quad j u a j \quad j u j \quad j u j \quad S l o S S m a r t C l e a n $$
$$ \left| \int_ {0} ^ {1} \right| _ {0} ^ {1} \left| \int_ {0} ^ {1} \right| _ {0} ^ {1} \left| \int_ {0} ^ {1} \right| _ {0} ^ {1} \left| \int_ {0} ^ {1} \right| _ {0} ^ {1} $$
$$ \therefore \text {i} \text {i} \text {i} \text {i} \text {i} \text {i} \text {i} \text {i} \text {i} \text {i} \text {i} \text {i} \text {i} \text {i} \text {i} \text {i} $$
$$ a _ {i j} l w a _ {i i} s l _ {j} s l g o, a _ {i j} l w c l a e o, a _ {i j} l w g a j l j f $$
$$ d i s s o n \text {i} _ {j} \text {i} _ {j} \text {i} _ {j} \text {i} _ {j} \text {i} _ {j} \text {i} _ {j} \text {i} _ {j} \text {i} _ {j} \text {i} _ {j} \text {i} _ {j} \text {i} _ {j} \text {i} _ {j} $$
$$ \dots \dots \dots \dots \dots \dots \dots $$
$$ \therefore \text {g w} \left| \right| \text {f} \text {f} \text {f} \text {f} \text {f} \text {f} \text {f} \text {f} \text {f} \text {f} \text {f} \text {f} \text {f} \text {f} \text {f} \text {f} \text {f} \text {f} \text {f} \text {f} \text {f l} \text {f l} \text {f l} \text {f l} $$
$$ S l i j b s \circ c w l S l e d i a n o n. d i f d > w y j w y s l p q u i l $$
$$ \text {a d i e} \quad \text {i n} \quad \text {i n} \quad \text {i n} \quad \text {i n} \quad \text {i n} \quad \text {i n} \quad \text {i n} \quad \text {i n} \quad \text {i n} \quad \text {i n} \quad \text {i n} \quad \text {i n} \quad \text {i n} \quad $$
$$ \therefore \omega_ {1} = \omega_ {2} = \omega_ {3} = \dots = \omega_ {n} $$
Lulilaiu
$$ \left. \right.\left. \right.\left. \right.\left.\left.\left.\left.\left.\left.\left.\left.\left.\left.\left.\left.\left.\left.\left.\left.\left.\left.\left.\left.\left.\left.\left.\left.\left.\left.\left.\left.\left.\left.\left.\right.\right.\right.\right.\right.\right.\right.\right.\right.\right.\right.\right.\right.\right.\right.\right.\right.\right.\right.\right.\right.\right.\right.\right.\right.\right.\right.\right.\right.\right.\right. $$
$$ j o d i a l w i t h \text {a l l} \omega , \text {c w l} \omega , \text {s u b j e c t} \text {j a i l}, \text {j a l l} $$
$$ \left. \right.\left. \right.\left. \right.\left. \right.\left. \right.\left. \right.\left. \right.\left. \right.\left. \right.\left. \right.\left. \right.\left.\left.\left.\left.\left.\left.\left.\left.\left.\left.\left.\left.\left.\left.\left.\left.\left.\left.\left.\left.\left.\left.\left. \text {的} \right]\right]\right]\right]\right]\right]\right]\right]\right]\right]\right]\right]\right]\right]\right]\right]\right]\right]\right]\right]\right]\right]\right] $$
$$ \left. \right.\left. \right.\left. \right.\left.\left.\left.\left.\left.\left.\left.\left.\left.\left.\left.\left.\left.\left.\left.\left.\left.\left.\left.\left.\left.\left.\left.\left.\left.\left.\left.\left.\left.\left.\left.\right.\right.\right.\right.\right.\right.\right.\right.\right.\right.\right.\right.\right.\right.\right.\right.\right.\right.\right.\right.\right.\right.\right.\right.\right.\right.\right.\right.\right.\right.\right. $$
$$ \therefore \mathrm {s l a w} $$
$$ \left. \right.\left. \right.\left. \right.\left. \right.\left. \right.\left. \right.\left. \right.\left. \right.\left. \right.\left. \right.\left. \right.\left. \right.\left. \right.\left. \right.\left. \right.\left. \right.\left. \right.\left. \right.\left. \right.\left. \right.\left. \right.\left. \right.\left. \right.\left. \right.\left. \right.\left. \right.\left. \right.\left.\left.\left.\left.\left.\left.\left. \text {S m a r t C l e a n} _ {\rho_ {0}} ^ {\omega_ {0}} + \omega_ {0} ^ {\omega_ {0}} + \omega_ {0} ^ {\omega_ {0}} + \omega_ {0} ^ {\omega_ {0}} + \omega_ {0} ^ {\omega_ {0}} + \omega_ {0} ^ {\omega_ {0}} + \omega_ {0} ^ {\omega_ {0}} + \omega_ {0} ^ {\omega_ {0}} + \omega_ {0} ^ {1 2 0 0 0 0 0 0 0 0 0 0 0 0 0 0 0 0 0 0 0 0 0 0 0 0 0 0 0 0 0 0 0 0 0 0 0 0 0 0 0 0 0 0 0 0 0 0 0 0 0 0 1} _ {\rho_ {1}} ^ {\omega_ {1}} + \omega_ {1} ^ {\omega_ {1}} + \omega_ {1} ^ {\omega_ {1}} + \omega_ {1} ^ {\omega_ {1}} + \omega_ {1} ^ {\omega_ {1}} + \omega_ {1} ^ {\omega_ {1}} + \omega_ {1} ^ {\omega_ {1}} + \omega_ {1} ^ {\omega_ {1}} + \omega_ {1} ^ {1 2 0 0 0 0 0 0 0 0 0 0 0 0 0 0 0 0 0 0 0 0 0 0 0 0 0} + \right. ^ {\omega_ {1}} + \right. ^ {\omega_ {1}} + \right. ^ {\omega_ {1}} + \right. ^ {\omega_ {1}} + \right] _ {\rho_ {1}} ^ {\omega_ {1}} + \right] _ {\rho_ {1}} ^ {\omega_ {1}} + \right] _ {\rho_ {1}} ^ {\omega_ {1}} $$
$$ \text {a b l i e o g r i t} \quad s l p i l y o c l e w e i t a b g y o c l j r e o g $$
$$ \therefore \text {c a l b o} $$
$$ s l o j t i g s l y g w l b \omega S i l o g i l j t g j k l a l a j j e n o r g i l $$
$$ \therefore \text {w l l} = \text {w w l i o} \text {c l g} \text {r r} \text {l} 1 \dots \text {o g} \text {s s} $$
$$ \left. \right.\left. \right.\left. \right.\left. \right.\left. \right.\left.\left.\left.\left.\left.\left.\left.\left.\left.\left.\left.\left.\left.\left.\left.\left.\left.\left.\left.\left.\left.\left.\left.\left.\left.\left.\left.\left.\left.\right.\right.\right.\right.\right.\right.\right.\right.\right.\right.\right.\right.\right.\right.\right.\right.\right.\right.\right.\right.\right.\right.\right.\right.\right.\right.\right.\right.\right. $$
$$ \dots \dots \dots \dots \dots \dots \dots \dots \dots \dots \dots \dots \dots \dots \dots \dots \dots \dots \dots \dots \dots \dots \dots $$
$$ d B (A) r q = L c: j _ {2} g; \cup | j _ {2} o, 5 1, a $$
yloa
$$ l _ {j} \text {i} \text {i} \text {i} \text {i} \text {i} \text {i} \text {i} \text {i} \text {i} \text {i} \text {i} \text {i} \text {i} \text {i} \text {i} \text {i} \text {i} \text {i} \text {i} \text {i} \text {1} \text {i} \text {i} \text {i} \text {i} \text {i} \text {i} \text {i} \text {i} \text {i} \text {i} \text {i} \text {i} \text {i} \text {i} \text {i} \text {i} \text {i} \text {i} \text {i} \text {j} \text {j} \text {j} \text {j} \text {j} \text {j} \text {j} \text {j} \text {j} \text {j} \text {j} \text {j} $$
$$ \therefore \lim _ {x \to 1} \left| \frac {\sin x}{x + 2} - \frac {\sin x}{x + 3} \right| = \frac {\sin x}{x + 2} - \frac {\sin x}{x + 3} $$
$$ \mathrm {d i s l y} \rightarrow \mathrm {d i s l i s o} \mathrm {s l p a t u l a i d e s o} \mathrm {s l j l} \mathrm {d i s l i s o} \mathrm {s l p a t y r} \rightarrow $$
$$ \therefore \omega \omega \omega \omega \omega \omega \omega \omega \omega \omega \omega \omega \omega \omega \omega \omega \omega \omega \omega \omega \omega \omega \omega \omega \omega \omega \omega \omega \omega \omega \omega \omega \omega \omega \omega \omega \omega \omega \omega \omega \omega \omega \omega \omega $$
$$ S 9 1 X X / S 9 0 X X $$


四
SmartClean g jj j j j j j j j j j j j j j j j j j j j j j j j j j j j j j j j j j j j j j j j j j j j j j j j j j j j j j
$$ \therefore \text {d i s} S _ {\text {i n}} \left| _ {j, j + 1} \right| $$
jua
J 1
Jg 1
Jg 1
Jg 1
Jg 1
Jg 1
Jg 1
Jg 1
Jg 1
Jg 1
Jg 1
Jg 1
Jg 1
Jg 1
Jg 1
Jg 1
Jg 1
Jg 1
Jg 1
Jg 1
Jg 1
J g 1
Jg 1
Jg 1
Jg 1
Jg 1
Jg 1
Jg 1
Jg 1
Jg 1
Jg 1
Jg 1
Jg 1
Jg 1
Jg 1
Jg 1
Jg 1
Jg 1
Jg 1
Jg 1
Jg 1
Jf 1
Jf 1
Jf 1
Jf 1
Jf 1
Jf 1
blusl
SmartClean
.
d
SmartClean, j
.
.
.
.
.
.
.
.
.
.
.
.
.
.


douao
Philips 95
Philips 96
philips.com/welcome 1
Jbbls 2
Jbbls 3
Jbbls 4
Jbbls 5
Jbbls 6
(1)
1
1
2
3
4
5
6
7
8
9
10
12
13
14
15
16
17
18
19
20
21
22
23
24
| الل | العربية | العربية |
| العربية) محيى أيربُّة الحرفية ("محيى و محيى " | محيى محيى محيى محيى محيى محيى محيى محيى محيى محيى محيى محيى محيى محيى محيى محيى محيى محيى محيى محيى محيى محيى محيى محيى محيى محيى محيى محيى محيى محيى محيى محيى محيى محيى مalteام محيى مalteام مalteام مalteام مalteام مalteام مalteام مalteام مalteام مalteام مalteام مalteام مalteام مalteام مalteام مalteام مalteام مalteام مalteام مalteام مalteام مalteام مalteام مalteام مalteام مalteام مalteام مalteام مalteام مalteام مalteام مalteام مalteام مalteام مalteام malmal | محيى محيى محيى محيى محيى محيى محيى محيى محيى محيى محيى محيى محيى محيى محيى محيى محيى محيى محيى محيى محيى محيى محيى محيى محيى محيى محيى محيى محيى محيى محيى محيى محيICY |
| العربية) محيى محيى محيى محيى محيى محيى محيى محيى محيى محيى محيى محيى محيى محيى محيى محيى محيى محيى محيى محيى محيى محيى محيى محيى محيى محيى محيى محيى محيى محيى محيى محيى محيى malmal | محيى محيى محيى محيى محيى محيى محيى محيى محيى محيى محيى محيى محيى محيى محيى محيى محيى محيى محيى محيى محيى محيى محيى محيى محيى محيى محيى محيى محيى محيى محيى محيICY | |
| العربية) محيى محيى محيى محيى محيى محيى محيى محيى محيى محيى محيى محيى محيى محيى محيى محيى محيى محيى محيى محيى محيى محيى محيى محيى محيى محيى محيى محيى محيى محيى محيICY | ||
| العربية) محيى محيى محيى محيى محيى محيى محيى محيى محيى محيى محيى محيى محيى محيى محيى محيى محيى محيى محيى محيICY | ||
| العربية) محيى محيى محيى محيى محيى محيى محيى محيى محيى محيى malmal | محيى محيى محيى محيى محيى محيى محيى محيICY | |
| العربية) محيى محيى محيى محيى محيى محيى محيى محيى malmal | محيى محيى محيى محيى محيى محيICY | |
| العربية) محيى محيى محيى محيى محيى محيى malmal | محيى محيى محيى محيى محيICY | |
| العربية) محيى محيى محيى محيى محيى malmal | محيى محيى محيى محيى محيICY | |
| العربية) محيى محيى محيى محيى محيى malmal | محيى محيى محيى محيICY | |
| العربية) محيى محيى محيى محيى malmal | محيى محيى محيى محيICY | |
| العربية) محيى محيى محيى محيى malmal | محيى محيى محيى m贴吧 | |
| العربية) محيى محيى محيى malmal | محيى محيى محيى m贴吧 | |
| العربية) محيى محيى محيى malmal | محيى محيى محيى m贴吧 | |
| العربية) محيى محيى محيى malmal | m贴吧 | |
| العربية) محيى محيى محيى malmal | m贴吧 | |
| العربية) محيى محيى محيى malmal | m贴吧 | |
| العربية) محيى محيى محيى malmal | m贴吧 | |
| العربية) محيى محيى محيى malmal | m贴吧 | |
| العيلة) محيى محيى محيى malmal | m贴吧 | |
| العيلة) محيى محيى محيى malmal | m贴吧 | |
| العيلة) محيى محيى محيى malmal | m贴吧 | |
| العيلة) محيى محيى محيى malmal | m贴吧 | |
| العيلة) محيى محيى mحيى malmal | m贴吧 | |
| العيلة) محيى محيى محيى malmal | m贴吧 | |
| العيلة) محيى محيى mحيى malmal | m贴吧 | |
| العيلة) محيى محيى mحيى malmal | m贴吧 | |
| العيلة) محيى محيى mحيى malmal | m贴吧 | |
| العيلة) محيى محيى mحيى malmal | m贴吧 | |
| العيلة) محيى محيى mحيى malmal | mopsis | |
| العيلة) محيى محيى mحيى malmal | mopsis | |
| العيلة) محيى محيى mحيى malmal | mopsis | |
| العيلة) محيى محيى mحيى malmal | mopsis | |
| العيلة) محيى محيى mحيى malmal | mopsis | |
| العيلة) | mopsis | |
| Jall | Jaizell | alCuill |
| a#xlll a#ylo##n #sclp p# J#e#i#/J#e#i#j#b#dally (“J#e#y#xll” J#e#y#j#) ##Vg#l | a#ylo##n #sclp p# .### | w#y#y#l#d Jl#y#x#y#d yS#ll#y#y#b# .### |
| J#e#y#ll) a#xlll y#y#/ (“J#e#y#xll”) | a#y#ly##y#y#ll# | a#xlll ##y#y#b# .### |
| J#e#y#n o# a#xlll a#ylo J#e#y#ll) a#xlll y#y#y#l# | a#xlll a#ylo c#y#y# .### | y#y#y#c#y#b# a#xlll #y#y# .### |
| (“J#e#y#xll” J#e#y#j#ll) J#e#y#ll) a#xlll y#y#y#b# (“a#y#ll#y#y#b#ll”) | a#lll y#a#ll a#y#ll y#y# | a#xlll #y#y#b# a#y#y#y#y# yS#ll#y#y#b# yS#ll#y#y# .### |
| a#y#y#b#y#y#y#y#y#y#y#y#y#y#y#y#y#y#y#y#y#y#y#y#y#y#y#y#y#y#y#y#y#y#y#y#y#y#y#y#y#y#y#y#y#y#y#y#y#y#y#y#y#y# | y#y#y#y#y#y#y#y#y#y#y#y#y#y#y#y#y#y#y#y#y#y#y#y#y#y#y#y#y#y#y#y#y#y#y#y#y#y#y#y#y#y#y#y#y#y#y#y#y#y | el# no y##y#y#ll .### |
| pl#y#y#y#y#y#y#y#y#y#y#y#y#y#y#y#y#y#y#y#y#y#y#y#y#y#y#y#y#y#y#y#y#y#y#y#y#y#y#y#y#y#y#y#y#y#y#y#y#y# | ||
| a#y#y#y#y#y#y#y#y#y#y#y#y#y#y#y#y#y#y#y#y#y#y#y#y#y#y#y#y#y#y#y#y#y#y#y#y#y#y#y#y#y#y#y#y#y#y#y#y#y# y#y#y#y#y#y#y#y#y#y#y#y#y#y#y#y#y#y#y#y#y#y#y#y#y#y#y#y#y#y#y#y#y#y#y#y#y#y#y#y#y#y#y#y#y#y#y#y#y#y#yy# | a#y#y#y#y#y#y#y#y#y#y#y#y#y#y#y#y#y#y#y#y#y#y#y#y#y#y#y#y#y#y#y#y#y#y#y#y#y#y#y#y#y#y#y#y#y#y#y#y#yy# y#y#y#y#y#y#y#y#y#y#y#y#y#y#y#y#y#y#y#y#y#y#y#y#y#y#y#y#y#y#y#y#y#y#y#y#y#y#y#y#y#y#y#y#y#y#y#y#y#yy# yy# y#y#y#y#y#y#y#y#y#y#y#y#y#y#y#y#y#y#y#y#y#y#y#y#y#y#y#y#y#y#y#y#y#y#y#y#y#y#y#y#y#y#y#y#y#y#y#y#y# y# y# y# y# y# y# y# y# y# y# y# y# y# y# y# y# y# y# y# y# y# y# y# y# y# y# y# y# y# y# y# y# y# y# y# y# y# y# y# y# y# y# y# y# y# y# y# y# y# y# yy# y# y# y# y# y# y# y# y# y# y# y# y# y# y# y# y# y# y# y# y# y# y# y# y# y# y# y# y# y# y# y# y# y# y# y# y# y# y# y# y# y# y# y# y# y# y# y# y# y# # y# y# y# y# y# y# y# y# y# y# y# y# y# y# y# y# y# y# y# y# y# y# y# y# y# y# y# y# y# y# y# y# y# y# y# y# y# y# y# y# y# y# y# y# y# y# y# y# y# y # y# y# y# y# y# y# y# y# y# y# y# y# y# y# y# y# y# y# y# y# y# y# y# y# y# y# y# y# y# y# y# y# y# y# y# y# y# y# y# y# y# y# y# y# y# y# y# y# y# yy # # # # # # # # # # # # # # # # # # # # # # # # # # # # # # # # # # # # # # # # # # # # # # # # # # # # # # # # # # # # # # # # # # # # # # # # # # # # # # # # # # # # # # # # # # # # # # # # # # # # # a##Clean # # # # # # # # # # # # # # # # # # # # # # # # # # # # # # # # # # # # # # # # # # # # # # # # # # # # # # # # # # # # # # # # # # # # # # # # # # # # # # # # # # # # # # # # # # # # # # # # # # # ## # # # # # # # # # # # # # # # # # # # # # # # # # # # # # # # # # # # # # # # # # # # # # # # # # # # # # # # # # # # # # # # # # # # # # # # # # # # # # # # # # # # # # # # # # # # # # # # # # # # ### | a##Clean ## ## ## ## ## ## ## ## ## ## ## ## ## ## ## ## ## ## ## ## ## ## ## ## ## ## ## ## ## ## ## ## ## ## ## ## ## ## ## ## ## ## ## ## ## ## ## ## ## ## ## ## ## ## ## ## ## ## ## ## ## ## ## ## ## ## ## ## ## ## ## ## ## ## ## ## ## ## ## ## ## ## ## ## ## ## ## ## ## ## ## ## ## ## ## ## ## ## ## ## # ## ## ## ## ## ## ## ## ## ## ## ## ## ## ## ## ## ## ## ## ## ## ## ## ## ## ## ## ## ## ## ## ## ## ## ## ## ## ## ## ## ## ## ## ## ## ## ## ## ## ## ## ## ## ## ## ## ## ## ## ## ## ## ## ## ## ## ## ## ## ## ## ## ## ## ## ## ## ## ## ## ## ## ## ## ## ## ## ## ## ## ## ## ## ## ## ## ## ## # a##Clean ## ## ## ## ## ## ## ## ## ## ## ## ## ## ## ## ## ## ## ## ## ## ## ## ## ## ## ## ## ## ## ## ## ## ## ## ## ## ## ## ## ## ## ## ## ## ## ## ## ## ## ## ## ## ## ## ## ## ## ## ## ## ## ## ## ## ## ## ## ## ## ## ## ## ## ## ## ## ## ## ## ## ## ## ## ## ## ## ## ## ## ## ## ## ## ## # # # # # # # # # # # # # # # # # # # # # # # # # # # # # # # # # # # # # # # # # # # # # # # # # # # # # # # # # # # # # # # # # # # # # # # # # # # # # # # # # # # # # # # # # # # # # # # # # # # ab##Clean ## ## ## ## ## ## ## ## ## ## ## ## ## ## ## ## ## ## ## ## ## ## ## ## ## ## ## ## ## ## ## ## ## ## ## ## ## ## ## ## ## ## ## ## ## ## ## ## ## ## ## ## ## ## ## ## ## ## ## ## ## ## ## ## ## ## ## ## ## ## ## ## ## ## ## ## ## ## ## ## ## ## ## ## ## ## ## ## ## ## ## ## ## ## ## ## ## # a####Clean ## ## ## ## ## ## ## ## ## ## ## ## ## ## ## ## ## ## ## ## ## ## ## ## ## ## ## ## ## ## ## ## ## ## ## ## ## ## ## ## ## ## ## ## ## ## ## ## # a##Clean ## ## ## ## ## ## # a##Clean ## ## # a##Clean ## # a##Clean # a##Clean # a##Clean # a##Clean # a##Clean # a##Clean # a##Clean # a##Clean # a##Clean # a##Clean # a##Clean # a##Clean # a##Clean # a##Clean # a##Clean # a##Clean # a##Clean # a##Clean # a##Clean # a##Clean # a##Clean # a##Clean # a##Clean # a##Clean # a##Clean # a## Clean # a##Clean # a##Clean # a##Clean # a##Clean # a##Clean # a##Clean # a##Clean # a##Clean # a##Clean # a##Clean # a##Clean # a##Clean # a##Clean # a##Clean # a##Clean # a##Clean # a##Clean # a##Clean # a##Clean # a##Clean # a##Clean # a##Clean # a##Clean # a##Clean # a## # # # a##Clean # a##Clean # a##Clean # a##Clean # a##Clean # a##Clean # a##Clean # a##Clean # a##Clean # a##Clean # a##Clean # a##Clean # a##Clean # a##Clean # a##Clean # a##Clean # a##Clean # a##Clean # a##Clean # a##Clean # a##Clean # a##Clean # a##Clean # a##Clean # a##L## a##Clean # a##Clean # a##Clean # a##Clean # a##Clean # a##Clean # a##Clean # a##Clean # a##Clean # a##Clean # a##Clean # a##Clean # a##Clean # a##Clean # a##Clean # a##Clean # a##Clean # a##Clean # a##Clean # a##Clean # a##Clean # a##Clean # a##Clean # a##Clean # a##Clean & a##Clean # a##Clean # a##Clean # a##Clean # a##Clean # a##Clean # a##Clean # a##Clean # a##Clean # a##Clean # a##Clean # a##Clean # a##Clean # a##Clean # a##Clean # a##Clean # a##Clean # a##Clean # a##Clean # a##Clean # a##Clean # a##Clean # a##Clean # a##Clean # a##Clean = a##Clean # a##Clean # a##Clean # a##Clean # a##Clean # a##Clean # a##Clean # a##Clean # a##Clean # a##Clean # a##Clean # a##Clean # a##Clean # a##Clean # a##Clean # a##Clean # a##Clean # a##Clean # a##Clean # a##Clean # a##Clean # a##Clean # a##Clean # a##Clean # a##Clean# a##Clean # a##Clean # a##Clean # a##Clean # a##Clean # a##Clean # a##Clean # a##Clean # a##Clean # a##Clean # a##Clean # a##Clean # a##Clean # a##Clean # a##Clean # a##Clean # a##Clean # a##Clean # a##Clean # a##Clean # a##Clean # a##Clean # a##Clean # a##Clean # a##Clean& a##Clean # a##Clean # a##Clean # a##Clean # a##Clean # a##Clean # a##Clean # a##Clean # a##Clean # a##Clean # a##Clean # a##Clean # a##Clean # a##Clean # a##Clean # a##Clean # a##Clean # a##Clean # a##Clean # a##Clean # a##Clean # a##Clean # a##Clean # a##Clean # a##Clean ## a##Clean # a##Clean # a##Clean # a##Clean # a##Clean # a##Clean # a##Clean # a##Clean # a##Clean # a##Clean # a##Clean # a##Clean # a##Clean # a##Clean # a##Clean # a##Clean # a##Clean # a##Clean # a##Clean # a##Clean # a##Clean # a##Clean # a##Clean # a##Clean # a##Clean ### a##Clean # a##Clean # a##Clean # a##Clean # a##Clean # a##Clean # a##Clean # a##Clean # a##Clean # a##Clean # a##Clean # a##Clean # a##Clean # a##Clean # a##Clean # a##Clean # a##Clean # a##Clean # a##Clean # a##Clean # a##Clean # a##Clean # a##Clean # a##Clean # a##Clean### a##Clean # a##Clean # a##Clean # a##Clean # a##Clean # a##Clean # a##Clean # a##Clean # a##Clean # a##Clean # a##Clean # a##Clean # a##Clean # a##Clean # a##Clean # a##Clean # a##Clean # a##Clean # a##Clean # a##Clean # a##Clean # a##Clean # a##Clean # a##Clean # a##Clean与发展 a##Clean # a##Clean # a##Clean # a##Clean # a##Clean # a##Clean # a##Clean # a##Clean # a##Clean # a##Clean # a##Clean # a##Clean # a##Clean # a##Clean # a##Clean # a##Clean # a##Clean # a##Clean # a##Clean # a##Clean # a##Clean # a##Clean # a##Clean # a##Clean # a##Clean & # a##Clean & a##Clean & a##Clean & a##Clean & a##Clean & a##Clean & a##Clean & a##Clean & a##Clean & a##Clean & a##Clean & a##Clean & a##Clean & a##Clean & a##Clean & a##Clean & a##Clean & a##Clean & a##Clean & a##Clean & a##Clean & a##Clean & a##Clean & a##Clean & a##Clean & a##Clean & # a##Clean & a##Clean & a##Clean & a##Clean & a##Clean & a##Clean & a##Clean & a##Clean & a##Clean & a##Clean & a##Clean & a##Clean & a##Clean & a##Clean & a##Clean & a##Clean & a##Clean & a##Clean & a##Clean & a##Clean & a##Clean & a##Clean & a##Clean & a## Clean & a##Clean & a##Clean & a##Clean & a##Clean & a##Clean & a##Clean & a##Clean & a##Clean & a##Clean & a##Clean & a##Clean & a##Clean & a##Clean & a##Clean & a##Clean & a##Clean & a##Clean & a##Clean & a##Clean & a##Clean & a##Clean & a##Clean & a##Clean & a##Clean & a## Clean & a##Clean & # a##Clean & a##Clean & a##Clean & a##Clean & a##Clean & a##Clean & a##Clean & a##Clean & a##Clean & a##Clean & a##Clean & a##Clean & a##Clean & a##Clean & a##Clean & a##Clean & a##Clean & a##Clean & a##Clean & a##Clean & a##Clean & a##Clean & a##Clean & a####Clean & a##Clean & a##Clean & a##Clean & a##Clean & a##Clean & a##Clean & a##Clean & a##Clean & a##Clean & a##Clean & a##Clean & a##Clean & a##Clean & a##Clean & a##Clean & a##Clean & a##Clean & a##Clean & a##Clean & a##Clean & a##Clean & a##Clean & a##Clean & a##Clean & a####Clean & a##Clean & # a##Clean & a##Clean & a##Clean & a##Clean & a##Clean & a##Clean & a##Clean & a##Clean & a##Clean & a##Clean & a##Clean & a##Clean & a##Clean & a##Clean & a##Clean & a##Clean & a##Clean & a##Clean & a##Clean & a##Clean & a##Clean & a##Clean & a##Clean & ### |
JaaJIg
aalw gj jaiy x jgll jao bgy y g 15l lla Ijx Jbi (olglg
4>do!g Jlbo21 JliuSi
go 1g jn sai jll aolll lalll li y
clogleall plsiuay all i g jplip
www.philips.com/support ayj jy adjgl
ellaiagj jy jai g aiaa alw y aotla jgnn
.
| الل | العربية | العربية |
| العربية الحرفية/العربية الحرفية/العربية الحرفية/العربية الحرفية | العربية الحرفية/العربية الحرفية/العربية الحرفية/العربية الحرفية | العربية الحرفية/العربية الحرفية/العربية |
| العربية الحرفية/العربية الحulty/العربية الحulty/العربية الحulty | العربية الحرفية/العربية الحulty/العربية الحulty | العربية الحolta/العربية الحolta/العربية |
| العربية الحرفية/العربية الحulty/العربية الحulty/العربية | ||
| العربية الحolta/العربية الحulty/العربية الحulty/العربية | ||
| العربية الحolta/العربية الحulty/العربية | ||
| العitheان/العitheان/العitheان/العitheان/العitheان/العitheان/العitheان/العitheان/العitheان/العitheان/العitheان/العitheان/العitheان/العitheان/العitheان/العitheان/العitheان/العitheان/العitheان/العitheان/العitheان | العitheان/العitheان/العitheان/العitheان/العitheان/العitheان/العitheان/العitheان/العitheان/العitheان/العitheان/العitheان/العitheان/العitheان/العitheان/العitheان/العitheان/العitheان/العitheان/العithestan | العitheان/العitheان/العitheان/العitheان/العitheان/العitheان/العitheان/العitheان/العitheان/العitheان/العitheان/العitheان/العitheان/العitheان/العitheان/العitheان/العitheان/العitheان/العitheان/العitheAN |
| العitheان/العitheان/العitheان/العitheان/العitheان/العitheان/العitheان/العitheان/العitheان/العitheان/العitheان/العitheان/العitheان/العitheان/العitheان/العitheان/العitheان/العitheان/العitheان/الoug | العitheان/العitheان/العitheان/العitheان/العitheان/العitheان/العitheان/العitheان/العitheان/العitheان/العitheان/العitheان/العitheان/العitheان/العitheAN | |
| العitheان/العitheان/العitheان/العitheان/العitheان/العitheان/العitheان/العitheان/العitheان/العitheAN | (“العitheان/العitheان/العitheان/العitheان/العitheAN) |
ailll lla
Soo SmartClean pblig aall aislo no jai x
p 1aolll aodll aie aie jiaell jiall
clu cill ygill aie gaoaia bai jiauL
. fll bcbln llippll Jds no
nll aieaiaaiaaaaiybiaygni
ejl lalss. atll aagno n no yao jle
s! g lau w g aaslaa aislao no sall jia aibll
laaull bll no as. calsall agwll blll
afkdo aif dglg l. alrlbllg aawabai
e alsoj so jlljgllyd gill ldac, aylbll jx!
aylbll egjbjrall i. gogabgall pgs.Philips ad
nll aol alal lalal yblg
aIbfo n o alll ie bao nn aale x alal lal lal .4jJr!ie lao ae jla yra I 0 s.
aal aJbBabjai
aalll aagllg aodall yddall j 1.aaal lgll gjl jj no jwll
aolaoaiaglll
g 111 111 111 111 111 111
Jolao plssuIy jll aIall aIbll gjI .gl
ealglaal
aJy j yj gI clogeo Jd j ciS Ij
iEgblgWww.philips.com/support

Je geog (1)jx>xl aol> Jc jx>xl aol> Jol>g
aLcX(r) aclll bla c alg (r) aI
jxla
5x1jx1clbgoaelldo
aag no jll jjll aal lol
.
jJyIyBbO, aXaIbUaIeX A
.
aalb
gall jj jll gao
Ego Jd gjf www.shop.philips.com/service
plllll lccjy jlls .Philips as
JC301/JC302/JC303/JC304/JC305
aJw9j
w9jx.0eL J5 aal w9j juiu y
. Philips SH90 1

1
aJll wg jI
dai li jao aal 1 Jgall
.0eL 5 aalwogj Jy
Juswryssiill aolc
w9j j1s1 a0g 1a1yll aoll adg jo
JALI aalil aolJgJ.
. Philips SH90 aLxI wgglx IaX
gawg w 1 aogig jaiw y dssll ad g jy
.
.
uSeIg(1)jxXiaJcJxXiaJolgo
.(r) aasll wj, jc no lqaglg (r) aclll jlac al
aallldojgjxlaoljoljcnojixlaol
.5x1jx>xlol 20
Lgio alsiig aall wJ Jol no aalll w9jEjl
Jolal jd dll aal wg g
aiaaa aaii 100g joo ojjll cjjj 1005:abdo
.0g 1
Lg jll Jn all aal
iiill 1
puiuX1 1yoo o yo J5 1yBiiill a
1
.
.
puii: p 11jx Jioxl jgall
aui 15 a11i aieslo ci j no ojba plssiiu olal
S OBC = S COD + S_ BOC
aullip 10o lo abii
pL 1000000000000000000000000000000000000000000000
.
CJ 150
.
i 1
.
auiu cui j no aibplsiu wulj liw1paa
aai ss
#
.
Laijss Jia jao aolaiylo juiu lii:abxlo
a
J 15 Jll .aal. aal l jol no aall wg jg jil
yall g gg a j 151 bii y: abxlo
lil. aibio cagao no ojue lai jbi. aolgl
aig,blll aasll g g g aegbll q bi
aill llalcljai jgiuai jc yj
.
.aaalwJolI Jy aagaaaal wogj 7
aiaaall wogj no ojjll cljz1 j no s: abdo
.ogj all j
Je Igeog (1) jx>xl aal> Je Jx>xl aal> Jol> g V
yj dJlex (r) aclll yjoc ge Igol (r) aodll wj
. jx>xl aal>
. jx>xl cIaLge aLoelldo
a 1

.
Lalllll 1 Jol 0
aag no jll aol l Jol .
aalaae aee
j_4 = 11
jll jgagall aill g yil ldo b J
yill gdoJe bol p. aal alg
.(“abab”gogcaw)jglg
Jieiui 1
| 4_0| = 1
.
.
a
jgl
aIbll aS oJg jg Jg Jg Jg Jg
aai
1
jll no oclil yill gdo y:abso
jll aaggall aiaill gaoa
jgllygul aal jc bol p jgeell
.(“abab”cgo elaw)
aulli 14o lo plssii
jglj 1
jglll no 0o ooloo
laai clil aal lao gglge Ie Joo:
[\therefore \lg x \geq x]
a 1
.aaaiislo
.
bllgll
p 100 400 400 400 400 400 400 400
.
alil gallgals
.
.
aag gjil jolgailll aaii aag abil
.
Jzulg jy Jzill /jzlljjbe
.
.
jolol pblilj gialll cai aalall ai5lo abil:abdo
.
plssx1 Jololla aoll 1slo abig dgs
.(“aIallgabill”Jalllg>1)
ailljg aoll jgs gall gaae aeol
.
Lgjll Joo jll aoll plss
yiiill 1o plsi
y
SmartClean
SmartClean
.
. . . . . . . . . . . . . . . . . . . . . . . . . . . . . . . . . . . . . . . . . . . . . . . . . . . . . . . . . . . . . . . . . . . . . . . . . . . . . . . . . . . . . . .
aill aill Jolg (1) Jolal g aolll ailg e 8
elw) aill jogil gall boll lc bolg (r) .(r)"abab"
. 1
aalil aiofo plssiul
#
aalp 1
g aasll cno gai y jil lnnx 1
di g bni jn .yubol li .bysy dtyi
. aasll jge jpll tgl
d (egwxl jxl o r) plblly adslly elnui li
aasll aislo jlc diy platu jg wrlr aial slall
ii iii ii lil jlll Jai jg aill glal : aai .jgl pl r adol gioslo pae alls y laa aall .abll Jx Joo 2 j4nll li : abso
Jg 1
.
.
.
.

aioe oolp jy aoll wg jlll l:ablo .v 1j
uill osle
aalwogjulwil
glll aoe e, gglj lal - 11111111111111111111111111111111111111
aillgssll
aocg jnll auljll gssll jgei l j 1111111111111111111111111111
#
a aclw nll aloc gsw
adnll alfo aylbol adsls plxwl sO
.0
. 111111111111111111111111111111111111111
gall plu wly j
jIJI JJ 1
g (1) jgl 1al all J.
sill aols oogj,aaal ail slo jiai jai sic .aal aislo abii ysi iit bittl
Jaa
Jie Jiaell liu yaiy jaiy aal aiyslo jao diy. dyaooa oayabaiyaiy gio
jill jbi
Jgll g r aal Jzull j 1
Jglll jao yjwll jaa uuui 1
Lgao aal iislo wu wll jaa uuui ic jyaowlu
. jao
Jaaa
1 1
Jooj Jds no jess Jee buiu clll dss:abxlo
aalwogj Jd
aJus Jus Jus Jus Jus Jus Jus Jus Jus Jus Jus Jus Jus Jus Jus Jus Jus Jus Jus Jus Jus Jus Jus Jus Jus Jus Jus Jus Jus Jus Jus Jus Jus Jus Jus Jus Jus Jus Jus Jus Jus Jus Jus Jus Jus Jus Jus Jus Jus Jus Jus
a
ylll lll yll lll glln 0g, a jla bll oic
aIbI aIb
yfo 1gol no aaiall yjIbll adlb Jus -
#
puiu 15 2i slll bii i nii jio axl x
y 89 Jols JSL aSlo SmartClean pbl bbi y
jgs go aol iSlo plu w f jui x ell ail
Jgognssall abi gBaaal agll pui x
gI aIgill clai all jao ggl abl l Ibi
jLJIaBii g nusx
no Jawll jgall uagall no cll B
aJgbs Jia xg liub elljuy. Lgab ssac aIsl
aIb dag JSL acgoaigjxlcljgs jx
. aIaI aI5o JSL da
ylaall aIb0
aolll ggo gglgcll aoglao diaaia slo 1n gl plal gplssuall aaislo ag. lgs daieall plaiipnog jgiinll cni abill aaslog wll .aoxlly glee iay llig,baa aibll lc aasll aislo gao aaasll aisIlog SmartClean pblbi xll all gleblg
pL Jg aal gol aagall y bgs jgo gall .glg r.11 11 11 11 11 11 11 11 11 11 11 11 11 11 11 11 11 11 11 11 11 11 11 11 11 11 11 11 11 11 11 11 11 11 79 = Lc :glg all g
#
alg jg 1g2 aislo plssuol j:abdo .jell ailw l no agll dill
aog g aasll aislo egj slslly jorell alu elix
.ali f gall JxS91XX/S90XX
pIbig aasll aislo plxil 1y Ii paxnall Jy jol.
Liaa o 1gjllipaxnnall Jy bai SmartClean
pL
yixi
dall lllw x. dsljgno jle llal g
ybloll jjll ljj 5g
pplssll jnnooieSmartClean pblig aoll aislo
g d 1
aill paaai j g (JabXl dj s lo) aalgll aannll
dJlaoiul clalg jdljall pJglglo,dejolg
pssxg 1
aill aisla piepe no sll labxl aljo
SmartClean p1b
aaii iia aie 1e e ae ie
4
aill aagbgo bao SmartClean pblp
山
g g G b u Jc laSmartClean pbi
yill gial
plbi plssill aagbll 10
SmartClean
S
.
ao jao
dIi!Philips pIe yog aiaI 1e Ie ll
Jc d jyip Philips doa j sll pcll no aol
. www.philips.com/welcome
Jclogleoo 8gaiyaiyaiuall Jd j
Jey Loo 1
aaiag aayll no jaoa aal aLac
(1J)pall
aillipio gdo bio 1
aie jill Joo sill aal yigo 2
dJy jy y 3
4
5
6
7
JxLjSill 8
a1b2y 9
joo 10
aill sill 11
12
SmartClean 13
SmartClean pIbi Ibic 14
15
a bill j0j 16
00j0 17
joljoj 18
19
SmartClean pblil bill 20
21
22
jaiiaol Jol 23
24

All rights reserved.
Document order number: 4222.002.5612.1 (04/2014)

100% recycled paper
100% papier recyclé