
KA110E - Sander BLACK & DECKER - Free user manual and instructions
Find the device manual for free KA110E BLACK & DECKER in PDF.
| Product Type | Sander |
| Brand | Black & Decker |
| Model | KA110E |
| Power | 150 W |
| Maximum no-load speed | 10500/min |
| Speed controller | Yes, 5 positions |
| Sanding plate | Removable, with detachable diamond-shaped tip |
| Dust extraction system | Dust bag included; compatible with external extraction |
| Abrasive paper type | Nylon-backed sheets, pre-cut, with detachable tip |
| Dimensions (L x W x H) | 20 x 10 x 12 cm (estimated) |
| Weight | 1.2 kg (estimated) |
| Power supply | Mains, 230 V |
| Double insulation | Yes |
| Noise level | 81 dB(A) |
| Vibration level | < 2.5 m/s² |
| Warranty | 2 years |
| Maintenance | Clean ventilation slots with dry brush; housing with damp cloth |
| Safety | Double insulation; do not sand lead paint |
| Spare parts available | Replacement tips, supports, vacuum adapter |
Frequently Asked Questions - KA110E BLACK & DECKER
User questions about KA110E BLACK & DECKER
0 question about this device. Answer the ones you know or ask your own.
Ask a new question about this device
Download the instructions for your Sander in PDF format for free! Find your manual KA110E - BLACK & DECKER and take your electronic device back in hand. On this page are published all the documents necessary for the use of your device. KA110E by BLACK & DECKER.
USER MANUAL KA110E BLACK & DECKER
natural_image
Line drawing of a power tool with a mounted base and cable (no text or symbols)KA110
| Australia DEWALT Industrial Power Tool Company Tel. 03 9895 92007 Clarice Road, Box Hill, Victoria 3128 Fax 03 9899 7465 | ||
| Belgique/België Black & Decker (Belgium) N.V. Tel. 02/719.07.11Weihoek 1, 1930 Zaventem Fax 02/719.08.10 | ||
| Danmark Black & Decker Tel. 70 20 15 10Hejrevang 26B, 3450 Allerød Fax 48 14 13 99Internet: www.blackdecker.dk | ||
| Deutschland Black & Decker GmbH Tel. 06126/21 24 83Black & Decker Str. 40, D - 65510 Idstein Fax 06126/21 26 01 | ||
| Ελλάς | Black & Decker (Ελλάς) A.E.Στράβωνος 7 & Βουλιαγμένης 159Γλυφάδα 16674, Ελλάδα | Τηλ. (01) 8981-616Φαξ (01) 8983-570Service (01) 8982-630 |
| España | Black & Decker SpainParque de Negocios “Mas Blau”Edificio Muntadas, c/Bergadá, 1, Of. A608820 El Prat de Llobregat (Barcelona) | Tel. 934 797 400Fax 934 797 419 |
| France | Black & Decker (France) S.A.S.B.P. 21, 69571 Dardilly Cédex | Tel. 04 72 20 39 20Fax 04 72 20 39 00 |
| Helvetia | Eduard LuggenBlack & Decker-Service SchweizIndustriestrasse 1 / Postfach 3238157 Dielsdorf | Tel. 01/854 01 01Fax 01/854 02 02 |
| Italia | Black & Decker Italia SpAViale Elvezia 220052 Monza (MI) | Tel. 039-23871Fax 039-2387592/2387594Numero verde 800-213935 |
| Nederland Black & Decker (Nederland) BV Florijnstraat 10, 4879 AH Etten-Leur | Tel. 076-5082000 | Fax 076-5038184 |
| New Zealand | Black & Decker Tel. 09 579 760081 Hugo Johnson DrivePenrose, Auckland, New Zealand | Fax 09 579 8200 |
| Norge | Black & Decker (Norge) A/SPostboks 248, Leirdal, 1011 OsloInternet: www.blackdecker.no | Tlf. 22 90 99 00Fax 22 90 99 01 |
| Österreich Black & Decker Vertriebsges.m.b.H Erlaerstraße 165, 1231 Wien | Tel. 01 66116-0 | Fax 01 66116-14 |
| Portugal | Black & Decker Tel. 214667500Rua Egas Moniz 173,2766-651 S. João do Estoril | Fax 214667575 |
| South Africa | Black & Decker South Africa (Pty) LtdPhysical address:146 Lechwe Street, Corporate parkRandjiesfontein, MidrandPostal address:Postnet Suite 107, Private Bag X65Halfway House 1685 | Tel. (011) 653-1400Fax (011) 653-1499 |
| Suomi | Black & Decker OyPalotie 3, 01610 Vantaa | Puh: (09) 825 4540Fax: (09) 825 45 444 |
| Black & Decker Oy,Brandvägen 3, 01610 Vanda | Tel: (09) 825 4540Fax: (09) 825 45 444 | |
| Sverige Black & Decker AB Box 603, 421 26 Västra Frölunda,Besöksadr. Ekonomivägen 11 | Tel: 031-68 60 00 | Fax: 031-68 60 08 |
| Türkiye | Black & Decker Merkez Servis Tel. 0216 455 89 73Dudullu Cad. Kerembey Sok. No. 1Küçükbakkalköy/Istanbul | Faks 0216 455 20 52 |
| United Kingdom | Black & Decker Tel. 01753 511234210 Bath RoadSlough, Berkshire SL1 3YD Helpline 01753 574277 | Fax 01753 551155 |
KÆREKUNDE.
On the purchase of your Black & Decker products! To ensure the best results from your power tool please read these safety and usage instructions carefully. If you have any questions or queries after reading this user manual please do not hesitate to call our Service and Information Centre, whose number you will find towards the back of this user manual, or one of our Authorised Repair Agents. A list of these Agents and further information is available on the Internet at www.2helpU.com.
¡ENHORABUENA!
HASTIGHEDSREGULATOR (KA110E)
natural_image
Illustration of a hand pressing down on a curved surface with directional arrows (no text or symbols)natural_image
Illustration of a hand holding a padlock over a device (no text or symbols)natural_image
Illustration of a person using a medical or surgical instrument to adjust or install a device (no text or symbols visible)natural_image
Line drawing of a power tool with base and shunt (no text or symbols)natural_image
Diagram of a mechanical device with granular material inside, showing internal components and a foot (no text or symbols)natural_image
Line drawing of a hand holding a small object with a pointed tip, no text or symbols presentnatural_image
Line drawing of a hand using a power tool on a workbench (no text or symbols)89/336/EEC, EN55014, 73/23/EEC, EN55104, EN50144
Brian Cooke - Director of Engineering
Black & Decker Ltd, Spennymoor, County Durham
DL166JG, United Kingdom
natural_image
Illustration of a hand pressing down on a curved surface with directional arrows indicating motion (no text or symbols)natural_image
Illustration of a hand pressing down on a mechanical component with a lock symbol (no text or labels)natural_image
Illustration of a hand using a power shaver to press or adjust a component (no text or symbols visible)natural_image
Line drawing of a mechanical power tool with a base plate (no text or symbols)den spitzen
Jedes Schleifblatthat
Die Spitze der
natural_image
Line drawing of a hand holding a small object with a black arrow pointing to it (no text or symbols present)Halten Sie den
natural_image
Line drawing of hands using a power tool on a workbench (no text or symbols)Brian Cooke - Director of Engineering Black & Decker Ltd, Spennymoor, County Durham DL166JG United Kingdom
ΕΛΛΗΝΙΚΑ
natural_image
Illustration of a hand pressing down with a curved arrow indicating motion or force (no text or symbols)natural_image
Illustration of a person using a tool on a device, with no visible text or symbolsnatural_image
Line drawing of a person using a power tool on a machine (no text or symbols)natural_image
Line drawing of a mechanical power tool with a base and shaver (no text or symbols)natural_image
Diagram of a mechanical device with granular material and a handle, no visible text or symbolsnatural_image
Line drawing of a hand holding a small object, possibly a tool or device, with no visible text or symbols.Warning! When using electric tools, the following basic safety precautions should always be taken to reduce the risk of fire, electric shock and personal injury. Read all these instructions before attempting to operate the product and save this booklet.
For safe operation:
- Keep the work area clean! Cluttered areas and benches invite injuries.
- Consider the work area environment! Do not expose the power tool to rain and do not use in damp or wet locations. Keep the work area well lit. Do not use the power tool where there is a risk to cause fire or explosion.
- Guard against electric shock! Avoid body contact, where possible, with earthed or grounded surfaces (e.g. pipes, radiators, ranges and refrigerators).
- Keep children away! Do not let visitors touch the tool or extension cord. All visitors should be kept away from the work area.
- Store idle tools! When not in use, tools should be stored in a dry, high or locked place, out of reach of children.
- Do not force the tool! It will do the job better and more safely at the rate for which it was intended.
- Use the right tool! Do not force small tools or attachments to do the job of a heavy duty tool. Do not use the tool for purposes not intended; for example, do not use a circular saw to cut tree limbs or logs.
- Dress properly. Do not wear loose clothing or jewellery as they can be caught in moving parts. Rubber gloves and non-skid footwear are recommended when working outdoors. Wear protective hair covering to contain long hair.
- Use safety glasses! Use a face or dust mask as well, if the operation is dusty or if the tool is being used in enclosed spaces.
- Connecting dust extraction equipment! If devices are provided for the connection of dust extraction and collection ensure these are connected and properly used, especially in confined areas.
- Do not abuse the cord! Never carry the tool by its cord or yank it to disconnect it from the socket. Keep the cord away from heat, oil and sharp edges.
- Secure the work! Use clamps or a vice to hold the work. It is safer than using a hand and it frees both hands to operate the tool.
-
Do not overreach! Keep proper footing and balance at all times.
-
Maintain the tool with care! Keep a cutting tool sharp and clean for better and safer performance. Follow the instructions for lubricating and changing accessories. Inspect the tools cord periodically and, if damaged, have repaired by an authorised service agent. Inspect the extension cord periodically and replace if damaged. Keep the handles dry, clean and free from oil and grease.
- Disconnect the tool when not in use, before servicing and when changing accessories such as blades, bits and cutters.
- Remove adjusting keys and wrenches! Form the habit of checking to see that keys and adjusting wrenches are removed from the tool and replaced in the storage area before switching on.
- Avoid unintentional starting! Do not carry a plugged-in tool with a finger on the switch. Ensure the switch is off when plugging in.
- Use an outdoor extension cord! When a tool is used outdoors, only use an extension cord intended for outdoor use and so marked.
- Stay alert! Watch what you are doing, use common sense and do not operate the tool when tired.
- Check damaged parts! Before further use of the tool, a guard or other part that is damaged should be carefully checked to determine whether it will operate properly and perform its intended function. Check for alignment of moving parts, free running of moving parts, breakage of parts, mounting and any other conditions that may affect its operation. A guard or other part that is damaged should be properly repaired or replaced by an authorised service centre unless otherwise indicated in the product booklet. Have defective switches replaced by an authorised service agent. Do not use the tool if the switch does not turn it on and off.
- Warning! The use of any accessory or attachment, other than recommended in the product booklet, may present a risk of personal injury.
- Have the tool repaired by a qualified person! The electrical tool is in accordance with the relevant safety requirements. Repairs should only be carried out by qualified persons using original spare parts, otherwise, this may result in considerable danger to the user.
ADDITIONAL PRECAUTIONS TO TAKE WHEN SANDING PAINT AND MEDIUM DENSITY FIBREBOARD (MDF)
Sanding of lead based paint is not recommended due to the difficulty of controlling the contaminated dust. The greatest danger of lead poisoning is to children and pregnant women.
ENGLISH
Any pre-1960 building may have been painted in the past with paint containing lead, and covered by additional layers of paint. It is important to determine whether the paint that is being sanded contains lead before beginning work. This can be done with lead test kits or by a professional decorator.
If in doubt, we recommend the following precautions when sanding any paint or MDF.
PERSONAL SAFETY
No children or pregnant women should enter the work area where the paint sanding is being done until all cleaning up has been completed.
A dust mask or respirator should be worn by all persons entering the work area. The filter should be replaced daily or whenever the wearer has difficulty breathing.
Note: Only those dust masks suitable for working with lead paint dust and fumes should be used. Ordinary paint masks do not offer this protection.
No eating, drinking or smoking should be done in the work area to prevent ingesting paint particles. Workers should wash and clean up before eating, drinking or smoking. Articles of food, drink etc., should not be left in the work area where dust could settle on them.
ENVIRONMENTAL SAFETY
Paint should be removed in such a manner as to minimise the amount of dust generated
Areas where paint removal is occurring should be sealed with plastic sheeting.
Sanding should be done in a manner to reduce tracking of paint dust outside the work area.
CLEANING AND DISPOSAL
All surfaces in the work area should be vacuumed and thoroughly cleaned daily for the duration of the sanding project. Vacuum filter bags should be changed frequently. Items of clothing, dust sheets, toys, washable furniture and utensils should be washed thoroughly before being used again.
Save these instructions!
DOUBLE INSULATION

The tool is double insulated. This means that all the external metal parts are electrically insulated from the mains power supply. This is done by placing insulation barriers between the electrical and mechanical components making it unnecessary for the tool to be earthed.
Note: Double insulation does not take the place of normal safety precautions when operating the tool. The insulation system is for added protection
against injury resulting from a possible electrical insulation failure within the tool.
ELECTRICAL SAFETY
Be sure the supply is the same as the voltage given on the rating plate. The tool is fitted with a two-core cable and plug.
MAINS PLUG REPLACEMENT (UK ONLY)
Should the mains plug need replacing and you are competent to do this, proceed as instructed below. If you are in doubt, contact a Black & Decker service agent or a qualified electrician.
- Disconnect the plug from the power supply.
- Cut off the plug and dispose of safely. A plug with bared copper conductors is very dangerous if engaged in a live socket outlet.
- Only fit BS1363A approved plugs fitted with the correctly rated fuse. Note: Fuses do not give personal protection against electric shock.
- The cable wire colours, or a letter, will be marked at the connection point of most good quality plugs. Attach the wires to their respective points in the plug (see diagram). Brown is L (live) and blue is N (neutral).
- Before replacing the top cover of the plug ensure that the cable restraint is holding the outer sheath of the cable firmly and that the two leads are correctly fixed at the terminal screws. If the fuse cover is missing or damaged do not use the plug. For replacement or detachable fuse covers, contact a Black & Decker service agent.
Warning! Never connect live or neutral wires to the earth pin marked E or .
MAINS PLUG REPLACEMENT
(AUSTRALIA AND NEW ZEALAND ONLY)
Should the mains plug or cordset of the product be damaged, it must only be replaced by an authorised
ENGLISH
Black & Decker service agent because special purpose tools are required.
EXTENSION CABLES
Up to 30m (100ft) of 3-core extension cable can be used without undue loss of power. Note: An extension cable should not be used unless absolutely necessary. Use of an improper extension cable could result in a risk of fire and electric shock. If an extension cable must be used, make sure it is properly wired, contains the correct rated fuse as recommended in its literature and is in good electrical condition.
UNWANTED TOOLS AND THE ENVIRONMENT
Should you find one day that the tool needs replacement or is of no further use, think of the protection of the environment. Black & Decker service agents will accept old tools and will dispose of them in an environmentally safe way.
THE BLACK & DECKER GUARANTEE
(UK, AUSTRALIA AND NEW ZEALAND ONLY)
If the Black & Decker product becomes defective due to faulty materials and workmanship, within 24 months from the date of purchase, we guarantee to either replace all defective parts or at our discretion, replace the unit free of charge provided that:
• The product is returned to us or our authorised repairers with evidence of date of purchase.
• The product has not been used for trade, professional or hire purposes.
• The product has not been subjected to misuse or neglect.
- The product has not sustained any damage through foreign objects, substances or accidents.
• Repairs have not been attempted by anyone other than our authorised repair agents.
This guarantee is offered as an extra benefit and is additional to the customers statutory rights.
AFTER SALES SERVICE FOR YOUR BLACK & DECKER PRODUCT (UK, AUSTRALIA AND NEW ZEALAND ONLY)
Black & Decker offers a nationwide network of authorised service agents. The use of other than genuine Black & Decker accessories and parts may damage or reduce the performance of your Black & Decker product and may also endanger the user. The terms and conditions of the warranty may also be effected.
OUR AFTER SALES SERVICE POLICY (UK, AUSTRALIA AND NEW ZEALAND ONLY)
It is our aim that all Black & Decker customers should be totally satisfied with their Black & Decker product and after sales service, but if help or advice is needed please contact your local Black & Decker authorised repair agent who will be happy to help. Full details of our after sales service and a list of these agents can be found on the Internet at www.2helpU.com. Alternatively, call our Service and Information Centre whose number you will find towards the back of this manual.
ACCESSORIES
The performance of any power tool is dependant upon the accessory used. Black & Decker accessories are engineered to high quality standards and are designed to enhance the performance of your tool. Buying a Black & Decker accessory will ensure that you get the very best from your Black & Decker tool.
TECHNICAL DATA
The level of sound pressure of the tool is in accordance with EEC legislation. It is recommended that you take appropriate measures for the protection of your hearing if the sound level seems uncomfortable. This normally equates to a sound pressure in excess of 85dB (A).
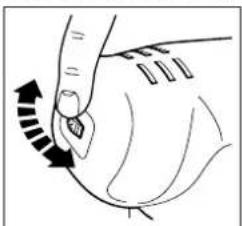
FEATURES
Note: This user manual also covers more than one catalogue number within this product group. Refer to your carton for details of your product.
ENGLISH
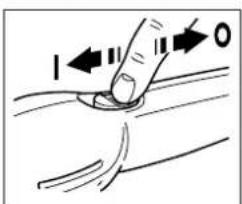
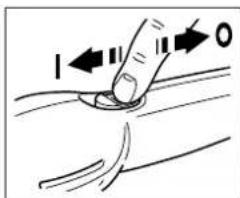
To switch your sander on, slide the on/off switch forward until the mark "I" appears. To switch your sander off, slide the on/off switch to the rear until the mark "O" appears.
Before plugging your sander in, make sure it is switched off.
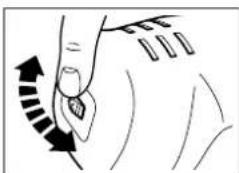
SPEED CONTROL (KA110E)
natural_image
Illustration of a hand pressing down on a curved object with directional arrows (no text or symbols)The speed control switch (2) gives the best operating performance for each material. As a general rule, use low speed for polishing and for sanding acrylic/
synthetic materials, and high speed for wood and metal. The following table gives an indication of which settings to use:
Material Variable speed setting
Hardwood (beech) 4-5
Softwood (pine) 4-5
Veneerwood3-4
Synthetic materials 2-3
Acrylic sheet 1-3
Non-ferrous metals 4-5
Steel3-4
Lacquer and paint removal 3-5
Polishing 1-2
Rustremoval4-5
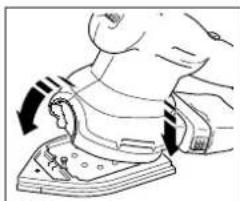
REMOVING AND REFITTING THE SANDING PLATEN
Proceed as follows:
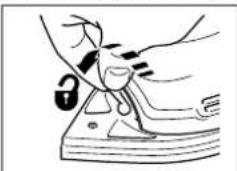
Disconnect the plug from the electricity supply.
natural_image
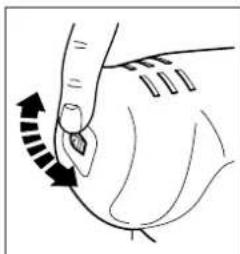
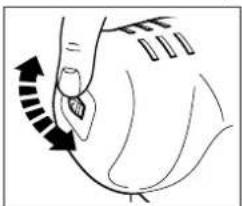
Line drawing of a hand holding a lock on a device (no text or symbols)Turn the platen locking lever (3) anti-clockwise (to the left from the front of your sander) and lift your sander off the platen.
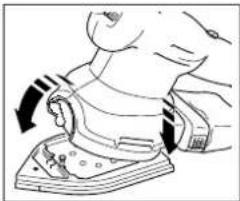
To refit the sanding
platen, place the back of the sander into the locating points on the platen and push the front downwards.
The platen locking lever should now be turned clockwise (to the right from the front of your sander)
natural_image
Illustration of a person using an electric iron on a base, showing mechanical components and motion arrows (no text or symbols)into the locked position.
Note: Make sure that the lever is fully down before operating the sander.

natural_image
Line drawing of a power tool with a base and shaver (no text or symbols)Your sander can be used in one of two ways, with the sanding platen either with the pointed detail section at the front of your sander, or with the
square section at the front of your sander.
FITTING THE SANDPAPER
Your sander uses pre-cut punched nylon backed sheets of a specific size and shape. To fit the sandpaper proceed as follows:
Disconnect the plug from the electricity supply.

natural_image
Illustration of a person standing on a boat with a large object above, no text or symbols presentDetach the two diamond shaped spare tips from the main sheet. Place the sandpaper on the pointed base making sure the holes of the paper are aligned.
Never use your sander without sandpaper and always use a full sheet of paper.
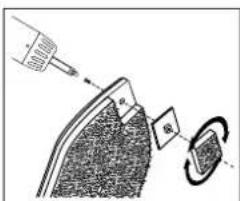
Each sheet of sandpaper has a removable tip, with two spare tips attached. To obtain maximum use from each sheet, detach and turn the tip when the front part is
worn. When the whole tip is worn, replace it with a new tip which is available as an accessory.
The tip of the backing pad is removable. When the front part is worn, turn the tip. When the tip is completely worn, replace the tip. Spare tips are available as accessories. When the tip of the hard plastic tip holder is worn, remove the screw and turn the holder. Spare holders are available as accessories.
ENGLISH
Most of the dust from the work surface is collected in the dustbag. The extraction fan of your sander draws the dust from the surface through the holes in the sanding platen. The dust then passes through the fan shroud to the dustbag. You can connect your sander to a vacuum cleaner for dust extraction purposes. An adapter is available from Black & Decker as a part.
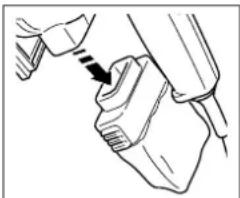
REMOVING AND EMPTYING THE DUSTBAG
Disconnect the plug from the electricity supply.
natural_image
Line drawing of a hand holding a small object with a black arrow pointing to it (no text or symbols present)Hold your sander vertically with the dustbag facing downwards. Pull the bag gently holding the grips on the side of the dustbag. Empty the dustbag and replace on
the sander. A click is heard when the dustbag is correctly fitted. Do not wash the dustbag, Empty the dustbag every 10 minutes.
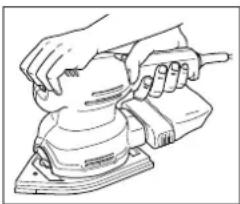
HANDY HINTS
natural_image
Line drawing of a hand using a power tool on a workbench (no text or symbols)Always hold your sander with two hands.
• Always sand with the grain of the wood. If you sand across the grain you may leave swirl marks.
- Your sander can be used in two different ways, either in detail mode for accessing corners, or in orbital mode for flush sanding up against edges.
- Replace worn sandpaper.
- Use the correct grade of sandpaper.
Low grit coarse sandpaper gives a high material removal rate, with a coarse finish.
High grit fine sandpaper gives a low material removal rate, with a finer finish.
As a general rule, start with the low grit paper and finish with the higher grit.
TOOLCARE
Do not apply excessive pressure when you use your sander. This can cause your sander to overheat. If your sander becomes too hot, operate it off-load for 2 minutes. Keep the cooling vents on the motor housing clear.
To clean your sander proceed as follows: Disconnect the plug from the electricity supply. Use a clean dry paintbrush to clear vents and ducts. Clean the housing using a clean damp cloth (do not use solvents, petrol or turpentine).
EC DECLARATION OF CONFORMITY
We declare that units:
KA110, KA110E conform to 89/392/EEC, 89/336/EEC,
EN55014, 73/23/EEC, EN55104, EN50144
A weighted sound pressure 81dB (A)
Hand/arm weighted vibration <2.5m/s²
150W, 10500/min
Brian Cooke - Director of Engineering Black & Decker Ltd, Spennymoor, County Durham DL166JG United Kingdom
The Black & Decker policy is one of continuous improvement to our product and as such we reserve the right to change the product specification without prior notice.
Lijadora - manual de instrucciones
natural_image
Illustration of a hand pressing down on a curved surface with directional arrows indicating motion (no text or symbols)natural_image
Illustration of a hand holding a lock and a small object on a surface (no text or symbols)natural_image
Line drawing of a hand using a tool to press or install a mechanical component (no text or symbols present)natural_image
Line drawing of a mechanical tool with a base and lever mechanism (no text or symbols)natural_image
Illustration of a hand holding a small object with granular texture, possibly a tool or device (no text or symbols visible)natural_image
Line drawing of a hand holding a small object with an arrow pointing to it (no text or symbols)natural_image
Line drawing of hands using a power tool on a workbench (no text or symbols)natural_image
Illustration of a hand pressing down with motion arrows indicating movement (no text or symbols)natural_image
Illustration of hands using a lock to adjust or install a device (no text or symbols present)natural_image
Line drawing of a person using a power shaver to press or install a component (no text or symbols present)natural_image
Line drawing of a power tool with a base, no text or symbols presentnatural_image
Diagram of a mechanical component with textured surfaces and a base, no visible text or symbolsnatural_image
Line drawing of a hand holding a tool, no text or symbols presentnatural_image
Line drawing of hands using a power tool on a workbench (no text or symbols)natural_image
Illustration of a hand pressing down on a curved surface with directional arrows (no text or symbols)natural_image
Illustration of a hand pressing down on a mechanical component with a lock symbol (no text or labels)natural_image
Illustration of a hand using a power shaver to lift a wooden block (no text or symbols visible)natural_image
Line drawing of a mechanical device with a base and top component (no text or symbols)natural_image
Illustration of a person using a tool on a boat, with no visible text or symbolsnatural_image
Line drawing of a hand holding a small object with a pointed tip, no text or symbols presentnatural_image
Line drawing of hands using a power tool on an electric shaver (no text or symbols)Brian Cooke - Director of Engineering Black & Decker Ltd, Spennymoor, County Durham DL166JG, United Kingdom
SNELHEIDSREGELAAR (KA110E)
natural_image
Illustration of a hand pressing down on a curved object with directional arrows (no text or symbols)natural_image
Illustration of a person using a lock on a device (no text or symbols present)natural_image
Illustration of a person using a power tool on a machine (no text or symbols visible)natural_image
Line drawing of a handheld electric shaver with base mount (no text or symbols)natural_image
Illustration of a hand holding a tool with a curved blade and textured surface (no text or symbols)natural_image
Line drawing of a hand holding a small object with a black arrow indicating direction (no text or symbols)natural_image
Line drawing of hands using a power tool on a workbench (no text or symbols)KA110, KA110E in overeenstemming is met 89/392/EEC, 89/336/EEC, EN55014, 73/23/EEC, EN55104, EN50144
Black & Decker Ltd, Spennymoor, County Durham DL166JG, United Kingdom
BRUKE SLIPEMASKINEN
natural_image
Illustration of a hand holding a lock and interacting with a device (no text or symbols present)Drei skivelåsespaken (3) mot urviserne (til venstre fra forsiden av slipemaskinen) og løft slipemaskinen av skiven.
natural_image
Illustration of a person using a power shaver to lift a device (no text or symbols visible)natural_image
Line drawing of a robotic arm operating on a base platform (no text or symbols)natural_image
Illustration of a mechanical device with a textured surface and internal components, no visible text or symbolsSpissen på bakgrunnsskiven er avtakbar. Når frontdelen er slitt, snur du spissen. Når spissen er helt slitt, bytter du den ut. Ekstra spisser er tilgjengelige som
tilleggsutstyr.
natural_image
Line drawing of a hand holding a small object with an arrow indicating direction (no text or symbols)natural_image
Line drawing of a hand using a power tool on a workbench (no text or symbols)Hold alltid slipemaskinen med to hender.
ETTERSYN
Brian Cooke - Director of Engineering
Black & Decker Ltd, Spennymoor, County Durham
DL166JG, United Kingdom
Manual do utilizador para a lixadora
INSTRUÇÕES DE SEGURANÇA
natural_image
Illustration of a hand pressing down on a curved surface with directional arrows indicating motion (no text or symbols)natural_image
Illustration of a person using a device with a lock and earplifier (no text or symbols)natural_image
Illustration of a person using an ironing machine to press or install a piece of material (no text or symbols visible)natural_image
Line drawing of a mechanical device with a base and handle (no text or symbols)natural_image
Illustration of a hand holding a tool with a blade and circular components (no text or symbols)natural_image
Line drawing of a hand holding a small object with a diagonal arrow indicating motion (no text or symbols)natural_image
Line drawing of hands using a power tool on a workbench (no text or symbols)Black & Decker Ltd, Spennymoor, County Durham
DL166JG, United Kingdom
HIOMAKONEENKÄYTTÖ
PORTAATON NOPEUDENSÄÄDIN (KA110E)
natural_image
Illustration of a hand pressing down on a curved surface with directional arrows (no text or symbols)natural_image
Illustration of a person using a lock on a device (no text or symbols present)natural_image
Line drawing of a hand using a tool to press or adjust a mechanical component (no text or symbols present)natural_image
Line drawing of a mechanical device with a base and handle (no text or symbols)natural_image
Diagram of a hand holding a fan with a fan blade and a plate, showing internal components (no text or symbols)PÖLYPUSSIN IRROTUS JA TYHJENNYS
Toimi seuraavasti:
natural_image
Line drawing of a hand holding a small object with a black arrow pointing to it (no text or symbols)natural_image
Line drawing of a hand using a power tool on a workbench (no text or symbols)Brian Cooke - Director of Engineering
Black & Decker Ltd, Spennymoor, County Durham
DL166JG, United Kingdom
HASTIGHETSREGULATOR (KA110E)
natural_image
Illustration of a hand pressing down on a curved surface with directional arrows (no text or symbols)natural_image
Illustration of a person using a lock on a device (no text or symbols present)natural_image
Illustration of a person using a medical or surgical device to interact with another person (no text or symbols visible)natural_image
Line drawing of a mechanical tool or machine component (no text or symbols)natural_image
Line drawing of a hand holding a piece of dough with a dashed arrow indicating a step (no text or symbols present)natural_image
Line drawing of hands using a power tool on a workbench (no text or symbols)Brian Cooke - Director of Engineering
Black & Decker Ltd, Spennymoor, County Durham
DL166JG, United Kingdom
| Forhandler adresseHändleradresseΔιεύθυνοη αντιπροσώπουAddress of dealerDirección del detallistaCachet du revendeurIndirizzo del rivenditoreAdres van de dealerForhandlerens adresseMorada do revendedorJälleenmyyjän osoiteÄterförsäljarens adress | IndkøbsdatoKaufdatumΗμερομηνία αγορὰσDate of purchaseFecha de compraDate d’achatData d’acquistoAankoopdatumInnkjøpsdatoData de compraOstopäiväInköpsdatum |
| Navn/Name/Ovoμα/Name/Nombre/Nom/Nome/Naam/Navn/Nome/Nimi/Namn: | machine cadeau?/Er maskinen en gave?/Recebeu esta ferramenta como presente?/Onko kone lahja?/Är maskinen en gåva?Ja/Ja/Naɪ/Yes/Sí/Oui/Si/Ja/Ja/Sim/Kyllä/JANej/Nein/Oχ/No/No/Non/No/Nee/Nei/Não/Ei/NeJHvor meget kostede maskinen?/Was war der Preis dieses Werkzeuges?/Ποιά είναι η τιμή του εργαλείου autού?/What was the price of this tool?/?Cual fue el precio de esta herramienta?/Prix payé?/?Quanto ha pagato questo prodotto?/Wat was de prijs van dit produkt?/?Hvor meget kostet maskinen?/?Que preço pagou por esta ferramenta?/?Paljonko kone maksoi?/?Hur myket kostade maskinen? | Ja/ein Erstkauf?/?η πρώτη σσσ αγορά?/?your first purchase?/?la primera de este tipo?/?un ler achat?/?il suo primo acquisto?/?uw eerste aankoop?/?Ja/a sua primeira compra?/?Kyllä/JANej/Ersatzkauf?/?για αντικατάσταση?/?a replacement?/?un reempalzo?/?un achat de remplacement?/?una sostituzione?/?een vervanging?/?Nei/uma substitución?/?Ei/NeJForhandler adresse/Händleradresse/Διεύθυνση αντιπροούπου/Address of dealer/Dirección del detallista/Cachet du revendeur/Indirizzo del rivenditore/Dealeradres/Forhandlerens adresse/Morada do revendedor/Jälleenmyyjän osoite/Äterförsäljarens adress: | Venligst sæt kryds i ruden säfremt De ikke måtte ønske at modtage information fra anden virksomhed end Black & Decker.Bitta ankreuzen, falls Sie weiteres Informationsmaterial von Black & Decker erhalten möchten.Παρακαλείσθε να σημειώσετε εάν δέν θέλετε να πάρετε πληροφορίεσα άλλησε εταμείσα εκτόσ τησ Black & Decker.Data protection act: Tick the box if you prefer not to receive information from us or others.Señale en la casilla sino quiere recibir información de otras empresas.Sivous ne souhaitez pas recevoir d'informations de la part d'autres sociétés que Black & Decker, cochez cette case.Barrate la casella se non desiderate ricevere informazioni da altre aziende.A.u.b.dit vakje aankruisen indien u geen informatie wenst te ontvangen van andere bedrijven dan Black & Decker.Vennligst kryss av dersom De ikke ønsker informasjon fra andre bedrifter enn Black & Decker.Por favor, assinale com uma cruz se desejar receber informação de outras empresas, além da Black & Decker.Merkitkää rasti ruutuun, mikäli ette halua vastaanottaa informaatiota muulta taholta kuin Black & Deckeriltä.Vänligen kryssa för i rutan om Ni inte vill ha information från andra företag än Black & Decker. |
| Adresse/Adresse/ΔιεύθυνσηAddress/Dirección/Adresse/Indirizzo/Adres/Adresse/Morada/Osoite/Adress: | |||
| By/Wohnort/Πόλη/Town/Ciudad/Ville/Cittá/Plaats/By/Localidade/Paikkakunta/By: | |||
| Postnr./Postleitzahl/Kωδικόσ/Postcode/Code postal/Código/Codice postale/Postcode/Postnr./Código postal/Postinumero/Postnr.: | Er dette din første B&D maskine?/?Ist dieses Werkzeug-/Eïvaɪ to εργαλείο auto-/-Is this tool-/?Es esta herramienta que comprado-/Est-ce-/?Questo prodotto è-/Is deze machine-/-Er dette din første B&D maskin?/?Esta ferramenta é-/Onkotämä ensimmäinen B&D-koneesi?/?Är detta Din första B&D-velu? | Cat.no.KA110/_ |
adress! Dittland (se oven).