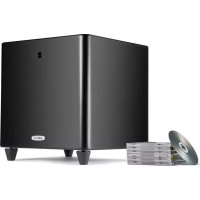
DSWPRO440 - Subwoofer POLK - Free user manual and instructions
Find the device manual for free DSWPRO440 POLK in PDF.



User questions about DSWPRO440 POLK
0 question about this device. Answer the ones you know or ask your own.
Ask a new question about this device
Download the instructions for your Subwoofer in PDF format for free! Find your manual DSWPRO440 - POLK and take your electronic device back in hand. On this page are published all the documents necessary for the use of your device. DSWPRO440 by POLK.
USER MANUAL DSWPRO440 POLK
the speaker specialists
OWNER'SMANUAL
The advantages of Polk Audio's new line of wireless high-performance subwoofoers can be summed up like this: one power plug and you're done.
Yes, it's snowthateasystoreallyturnupthebassinyourmusic,movies,gamesandTVprograms.
We've redesigned our award-winning DSmo Digital Subwoofer so they can be connected wirelessly to virtually any home entertainment system using the optional PWSK-1 wireless kit, a simple plug-and-play kit that adds loss-less wireless capabilities to any of these subwoofer in seconds.
You'll enjoy the best possible bass performance without the hassles of subwoofer cables.
ENGLISH
IMPORTANT SAFETY INSTRUCTIONS
READ BEFORE OPERATING EQUIPMENT
-
Read these instructions.
-
Keep these instructions.
-
Heed all warnings.
-
Follow all instructions.
-
Do not use this apparatus near water.
-
Clean only with dry cloth.
-
Do not block any ventilation openings. Install in accordance with the manufacturer's instructions.
-
Do not install near any heat sources such as radiators, heat registers, stoves, or other apparatus (including amplifiers) that produce heat.
-
Do not defeat the safety purpose of the polarized or grounding-type plug. A polarized plug had a polarised plug having a single lame plus large that is another. One fiche to broche de terre est munie blades with one wider than the other. A grounding type plug has two blades and a third grouding lanes and d'une troisieme broche pour la terre. La lame large et la troisieme broche sont prong. The wide blade or the third prong are provided for your safety. If the provided plug does not pour la sécurité de l'utilisateur. Si la fiche fournie ne rente pas dans cette prise fit into your outlet, consult an electrician for replacement of the obsoletie outlet. de courant, demander a un electrique de replacier cette prise d'un type ancien.
-
Protect the power cord from being walked on or pinched particularly at plugs, convenience0. Protégé le cordon d'alimentation en s'assurant qu'il ne risque pas d'être piñné ou écrasé,
receptacles, and the point where they exit from the apparatus.
-
Only use attachments/accessories specified by the manufacturer.
-
Use only with the cart, stand, tripod, bracket, or table specified by manufacturer, or sold with the apparatus. When a cart is used, use when moving the cart/apparatus combination to avoid injury from tip

-
Unplug this apparatus during lightning storms or when unused for long periods of time.
-
Refer all servicing to qualified service personnel. Servicing is required when the apparatus has been damaged in any way, such as power-supply cord or plug is damaged, liquid has been spilled. If applicable, it shall be declared that the apparatus shall not operate normally, or has been dropped. 15. WARNING: To reduce the risk of fire or electric shock, this apparatus should not be exposed to water.
raain or moisture and ojects filled with lccids, such as vases, should not be placed on this. Avertissement: Pour reduire les risques d'incendie et da choc ecletrique, ne pas exposer aparatus. 16. To completely disconnect this equipment from the mains, disconnect the power supply cord plq qu'un vase.
- The main plug of the power supply cord shall remain readily operable.e.
WARNING: Listen Carefully
Polk Audio loudspeakers and subwoofoers are capable of playing at extremely high volume levels, which could cause serious or permanent hearing damage. Pol Inc. accepts no liability for hearing loss, bodily injury or property damage resulting from the of its products. Keep these guidelines in mind and always use your own good judgment w controlling volume: You should limit prolonged exposure to volumes that exceed 85 decibels
For more about safe volume levels refer to the Occupational Health and Safety Administration (OSHA) guidelines at www.osha.gov/dts/osta/otm/noise/standards_more.html
PRODUCT DISPOSAL

Certain international, national and/or local laws and/or regulations may apply regarding the disposal of this product. For further detailed information, please contact the retailer where you purchased this product or the Polk Audio Importer/ Distributor in your country. A listing of Polk Audio Importer/ Distributors can be found on the Polk Audio website www.polkaudio.com or by contacting Polk Audio 5601 Metro Drive, Baltimore, Maryland 21215, USA Phone: +1 410 358-3600.
The CAUTION marks shown here are located on the back of yeaDCsw
CAUTION: To prevent electric shock, match wide blade of plug to wide slot, insert fully.
CAUTION: No naked flame sources, such as candles, should be placed on the apparatus
Class B Emissions Limits
This Class B digital apparatus meets all requirements of the Canadian Interference-Causing Equipment Regulations.

m = 311 ;
Caution: Subwoofoers are heavy. Exercise caution when unpacking your subwoofer.
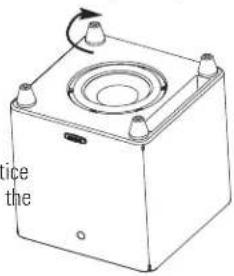
Feet/Carpet Spikes
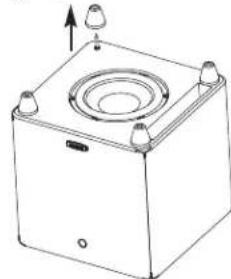
Wireless-ready subwoofer have removable feet. Each foot's shaft is also a carpet spike, which allows you to place your subwoofer on a carpeted floor.
To remove the conical feet from the carpet spike, grasp a foot firmly and turn the foot clockwise while pulling up. Three complete turns should raise the foot enough to allow you to place your fingertips under the foot and pull it off the s
Take Inventory
1 Subwoofer
1 Remote Control
1 Owner's Manual
1 Power Cord
1 Registration Card
4 Rubber Foot Inserts
Please inspect your subwoofer carefully. Notify your Polk Audio dealer if you notice any damage or missing items. Keep the carton and packing material. It will do the best job of protecting your subwoofer if it needs to be transported.
Your system includes a detachable power cord that's packaged separately from the subwoofer. Insert the female end into the receptacle on the amplifier plate and insert the AC plug into a wall outlet (or power strip) as per the safety in PLACIN found on the inside cover of this manual. We do not recommend connecting
the subwoofer's AC power cord to your receiver's switched outlet.
PLACING YOUR SUBWOOFER IN A CABINET
airing wireless-ready subwoofer can be placed in a cabinet, thereby reorienting the subwoofer's driver so that it faces into your listening room. See the instructions below:
PLACING YOUR SUBWOOFER IN A ROOM
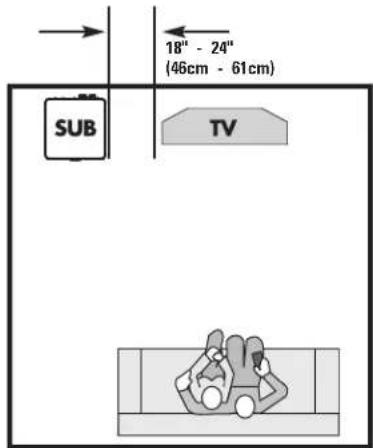
While your wireless-ready subwoofer may be placed anywhere in the magnetically shielded for placement near video monitors. (LCD, DLP and televisions are not affected by magnetism.) Allow at least 18^ (46cm) of between your subwoofer and any tube television, but if you do notice distortion or discoloration, immediately move the subwoofer away from
Also, the Polk Room Optimizer tPRature lets you place your subwoofer anywhere in the room without compromising performance. When locating your subwoofer in the room, we recommend placing it on its base, feet side down. If you can avoid it, do not place your subwoofer next to an open door.
Note: The remote control may not operate when the subwoofer is placed in it's cabinet with the driver facing into the room. If this occurs, adding an IR repeater will enable the remote control to communicate with the subwoofer.
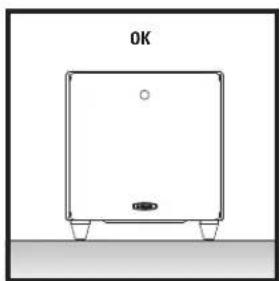
We do recommend placing your subwoofer in different locations within your room to learn what produces the best sound quality based upon your listening preferences.
The pro feature will tailor your subwoofer's performance to its location in room. Select one of the four buttons on your subwoofer's remote control indicates where you've placed your subwoofer in the room. (For more on feature, see "Polk Room Optimizer.")
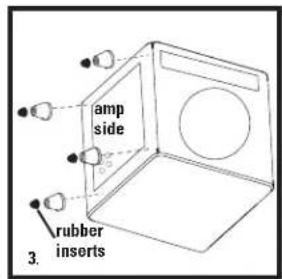
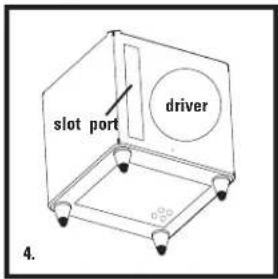
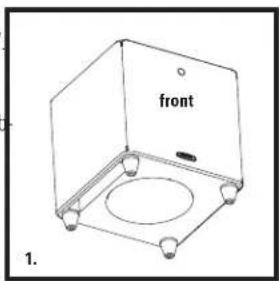
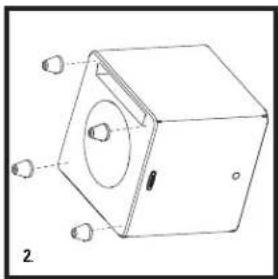
Instructions For Placing Subwoofer In Cabinet:
- With the subwoofer's logo facing you, turn the sub on its side.
- Unscrew the feet from the bottom of the subwoofer.
- Reattach the feet in the threaded inserts located on the amplifier side. Press rubber inserts into bottom of feet.
- Turn the subwoofer onto its feet. Place the subwoofer in the cabinet you go that the driver faces into the room.
Note: Grilles are available for wireless-ready subwoofoers at your authorized Polk Audio dealer or at www.polkaudio.com.
For more information on subwoofer placement, go to www.polkaudio.com/education/article.php?id=20.
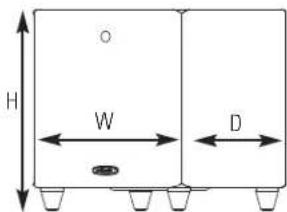
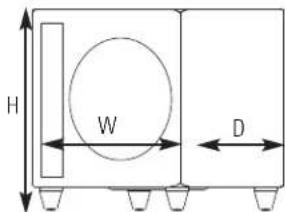
Downward Firing Dimensions
| DSWPRO400w: 13 3/4"W x 13 3/4"D x 14 5/8"H (34.9cm W x 34.9cm D x 37.2cm H) |
| DSWPRO550w: 15 1/2"W x 15 1/2"D x 16 1/8"H (39.4cm W x 39.4cm D x 41.0cm H) |
| DSWPRO660w: 16 1/2"W x 16 1/2"D x 17 1/8"H (41.9cm W x 41.9cm D x 43.5cm H) |
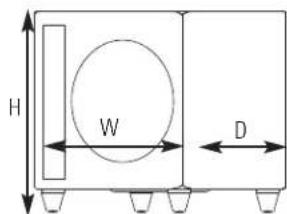
Forward Firing Dimensions (height with rubber foot inserts)
| DSWPRO440w: | 13 3/4" W x 13" D x 15 7/8" H |
| (34.9cm W x 33.0cm D x 40.3cm H | |
| DSWPRO550w: | 15 1/2" W x 14 1/2" D x 17 5/8" H |
| (39.4cm W x 36.8cm D x 44.8cm H | |
| DSWPRO660w: | 16 1/2" W x 15 1/2" D x 18 5/8" H |
| (41.9cm W x 39.4cm D x 47.3cm H |
Note: Optional grille adds to depth (sold separately).
AC POWER CONNECTION AND AUTO ON/OFF
Dual Voltage Switch
Wireless-ready subwoofoers are equipped with either a dual voltage switch or an auto sensor.
| DSWPRO440wi | Auto Sense |
| DSWPRO550wi | Selectable |
| DSWPRO660wi | Selectable |
WARNING: The correct voltage for your country has been set at the factory. Only use the voltage setting specified for your country. Using an improper setting may damage your subwoofer.
Main Power Switch
Turn power on/off via the AC MAIN switch.
Standby/Auto/On Switch
Your wireless-ready subwoofer uses a 3-position power switch, which selects your subwoofer's operational mode. The three modes are: Standby, Auto and On.

With the switch in this position, the subwoofer will only turn on (become active) when the user presses the power button on the remote control. Once active the subwoofer will remain on regardless of whether an audio signal is present.

In the "Auto" position, your subwoofer automatically turns on when it senses an audio signal and the LED located on the back of the subwoofer will be green. When no signal is present, the subwoofer will enter a "waiting" state after 10 minutes and the LED will turn yellow.
We recommend the "Auto" mode if your subwoofer is always receiving power (i.e., if it's plugged into a wall outlet).

The subwoofer is always on and fully active in this mode. The LED on the back the subwoofer will be green. This mode is best if the subwoofer is plugged into switched power outlet. The remote control cannot be used to turn off the subwoofer.
Note: You may want to leave your subwoofer unplugged or the AC MAIN switch turned off during extended periods of non use, such as during a vacation and also during electrical storms.
Power Mode LED Colors And Their Meaning:
Green: Fully active
Yellow: Standby
Red: Protection
CONNECTING THE SUBWOOFER TO THE SYSTEM-HOOKUP OPTIONS
IMPORTANT NOTE: USE ONLY ONE OF THESE OPTIONS.
NEVER COMBINE HOOKUP OPTIONS.
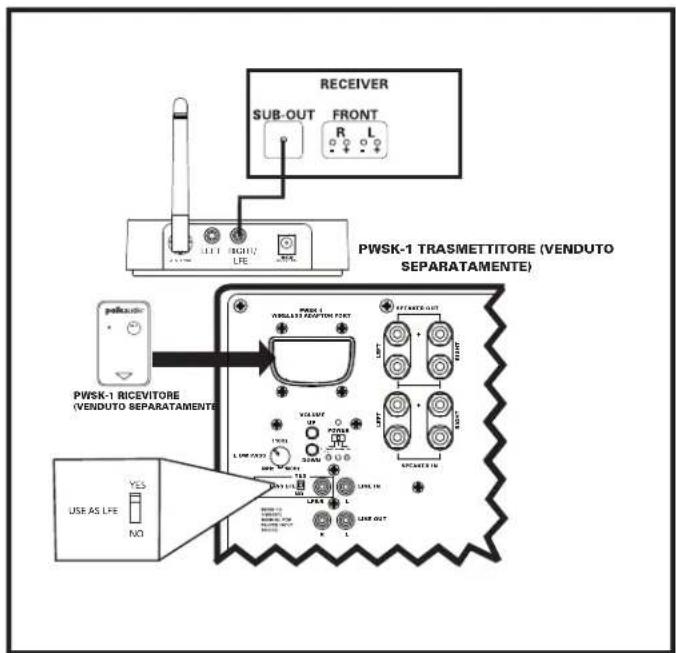
Wireless Connections
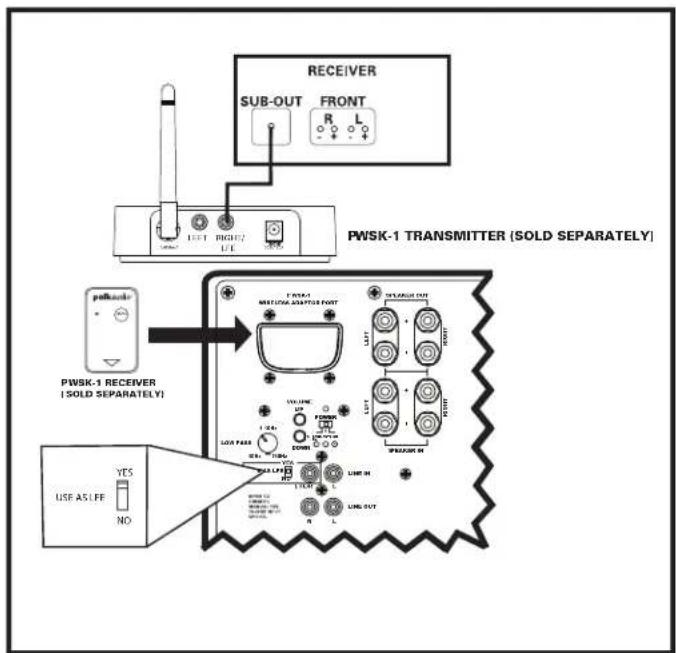

OPTION #1 LFE
Verify that on your receiver you have a dedicated subwoofer output jack, (common on most Dolby Digital 5.1, 6.1 and 7.1 surround receivers). The output will be labeled "SW Out," "Sub-Pre Out" or something similar. Using a single subwoofer cable, connect the receiver to the LFE input on the transmitter as shown in the OPTION #1 illustration.
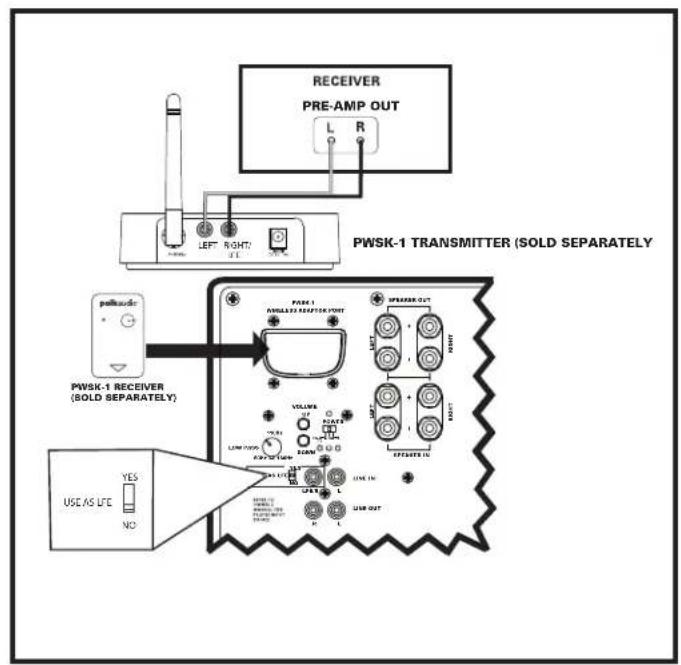
OPTION #2 Line Level
If your receiver does not have a dedicated subwoofer output jack (common with stereo (2 channel) and older Dolby Pro-Logic receivers), use line level connections. Connect the preamp outputs of your receiver and to the LEFT and RIGHT inputs or the transmitter as shown in the OPTION #2 illustration.
Wired Connections
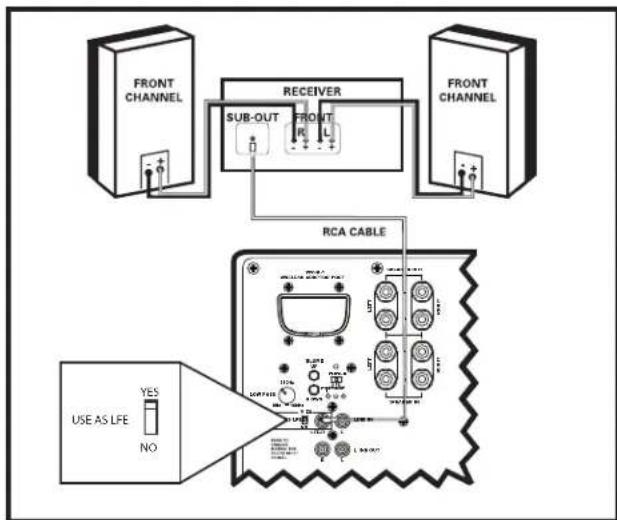
OPTION #1 Receivers that include a "SUB OUT" feature—the most common hookup method with Dolby DinitaDTS receivers.
-
Connect a single RCA cable from the "SUB OUT" of your receiver to the LFE/ input of the subwoofer. This connection method bypasses the subwoofer's internal filter and relies on the filter built into your receiver. Make no other signal connections. Do not use speaker wire to make the connection to the subwoofer.
-
Connect all other speakers directly to the receiver. Adjust your receiver's speaker configurations as follows:
Front Speakers = SMALL
Center and Surrounds = SMALL
Subwoofer = ON, YES, or PRESENT
- Depending on your front speakers' bass output capabilities, set the crossover frequency on the receiver to 80Hz for tower and bookshelf speakers (speakers with a woofer 5 1/4^ in diameter or larger) and 100 - 120Hz for satellite speakers. Consult your receiver's owner's manual for instructions.
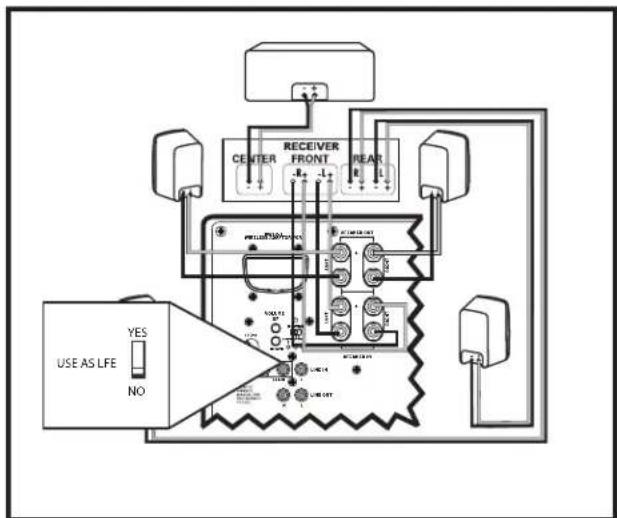
OPTION #2 Two channel or Dolby Pro with no "SUB OUT." Use two-conductor 16 gauge or thicker speaker wires. See your Polk Audio dealer for wire recommendations.
Note: Do not use the line or LFE input in this configuration.
-
Connect the left and right front speaker outputs of your receiver to the speaker level inputs of the subwoofer using speaker wire (see "Making Binding Post/Speaker Wire Connections" for detailed instructions).
-
Connect the left and right front speakers using speaker wire from the speaker level outputs from the subwoofer.
-
Connect the center channel speaker directly to the center channel output from your receiver.
-
Connect the rear surround satellites directly to the rear or surround channel outputs from your receiver.
-
Adjust your receiver's speaker configurations as follows: Front Speakers = LARGE
Subwoofer = OFF or NO
Center and Surrounds = SMALL
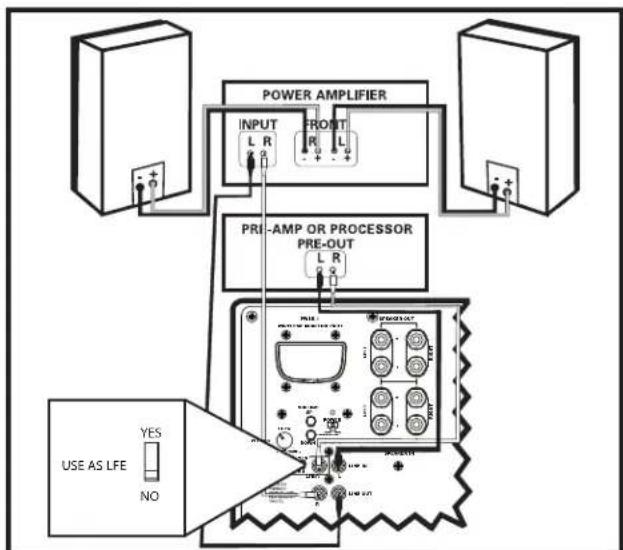
OPTION #3 Receivers with full-range (unfiltered) Left and Right "Pre Out" jacks (this is the least commonly used hookup).
- Connect the left and right preamp outputs from your receiver to the left and right LINE LEVEL inputs of the subwoofer. Do not use speaker wires.
- Connect the left and right LINE LEVEL outputs to the left and right inputs on the power amplifier.
- Adjust the settings on your receiver as follows: Front Speakers = LARGE Subwoofer = OFF or NO
Making Binding Post/Speaker Wire Connections
POLK ROOM OPTIMIZER (PRO)
Note that one of the speaker input terminals on the rear of the subwoofer where you place your subwoofer in your room affects its response. wireless-ready marked red (+) and the other black (-). Make certain that you connect the subwooferers incorporate the Polk Room Optimizer (PRO) feature—four push from the red (+) terminal of your receiver to the red (+) terminal on your subwoofer equalization presets that maximize your subwoofer's performance and the wire from the black (-) terminal of the receiver to the black (-) technical room placements: "cabinet," "corner," "mid-wall" and "mid-room." on your subwoofer. Speaker wire has some indication (such as color coding, ribbing, or writing) on one of the two conductors to help maintain consistency. Traditional subwoofer's response is affected by its location in a room. The
Note: If your subwoofer doesn't seem to produce much bass, it is most that one of the speaker wires is connected backwards. Double check all connections for correct polarity.
Strip 1/2 (12mm) of insulation from each of the two conductors on both to expose the bare wire. Twist the exposed wire of each conductor to f un-frayed strands (one on each end).
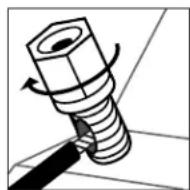
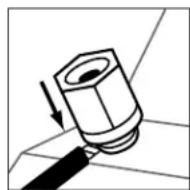
Unscrew the binding post hex nuts several turns. Insert the exposed wire ensuring that none of the bare wire ends touch each other, because con could result in an electrical short and cause your receiver to turn off or tion. With the speaker wire inserted into the binding post, turn the hex clockwise until it's snug.

ADJUSTING YOUR SUBWOOFER
Note: When you set up your subwoofer for the first time, you will probably to make adjustments several times before you hear what you personally like
Don't forget to turn the AC MAIN power switch on.
INITIAL SETTINGS
Your wireless-ready subwoofer offers a range of settings. The unit's initial settings are as follows:
Phase:0
Volume: 50% (20, on a scale from 0-40)
PROsetting: mid-room
The settings that are best for you depend upon your subwoofer placement, electronics and personal taste. After you've become familiar with what the settings do, experiment with alternate options to find the method that works best for your system setup. You'll find an informative article on "Subwoofer Positioning and Adjustment" in the set up section at: www.polkaudio.com/education/article.php?id=19.
Additional subwoofer's response is affected by its location in a room. The Polk Room Optimizer (PRO) feature allows you to place your wireless-ready subwoofer where you want it in your listening room. Based upon the four most common room placements for subwoofer, maximizes sound quality for you, smoothing out the bass response that a particular room placement creates. You simply choose the location you want and select the corresponding button on your subwoofer's remote control.
FINE TUNING YOUR SUBWOOFER
Volume: Adjust by ear using a wide variety of CDs and video sources. Adjust for deep, powerful bass without "boominess."
Low Pass Filter Control: NOTE: This control does not operate when the subwoofer is connected with Option #1 (wireless/wired LFE Input). This control, which is located on the back of the amplifier, adjusts the frequency range over which the subwoofer operates. When using smaller main speakers the upper range of the control will probably yield the best results. With larger speakers the lower end of the control range will probably sound best, but always let you ear be the final judge. If male vocals sound "thin," turn this control up until the voice sounds rich but not "boomy." If male vocals sound too "thick" or "chesty," turn this control down until the voice sounds natural.
- 4 Button Phase Control (0, 90, 180 and 270 degree settings): This control enables the subwoofer to blend more seamlessly with your main speakers. Sit in your favorite listening position. Using the subwoofer's remote control, play music (not a movie) with a walking bass line. We recommend playing jazz or country music. Now listen carefully for the point at which the subwoofer transitions to your main speakers. This is the crossover point, and this point should be below the frequency of a male human voice. Whichever phase setting sounds louder or fuller at the subwoofer's crossover (transition) point is the optimum setting. If after trying all four possible phase settings you cannot hear any difference, leave the phase setting at "0."
DSWPRO440wi Amplifier
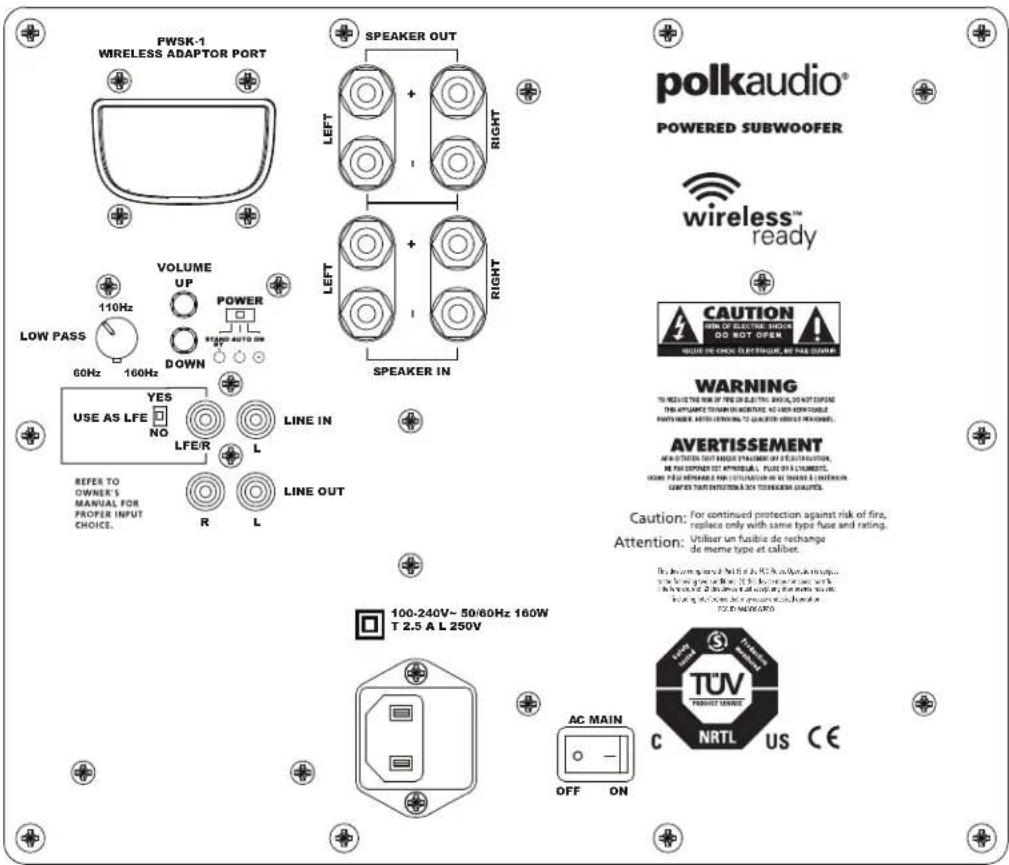
DSWPRO550wAmplifier
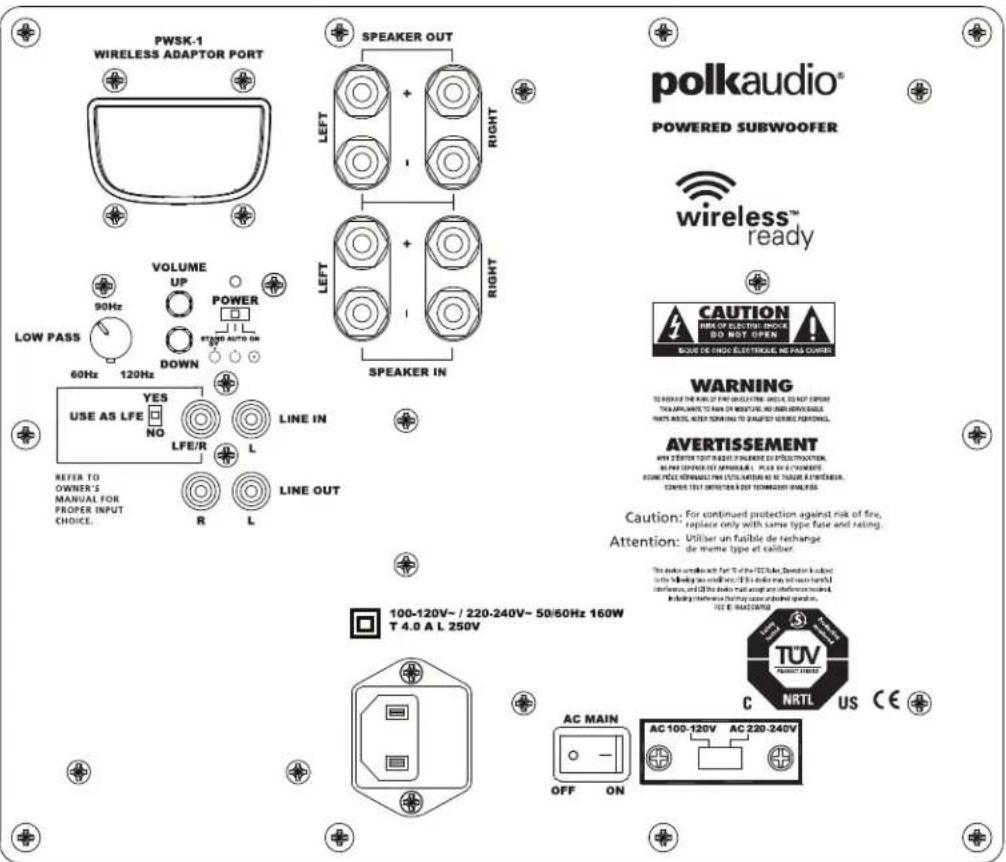
DSWPRO660wAmplifier
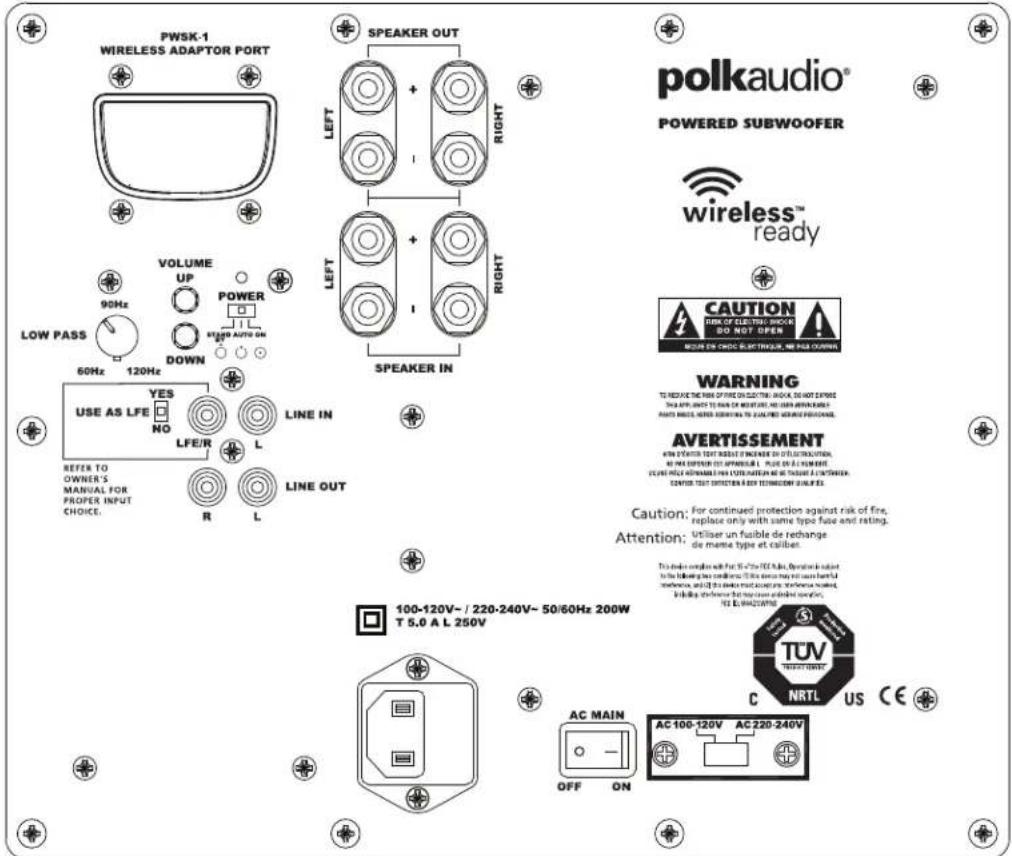
DSWPROWMEMOTECONTROL
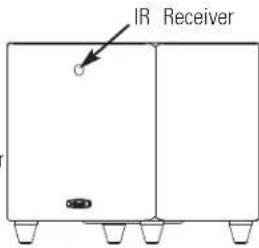
Wireless ready subwoofoers come with a credit card sized remote control. All commands are sent to the subwoofer via IR control. The IR receiver is located on the front of the subwoofer when the subwoofer is in its downward firing configuration.
The remote control has the following features:
Power
Volume
4 Button
4 Button Phase Control (0, 90, 180 and 270 degree settings)
Polk Room Optimizer (PRO) preset
Mute function
Night function allows you to hear low-lev bass detail at lower volumes. If you have the volume at 30 and press "night," the volume is reduced by 50% , in this example to 15. Pressing "night" a second time restores the volume to its original setting. Pressing Volume+ (or Volume-) incrementally increases (or decreases) the volume in the normal manner and takes the subwoofer out of "night" mode. Also, the LED shines at a reduced intensity when the subwoofer is in "night" mode.
- Reset button restores the woofer's settings to factory presets. Hold down for two (2) seconds.
LED turns LED On/Off. The amplifier remains active.
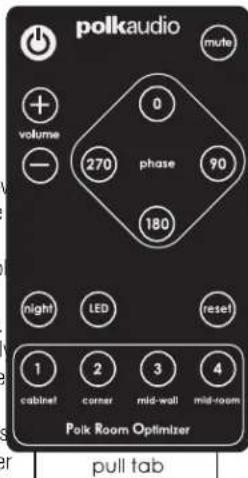
Important: To activate the remote control for the first time, remove the plastic tab.
WHAT IS THAT BLINKING BLUE LIGHT?
Behind the logo badge on the front of your subwoofer there is a blue LED. The blue light blinks whenever you press a button on the subwoofer's remote control. The 3 light lets you know that the subwoofer has received the command and is enabling 2 the function you've selected. The following table describes each button's function 1 and how the LED communicates to you: 0 0 0
Power LED is on when power is active and is off when power is not active. (Pressing the LED button on the remote will also turn the LED off.)
Volume LED will blink a 2-digit code indicating volume setting from 0 to 40 (i.e., if the volume is turned up to 28, the LED will flash two long blinks followed by eight short blinks).
Mute LED blinks slowly when "mate" is selected.
Phase 0 degrees—1 blink; 90 degrees—2 blinks; 180 degrees—3 blinks; 270 degrees—4 blinks.
Night LED is on at a lower intensity; volume is reduced by 50% .
PRO Presets Cabinet-1 blink; Corner-2 blinks; Mid-wall-3 blinks; Mid-room-4 blinks.
Reset LED will blink 4 times.
LED Turns LED on/off. The amplifier remains active.
VOLUME SETTINGS
Blue LED Indicator
| Volume Level Long Blinks Short Blinks |
| 40 40 |
| 39 39 |
| 38 38 |
| 37 37 |
| 36 36 |
| 35 35 |
| 34 34 |
| 33 33 |
| 32 32 |
| 31 31 |
| 30 30 |
| 29 29 |
| 28 28 |
| 27 27 |
| 26 26 |
| 25 25 |
| 24 24 |
| 23 23 |
| 22 22 |
| 21 21 |
| 20 20 |
| 19 19 |
| 18 18 |
| 17 17 |
| 16 16 |
| 15 15 |
| 14 14 |
| 13 13 |
| 12 12 |
| 11 11 |
| 10 10 |
| 9 0 9 |
| 8 0 8 |
| 7 0 7 |
| 6 0 6 |
| D. The blue 5 0 5 |
| at. The 4 0 4 |
| enabling 3 0 3 |
| unction 2 0 2 |
| 0 0 0 |
TROUBLESHOOTING
| No sound coming If hookup is "SUB OUT" to LFE, check from subwoofer. and make sure your receiver is set to Subwoofer = YES. If hookup is via speaker wire, check that the polarity of the wires is correct. |
| Subwoofer doesn't sound right. Adjust volume, low pass filter, phase and pro settings. |
| The subwoofer is humming. There could be interference from a cable TV line. Disconnect the cable TV line from the cable box to see if the hum stops. A low-level hum is normal. |
| Subwoofer has no power. Is the AC MAIN switch on? Check outlet; check fuse after unplugging the subwoofer. The fuse is located under the power cord receptacle. Fuse type and rating is found on the back panel. |
| Remote control doesn't work. Remove the plastic tab to activate the remote control's battery or try replacing the battery. Ensure the IR sensor is not blocked. |
| Power LED is red. Unplug subwoofer for 15 minutes, then plug back in. |
| The subwoofer's sound - Turn off both the the transmitter and the is intermittent, sounds wireless subwoofer. Then turn them back weak or is distorted. on to re-establish communication. - Try changing settings of the Channel ID switches on both the transmitter and the wireless subwoofer. - The wireless subwoofer could be too far away from the transmitter to receive a sufficiently strong signal. Try moving it close |
TECHNICAL ASSISTANCE AND SERVICE
If, after following the hook up directions, you experience difficulty please double-check all wire connections. Should you isolate the problem to the subwoofer, contact the authorized Polk Audio dealer where you made your purchase, or call Polk Audio's friendly Customer Service Department at 1-800-377-7655 (calls from US or CAN only), 410-358-3600 9am to 6pm EST, Monday through Friday.
You may also contact us via email: polkcs@polkaudio.com. For more detailed hook up information and manual updates, visit: www.polkaudio.com.
Specifications can be found on the Webpages. Go to www.polkaudio.com.
POWER RATINGS
Model Shipping Weight Power Rating
| DSWPRO440wi | 34.6 lb. (15.7 kg) | 100V-240V-50/60 Hz 160W |
| DSWPRO550wi | 46.5 lb. (21.1 kg) | 100V-120V-/220V-240V-50/60 Hz 160W |
| DSWPRO660wi | 50.3 lb. (22.8 kg) | 100V-120V-/220V-240V-50/60 Hz 200W |
A Note Regarding Wireless Performance:
Like all wireless devices, your DSWPROwi may be susceptible to RF interference from such sources as microwave ovens, WiFi computer systems, video game systems, cordless telephones, blue tooth systems, baby monitors and other devices. In particular, any devices operating in the 2.4GHz band may cause intermittent wireless connections between the DSWPROwi. It is also possible that your DSWPROwi may affect other wireless systems. For the most part, you can avoid wireless performance problems by physically separating these devices from youDSWPROwi. Maintaining a distance of several feet or more between ydswprowi speaker and any wireless device should prevent any mutual interference effects. If you do notice any subwoofer signal dropouts take care to identify the root cause (most commonly having other wireless devices too close) and resolve accordingly. Any interference effects from a microwave oven will cease once the oven stops operating and may be resolved on a long-term basis by increasing the physical distance between ydswprowi and the microwave oven.
FRANÇAIS
AVANT TOUT
OU INSTALLER VOTRE SUBWOOFER
DSWPRO440w:133/4"Wx133/4"Dx145/8"H
(34.9cm W x 34.9cm D x 37.2cm H)
DSWPRO550w:15 1/2" W x 15 1/2" D x 16 1/8" H
(39.4cm W x 39.4cm D x 41.0cm H)
DSWPRO600w:16 1/2" W x 16 1/2" D x 17 1/8" H
(41.9cm W x 41.9cm D x 43.5cm H)
(41.9cm W x 39.4cm D x 47.3cm H
Concessioni Wireless
OPZIONE N.1 LFE
| DSWPRO440w: 133/4"W x 133/4"D x 145/8"H (34.9cm W x 34.9cm D x 37.2cm H) |
| DSWPRO500w: 15 1/2"W x 15 1/2"D x 16 1/8"H (39.4cm W x 39.4cm D x 41.0cm H) |
| DSWPRO600W: 16 1/2"W x 16 1/2"D x 17 1/8"H (41.9cm W x 41.9cm D x 43.5cm H) |
| DSWPRO440w: 13 3/4"W x 13" D x 15 7/8"H (34.9cm W x 33.0cm D x 40.3cm H |
| DSWPRO550wt: 15 1/2"W x 14 1/2"D x 17 5/8"H |
| (39.4cm W x 36.8cm D x 44.8cm H |
| DSWPRO600W: 16 1/2"W x 15 1/2"D x 18 5/8"H (41.9cm W x 39.4cm D x 47.3cm H |
Polk Audio, Inc., warrants to the original retail purchaser only. This warranty will terminate automatically prior to its stated expiration if the original retail purchaser sells or transfers the Product to any other party.
Polk Audio, Inc., warrants, to the original retail purchaser only, that the LOUDSPEAKER(S), PASSIVE CROSSOVER COMPONENT(S) and ENCLOSURE on this Polk Audio Loudspeaker Product will be free from defects in material and workmanship for a period of five (5) years from the date of original retail purchase from a Polk Audio Authorized Dealer.
Furthermore, Polk Audio, Inc., warrants to the original retail purchaser only, that any AMPLIFIER OR OTHER ELECTRONIC COMPONENT that may be included in this Polk Audio Loudspeaker Product will be free from defects in material and workmanship for a period of three (3) years from the date of original retail purchase from a Polk Audio Authorized Dealer.
To allow Polk Audio to offer the best possible warranty service, please register your new product online at: www.polkaudio.com/registration or call Polk customer service 800-377-7655 in the USA and Canada (outside the USA: 410-358-3600) within ten (10) days of the date of original purchase. Be sure to keep your original purchase receipt.
Defective Products must be shipped, together with proof of purchase, prepaid insured to the Polk Audio Authorized Dealer from whom you purchased the Product, or to the Factory at 1 Viper Way, Vista CA 92081. Products must be shipped in the original shipping container or its equivalent; in any case the risk of loss or damage in transit is to be borne by you. If upon examination at the Factory or Polk Audio Authorized Dealer it is determined that the unit was defective in materials or workmanship at any time during this Warranty period, Polk Audio or the Polk Audio Authorized Dealer will, at its option, repair or replace this Product at no additional charge, except as set forth below. All replaced parts and Products become the property of Polk Audio. Products replaced or repaired under this warranty will be returned to you, within a reasonable time, freight prepaid.
This warranty does not include service or parts to repair damage caused by accident, disaster, misuse, abuse, negligence, inadequate packing or shipping procedures, commercial use, voltage inputs in excess of the rated maximum of the unit, cosmetic appearance of cabinry not directly attributable to defect in materials or workmanship, or service, repair, or modification of the Product which has not been authorized or approved by Polk Audio. This warranty shall terminate if the Serial number on the Product has been removed, tampered with or defaced.
This warranty is in lieu of all other expressed warranties. All implied warranties on this Product are limited to the duration of this expressed Warranty. Some states do not allow limitation on how long an implied Warranty lasts, so the above limitations may not apply to you. This Warranty gives you specific legal rights, and you also may have other rights which vary from state to state.
If this Product is defective in materials or workmanship as warranted above, your sole remedy shall be repair or replacement as provided above. This warranty does not cover service, parts, or supplies to repair damage to property other than the Product. In no event will Polk Audio, Inc. be liable to you for any incidental or consequential damages arising out of the use or inability to use the Product, even if Polk Audio, Inc. or a Polk Audio Authorized Dealer has been advised of the possibility of such damages, or for any claim by any other party. Some states do not allow the exclusion or limitation of incidental or consequential damages, so the above limitation and exclusion may not apply to you.
This Warranty applies only to Products purchased in Canada, the United States of America, its possessions, and U.S. and NATO armed forces exchanges and audio clubs. The Warranty terms and conditions applicable to Products purchased in other countries are available from the Polk Audio Authorized Distributors in such countries.