FEHCPK 4805 ID - Hob Fulgor Milano - Free user manual and instructions
Find the device manual for free FEHCPK 4805 ID Fulgor Milano in PDF.

User questions about FEHCPK 4805 ID Fulgor Milano
0 question about this device. Answer the ones you know or ask your own.
Ask a new question about this device
Download the instructions for your Hob in PDF format for free! Find your manual FEHCPK 4805 ID - Fulgor Milano and take your electronic device back in hand. On this page are published all the documents necessary for the use of your device. FEHCPK 4805 ID by Fulgor Milano.
USER MANUAL FEHCPK 4805 ID Fulgor Milano
Warnings For Electrical Connection 2
1 - Safety Instructions 3
Cooktop Safely 3
Personal Safety 4
2 - Models and Part Identification 5
3 - How Induction Heating Works 6
Pots and pans and how to use them 6
4 - Induction Cooktop Operation 7
Before using the cooktop for the first time 7
Power Sharing 7
Cookware "noise" 7
5 - Element and Control Setting 10
Control knobs and power level adjusting 10
Melting function 11
Warming function 11
Booster function 11
Bridge function 11
Cookware recognition function 11
Automatic Heat Up time function 12
Control Lock function 13
Residual Heat indication 13
6-Advice on cooking 14
Operation Time limitation 15
Permanent use of keys 15
Cookware "noise" 15
7 - Cleaning the Cooktop 16
8 - Resolution of operational problems COOKTOP 17
9 - Assistance or Service 18
Pay attention to these symbols present in this manual:

WARNING
- This is the safety alert symbol. This symbol alerts you to potential hazards that can kill or hurt you and others.
- You can be killed or seriously injured if you don't follow these instructions.
READ AND SAVE THESE INSTRUCTIONS.
Warnings For Electrical Connection

WARNING
- Installation and service must be performed by a qualified installer or service agency.
The models may be powered at 240V or 208V.

CAUTION
- Always disable the electrical supply source before servicing this unit.
- For personal safety, this appliance must be properly grounded.
Changes or modifications not expressly approved by the party responsible for compliance could void the user's authority to operate the equipment.
Note: This equipment complies with part 18 of the FCC Rules. This equipment generates, uses and can radiate radio frequency energy and, if not installed and used in accordance with the instructions, may cause harmful interference to radio communications. However, there is no guarantee that interference will not occur in a particular installation. If this equipment does cause harmful interference to radio or television reception, which can be determined by turning the equipment off and on, the user is encouraged to try to correct the interference by one or more of the following measures:
- Reorient or relocate the receiving antennae.
- Increase the distance between the equipment and receiver.
- Connect the equipment into an outlet or a circuit different from that to which the receiver is connected.
- Consult the dealer or an experienced radio/TV technician for help.

WARNING
Persons with a pacemaker or similar medical device should exercise caution when using or standing near an induction unit while it is in operation. The electromagnetic field may affect the working of the pacemaker or similar medical device. It is advisable to consult your doctor or the pacemaker manufacturer about your particular situation.

IMPORTANT INSTRUCTION
Please read all instructions before using this appliance.

Cooktop Safety

WARNING
Proper Installation
- Be sure your appliance is properly installed and grounded by a qualified technician.
Never Use Your Appliance for Warming or Heating the Room Do Not Leave Children Alone
Children should not be left alone or unattended in area where appliance is in use. They should never be allowed to sit or stand on any part of the appliance.
Wear Proper Apparel
- Loose-fitting or hanging garments should never be worn while using the appliance.
User Servicing
- Do not repair or replace any part of the appliance unless specifically recommended in the manual. All other servicing should be referred to a qualified technician.
Storage in or on Appliance
- Flammable materials should not be stored in an oven or near surface units.
Do Not Use Water on Grease Fires
- Smother fire or flame or use dry chemical or foam-type extinguisher.
Use Only Dry Potholders
- Moist or damp potholders on hot surfaces may result in burns from steam. Do not use a towel or other bulky cloth.
Never Leave Surface Units Unattended at High Heat Settings
- Boil over causes smoking and greasy spillovers that may ignite.

WARNING
- Do not place metallic objects such as knives, forks, spoons, and lids on the cooktop surface since they can get hot.
Do Not Cook on Broken Cook-Top
- If cook-top should break, cleaning solutions and spillovers may penetrate the broken cooktop and create a risk of electric shock. Contact a qualified technician immediately.
Clean Cook-Top With Caution
- If a wet sponge or cloth is used to wipe spills on a hot cooking area, be careful to avoid steam burn. Some cleaners can produce noxious fumes if applied to a hot surface.
Personal Safety

WARNING
To reduce the risk of injury to persons, in the event of a grease fire, observe the following:
Grease is flammable and should be handled carefully.
- Do not use water on grease fires.
- Never pick up a flaming pan. Smother with a baking sheet or flat, metal tray.
- Flaming grease outside of utensil can be extinguished with baking soda or, if available, a multipurpose dry chemical or foam type extinguisher.
- Let fat cool before attempting to handle it.
- Wipe up spill-over immediately.
If you are "flaming" liquors or other spirits under an exhaust, turn the fan off. The draft could cause the flames to spread out of control.
- Never leave the surface area unattended at high heat setting. Boil over cause smoking and greasy spill over, which may ignite.

CAUTION
Do not allow aluminum foil, plastic, paper or cloth to come in contact with a hot Surface. Do not allow pans to boil dry.
- Be careful to prevent burns. If the flames do not go out immediately, evacuate and call the fire department.
- Always have a working smoke detector near the kitchen.
- Leave the hood ventilator on when flambéing food only if there is smoke without flames.
Use an extinguisher only if
- You know you have a Class ABC extinguisher, and you already know how to operate it.
- The fire is small and contained in the area where it started.
The fire department is being called. - You can fight the fire with your back to an exit.
- Never use water on cooking fires.
- In the event that personal clothing catches fire, drop and roll immediately to extinguish flames.

WARNING
To reduce the risk of burn injuries during cooktop use, observe the following:
- Never use the cooktop to warm or heat a room.
- Children or pets should not be left alone or unattended in an area where appliances are in use. They should never be allowed to sit or stand on any part of the appliance.

CAUTION
Do not store items of interest to children in cabinets above a range or on the backguard of a range; children climbing on the range to reach items could be seriously injured.
When using the cooktop
- Do not touch surface units or areas near units. Surface areas may become hot enough to cause burns. Surface elements may be hot even though they are dark in color. During and after use, do not touch or let flammable materials contact heating elements until they have had time to cool.
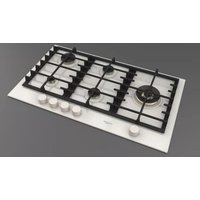
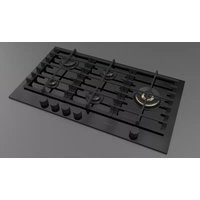
90 MODELS
| 90 | |
| Position 1 | 190 mm x 220 mm - 2100W (Booster 3700W) |
| Position 2 | 190 mm x 220 mm - 2100W (Booster 3700W) |
| Position 3 | 280 mm x 180 mm - 3000/1850W (Booster 5500/2600W) |
| Position 4 | 190 mm x 220 mm - 2100W (Booster 3700W) |
| Position 5 | 190 mm x 220 mm - 2100W (Booster 3700W) |
| Position 6 | knob control |
120 MODELS
| 120 | |
| Position 1 | 190 mm x 220 mm - 2100W (Booster 3700W) |
| Position 2 | 190 mm x 220 mm - 2100W (Booster 3700W) |
| Position 3 | 280 mm x 180 mm - 3000/1850W (Booster 5500/2600W) |
| Position 4 | 190 mm x 220 mm - 2100W (Booster 3700W) |
| Position 5 | 190 mm x 220 mm - 2100W (Booster 3700W) |
| Position 6 | knob control |
How INDUCTION heating works
There is an electronic circuit inside the induction hob which powers and commands a coil. This creates a magnetic field which activates when it comes into contact with suitable pots and pans (magnetic material).
The pan on the hob warms up instantly, while the hob remains cold.
There is no loss of heat. The heat generated in the pan lets you cook quickly, saving time and emergy.
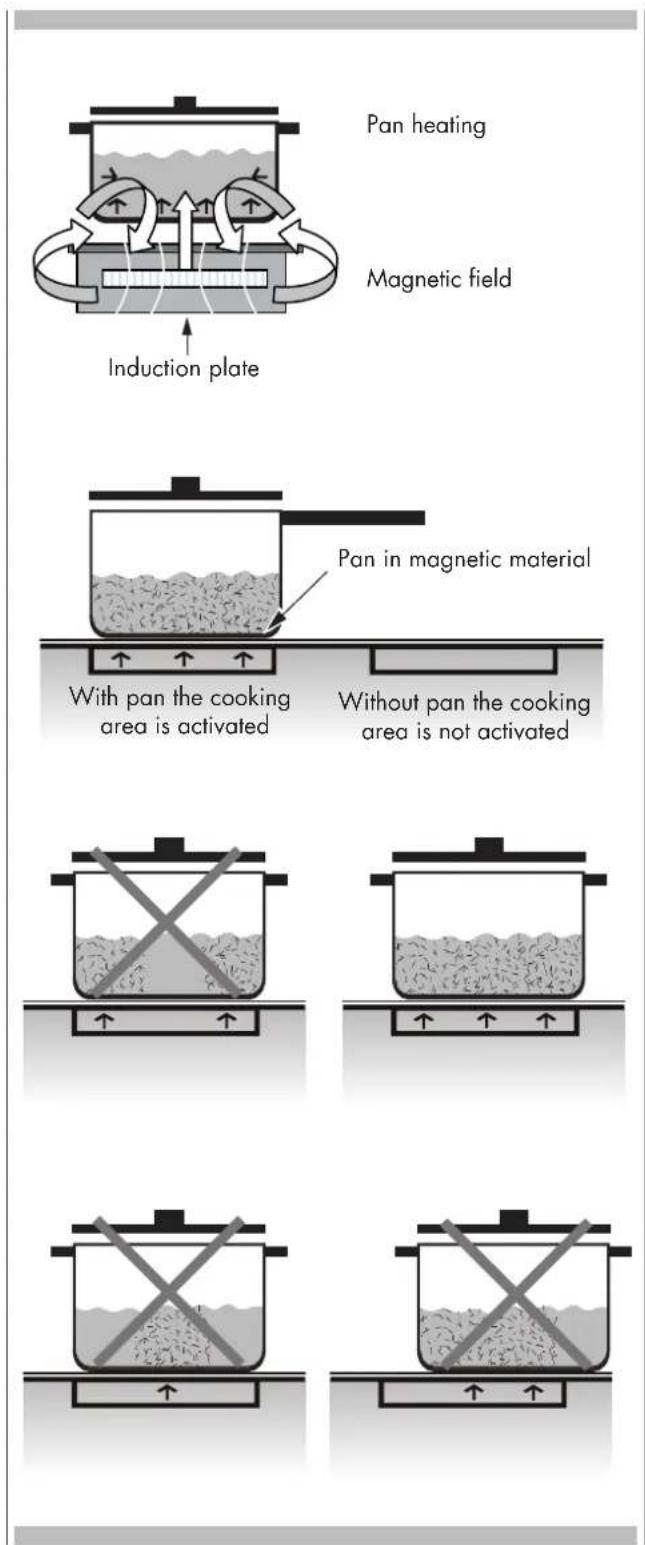
Pots and pans and how to use them

ATTENTION
They can be made of enamaled steel, cast iron or special pans of stainless steel for induction.
To make sure a pan is suitable, try using a magnet to see if it sticks to the bottom of the pan. Never use normal thin steel nor anything containing even just an amount of glass, terracotta, copper or aluminum.
The display of the cooking area will show if the pan is suitable, if the power Indicator flashes the pan is not suitable or the diameter of the bottom is too small for the diameter of the cooking area.
The pots and pans must be placed precisely in the middle of the cooking area.
In some cooking areas an internal diameter is indicated, with a lighter outline.
Before using the cooktop for the first time
- All products are wiped clean with solvents at the actory to remove any visible signs of dirt, oil, and grease which may have remained from the manufacturing process.
- If present, remove all packing and literature from the cooktop surface.
- Clean your glass top before the first time you use it. A thorough cleaning with a glass top cleaner is recommended. It only takes a minute and puts a clean, shiny coating on the glass top before its initial use.
- There may be a slight odour during the first several uses: this is normal and will disappear.
- Optimum cooking result depends on the proper cookware being selected and used.
The cooking surface will hold the heat and remain hot over 20 minutes after the elements have been turned off. - The glass ceramic cooking surface is a durable material resistant to impact but not unbreakable if a pan or other object is dropped on it.
- Do nor allow pans to boil dry. This can damage the pan, element and/or cooktop.
- Do not slide cookware across cooking surface it may scratch the glass

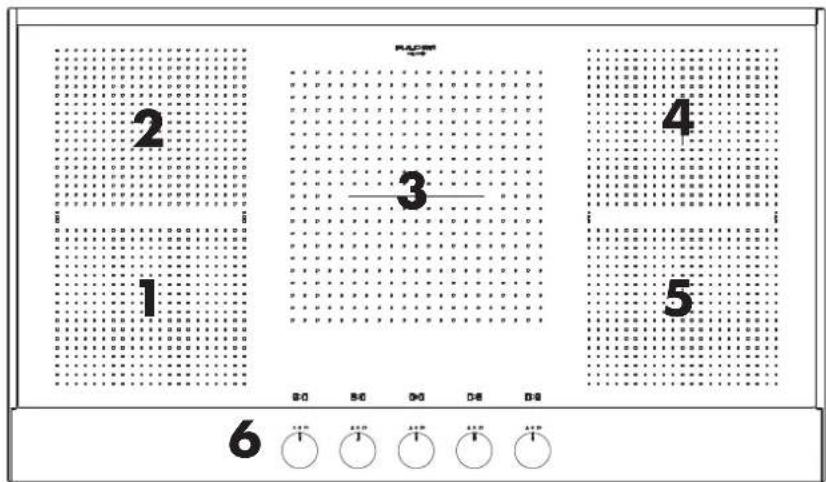
4 burner cooktops with right and lift side (2) induction generators.
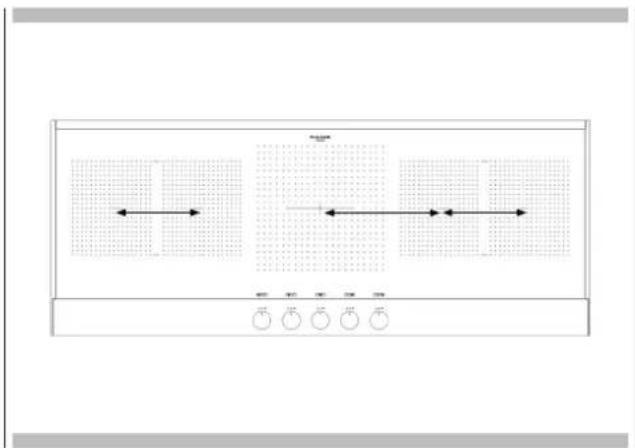
5 burner cooktops with right and lift center (3) induction generators.
Power Sharing
Four burner cooktops are divided into two separate heating zones.
Five burner cooktops are divided into 3 zones.
One generator controls 2 elements, or two cooking zones within a heating section share the power of one generator. Power Sharing is activated when both elements in the same cooking zone are activated and one element is set for Boost (P). The element that is not set for Boost will change to a lower power level. This is called Power Sharing.
Cookware "noise"
When using adjacent elements that are set at certain power level setting, magnetic fields may interact and produce a low whistle or intermitted "hum". Pens that completely cover the elements ring will produce less noise. A low "humming" noise is normal particularly on high settings. These noises can be reduced or eliminated by lowering or raising the power level settings of one or both of elements.
In some cooking areas an internal diameter is indicated with a lighter outline.
90 Wide Cooktop. Use the minimum size pan shown for each cooking element.
| Diameter pan size 90 - 120 | |
| 1 | 12.0 cm minimum diameter pan size |
| 2 | 12.0 cm minimum diameter pan size |
| 3 | 11.0 cm minimum diameter pan size |
| 3B | 25.0 cm minimum diameter pan size |
| 4 | 12.0 cm minimum diameter pan size |
| 5 | 12.0 cm minimum diameter pan size |
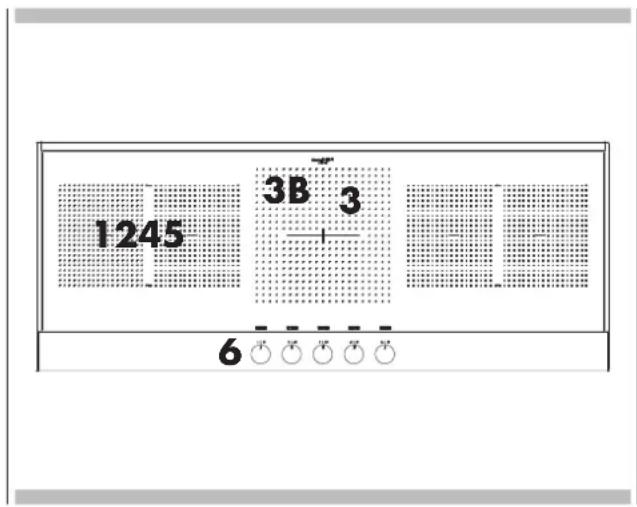
120 Wide Cooktop. Use the minimum size pan shown for each cooking element.
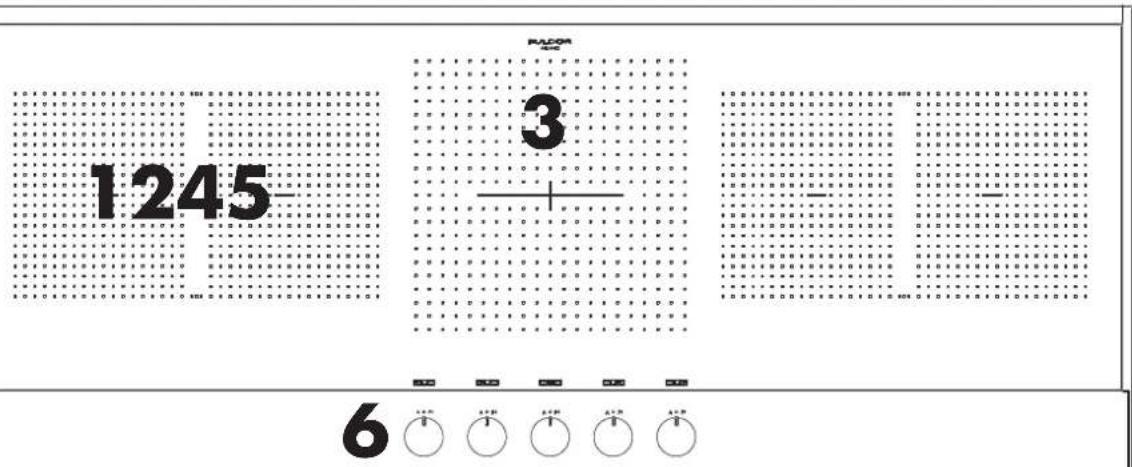
NOTE: Dual Size Surface Cooking Area (3-3B)
The dual size surface cooking area contains two cooking areas.
If the size of the pan is the same as the single size surface cooking area, the cooking area will work as a single size cooking area.
If the size of the pan is the same as the dual size surface cooking area, the dual size cooking area will activate automatically.
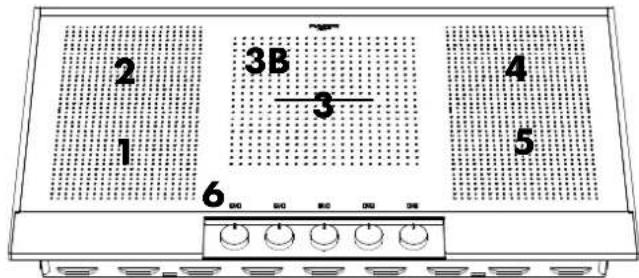
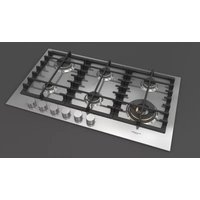
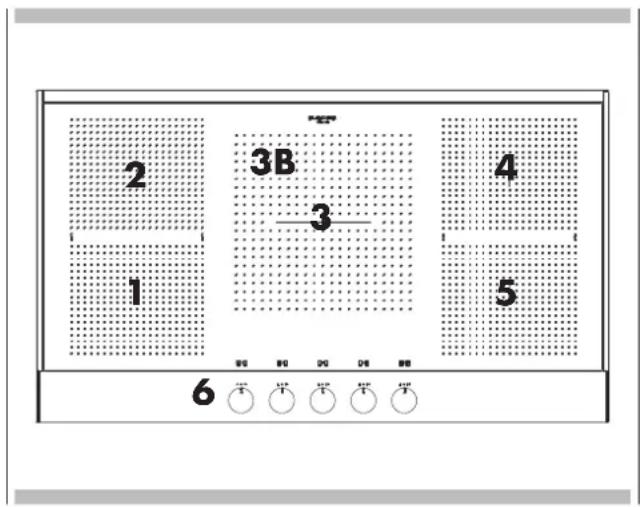
FEATURES OF YOUR COOKTOP 90-120
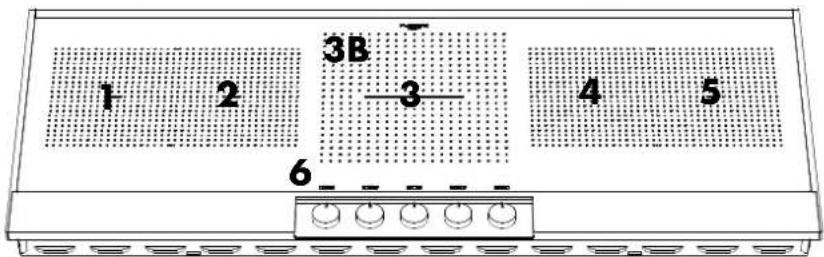
90-120
| Position 1 | 2100W (Boost 3700W) | 190 mm x 220 mm induction element and control |
| Position 2 | 2100W (Boost 3700W) | 190 mm x 220 mm induction element and control |
| Position 3 | 1850W (Boost 2600W) | 180 mm induction element and control |
| Position 3B | 3000W (Boost 5500W) | 280 mm induction element and control |
| Position 4 | 2100W (Boost 3700W) | 190 mm x 220 mm |
| Position 5 | 2100W (Boost 3700W) | 190 mm x 220 mm induction element and control |
| Position 6 | Led Display induction element and control | |
DISPLAY UNIT INDICATIONS

A-ON display
B - Power level display
C - Residual heat display
NOTE: power levels are indicative and can vary according to the pan used or the settings mode.

ELEMENT AND CONTROL SETTING
Control knobs and power level adjusting
The placement of each knob corresponds to the placement of the induction element that it controls.
To turn on any, PUSH and TURN the knob clockwise to the required setting, of the according cooking zone can be increased between a minimum of 1 to a maximum of 9. To reduce the power of the cooking zone again it is necessary to turn the knob anticlockwise.
The current power level is displayed on the display unit of the hob.
Example:
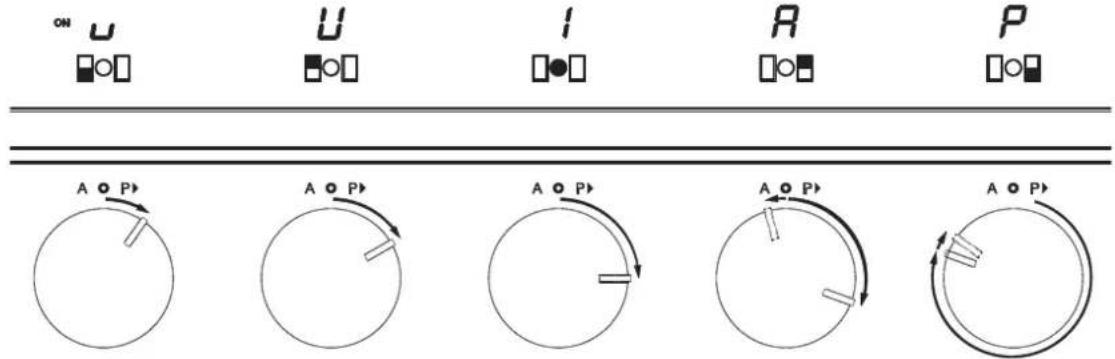
| HOT U | Melting function If the knob is turned clockwise from zero position the first "power level" reached is the melting function. The according 7 segment display unit shows this "u" symbol. The melting function is used to heat up the bottom of the pot (40 C / 105 F inside the pot). This function is used to melt food. The maximum time for using the melting function is limited to 2 hours. |
| HOT U | Warming function The warming function is the second "power level" which will be selected when turning the knob clockwise. The according 7 segment display unit shows this "U" symbol. The warming function is used to heat up the bottom of the pot to 70 C / 160 F (65 C / 150 F inside the pot). Using this function the food can be kept warm or it can be used to warm up food gently. The maximum time for using the warming function is limited to 2 hours. |
| HOT P | Booster function To activate the boost function press and turn the knob clockwise in overwind position "P" until a beep sounds. The symbol is as shown "P" and will be displayed. After 10 minutes the boost function will be automatically switched off and the "P" is not shown on the display anymore and the induction control will be set automatically at level 9. |
| HOT R | Bridge function In the 90 and 120 ranges, the adjacent zones (1-2)(4-5) can be bridged (joined) to function as a single elongated cooking zone. Of the 2 cooking zones, the 2 and 4 are the "passive cooking zone", the 1 and 5 are the "master cooking zone". To bridge the two zones together: simultaneously turn both zones' knobs clockwise all the way to position "P" (Power Boost) and hold them there for at least 3s. Release both knobs which will spring back to the setting of 9. The knob for zone 2 and 4 must remain in this position to maintain the bridge. The display for that zone (2 and 4) will show the symbol of the bridge function connected. Now the knob for the master zone (1 and 5) can be used to adjust the power level which will affect both zones equally effectively operating as a single zone. If the master control knob is turned to the off position or if the passive (2 and 4) zone knob is adjusted at all the bridge mode will be canceled and each zone will once again operate independently. |
| HOT U | Cookware recognition function The cooking level of cooking zone can be selected by turning the knob to the according position even if no pot is in place. The output of power starts automatically as soon as an appropriate pot is put on the cooking zone. If no pot is being detected the display changes to the shown "pot missing" symbol after a short time. This symbol will be shown until a appropriate pot is put on the cooking zone or the maximum time of 10 minutes expired. The same applies if the pot is removed during normal cooking. After 10 minutes without detected pot the cooking zone switches off automatically and can only be activated again after returning the knob into the OFF position. |
HOT

Automatic Heat Up time function
The purpose of the Automatic Heat-Up time function is to automate raising food to the desired temperature more quickly compared to simply setting the inductor to that setting.
Automatic Heat-Up function will act as a 'fast preheat' for an inductor. It will apply setting 9 wattage in order to achieve your desired lower set temperature more quickly.
It is not recommended to use this function to preheat an empty pot or pan.
Example: you set an inductor to setting 4. It receives a set amount of wattage that is maintained consistently throughout the setting. However, at that wattage it would take quite a bit of time to reach temperature due to the lower wattage input. If you set the inductor at 9 it receives a great deal more wattage which raises the temperature more quickly. How to you get to the temperature of setting 4 but reach it with the speed and wattage of setting 9? Enter Automatic Heat-Up function.
To activate the Automatic Heat-Up time function, press and turn the knob counterclockwise to position "A" on the knob (you will feel a spring-back resistance). Hold it on "A" until the "A" symbol shows on the display of the inductor you are adjusting. It will blink waiting for the next input. Within 10 seconds (while the "A" is flashing) select your desired cooking level from 1 through 8. This function will not work if you set it to melt, keep warm or level 9 after the "A" starts flashing.
This will be the cooking level after the automatic heat-up is complete. During the automatic heat-up period, the inductor's display will alternate between "A" and the selected cooking level. Refer to the table below for the time that Automatic Heat-Up mode will operate at setting 9 before automatically switching to the actual level set.
Once the Automatic Heat-Up function is locked in any adjustment to the knob will cancel the mode and the inductor will simply operate at the set temperature. So, if you feel that the power 9 has run long enough, you can easily cancel the mode by rotating the knob to a new a different setting and back to your original setting if so desired.
| Automatic heat-up | |
| Level Zone Time (seconds) | |
| Level 1 48 | |
| Level 2 144 | |
| Level 3 230 | |
| Level 4 312 | |
| Level 5 408 | |
| Level 6 120 | |
| Level 7 168 | |
| Level 8 216 | |
| Level 9 - | |
HOT

Control Lock function
The control lock is a device that protects the appliance from accidental or inappropriate use. With all cooking zones turned off, simultaneously press and turn two knobs countervise in overwind position "A". They need to be hold in that position for at least 2s until the symbols "L" appear on the displays, then release the knobs.
90/120
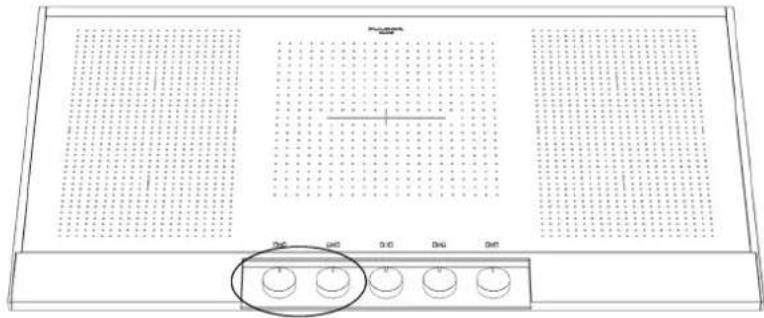
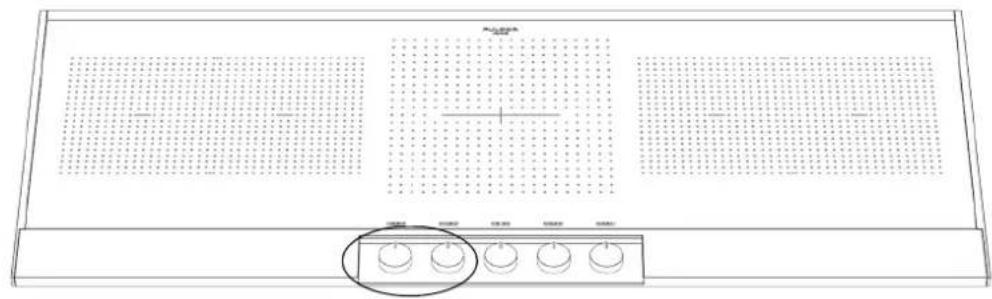
In order to deactivate the CL function repeat the same procedure as for activating.
After unlocking all knobs have to be turned back in the zero position (if any knob was in a position different from zero). The control is than off and can be operated as expected.
NOTE: If the knobs are not hold in the OWL position for long enough the CL will not be enabled / displayed. If the knobs are hold in that position for more than 30 seconds the input is considered to be invalid and a error message "Permanent use of key" will be displayed (flash symbol ).
HOT
Residual Heat indication
Cooking zones which are already switched off can still have a hot glass surface. In order to warn and protect users from burning themselves this condition is visualized, the residual heat measurement is done from the temperature sensor of each inductive cooking zone..
When the measured temperature drops below 60C / 140F on the glass the symbol indicating the hot surface disappears.
Some traditional methods of cooking, such as double boiler (bain-marie) for creams, sauces, chocolate, etc. are no longer necessary, because now you can cook these directly in the pan, thanks to perfect power regulation and even temperature distribution of the induction system.
You can use the "Booster" function with water and soups until they boil, then use a lower level immediately to avoid too much steam and to save energy.
When frying heat the oil to the highest power level, then turn down if needed to a medium level when adding food to the pan.
Always use pots and pans with a proper lid.
Reduce the selected power in the cooking area in time, in the case of water do not let it boil unnecessarily for too long.
Always choose containers of an adequate size for the amount of food to be cooked. A large pot which is not completely full consumes a lot of energy.
For the best cooking results, metal pots and pans with a flat bottom are recommended. Make sure the bottom of the pan corresponds with the cooking area indicated on the glass.
To save energy cook vegetables and potatoes in a small amount of water. Do not heat empty pans otherwise they may be damaged and can also ruin the glass cooking area.

IMPORTANT
Automatic Switch OFF
The induction hob has an automatic device which limits the duration of use.
Depending on the chosen cooking level a maximum operation time limitation is defined, the safety device will be activated only if no change of cooking level is done. If this maximum operating time is exceeded on a cooking zone this cooking zone is being switched off, a short beep sounds and if the zone is hot the "residual heat" symbol is showed. In order to reactivate this cooking zone the control knob has to be turned back into OFF position.

IMPORTANT
Overheating status of cooking zone
If the hob is used on full power for a long period, the electronics could have trouble cooling down if the room temperature is high. To avoid excessively high temperatures forming in the electronics, the power to the cooking zone is managed automatically to protect itself.
Operating time limitation
The Fulgor Milano induction appliances all feature safety time-outs (Operating Time Limitation or OTL) on the induction cooking zones. The following table shows the various OTL for each inductor before timing out based on what power level is chosen. (Also applies to bridged zones or induction griddle depending on model). Thus, longer, overnight simmering is possible on settings 1, 2, or 3.
| OTL - Operating time limitation | ||
| Level Specs [h] | Timeout U&C [h:m] | |
| Low 2 | 2:00 | |
| 1 18 | 18:00 | |
| 2 18 | 18:00 | |
| 3 18 | 18:00 | |
| 4 5.0 | 5:00 | |
| 5 4.0 | 4:00 | |
| 6 1.5 | 1:30 | |
| 7 1.5 | 1:30 | |
| 8 1.5 | 1:30 | |
| 9 1.5 | 1:30 | |
Permanent use of keys

FAULTMESSAGE
HOT
If the knobs have been kept rotated in the "A" or "P" positions for more than 30 seconds a fault message will appear on the display, or the display will turn off.
Cookware "noise"
When using adjacent elements that are set at certain power level settings, magnetic fields may interact and produce a low whistle or intermitted "hum". Pans that completely cover the element ring will produce less noise. A low "humming" noise is normal particularly on high settings. These noise can be reduced or eliminated by lowering or raising the power level settings of one or both of the elements.
The less ferrous material there is in a piece of cookware, the noisier and less efficient it will be - to the point where the cookware may not be detected intermittently or at all. Try to avoid "induction compatible" cookware that is "cladded". Very little of the material in the base of the cookware has the ferrous material needed for effective operation of an induction cooktop. The ideal cookware would be solid stainless steel or cast iron (can be porcelainized).
If you are experiencing difficulty with a particular pot or pan, test the same inductor using an all stainless steel or cast iron pot or pan. If the steel or cast iron pot / pan works fine then the issue is with your other cookware, not the appliance.
Non-stick cookware is terrible on induction as non stick cookware is primarily aluminum which is not induction compatible.
The more ferrous material there is in the cookware, the better and quieter the cooktop will operate.

CAUTION
Be sure electrical power is off and all surfaces are cool before cleaning any part of the cooktop.
Apply a small amount of cooktop cleaning specific ceramic crème on a daily basis. This provides a protective film that makes it easy to remove water spots or food spatters. The temperature of the cooking surface reduces the protective qualities of this cleaner.
It must be reapplied before each use. Use a clean cloth and apply cooktop cleaning crème before each use to remove dust or metal marks that can occur on the counter level surface between uses.
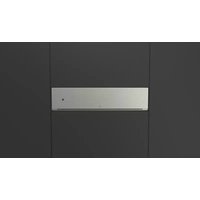
FRAME
(Stainless steel models)
Always wipe with the grain when cleaning. For moderate/ heavy soil, use BonAmi® or Soft Scrub® (no bleach).
Wipe using a damp sponge or cloth, rinse and dry.
DAILY CLEANING TECHNIQUES
Clean the surface when it is completely cool with the following exception.
CLEANING THE COOKTOP
Remove these soils immediately with the razor blade scraper:
Dry Sugar
Sugar Syrup
- Tomato Products
Milk
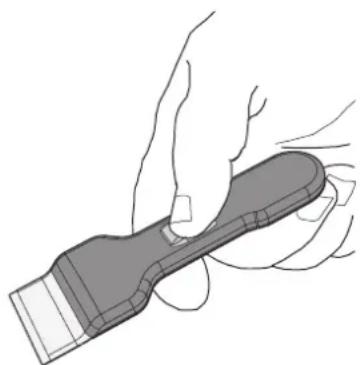
USE DAILY
Wipe off spatters with a clean, damp cloth; use white vinegar if smudge remains; rinse.
Apply a small amount of the Cooktop Cleaning Cream.
When dry, buff surface with a clean paper towel or cloth.

CAUTION
Do not use any kind of cleaner on the glass while the surface is hot; use only the razor blade scraper. The resulting fumes can be hazardous to your health.
Heating the cleaner can chemically attack and damage the surface.
RECOMMENDED CLEANERS
Cooktop Cleaning Crème:
Use only a small amount; apply to a clean paper towel or cloth. Wipe on the surface and buff with a clean dry towel.
BonAmiR
Rinse and dry.
- Soft Scrub® (without bleach):
Rinse and dry.
- White Vinegar:
Rinse and dry.
Razor blade scraper
Packaged with cooktop.
Note: The recommended cleaners indicate a type of cleaner and do not constitute an endorsement.
AVOID THESE CLEANERS
Glass cleaners which contain ammoniac or chlorine bleach
These ingredients may permanently etch or stain the cooktop.
- Caustic Cleaners
Oven cleaners such as Easy Off® may etch the cooktop surface.
- Abrasive Cleaners
Metal scouring pads and scrub sponges such as Scotch Brite® can scratch and / or leave metal marks.
Soap-filled scouring pads such as SOS® can scratch the surface.
Powdery cleaners
Containing chlorine bleach can permanently stain the cooktop.
- Flammable cleaners
Such as lighter fluid or WD-40.
| Problem Cause Possible Remedy | ||
| Nothing works Cooktop not connected to proper electricalcircuit.Fuse is blown or circuit breaker is tripped.No electricity to the cooktop.Cooktop is in lockout mode. | Have electrician verify that the proper rated cooktop voltage is being supplied to the cooktop. Have electrician replace fuse or reset circuit breaker.Have electrician check your power supply.Unlock cooktop. | |
| Heating elements do not heat properly | Improper cookware is being used. Select proper cookware as outlined in the Cooktop Operation section of this manual. | |
| Glass ceramic surface is seethrough or appears to be red in color. | Under direct or bright lighting, you will sometimes be able to see through the glass and into the chassis due to its transparent quality. You may also notice a red tint under these conditions. | These are normal properties of black ceramic glass panels. |
| Lock Key blocked after first connecting or unresponsive control. | When first connecting electrically or after a power failure, any direct strong light over the sensor area may affect the control functionality. | When powering on the unit make sure that no strong light is shining direct over the control zone, it can promise the start-up sensor calibration resulting in an unresponsive control. |
Before contacting service, please check "Troubleshooting." It may save you the cost of a service call.
If you still need help, follow the instructions below. When calling, please know the purchase date and the complete model and serial number of your appliance. This information will help us to better respond to your request.
Service Data Record
For authorized service or parts information see "WARRANTY for Home Appliances".
Now is a good time to write this information in the space provided below.
Keep your invoice for warranty validation.
Service Data Record
Model Number
Serial Number
Date of Installation or Occupancy