
Sliding XPro 7 - Iron TAURUS - Free user manual and instructions
Find the device manual for free Sliding XPro 7 TAURUS in PDF.

| Product type | Steam generator |
| Brand | Taurus |
| Model | Sliding XPro 7 |
| Color | White/Silver (estimated) |
| Power supply | 220-240 V ~ 50/60 Hz (estimated) |
| Power | 2400 W (estimated) |
| Water tank capacity | 1.5 L (estimated) |
| Soleplate type | Ceramic or stainless steel soleplate (not specified) |
| Functions | Dry ironing, continuous steam, vertical steam, auto shut-off |
| Temperature adjustment | Yes, with rotary selector |
| Steam flow control | By locking button and unlocking trigger |
| Auto shut-off | Yes, after 8 minutes of inactivity |
| Thermal protection | Yes, overheat safety device |
| Temperature indicator | Indicator light |
| Ready steam indicator | Indicator light |
| Low water level indicator | Indicator light |
| Maintenance | Clean with damp cloth; periodic descaling with descaling product |
| Descaling | Every 6 to 12 weeks depending on water hardness |
| Recommended water type | Tap water, but descaling needed in hard water |
| Power cord length | Approximately 2 m (estimated) |
| Dimensions (L x W x H) | 370 x 250 x 300 mm (estimated) |
| Weight | 2.5 kg (estimated) |
Frequently Asked Questions - Sliding XPro 7 TAURUS
User questions about Sliding XPro 7 TAURUS
0 question about this device. Answer the ones you know or ask your own.
Ask a new question about this device
Download the instructions for your Iron in PDF format for free! Find your manual Sliding XPro 7 - TAURUS and take your electronic device back in hand. On this page are published all the documents necessary for the use of your device. Sliding XPro 7 by TAURUS.
USER MANUAL Sliding XPro 7 TAURUS
natural_image
Line drawing of a steam iron with handle and mounting base (no text or symbols)EN. Instructions for use
FR. Mode d'emploi
ES
English (Original instructions)
STEAM STATION
SLIDING X-PRO 7
DESCRIPTION
A Water Inlet lid
B Detachable water tank
C Steam lock Button
D Trigger to unlock steam
E Temperature pilot lamp
F Temperature regulator
G Handle
H Main body
I Lime scale cleaning cap
J Steam hose
K Supply cord
L Steam ready indicator
M On/Off button
N Low water level indicator
O Base lock lever
P Water tank unlock lever
Q Supply cord housing
USE AND CARE
- Fully extend the appliance's supply cord before each use.
- Do not use the appliance when empty.
- Do not switch the appliance on without water.
- Do not use the appliance if the on/off button does not work.
- Use the appliance handle/s, to lift it or move it.
- Do not use the appliance if it is tipped up and do not turn it over.
- Do not turn the appliance over while it is in use or connected to the mains.
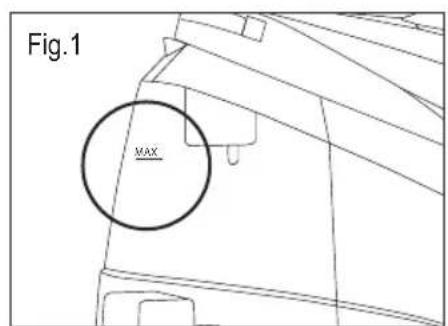
- Respect the MAX level indicator.
- Disconnect the appliance from the mains when not in use and before undertaking any cleaning task.
- Store this appliance out of reach of children and/or persons with physical, sensory or reduced mental or lack of experience and knowledge.
- Do not store or transport the appliance if it is still hot.
-
Keeping the iron in its housing support at maximum temperature for too long time, may cause its colour change, which will not affect the correct working order of the appliance.
-
For a correct operation, keep the sole plate in proper conditions does not operate over metal objects (ironing board metal parts, buttons, zips etc.).
- Only use water with the appliance.
- Make periodical checks on the lime scale cleaning cap (I).
- Check that the lime scale cleaning cap screwed on tightly before switching on the appliance.
- Check that the water inlet lid is closed properly before starting the appliance.
- Make sure water tank is perfectly fitted before starting to use the appliance.
- Never leave the appliance connected and unattended if is not in use. This saves energy and prolongs the life of the appliance.
- Never rest the appliance into a surface while in use.
- Do not use the appliance on any part of the body of a person or animal.
- Do not use the appliance to dry textiles of any kind.
- Turning the temperature regulator to the minimum setting, not mean that the iron is switched off permanently.
INSTRUCTIONS FOR USE
BEFORE USE
- Make sure that all product's packaging has been removed.
- Please read carefully the "Safety advice and warnings" booklet before first use
- Some parts of the appliance have been lightly greased. Consequently, the first time the appliance is used a light smoke may be detected. After a short time, this smoke will disappear.
- To eliminate the smell given off by the appliance when used for the first time, it is recommended to have it on at full power for 10 minutes in a well-ventilated room.
FILLING WITH WATER
- You must fill the water tank before turning on the appliance.
- Remove the appliance's water tank.
- Open water inlet lid.
- Fill the water tank with cold water taking care to observe the MAX level.
- Close water inlet lid.
- Put the water tank back into its housing, ensuring that it is inserted properly.
USE
- Extend the supply cord completely before plugging it in.
- Connect the appliance to the mains.
- Turn the appliance on, by using the on/off button.
• The temperature pilot light comes on. - Turn the temperature regulator to the desired temperature position and wait until the temperature pilot comes off.
- To work with steam, wait for the ready pilot to also comes on.
- Do not use temperatures higher than those indicated on the garments to be treated.
• Temperature for synthetic fibres (Polyester, Nylon...)
●● Temperature for silk and wool
●●● Temperature for cotton
MAX Temperature for linen
- To work with dry steam, select the MAX temperature.
- If garment has various kinds of fibres, select the temperature for the fibre that requires the lowest temperature. (For example, select the temperature for polyester for an article made out of 60% polyester and 40% cotton).
DRY IRONING
- The appliance has an option to dry ironing (without steam). To use this option, iron without pressing the steam lock button.
STEAM IRONING
- It is possible to iron with steam whenever the water tank is filled with water and the adequate temperature is selected.
- When the ready pilot light comes on, press the steam lock button (C) to work with continuous steam.
- Once you want to stop the steam flow, press once the steam unlock trigger (D).
STEAM FLOW CONTROL
- The appliance is equipped with a temperature control knob which allows the steam flow to be controlled.
- To archive "dry steam", set the temperature regulator to the MAX position.
VERTICAL STEAMING
- It is possible to iron hanging curtains, clothes on hangers, etc. Follow the instructions:
- Select the maximum temperature of the iron by turning the temperature control clockwise (F).
- Move the iron from top to bottom and press the steam lock button (C). Important: For cotton and linen, it is recommended that the base of the iron is in contact with the fabric. For other more delicate fibres, it's best to keep the iron base a few centimetres away.
STAND-BY FUNCTION
- If the appliance is left unused for more than 8 minutes, it will automatically switch off.
- To turn it back on, simply press the on/off button.
ONCE YOU HAVE FINISHED USING THE APPLIANCE
- Select the minimum position (MIN) using the temperature regulator.
- Turn the appliance off using the on/off button.
- Unplug the appliance from the mains.
- Put the supply cord back in the supply cord housing.
- Remove the water from the water tank.
- Allow it to cool down.
- Clean the appliance.
PRACTICAL RECOMMENDATIONS
- Classify garments into groups according to ironing temperature. The iron heats up faster than it cools down, so to avoid accidents, minimise energy consumption and optimise time, start ironing items that require lower temperatures and work your way up to those that require higher temperatures.
- Pure wool fabrics (100%) can be ironed with the iron set to steam. Select a high steam temperature and place a cotton cloth between the metal surface of the iron and the garment.
SAFETY THERMAL PROTECTOR
- The appliance has a safety device, which protects the appliance from overheating.
CLEANING
- Disconnect the appliance from the mains and allow it to cool before undertaking any cleaning task.
- Clean the equipment with a damp cloth with a few drops of washing-up liquid and then dry.
- Do not use solvents, or products with an acid or base pH such as bleach, or abrasive products, for cleaning the appliance.
- Never immerse the appliance in water or any other liquid or place it under running water.
HOW TO DEAL WITH LIME SCALE INCRUSTATIONS
- For the appliance to work correctly it should be kept free of lime scale or magnesium incrustations caused by the use of hard water.
- To use the kind of water recommended above, you should periodically remove the lime scale from the appliance:
- Every 6 weeks if the water is "very hard".
- Every 12 weeks if the water is "hard".
• To do so, we recommend the use of the specific product for this kind of appliance, which can be found in specialised shops and authorised technical services.
- Homemade solutions such as vinegar are not recommended for decalcifying this appliance.
CLEANING THE BOILER
- Check that the appliance has cooled down (wait at least 3 hours after disconnecting the appliance).
• Empty the water tank and after the boiler. - To empty the boiler, unscrew the lime scale cleaning cap (I) in an anti-clockwise direction.
- Empty the boiler and close it by screwing the lime scale cleaning cap clockwise.
- Fill the water tank with approximately 500ml of water and add the selected anti-lime scale product.
- Connect the appliance (with the maximum selected steam) and wait for 20 minutes approximately in order for the anti-scale product begin to take effect.
- Let all the steam out (in a suitable place, for example the sink) until the water tank is empty.
- Wait for the appliance to cool down. Rinse the water tank and boiler with cold water.
FR
RECOMMANDATIONS PRATIQUES
HOE OM TE GAAN MET KALKAANSLAG
D Udløser for at låse op for damp
E Pilotlampe for temperatur
F Temperaturregulator
G Håndtag
●●● Temperatur for bomuld
MAX-temperatur for linned
●●● Temperatur for bomull
MAX temperatur for lin


- ES
- English (Original instructions)
- STEAM STATION
- SLIDING X-PRO 7
- DESCRIPTION
- USE AND CARE
- INSTRUCTIONS FOR USE
- BEFORE USE
- FILLING WITH WATER
- USE
- DRY IRONING
- STEAM IRONING
- STEAM FLOW CONTROL
- VERTICAL STEAMING
- STAND-BY FUNCTION
- ONCE YOU HAVE FINISHED USING THE APPLIANCE
- PRACTICAL RECOMMENDATIONS
- SAFETY THERMAL PROTECTOR
- CLEANING
- HOW TO DEAL WITH LIME SCALE INCRUSTATIONS
- CLEANING THE BOILER
- FR
- RECOMMANDATIONS PRATIQUES
- HOE OM TE GAAN MET KALKAANSLAG
- MAX-temperatur for linned
- MAX temperatur for lin
Brand : TAURUS
Model : Sliding XPro 7
Category : Iron