USER MANUAL 47DRIVE SABO
natural_image
Line drawing of a SABO lawn mower with grass at the base (no text or symbols on the diagram itself)
DE
EN Translation of the original instructions
Nederlands
Sicherheitshinweis!
Arrêt du moteur
Note de sécurité !
1 Introduction....2
2 Explanation of the rating plate affixed to the machine 2
3 Explanation of the pictograms....2
4 Explanation of the symbols....2
5 Intended use....3
6 General safety instructions for the walk-behind sickle lawn mower (petrol)
3
General safety instructions....3
Preparatory measures....3
Handling....3
Maintenance and storage 4
7 Description of the components .... 5
8 Preparation....5
Raise the guide rail (Figure A1 + B1 + V4) 5
Handle starter assembly (Figure L1)....5
Attach the grass bag to the mower (Figure R1 + S1) 6
Setting the cutting height (Figure 1)....6
Fitting the charged starter battery (only for electro-start) (Figure V1 + U1)...... 6
9 Before using the lawnmower for the first time....6
Charging the starter battery (only for electro-start)....6
Charger (Figure R4) 6
Charging in assembled state (Figure X1)....6
Charging the battery in disassembled state (Figure W1)....6
Fill with oil (Figure Y1) 6
Fill with fuel....6
10 Starting the engine 7
Manual start without electro-start (Figure D + E) 7
11 Switching off the engine (Figure F + P4) 7
12 Stopping in an emergency 7
13 Traction drive....7
Operating the rear wheel drive (Figure G) 7
Speed setting (Figure H) 7
14 Operation with grass bag 7
Grass catcher 7
TurboSignal (grass bag fill indicator) (Figure J + K) 7
Emptying the grass catcher bag (Figure L) 7
Operation without grass bag 7
15 Mowing operation....7
Mowing on slopes....7
Oil level check 7
Checking operational safety....7
Time restrictions 8
Tips for lawn care 8
Mowing (Figure M) 8
Mulching 8
Conversion to rear ejection mower (Figure U2 + S1) 8
16 Maintenance intervals....8
17 Care and maintenance of the mower 8
Cleaning (Figure O) 8
Storage 8
Folding down the guide rail (Figure A1) 8
Transporting and securing the appliance (Figure N)....8
Maintenance of the blade bar....9
Regrinding and balancing the blade bar (Figure Q)....9
Replacing the blade bar 9
Maintenance of the wheels....9
Maintenance of the rear wheel drive (Figure R)....9
Maintenance of the drive 9
Replacing the drive V-belt 9
Recharging the starter battery (only for electro-start) 9
18 Engine maintenance....9
Oil change....9
Cleaning or replacing the air filter (Figure W) 10
Checking the spark plug (Figure Y)....10
Winterising the engine in accordance with regulations (or prolonged non-use) 10
19 Troubleshooting 10
20 Technical data....11
Engine....11
Mower 11
Sound power level....11
Sound pressure level....11
Vibrations....11
21 Original spare parts and accessories.... 11
Declaration of Conformity ...... see the back, after the last language
EN
1 INTRODUCTION
Dear gardening friend,
when the joy of gardening is added to the pride of a well-tended lawn, then you know what you have in your garden tools. You have made a good choice with your new lawn mower. It combines the performance of a great traditional brand with the innovations of modern high-tech. You will feel this when you work with it, and you will be delighted when you see the marvellous results.
But before you start with lawn care, here is some important information that you should definitely bear in mind.
Before using the mower for the first time, read these operating instructions carefully to familiarise yourself with the correct operation and maintenance of the machine and to avoid injury or damage to your lawn mower.
Use the lawn mower with care. The pictograms on the appliance indicate the most important precautionary measures.
The safety instructions in these operating instructions are labelled with symbols.
The meaning of the pictograms and symbols is explained in the following chapters.
The designations left and right always refer to the left or right side of the appliance when viewed in the direction of travel.
If you follow the technical instructions carefully, your lawn mower will work reliably. We would like to point out that damage to the mower caused by operating errors is not covered by the warranty / guarantee.
We hope you enjoy lawn and grounds maintenance.
2 EXPLANATION OF THE RATING PLATE AFFIXED TO THE MACHINE

1 Model
2 Product identification number
3 Rated power
4 Weight
5 Tested safety (depending on model)
6 Rated engine speed
7 Model year
8 CE conformity mark
9 Walk-behind lawn mower
10 Guaranteed sound power level
11 Serial number
These operating instructions apply for the following models:
47-DRIVE (SA216725): with SABO motor V196 and selective motor drive without speed control
47-VARIO (SA226521): with SABO motor V196 and selective VARIO drive with speed control
47-VARIO E (SA226621): with SABO motor V196 E with electric start and selective VARIO drive with speed control
Please refer to the type plate for the correct model designation of your appliance and the serial number.
The section underneath a heading in italics and underlined applies up until the next such heading for the respective model.
3 EXPLANATION OF THE PICTOGRAMS


Read and observe the operating instructions and safety instructions before commissioning!
Danger from spinning parts when the engine is running - keep a safe distance / keep third parties away from the danger zone!
Beware of sharp blades! Avoid contact with the rotating blade bar! Ensure that hands and feet do not get under the housing!
- Switch off the engine and remove the spark plug connector before cleaning and maintenance work.
Noise hazard - Hearing protection is recommended for prolonged use.

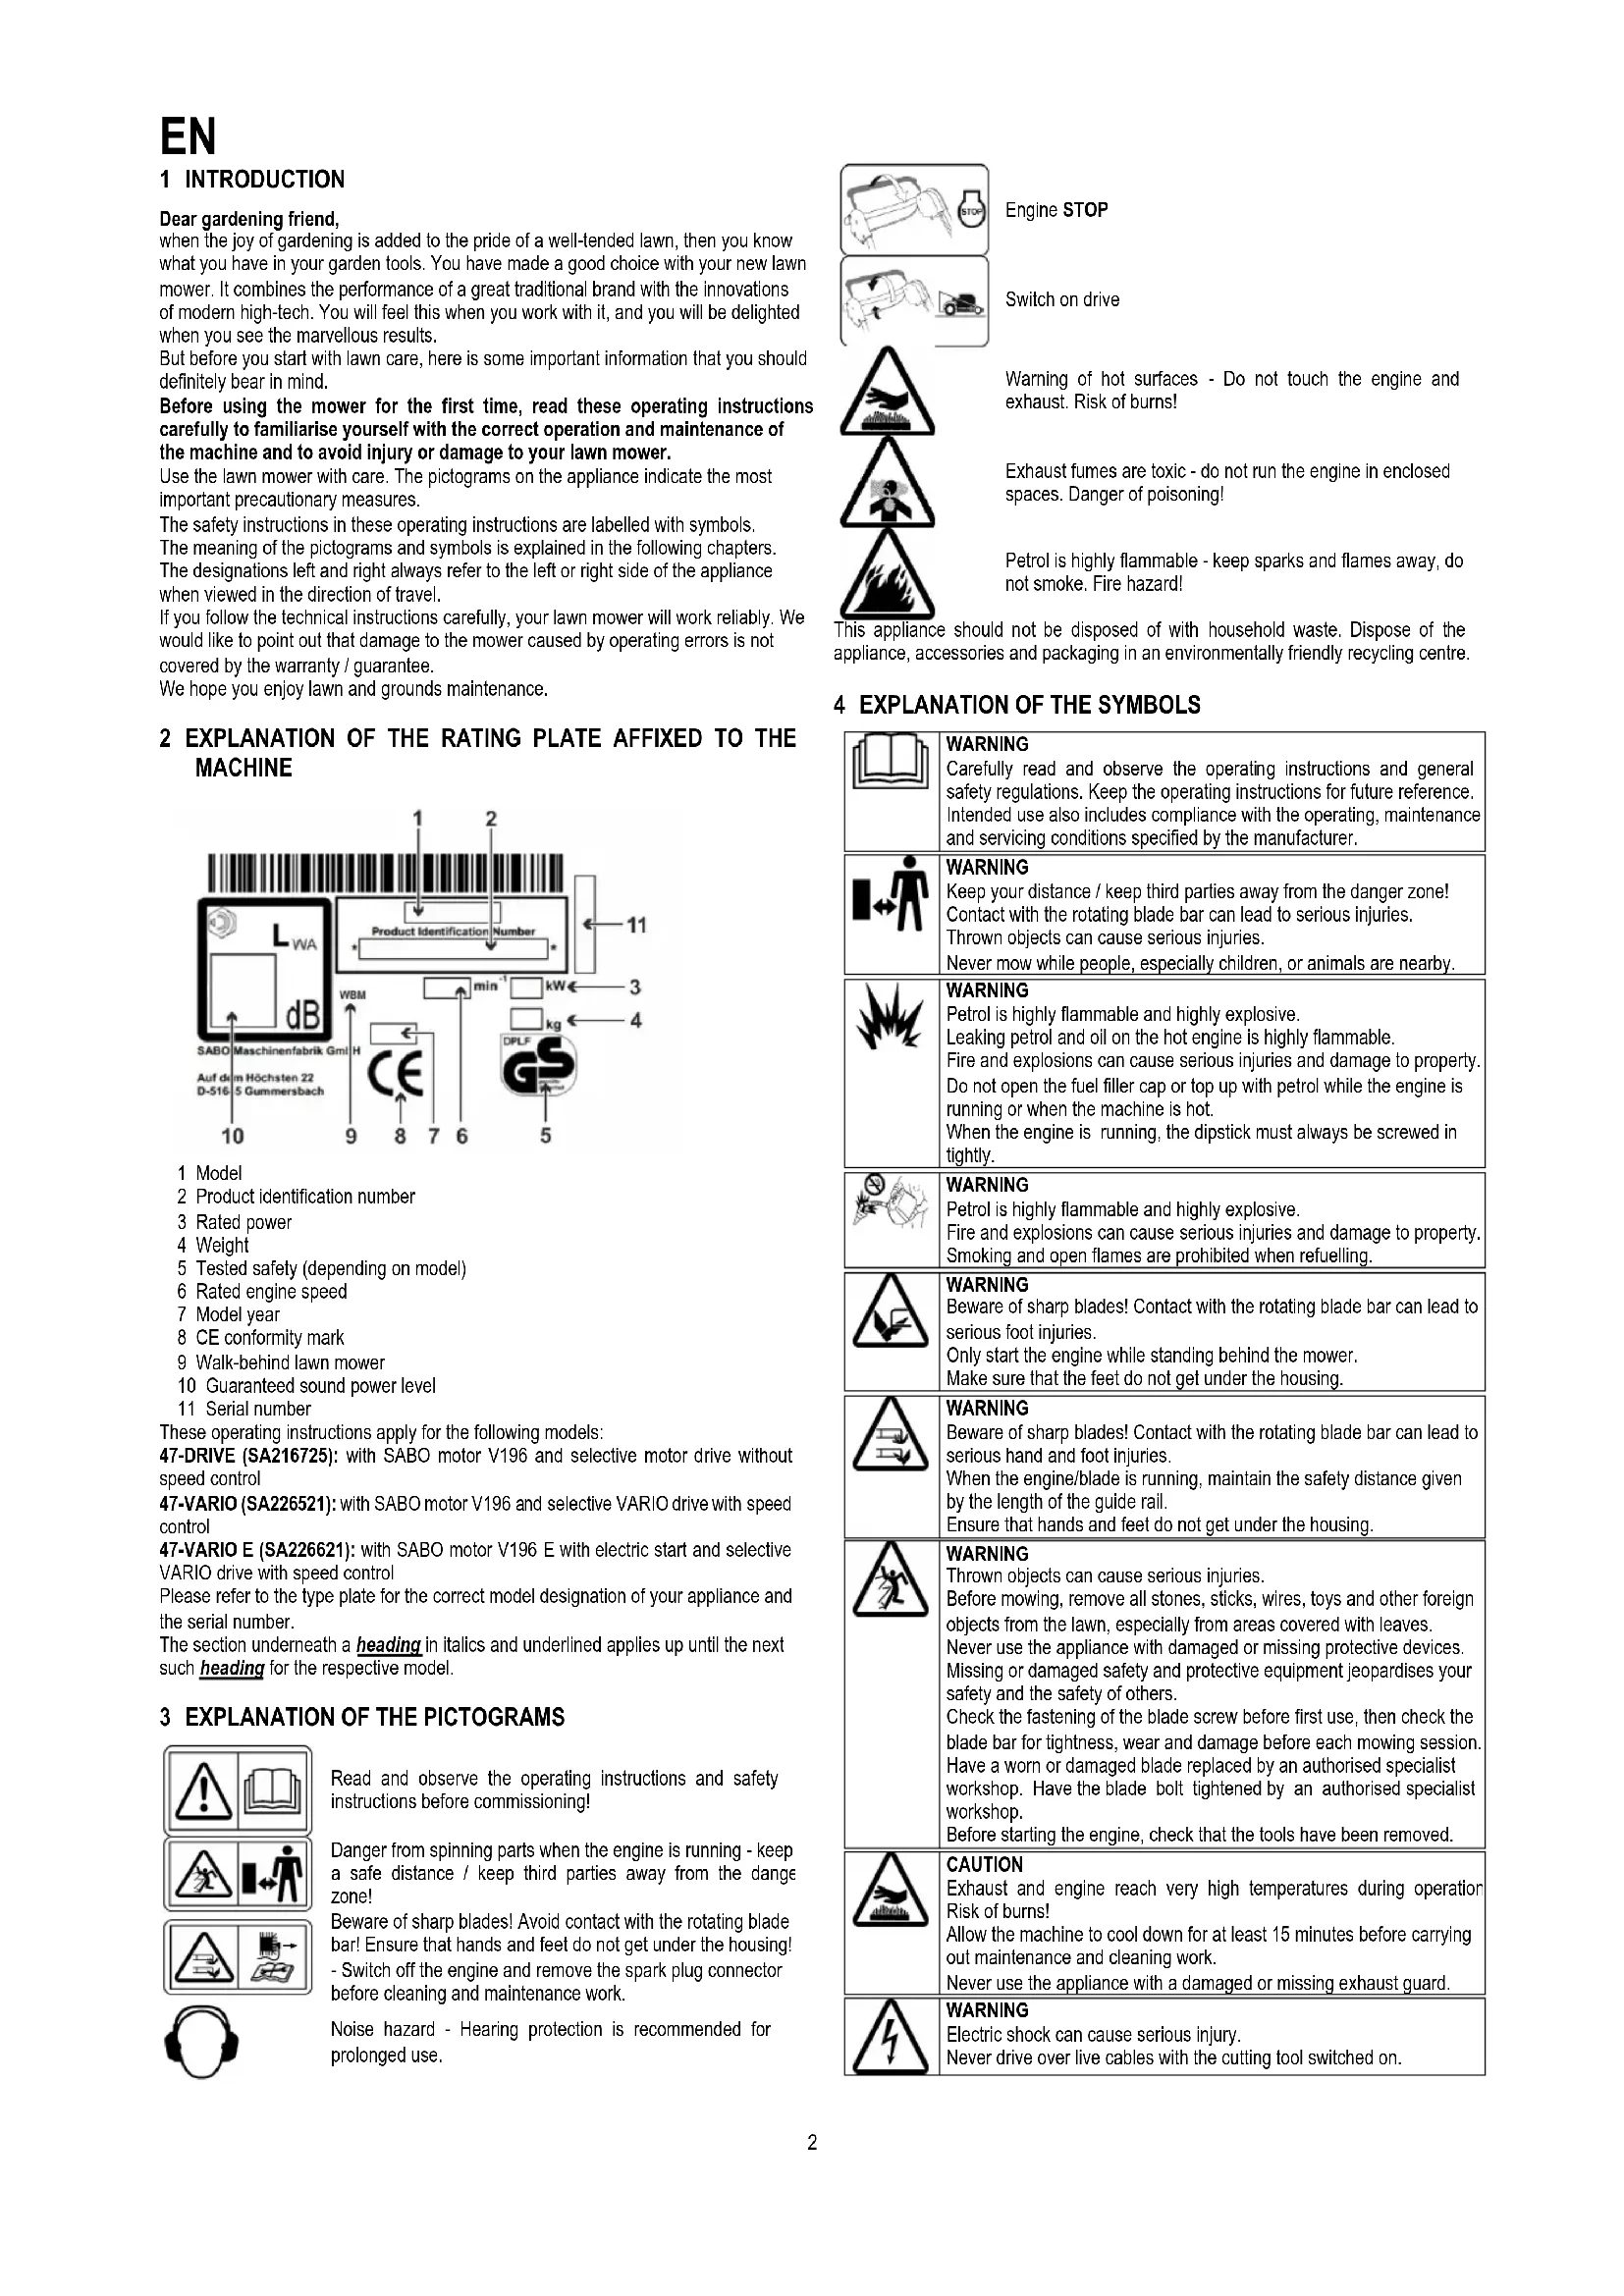
Engine STOP
Switch on drive

Warning of hot surfaces - Do not touch the engine and exhaust. Risk of burns!

Exhaust fumes are toxic - do not run the engine in enclosed spaces. Danger of poisoning!

Petrol is highly flammable - keep sparks and flames away, do not smoke. Fire hazard!
This appliance should not be disposed of with household waste. Dispose of the appliance, accessories and packaging in an environmentally friendly recycling centre.
4 EXPLANATION OF THE SYMBOLS

WARNING
Carefully read and observe the operating instructions and general safety regulations. Keep the operating instructions for future reference. Intended use also includes compliance with the operating, maintenance and servicing conditions specified by the manufacturer.

WARNING
Keep your distance / keep third parties away from the danger zone!
Contact with the rotating blade bar can lead to serious injuries.
Thrown objects can cause serious injuries.

Never mow while people, especially children, or animals are nearby.
WARNING
Petrol is highly flammable and highly explosive.
Leaking petrol and oil on the hot engine is highly flammable.
Fire and explosions can cause serious injuries and damage to property. Do not open the fuel filler cap or top up with petrol while the engine is running or when the machine is hot. When the engine is running, the dipstick must always be screwed in tightly.

WARNING
Petrol is highly flammable and highly explosive.
Fire and explosions can cause serious injuries and damage to property. Smoking and open flames are prohibited when refuelling.

WARNING
Beware of sharp blades! Contact with the rotating blade bar can lead to serious foot injuries.
Only start the engine while standing behind the mower. Make sure that the feet do not get under the housing.

WARNING
Beware of sharp blades! Contact with the rotating blade bar can lead to serious hand and foot injuries.
When the engine/blade is running, maintain the safety distance given by the length of the guide rail.
Ensure that hands and feet do not get under the housing.

WARNING
Thrown objects can cause serious injuries.
Before mowing, remove all stones, sticks, wires, toys and other foreign objects from the lawn, especially from areas covered with leaves.
Never use the appliance with damaged or missing protective devices. Missing or damaged safety and protective equipment jeopardises your safety and the safety of others.
Check the fastening of the blade screw before first use, then check the blade bar for tightness, wear and damage before each mowing session. Have a worn or damaged blade replaced by an authorised specialist workshop. Have the blade bolt tightened by an authorised specialist workshop.
Before starting the engine, check that the tools have been removed.

CAUTION
Exhaust and engine reach very high temperatures during operation Risk of burns!
Allow the machine to cool down for at least 15 minutes before carrying out maintenance and cleaning work.
Never use the appliance with a damaged or missing exhaust guard.

WARNING
Electric shock can cause serious injury.
Never drive over live cables with the cutting tool switched on.
| Check the area for live cables before and during mowing and remove them if possible.If a live cable is damaged, switch off the appliance and disconnect the cable from the mains supply. |
 | CAUTIONIf the spark plug connector and the ignition key, if present, are n disconnected during work on the equipment, the motor may start up and this can result in serious injuries.Switch the engine off, pull the spark plug connector off and remove the ignition key, if present, before carrying out any maintenance and repair work. Never pull the plug connector off with the engine running. Risk of electric shock!Consult the operating instructions for respective cleaning or maintenance instructions.Insufficient equipment maintenance will lead to safety-related faults. |
 | WARNINGContact with the rotating cutting blade can lead to serious hand and foo injuries. Objects thrown upwards can cause serious injuries.Stop the engine and wait until the cutting tool comes to a standsti remove the ignition key if present:- if the mower needs lifting or tilting e.g. for transport purposes;- when driving outside the lawn on paths or streets;- if the mower is left unsupervised for a short time;- before setting the cutting height;- before removing the grass collecting bag.- before the mulching plug is removed;- before filling with fuel. Only fill with fuel with the engine is cold. |
 | CAUTIONContact with the sharp edges of the blade bar and other sharp edges of the appliance can lead to injuries.Always wear protective gloves during maintenance and cleaning work. |
 | CAUTIONNoise hazard -Hearing protection is recommended for prolonged use. |
5 INTENDED USE
- The appliance is intended exclusively for mowing grass and lawns as part of garden and landscape maintenance ("Intended use"). Any other use is considered improper use; the manufacturer is not liable for any resulting damage; the user alone bears the risk. Intended use also includes compliance with the operating, maintenance and servicing conditions prescribed by the manufacturer.
• Special care is required when using in public areas, parks, sports facilities, on roads and in agricultural and forestry operations.
- The mower must not be used in particular for trimming bushes, hedges and shrubs, for cutting climbing plants or vegetation on roofs and in balcony boxes, for vacuuming and/or blowing away on pavements.
- The use of any accessories and attachments not approved by the manufacturer is not permitted. The use of such accessories and attachments invalidates CE conformity and the warranty. Unauthorised modifications to this lawn mower exclude the manufacturer's liability for any resulting damage.
6 GENERAL SAFETY INSTRUCTIONS FOR THE WALK-BEHIND SICKLE LAWN MOWER (PETROL)
General safety instructions

Read the operating instructions carefully for your own protection and to ensure proper function. Familiarise yourself with the controls and the correct use of the machine. Keep the operating instructions for future reference.
- Remember that the machine operator or user is responsible for accidents involving other persons or their property.
• These operating instructions are part of the machine and must be handed over to the purchaser of the appliance in the event of resale.
- Never allow children and persons under the age of 16 or other persons who are not familiar with the operating instructions to use the machine. Local regulations may specify the minimum age of the user.
- Explain the potential hazards and how to avoid accidents to anyone who is to work with the appliance. This appliance may only be used, maintained and repaired by persons who are familiar with it and have been informed of the dangers. The relevant accident prevention regulations and other generally recognised safety and occupational health regulations must be observed.
- This appliance is not intended for use by persons with reduced physical, sensory or mental capabilities, or lack of experience and/or knowledge, unless they have been given supervision or instruction concerning use of the appliance by a person responsible for their safety. This supervisor must decide in advance whether the person with reduced physical, sensory or mental capabilities is suitable for this activity.

Never mow while people, especially children, or animals are nearby.
- Store your machine safely! Unused appliances should be stored in a dry, locked room out of the reach of children.
- Safety and protective devices on the machine must not be manipulated or deactivated!
- The cable routing must not be manipulated, e.g. by removing cable clamps or attaching additional cable ties! The cables must lie against the outside of the upright in such a way that they are neither crushed nor overstretched when the upright is folded down. A damaged cable can lead to a technical defect in the appliance.
Preparatory measures
- Always wear sturdy, closed, non-slip footwear or safety shoes and long trousers when mowing. Avoid wearing loose clothing or clothing with hanging strings or belts. Do not mow barefoot or in sandals. Wear safety goggles to protect your eyes.
- Loud noises can cause hearing damage. Wear hearing protection.

Before and during mowing, fully inspect the area on which the appliance is being used and remove all stones, sticks, wires, toys and other foreign objects that could be caught and thrown away. Check the area for live cables before and during mowing and remove them if possible.

Never drive over live cables with the cutting tool switched on. Danger: electric shock!
If a live cable is damaged, switch off the appliance and disconnect the cable from the mains supply.
If you also use a robotic lawnmower for lawn care, the following safety instructions must be observed with regard to the working area of the robotic lawnmower:
- Before working on these areas (mowing, scarifying, etc.), always check the area of the boundary wire.
- If the cables are laid in the ground, they must be checked, no cables must be visible, special care must be taken with the charging station.
- If the boundary wires are laid above ground, they should be stretched directly over the ground and not lie slack in the grass. The cables must be adequately secured with boundary pegs, see operating instructions.
- the perimeter nails must not protrude, otherwise the nails must be pressed down.
- Remove any cable remnants lying around before mowing. In the conditions described above, there is a risk of the cable being pulled in and wound up by the working tool, which can lead to serious injuries.
- Hanging branches and similar obstacles can injure the user or hinder mowing. Before mowing, check for possible obstacles such as hanging branches and cut them back or remove them.
WARNING

– Petrol is highly flammable and highly explosive.
– Fire and explosions can cause serious injuries and damage to property.
- Store petrol only in an approved container and out of the reach of children.
- Do not fill the tank in the vehicle, on a loading area or on a trailer with plastic panelling. Before filling the tank with fuel, do not place it near the vehicle and always place it on the ground.
- Only refuel outdoors and when the engine is cold. Smoking and naked flames are prohibited when refuelling.
- Do not refuel fuel-powered equipment on a loading area or trailer from the petrol pump, but refuel using a portable fuel tank.
– Fill with petrol before starting the engine.
- Do not open the fuel filler cap or top up with petrol while the engine is running or when the machine is hot.
- If petrol has overflowed, do not attempt to start the engine. Instead, remove the appliance from the petrol-contaminated area and wipe off the spilled fuel from the engine. Avoid any attempt at ignition until the petrol vapours have dissipated.
- For safety reasons, the petrol tank and petrol canister must be carefully closed again.
- If damaged, the petrol tank and fuel cap must be replaced.
- Before use, always visually check whether the cutting tool, fastening screws and the entire cutting unit are worn or damaged. To avoid an imbalance, worn or damaged blades and fastening screws must be replaced by an authorised specialist workshop.
- The condition of the pictograms must be checked each time they are used. Worn or damaged pictograms must be replaced.
Handling
• The appliance must not be operated in potentially explosive atmospheres.
- The combustion engine must not be operated in enclosed spaces where hazardous exhaust fumes can accumulate. Risk of poisoning.
- Wearers of pacemakers must not touch live engine parts when the engine is running.
EN
- Caution! Do not run the appliance in front of the intake openings of room ventilation systems.
• Do not mow in bad weather when there is a risk of lightning strikes.
- Never remove the spark plug connector while the engine is running. Danger: Electric shock!
- Only remove the spark plug connector when the engine has cooled down. Risk of burns!
- Do not wear headphones to listen to the radio or music. Safety during maintenance and operation of the machine requires full attention.
- Only mow in daylight or in good lighting conditions. Operate the machine at walking pace.
- Adapt the driving speed to the person and terrain. Slowly increase the speed until you have reached your suitable driving speed, switch off the drive if necessary.
- Be particularly careful when blind comers, bushes, trees or other obstacles may impair visibility.
- Do not drive too close to holes, ditches and embankments. The machine can suddenly roll over if a wheel drives over the edge of a ditch or an embankment or if an edge suddenly gives way.
• Take care when mowing under play equipment (e.g. swings). The appliance could end up in an unsafe position. There is a risk of injury.
- Do not operate the machine if you are ill, tired or under the influence of alcohol, medication or drugs.
- If possible, avoid using the appliance on wet grass. There is a risk of slipping.
- Always ensure a good, secure footing on slopes. Mow across the slope, never up or down. Be particularly careful when changing direction on a slope.
- Do not mow on excessively steep slopes! Mowing on slopes is inherently dangerous. Your lawn mower is so powerful that it can still mow on slopes with a gradient of up to 46% (25° incline). For safety reasons, however, we strongly recommend that you do not utilise this theoretical performance potential. Always make sure you have a secure footing. Walk-behind lawn mowers should never be used on slopes steeper than 26% (15° incline). There is a risk of losing stability.
- Be particularly careful when turning the machine or pulling the appliance towards you.
- There is a risk of tripping when reversing with the machine. Avoid walking backwards. Avoid abnormal body posture. Ensure that you are standing securely and keep your balance at all times.
- Maintain the safety distance given by the length of the guide rail.
- To prevent the appliance from slipping when carrying it, always hold the appliance by the gripping devices provided for this purpose (carrying handle, housing, spar ends or crossbar of the lower part of the guide spar). Do not hold the ejection flap!
• Note the weight of the machine before lifting or carrying (see chapter "Technical data"). Lifting heavy weights can lead to health problems.
- Never lift or carry a machine with the engine running.
- Never use the machine with damaged or missing safety and protective equipment.
- Missing or damaged safety and protective equipment jeopardises your safety and the safety of others.
Safety devices (see chapter "Description of the components"):

- Safety switch lever engine stop (1)
The lawn mower is equipped with an engine stop device.
During operation and at the moment of danger, the combustion engine is switched off by releasing the engine stop lever.
The combustion engine and the blade must come to a standstill within 3 seconds.
After being released, the lever must always spring back into the position shown in the "Description of components" illustration.
If this is not the case, an immediate inspection by an authorised specialist workshop is required.
Risk of injury!
If the run-on time of the blade is longer, stop using the appliance and take it to an authorised specialist workshop.
Measuring the run-on time
After starting the combustion engine, the blade rotates and a wind noise is audible.
The run-on time corresponds to the duration of the wind noise after the combustion engine has been switched off; it can be measured with a stopwatch.
The function of the safety switch lever must not be overridden under any circumstances.
Ensure that the safety switch lever is functioning properly. If this is not the case, have it repaired by an authorised specialist workshop.
Protective devices (see chapter "Description of the components"):

- Housing, grass bag, ejection flap (13)
These guards protect against injuries caused by objects being thrown upwards.
The appliance must not be operated with a damaged housing or without a properly secured grass bag attached to the housing.

- Housing
This protective device protects against injuries caused by contact with the rotating cutter bar.
The appliance must not be operated with a damaged housing. Ensure that hands and feet do not get under the housing.
- Belt drive covers (11), engine covers (5)
These protective devices protect against injuries caused by moving parts.
The appliance must not be operated with damaged covers or without properly fastened covers.
- Exhaust protection grille (10)
The engine/exhaust gets very hot. The protective grille protects against burns.
Do not use the appliance without an exhaust protection grille.
- The protective devices must not be modified.
- Do not change the basic setting of the engine or over-rev it.
• Do not switch on the drive, if present, during the starting process.

During commissioning, ensure that the feet are at a safe distance from the cutting tool.
When starting or cranking the engine, the machine must not be tilted upwards but, if necessary, must be tilted by pressing down the guide rail so that the cutting tool points in the direction away from the user, but only as far as is absolutely necessary. Both hands must be on the upper part of the handlebar before the appliance is back on the ground.
Do not start the engine if people or animals are standing in front of the mower.
For devices with side ejector, do not start the engine if you are standing in front of the ejector channel or if there are other people or animals in the discharge area.

Never place your hands or feet near or under rotating parts. Ensure that hands and feet do not get under the housing. For appliances with side ejector, always keep away from the ejector opening.
Stop the engine by releasing the motor stop bar, disconnect the spark-plug connector, make sure that all moving parts have come to a complete standstill and the ignition key, if there is one, has been removed:
- when the machine is left;
- before checking, cleaning or working on the machine;
- before you loosen blockages or clear blockages in the ejection channel;
- when a foreign body has been hit.
- if the machine starts to vibrate unusually.
- If a foreign object has been hit and if the machine is blocked, e.g. by hitting an obstacle, an authorised specialist workshop must check whether parts of the appliance have been damaged or deformed. Always have any necessary repairs carried out by an authorised specialist workshop.
- If the machine starts to vibrate abnormally or make unusual noises, it must be checked immediately by an authorised specialist workshop. High vibrations on your hands can cause damage to your health. If strong vibrations occur, contact an authorised specialist workshop immediately.
- WARNING
The noise levels and vibrations specified in these operating instructions are the maximum values that can occur when using the machine.
The use of unbalanced cutting tools, excessive travelling speed and inadequate maintenance have a significant impact on noise emissions and vibrations. Preventive measures must therefore be taken to avoid possible damage caused by high noise levels or vibration stresses.
Ensure that the machine is well maintained, wear hearing protection and take breaks during work.
Observe the maintenance work listed in these operating instructions and have the appliance checked and serviced regularly by an authorised specialist workshop.

Switch off the engine by releasing the engine stop lever, make sure that all moving parts have come to a complete standstill and that the ignition key, if present, has been removed,
- if you need to lift or tilt the mower, e.g. for transport;
- when transporting the machine to and from the mowing area;
- when driving outside the lawn;
- when you leave the machine for a short time;
- if you want to adjust the cutting height;
– before removing the grass bag;
– before removing the mulch plug;
– before refuelling. Only refuel when the engine is cold!
• If the engine has a petrol shut-off valve, this must be closed after mowing.
Maintenance and storage
• Insufficient maintenance of your appliance leads to safety-relevant defects.
- Ensure that all screw connections are firmly tightened and that the appliance is in a safe working condition.

The ejection flap may only be opened and the grass bag removed or the mulch plug removed when the engine is switched off.

Never store the machine with petrol in the tank inside a building where petrol vapours could come into contact with open flames or sparks or could ignite.

The exhaust and engine reach very high temperatures during operation. Allow the machine to cool down for at least 15 minutes before carrying out maintenance and cleaning work.
• To avoid the risk of fire, keep the engine, silencer (exhaust) and fuel tank free of grass, leaves or leaking oil (grease).
When tipping up or laying on its side, ensure that no oil or petrol escapes. Fire hazard!
Allow the engine to cool down before parking the machine indoors.
Do not store the machine near open flames or sources of fire such as boilers or heaters.

Check the grass collecting equipment for wear or loss of functionality before each mowing.
Check the condition and tight fit of the blade before every mowing session. The blade fastening screw must always be tightened by an authorised specialist workshop. If the blade screw is tightened too tightly or too loosely, the blade coupling and blade bar can be damaged or come loose, which can lead to serious injury. A worn or damaged blade must always be replaced.
Replacement, regrinding and balancing of the blade must be carried out by an authorised specialist workshop.
An incorrectly assembled blade coupling can cause the blade bar to come loose, which can lead to serious injuries. An improperly sharpened and unbalanced blade can cause strong vibrations and damage the lawn mower.
- Replace worn or damaged parts for safety reasons.

Always wear protective gloves when carrying out maintenance and cleaning work.
- Suitable protective equipment (e.g. suitable protective gloves) must be worn when handling operating materials such as engine oil and fuel.
The data sheets for the operating materials must be observed.

Maintenance and cleaning work may only be carried out on level surfaces with the engine switched off, spark plug connector disconnected and ignition key removed (if present). Regular maintenance is essential to ensure safety and maintain performance.

- Never remove the spark plug connector while the engine is running! Danger: Electric shock.
• Only remove the spark plug connector when the engine has cooled down. Risk of burns!
• Ensure that the spark plug connector is firmly seated! Danger: electric shock.
• If the tank needs to be emptied, this should be done outdoors and when the engine is cold. Ensure that no fuel is spilt.

Always store the equipment in a clean state in a closed, dry room and inaccessible to children.
Always remove the ignition key (if present) during storage, to prevent unauthorised actuation of the starter or mower.
For guarantee/warranty and safety reasons, only original spare parts may be used.
Non-equivalent spare parts can damage the machine and jeopardise your safety.
7 DESCRIPTION OF THE COMPONENTS

1 Safety control bar for motor stop
2 Vario actuation (depending on the model)
3 Drive control bar
4 Tank cap
5 Engine cover
6 Cutting height setting
7 Air filter
8 Spark plug
9 Carrying handle
10 Exhaust protection grid
11 Belt drive covers
12 Oil refill neck with dipstick
13 Ejector flap
14 Fast release (depending on the model)
15 Starter cable handle
16 Starter key (depending on the model)
8 PREPARATION
The following individual parts are included in the packaging for assembling the mower:
• Mower with pre-mounted guide rail
- Catch cloth, catch bag frame
• Tool bag with the following contents:
- Operating instructions with declaration of conformity
- Guarantee conditions
- Various mounting parts.
If, contrary to expectations, a part is missing, please contact your specialist dealer.
ATTENTION
Always disconnect the spark plug connector before installing the handlebar and starter rope holder and when unfolding the handlebar! After installation, push the spark plug connector back on before starting the engine at the latest!
IMPORTANT
Make sure the throttle cables are not kinked or jammed when lifting the handlebars.
IMPORTANT
Make sure that the cables are not pinched, squeezed, twisted or overstretched when the handlebars are folded apart or collapsed! Always run the cables along the outside of the bar connection. A damaged cable may result in a technical defect of the equipment.
Pull the handlebar which is collapsed in a Z-shape upwards into place in the following sequence:
- First lift the bottom part of the handlebar A1, push the ends of this bottom part as far apart as necessary for the locking cams facing the inside to lock into the respective bore holes B1.
- Three different handlebar heights can be set.
- Tighten the wing nuts on both sides by hand B1.
- Lift the top part of the handlebar until the top part and the bottom part of the handlebar are on the same level.
- The quick releases for attachment of the top part and the bottom part of the handlebar are preset by the manufacturer.
- Pull the quick releases upwards to the handlebar.
- Tighten the screws hand-tight.
- Open the quick releases.
- Tighten the screws by a quarter to a half of a turn.
- Pull the quick releases up again and check whether the bars are tightly connected, correct again if necessary.
- Keep this setting. If the tension slacks over time, the screws have to be tightened again.
CAUTION
When you activate the bar height adjustment, when loosening the grip nuts B1 used to secure the bar bottom to the housing (only loosen sufficiently to ensure that the bar can be moved freely) and snapping the locking cams out of the drilled holes on the connecting bar, it is possible that unintentional upsetting of the bar may occur. In addition, this may result in crushed points between the bar bottom and the bar connection/housing. This may result in a risk of injury!
- Remove the starter rope holder (1) from the tool bag.
– Unscrew the screw until both halves can be pushed over the rail.
There is a sticker (2) on the upper rail for positioning the starter rope holder.
ATTENTION
For safety reasons, the starter rope holder may only be fitted in the specified position.
- Press the engine stop switch lever (3) onto the upper part of the handlebar (4) and hold it there, pull out the starter rope (5) and insert it into the starter rope holder.
- Join the two halves together (6) and tighten the screw again. This prevents the starter rope from jumping out.
- The starter rope holder must be mounted / aligned in such a way that the starter rope can move freely and does not rub against any other parts.
EN
- Insert the catch bag frame into the catch cloth with the bracket first. Align the upper seams of the catch cloth with the bracket.
- Press the holding profile onto the frame of the collection bag frame R1.
- Open the ejection flap of the mower upwards.
- Lift the grass catcher bag by the carrying handle, insert the ramp (1) R1 at the catcher bag opening into the ejection opening and hook the grass catcher bag onto the top of the mower housing using its two side hooks S1.
– Fold the ejection flap onto the grass bag.


Safety note!
Explanation of symbols see table on
page 2
You can set the desired cutting height with the adjustment lever (1) on the left of the mower.
– Pull the lever out of the catch and latch again after a lateral move into the desired position.
– The marking on the left of the housing indicates the cutting height.
IMPORTANT
Mowing at the lowest cutting height should only be carried out on level and flat lawns!
Please note that the lower cutting height settings should only be used in optimum conditions. If you set the cutting height too low, the turf may be damaged and possibly even destroyed.
In addition to the cutting height, the travelling speed also influences the cutting pattern and catching result. Adjust the cutting height and forward speed to the height of the grass to be cut; if necessary, do not switch on the drive.
- Behind the motor, first remove the two screws (1) which are used to fix the battery bracket in place V1.
- Take the battery cover (2) and wing screws (3) out of the tool bag.
- Place the battery cover (2) onto the battery, turn them forwards together through 90^ and insert behind the motor V1. Turn back and place on the battery bracket, making sure that the connection cable is facing the left, away from the ejector channel.
- Insert the two screws (1) through the battery cover (2) and screw in place together with the battery bracket.
- Route the cable harness around the battery between the battery and the ejector channel and between the battery and motor U1.
- Connect the battery plug with the counter-plug of the cable form before mowing U1.
To charge the battery, see section "Charging the starter battery (only for electro-start)".
9 BEFORE USING THE LAWNMOWER FOR THE FIRST TIME

Safety note!
Explanation of symbols see table on
page 2
Check all screw connections and the spark plug connector for tightness. Tighten the screws if necessary! In particular, check the fastening of the blade bar (see chapter "Maintenance of the blade bar").
The blade fastening screw must always be tightened by an authorised specialist workshop. If the blade screw is tightened too tightly or too loosely, the blade coupling and blade bar can be damaged or come loose, which can lead to serious injury.
The lawn mower is equipped with an engine stop device.
Before starting up for the first time, check that the engine stop safety switch lever is working properly. When the switch lever is released, the engine and cutter bar must come to a standstill within three seconds.
After being released, the lever must always spring back into the position shown in the "Description of components" illustration.
If this is not the case, an immediate inspection by an authorised specialist workshop is required.
Risk of injury!
If the run-on time of the blade is longer, stop using the appliance and take it to an authorised specialist workshop.
Measuring the run-on time
After starting the combustion engine, the blade rotates and a wind noise is audible.
The run-on time corresponds to the duration of the wind noise after the combustion engine is switched off; it can be measured with a stopwatch.
Safety and protective devices on the machine must not be manipulated or deactivated! Ensure that all protective devices are properly fitted and not damaged!
Charging the starter battery (only for electro-start)
- The starter battery is a maintenance-free dry battery.
– Prior to the initial start-up, it should be charged with the original charger for approx. 24 hours.
For safety reasons and to avoid battery damage, the battery may only be charged within a building in dry rooms and not in direct sunlight.
- To avoid unnecessary power consumption, disconnect the power plug from the charger after charging and disconnect the battery from the charger.
- Avoid storing discharged batteries for a long time without charging them.
- To ensure that your battery is always ready for use, this must be charged at regular intervals once the starting performance diminishes. We recommend that you always charge the battery for approx. 24 hours prior to and after each mowing season or after long breaks between uses. Avoid emptying the battery completely as this may result in a battery failure.
- To prevent unauthorised use of the mower, especially by children, always remove the ignition key and disconnect the cable which leads from the battery to the starter motor by removing the battery plug from the mating plug of the cable harness when you store the lawn mower until the next mowing. However, you should do this at least before you store the mower for the winter break.
- Store the battery in a dry, cool and frost-protected room.
NOTE
The battery can be charged in the assembled or disassembled state.
The charger is made up of two parts and must be put together before initial use. Insert the country-specific plug (1) into the charger (2) and push it forwards until it clicks into place.
IMPORTANT
Use the charger supplied only for charging the respective mower battery. Equally, do not try to charge your mower using a different charger. You could endanger yourself or damage your equipment.
For safety reasons and to avoid damage to the charger, it may only be used indoors and in dry rooms and the battery must not be charged in direct sunlight. Chafed or bent connection cables on the plug-charger can lead to an excessive cable load. Chargers with damaged cables must be replaced.
- Remove the battery cable from the cable harness.
- Connect the battery cable to the original charging device and plug the charging device into a 230 V socket.
Removing the battery
- To remove the battery, detach the cable from the wiring harness, remove the wing nuts.
– Turn the battery with the battery lid by 90^ to the front and remove upwards.
- Connect the battery cable to the original charging device and plug the charging device into a 230 V socket.
IMPORTANT
Please do not connect the charger to the plug connector of the cable harness since this can lead to a fault in the charger.
ATTENTION
The red warning light on the charger lights up during the charging process and goes out after charging has finished.
- After charging the battery, refasten to the battery holder (if the battery was dismounted for charging). Reconnect the battery cable to the cable harness prior to mowing.
ATTENTION
As soon as the battery must be renewed for reasons of age or mechanical damage, it should be handed in as hazardous waste to public collection points of your community or your authorized dealer for proper disposal.

Safety note!
Explanation of symbols see table on
page 2
IMPORTANT
Avoid damage! The engine is supplied without oil. It must be filled with oil before starting for the first time.
Before starting for the first time, after unscrewing the dipstick pour engine oil (see Technical data for quantity and quality) into this opening using a funnel.
– Park the mower on level ground.
Fill oil slowly through the filler neck. Do not overfill. After filling the oil, wait approx. one minute and then check the oil level.
Insert the oil dipstick and screw it tight.
- Check oil level
Remove the dipstick. Use a clean cloth to wipe off the dipstick, then insert it again and screw tightly. Then pull the dipstick out again and read off the oil level. The oil must be at the full mark at the top (arrow). Replenish oil if necessary. The oil level must not be higher than the full mark, however. Insert the oil dipstick again and tighten.
- After initial filling, remove the "NO OIL" label from the top of the engine.
Fill with fuel


Safety note!
Explanation of symbols see table on
page 2
- Only use fresh and clean lead-free standard fuel for refuelling. Fuel with up to 10% ethanol is acceptable.
- Fuel tap should be closed A!
– Unscrew the fuel filler cap.
— Fill with fuel using a funnel up to max. the lower edge of the filler neck.
– Replace the fuel filler cap and screw tight.
10 STARTING THE ENGINE


Safety note!
Explanation of symbols see table on
page 2
Only start the engine while standing behind the mower.
Always position the mower on a level surface that is not overgrown with tall grass (grass that is too tall impedes the start of the blade bar and makes the starting process more difficult). When starting or cranking the engine, the machine must not be tilted upwards but, if necessary, must be tilted by pressing down the guide bar so that the cutting tool points in the direction away from the user, but only as far as is absolutely necessary. Both hands must be on the upper part of the handlebar before the appliance is back on the ground.
CAUTION
Grip the starter rope handle firmly when starting. Otherwise the handle could slip out of your hand. Risk of injury!
IMPORTANT
The engine only runs when the safety switch lever is pressed onto the upper part of the handlebar. As soon as the switch lever is released, it folds back up to its original position by spring force, the engine brake is applied and the engine and cutter bar come to a standstill within three seconds.
- Push and hold the safety control bar (1) on the top tube (2) D
- Slowly pull the starter cable (3) until resistance is felt, then rapidly pull it out. E – the engine begins to run, slowly recoil the cable.
ATTENTION
To ensure a long service life of the battery and starter, the starting process should never be longer than 5 seconds.
ATTENTION
This system has a temperature-controlled automatic choke. The engine runs with optimum power at maximum speed, which is required for a clean cutting pattern (engine speed = blade speed).
ATTENTION
Should the electric starter be defective at some point, then the engine can also be started manually.
- Push and hold the safety control bar (1) on the top tube (2) D.
- Slowly pull the starter cable (3) until resistance is felt; then rapidly pull it out E - the engine begins to run, slowly recoil the cable.
- Release the safety switch lever (1) F
- Remove the ignition key (4) (only for electro-start) P4.
12 STOPPING IN AN EMERGENCY
Release the safety switch lever and drive switch lever.
- The mower stops.
– The blade comes to a standstill.
- The engine stops.
ATTENTION
Before each mowing session, check that the engine stop safety switch lever and the drive switch lever are working properly:
- when the safety switch lever is released, the engine and cutter bar must stop within three seconds.
– the machine must come to an immediate standstill when the drive switch lever is released.
Otherwise, contact the nearest authorised specialist workshop.
13 TRACTION DRIVE
The rear-wheel drive is engaged and disengaged via the drive switch lever (1) on the upper guide rail (2) when the engine is running:
- Tighten and hold the drive switch lever = mower moves.
- Release drive switch lever = mower stops (0 position).
The drive shift lever must always be firmly pulled on the upper guide rail. Improper operation causes wear on the gearbox. The higher resistance of the lever in the initial state is desirable to make it more difficult to operate incorrectly.
NOTE
The rear wheels click when the mower is pushed forwards.
IMPORTANT
The speed may only be adjusted when the engine is running in order to avoid damage!
NOTE
Mowing at too high a speed leads to a poor cutting pattern or catching result.
Always adapt the speed to the conditions. A slower travelling speed should be selected for longer grass sections.
The driving speed is set using the rotary handle on the left.
- To adjust the speed, turn the handle in the desired direction to set the desired travelling speed. The arrow on the rotary handle indicates the travelling speed.
- "Hare" position = fast (max. speed).
- "Turtle" position = slow (min. speed).
14 OPERATION WITH GRASS BAG
Grass catcher


Safety note!
Explanation of symbols see table on
page 2
WARNING
When operating with a grass bag, it must be fully assembled and in perfect technical condition.
IMPORTANT
When handling the grass catcher bag, make sure that the ramp (1) R1 is not bent.
When mowing, ensure that the grass bag is emptied in good time. The TurboSignal on the grass bag shows you the right time to empty it.
There is an indicator on the top of the grass bag that shows whether the grass bag is empty or full:
- When the grass bag is empty and during mowing, the TurboSignal inflates J.
- If the grass catcher bag is full, the TurboSignal collapses; then stop the mowing process immediately and empty the grass catcher bag K.
IMPORTANT
If the collection bag fabric is very dirty, the TurboSignal will not inflate - you should clean the fabric immediately. You can only achieve perfect grass collection with an air-permeable grass bag.
IMPORTANT
Do not clean the grass catcher bag with hot water!
– Switch off the engine.
- Lift the ejection flap.
- Unhook the filled grass bag from the mower using the carrying handle - the ejection flap closes automatically.
- Thoroughly empty the grass catcher bag while holding it by the carrying handle and the recessed grip on the underside of the floor.
Operation without grass bag
WARNING
When operating without a grass bag, the ejection flap on the mower housing must always be closed (flap down).
15 MOWING OPERATION


Safety note!
Explanation of symbols see table on
page 2
Mowing on slopes
ATTENTION
The mower can be used on embankments and slopes with a gradient of up to 46% (25° incline). Slopes exceeding this can lead to engine damage.
For safety reasons, however, we strongly recommend that you do not utilise this theoretical performance potential. Always ensure that you are standing safely.
Walk-behind lawn mowers should never be used on slopes of more than 26% (15° incline). There is a risk of losing stability!
Oil level check
Check the oil level before each mowing Y1. Never run the engine with too little or too much oil. Irreparable damage could occur.
Checking operational safety
The lawn mower is equipped with an engine stop device.
Before each mowing session, check that the engine stop safety switch lever is working properly. When the switch lever is released, the engine and cutter bar must come to a standstill within three seconds.
After being released, the lever must always spring back into the position shown in the "Description of components" illustration.
If this is not the case, an immediate inspection by an authorised specialist workshop is required.
Risk of injury!
If the run-on time of the blade is longer, stop using the appliance and take it to an authorised specialist workshop.
Measuring the run-on time
After starting the combustion engine, the blade rotates and a wind noise is audible. The run-on time corresponds to the duration of the wind noise after the combustion engine has been switched off; it can be measured with a stopwatch.
Safety and protective devices on the machine must not be manipulated or deactivated! The correct functioning of the drive switch lever must also be checked before each mowing operation. When the drive switch lever is released, the machine must come to an immediate standstill. If this is not the case, an immediate check by an authorised specialist workshop is required.
Ensure that all protective devices are properly fitted and not damaged!
EN
To avoid danger, check the condition and tight fit of the blade before each mowing. The blade fastening screw must always be tightened by an authorised specialist workshop. If the blade bolt is tightened too tightly or too loosely, the blade coupling and blade bar can be damaged or come loose, which can lead to serious injury. A worn or damaged blade must always be replaced. (see chapter "Maintenance of the blade bar").
Check the fan, blade coupling and fan housing for wear and fit every 10 operating hours. Also check the screws and nuts of the appliance for tightness and retighten if necessary!
Ensure that the spark plug connector is firmly seated! Danger: electric shock. Never remove the spark plug connector while the engine is running! Danger: electric shock. Only remove the spark plug connector when the engine has cooled down! Risk of burns.
If the mower is blocked, e.g. due to hitting an obstacle, have an authorised specialist workshop check whether any parts of the mower are damaged or deformed. Always have any necessary repairs carried out by an authorised specialist workshop.
If the machine starts to vibrate abnormally or make unusual noises, it must be checked immediately by an authorised specialist workshop.
Time restrictions
In Germany, the temporal operation of lawn mowers is regulated in the "32nd Ordinance on the Implementation of the Federal Immission Control Act (32nd BlmSch-V)".
In addition, regional restrictions are possible (e.g. to protect the midday rest period), about which the responsible local authority can provide you with information.
Tips for lawn care
WARNING
Remove all foreign objects (stones, wood, branches, etc.) from the lawn before each cut; however, pay attention to objects lying around during mowing.
You can obtain instructions on lawn care from your dealer on request. Information and instructions on mowing can also be found on the manufacturer's website.
Mulching
Your lawn mower can be equipped with a mulching kit. The corresponding conversion kit for the mulching system is available from specialist dealers as an accessory (for the order no. of the conversion kit, see "Original spare parts and accessories").
The mulching kit also contains tips and information on mulching. You can also find information about mulching on the manufacturer's homepage.
WARNING
Always have the mower converted to a mulching system by an authorised specialist workshop. An incorrectly assembled blade coupling or a blade bolt that is too tight or too loose can cause the blade bar to come loose, which can lead to serious injuries.
If the grass is too high for mulching, the mulching mower can be converted for mowing with a grass bag in just a few simple steps.
- Switch off the engine.
- Lift the ejection flap.
– Remove the mulching plug from the channel U2
- Hang the grass bag in the holder provided on the mower housing S1
It is not necessary to modify the mulching blade system! In difficult mowing conditions (e.g. wet grass), however, the collection bag filling may be reduced.
The mulching plug must be reinstalled before the appliance can be used as a mulching mower again. To do this, remove the grass catcher bag, insert the mulching plug into the ejection channel and close the ejection flap.
Clean the ejection channel beforehand.
16 MAINTENANCE INTERVALS
IMPORTANT
Avoid damage! Under extreme or exceptional conditions, shorter maintenance periods than those specified below may be required. If you notice any defects, please contact an authorised specialist workshop.
Carry out routine maintenance on the machine in accordance with the following maintenance intervals.
The following maintenance intervals must be carried out in addition to the maintenance work listed in these operating instructions.
Before initial commissioning
- Check the oil level Y1
- Check that all screw connections are tight.
- Check the blade screw and have it tightened by an authorised specialist workshop if necessary.
• Check that the engine stop safety switch lever is working properly.
- Check that the drive switch lever is working properly.
• Check that all protective devices are properly fitted and not damaged.
Before each operation
- Check the lawn and remove all foreign objects.
- Check the area of the boundary wire (if an automatic mower is also used for lawn care).
- Check the oil level Y1
- Check the condition and tight fit of the blade and, if necessary, have the blade screw tightened by an authorised specialist workshop.
• Check that the engine stop safety switch lever is working properly.
- Check that the drive switch lever is working properly.
• Check that all protective devices are properly fitted and not damaged.
- Check the grass catcher for wear or loss of functionality.
After each operation
- Clean the mower.
- Check the blade for damage and wear.
Running-in period - After the first 5 operating hours
- Change the engine oil.
Every 10 operating hours
- Check that all screw connections are tight.
- Check the fan, blade coupling and fan housing for wear and fit.
Every 15-20 operating hours or annually
• Lubricate the wheel bearings.
Every 50 operating hours
- Change the engine oil.
- Clean the air filter W.
• Clean spark plug and adjust electrode gap Y.
During the annual inspection
• Have the air filter replaced W
• Have spark plug replaced Y
- Have the gearbox and the area under the belt cover cleaned.
- Check all Bowden cables and have them adjusted if necessary.
17 CARE AND MAINTENANCE OF THE MOWER
Regular maintenance is the best guarantee for a long service life and trouble-free operation! Inadequate maintenance of your appliance will lead to safety-relevant defects!
Only use original spare parts, as only these guarantee safety and quality!

Safety note!
Explanation of symbols see table on page 2
IMPORTANT
During cleaning and maintenance work, do not place the mower on its side, tilt it forwards O (spark plug upwards) as otherwise start-up difficulties could occur. When tilting the mower up, ensure that the ejection flap is not damaged. Secure the mower when it is raised!
ATTENTION
When tilting the mower upwards, make sure no oil or petrol escapes. Fire hazard!
Remove dirt and grass clippings immediately after mowing. Use a brush or cloth for cleaning.
Do not turn the cutter bar, otherwise engine oil will be pumped into the carburettor/air filter and starting difficulties may occur.
ATTENTION
Do not insert your fingers into the openings of the fan housing and hold the fan firmly. If the blade bar is turned during cleaning, there is a risk of fingers being crushed between the fan and fan housing!
IMPORTANT
Never use a high-pressure cleaner or normal water jet to clean the drive area, engine parts (such as the ignition system, carburettor, etc.), seals and bearings. Damage or expensive repairs may result.
Storage
Always park the appliance in a clean condition in a closed, dry room and out of reach of children. Allow the engine to cool down before parking the machine indoors.
IMPORTANT
Ensure that the cables are not pinched, crushed, twisted or overstretched when folding and unfolding the guide rails! Always route the cables on the outside of the rail connection. A damaged cable can lead to a technical defect in the appliance.
- For space-saving storage space or for transportation, open the quick releases, loosen the wing nuts such that the handlebar can be folded together without resistance in Z-shape above the engine A1.
The locking cams on the lower end of the rail have to snap out of the holes in the rail connection.
Do not kink nor squeeze the throttle cables in the process.
CAUTION
When the rail is moved for transport and storage purposes, the rail may fold over unintentionally during opening of the quick releases, loosening of the handle nuts and snapping of the locking cams out of the holes in the rail connection. In addition, crushing spots can occur between the base and top of the rail and the rail connection/housing. This may result in risk of injury.
- If the equipment has to be carried, do not hold the ejection flap! Hold the carrying handle at the front and at the back N.
Please take the weight of the machine into consideration before lifting it (see Technical data). Lifting large weights can result in health problems.
EN
We recommend to lift or carry the equipment always with two persons.
– Transport the unit upright on all 4 wheels to avoid fuel loss, damage to the equipment and personal injury.
- Park the means of transport on level ground so that the equipment cannot roll away before it is secured.
– Remove the collecting bag and secure it separately during transport.
- Secure the equipment with approved load-securing devices (e.g. tie-down straps with clamping elements) on or inside the vehicle. Tie-down straps are belt bands made of synthetic fibres. Every tie-down strap is marked with a label. The label contains important details for application. The information on this label must be heeded when using the tie-down strap.
- For loaded goods that can roll, we recommend using direct strapping with four lashing straps. Secure the wheels of the equipment in such a way that it does not move during transportation.
NOTE
Do not tighten the belts too firmly. Fixing the equipment too firmly can cause damage.
Maintenance of the blade bar
A sharp blade guarantees optimum cutting performance. Check the condition and tight fit of the blade before every mowing session. The blade fastening screw must always be tightened by an authorised specialist workshop. If the blade screw is tightened too tightly or too loosely, the blade coupling and blade bar can be damaged or come loose, which can lead to serious injury. A worn or damaged blade must always be replaced.
WARNING
Regrinding and balancing of the blade bar must be carried out by an authorised specialist workshop. An improperly sharpened and unbalanced blade can cause strong vibrations and damage the lawn mower.
The cutting edges of the cutter bar may only be reground until the respective value (see figure Q) or the marking (1) on the cutter bar (ring) has been reached. Caution! Observe the grinding angle of 30^ .
Your specialist workshop can check this value (wear limit) for you!
WARNING
A blade that has exceeded the wear limit (marking) can break and be thrown away, which can lead to serious injuries.
Replacing the blade bar
WARNING
The blade bar must be replaced by an authorised specialist workshop. An incorrectly assembled blade coupling or a blade screw that is too tight or too loose can cause the blade bar to come loose, which can lead to serious injuries.
- Only use original cutter bars for replacements. Non-equivalent spare parts can damage the machine and jeopardise your safety.
– Replacement cutter bars must be permanently labelled with the name and/or company logo of the manufacturer or supplier and the part number.
Maintenance of the wheels
Lubricate the wheel bearings once a year or every 15-20 operating hours.
47-DRIVE
- Remove the wheel caps.
- Using a wrench, loosen the hexagonal nut and remove the pulley and the wheels.
- After the bearings have been lubricated with roller bearing grease (for order no., see chapter "Original spare parts and accessories"), push the wheels back in place, attach the washer, fasten using the hexagonal nut and tighten so that the wheels can turn easily but without play. Reattach the wheel cap.
47-VARIO, 47-VARIO E
- Remove the covers in the middle of the wheel caps.
- Use a socket wrench to loosen the hexagon nut, remove the washer, pull the wheels off the wheel axle together with the wheel cap and collar washer. Remove the wheel cap from the wheel.
- After the bearings have been lubricated using the roller bearing grease (for order no., see chapter "Original spare parts and accessories"), push the wheels back on. First insert the collar washer into the wheel, set the wheel cap in place and press until you hear it click. Set the washer in place, fix using the hexagon nut and tighten to such an extent that the wheels can just about turn easily but without play. Replace the covers in the middle of the wheel caps.
All models
Maintenance of the rear wheel drive (Figure R)
Lubricate the wheel bearings once a year or every 15-20 operating hours.
- Remove the wheel cap cover on both sides.
- Use a socket wrench to loosen the hexagon nut, remove the washer, pull the drive wheels off the wheel axle together with the wheel cap and collar washer.
- Remove the wheel cover, paying attention to the thrust washer.
- Remove the dirt from the wheel cover, the freewheel pinion on the gear shaft and the sprocket on the inside of the wheel.
NOTE
Do not remove the freewheel pinion from the gearbox shaft!
- Lubricate the bearings using the roller bearing grease (for order no., see chapter "Original spare parts and accessories"). Do not lubricate the free-wheeling pinion and gear rim in the wheel!
- Fit the wheel cover and slide the thrust washer onto the wheel axle. When fitting the drive wheel, make sure that the pinion and sprocket mesh, possibly twisting the wheel slightly on the axle.
- If the wheel cap has loosened from the wheel, insert the collar washer into the wheel first as shown in Figure R, set the wheel cap in place and press until you hear it click. Set the washer in place, fix using the hexagon nut and tighten to such an extent that the wheels can just about turn easily but without play. Replace the wheel cap covers.
Maintenance of the drive
- For the belt drive to function properly, it is essential that the Bowden cable for switching the drive on/off runs smoothly.
– The Bowden traction mechanism has been set ready for operation at the works and requires no adjustment.
- The Bowden cable can only be adjusted by a specialist workshop.
Replacing the drive V-belt
The drive V-belt may only be replaced by an authorised specialist workshop.
Recharging the starter battery (only for electro-start) IMPORTANT
Use the charger supplied only for charging the respective mower battery. Equally, do not try to charge your mower using a different charger. You could endanger yourself or damage your equipment.
For safety reasons and to avoid damage to the charger, it may only be used indoors and in dry rooms and the battery must not be charged in direct sunlight. The battery can be charged in the assembled or disassembled state.
- Disconnect battery cable from cable harness.
- Removing the battery
To remove the battery, detach the cable from the wiring harness, remove the wing nuts. Turn the battery with the battery lid by 90^ to the front and remove upwards.
- Connect the battery cable to the original charging device and plug the charging device into a 230 V socket. (See also Chapter "Charging the starter battery (only for electro-start)")
- After charging the battery, refasten to the battery holder (if the battery was dismounted for charging). Reconnect the battery cable to the cable harness prior to mowing. (See also Chapter "Fitting the charged starter battery (only for electro-start) (Figure V1 + U1)")
18 ENGINE MAINTENANCE

Safety note!
Explanation of symbols see table on page 2
WARNING
Avoid injuries! Engine exhaust gases contain carbon monoxide and can cause serious illness or death.
Do not operate the engine in enclosed spaces such as garages, even if doors and windows are open. Move the machine outside before starting the engine.
IMPORTANT
During cleaning and maintenance work, do not place the mower on its side, tilt it forwards O (spark plug upwards) as otherwise start-up difficulties could occur. When tilting the mower up, ensure that the ejection flap is not damaged.
Secure the mower when it is raised!
ATTENTION
When tilting the mower upwards, make sure no oil or petrol escapes. Fire hazard!
Regular performance of the prescribed maintenance and care work is a prerequisite for the long-lasting and trouble-free operation of the engine and also a basic requirement for warranty claims.
Always keep the engine clean, especially on the outside; the silencer and cylinder area in particular must always be free of foreign objects (e.g. grass clippings). The exhaust and engine reach very high temperatures during operation. Flammable foreign objects such as leaves, grass etc. can ignite.
Perfect cooling is also only guaranteed if the cylinder fins are always clean.
IMPORTANT
Never clean the engine with a high-pressure cleaner or normal water jet. Damage or expensive repairs may result.
Oil change
NOTE
For environmental reasons, we recommend having the oil changed by a specialised workshop.
The first oil change with a new engine is required after approx. 5 operating hours.
Later, approximately every 50 operating hours or at least once per mowing season.
Before tipping the engine or the appliance to drain the oil, empty the petrol tank and run the engine until it stops due to lack of fuel.
- Switch off the engine and remove the spark plug connector.
- Change the oil while the engine is warm.
EN
- To replace the oil, remove the dipstick from the oil filler neck and set the mower on its side so that the used oil can drain into a container.
Make sure that the mower is not laid on its air filter or carburettor side, as this could cause starting difficulties or damage to the engine. Do not drain used oil into the sewage system or the ground, but dispose of it in accordance with local regulations.
- Set the mower upright and fill with brand oil (see Technical data for quantity and quality) at the nozzle. Screw in the dipstick and check the oil level (see "Check oil level" and "Fill with oil (Figure Y1 )")! If the oil level is correct, insert and tighten the dipstick.
Note:
IMPORTANT
Never start or run the engine with the air filter removed.
- Loosen the latch taps of the air filter cover (4) from the air filter housing (1) with a screwdriver and remove the air filter cover (3).
- Remove the air filter (2).
– Clean the paper filter element every 50 operating hours.
Knock gently onto a smooth surface if soiled lightly. Replace if heavily soiled or damaged. Do not wash out paper filters, nor blow them out with compressed air or grease them.
– Insert the air filter (2).
— Place the air filter cover (3) on the filter and engage the latch taps of the air filter cover (4) in the air filter housing (1).
In the case of unfavourable operation conditions (severe formation of dust), cleaning is required after every mowing process. Replace the filter annually or every 200 operation hours.
(Please see section "Original spare parts and accessories" for Order No. of filter)
To check for wear, remove the spark plug connector (1) and unscrew the spark plug (2). If the electrode is badly worn, the spark plug must always be replaced (for order no., see chapter "Original spare parts and accessories").
Otherwise, it is sufficient to clean the spark plug with a steel brush and adjust the electrode gap to 0.7 - 0.8 mm. Screw the spark plug into the engine by hand (make sure it has a sealing ring) and tighten hand-tight using the socket spanner. Press on the spark plug connector. Replace the spark plug annually.
Winterising the engine in accordance with regulations (or prolonged non-use)
– Empty the petrol tank and run the engine until it stops due to lack of fuel.
- Switch off the engine and remove the spark plug connector.
- Drain the oil while the engine is still warm. Fill with fresh oil (see Technical data for quantity and quality).
- Remove grass and cuttings deposits from the cylinder and cylinder ribs, under the engine cover and around the silencer.
— Always store the appliance in a clean condition in a closed, dry room out of the reach of children.
19 TROUBLESHOOTING
| Fault | Possible cause | Remedy |
| Engine does not start | Shift lever not pressed down. | Press the shift lever onto the upper part of the handlebar D. |
| Fuel tank empty. | Refuel with clean and fresh fuel. |
| Spark plug connector loose. | Press on the spark plug connector or have it checked by an authorised specialist workshop. |
| Spark plug defective or dirty or electrodes burnt out. | Replace or clean spark plug, set electrode gap to 0.7 - 0.8 mm Y. |
| Engine is getting too much petrol (spark plug wet). | Have it checked by an authorised specialist workshop. |
| Air filter dirty. | Clean or replace air filter insert W. |
| Battery not charged (only for electro-start). | Charge battery W1, X1. |
| Start-up takes longer than 5 seconds or is repeated too often (only for electro-start). | If you have difficulties in starting up, the battery must be charged. |
| Connection cable between the ignition key, battery and engine is loose or without contact (only for electro-start). | Connect the battery connector with the mating connector on the harness U1 or check it or have it checked by an authorised workshop. |
| Engine performance decreases | Air filter dirty. | Clean or replace air filter insert W. |
| Spark plug sooted up. | Have it checked by an authorised specialist workshop. |
| Fuel overaged or contaminated. | Empty the petrol tank and fill with fresh fuel. |
| Engine runs irregularly | Air filter dirty. | Clean or replace air filter insert W. |
| Spark plug sooted up. | Have it checked by an authorised specialist workshop. |
| Have it checked by an authorised specialist workshop. |
| Mower does not run | Drive switch lever not pulled. | Pull drive switch lever G. |
| Have it checked by an authorised specialist workshop. |
| Travelling speed cannot be regulated | | Have it checked by an authorised specialist workshop. |
| Strong shocks (vibrations) | | Have it checked by an authorised specialist workshop. |
| Cut unclean, lawn turns yellow | Blade bar blunt. | Have them reground and balanced by an authorised specialist workshop Q. |
| Cutting height too low. | Set a higher cutting height I. |
| Engine speed too low. | Have it checked by an authorised specialist workshop. |
| Mowing at too high a speed. | Adjust the mowing speed, switch off the drive if necessary. |
| Mowing paths not sufficiently overlapped. | If the grass is tall, the mowing paths may need to overlap further. |
| Matted lawn. | Noticeable improvement can be achieved by using a scarifier. |
| Ejector blocked | TurboSignal ignored J + K. | Empty collection bag L. |
| Engine speed too low. | Have it checked by an authorised specialist workshop. |
| Cutting height too low when grass is too high. | Set a higher cutting height I. |
| Mowing at too high a speed. | Adjust the mowing speed, switch off the drive if necessary. |
| Grass is moist. | Allow the lawn to dry. |
| The mulched grass looks bad: Clumps, excessive amounts of clippings, rough cut | Blade bar blunt. | Have them reground and balanced by an authorised specialist workshop. |
| Mulching rule not followed (cut max. 1/3 of the grass height; the grass height to be cut must be lower than 10 cm). | Set a higher cutting height I. Convert mower to rear ejection U2 + S1 and mow lawn with high cutting setting first. |
| Driving speed too high. | Adjust the driving speed, switch off the drive if necessary. |
| Grass build-up under the mower deck. | Set a higher cutting height I. |
| Mowing paths not sufficiently overlapped. | If the grass is tall, the mowing paths may need to overlap further. |
| Grass is moist. | Set a higher cutting height I. Allow the lawn to dry. |
In the event of faults and defects not listed here, please contact your nearest authorised specialist workshop.
Repairs that require specialist knowledge should only be carried out by a specialist. Your authorised specialist workshop will also be happy to help you if you do not wish to carry out the maintenance work described here yourself.
20 TECHNICAL DATA
Engine
| Engine | 4-stroke motor, SABO V196 (47-DRIVE, 47-VARIO)4-stroke motor, SABO V196 E (47-VARIO E) |
| Engine displacement | 196 cm^3 |
| Engine speed | 2800 min^-1 |
| Rated power | 3.4 kW |
| Electrode gap | 0.7 – 0.8 mm |
| Battery (only for electro-start models) | 12 V / 5.4 Ah |
| Fuel | Unleaded standard petrol, with max.10% ethanol |
| Tank capacity | approx. 1.0 litres |
| Lubricating oil | SAE 10W-30, SAE 10W-40, API SE or similar brand name oil, Minimum quality SF |
| Oil quantity | 0.5 litres |
Mower
| Housing | Die-cast aluminium |
| Cutting width | 470 mm |
| Cutting heights | Central,25, 30, 40, 45, 55, 60, 70, 80 mm |
| Height-adjustable guide rail | 3-way |
| Grass bag volume | 65 litres |
| Travelling speed | 3.6 km/h (47-DRIVE)2.7 – 4.3 km/h (47-VARIO, 47-VARIO E) |
| Weight | 38.0 kg (47-DRIVE)38.5 kg (47-VARIO)41.0 kg (47-VARIO E) |
| Length | 1625 mm |
| Width | 500 mm |
| Height | 935 mm |
| Front / rear wheels | ∅ 180 mm / ∅ 200 mm |
| Front bearing | Cup-and-cone bearing |
| Rear bearing | Cup-and-cone bearing |
Sound power level
47-DRIVE
| Measured sound power level; measured according to EN ISO 5395-2 | L_WA = 94.8 dB(A) |
| Measurement uncertainties; according to ISO 4871 | 0.45 dB |
47-VARIO, 47-VARIO E
| Measured sound power level; measured according to EN ISO 5395-2 | L_WA = 95.1 dB(A) |
| Measurement uncertainties; according to ISO 4871 | 1.5 dB |
All models
| Guaranteed sound power level; measured according to 2000/14/EC | L_WA = 96 dB(A) |
Sound pressure level
| Emission sound pressure level at the operator's workplace; measured according to EN ISO 5395-2 | L_pA = 84 dB(A) |
| Measurement uncertainties; according to ISO 4871 | 1.5 dB |
Vibrations
47-DRIVE
| Vibrations on the guide rail; measured according to EN ISO 5395-2 | a_hw = 4.5 m/s |
| Measurement uncertainties; according to EN 12096 | 2.25 m/s |
47-VARIO, 47-VARIO E
| Vibrations on the guide rail; measured according to EN ISO 5395-2 | a_iwW = 6.9 m/s |
| Measurement uncertainties; according to EN 12096 | 2.8 m/s |
21 ORIGINAL SPARE PARTS AND ACCESSORIES
| Roller bearing grease | SAA11300 |
| Spark plug | SAE10005 |
| Air filter | SAE10006 |
| Conversion kit to mulching system | BSA625 |
| Blade bar | For safety reasons, the blade bar may only be replaced by an authorised specialist workshop.This specialist workshop also has the corresponding spare part number for the blade bar. |
1 Inleiding....2
14 WERKING MET GRASZAK
Grasvanger


Nota de seguridad
(Figura V1 + U1)....6
Nota di sicurezza!
Name and address of the person in the community authorized to compile the technical construction file:
Name and address of the person in the community authorized to compile the technical construction file:
Name and address of the person in the community authorized to compile the technical construction file: