
U304.7 IEM - Wireless audio system LD Systems - Free user manual and instructions
Find the device manual for free U304.7 IEM LD Systems in PDF.
| Product Type | Wireless In-Ear Monitoring System |
| Brand | LD Systems |
| Model | U304.7 IEM |
| Frequency Band | 470 - 490 MHz |
| Number of RF Channels | 12 |
| Range | Up to 100 m |
| Frequency Response | 50 Hz - 16 kHz |
| Distortion (THD+N @ 1 kHz) | < 0.5% |
| Signal-to-Noise Ratio | 90 dB (A-weighted) |
| Transmission Type | FM, mono/stereo |
| HF Output Power | 10 mW |
| Transmitter Power Supply | 12-18 V DC power adapter (included) |
| Receiver Power Supply | 2 AA 1.5 V batteries (alkaline) |
| Receiver Battery Life | Approx. 10 hours |
| Transmitter Dimensions (W x H x D) | 212 x 43 x 123 mm |
| Transmitter Weight | 0.66 kg (with antenna) |
| Receiver Dimensions (W x H x D) | 64 x 103 x 24 mm |
| Receiver Weight | 0.085 kg |
| Transmitter Input Connectors | 2 x Combo XLR/TRS 6.3 mm (balanced/unbalanced) |
| Receiver Headphone Output | 3.5 mm stereo jack |
| Main Functions | Channel selection, mono/stereo mode, L/R level adjustment, level and RF indicator, belt clip |
| Maintenance and Cleaning | Dry cloth; do not use liquids |
| Safety | Do not open the device; use only the supplied adapter; observe safety distances |
| Spare Parts and Repairability | Contact the manufacturer or an authorized service center; replace fuses with same type |
| General Information | Professional use; license required depending on country; 19" rack mount kit included |
Frequently Asked Questions - U304.7 IEM LD Systems
User questions about U304.7 IEM LD Systems
0 question about this device. Answer the ones you know or ask your own.
Ask a new question about this device
Download the instructions for your Wireless audio system in PDF format for free! Find your manual U304.7 IEM - LD Systems and take your electronic device back in hand. On this page are published all the documents necessary for the use of your device. U304.7 IEM by LD Systems.
USER MANUAL U304.7 IEM LD Systems
natural_image
Exterior view of a black U300 IEM R audio recording device with earbuds and external speakers (no visible text or symbols on main body)U300® IEM SERIES
WIRELESS IN-EAR MONITORING SYSTEMS
CONTENTS / INHALTSVERZEICHNIS / CONTENU / CONTENIDO / TREŚĆ / CONTENUTO
ENGLISH
SAFETY INFORMATION 3
INTRODUCTION
CONNECTIONS, CONTROL AND DISPLAY ELEMENTS 5
TROUBLESHOOTING
SPECIFICATIONS
MANUFACTURER DECLARATION 10
DEUTSCH
SICHERHEITSHINWEISE
EINFÜHRUNG
We have designed this product to operate reliably over many years. LD Systems stands for this with its name and many years of experience as a manufacturer of high-quality audio products. Please read this User's Manual carefully, so that you can begin making optimum use of your LD Systems product quickly.
You can find more information about LD-SYSTEMS at our Internet site www.LD-SYSTEMS.COM
SAFETY INFORMATION
- Please read these instructions carefully.
- Keep all information and instructions in a safe place.
- Follow the instructions.
- Observe all safety warnings. Never remove safety warnings or other information from the equipment.
- Use the equipment only in the intended manner and for the intended purpose.
- Use only sufficiently stable and compatible stands and/or mounts (for fixed installations). Make certain that wall mounts are properly installed and secured. Make certain that the equipment is installed securely and cannot fall down.
- During installation, observ e the applicable safety regulations for your country.
- Never install and operate the equipment near radiators, heat registers, ovens or other sources of heat. Make certain that the equipment is always installed so that is cooled sufficiently and cannot overheat.
- Never place sources of ignition, e.g., burning candles, on the equipment.
- Ventilation slits must not be blocked.
- Keep a minimum distance of 20 cm around and above the device.
- Do not use this equipment in the immediate vicinity of water (does not apply to special outdoor equipment - in this case, observe the special instructions noted below. Do not expose this equipment to flammable materials, fluids or gases. Avoid direct sunlight!
- Make certain that dripping or splashed water cannot enter the equipment. Do not place containers filled with liquids, such as vases or drinking vessels, on the equipment.
- Make certain that objects cannot fall into the device.
- Use this equipment only with the accessories recommended and intended by the manufacturer.
- Do not open or modify this equipment.
- After connecting the equipment, check all cables in order to prevent damage or accidents, e.g., due to tripping hazards.
- During transport, make certain that the equipment cannot fall down and possibly cause property damage and personal injuries.
- If your equipment is no longer functioning properly, if fluids or objects have gotten inside the equipment or if it has been damaged in anot her way, switch it off immediately and unplug it from the mains outlet (if it is a powered device). This equipment may only be repaired by authorized, qualified personnel.
- Clean the equipment using a dry cloth.
- Comply with all applicable disposal laws in your country. During disposal of packaging, please separate plastic and paper/cardboard
- Plastic bags must be kept out of reach of children.
- Please note that changes or modifications not expressly approved by the party responsible for compliance could void the user's authority to operate the equipment.
FOR EQUIPMENT THAT CONNECTS TO THE POWER MAINS
- CAUTION: If the power cord of the device is equipped with an earthing contact, then it must be connected to an outlet with a protective ground. Never deactivate the protective ground of a power cord.
- If the equipment has been exposed to strong fluctuations in temperature (for example, after transport), do not switch it on immediately. Moisture and condensation could damage the equipment. Do not switch on the equipment until it has reached room temperature.
- Before connecting the equipment to the power outlet, first verify that the mains voltage and frequency match the values specified on the equipment. If the equipment has a voltage selection switch, connect the equipment to the power outlet only if the equipment values and the mains power values match. If the included power cord or power adapter does not fit in your wall outlet, contact your electrician.
- Do not step on the power cord. Make certain that the power cable does not become kinked, especially at the mains outlet and/or power adapter and the equipment connector.
- When connecting the equipment, make certain that the power cord or power adapter is always freely accessible. Always disconnect the equipment from the power supply if the equipment is not in use or if you want to clean the equipment. Always unplug the power cord and power adapter from the power outlet at the plug or adapter and not by pulling on the cord. Never touch the power cord and power adapter with wet hands.
- Whenever possible, avoid switching the equipment on and off in quick succession because otherwise this can shorten the useful life of the equipment.
- IMPORTANT INFORMATION: Replace fuses only with fuses of the same type and rating. If a fuse blows repeatedly, please contact an authorised service centre.
- To disconnect the equipment from the power mains completely, unplug the power cord or power adapter from the power outlet.
- If your device is equipped with a Volex power connector, the mating Volex equipment connector must be unlocked before it can be removed. However, this also means that the equipment can slide and fall down if the power cable is pulled, which can lead to personal injuries and/or other damage. For this reason, always be careful when laying cables.
- Unplug the power cord and power adapter from the power outlet if there is a risk of a lightning strike or before extended periods of disuse.

CAUTION:
To reduce the risk of electric shock, do not remove cover (or back). There are no user serviceable parts inside. Maintenance and repairs should be exclusively carried out by qualified service personnel.
The warning triangle with lightning symbol indicates dangerous uninsulated voltage inside the unit, which may cause an electrical shock.

The warning triangle with exclamation mark indicates important operating and maintenance instructions.

Warning! This device is designed for use below 2000 metres in altitude.

Warning! This product is not intended for use in tropical climates.
CAUTION! HIGH VOLUMES IN AUDIO PRODUCTS!
This device is meant for professional use. Therefore, commercial use of this equipment is subject to the respectively applicable national accident prevention rules and regulations. As a manufacturer, Adam Hall is obligated to notify you formally about the existence of potential health risks. Hearing damage due to high volume and prolonged exposure: When in use, this product is capable of producing high sound-pressure levels (SPL) that can lead to irreversible hearing damage in performers, employees, and audience members. For this reason, avoid prolonged exposure to volumes in excess of 90 dB.
INTRODUCTION
Unlimited freedom of movement on the stage and always perfect monitor sound directly in your ear – this is why we developed the wireless U300 in-ear monitoring systems in Germany. With their clear, modern design and easy operation, they are the perfect choice, and not just for beginners. The reliable range up to 100 m and a frequency response of 50 Hz to 16 kHz guarantee professional performance. Up to six systems can be used at the same time. U300 in-ear sets are available for use in 5 frequency bands:
LDU3047IEM - in-ear monitoring system 470 - 490 MHz
LDU3051IEM - in-ear monitoring system 514 - 542 MHz
LDU305IEM - in-ear monitoring system 584 - 608 MHz
LDU306IEM - in-ear monitoring system 655 - 679 MHz
LDU308IEM - in-ear monitoring system 823 - 832 MHz + 863 - 865 MHz
- Reliable wireless transmission with a range of up to 100 m
- Low-reaching frequency response
- 12 selectable channels
- Choice of stereo or mono mode
- Up to 6 systems can be used simultaneously
• 10-hour bodypack operating time with two AA batteries - Unlimited number of bodypacks can be set to the same transmission frequency
• Channel and RF reception displayed on bodypack
• Transmitter in rugged metal casing with stereo level display - Removable antenna with BNC connection
- 19" rack assembly kit included.
Scope of delivery of LDU30xIEM
transmitter, pocket receiver, BNC antenna, power pack, 2x AA batteries, 19" rack installation kit, operating instructions
Scope of delivery of LDU30XIEMHP
transmitter, pocket receiver, stereo ear receiver, BNC antenna, power pack, 2x AA batteries, 19" rack installation kit, operating instructions
Note
Use of the wireless microphone system may require a license depending on the country where it is used. For detailed information, please contact the relevant authority in your country.
CONNECTIONS, CONTROL AND DISPLAY ELEMENTS
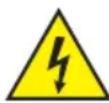
1 POWER
On/off switch. Press and hold this button for a duration of approx. 1 second in order to turn the device on or off.
2 CHANNEL DISPLAY
Illuminated LC display to show the radio channel.
③ CHANNEL + / -
Switch to set the radio channel 1 to 12. In order to establish a radio connection between the transmitter and receiver, the radio frequency of both devices must match.
4 LEFT / RIGHT
Knob to adjust the input signal level of the left and right audio channels. In stereo mode, the signals of the left and right channel should have the same level in order to have a homogeneous stereo signal in the pocket receiver. Use the equalizer in mono mode to create a custom mix of the left and right channels, meaning the volume of both channels can be set as needed (example: left channel = mixer mono sum, right channel = solo vocals).
5 LEVEL DISPLAY L / R
5 segment LED chain to display the audio input signal level. For an optimum signal-to-noise ratio, level the left and right signals as high as possible, but make sure that the red PEAK LED does not light up, or only briefly, to avoid signal distortion.
6 STEREO / MONO
Switch to set the operating mode.
STEREO: A pending stereo signal is transmitted to the pocket receiver in stereo.
MONO: Pending audio signals are summed internally and transmitted to the pocket receiver in mono.
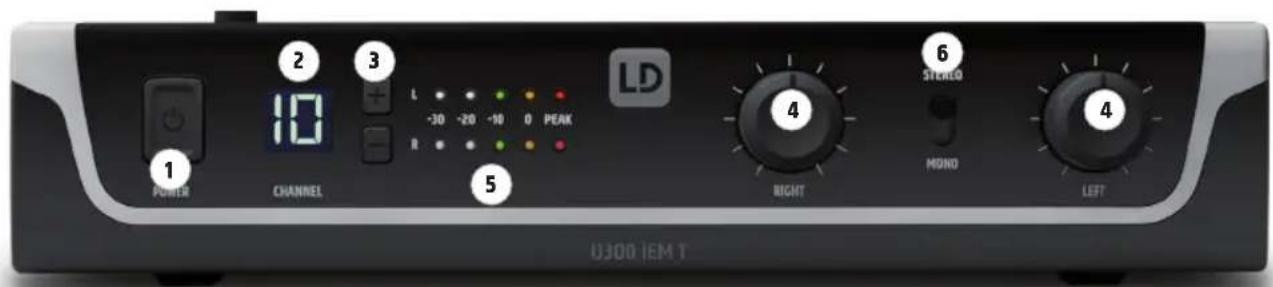
7 DC CONNECTOR
Low-voltage connector to supply power to the device. Please use only the provided power adapter.
8 CABLE STRAIN RELIEF
Use the strain relief for the flexible cable of the power adapter to protect the transmitter's low-voltage connector and the power adapter's low-voltage plug from unintentional damage and to avoid pulling out the connector inadvertently.
9 AF INPUT LEFT / RIGHT
XLR/6.3 mm jack combination socket for the left and right input channel (XLR = symmetric, jack = asymmetric).
10 ANTENNA
BNC connector for the provided transmitter antenna.
11 TRANSMITTER ANTENNA
Transmitter antenna with BNC connector.

12 DISPLAY
Illuminated DC display with dual functions. When switched on, the display illuminates for several seconds and shows the channel number currently set. If the batteries have low power, the display begins to flash red.
⑬ CHANNEL + / -
Switch to select radio channels 1 to 12. Press and hold one of the two buttons for approx. 2 seconds in order to change the setting. The currently set channel number will begin to flash and you can select the desired radio channel using the + and - buttons. The flashing stops after approx. 5 seconds, the display illumination goes out, and the selected radio channel is activated. In order to establish a radio connection between the transmitter and receiver, the channel number or radio frequency of both devices must match.
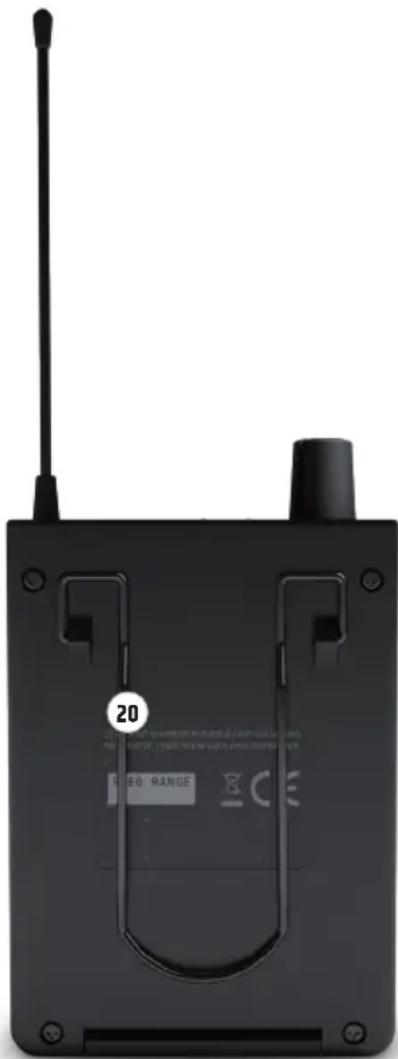
14 ANTENNA
Antenna of the pocket receiver. For optimal reception, do not obscure or bend.
15 BATTERY COMPARTMENT
To replace the batteries, open the battery compartment of the pocket receiver by simultaneously pressing on the markings on both sides of the battery compartment cover and open the cover towards the front. Remove the used batteries and insert fresh batteries (2x AA/LR6, alkaline) as depicted in the battery compartment. Now fold the battery compartment cover back onto the housing until the lid clicks into place. Do not use the receiver for extended periods of time, and please remove the batteries in order to prevent damage to the receiver due to leaky batteries.
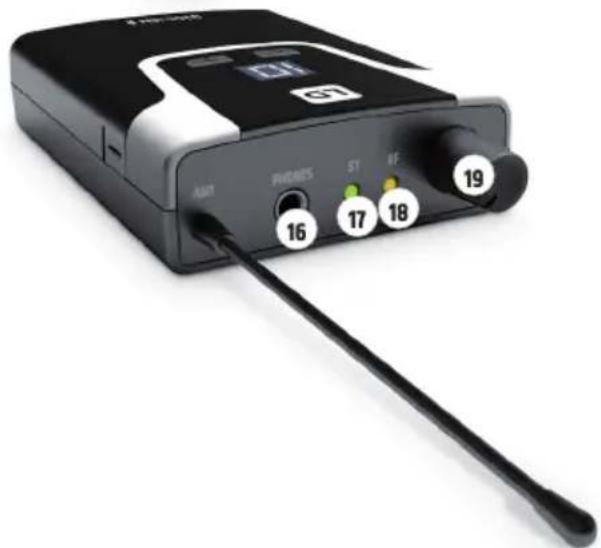
natural_image
Black electronic device with labeled ports (no readable text or symbols beyond numbers)
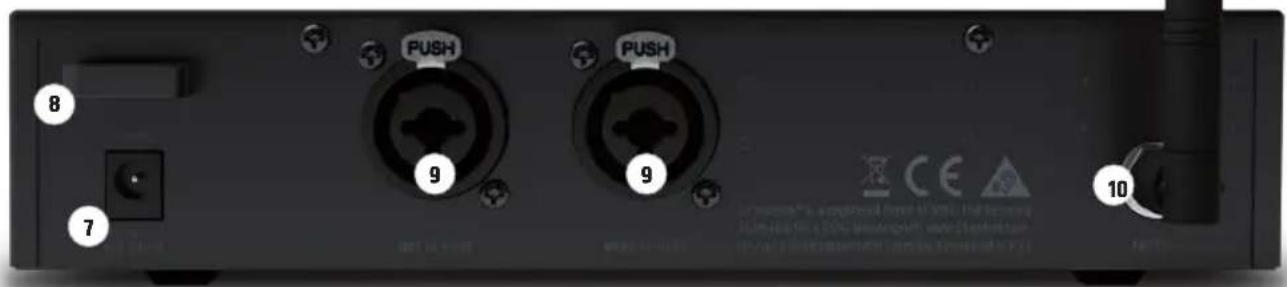
PHONES
3.5 mm stereo jack socket to connect earphones or headphones.

ST
The green ST status LED illuminates when stereo mode is activated on the transmitter. The LED goes out as soon as mono mode is activated.

RF
The yellow RF LED display illuminates when a radio signal is present. If the LED does not illuminate while in operation, check whether the receiver's radio channel matches that of the transmitter, or reduce the distance between the receiver and transmitter.

ON / OFF - VOL
Turn the volume knob clockwise over the stop to turn the receiver on and further to the right to increase the volume. Turn the knob counterclockwise to reduce the volume and past the stop to turn off the receiver. Always keep the volume at a comfortable level to avoid hearing damage.

BELT CLIP
There is a belt clip on the rear side of the pocket receiver that can be used to attach the receiver to a waistband, belt, or similar.
TROUBLESHOOTING
| PROBLEM DISPLAY SOLUTION | ||
| No audio signal or level too low | Receiver: RF LED is not illuminating. Verify that the transmitter is switched on and connected. | |
| Receiver: RF LED is not illuminating. Battery levels are okay.Transmitter: Device is switched on. | Verify that the radio frequency of the transmitter and receiver matches.Reduce the distance between transmitter and receiver.Make sure that the transmitter and receiver and are in a direct line of sight.Make sure that the receiver antenna is intact and not obscured. | |
| Receiver: RF LED illuminates. Increase the signal level on the transmitter or increase the volume of the pocket receiver.Verify that the headphones are correctly connected. | ||
| Distortions and interference | Receiver: RF LED illuminates. | Remove possible source of interference (digital devices, other radio systems). |
| Distorted sound Transmitter: PEAK LED illuminates.Receiver: LC display flashes red. | Lower the signal level of the transmitter.Replace the batteries in the pocket receiver. | |
SPECIFICATIONS
Model Number: LDU3047IEMT LDU3051IEMT LDU305IEMT LDU306IEMT LDU308IEMT
| Product Type: In-Ear Monitoring In-Ear Monitoring In-Ear Monitoring In-Ear Monitoring In-Ear Monitoring | |||||
| Type: Transmitter Transmitter Transmitter Transmitter | |||||
| Transmission frequency range: | 470 - 490 MHz 514 - 542 MHz 584 - 608 MHz 655 - 679 MHz 823 - 832 MHz & | 863 - 865 MHz | |||
| RF-Channels: 12 12 12 12 12 | |||||
| Transmission method: | FM, mono/stereo | FM, mono/stereo | FM, mono/stereo | FM, mono/stereo | FM, mono/stereo |
| Rated HF output power: | 10 mW | 10 mW | 10 mW | 10 mW | 10 mW |
| Antenna gain: | 2.15 dBi | 2.15 dBi | 2.15 dBi | 2.15 dBi | 2.15 dBi |
| Antenna connector: | BNC | BNC | BNC | BNC | BNC |
| Audio Frequency response +/- 1,5dB: | 50 Hz - 16000 Hz | 50 Hz - 16000 Hz | 50 Hz - 16000 Hz | 50 Hz - 16000 Hz | 50 Hz - 16000 Hz |
| THD+N @ 1kHz: | < 0.5% | < 0.5% | < 0.5% | < 0.5% | < 0.5% |
| S/N -Ratio @ 1kHz, A-weighted: | 90 dB | 90 dB | 90 dB | 90 dB | 90 dB |
| Dynamic range @ 1kHz, non-weighted: | 88 dB | 88 dB | 88 dB | 88 dB | 88 dB |
| Input Sensitivity: | -4.5 dBu (all gain controls full, stereo mode) | -4.5 dBu (all gain controls full, stereo mode) | -4.5 dBu (all gain controls full, stereo mode) | -4.5 dBu (all gain controls full, stereo mode) | -4.5 dBu (all gain controls full, stereo mode) |
| Max. Input Level: | +15dBu (all gain controls set to 9 o'clock, stereo mode) | +15dBu (all gain controls set to 9 o'clock, stereo mode) | +15dBu (all gain controls set to 9 o'clock, stereo mode) | +15dBu (all gain controls set to 9 o'clock, stereo mode) | +15dBu (all gain controls set to 9 o'clock, stereo mode) |
| CMRR IEC: | 45 dB | 45 dB | 45 dB | 45 dB | 45 dB |
| Line inputs: | 2 | 2 | 2 | 2 | 2 |
| Line input connectors: | XLR (balanced) / Combo TRS 6.3 mm | XLR (balanced) / Combo TRS 6.3 mm | XLR (balanced) / Combo TRS 6.3 mm | XLR (balanced) / Combo TRS 6.3 mm | XLR (balanced) / Combo TRS 6.3 mm |
| Input impedance: | 8.5 k ohms | 8.5 k ohms | 8.5 k ohms | 8.5 k ohms | 8.5 k ohms |
| Controls: | Input level L + R controls, mono/ste-reo -switch, power on-off -button | Input level L + R controls, mono/ste-reo -switch, power on-off -button | Input level L + R controls, mono/ste-reo -switch, power on-off -button | Input level L + R controls, mono/ste-reo -switch, power on-off -button | Input level L + R controls, mono/ste-reo -switch, power on-off -button |
| Indicators: | 2 Digit backlit LC-display (channel number), 2x 5 segment LED VU Meter | 2 Digit backlit LC-display (channel number), 2x 5 segment LED VU Meter | 2 Digit backlit LC-display (channel number), 2x 5 segment LED VU Meter | 2 Digit backlit LC-display (channel number), 2x 5 segment LED VU Meter | 2 Digit backlit LC-display (channel number), 2x 5 segment LED VU Meter |
| Power Consumption (nominal): | 1.7 W | 1.7 W | 1.7 W | 1.7 W | 1.7 W |
| Operating Voltage: | 12 - 18 V DC | 12 - 18 V DC | 12 - 18 V DC | 12 - 18 V DC | 12 - 18 V DC |
| Voltage input connector: | 5.3 mm barrel jack, plus inside | 5.3 mm barrel jack, plus inside | 5.3 mm barrel jack, plus inside | 5.3 mm barrel jack, plus inside | 5.3 mm barrel jack, plus inside |
| Ambient Temperature (in operation): | 0°C - 35°C | 0°C - 35°C | 0°C - 35°C | 0°C - 35°C | 0°C - 35°C |
| Relative Humidity: <80% | (non-condensing) | <80% (non-condensing) | <80% (non-condensing) | <80% (non-condensing) | <80% (non-condensing) |
| Dimensions (W x H x D): | 212 x 43 x 123 mm | 212 x 43 x 123 mm | 212 x 43 x 123 mm | 212 x 43 x 123 mm | 212 x 43 x 123 mm |
| Weight: 0.66 kg(with antenna) | 0.66 kg(with antenna) | 0.66 kg(with antenna) | 0.66 kg(with antenna) | 0.66 kg(with antenna) | |
| Accessories included: Power adapter, BNC-antenna, 19" rack mount kit | Power adapter, BNC-antenna, 19" rack mount kit | Power adapter, BNC-antenna, 19" rack mount kit | Power adapter, BNC-antenna, 19" rack mount kit | Power adapter, BNC-antenna, 19" rack mount kit | |
Model Number: LDU3047IEMR LDU3051IEMR LDU305IEMR LDU306IEMR LDU308IEMR
Product Type: In-Ear Monitoring In-Ear Monitoring In-Ear Monitoring In-Ear Monitoring In-Ear Monitoring
| Type: Bodypack receiver, | non-diversity | Bodypack receiver, non-diversity | Bodypack receiver, non-diversity | Bodypack receiver, non-diversity | Bodypack receiver, non-diversity |
| Transmission frequency range: | 470 - 490 MHz 514 - 542 MHz 584 - 608 MHz 655 - 679 MHz 823 - 832 MHz, | 863 - 865 MHz | |||
| RF-Channels: | 12 | 12 | 12 | 12 | 12 |
| Phones output: | 3.5 mm Stereo jack | 3.5 mm Stereo jack | 3.5 mm Stereo jack | 3.5 mm Stereo jack | 3.5 mm Stereo jack |
| Phones minimum impedance: | 16 ohms | 16 ohms | 16 ohms | 16 ohms | 16 ohms |
| Phones max output level: | 73 mW @ 33ohm load / 100 mW @ 16 ohm load | 73 mW @ 33ohm load / 100 mW @ 16 ohm load | 73 mW @ 33ohm load / 100 mW @ 16 ohm load | 73 mW @ 33ohm load / 100 mW @ 16 ohm load | 73 mW @ 33ohm load / 100 mW @ 16 ohm load |
| Audio Frequency response: | 50Hz - 16000 Hz | 50Hz - 16000 Hz | 50Hz - 16000 Hz | 50Hz - 16000 Hz | 50Hz - 16000 Hz |
| L/R Crosstalk 100Hz/1kHz/10kHz: | 45/60/45 dB's | 45/60/45 dB's | 45/60/45 dB's | 45/60/45 dB's | 45/60/45 dB's |
| Residual noise: | 42 uVrms | 42 uVrms | 42 uVrms | 42 uVrms | 42 uVrms |
| Antenna gain: | 0.5 dBi | 0.5 dBi | 0.5 dBi | 0.5 dBi | 0.5 dBi |
| Antenna connector: | Fixed antenna | Fixed antenna | Fixed antenna | Fixed antenna | Fixed antenna |
| Controls: | On/off/volume, channel +, channel - | On/off/volume, channel +, channel - | On/off/volume, channel +, channel - | On/off/volume, channel +, channel - | On/off/volume, channel +, channel - |
| Indicators: | 2 Digit backlit LC-Display (channel number), ST-LED, RF-LED | 2 Digit backlit LC-Display (channel number), ST-LED, RF-LED | 2 Digit backlit LC-Display (channel number), ST-LED, RF-LED | 2 Digit backlit LC-Display (channel number), ST-LED, RF-LED | 2 Digit backlit LC-Display (channel number), ST-LED, RF-LED |
| Power Consumption (nominal): | 0.5 W | 0.5 W | 0.5 W | 0.5 W | 0.5 W |
| Operating Voltage: 2x 1.5 VDC AA-Batteries | 2x 1.5 VDC AA-Batteries | 2x 1.5 VDC AA-Batteries | 2x 1.5 VDC AA-Batteries | 2x 1.5 VDC AA-Batteries | 2x 1.5 VDC AA-Batteries |
| Ambient Temperature (in operation): | 0°C - 35°C | 0°C - 35°C | 0°C - 35°C | 0°C - 35°C | 0°C - 35°C |
| Relative Humidity: | <80% (non-condensing) | <80% (non-condensing) | <80% (non-condensing) | <80% (non-condensing) | <80% (non-condensing) |
| Dimensions (W x H x D, without antenna): | 64 x 103 x 24 mm 64 x 103 x 24 mm 64 x 103 x 24 mm 64 x 103 x 24 mm | ||||
| Weight: | 0.085 kg | 0.085 kg | 0.085 kg | 0.085 kg | 0.085 kg |
| Other Features: | Low battery indication: LCD backlight blinks red when battery cell voltage is below 0.96 VDC | Low battery indication: LCD backlight blinks red when battery cell voltage is below 0.96 VDC | Low battery indication: LCD backlight blinks red when battery cell voltage is below 0.96 VDC | Low battery indication: LCD backlight blinks red when battery cell voltage is below 0.96 VDC | Low battery indication: LCD backlight blinks red when battery cell voltage is below 0.96 VDC |
LDU30xIEMHP including stereo LDIEHP1 earphones
Model Number: LDIEHP1
Product Type: Stereo In-Ear headphones
Frequency response: 30 Hz - 20000 Hz
Impedance: 160hms
Audio connector: 3.5 mm stereo plug
Cable: 1.5 m
Weight: 0.12 kg
Accessories included: 3 pairs of ear pads (S, M, L)
MANUFACTURER'S DECLARATIONS
MANUFACTURER'S WARRANTY & LIMITATIONS OF LIABILITY
You can find our current warranty conditions and limitations of liability at: https://cdn-shop.adamhall.com/media/pdf/MANUFACTURERS-DECLARA-TIONS_LD_SYSTEMS.pdf To request warranty service for a product, please contact Adam Hall GmbH, Adam-Hall-Str. 1, 61267 Neu Anspach / Email: Info@adamhall.com / +49 (0)6081 / 9419-0.

CORRECT DISPOSAL OF THIS PRODUCT
(valid in the European Union and other European countries with a differentiated waste collection system)
This symbol on the product, or on its documents indicates that the device may not be treated as household waste. This is to avoid environmental damage or personal injury due to uncontrolled waste disposal. Please dispose of this product separately from other waste and have it recycled to promote sustainable economic activity. Household users should contact either the retailer where they purchased this product, or their local government office, for details on where and how they can recycle this item in an environmentally friendly manner. Business users should contact their supplier and check the terms and conditions of the purchase contract. This product should not be mixed with other commercial waste for disposal.
FCC STATEMENT
This device complies with Part 15 of the FCC Rules. Operation is subject to the following two conditions:
(1) This device may not cause harmful interference, and
(2) This device must accept any interference received, including interference that may cause undesired operation
NOTE: This equipment has been tested and found to comply with the limits for a Class B digital device, pursuant to Part 15 of the FCC Rules. These limits are designed to provide reasonable protection against harmful interference in a residential installation. This equipment generates, uses and can radiate radio frequency energy and, if not installed and used in accordance with the instructions, may cause harmful interference to radio communications. However, there is no guarantee that interference will not occur in a particular installation. If this equipment does cause harmful interference to radio or television reception, which can be determined by turning the equipment off and on, the user is encouraged to try to correct the interference by one or more of the following measures:
- Reorient or relocate the receiving antenna.
- Increase the separation between the equipment and receiver.
- Connect the equipment into an outlet on a circuit different from that to which the receiver is connected.
- Consult the dealer or an experienced radio/TV technician for help.
CE Compliance
Adam Hall GmbH states that this product meets the following guidelines (where applicable):
R&TTE (1999/5/EC) or RED (2014/53/EU) from June 2017
Low voltage directive (2014/35/EU)
EMV directive (2014/30/EU)
RoHS (2011/65/EU)
The complete declaration of conformity can be found at www.adamhall.com.
Furthermore, you may also direct your enquiry to info@adamhall.com.
EU DECLARATION OF CONFORMITY
Hereby, Adam Hall GmbH declares that this radio equipment type is in compliance with Directive 2014/53/EU.
The full text of the EU declaration of conformity is available at the following
internet address: www.adamhall.com/compliance/
DEUTSCH
natural_image
Black electronic device with labeled ports (no readable text or symbols beyond numbers)
PHONES
Produkttyp: In-Ear-Monitoring In-Ear-Monitoring In-Ear-Monitoring In-Ear-Monitoring In-Ear-Monitoring
APPAREILS RELIÉS AU SECTEUR
(valid in the European Union and other European countries with waste separation)
DÉCLARATION DE CONFORMITÉ CE
natural_image
Back view of a black electronic device with antenna and control knobs (no visible text or symbols)ZNAJDOWANIE BŁĘDU
DEKLARACJA ZGODNOŚCI WE
natural_image
Black electronic device with labeled ports (ANT, PHONES, ST, RF) and a black antenna, no visible text or symbols beyond component labels
PHONES
- U300® IEM SERIES
- CONTENTS / INHALTSVERZEICHNIS / CONTENU / CONTENIDO / TREŚĆ / CONTENUTO
- ENGLISH
- DEUTSCH
- SAFETY INFORMATION
- FOR EQUIPMENT THAT CONNECTS TO THE POWER MAINS
- CAUTION:
- CAUTION! HIGH VOLUMES IN AUDIO PRODUCTS!
- INTRODUCTION
- Scope of delivery of LDU30xIEM
- Scope of delivery of LDU30XIEMHP
- Note
- POWER
- CHANNEL DISPLAY
- ③ CHANNEL + / -
- LEFT / RIGHT
- LEVEL DISPLAY L / R
- STEREO / MONO
- DC CONNECTOR
- CABLE STRAIN RELIEF
- AF INPUT LEFT / RIGHT
- ANTENNA
- TRANSMITTER ANTENNA
- DISPLAY
- ⑬ CHANNEL + / -
- ANTENNA
- BATTERY COMPARTMENT
- PHONES
- ST
- RF
- ON / OFF - VOL
- BELT CLIP
- SPECIFICATIONS
- Model Number: LDIEHP1
- MANUFACTURER'S DECLARATIONS
- MANUFACTURER'S WARRANTY & LIMITATIONS OF LIABILITY
- CORRECT DISPOSAL OF THIS PRODUCT
- FCC STATEMENT
- CE Compliance
- EU DECLARATION OF CONFORMITY
- APPAREILS RELIÉS AU SECTEUR
- DÉCLARATION DE CONFORMITÉ CE
- DEKLARACJA ZGODNOŚCI WE
Brand : LD Systems
Model : U304.7 IEM
Category : Wireless audio system