2200056 - Coffee machine RUSSELL HOBBS - Free user manual and instructions
Find the device manual for free 2200056 RUSSELL HOBBS in PDF.
User questions about 2200056 RUSSELL HOBBS
0 question about this device. Answer the ones you know or ask your own.
Ask a new question about this device
Download the instructions for your Coffee machine in PDF format for free! Find your manual 2200056 - RUSSELL HOBBS and take your electronic device back in hand. On this page are published all the documents necessary for the use of your device. 2200056 by RUSSELL HOBBS.
USER MANUAL 2200056 RUSSELL HOBBS
nHCTpyKcnn (Pycckn) 33
pokyny (Čestina) 36

=plusfort
=encoreplusfort
http://www.russellhobbs.com/ifu/550979
http://www.russellhobbs.com/ifu/550979
http://www.russellhobbs.com/ifu/550979
http://www.russellhobbs.com/ifu/550979
| figurer | 3 hake | 7 kanne |
| 1 filter | 4 filterdeksel | trykk |
| 1 kvern | 5 beholderdeksel | |
| 2 filterholder | 6 varmeplate |
BEHANDLING OG VEDLIKEHOLD
http://www.russellhobbs.com/ifu/550979
BAXHbIE MEPbI INPEDOCTOPOXHOCTN
CneyuTe OCHOBbIM HNCTpyKcIaM NO 6e3oNaChOCTN, BkIouaY CneDuOuIe:
1 IcnoIb3OBaHne daHHoro yCTpoiCTBa IuIaMn C OrpaHnueHHbIMn n3UyeCKIMN, CeHCOPHBIMn IIN YMCTBENHBIMN CNOco6HOCTaMn, HeIOCTaTKOM ONbITa IIN 3HaHnJ DOyckaETcPn YCIOBnKoHTPOJIa IIN IHCTpykTaJa N OCO3HaHnJ CBraHHbIX PNCOB.
- DeTAM 3aIpEeHNO IcNoIb3OBaTb yCTPOIcTB OII INIgPaTb C HIM.
-ДерЖITE yCTPOIcTBOи shHyp BHe doCЯeMoCTn DeTei.
He norgykaite np6op B XnIDKoCTb.
NobepxHOCTn np6opa HarpeBaOTc. 3a cuet octaToUHoro TeIIOBepxHOCTn 6ydyT OCTaBaTbCra TOpAUM NocJe IcNoIb3OBAHnI.
HeppaBnIbHOe nCNoJIb3OBAHne npI6Opa MoXeT npNBeCTn K TpaBMe.
2 Otklnouhte np6op ot po3eTKn nepeed c6opko, pa36opko nnn oynCTKOJ.
3 He octabrai Te BkIIOueHHbI np6op 6e3 npncMOtpa.
4 Ecni Ka6eIb NOBpeXJeH, OH DoJIkeH 6bITb 3aMeHeH IPOIN3BOIDNTeIeM, CepBnCHbIM aReHTOM IJIu DpyrUm KBaIINΦUncPobAHNbIM IIncOm dIy PpeDOTBpaSeHnA ONaCHOCTN.
5 UcTaHabnBaIte np6Op Ha yctOuNByIO, rOpN3oHTaIbHyIO, TepMOCToKyIO NOBepxHOCTb.
6 NcnoIb3yIe ToIbKO npHaNJIeXHOCTn Hacakn OT npOn3BOIDTeJIA.
7 Pn6op He moKet pa6oTaB OT BHeUHero TaMepa nn DnCTaHcNHOHcNCTeMbI ynpabLeHn.
8 He n cnoIb3yIe np6Op, ecn OH noBpeXdE Hnn pa6Otaet C nepe6oAMy.
TolbkoДл6bITOBORIO nCNoJb3ObaHnA

YdaIaIte HaKunb peryIarpho (KaXdbI MeCra).
36 YdaIaIte HaKInb n3 yCTpoiCTBa KaK MNHmym pa3 B MeCraC NOMOuB O HnpMeHHoro cpeIcTBA dIy ydaJIeHnHaKUnn. CneDyIte IHCTpykUmaH Ha yNaKOBKe cpeIcTBA dIy ydaJIeHnHaKUnn.
Tobapbl, Bo3BpaueHHbIe no rapaHTnC nOLOMKamN BCJeCTBne HaKnn, 6ydyT noJnxKaTb peMOHTy.

3AUHTA OKPYXAOUCEI CPEbI
ДяТоTO6bI n36exKaTb yrpo3 ДЯ 3ДОРOBьи OkpykaUошeI cpebl n3-3a BpeHbIX BeueCTB B элКТрчecKnx I элКТрOHHbIX TOBapax, np6Opbl, OTMeueHHbIe daHHbIM CnMBOJOM, IDOLJIbI yTNIIIN3InPOBaTbcR He KaK He OTCOPTInpOBAHHbIe 6blTOBblcOTXoDbI, a KaK BOCCTaHOBHeHHbIe INI NOBTOPHIO NcNoJIb3OBAHHbIe.
Prcte si pkyny a uschovejte je. Pokud zaizeni prade dal, predeje ho i navodem. Prid pouzitim odstrahte vsechny obaly.
STOP DULEZITA BEZPECNOSTNI OPATRENI
http://www.russellhobbs.com/ifu/550979
PIPIN AIO THN PQTH XPHSH
- to doxio vepou i tnv evdeltaen otaounc max kai theote oe laitoupyia tn ouokevn xwiic va npootheoet e kafe.
AAESEMOSKAΦE
AZ ELSO HASNZALATE ELOTT
http://www.russellhobbs.com/ifu/550979
http://www.russellhobbs.com/ifu/550979
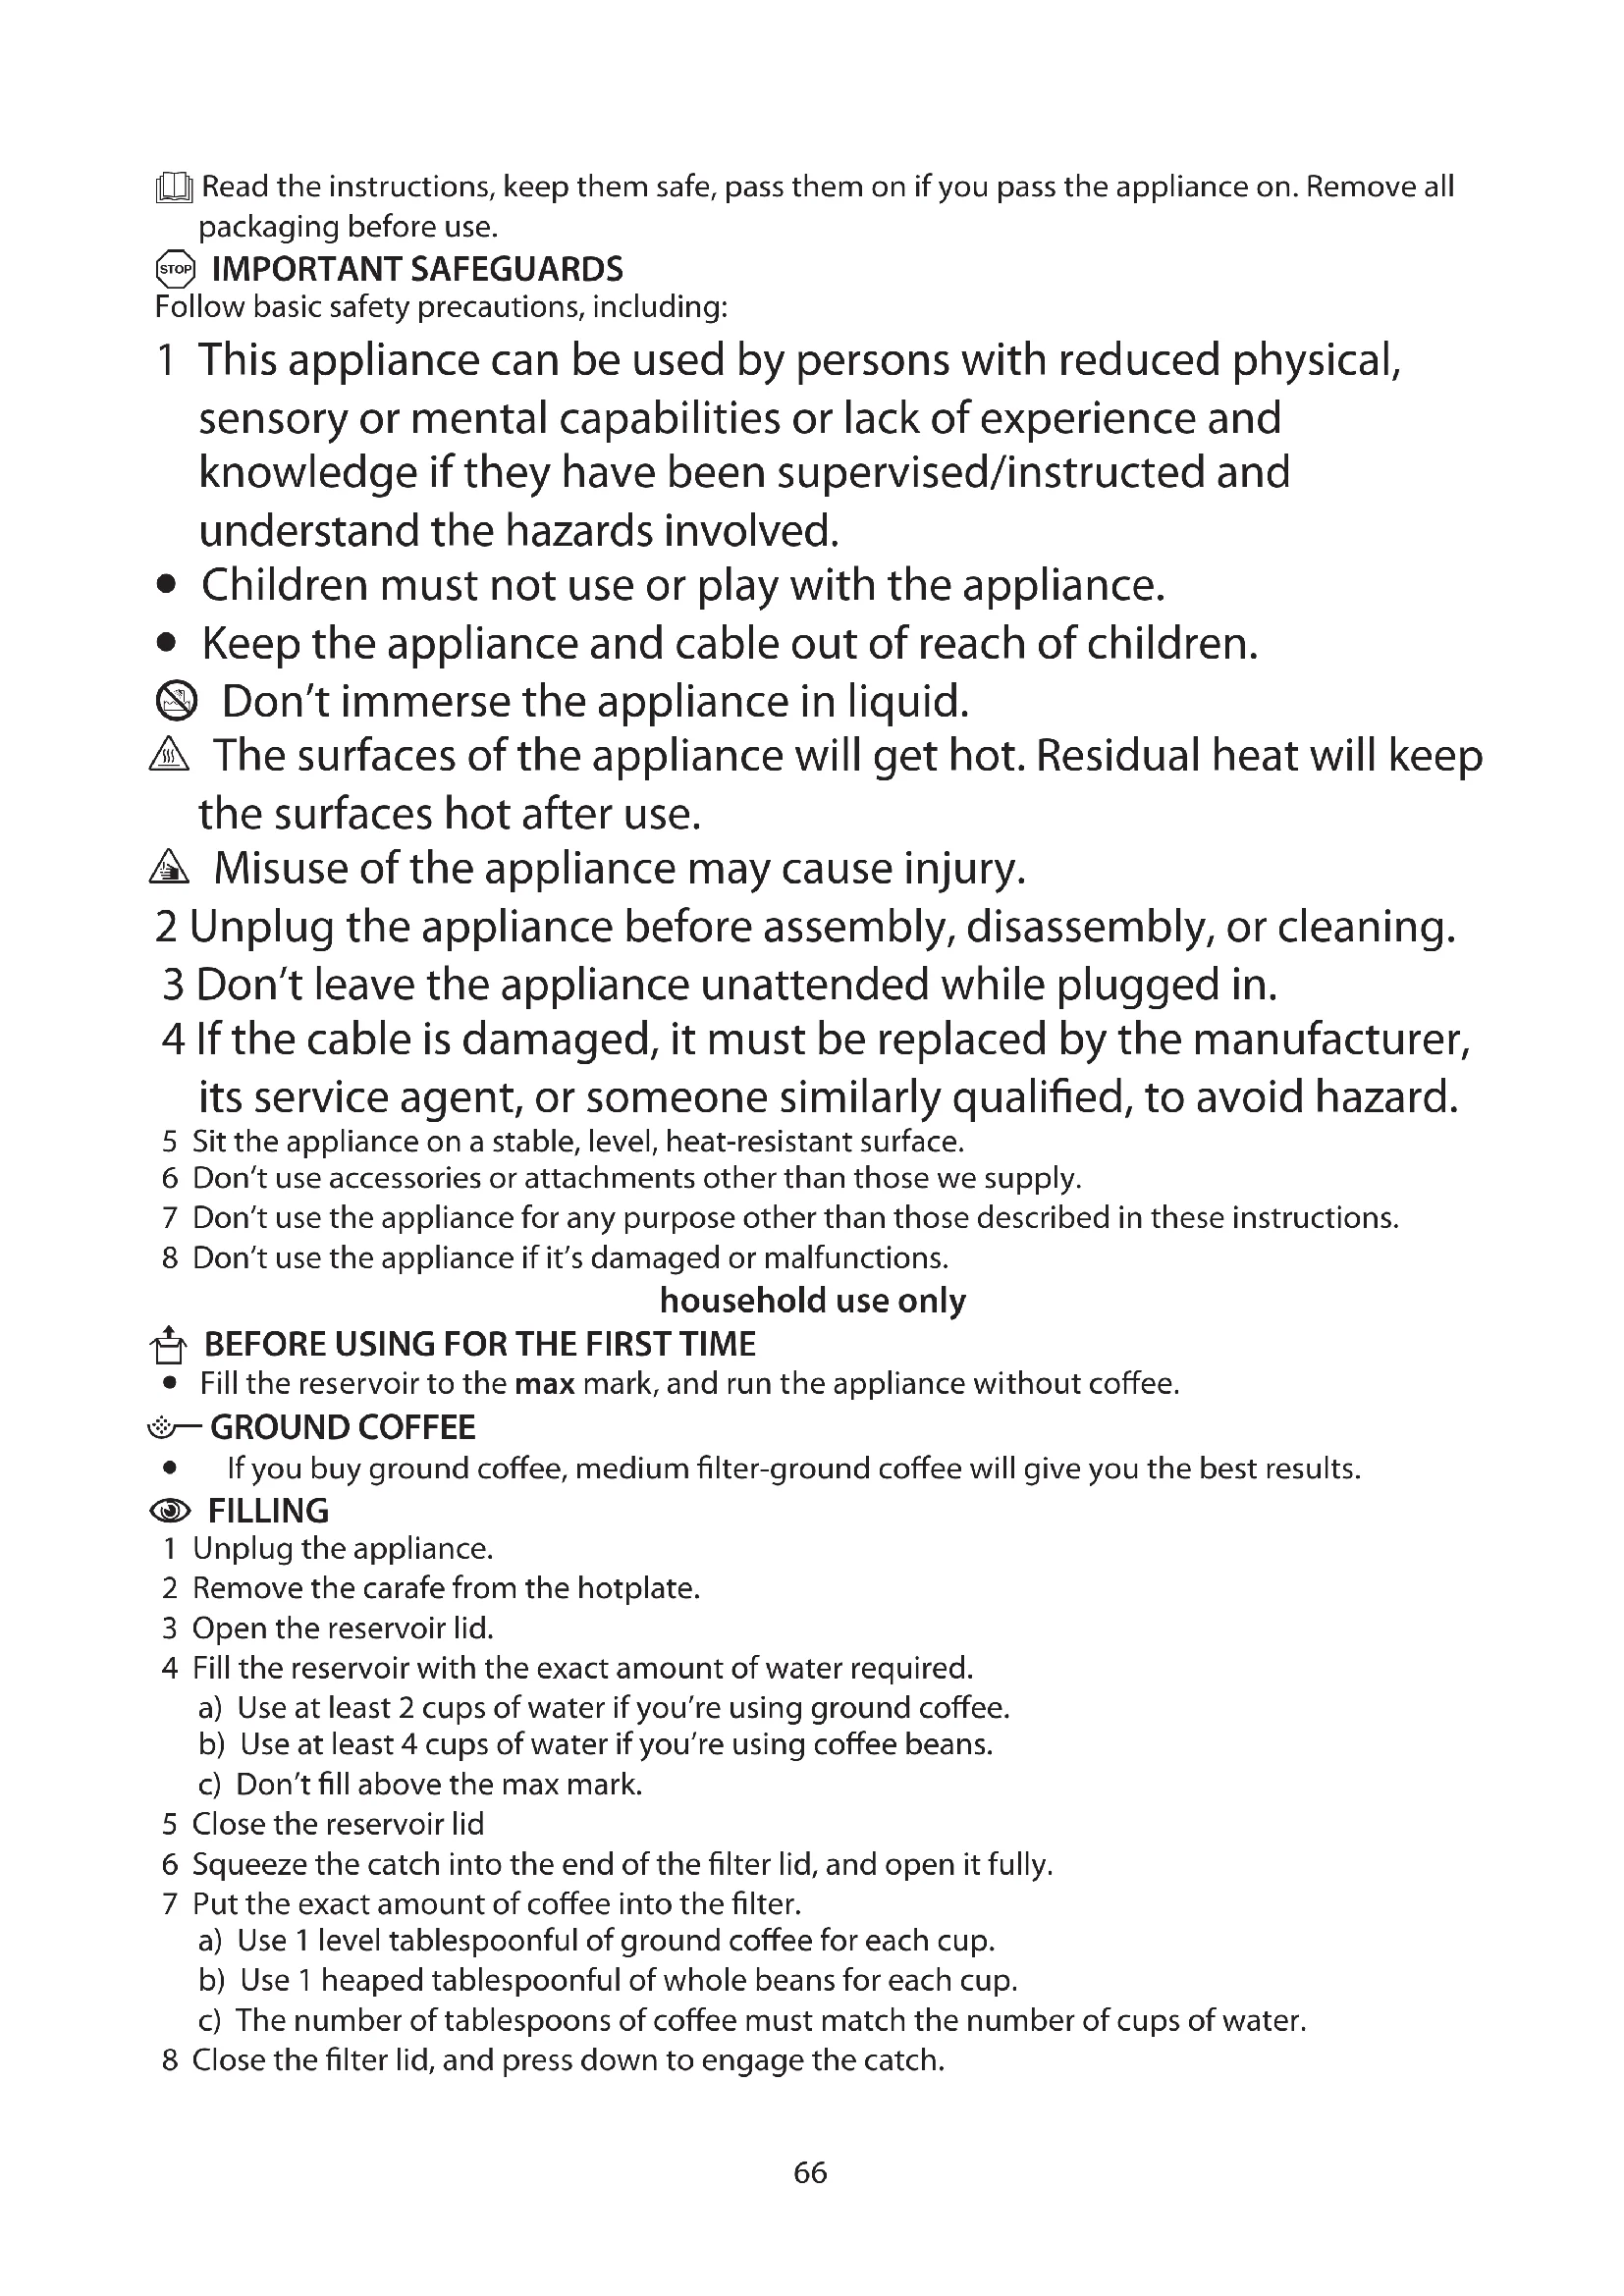
Read the instructions, keep them safe, pass them on if you pass the appliance on. Remove all packaging before use.
STOP IMPORTANT SAFEGUARDS
Follow basic safety precautions, including:
1 This appliance can be used by persons with reduced physical, sensory or mental capabilities or lack of experience and knowledge if they have been supervised/instructed and understand the hazards involved.
Children must not use or play with the appliance.
- Keep the appliance and cable out of reach of children.
Don't immerse the appliance in liquid.
The surfaces of the appliance will get hot. Residual heat will keep the surfaces hot after use.
Misuse of the appliance may cause injury.
2 Unplug the appliance before assembly, disassembly, or cleaning.
3 Don't leave the appliance unattended while plugged in.
4 If the cable is damaged, it must be replaced by the manufacturer, its service agent, or someone similarly qualified, to avoid hazard.
5 Sit the appliance on a stable, level, heat-resistant surface.
6 Don't use accessories or attachments other than those we supply.
7 Don't use the appliance for any purpose other than those described in these instructions.
8 Don't use the appliance if it's damaged or malfunctions.
household use only
BEFORE USING FOR THE FIRST TIME
- Fill the reservoir to the max mark, and run the appliance without coffee.
GROUND COFFEE
If you buy ground coffee, medium filter-ground coffee will give you the best results.
FILLING
1 Unplug the appliance.
2 Remove the carafe from the hotplate.
3 Open the reservoir lid.
4 Fill the reservoir with the exact amount of water required.
a) Use at least 2 cups of water if you're using ground coffee.
b) Use at least 4 cups of water if you're using coffee beans.
c) Don't fill above the max mark.
5 Close the reservoir lid
6 Squeeze the catch into the end of the filter lid, and open it fully.
7 Put the exact amount of coffee into the filter.
a) Use 1 level tablespoonful of ground coffee for each cup.
b) Use 1 heaped tablespoonful of whole beans for each cup.
c) The number of tablespoons of coffee must match the number of cups of water.
8 Close the filter lid, and press down to engage the catch.
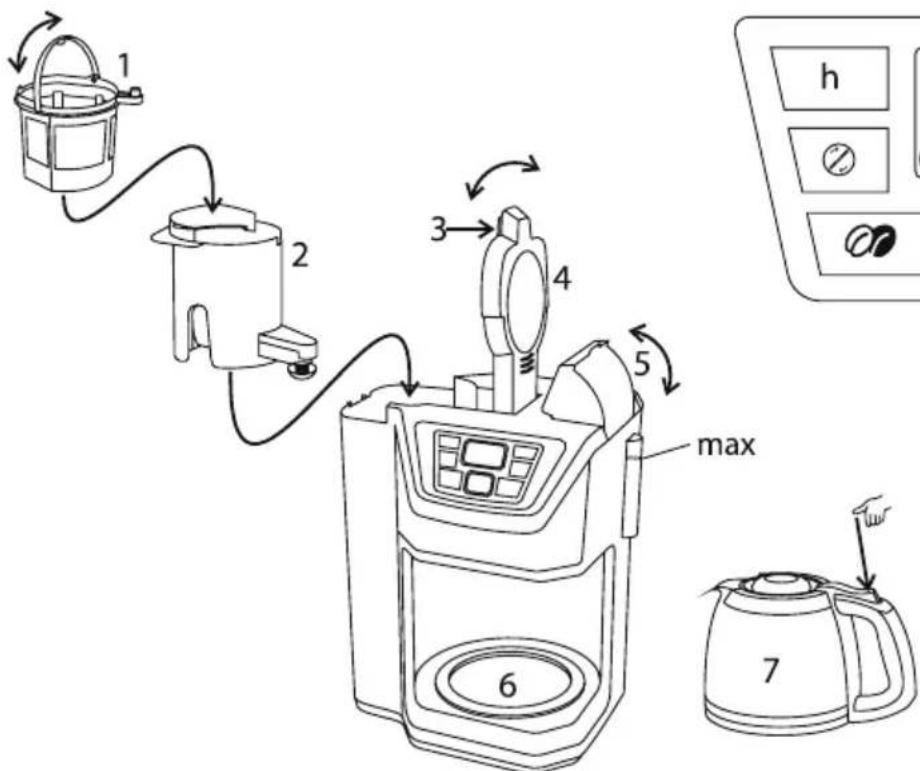
| diagrams | 3 catch | 7 carafe |
| 1 filter | 4 filter lid | press |
| 1 grinder | 5 reservoir lid | |
| 2 filter holder | 6 hotplate |
SWITCH ON
9 Replace the carafe on the hotplate.
10 Put the plug into the power socket.
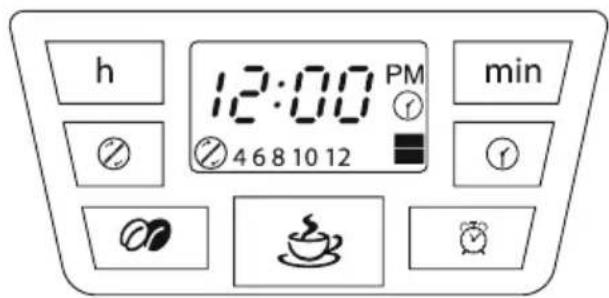
The display will glow, showing 12:00 blinking and 念 + 12 (12 cups).
COFFEE NOW
11 Ignore the display.
12 Use the 念 button to cycle the bottom of the display to the grind setting you need:
= you're using ground coffee
日 + 4,6,8,10, or 12 = you're using coffee beans ^+ the number of cups/tablespoon
13 Press the button - If you're using coffee beans, the grinder will operate.
14 Shortly afterwards, coffee will start to drip into the carafe.
- If you want to stop the coffee maker while it's brewing, press the button. The light will go off.
15 When it's done, the hotplate will keep the carafe warm.
16 The display will count up, to show how long the keep warm function has been operating.
17 After a set time, the heater will switch off, the display will stop glowing, and the appliance will go into standby mode.
18 To wake the appliance, press the button.
The default keep warm time is 40 minutes.
You may change this - see below.
After about 40 minutes, chemical changes will affect the taste of the coffee.
COFFEE LATER
19 Set the clock to the correct time.
a) Use the h and min buttons to set the correct hour and minute.
b) It's a 12 hour clock - the display shows PM for afternoon.
c) If you overshoot, you can't step back.
d) The clock will retain its settings until the coffee maker is unplugged.
20 Set the timer to the time you want to start brewing.
a) Press the button and hold it for 3 seconds.
b) “①” will blink on the display.
c) If you don't press anything for 5 seconds, the display will revert to normal.
d) You'll have to press the 1 button, and start again.
e) Use the h and min buttons to set the correct hour and minute.
f) When you've set the time, wait 5 seconds, and the display will revert to normal.
ACTIVATION
21 Press the button to activate the timer.
will show on the display.
22 To cancel the timer before brewing has started, press the button again.
KEEP WARM TIME
23 The default keep warm time is 40 minutes.
24 To change this, press the ① button, and hold it in for 3 seconds.
The display will show the current keep warm time.
25 Use the min button to choose the keep warm time you want – the options are 00, 20, 30, and 40 minutes after brewing has finished.
26 Press the ① button again, to activate your choice.
BREW STRENGTH
27 Use this feature if you prefer your coffee a bit stronger. It slows the brewing process, lengthening the time the water is in contact with the coffee.
28 Use the button to choose the setting you want – the setting shows in the bottom right corner of the display:
blank = normal strength (the default setting)
=stronger
= even stronger
If you want to change these settings, you should do so before making coffee.
A QUICK CUP
19 You can remove the carafe at any time. To prevent the filter holder overflowing, replace the carafe on the hotplate within about 20 seconds.
CARE AND MAINTENANCE
30 Unplug, and let the appliance and carafe cool down fully before cleaning, or for about 10 minutes before refilling.
31 Tip the contents of the filter into the bin.
32 Hand wash the carafe, filter, and filter holder.
33 Press the lever at the rear of the carafe lid, above the handle, to open the carafe lid.
34 Clean the outside surfaces of the appliance with a damp cloth.
35 Don't put any part of the appliance in a dishwasher.
Descale regularly, (at least monthly).
36 Descale the appliance at least monthly with a proprietary descaler. Follow the instructions on the package of descaler.
- Products returned under guarantee with faults due to scale will be subject to a repair charge.

ENVIRONMENTAL PROTECTION
To avoid environmental and health problems due to hazardous substances in electrical and electronic goods, appliances marked with this symbol mustn't be disposed of with unsorted municipal waste, but recovered, reused, or recycled.

instructions - more detailed instructions are available on our website: http://www.russellhobbs.com/ifu/550979
34
35
()
PM CM
ai = 12 j = 1^ma_ij
11 jjglj jll 9.3)
.0gell jge jy j 1 glll 4)
20
.3 1
. 1"
5 5 13
1 1
J 5
. 5 16
Jiei

j 21
Aaie 10
.22
aiee

40 41 23
3 1 jll 24
aieill lbclll aillll sall aillll
40,30,20,00 - 15- 25 min jj 25
Jusill
26
1

27
.
28
()=blank
g=
jSg=
.0gall Joc j 1 y

29
.20
aillg lizl

30
31
. 32
. 33
j = 1 j = 1
2
3
4
.0aallnll p 15 1 1 2
.0galln p d 125 134 4 2
ao 2015.
j5
JalS Jkuiy aai g jilai llbc yjie 6
jilll 7
1
15 2
1 3
8
J
. 9
10
12/8 12+ g 12:00 12:00
Jalj 11
12
$$ \mathrm {i n} \mathrm {a l p h a} \mathrm {i n} \mathrm {p} \mathrm {d i s i n} = \bigotimes $$
$$ \left. \right.\left. \right.\left. \right.\left. \right.\left. \right.\left. \right.\left. \right.\left. \right.\left. \right.\left. \right.\left. \right.\left.\left.\left.\left.\left.\left.\left.\left.\left.\left.\left.\left.\left.\left.\left.\left.\left.\left.\left.\left.\left.\left.\left. \text {的} \right]\right]\right]\right]\right]\right]\right]\right]\right]\right]\right]\right]\right]\right]\right]\right]\right]\right]\right]\right]\right]\right]\right] $$
13
.
14
aaii iiaii aai. jll biaia i gaiiaai Jaoj lalai geall aiSlo
15
16
17
1 jll bai 18
40 40
.
40 1
Laa 8gai
19
J 1)
| الله抵抗力 7 | الله 3 | الله抵抗力 |
| الله 4 | الله 4 | الله 1 |
| الله 5 | الله 2 | |
| الله 6 |
1 1
JooWJ Jia adic y1

J
y
1
1
aaiil jiaaii jao
1 1
Jibj Jglii jg jg j

Jilw jiey
1
aaii 1 1

1.
2
Jilll all oil Jda xao jgeall 3
45
J 1
5
j 6
7
8
baa jiaai Jaaaiu
g 1
max 1