POWER DRAIN CLEAN 2.3E - Drain cleaning machine MSW - Free user manual and instructions
Find the device manual for free POWER DRAIN CLEAN 2.3E MSW in PDF.
| Product type | Drain cleaning machine (pipe unblocker) |
| Brand | MSW |
| Model | POWER DRAIN CLEAN 2.3E |
| Dimensions (L x W x H) | 460 x 200 x 560 mm |
| Weight | 87 kg |
| Supply voltage | 230 V ~ 50 Hz |
| Power | 570 W |
| Rotation speed | 400 rpm |
| Suitable pipe diameter | 20 - 150 mm |
| Spiral diameters | Spiral #1: 16 mm; #2: 22 mm; #3: 9 mm (tuba); #4: 15 mm |
| Spiral lengths | Spiral #1: 5 x 2.3 m; #2: 3 x 4.6 m; #3: 5 m (tuba); #4: 2.4 m |
| Control | FOR/REV/OFF switch; direction lever; pedal or trigger |
| Electrical safety | FI circuit breaker (GFCI) with TEST/RESET buttons |
| Included accessories | Protective gloves, key, tips (various diameters), funnel, protective sheath |
| Housing material | Robust steel with anti-corrosion coating |
| Intended use | Unblocking of indoor and outdoor pipes (dry weather) |
| Operating environment | Do not use in very humid conditions, in rain or snow |
| Routine maintenance | Cleaning the spiral and lubrication after use; exterior cleaning with a damp cloth |
| Storage | In a dry place, protected from moisture and sunlight |
| Warranty | Subject to proper use; warranty void in case of unauthorized opening |
Frequently Asked Questions - POWER DRAIN CLEAN 2.3E MSW
User questions about POWER DRAIN CLEAN 2.3E MSW
0 question about this device. Answer the ones you know or ask your own.
Ask a new question about this device
Download the instructions for your Drain cleaning machine in PDF format for free! Find your manual POWER DRAIN CLEAN 2.3E - MSW and take your electronic device back in hand. On this page are published all the documents necessary for the use of your device. POWER DRAIN CLEAN 2.3E by MSW.
USER MANUAL POWER DRAIN CLEAN 2.3E MSW
DRAIN CLEANING MACHINE
MSW-DRAIN CLEAN 23E
MSW-DRAIN CLEAN 2.3E
MSW-POWER DRAIN CLEAN 2.3E
MSW-POWER DRAIN CLEAN 4.6E

INHALT | CONTENU | CONTENT | CONTENUTO | CONTENIDO | TREŚĆ
Deutsch 3
English 10
Polski 17
Česky 24
Français 31
Italiano 38
Español 45
Magyar 52
| NAZWA PRODUKTU PRZEPYCHACE DO RURPRODUKTNAME ROHRBEINGKUNESGERÄTPRODUCT NAME DRAIN CLEANING MACHINENOM DU PRODUIT APPAREIL DE NETTOYAGE DE TUBERSNOME DEL PRODOTTO MACCHINA PER SPURGONOMBRE DEL PRODUCTO DISPOSITIVO LIMPIADOR DE TUBELRÄSNÄZEV VÝROBKU STROI NA ČISTENÍ TRUBEK | |
| MODEL PRODUKTUMODELLPRODUCT MODELMODELEMODELLOMODELOMODEL VÝROBKU | MSW DRAIN CLEAN 23EMSW DRAIN CLEAN 3.3EMSW POWER DRAIN CLEAN 2.3EMSW POWER DRAIN CLEAN 4.6E |
| HERSTELLERMANUFACTURERPRODULENTFABRICANTPRODUITIONEFABRICANT EVÝROCKE | EXPONDO POLSKA SP. Z O.D. SP. K. |
| ANSCHRIET DES HERSTELLERSMANUFACTURER ADDRESSADRES PRODUCENTAADRESSE DU FABRICANTINDIRIZZO DEL PRODUITOREDIRECCIÓN DEL FABRICANTEADRESA VÝROCKE | UL NOWY KISIEUN – INNOWACYINA 7, 65 002 ZIELONA GÓRA | POLAND, EU |
BEDIENUNGSANLEITUNG

SYMBOLE
text_image
Labeled diagram of a portable water heater with numbered components for identificationtext_image
Labeled diagram of a cooling fan assembly with numbered parts for identificationMSW-POWER DRAIN CLEAN 2.3E
text_image
Labeled diagram of electrical components including a lamp, transformer, and coiled cable with numbered partsMSW-POWER DRAIN CLEAN 4.6E
text_image
Labeled diagram of a motorcycle showing parts numbered 1 through 11 for identification.CLEAN 2.3E | MSW-POWER DRAIN CLEAN 4.6E
Funktionsweise:
| Operation manual must be reviewed |
| Never dispose of electrical equipment together with household waste. |
| The product satisfies the relevant safety standards. |
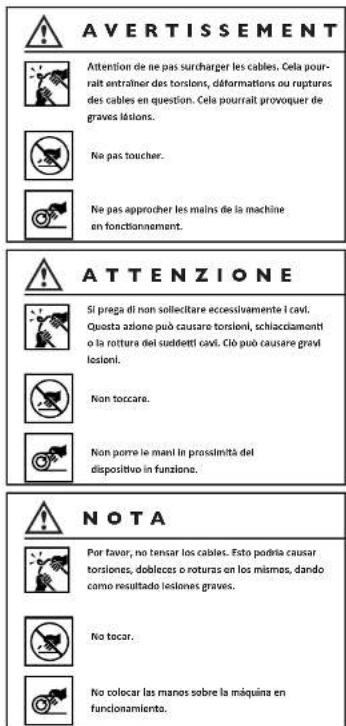
| Attention! Danger of accident. |
| Note! Make sure bystanders remain in safe distance from the work place. |
| Attention! Wear protective gloves. |
| Caution, the hand can be squeezed! |
| Do not overstress the wires. Overstressing a wire may cause it to twist, kink or break, which may lead to serious injuries. |
| Do not touch the moving elements of the machine. |
| Keep your hands away from the moving elements of the machine. |
PLEASE NOTE
Drawings in this manual are for illustration purposes only and in some details may differ from the actual machine. The original operation manual is in German. Other language versions are translations from German.
I. SAFETY INSTRUCTIONS
To avoid injury from fire or electric shock, please ensure the compliance with the safety instructions when using this device. Please read the instructions carefully and make sure that you have understood them well. Keep the manual near the equipment to be able to read it at any time. Always use current sources connected to the ground which also provide the necessary voltage (indicated on the label on the device). If you have any doubt, let an electrician check that your outlet is properly grounded. Never use a damaged power cable. Do not open the unit in damp or wet environment, or if your hands or body are damp or wet. Protect the unit from solar radiation. Use the device in a protected location to avoid damaging the equipment or putting others at risk. Make sure that the device is able to cool down and please avoid placing it too close to other devices that produce heat. Disconnect the machine from the power source before cleaning it. Use a soft damp cloth for cleaning. Avoid using detergents and make sure that no liquid enters the unit. No internal element of this device needs to be maintained by the user. Opening the device without our approval leads to a loss of warranty!
II. SAFETY GUIDELINES
I. Please read and understand these instructions carefully before operating the device! Please observe the safety guidelines carefully in order to prevent damages through improper use!
- Please keep this manual available for future reference. If this device is passed on to third parties, the manual must be passed on with it.
- We do not offer any warranty for damages resulting from improper use or incorrect operation.
- Before the first use, please check whether the voltage type and the current comply with the indicated data on the type plate.
- This device is not intended to be used by persons (including children) with limited physical, sensory or mental aptitude or lack of experience and/or knowledge, unless they are supervised by a person responsible for their safety or have received instructions from this person as to how the device is used.
-
ELECTRICAL SHOCK HAZARD! Do not attempt to repair the unit by yourself. In case of device failures, repairs must only be done by qualified experts.
-
Please check the power plug and power cable regularly. If the power cable for this device is damaged, it has to be replaced by the manufacturer or its customer service or another qualified person in order to prevent hazards.
- In order to prevent damages to the power cable, you should not squeeze or bend the cable, nor rub it on sharp edges. Also keep the power cable away from hot surfaces and open flames.
- ATTENTION! DANGER TO LIFE! While cleaning, never immerse the device in water or other liquids.
- Under no circumstances should the housing be opened.
- Do not clench your fingers around the spiral when inserting it into the opening you want to clean/ clear.
- When operating the device, be careful for the moving parts not to cause any damage.
| Product name Drain Cleaning Machine | ||||
| Model MSW-DRAIN | CLEAN 23E | MSW-DRAIN CLEAN 2.3E | MSW-POWER DRAIN CLEAN 2.3E | MSW-POWER DRAIN CLEAN 4.6E |
| Length x Width x Height [mm] | 600x440x950 350x175x335 460x200x560 560x1060x745 | |||
| Voltage [V] / Frequency [Hz] | 230~/50 230~/50 | 230~/50 | 230~/50 | |
| Power [W] | 390 | 390 | 570 | 1100 |
| Revolutions/min | 370 | 400 | 400 | 700 |
| Designed for pipes with diameter [mm] | 25-125 | 30-100 | 20-150 | 50-200 |
| Coil diameter [mm] | 12.7 | 16 | Coil No. 1: 16 Coil No. 2: 22 Coil No. 3: 9 (tube) Coil No. 4: 15 | 32 |
| Coil length [m] | 23 | 6x2,45 Coil No. | 1: 5x2,3 Coil No. 2: 3x4,6 Coil No. 3: 5 (tube) Coil No. 4: 2,4 | 4x4,65 |
| Weight [kg] | 48 | 24 | 44 | 87 |

IV. SCOPE OF APPLICATION
The Drain Cleaning Machine is intended solely for clearing blocked pipes and outlets. It may be used indoors and outdoors only in good weather conditions – it is prohibited to use the plunger in high temperature, as well as during rain-snowfall.
The user is liable for any damage resulting from non-intended use of the device!
V. BEFORE FIRST USE
Upon receipt of the goods, check the packaging for integrity and open it. If the packaging is damaged, please contact your transport company and distributor within 3 days, and document the damages as detailed as possible. Do not turn the package upside down! When transporting the package, please ensure that it is kept horizontal and stable.
VI. DISPOSING OF PACKAGING
Please keep all packaging materials (cardboard, plastic tapes and Styrofoam), so that in case of a problem, the device can be sent back to the service centre in accurate condition!
VII. INSTALLING THE APPLIANCE
Positioning the machine
Place the device on a dry and stable surface, in vertical position, so that it wouldn't move during work. The foundation must be able to resist the weight of the device. It should be flat and level. The device is to be located in such a way that the mains plug was accessible at all times. Place the device about 20cm from the opening of the cleared pipe. Remember for the mains supply to be compatible with the details specified on the rating plate.
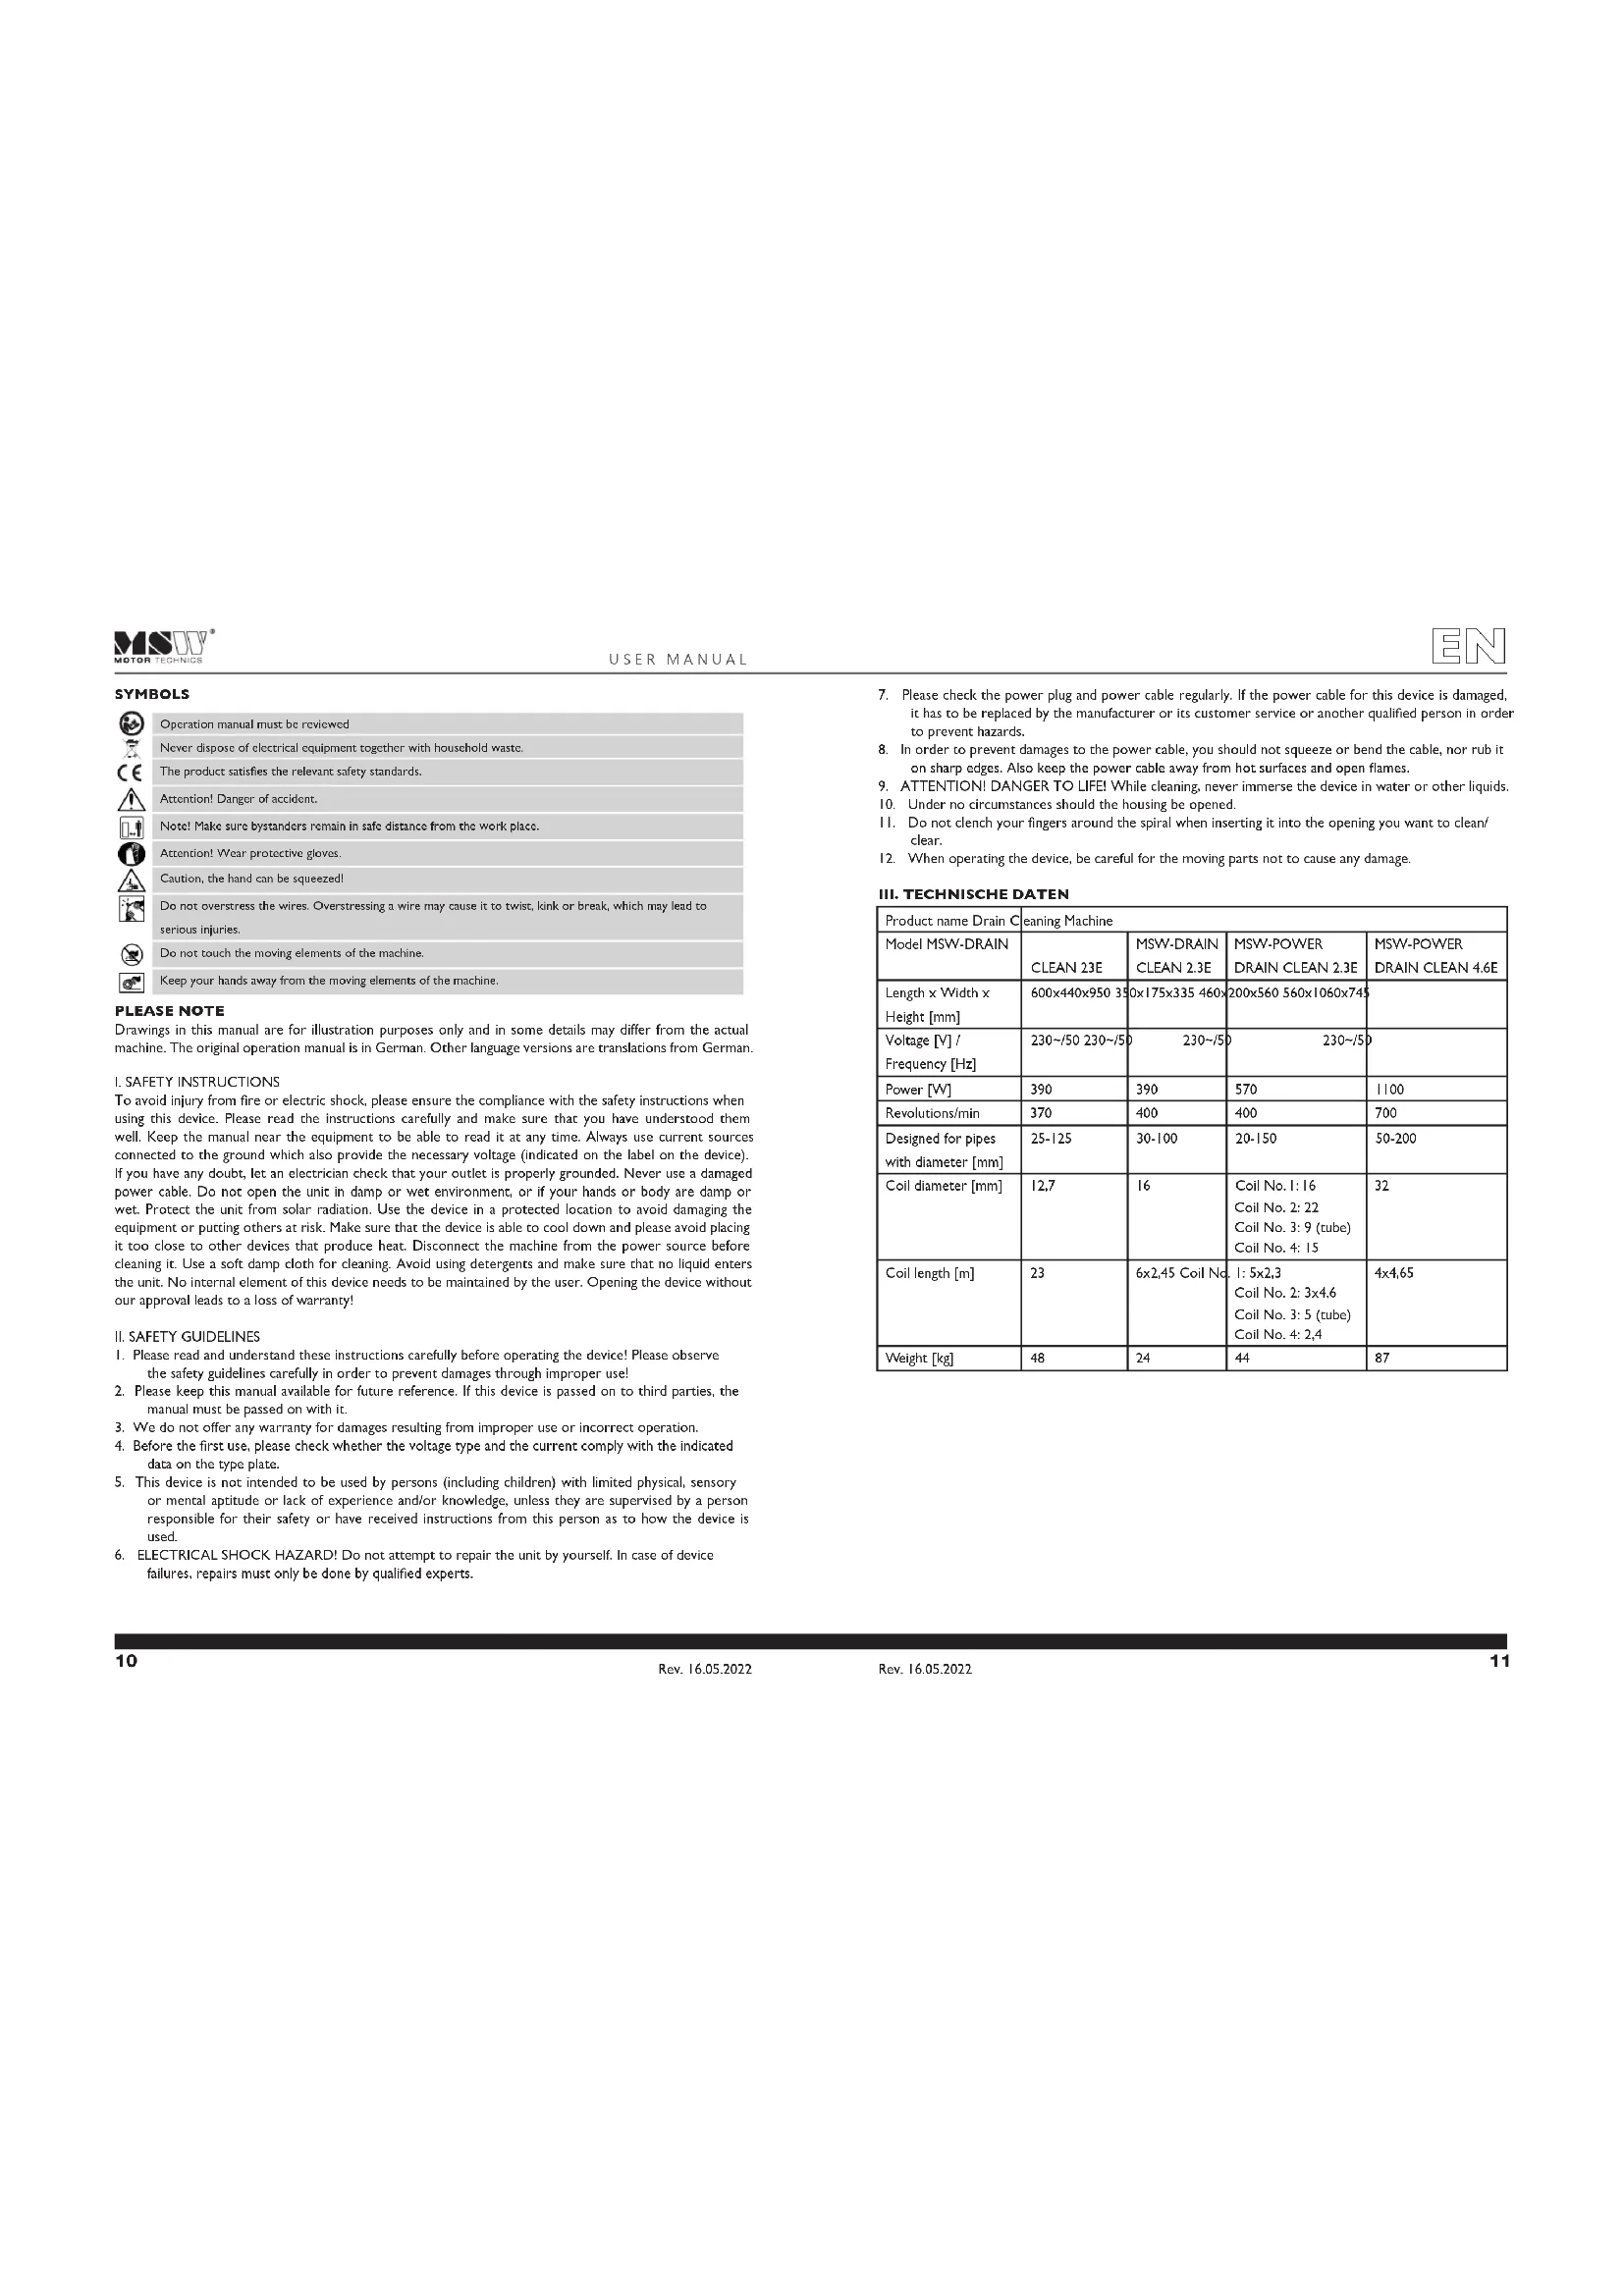
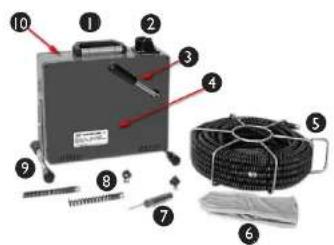
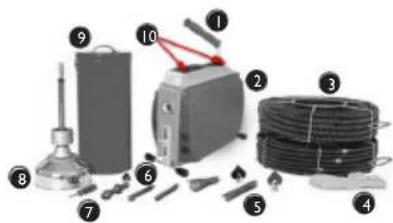
Description of the device:
text_image
Labeled diagram of a portable water heater with numbered components for identification- Motor switch:
FOR / REV – change of the coil rotation direction OFF – device turned off
2 Belt guard - Belt
- Residual current device GFCI
- Wheels
- Pedal
- Drum
- Coil
- Outlet nozzle
- Lever
- Knob
- Handle
DEVICE OPERATION DESCRIPTION – APPLICABLE TO MODEL MSW-DRAIN CLEAN 23E Operation:
- After receiving the device, assemble it as shown in the attached drawing. Before commencing operation, ensure that neither the device nor the power cable are damaged. Next, make sure that the switch at the motor is in the "OFF" position. If it is not, put it in the middle position.
- When all the elements are in place, take the coil out of the drum and thread it through the outlet nozzle. In order to do so, undo the black knob, thread appropriate length of the coil through the nozzle opening and tighten the knob, so that the coil could perform its function when the engine is on. Overtightening the knob will jam the coil in the device, and if the knob is too loose, the coil will not be able to come out or retract. When the coil is ready, fit an appropriate tip with the power supply turned off. In order to attach the tip to the coil, undo the bolt located at the end of the coil, fit the tip and tighten the bolt, so that the tip was firmly attached to the coil.
- Next, connect the device to the mains outlet. Every time before turning the device on, it must be tested as follows: press the "RESET" button, turn the device on as per the following guidelines, and, during operation, press the "TEST" button. If the device stops, it means that the GFCI switch works properly and the device can be used safely. If the device fails to stop after pressing the TEST button, immediately disconnect it from the power supply.
After the test, press the "RESET" button to operate the device normally. If during operation the „RESET" button goes off automatically, or if it is impossible to turn it on, it means that the device is most likely defective. In such a case, disconnect the device from mains immediately and follow the instructions provided in the section "REGULAR INSPECTION OF THE DEVICE".
- In order to start clearing, place the device about 20 cm from the place of inserting the coil, insert the coil into the opening in such a way that after insertion the coil does not twist and curl. Then, switch the rotation direction switch located at the engine and put the lever in the appropriate position. Possible settings:
Switch in the FOR position + lever in the upper position – the coil rotates clockwise and comes out.
Switch in the FOR position + lever in the lower position - the coil rotates clockwise and retracts.
Switch in the REV position + lever in the upper position – the coil rotates counter clockwise and retracts.
Switch in the REV position + lever in the lower position – the coil rotates counter clockwise and comes out.
Next, you can turn the device on using the pneumatic pedal provided with the device.
Always be ready to immediately stop the power device! Caution! The coil is about 23m long – it is not recommended to remove impurities located near this distance.
- In order to wind the coil in, set the lever and the switch in the appropriate position (as specified in item 3 above) and press the pedal.
- After completing the clearing, put the switch in the "OFF" position and disconnect the device from the mains. Remember to thoroughly clean the device before winding the coil.
text_image
Labeled diagram of a mechanical device with numbered parts for identification and assembly reference.MSW-POWER DRAIN CLEAN 2.3E
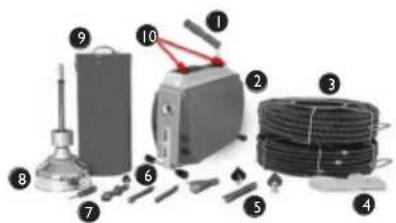
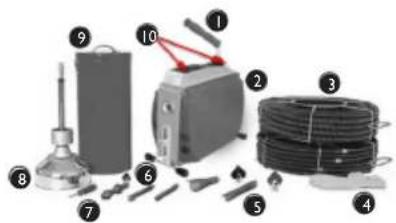
Description of the device:
- Handle
2 Motor switch - Lever
- Enclosure
- Coil
- Protective gloves
- Wrench
- Tip set
- Adjustable legs
- Lubrication hole
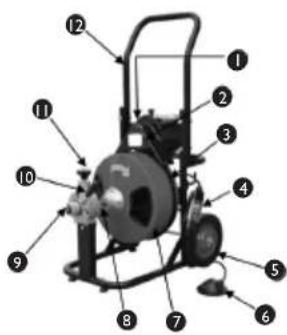
Description of the device:
- Lever/handle
- Locking lever/rear of the device
- Coil
- Protective gloves
- Tip set
- Legs
- Wrenches
- Tube
- Container
- Lubrication holes

text_image
Labeled diagram of electrical components including a lamp, transformer, coil, and heating elementMSW-POWER DRAIN CLEAN 4.6E

text_image
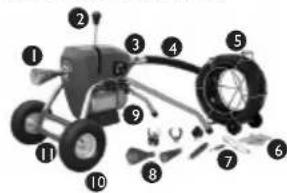
Labeled diagram of a motorcycle showing parts numbered 1 through 11 for identification.Description of the device:
- Outlet nozzle
2 Lever - Protective pipe joint
- Protective pipe
- Coil
- Protective gloves
- Wrenches
- Tip set
- Motor
- Wheels
- Frame
DESCRIPTION OF THE DEVICE OPERATION - APPLICABLE TO MODELS MSW-DRAIN CLEAN 2.3E |
MSW-POWER DRAIN CLEAN 2.3E | MSW-POWER DRAIN CLEAN 4.6E
Operation:
-
Before commencing operation, ensure that neither the device nor the power cable are damaged. Next, make sure that the switch at the motor is in the "OFF" position. If it is not, put it in the middle position. And put the lever in the upper position.
-
Next:
-
Adjust the legs and tighten the fitting bolts (for models MSW-DRAIN CLEAN 2.3E | MSW-POWER DRAIN CLEAN 2.3E)
- attach the protective pipe by inserting it into place (for model MSW-POWER DRAIN CLEAN 4.6E
and pull out an appropriate length of the selected coil. The method of connecting the coil can be found below. When the coil is ready, attach an appropriate tip with the power supply turned off.
Or in the case of the model MSW-POWER. DRAIN CLEAN 2.3E use the included tube instead of the pipe.
- Next, insert the coil prepared in advance into the opening of the device. Insert the coil in such a way as to put the end of the coil without the tip into the opening located at the front of the device – opposite the power cable (in the model MSW-POWER DRAIN CLEAN 4.6E, the coil should be inside the protective pipe). Leave about 50cm of the coil in front of the device. When the device is ready for clearing, connect it to the mains.
In the case of using the tube instead of the coil in the MSW-POWER DRAIN CLEAN 2.3E model, insert the narrow end of the tube into the rear of the device (on the power cable side). In order to do so, lift the locking pin located on the top of the enclosure, insert the tube and release the pin. Next, check if the tube is sufficiently stable and secured against falling out of the machine. Pull out enough coil from the tube for the coil to protrude from the front of the device after attaching the pipe. - In order to start clearing, place the device about 50cm from the place of inserting the coil, insert the coil into the opening in such a way as to prevent the coil from twisting and curling when the motor is on and put the direction switch located at the engine in the "FOR" position – the engine of the device is active, but the torque is not transmitted to the coil until the lever is put in the lower position. Next, insert an appropriate length of the coil (pulling it out of the device) into the opening of the cleared pipe. Use protective gloves! When the coil is in the right place, put the lever in the lower position start clearing. In order to insert consecutive sections of the coil into the opening, put the lever in the upper position, thus stopping the coil, then, wearing protective gloves, push another section in and put the lever in the lower position again. Caution! When standing near the coil, remember about the existing torsional torque. The coil can move independently at any time, even when the drive is off.
In the case of using a tube instead of a coil in the MSW-POWER DRAIN CLEAN 2.3E model, place the device about 50cm from the place of inserting the coil and put the direction switch located at the motor in the "FOR" position and put the lever in the lower position. Next, insert the coil into the opening is such a way that prevents it from being twisted or curled when the device is on and start clearing by putting the lever in the lower position.
The model MSW-POWER DRAIN CLEAN 2.3E is fitted with a special lever lock. To engage it, put the lever in the lower position and lock it with a handle (located next to the tube fitting place) by turning it clockwise. Thanks to this handle, the device can be conveniently carried using the lever. In order to disengage the lock, press the lever down and turn the handle counter-clockwise.
You should always be prepared to stop the device in case of emergency

- In order to pull the coil out, it is necessary to change its rotation direction. In order to do so, put the lever in the upper position, put the switch in the "OFF" position, wait for the motor to come to a full stop, then set the direction to "REV" and put the lever in the lower position again. When pulling the coil out, it must be under constant supervision. In order to remove the tube in the MSW-POWER DRAIN CLEAN 2.3E model, lift the pin and pull the tube out.
- After completing the clearing and removing the coil, put the lever in the upper position, set the switch to „OFF“ and disconnect the device from the mains. Before winding the coil, clean the device thoroughly.
THE METHOD OF CONNECTING/DISCONNECTING THE COIL AND THE TIPS - APPLICABLE TO MODELS MSW-DRAIN CLEAN 2.3E | MSW-POWER DRAIN CLEAN 2.3E | MSW-POWER DRAIN CLEAN 4.6E
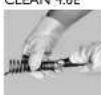
In order to connect the end of the coil with another end / tip, insert the matching part of the spiral as shown in the illustration. Next, check if the joint is solid and if the pin located inside is visible. This is the only way of connecting the coils, so it must be done properly. The manufacturer does not provide for the possibility of joining different diameter tips/ coils.
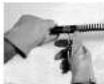
In order to disconnect the elements, insert the wrench provided with the device into the hole located near the middle of the joint in such a way that the wedge profiled on the wrench pushed the locking pin inside. Next, pull both ends apart holding the coil and/or the tip with both hands. When disconnecting, the wrench must be inside the hole.
IX. TRANSPORTATION AND STORAGE
Shaking, crashing and turning upside down of the device should be prevented when transporting it. Store it in a properly ventilated location with dry air and without any corrosive gas.
X. CLEANING AND MAINTENANCE
- Disconnect from electricity when cleaning equipment.
- Use cleaner without corrosive substances to clean surface.
- Dry all parts well after cleaning before the device is used again.
- Store the unit in a dry, cool location, free from moisture and direct exposure to sunlight.
- Never spray the device with water jets.
- After finishing work, leave the device working on idle for about 2 minutes. Put a small amount of oil into the oil holes – depending on the size of the machine.
- All the working elements such as the coil, outlet nozzle and tube should be kept clean. The coil should be properly lubricated (oiled).
XI. REGULAR CONTROL OF THE DEVICE
Check the machine regularly for signs of damage. If the machine is damaged, please stop using it immediately and contact your customer service to solve the problem.
What to do in case of a problem?
Please contact your customer service and prepare following information:
- Invoice number and serial number (the latter is to be found on the technical plate on the machine).
- If relevant, a picture of the damaged, broken or defective part.
- It will be easier for your customer service clerk to determine the source of the problem if you give a detailed and precise description of the matter. The more detailed your information, the better customer service will be able to solve your problem rapidly and efficiently!
CAUTION: Never open the machine without the authorization of your customer service. This can lead to a loss of warranty!
INSTRUKCJA OBSŁUGI


text_image
Labeled diagram of a mechanical device with numbered components for identificationtext_image
Labeled diagram of a cooling fan assembly with numbered parts for identificationMSW-POWER DRAIN CLEAN 2.3E
text_image
Labeled diagram of electrical components including a lamp, transformer, coil, and fuse with numbered partsMSW-POWER DRAIN CLEAN 4.6E

text_image
Labeled diagram of a motorcycle showing numbered parts for identificationOpis urządzenia:
text_image
Labeled diagram of a mechanical device with numbered components for identification- Vypínač motoru:
text_image
Labeled diagram of a mechanical or electronic device with numbered components for identification.Popis zařízení:
text_image
Labeled diagram of electrical equipment including a lamp, transformer, coil, and test tube with numbered partsPopis zařízení:
text_image
Labeled diagram of a motorcycle showing parts numbered 1 through 11 for identification.Popis zařízení:
CLEAN 2.3E | MSW-POWER DRAIN CLEAN 4.6E
Princip funkce:
text_image
Labeled diagram of a mechanical pump or pump assembly with numbered components for identification.text_image
Labeled diagram of a cooling fan assembly with numbered parts for identificationMSW-POWER DRAIN CLEAN 2.3E
text_image
Labeled diagram of electrical components including a lamp, transformer, coil, and heating elementMSW-POWER DRAIN CLEAN 4.6E

text_image
Labeled diagram of a motorcycle showing parts numbered 1 through 11 for identification.text_image
Labeled diagram of a portable water heater with numbered components for identificationtext_image
Labeled diagram of a mechanical or electronic device with numbered components for identification.MSW-POWER DRAIN CLEAN 2.3E

text_image
Labeled diagram of electrical equipment including a lamp, transformer, coil, and bulb componentsMSW-POWER DRAIN CLEAN 4.6E

text_image
Labeled diagram of a motorcycle showing parts numbered 1 through 11 for identification.text_image
Labeled diagram of a mechanical device with numbered components for identificationtext_image
Labeled diagram of a cooling fan assembly with numbered parts for identificationMSW-POWER DRAIN CLEAN 2.3E

text_image
Labeled diagram of electrical components including a lamp, transformer, coil, and fuse with numbered partsMSW-POWER DRAIN CLEAN 4.6E

text_image
Labeled diagram of a motorcycle showing parts numbered 1 through 11 for identification.text_image
Labeled diagram of a mechanical device with numbered components for identification- Motoros kapcsoló:
text_image
Labeled diagram of a mechanical or electronic device with numbered components for identification.MSW-POWER DRAIN CLEAN 2.3E

text_image
Labeled diagram of electrical equipment including a lamp, transformer, coil, and bulb componentsMSW-POWER DRAIN CLEAN 4.6E

text_image
Labeled diagram of a motorcycle showing parts numbered 1 through 11 for identification.A készülék leírása:
NAMEPLATES TRANSLATIONS

| MOTOR TECHNICS | expondo.com | |
| Product name | Input Power (W) | |
| Drain Cleaning Machine | Rated Voltage (V)Rated Frequency (Hz)Rotating speed (r.p.m.)Diamater of pipe (mm) | |
| Model | Protection ClassWeight(kg)Production yearSerial No. | |
| Manufacturer: espondo Polska sz. 2 o.o. sp. c. | ||
| Manufacturer Address: ul. Nowy Kiselin - innowacyjne 7, 65-002 Zielone Góra | Poland, EU | ||

NAMEPLATES TRANSLATIONS
GENERAL PRODUCT INFORMATION

GENERAL PRODUCT INFORMATION NOTES/NOTIZEN

text_image
AVERTISSEMENT Attention de ne pas surcharger les cables. Cela pour- rait entraîner des torsions, déformations ou ruptures des cables en question. Cela pourrait provoquer de graves lésions. No pas toucher. Ne pas approcher les mains de la machine en fonctionnement. ATTENZIONE Si prega di non sollecitrare eccessivamente i cavi. Questa asione può causare torsioni, schiaccadamenti o la rotura del suddetti cavi. Ciò può causare gravi losioni. Non toccare. Non porre le mani in prossimità del dispositivo in funzione. NOTA Por favor, no tensar los cables. Esto podria causar torsiones, dobleces o roturas en los mismes, dando como resultado lesiones graves. No tocar. No colocar las manos sobre la máquina en funcionamiento.For the disposal of the device please consider and act according to the national and local rules and regulations.
CONTACT
expondo Polska sp. z o.o. sp. k.