
MD 12090 - Ice machine MEDION - Free user manual and instructions
Find the device manual for free MD 12090 MEDION in PDF.
| Product type | Ice machine for slushies, milkshakes and icy drinks |
| Brand | MEDION |
| Model | MD 12090 |
| Dimensions (L x W x H) | 42.9 x 17.7 x 42.4 cm |
| Net weight | Approx. 10.8 kg |
| Total capacity | 2.6 litres (slush) |
| Usable liquid capacity | 1.9 litre (MAX mark) |
| Refrigerant | Propane R-290 (flammable) |
| Climate class | N/SN/T/ST (+10°C to +43°C) |
| Power supply | Grounded power outlet (voltage see rating plate) |
| Standby consumption | ≤ 0.5 W (OFF mode) |
| Programs | Soft slush, Hard slush, Milkshake, Wine, Cocktail, Cleaning |
| Main functions | Continuous stirring, cold keeping (12 h), key lock, automatic shut-off |
| Cleaning | Cleaning program (4 min); disassembly of tap; cleaning of parts with hot water (40-50°C) and mild detergent |
| Safety | Key lock, compressor protection (5 min wait), use by children from 8 years with supervision |
| Material | Plastic housing, slush container, metal evaporator |
| Spare parts | Available on MEDION online shop (medion.com/medionserviceshop) |
| After-sales service France | Hotline: 02 55 66 12 45 (Mon-Fri 9am-7pm) |
| Included accessories | Slush Ice Maker, quick start guide |
| General information | Instruction manual available in multiple languages; online community support |
Frequently Asked Questions - MD 12090 MEDION
User questions about MD 12090 MEDION
0 question about this device. Answer the ones you know or ask your own.
Ask a new question about this device
Download the instructions for your Ice machine in PDF format for free! Find your manual MD 12090 - MEDION and take your electronic device back in hand. On this page are published all the documents necessary for the use of your device. MD 12090 by MEDION.
USER MANUAL MD 12090 MEDION
MEDION Service Center
ENAME, S.A
- Information about this user manual 124
1.1.Explanation of symbols 124
FR - Proper use 125
- Safety instructions 125
- Package contents 129
5.5. Appliance overview
5.1. Programmes 131 - Before using the appliance for the first time 131
- Making an iced drink 132
7.1. Button lock 33
7.2. End of programme 133
7.3. Switching acoustic signals on/off 133 - Tips for making drinks 134
8.1. Tips for saving energy 134 - Recipe suggestions 135
9.1. Non-alcoholic slushies 135
9.2.Milkshakes 135
9.3. Long drinks with alcohol 136
9.4.Wine-based slushies 137 - Cleaning the appliance 138
10.1. Using the cleaning programme 139
10.2. Cleaning parts 139 - Prolonged non-use/transport 140
- Troubleshooting 141
- Disposal 143
- Technical specifications 144
- EU declaration of conformity 144
- Spare parts 144
- Service information 145
- Legal Notice 145
1. Information about this user manual

Thank you for choosing our product. We hope you enjoy using this appliance.
Please read the safety instructions and the user manual carefully before using the appliance for the first time. Note the warnings on the appliance and in the user manual.
Always keep the user manual close to hand. If you sell the appliance or give it away, please ensure that you also pass on this user manual. It is an essential component of the product.
1.1. Explanation of symbols
If a block of text is marked with one of the warning symbols listed below, the hazard described in that text must be avoided to prevent the potential consequences described there from occurring.

DANGER!
Warning: risk of fatal injury!

WARNING!
Warning: risk of possible fatal injury and/or serious irreversible injuries!

CAUTION!
Warning: risk of minor and/or moderate injuries!
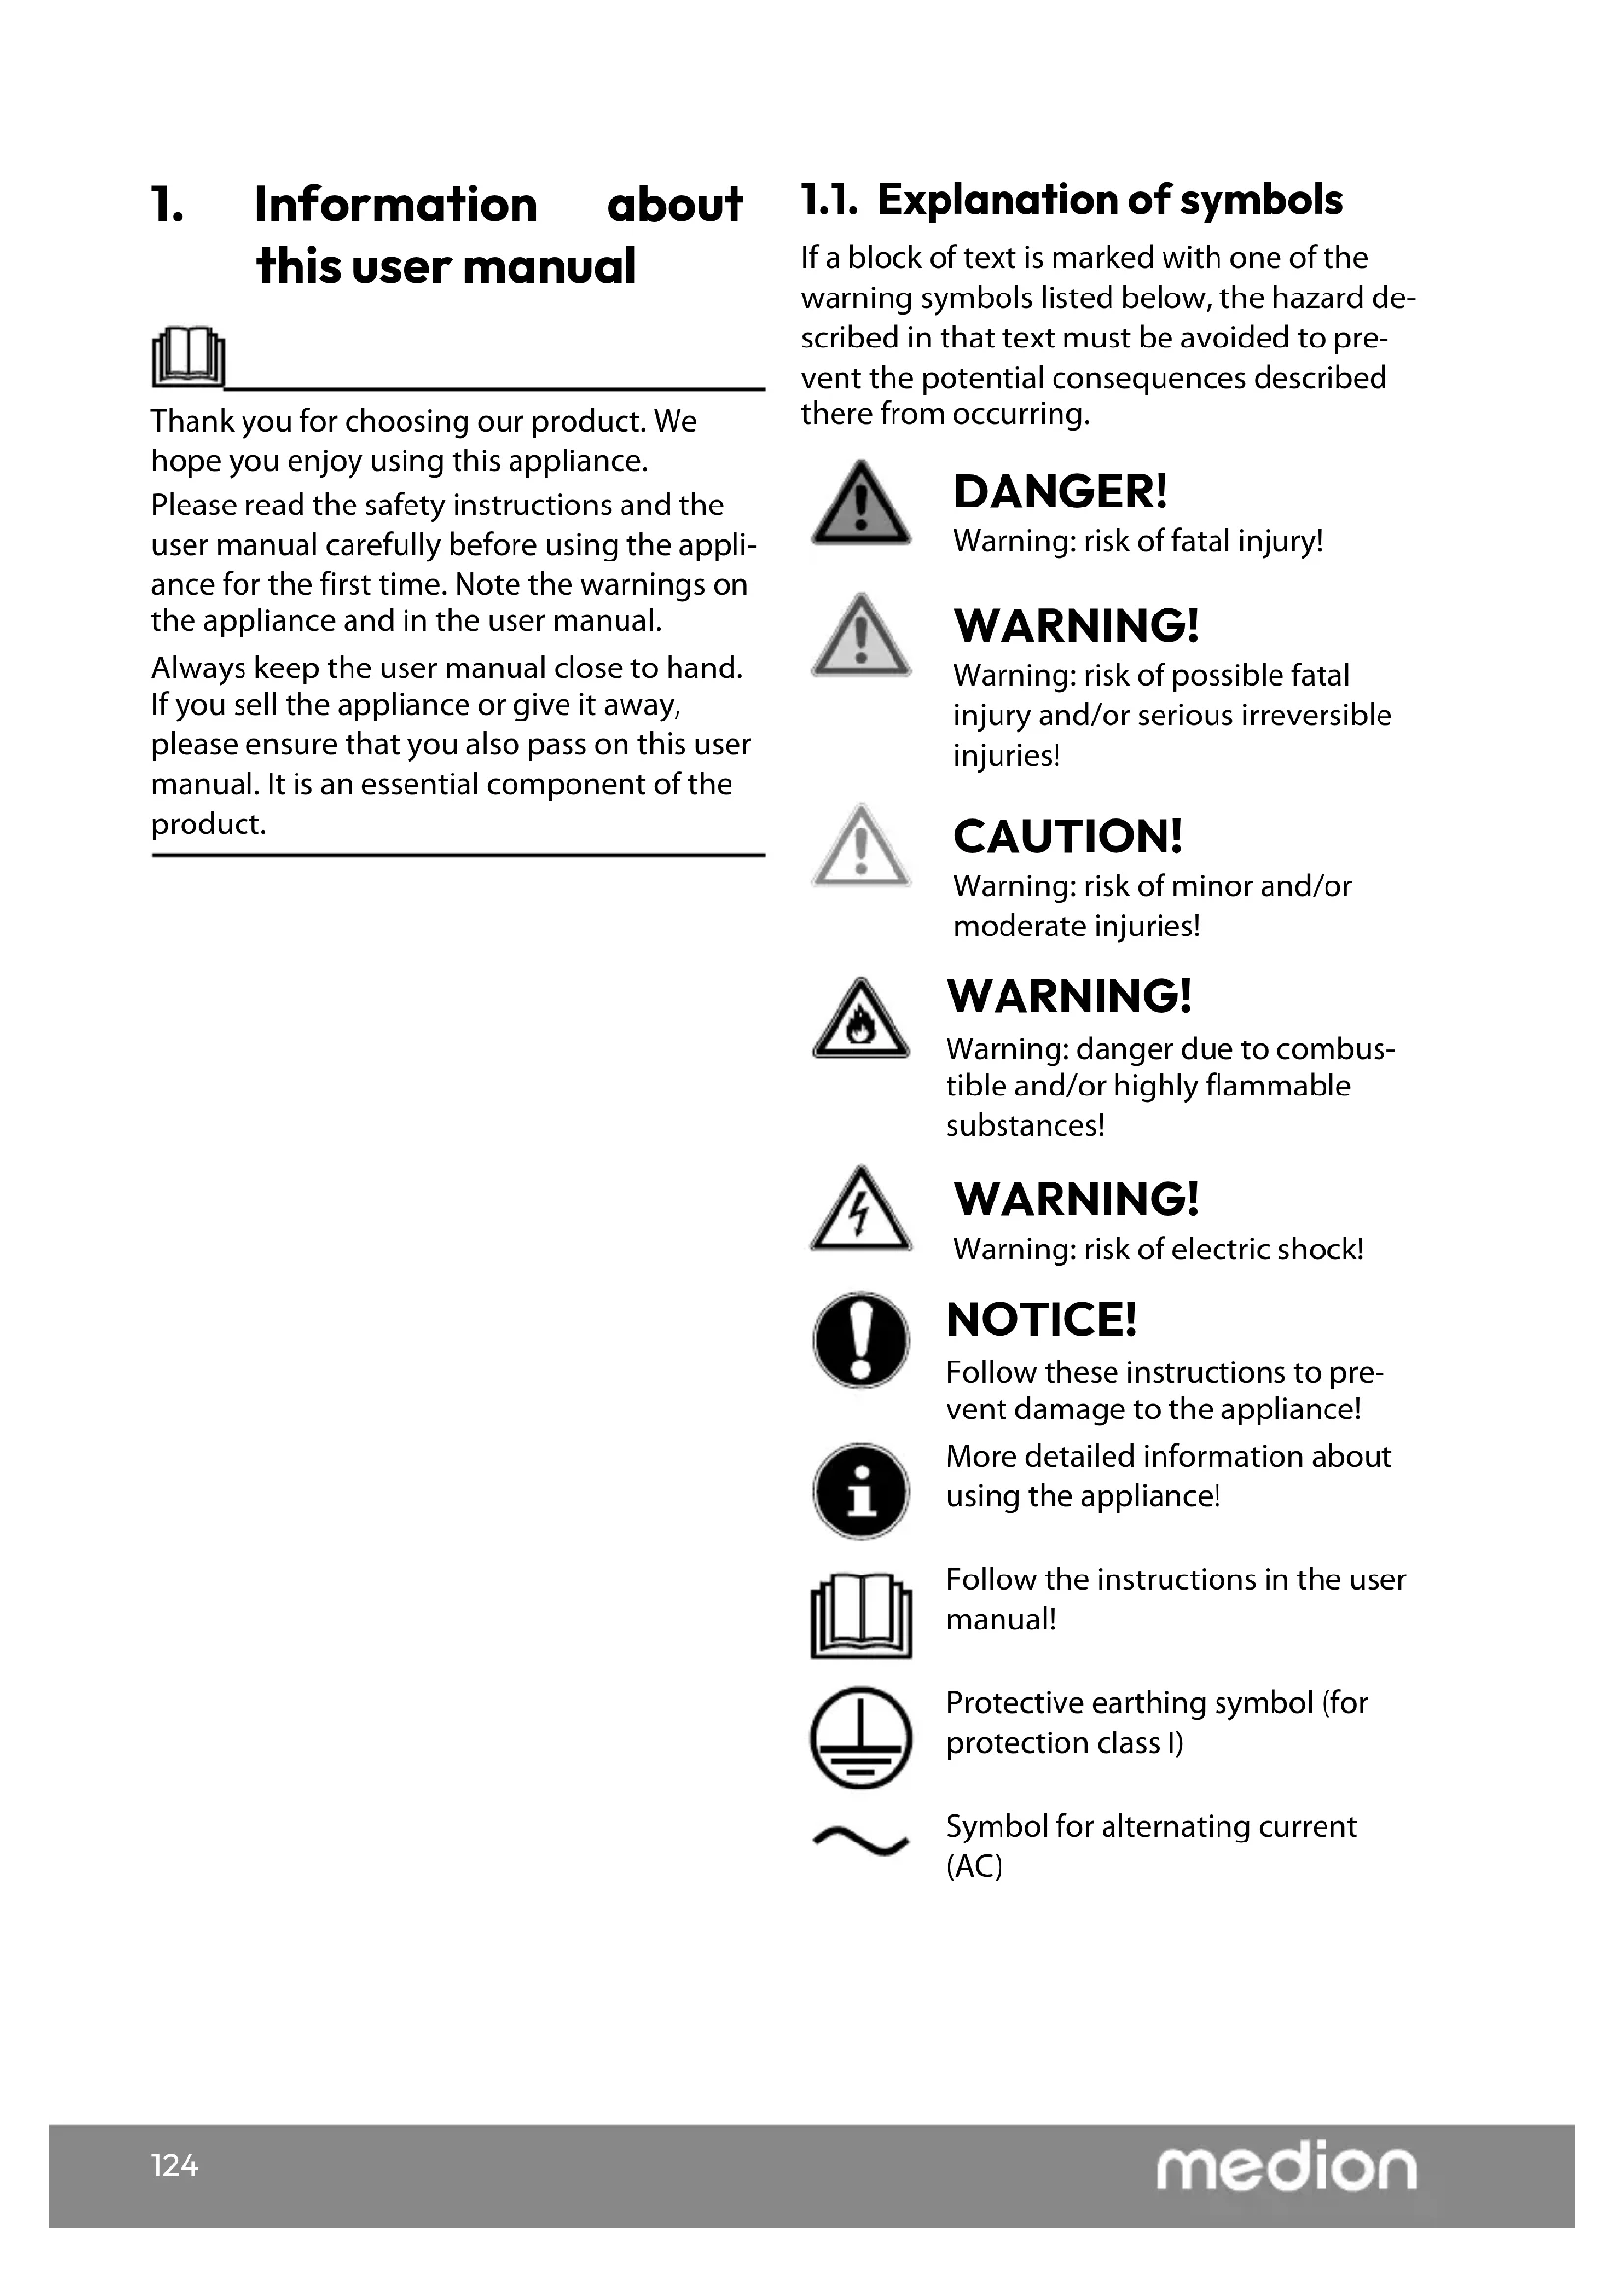
WARNING!
Warning: danger due to combustible and/or highly flammable substances!
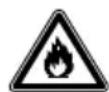
WARNING!
Warning: risk of electric shock!

NOTICE!
Follow these instructions to prevent damage to the appliance!

More detailed information about using the appliance!

Follow the instructions in the user manual!
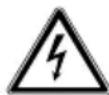
Protective earthing symbol (for protection class I)

Symbol for alternating current (AC)
2. Proper use
This appliance is designed for making slush ice drinks and chilled milkshakes.
This appliance is designed for use in private households and similar household applications, such as:
Staff kitchens in shops, offices and other workplaces
In agriculture and by guests in hotels, motels and other types of accommodation
- Bed-and-breakfast establishments
- Catering establishments and wholesale use
When used in commercial areas, the regulations that apply there must be observed.
Please note that we shall not be liable in cases of improper use:
Do not modify the appliance without our consent and do not use any auxiliary equipment that we have not approved or supplied.
Only use replacement parts or accessories that we have supplied or approved.
Comply with all the information in this user manual, especially the safety instructions. Any other use is considered improper and can cause personal injury or property damage.
3. Safety instructions
IMPORTANT SAFETY INSTRUCTIONS - READ CAREFULLY AND KEEP FOR FUTURE REFERENCE!
- Keep the appliance and its accessories out of the reach ES of children.
This appliance may be used by children over the age of 8 and by persons with reduced physical, sensory or mental abilities or by those with limited experience and/or knowledge, provided that they are supervised or have been instructed in the safe use of the appliance and have understood the associated risks.
Children must not be allowed to play with the appliance.
- Cleaning and user maintenance may not be carried out by children unless they are supervised.
Children between the ages of 3 and 8 are allowed to load and remove items from refrigerating appliances.
Children younger than 8 must be kept away from the power cable.
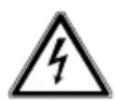
WARNING! Risk of electric shock/ short circuit!
There is a risk of electric shock/ short circuit from live parts.
Only connect the mains to easily accessible, correctly installed power sockets located close to the appliance. Always keep the mains socket free of obstructions so that the mains plug can be pulled out easily if a hazard should occur.
Before using the appliance, check that the voltage information on the type plate matches the local supply voltage.
When you unplug the mains plug from the mains socket, always take hold of the plug itself, not the cable.
WARNING! Ensure the mains cable is out of harm's way and will not trip people up. Do not use an extension cable.
WARNING! Do not allow the mains cable to become trapped or damaged during installation.
WARNING! Do not connect portable multiple sockets or power supplies to the back of the appliance.
Fully unwind the cable during use.
Unplug the appliance mains plug from the socket:
- when you are cleaning the appliance
- if the appliance is damp or wet
- if you are no longer using the appliance
- when the appliance is left unattended
-
during thunderstorms.
-
Do not allow the mains cable to come into contact with hot objects or surfaces (e.g. cooker hob).
- Do not use if the appliance or the mains cable is visibly damaged or if the appliance has been dropped. Check the appliance and the mains cable for damage before using the appliance for the first time and after each use.
-
Contact our Service team without delay if the appliance has been damaged during transport.
-
Do not, under any circumstances, make any unauthorised modifications to the appliance or try to open and/or repair a component yourself.
If there is damage to the mains connection cable on this appliance, it must be replaced by the manufacturer, its customer service department or another suitably qualified person. This is necessary to avoid hazards. - Do not operate the appliance with an external timer or a separate remote control system.
The appliance must not be submerged in water or other liquids nor held under running water nor used in damp environments because this may result in an electric shock. - Keep the appliance, the ventilation openings and the mains cable away from wash basins, sinks or the like.
- Do not place any objects filled with liquid (e.g. vases or drinks) on or near the appliance or the mains adapter.
Never touch the appliance DE or mains cable with damp or wet hands. FR
Use the appliance indoors only.

WARNING! Risk of injury! Possibility of damage to the appliance!
ES
IT
EN
Improper handling can result in damage to your appliance and your health. Please follow the safety advice below closely:
WARNING! Only fill the container with drinkable ingredients.
WARNING! Do not store any explosive materials, for example aerosol containers containing flammable propellant gas, in or in the vicinity of the appliance.
WARNING! Make sure that the ventilation openings in the housing, around the appliance and in the installation niche are not blocked.
- Never place the appliance on the edge of a table – it could tip over and fall.
Place the appliance on a stable, level surface.
- Do not switch the applian on and off too often in succession, as this can damage the compressor (wait at least 5 minutes).
- Never cover the ventilation openings and leave enough room for ventilation of at least 8cm . Set up the appliance at a sufficient distance from other appliances and the wall.
Never use the appliance with an empty container. - Do not pour hot drinks into the container.
Do not use the appliance outdoors. -
Do not expose the appliance to extreme conditions. Avoid:
-
high humidity or wet conditions
- extremely high or low temperatures
- direct sunlight or other strong sources of heat (e.g. oven, grill),
- naked flames.
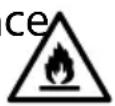
DANGER! FIRE HAZARD! Flammable substances!
The appliance's refrigeration system contains the refrigerant
propane (R-290). It is a natural gas that is very environmentally friendly, but it is combustible.
Avoid naked flames and ignition sources.

WARNING! Risk of injury!
There is a risk of injury if the refrigerant circuit is damaged.
WARNING! During trans
port and installation of the appliance, ensure that none of the components of the refrigerant circuit are damaged.
In the event of damage, have the appliance repaired by a qualified technician before using it again.
If the refrigeration system has nevertheless become damaged, ventilate the room.
Set up the appliance in a day and ventilated room. The room should be around 4m^2 to enable sufficient ventilation if the cooling system becomes damaged.
Package contents

DANGER!
Risk of choking and suffocation!
There is a risk of choking and suffocation due to swallowing or inhaling small parts or plastic wrap.
- Keep the plastic packaging out of the er-reach of children.
- Keep all packaging materials used (bag, pieces of polystyrene etc.) out of the reach of children.
-
Do not allow children to play with the packaging material.
-
Remove the product from the packaging and remove all packaging materials.
- Please check your package contents to ensure that all items are included and in perfect condition. If anything is missing or damaged, please contact us within 14 days of purchase.
The following items are supplied with your product:
- Slush ice maker
Short manual
5. Appliance overview
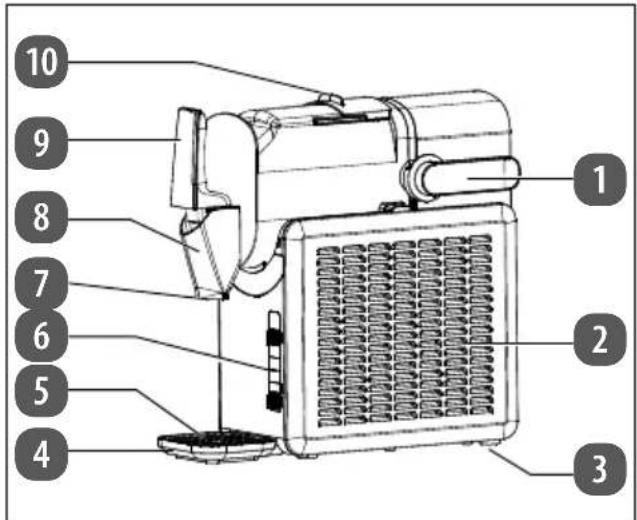
Fig. 1 - Parts overview
- Locking lever
- Ventilation openings
- Feet
- Collection tray
- Drain rack
- Control panel
- Outlet opening
- Tap
- Tap lever
- Container lid
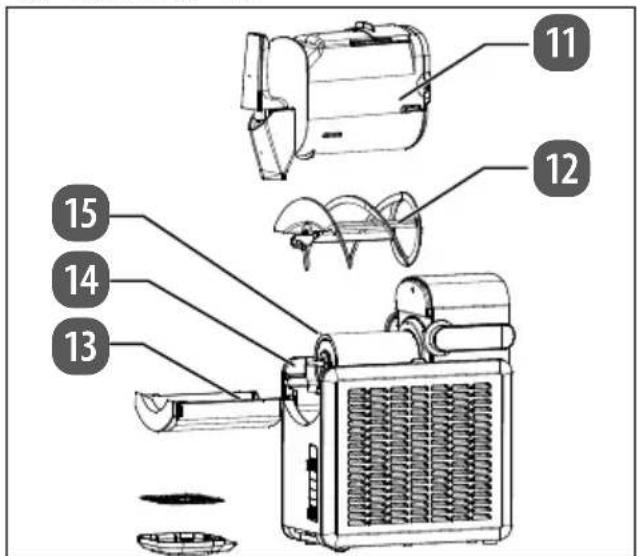
Fig. 2 - Parts overview with the appliance open
- Slush ice container
- Auger
- Drip tray
- Housing
- Evaporator
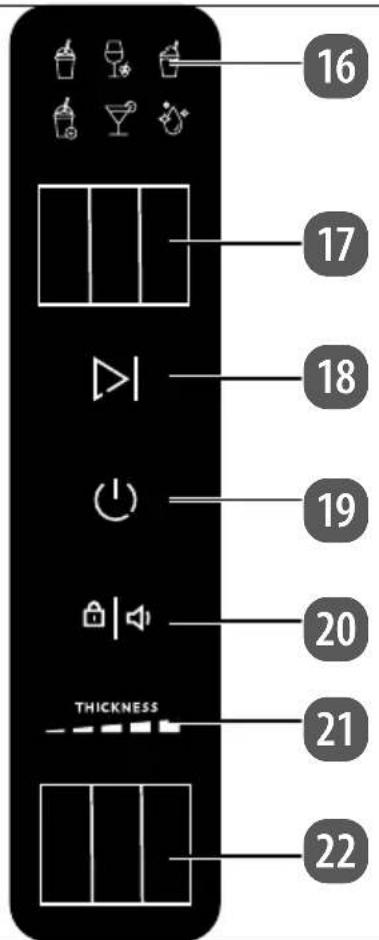
Fig. 3 - Control panel
- Programme indicator
- Programme selector switch
- button: start/stop
- ( ) button: switch the appliance on/off
- button/operating light: switch the key lock/acoustic signals on/off
- THICKNESS: consistency display
- consistency selector switch
5.1. Programmes
| Pro- gramme | Ingredients Examples | Duration* |
| Slush ice, soft | Cola, lemon- ade, fruit juice | Approx. 25–50 minutes (at an ambient temperature/ beverage tem- perature of 20–25 °C) |
| Slush ice, thick | ||
| Milkshake | Yoghurt drink, mixed milk drinks with co- coa/coffee | Approx. 40–45 minutes (at an ambient temperature/ beverage tem- perature of 20–25 °C) |
| Wine | Red wine, white wine, sparkling wine, cham- pagne, pro- secco | Approx. 40–65 minutes (at an ambient temperature/ beverage tem- perature of 20–25 °C) |
| Cocktails | Mixed alcohol- ic drinks | Approx. 40–90 minutes (at an ambient temperature/ beverage temperature of 20–25 °C, depending on alcohol con- tent) |
| Cleaning | - Approx. 4 min- utes |
- The preparation time varies depending on the ingredients and their sugar, alcohol and fat content, as well as their temperature.
6. Before using the appliance for the first time
Check the appliance for damage while in NL transit.
Place the appliance onto a level, non-slip ES and heat-resistant surface.
Take the space requirements into consideration when setting up the appliance: To ensure adequate ventilation, a clearance of at least 8 cm must be maintained on all sides.
Before using the appliance for the first time, wait 2 hours after you have set it up. Leave the container lid open for at least 2 hours.
Clean the appliance, including all parts that come into contact with food, once you have unpacked it. Comply with the corresponding notes in section "10. Cleaning the appliance" on page 138. Make sure that the mains plug is disconnected from the socket before cleaning.
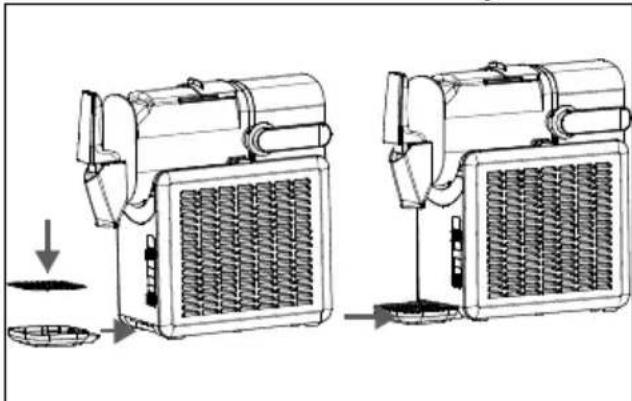
Fig. 4 - Assembling the appliance
Place the tap lever on the tap.
Place the drip grate on the collection tray and slide the collection tray under the appliance until it clicks into place (see Fig. 4).
- Ensure that the slush ice container and the auger are inserted correctly.
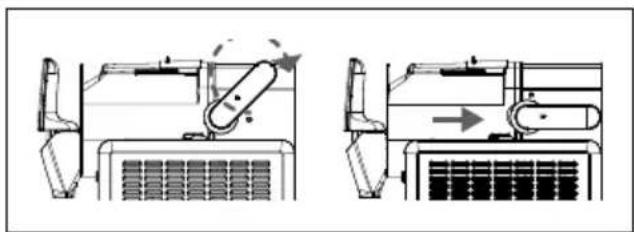
Fig. 5 - Securing the slush ice container
Turn the locking lever anti-clockwise to secure the slush ice container.
The appliance is now ready for use.

The appliance is driven by an electric motor. This can lead to a slight smell during initial operation. This smell is normal and is not a sign of a malfunctioning appliance. Ensure that there is adequate ventilation.
7. Making an iced drink

WARNING!
Health and hygiene
To prevent contamination of the food, observe the following instructions:
Opening the lid for prolonged periods of time can lead to a significant rise in temperature in the appliance compartments.
Regularly clean surfaces that may come into contact with food and the accessible drainage systems.
Clean the water tank if the appliance has not been used for 48 hours.
- Do not insert your fingers into the outlet standard opening. There is a risk of injury!
Do not touch the evaporator because this can cause burns.
Open the container lid.
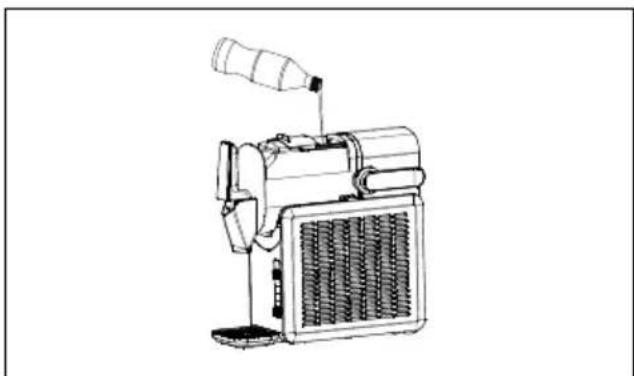
Fig. 6 - Filling the slush ice container
- Fill the slush ice container no higher than the MAX marking. The fill level must not fall below the MIN marking.
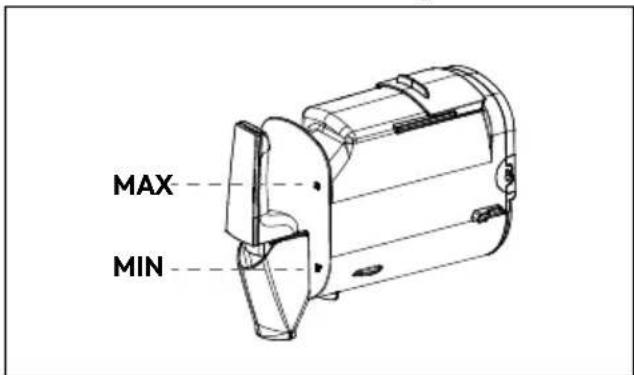
Fig. 7 - Observe the fill level marking
- Close the container lid.
Plug the mains plug into a socket.
The symbol for the standard programme lights up.
To select a different programme, move the programme selector switch to the left or right until the desired programme lights up on the display panel.
The consistency display shows three bars as standard.
To select a different consistency, move the consistency selector switch to the left or right until the desired level(1 to 5) lights up.

The higher the level selected, the more the appliance cools and the firmer the consistency becomes.
Press the button to start the program.
The beverage ingredients are cooled down according to the selected programme and continuously mixed by the auger to achieve a uniform consistency.
During preparation, the selected programme flashes and the bars on the consistency display light up continuously until the consistency is achieved.
To interrupt the programme, first cancel the button lock (see "7.1. Button lock" on page 133). Press the button. To resume the programme, press the button again.

The accumulation of condensation on the outside of the slush ice container is normal in damp weather or during prolonged use.
7.1. Butt on lock
Approx. 10 seconds after starting the programme, the key lock is automatically activated and the key lock symbol lights up.
To cancel the key lock, press the button. The symbol disappears.
7.2. End of programme
At the end of the programme, 6 acoustic signals sound. The programme symbol stops flashing and lights up permanently.
The appliance switches to maintenance cooling. The auger continues to stir the iced drink.
Place a suitable container under the tap. Pull the tap lever towards you and take the desired portion of slush ice/milkshake.

Do not switch off the appliance while you are taking the slush ice, because the ice mixture can freeze completely without moving the auger and block the motor.
After 12 hours of maintenance cooling, the appliance returns to the programme selection. After a further 10 minutes without operation, the appliance switches to standby mode.
To switch off the appliance, press the button.
Clean the appliance using the cleaning programme (see "10.1. Using the cleaning programme" on page 139), switch off the appliance and then disconnect the mains plug from the socket.
7.3. Switching acoustic signals on/off
In standby mode, press and hold the button until two acoustic signals sound. The acoustic signals are activated.
To switch the acoustic signals off again, press and hold the button again in standby mode until an acoustic signal sounds.
8. Tips for making drinks
You will achieve the best results:
- with a slush ice container filled up to the MAX marking
with pre-chilled drinks.

NOTICE!
Possibility of damage to the appliance!
An unsuitable sugar or alcohol content can cause the evaporator to freeze, damage the auger or block the motor and thus damage the appliance.
Use drinks with a
Sugar content higher than 6%
- Alcohol content from 2% to 16%
Filter out the pulp from fruit juices to prevent the tap from becoming blocked.

If possible, do not interrupt the process of making slush ice, because the ice mixture can freeze completely and block the motor.
8.1. Tips for saving energy
The actual cooling capacity depends on the outside temperature. Choose a location to use the appliance that is well ventilated and protected from the sun's rays.
Use pre-cooled drinks.
If you open the container lid for a longer period of time, this can lead to a significant increase in temperature in the refrigerator compartment. To avoid loss of cold/heat, open the container lid only briefly and not too often.
Do not cover the ventilation openings.

The appliance is suitable for climate classes N/SN/T/ST (see technical specifications). Correct cooling performance of the appliance is guaranteed at ambient temperatures from +10^ to 43^ . If temperatures deviate from this range, the appliance performance may be reduced.
9. Recipe suggestions

The preparation time varies depending on the ingredients and their sugar, alcohol and fat content, as well as their temperature. If a thicker consistency is selected, the preparation time may increase accordingly.
Fill the slush ice container as described in "7. Making an iced drink" on page 132.
9.1. Non-alcoholic slushies
Slush ice with syrup
| Ingredients: 150 | 0 ml water |
| 300 ml syrup (e.g. raspberry syrup or woodruff syrup) | |
| Programme: | to taste |
| Consistency: 3 | |
| Preparation time: | Approx. 30–35 minutes |
Cola slush ice
| Ingredients: 190 ml cola | |
| Programme: | to taste |
| Consistency: 3 | |
| Preparation time: | Approx. 30–35 minutes |
Tropical slush ice
| Ingredients: 190 | 0 ml tropical fruit juice/ multivitamin juice |
| Programme: | to taste |
| Consistency: 3 | |
| Preparation time: | Approx. 50–55 minutes |
Lemonade slush ice
| Ingredients: 120 ml Sprite | |
| 350 ml cranberry juice | |
| 350 ml strawberry juice | |
| Programme: | to taste |
| Consistency: 3 | |
| Preparation time: | Approx. 45-50 minutes |
9.2. Milkshakes
Iced latte
| Ingredients: 946 ml black coffee (cold) | |
| 245 ml chocolate syrup | |
| 290 ml milk | |
| 290 ml cream | |
| Programme: | |
| Consistency: 5 | |
| Preparation time: | Approx. 40–45 minutes |
Vanilla latte
| Ingredients: 946 ml black coffee (cold) |
| 245 ml vanilla syrup |
| 290 ml milk |
| 290 ml cream |
| Programme: |
| Consistency: 5 |
| Preparation time: Approx. 40-45 minutes |
Caramel latte
| Ingredients: 946 | ml black coffee (cold) |
| 245 ml caramel syrup | |
| 290 ml milk | |
| 290 ml cream | |
| Programme: | |
| Consistency: 5 | |
| Preparation time: | Approx. 40–45 minutes |
Chocolate milk slush
| Ingredients: 150 ml chocolate milk (Chocomel) | |
| 200 ml chocolate syrup | |
| Programme: | |
| Consistency: 3 | |
| Preparation time: | Approx. 40–45 minutes |
Strawberry milkshake
| Ingredients: 150 | 0 ml full cream milk |
| 350 ml strawberry syrup | |
| Programme: | |
| Consistency: 5 | |
| Preparation time: | Approx. 40–45 minutes |
Vanilla milkshake
| Ingredients: 150 ml full cream milk |
| 350 ml vanilla syrup |
| Programme: |
| Consistency: 5 |
| Preparation time: Approx. 40-45 minutes |
Chocolate milkshake
| Ingredients: 150 ml full cream milk |
| 350 ml chocolate syrup |
| Programme: |
| Consistency: 5 |
| Preparation time: Approx. 40-45 minutes |
9.3. Long drinks with alcohol
Frozen margarita
| Ingredients: 90 | ml water |
| 350 ml tequila | |
| 250 ml lime juice | |
| 200 ml triple sec (orange liqueur) | |
| 200 ml cane sugar syrup | |
| Programme: | |
| Consistency: 3 | |
| Preparation time: | Approx. 50-55 minutes |
Pina colada
| Ingredients: 100 ml pineapple juice |
| 500 ml coconut rum liqueur (e.g. Malibu) |
| 400 ml coconut cream/co- conut milk |
| Programme: | |
| Consistency: 3 | |
| Preparation time: | Approx. 70–75 minutes |
Aperol
| Ingredients: 600 ml Aperol | |
| 600 ml orange juice | |
| 450 ml prosecco | |
| 150 ml mineral water | |
| Programme: | |
| Consistency: 3 | |
| Preparation time: | Approx. 55-60 minutes |
Blue lagoon
| Ingredients: 144 | 0 ml lemonade |
| 180 ml BlueCuraçao | |
| 180 ml vodka | |
| Programme: | |
| Consistency: 3 | |
| Preparation time: | Approx. 40–45 minutes |
Vodka lemon
| Ingredients: 160 | 0 ml lemonade (or bitter lemon, orange lemonade to taste) |
| 300 ml vodka | |
| Programme: | |
| Consistency: 3 | |
| Preparation time: | Approx. 55–60 minutes |
Ginger 43
| Ingredients: 150 ml ginger ale | |
| 300 ml Licor 43 liqueur | |
| Programme: | |
| Consistency: 3 | |
| Preparation time: | Approx. 60–65 minutes |
9.4. Wine-based slushies
White wine slush
| Ingredients: 190 ml Spätlese white wine | |
| Programme: | |
| Consistency: 3 | |
| Preparation time: | Approx. 45-50 minutes |
Sangria slush
| Ingredients: 190 ml sangria (7% alcohol content) | |
| Programme: | |
| Consistency: 3 | |
| Preparation time: | Approx. 60–65 minutes |
Frozen mimosa
| Ingredients: 830 ml orange juice |
| 1070 ml prosecco or cham-agne |
| Programme: |
| Consistency: 5 |
| Preparation time: Approx. 45–50 minutes |
Red wine slush
| Ingredients: 105 | 0 ml orange juice |
| 750 ml red wine | |
| 100 ml orange liqueur or brandy | |
| 5 tablespoons brown sugar | |
| Programme: | |
| Consistency: 3 | |
| Preparation time: | Approx. 55–60 minutes |

Before filling the slush ice maker, mix the ingredients in a suitable bowl until the sugar has dissolved.
Tinto de verano
| Ingredients: 145 | 0 ml red wine |
| 450 ml lemonade (Sprite) | |
| Programme: | |
| Consistency: 3 | |
| Preparation time: | Approx. 50–55 minutes |
10. Cleaning the appliance

WARNING!
Risk of electric shock!
There is a risk of electric shock due to live parts.
- Never submerge the appliance or the mains cable with plug in water or other liquids!
Unplug the mains plug from the socket before cleaning the appliance.

WARNING!
Risk of injury!
Improper cleaning can lead to injury or damage to the appliance.
WARNING! Do not use any other mechanical equipment or synthetic agents to accelerate the defrosting process, e.g. electric heaters, hot air blowers or hair-dryers or pointed or hard objects. The heat insulation and appliance interior are sensitive to scratches and heat and can melt.
WARNING! Do not operate electrical appliances inside the cooling chamber that do not conform to the design recommended by the manufacturer.
There are moving parts in the container that may cause injury. Switch off the appliance and disconnect the mains plug before carrying out any work on the container.
- Do not use any abrasive or harsh cleaning agents on the inside or housing of the appliance as these could damage the surfaces.
- Do not use any flammable liquids to clean the appliance or appliance parts. An accumulation of gas can lead to explosions.

CAUTION!
Risk to health!
Remaining liquid can lead to the formation of germs and mould after 24 hours.
Regularly clean surfaces that may come into contact with food and accessible drain systems. For hygiene reasons, clean the appliance after each use.
Clean the water tank if the appliance has not been used for 48 hours.
Change the liquid daily for hygiene reasons.

CAUTION!
Risk of injury due to lifting or falling
The appliance is heavy.
Always hold the appliance on both sides at the bottom of the housing to move it. Never pull on the mains cable to move the appliance.
Avoid tilting the appliance more than 45^
Wait until the appliance has reached room temperature.
10.1. Using the cleaning programme
Fill the slush ice container with clean tap water (max. 50^ warm) up to the MAX marking.
Select the cleaning programme. It takes about 4 minutes.
Place a suitable, sufficiently large container under the tap. Operate the tap lever carefully and drain the liquid slowly and gradually.
If necessary, repeat the steps if the first cleaning is not sufficient.
Disconnect the mains plug from the socket and clean the parts as described below.
10.2. Cleaning parts
DE
Unlock the slush ice container by turning the locking lever to the left.
FR
- Remove the slush ice container. Remove the auger.
NL
Pull out the drip tray with drip grate. Pour out the liquid.
ES
Clean the parts with warm water (approx. 40 - 50^ and a mild washing-up liquid, a soft cloth or a soft brush. Rinse all the parts well under running water and dry them carefully.
IT
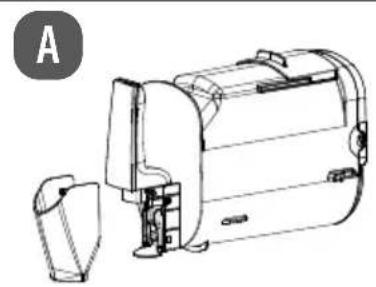
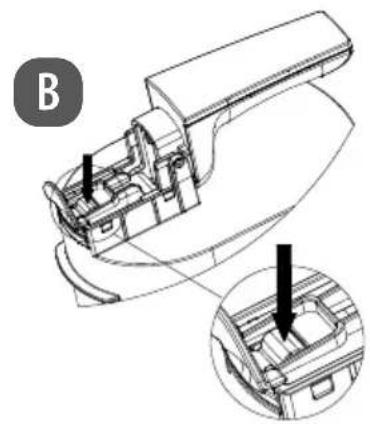
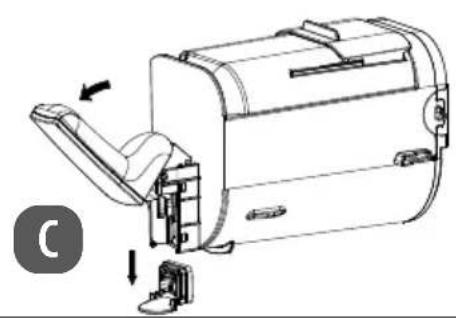
Fig. 8 - Cleaning the tap
- Remove the cover under the tap (A). Press and hold the tap lock (B). Then open the tap lever and remove the tap assembly (C).
EN
- Remove the rubber seal from the tap valve.
Clean the parts and reinsert them in reverse order.
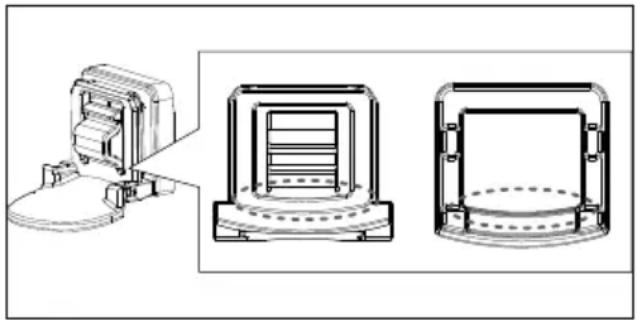
Fig. 9 - Inserting the tap valve seal correctly
- When inserting the rubber seal into the tap valve, make absolutely sure that it fits perfectly, otherwise the tap may leak: the straight side to the straight side of the recess, the rounded side to the rounded side of the recess.
Clean the evaporator and the rear sealing ring with a soft brush or a damp, soft cloth. Allow the parts to dry.

The sealing ring must not be dismantled or pulled out by force. This leads to deformation of the sealing ring and possible fluid leakage. This would render the appliance unusable.
11. Prolonged non-use/ transport
If the appliance will not be used for a longer period of time, switch it off, defrost it, clean it, dry it and leave the lid open to prevent mould from forming in the appliance.
- Store the completely dry appliance in a dry, dust- and frost-free location out of direct sunlight.
To avoid damaging the product during transport, we recommend that you use the original packaging.
12. Troubleshooting
The product left our warehouse in perfect condition. If you do, however, discover a problem, see if you can solve it by using the solutions offered in the following table. If you do not succeed, contact our customer service team.
| Error code/malfunction Cause Troubleshooting | ||
| The appliance is not working. | No power | Check whether the mains plug is plugged in. Check whether the socket is supplying power. Check that the connection cable is not damaged. |
| Appliance internal temperature too high | Compressor faulty ▶ Contact Service Centre | |
| The ambient temperature is above +43 °C. | The appliance is designed to work in a temperature range from +10 °C to +43 °C. | |
| The air circulation is insufficient. | Increase clearance from other objects. | |
| The appliance has been set up in a location exposed to direct sunlight or next to a heat source. | Place the appliance in a different position. | |
| Compressor does not work If the appliance is switched off and on again too quickly: Protection/delay time of the compressor of approx. three minutes to prevent it from starting too often | Unplug the mains plug for approx. 20 seconds and then plug it back in again. Switch the appliance back on and the compressor will work without delay | |
| • All symbols flash • Two acoustic signals/per minute sound Programme does not start | Microswitch malfunction: Slush ice container • Not used correctly • Not secured by the locking lever | Check that the slush ice container is inserted correctly and lock the locking lever. |
| ·All symbols flash ·A consistency bar lights up ·Two acoustic signals/per minute sound | Short circuit at the temperature sensor: Temperature sensor defective or short circuit on the circuit board | ► Check that everything has been installed correctly. ► Contact the service department if the temperature sensor is defective. |
| ·All symbols flash ·Two consistency bars light up ·Two acoustic signals/per minute sound | Interruption at the temperature sensor: Temperature sensor defective or short circuit on the circuit board | |
| ·All symbols flash ·Three consistency bars light up ·Two acoustic signals/per minute sound | Auger not fitted correctly or defective | ► Fit the auger correctly as described in “6. Before using the appliance for the first time” on page 131. ► Contact the service department and replace the defective auger. |
| Auger/motor blocked: Sugar content too low | ► Use drinks with a sugar content higher than 6%. ► Add one tablespoon of sugar/fruit juice per portion. | |
| Auger/motor blocked: Production process interrupted for too long, ice mixture freezes | ► Do not interrupt the production process. | |
| ·All symbols flash ·Four consistency bars light up ·Two acoustic signals/per minute sound | Production takes longer than 90 minutes: Check ingredients for excessive sugar content or cooling anomalies | Change the ingredients: ► Dilute the ingredients with 60 ml water per portion. |
| ·All symbols flash ·Five consistency bars light up ·Two acoustic signals/per minute sound | High alcohol content alarm Change | ► Dilute the ingredients with 60 ml water per portion. |
13. Disposal

When disposing of the appliance, note that it contains flammable refrigerant.
Avoid naked flames and ignition sources.
PACKAGING
Your appliance has been packaged to protect it from damage in transit. The pack
aging is made of materials that can be recycled in an environmentally friendly manner.

Observe the following packaging material label regarding waste separation with the abbreviations (a) and numbers (b):
1-7:plastics/20-22:paper and cardboard/80-98:composite materials

(France only)
The "Triman" symbol tells the consumer that the product can be recycled, is covered by an extended system of manufacturer's responsibility and must be sorted by material type in France.

(Spain only)
This symbol indicates disposal according to the type of packaging material used (blue = paper and cardboard; yellow = plastic, metal, composite packaging; green = glass).
Use the disposal options available to you in your area.
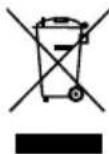
APPLIANCE
Old appliance that carry the symbol illustrated may not be disposed of in ordinary household waste.
In accordance with Directive 2012/19/EU, these appliances must be disposed of correctly at the end of their service life.
This involves separating the materials in the appliance for the purpose of recycling as well as minimising the environmental impact and negative effects on human health.
Take old appliances to an electrical scrap collection point or a recycling centre.
Contact your local waste disposal company or your local authority for more information on this subject.
14. Technical specifications
Supplier's address: MEDION AG
Am Zehnhof 77
45307 Essen
Germany
Model: MD 12090
Rated voltage: 220 - 240 V ,50 Hz
Power consump- 220 W
tion:
Refrigerant:Propane R-290
Capacity: 2.6 litres (slush ice)
1.9 litres (usable liquid
capacity up to MAX
marking)
Protection class I
Climate class N/SN/T/ST
(+10^ to +43^)
Weight (net): Approx. 10.8kg
Dimensions Approx.
(length x width x 42.9 x 17.7 x 42.4 cm
height):
Power ≤ 0.5W
consumption
OFF mode
Maximum time 10 minutes
until OFF mode
is reached during
inactivity
15. EU declaration of conformity
CE MEDION AG hereby declares that this appliance complies with the essential requirements and other relevant provisions of:
EMC Directive 2014/30/EU
Low Voltage Directive 2014/35/EU
- Ecodesign Directive 2009/125/EC
RoHS Directive 2011/65/EU
16. Spare parts
Please visit our MEDIONService-shop at https://www.medion.com/ medionserviceshop to order any spare parts you need.
You will be able to find out all the details about your specific product while you're there.
17. Service information
Please contact our Customer Service team if your device ever stops working the way you want or expect it to. There are several ways for you to contact us:
- In our Service-Community, you can meet other users, as well as our staff, and you can exchange your experiences and pass on your knowledge there. You will find our Service-Community at community.medion.com.
- Alternatively, use our contact form at www.medion.com/contact.
- You can also contact our Service team via our hotline or by post.
| Hotline number |
| 0333 3213106 |
| Opening times |
| Mon – Fri: 08.00 – 20.00Sat – Sun: 10.00 – 16.00 |
| Service address |
| MEDION Electronics Ltd. 120 Faraday Park, Faraday Road, Dorcan Swindon SN3 5JF, Wiltshire United Kingdom |
You can download this and many other sets of operating instructions from our service portal at www.medionservice.com. We have stopped providing printed copies of our warranty terms and conditions as part of our commitment to sustainability, but you can access the warranty terms and conditions on our service portal.
You can also scan the QR code below and to download the operating instructions onto your mobile device from the service portal.

18. Legal Notice
Copyright 2025
Date: 30. April 2025
All rights reserved.
These operating instructions are protected by copyright.
Mechanical, electronic and any other forms of reproduction are prohibited without the written permission of the manufacturer.
Copyright is owned by the company:
MEDION AG
Am Zehnhof 77
45307 Essen
Germany
Please note that you cannot use the address above for returns. Please always contact our Customer Service team first.

- MEDION Service Center
- ENAME, S.A
- Information about this user manual
- Explanation of symbols
- DANGER!
- WARNING!
- CAUTION!
- NOTICE!
- Proper use
- Safety instructions
- WARNING! Risk of electric shock/ short circuit!
- WARNING! Risk of injury! Possibility of damage to the appliance!
- DANGER! FIRE HAZARD! Flammable substances!
- WARNING! Risk of injury!
- Package contents
- Risk of choking and suffocation!
- Appliance overview
- Programmes
- Before using the appliance for the first time
- Making an iced drink
- Health and hygiene
- Butt on lock
- End of programme
- Switching acoustic signals on/off
- Tips for making drinks
- Possibility of damage to the appliance!
- Tips for saving energy
- Recipe suggestions
- Non-alcoholic slushies
- Slush ice with syrup
- Cola slush ice
- Tropical slush ice
- Lemonade slush ice
- Milkshakes
- Iced latte
- Vanilla latte
- Caramel latte
- Chocolate milk slush
- Strawberry milkshake
- Vanilla milkshake
- Chocolate milkshake
- Long drinks with alcohol
- Frozen margarita
- Pina colada
- Wine-based slushies
- Red wine slush
- Tinto de verano
- Cleaning the appliance
- Risk of electric shock!
- Risk of injury!
- Risk to health!
- Risk of injury due to lifting or falling
- Using the cleaning programme
- Cleaning parts
- Prolonged non-use/ transport
- Troubleshooting
- Disposal
- PACKAGING
- APPLIANCE
- Technical specifications
- EU declaration of conformity
- Spare parts
- Service information
- Legal Notice
Brand : MEDION
Model : MD 12090
Category : Ice machine