the Bambino Plus BEP501 - Coffee machine BREVILLE - Free user manual and instructions
Find the device manual for free the Bambino Plus BEP501 BREVILLE in PDF.
User questions about the Bambino Plus BEP501 BREVILLE
0 question about this device. Answer the ones you know or ask your own.
Ask a new question about this device
Download the instructions for your Coffee machine in PDF format for free! Find your manual the Bambino Plus BEP501 - BREVILLE and take your electronic device back in hand. On this page are published all the documents necessary for the use of your device. the Bambino Plus BEP501 by BREVILLE.
USER MANUAL the Bambino Plus BEP501 BREVILLE
natural_image
Exterior view of a modern Breville coffee maker with control knobs and a glass casing (no visible text or symbols)EN
INSTRUCTION BOOK
FR-CA
MANUEL D'INSTRUCTIONS
ES-MX
2 Breville Recommends Safety First
6 Components
8 Features
8 Assembly
9 Functions
16 Care & Cleaning
19 Troubleshooting
BREVILLE RECOMMENDS SAFETY FIRST
At Breville we are very safety conscious. We design and manufacture consumer products with the safety of you, our valued customer, foremost in mind. In addition we ask that you exercise a degree of care when using any electrical appliance and adhere to the following precautions.
IMPORTANT SAFEGUARDS

READ ALL INSTRUCTIONS BEFORE USE AND SAVE FOR FUTURE REFERENCE
- Carefully read all instructions instructions before operating and save for future reference.
- Do not touch hot surfaces. Use handles or knobs as advised in this instruction book.
• To protect against fire, electric shock and injury to persons do not immerse the power cord, plug, or appliance itself in water or other liquids.
- Close supervision is necessary when any appliance is used by or near children.
- Unplug from outlet when not in use and before cleaning. Allow to cool before putting on or taking off parts and before cleaning the appliance.
- It is recommended to regularly inspect the appliance and power cord. Do not use the appliance if there is damage to the power cord or plug, or after the appliance malfunctions or
has been damaged in any way. Immediately stop use and call Breville Consumer Support.
• The use of accessory attachments not recommended by Breville may result in fire, electric shock or injury to persons.
- Do not let the power cord hang over the edge of a table or counter-top, or touch hot surfaces.
- Do not place the appliance near the edge of a table or counter-top. Ensure the surface is level, clean and free of water and other substances.
- Do not place the appliance on or near a hot gas or electric burner. Do not place it in, or allow it to come in contact with a heated oven.
• This appliance is recommended for household use only. Do not use this appliance for anything other than its intended use. Do not use outdoors. Do not use in moving vehicles or boats.
NOTICE TO CUSTOMERS REGARDING MEMORY STORAGE
Please note that in order to better serve our customers, internal memory storage has been imbedded into your appliance. This memory storage consists of a small chip to collect certain information about your appliance including the frequency of use of the appliance and the manner in which your appliance is being used. In the event your appliance is returned for service, the information collected from the chip enables us to quickly and efficiently service your appliance. The information collected also serves as a valuable resource in developing future appliances to better serve the needs of our consumers. The chip does not collect any information regarding the individuals who use the product or the household where the product is used.
If you have any questions regarding the memory storage chip please contact us at privacy@breville.com
SPECIFIC INSTRUCTIONS FOR BES500
• This appliance is recommended for household use only. Do not use this appliance for other than its intended use. Do not use in moving vehicles or boats. Do not use outdoors. Misuse may cause injury.
- If the appliance is to be:
- left unattended
- cleaned
- moved
- assembled; or
- stored,
- left unattended - cleaned - moved - assembled; or - stored,
always switch Off the espresso machine by simultaneously pressing the 1 CUP and STEAM buttons. Unplug from the power outlet.
- Ensure the product is properly assembled before first use.
- Do not use any other liquid apart from cold mains/tap water. We do not recommend the use of highly filtered,
de-mineralized or distilled water as this may affect the taste of the coffee and how the espresso machine is designed to function.
- Ensure the portafilter is firmly inserted and secured into the group head before starting the extraction.
Never remove the portafilter during the brewing process. - Do not leave the product unattended when in use.
- Do not touch hot surfaces. Allow the product to cool down before moving or cleaning any parts.
- Use caution when operating the machine, as metal surfaces are liable to get hot during use.
- Use caution when descaling as hot steam may be released. Before descaling, ensure drip tray is inserted. Refer to ‘Care & Cleaning’ for further instructions.

WARNING
Do not immerse power cord, power plug or appliance in water or any other liquid.

WARNING
Misuse may cause injury.

WARNING
To avoid the risk of injury, do not open the brew chamber during the brew process.
SHORT CORD INSTRUCTIONS
Your Breville appliance is fitted with a short power cord to reduce personal injury or property damage resulting from pulling, tripping or becoming entangled with a longer cord. Longer detachable power cords or extension cords are available and may be used if care is exercised. If an extension cord is used,
(1) the marked electrical rating of the cord set or extension cord should be at least as great as the electrical rating of the appliance,
(2) the cord should be arranged so that it will not drape over the counter-top or table where it
can be pulled on by children or tripped over unintentionally and (3) the extension cord must include a 3-prong grounding plug.
BREVILLE ASSIST™ PLUG
Your Breville appliance comes with a unique Assist™ Plug, conveniently designed with a finger hole to ease removal from the power outlet.
CSA DUTY CYCLE MARKING
The Canadian Standards Authority requires any appliances capable of drawing over 1500W to be marked with a ‘duty cycle’ in minutes. For the BES500, this ‘duty cycle’ represents the maximum time for which the appliance will draw over 1500W during any 2 hour period of use. It does not indicate the appliance is unsafe for continuous use or is required to be switched off at certain intervals during normal use.
FOR HOUSEHOLD USE ONLY SAVE THESE INSTRUCTIONS

Components
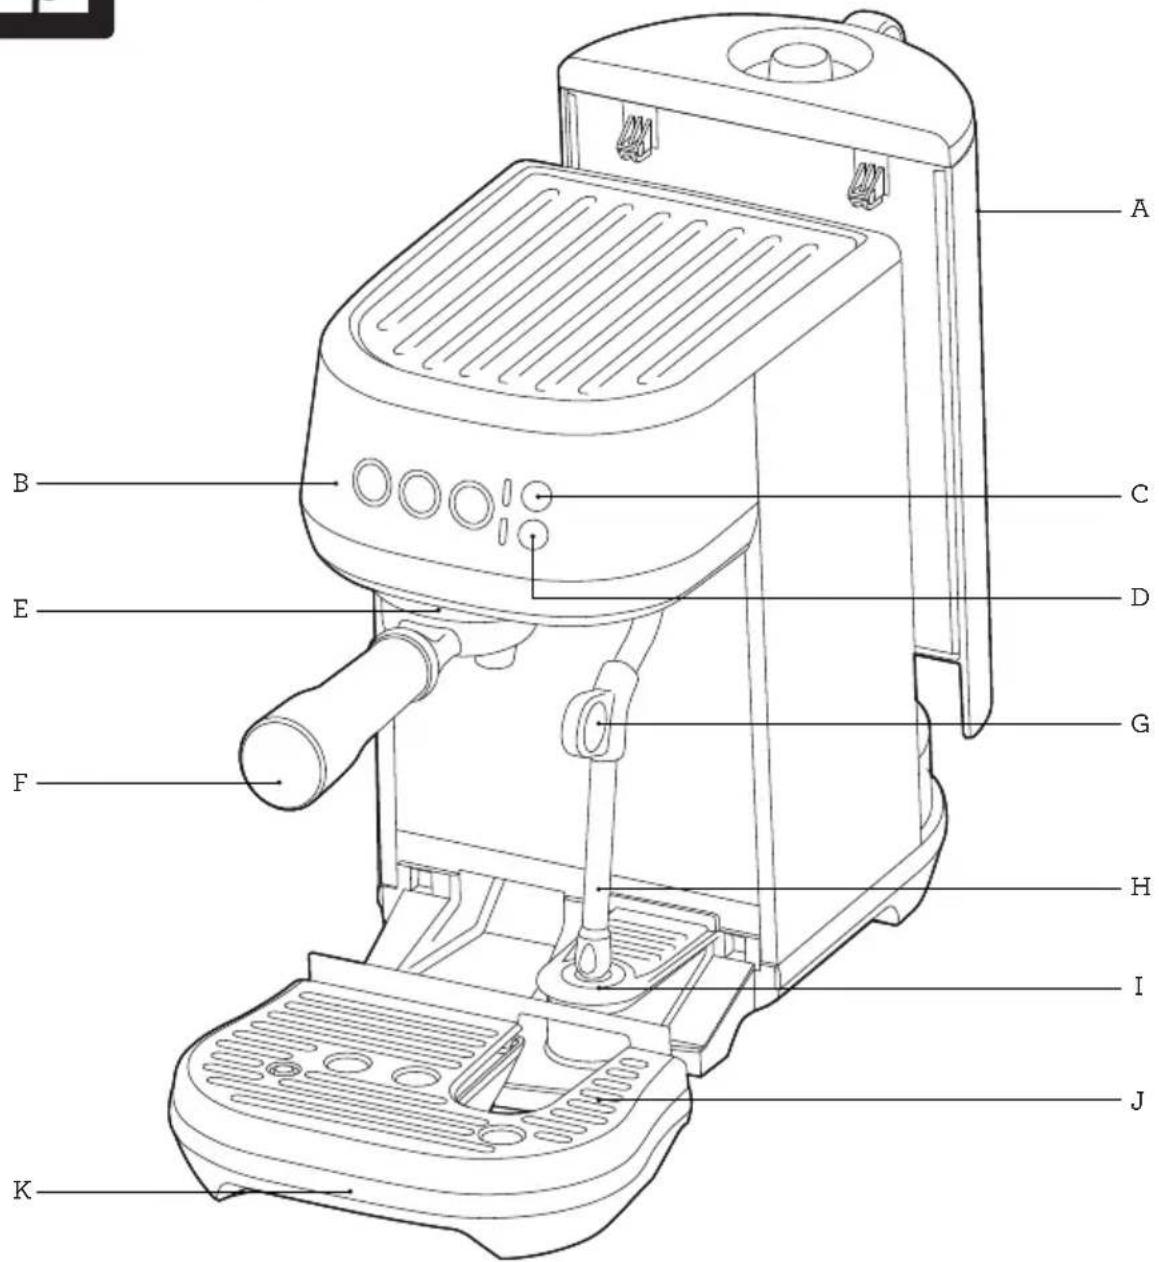
text_image
A B C D E G F H I J KA. 64 fl.oz (1.9L) removable water tank
B. Control panel
1 CUP, 2 CUP and STEAM buttons
With preset shot durations or
programmable durations and volumes
C. MILK TEMP settings
Select from Warm, Ideal and Hot
D. MILK FOAM settings
Select from Low, Medium and High
E. Group head
F. 54mm stainless steel portafilter
G. Steam wand grip
H. Steam wand
With automatic milk texturing
I. Milk jug temperature sensor
J. Removable drip tray grid
K. Removable drip tray
With full indicator
Rating Information 120 V\~ 60 Hz 1560 W
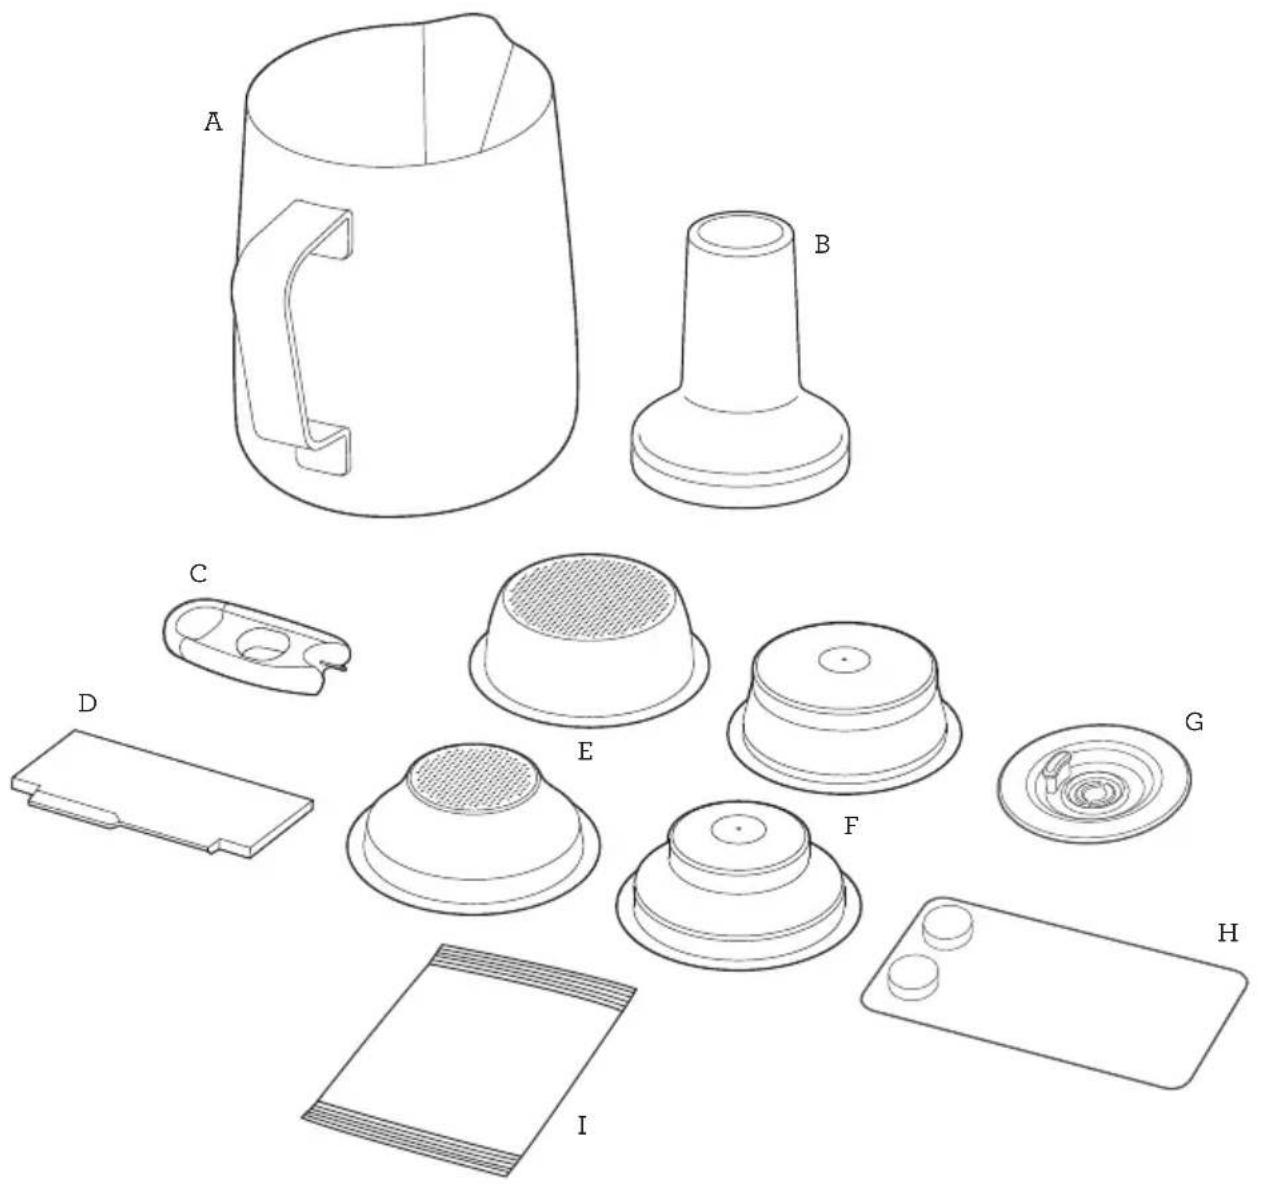
text_image
Technical diagram showing exploded view of a mechanical component with labeled parts A through IACCESSORIES
A. Stainless steel milk jug
With MIN and MAX markings
B. 54 ~mm 1
C. Steam wand tip cleaning tool (Located under water tank)
D. The Razor™ precision trimming tool
E. Single Wall filter baskets (1 cup & 2 cup)
F. Dual wall filter baskets (1 cup & 2 cup)
G. Cleaning disc
H. Cleaning tablets
I. Descaling powder

Bambino® Plus Features
COMPACT FOOTPRINT
Cafe quality coffee in a compact machine.
AUTOMATIC HANDS FREE MILK TEXTURING
Automatically textures milk to the selected temperature and style from silky smooth latté to creamy cappuccino. Automatic purge removes residual milk from the steam wand when returned to the downward position.
THERMOJET® TECHNOLOGY
Innovative heating system achieves ideal extraction temperature in 3 seconds.
PID TEMPERATURE CONTROL
Electronic PID temperature control for increased temperature stability.
LOW PRESSURE PRE-INFUSION
Applies low water pressure at the start of the extraction to gently expand grinds for an even extraction.
VOLUMETRIC CONTROL
Preset 1 & 2 cup volumes, manual over-ride or programmable shot volumes.
THE RAZOR™ DOSE TRIMMING TOOL
Patented twist blade trims down the puck to the right level for precision dosing and a consistent extraction.

Assembly
BEFORE FIRST USE
Machine Preparation
Remove and discard all labels and packaging materials attached to your machine. Ensure you have removed all parts and accessories before discarding the packaging.
Clean the drip tray, drip tray grid, portafilter, filter baskets and milk jugs using warm water and a gentle dish washing liquid. Rinse well and dry thoroughly before use.

Functions
FIRST USE
- Remove the water tank and fill with potable water to the indicated MAX line. Replace the water tank onto the machine.
- Ensure that the drip tray is correctly positioned on the machine.
- Plug the power cord in the power outlet, and the 1 CUP, 2 CUP, and STEAM buttons will blink for 3 seconds and 1 CUP will illuminate after.
- Press the 1 CUP button and the machine will commence its first use cycle.
natural_image
Pure diagram of icons and symbols without any text or labels- Once complete, the machine will go into ready mode and all lights will be illuminated.

NOTE
The first use cycle is to rinse the machine and prime the heating system.
TURNING OFF MACHINE
To turn the machine off, press the 1 CUP and STEAM button simultaneously.

text_image
Diagram showing two hands holding sun icons with plus and minus signs, accompanied by a 'OFF' button
FILLING THE WATER TANK
Lift the water tank from the machine. Remove the water tank lid and add potable water to the water tank, filling to the MAX marking indicated.

text_image
MAXReplace the water tank onto the machine, ensuring it is properly attached and sitting flush against the back of the machine.
If the 1 CUP, 2 CUP and STEAM buttons illuminate, the water tank has been correctly attached.
The machine will detect when the water level is low. The 1 CUP, 2 CUP and STEAM buttons will not be illuminated.
natural_image
Pure diagram of circular and rectangular shapes with icons, no text or symbols presentWhen this occurs, add water to the water tank. Once there is sufficient water, all buttons will be illuminated and the machine can be used.
FILTER BASKETS
This machine includes both single and dual wall 1 Cup and 2 Cup filter baskets. Use the 1 cup filter basket when brewing a single cup and the 2 cup filter baskets when brewing 2 cups or a stronger single cup or mug.
Adjust the grind amount and size if switching from a single basket to a double basket, or vice versa.
The provided filter baskets are designed for:
1 Cup filter basket = 8-11g
2 Cup filter basket = 16-19g
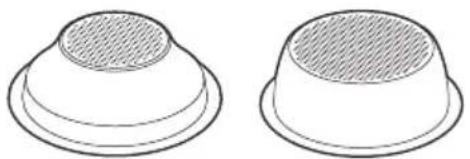
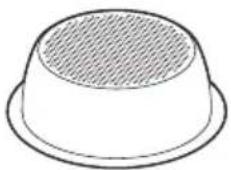
Single Wall Filter Baskets
Single Wall filter baskets should be used when grinding fresh whole coffee beans roasted less than 30 days. These single wall filter baskets allows you to experiment with grind, dose and tamp to create a more balanced espresso.
natural_image
Two identical 3D-rendered white dome-shaped objects with a textured inner layer, no text or symbols present.1 CUP 2 CUP
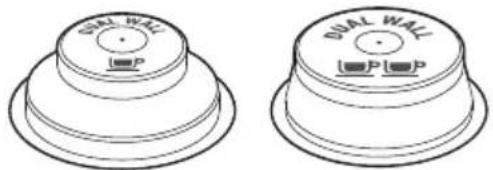
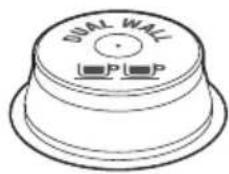
Dual Wall Filter Baskets
Dual Wall filter baskets should be used when using pre-ground coffee and older beans that are past the 30 day roast date. These dual wall filter baskets regulate the pressure and helps to optimise the extraction regardless of the grind, dose and tamp pressure or freshness.
natural_image
Two identical mechanical component diagrams showing front and side views with no text or symbols1 CUP 2 CUP

NOTE
Use Razor™ dose trimming tool to precisely control the dose of ground coffee AFTER you tamp.
THE GRIND
When grinding coffee beans, the grind size should be fine but not too fine. The grind size will affect the rate at which the water flows through the ground coffee in the filter basket and the taste of the espresso.
If the grind is too fine (looks like powder and feels like flour when rubbed between the fingers), the water will not flow through the coffee even when under pressure. The resulting espresso will be OVER EXTRACTED, dark in color and bitter in flavor.
If the grind is too course, the water will flow through the ground coffee in the filter basket too quickly. The resulting espresso will be UNDER EXTRACTED and lacking in color and flavor.
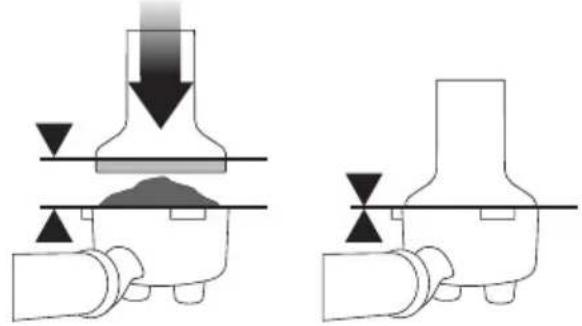
COFFEE DOSE AND TAMPING
- Insert the filter basket into the portafilter.
- Grind enough coffee to fill the filter basket.
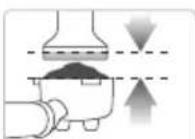
- Tap the portafilter several times to collapse and distribute the coffee evenly in the filter basket.
• Using the tamper, tamp down firmly (approx. 22-33 lbs (10-15kgs) of pressure). The amount of pressure is not as important as the consistent pressure every time.
natural_image
Pure mechanical diagram showing two stages of a press or valve mechanism with downward force arrows (no text or symbols)- As a guide, the top edge of the cap on the tamper should be level with the top of the filter basket AFTER the coffee has been tamped.

NOTE
We recommend quality 100% Arabica beans with a ‘Roasted On’ date stamped on the bag, not a ‘Best Before’ or ‘Use By’ date. Coffee beans are best consumed between 5–20 days
after the ‘Roasted On’ date. Stale coffee may pour too quickly from the portafilter spouts and taste bitter and watery.
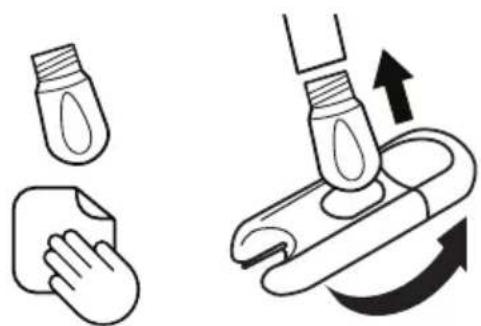
TRIMMING THE DOSE
The Razor ^™ precision dose trimming tool allows you to trim the puck to the right level for a consistent extraction.

text_image
the Razor™ Precision dose trimming tool- Insert the Razor™ tool into the coffee basket until the shoulders of the tool rest on the rim of the basket. The blade of the dosing tool should penetrate the surface of the tamped coffee.
- Rotate the Razor™ dosing tool back and forth while holding the portafilter on an angle over the knock box to trim off excess coffee grinds. Your coffee filter is now dosed with the correct amount of coffee.

natural_image
Illustration of hands operating a mechanical device with rotation arrows (no text or symbols)- Wipe excess coffee from the rim of the filter basket to ensure a proper seal is achieved in the group head.
PURGING THE GROUP HEAD
Before placing the portafilter into the group head, run a short flow of water through the group head by pressing the 1 CUP button. This will stabilize the temperature prior to extraction.
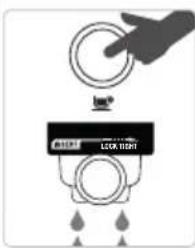
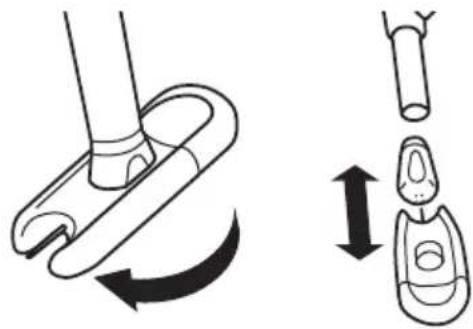
INSERTING THE PORTAFILTER
Place the portafilter underneath the group head so that the handle is aligned with the INSERT position. Insert the portafilter into the group head and rotate the handle towards the centre until resistance is felt.
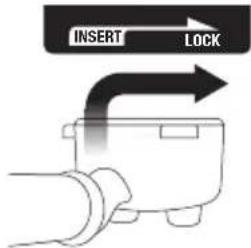
text_image
INSERT LOCKPlace your cup/s under the portafilter on the drip tray.
EXTRACTING ESPRESSO
- As a guide the espresso will start to flow after 8-12 seconds (infusion time) and should be the consistency of dripping honey.
- If the espresso starts to flow after less than 7 seconds, you have either under dosed the filter basket and/or the grind is too coarse. This is an UNDER EXTRACTED shot.
- If the espresso starts to drip but doesn't flow after 12 seconds, the grind is too fine. This is an OVER EXTRACTED shot.
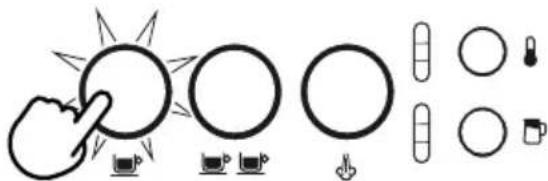
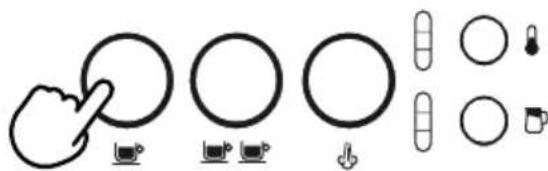
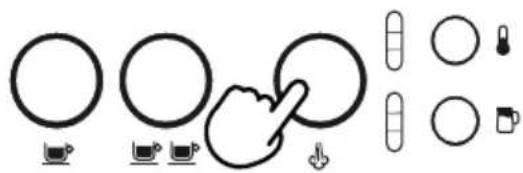
PRE-PROGRAMED SHOT VOLUME -1 CUP
Press the 1 CUP button once, the button will flash indicating that it has been selected. A preset single espresso volume of approximately 1oz / 30mls will be extracted. The machine will automatically stop once the pre-set volume has been extracted.
text_image
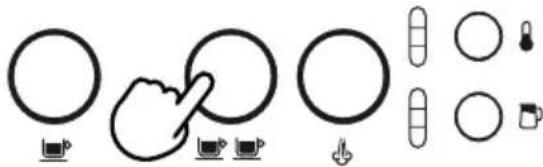
Diagram showing hand gesture interacting with circular and rectangular elements, including icons for zoom, lock, and mouse.PRE-PROGRAMED SHOT VOLUME - 2 CUP
Press the 2 CUP button once, the button will flash indicating that is has been selected. A preset double espresso volume of approximately 2oz / 60mls will be extracted. The machine will automatically stop once the pre-set volume has been extracted.
natural_image
Pure diagram of circular and rectangular shapes with control icons, no text or symbols present
NOTE
Pressing the 1 CUP or 2 CUP buttons during a programmed espresso will immediately stop the extraction.
MANUAL PRE-INFUSION AND SHOT VOLUME
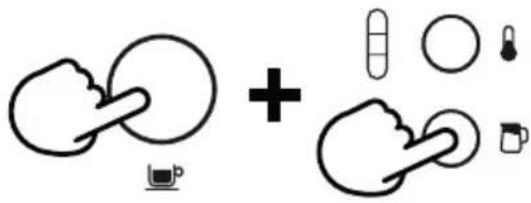
Press and hold the 1 CUP or 2 CUP button for the desired pre-infusion time. Release the button to start the extraction. Press the flashing button again to stop the extraction.
PROGRAMMING SHOT VOLUME
Press and hold the 1 CUP and 2 CUP buttons for 2 seconds, the buttons will illuminate and flash.

text_image
+ ② 2sTo set the 1 CUP volume:
- Press the 1 CUP button to start the extraction.
- Press the 1 CUP button again to stop the extraction. The modified volume will be saved.
To set the 2 CUP volume, follow the above steps but select the 2 CUP button to start and stop the extraction.
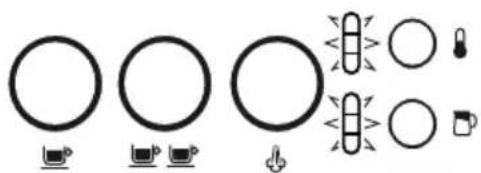
SETTING THE MILK TEMPERATURE
The machine has 3 milk temperature settings;
1 - Warm
2 - Ideal
3-Hot
When turning on the espresso machine, the milk temperature setting will default to the last chosen setting. Press the MILK TEMP button until the desired temperature is illuminated.
SETTING THE MILK FOAM
The machine has 3 milk foam settings;
1 - Low
2 - Medium
3 - High
When turning on the machine, the milk foam setting will default to the last chosen setting. Press the MILK FOAM button until the desired foam setting is illuminated.
TEXTURING MILK
Different brands and types of milk and milk alternatives will texture differently. You may need to adjust the foam level according.

NOTE
Prior to texturing milk, it is recommended to momentarily purge the steam wand. To do this press the STEAM button to start purging and press it again to stop.
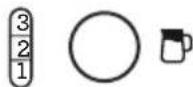
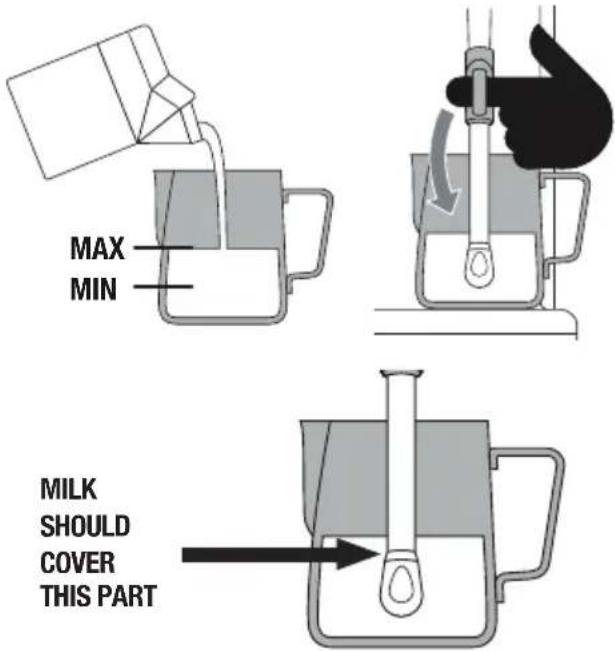
TO TEXTURE MILK
- Start with fresh cold milk.
- Fill the milk jug to between the min and max position.
- Lift the steam wand and insert into the milk jug.
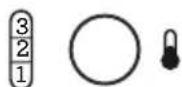
- Lower the steam wand, ensuring it is fully down.
- The milk jug must rest on the milk temperature sensor located on the drip tray and the milk should cover the steam wand tip.
text_image
MAX MIN MILK SHOULD COVER THIS PART- Press the MILK TEMP and MILK FOAM buttons to select the desired settings.
- Press the STEAM button, the button will flash while texturing.
- The milk texturing will stop automatically when the selected milk temperature is reached.
- Lift the steam wand to remove the milk jug.
- Wipe the wand and tip with a clean damp cloth.
- Lower the steam wand to the down position and the steam wand will automatically purge.

CAUTION: BURN HAZARD
Pressurized steam can still be released, even after the machine has been switched off. Children must always be supervised.

NOTE
When the machine creates steam, a pumping noise can be heard. This is normal operation.

NOTE
Use only the supplied stainless steel milk jug to froth milk using this machine. The use of other containers may lead to dangerous conditions.
MANUAL MILK TEXTURING
Auto milk texturing and auto shut-off are disabled during manual milk texturing.
- Fill the milk jug to between the MIN and MAX markings.
- Lift the steam wand and insert into the milk jug with the steam wand tip 3/4 inch (1-2cm) below the surface of the milk, close to the right-hand side of the jug at a 3 o'clock position.
- Press the STEAM button to begin texturing
natural_image
Pure diagram of circular and rectangular shapes with control buttons, no text or symbols present- Keep the steam wand tip just under the surface of the milk until the milk is spinning clockwise, producing a vortex (whirlpool effect).
- With the milk spinning, slowly lower the jug. This will bring the steam wand tip to the surface of the milk and start to introduce air into the milk.
• Gently break the surface of the milk with the tip to get the milk spinning fast enough. - Keep the steam wand tip at or slightly below the surface, continuing to maintain the vortex. Texture the milk until sufficient volume is obtained.
- Lift the jug to lower the tip beneath the surface but keep the vortex spinning. The milk is at the correct temperature (60-65°C) when the jug is hot to touch.
natural_image
Illustration of a tool interacting with a circular object, possibly a dial or sensor (no text or symbols present)- When texturing is complete, press the STEAM button.
- Remove the steam wand from the milk jug.
- Wipe the wand and tip with a clean damp cloth.
- Lower the steam wand to the down position and the steam wand will automatically purge.
STEAM WAND PURGING
After texturing milk, the steam wand must be returned to the lowered position and allowed to automatically purge. Not doing so, could result in the steam wand blocking.
If the steam wand remains in the raised position, the machine will display a lower steam wand alert; illuminating the MILK TEMP and MILK FOAM lights in a downwards pattern, identifying that the steam wand needs to be lowered.
To manually commence the steam wand purge, with the steam wand lowered, press and hold the STEAM button for 5 seconds.
STEAM WAND BLOCKED
During milk texturing, if the machine detects that the steam wand is blocked, it will immediately stop operating and the STEAM button light will be off. Both the MILK TEMP and MILK FOAM lights will fully illuminate and flash. These lights will flash until a steam tip clean cycle has been complete, see 'Cleaning the Steam Wand' for further instructions.
HOT WATER OPERATON
Hot water through the steam wand:
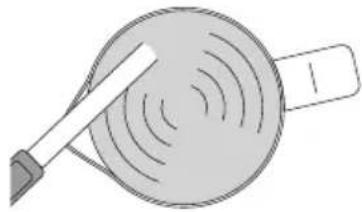
Position the steam wand tip over the drip tray. When the machine is on 'ready mode', lift the steam wand, press 1 CUP and MILK FOAM buttons, and hot water flow will start through the steam wand. Press the 1 cup button button to stop the hot water flow.
text_image
Diagram showing two hands holding circular objects with plus signs and icons, possibly illustrating a medical or diagnostic concept.
WARNING
Be careful in handling hot beverages.
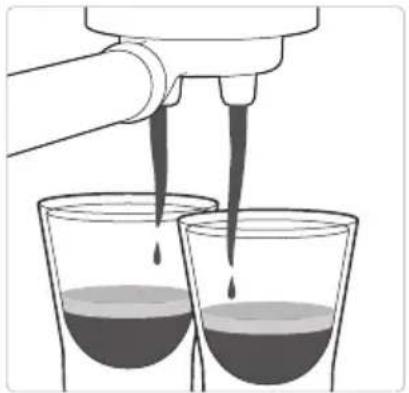
EXTRACTION TIPS
A great espresso is about achieving the perfect balance between sweetness, acidity, and bitterness. The flavor of your coffee will depend on many factors, such as the type of coffee beans, degree of roast freshness, coarseness or fineness of the grind, dose of ground coffee and tamping pressure. Experiment by adjusting these factors just one at a time to achieve the taste of your preference.
CORRECT EXTRACTION UNDER
natural_image
Illustration of a hand pouring liquid into two beakers with liquid droplets (no text or symbols)- Flow starts after 8–12 secs
- Flow slow like warm honey
- Crema is golden brown with a fine mousse texture
- Espresso is dark brown
AFTER EXTRACTION
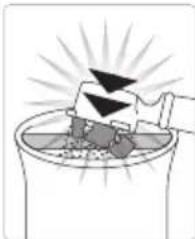
natural_image
Illustration of a mechanical device emitting black triangular components into a container with radiating lines (no text or symbols)REMOVE USED GRINDS
Used grinds will form a coffee 'puck'. If the puck is wet, refer to the 'Under Extraction' section.
text_image
LOCK RIGHTRINSE FILTER BASKET
Keep the filter basket clean to prevent blockages. Without ground coffee in the filter basket, lock the portafilter into the machine and run hot water through.
natural_image
Illustration of a hand pouring liquid from a bottle into two glasses filled with dark liquid (no text or symbols)- Flow starts after 1–6 secs
- Flow fast like water
- Crema is thin and pale
- Espresso is pale brown
• Tastes bitter/sharp, weak and watery
SOLUTIONS SOLUTIONS
EXPERIMENT WITH GRIND:
- Grind needs to be finer for a slower extraction.
- Ensure you are controlling dose with the Razor™.
Adjust & re-test

ALWAYS TAMP TO LINE
Adjust & re-test
Tamp using 22-33 lbs (10-15kgs) of pressure. The top edge of metal cap on the tamper should be level with the top of the filter basket AFTER tamping. Trim the puck to the right level using the Razor™ precision dose trimming tool.

natural_image
Illustration of a hand pouring liquid into two glasses with dark liquid, no text or symbols present- Flow starts after 12 secs
- Flow drips or not at all
- Crema is dark and spotty
- Espresso is very dark brown
• Tastes bitter and burnt
EXPERIMENT WITH GRIND:
- Grind needs to be coarser for a faster extraction.
- Ensure you are controlling dose with the Razor™.
Adjust & re-test
ALWAYS TAMP TO LINE
Adjust & re-test
Tamp using 22-33 lbs (10-15kgs) of pressure. The top edge of metal cap on the tamper should be level with the top of the filter basket AFTER tamping. Trim the puck to theright level using the Razor™ precision dose trimming tool.
| GRIND | GRIND DOSE | TAMP | |
| OVER EXTRATED BITTER • ASTRINGENT | Too fine | Too much Use RazorTM to trim | Too heavy |
| BALANCED | Optimum | 8-11g (1 cup) 16-19g (2 cup) | 22-33 lbs (10-15kgs) |
| UNDER EXTRACTED UNDERDEVELOPED • SOUR | Too coarse | Too little Increase dose & use RazorTM to trim | Too light |

Care & Cleaning

CLEANING CYCLE
The machine will detect when 200 extractions have been carried out since the last cleaning cycle; this will be shown by the 1 CUP and 2 CUP buttons alternately flashing. This indicates that the group head needs cleaning. This is a flushing cycle and is separate from descaling.

natural_image
Three simple line drawings of suns and cups with no text or symbolsTO PERFORM A CLEANING CYCLE
- Insert the provided cleaning disc into the filter basket in the portafilter.
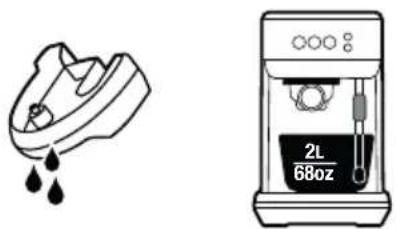
- Place a cleaning tablet on top of the cleaning disc.
- Lock the portafilter into the group head.
- Empty the drip tray and replace onto the machine. Place a 2L / 68 fl.oz container under the portafilter and steam wand sitting on the drip tray.
natural_image
Illustration of a shoe and a 2L water dispenser (no text or symbols)-
Fill the water tank to the MAX line then reattach to the machine, ensuring it is correctly attached.
-
Press and hold the 1 CUP and 2 CUP buttons for 5 seconds to enter the cleaning cycle mode.

text_image
+ ⑤ 5s- The 1 CUP and 2 CUP buttons will remain illuminated. Press either 1 CUP or 2 CUP to begin the cleaning cycle. When the cycle is in progress, the lights will alternatively flash.
- Once the cycle is complete the machine will go back to ready mode.
- Remove and rinse the portafilter, cleaning disc, drip tray and container.

NOTE
The user can also manually enter the cleaning cycle mode before the cleaning cycle alert is triggered. Press and hold 2 CUP and STEAM buttons simultaneously for five seconds when the unit is at off mode (all lights are off).

DESCALING
After regular use, hard water can cause mineral build up in and on many of the inner functioning components, reducing the brewing flow, brewing temperature, power of the machine, and the taste of the espresso.

natural_image
Three identical sun icons with water droplets below, no text or symbols presentThe machine will indicate that it requires descaling when the 1 CUP and STEAM button and the 2 CUP button flash alternately for 15 seconds. Pressing any of these buttons will cancel the alert and return the machine to ready mode.

WARNING
Do not immerse the power cord, power plug or appliance in water or any other liquid. The water tank should never be removed or completely emptied during descaling.
TO DESCALE
-
Empty the drip tray and re-insert into position on the machine.
-
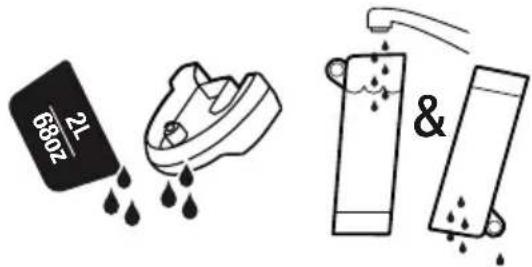
Fill the water tank to the DESCALE line indicated and add the descaling agent to the water.

text_image
1000 DESCALE 2L 68oz-
Place a 2L / 68 fl.oz container under the portafilter and steam wand.
-
Turn the machine off by simultaneously pressing the 1 CUP and STEAM buttons, and allow it to completely cool before descaling.

text_image
Diagram showing two hand gestures with a computer icon and time label '5s'- With the machine off, press the 1 CUP and STEAM buttons simultaneously for 5 seconds to enter descale mode.

natural_image
Three simple line drawings of suns and cups (no text or symbols)- The 1 CUP and STEAM buttons will illuminate, indicating that the machine is ready to start descaling.

text_image
OR 0.5s-
Press the 1 CUP or STEAM button to begin the descale cycle. These buttons will alternately flash throughout the cycle.
-
Once the descale solution has been used up, the descale mode will pause. Refill the water tank to the MAX line and empty the waste water container, then replace both parts on to the machine.
- The 1 CUP and STEAM buttons will illuminate when the machine is ready. Press the 1 CUP or STEAM button to resume descaling.
- When descaling is complete, the 1 CUP and STEAM button will alternately flash. The machine will then go into standby mode.
text_image
6802 21 & 7802- Remove and empty the waste water container. Rinse the drip tray and water tank and dry thoroughly before replacing them back onto the machine.
STEAM WAND BLOCKED
During milk texturing, if the machine detects that the steam wand is blocked, it will immediately stop operating and the STEAM button light will be off. Both the milk temperature and milk foam lights will fully illuminate and flash. These lights will flash until a manual steam purge has been completed.

CLEANING THE STEAM WAND
- The steam wand should always be cleaned after texturing milk. Wipe the steam wand with a damp cloth.
- If any of the holes in the tip of the steam wand become blocked, it may reduce frothing performance. Manually purge the steam wand to try and clear the holes.
- If the steam wand remains blocked, unscrew the steam wand tip using the steam tip cleaning tool, then use the tool to unblock the holes; cleaning tool is located in the back of the machine, under the water tank.
natural_image
Diagram showing a mechanical component with rotational motion and a separate view of its internal structure (no text or symbols)- Rinse the steam tip and wipe with a clean, dry cloth. Reassemble the steam wand by screwing the steam tip back on to the steam wand. Purge the steam wand after cleaning.
natural_image
Illustration showing two steps: first with a bottle and hand cleaning a pad, second with a tool pressing down on a curved mechanical component (no text or symbols)CLEANING THE FILTER BASKETS AND PORTAFILTER
- The filter baskets and portafilter should be rinsed under hot water directly after use to remove all residual coffee oils.
- If the holes in the filter baskets become blocked, use the steam wand cleaning tool to unblock the holes.
- The group head interior and shower screen should be wiped with a damp cloth to remove any ground coffee particles.
• Periodically run hot water through the machine with the filter basket and portafilter in place, without any ground coffee, to rinse out any residual coffee.
CLEANING THE DRIP TRAY
- The drip tray should be removed, emptied and cleaned after each use or when the drip tray indicator rises through the drip tray grid.
- Remove the drip tray grid and wash both parts in warm soapy water.
CLEANING THE OUTER HOUSING
- Wipe the outer housing with a soft, damp cloth and then polish with a soft, dry cloth.

NOTE
Do not use any abrasive cleaners, pads or cloths which can scratch the surfaces of the machine.

NOTE
Do not clean any of the parts or accessories in the dishwasher.

WARNING
Do not immerse the power cord, power plug or machine in water or any other liquid.
STORING YOUR MACHINE
Before storing, turn the machine off, switch off and remove the power plug from the power outlet. Empty the water tank and drip tray and ensure the machine is cool, clean and dry. Store in an upright position.
Do not place anything on top of machine.
RESET FACTORY ESPRESSO VOLUME SETTINGS
- Turn the machine off by pressing the 1 CUP and STEAM buttons simultaneously for 5 seconds.
- Press and hold the 1 CUP and 2 CUP buttons for 5 seconds. Buttons will illuminate.
- Press the 1 CUP or 2 CUP buttons and the light will flash 3 times to indicate that all volumes have been reset.
- Machine will then return to ready mode.

NOTE
Press any other button to exit factory reset mode.
PROBLEM POSSIBLE CAUSES EASY SOLUTION
| Water does not flow from the group head. No hot water. | Water tank is empty. Fill tank. | |
| Water tank is not fully inserted and locked into position. | Push water tank down completely to lock into place. | |
| Machine needs to be descaled. Perform descale cycle. | ||
| Coffee is ground too finely and/ or too much coffee in filter basket and/or over tamping and/or filter basket is blocked. | See below, ‘Espresso only drips from the portafilter spouts or not at all’. | |
| Espresso only drips from the portafilter spouts or not at all. | Coffee is ground too finely. Use slightly coarser grind. Refer to 'Coffee Dose and Tamping' and 'Extraction Tips'. | |
| Too much coffee in the filter basket. Lower dose of coffee. After tamping, trim the coffee dose using the RazorTM dose trimming tool. Refer to 'Coffee Dose and Tamping' and 'Extraction Tips'. | ||
| Coffee tamped too firmly. Tamp between or 22-33 lbs (10-15kgs) of pressure. | ||
| Water tank is empty. Fill tank. | ||
| Water tank is not fully inserted and locked into position. | Push water tank down completely to lock into place. | |
| The filter basket may be blocked. Use the pin on the end of the provided cleaning tool to unblock the hole(s). | ||
| Machine needs to be descaled. Perform descale cycle. | ||
| Water doesn't come through (the machine makes loud noise). | Water tank is empty or water level is below MIN. | Fill tank. |
| Froth and temperature lights flashes together. | Steam function error. Water tank may be empty. | Press and hold steam button for 3 seconds to purge the system. |
| Fill tank. | ||
PROBLEM POSSIBLE CAUSES EASY SOLUTION
| Espresso runs out too quickly. | Coffee is ground too coarsely. Use slightly finer grind.Refer to 'Coffee Dose and Tamping' and 'Extraction Tips'. | |
| Not enough coffee in the filter basket. | Increase dose of coffee.Tamp then use the RazorTM dose trimming tool to trim off excess coffee.Refer to 'Coffee Dose and Tamping' and 'Extraction Tips'. | |
| Coffee tamped too lightly. Tamp between or 22-33 lbs (10-15kgs) of pressure. | ||
| Espresso runs out around the edge of the portafilter. | Portafilter not inserted in the group head correctly. | Ensure portafilter is completely inserted and rotated until resistance is felt. |
| There are coffee grounds around the filter basket rim. | Clean excess coffee from the rim of the filter basket to ensure a proper seal in group head. | |
| Too much coffee in the filter basket. Lower dose of coffee.Refer to 'Coffee Dose and Tamping'. After tamping, trim the coffee dose using the RazorTM dose trimming tool. | ||
| No steam. Machine has not reached operating temperature. | Allow time for the machine to reach operating temperature. | |
| Water tank is empty. Fill tank. | ||
| Water tank is not fully inserted and locked into position. | ||
| Machine needs to be decalcified. Perform descale cycle. | ||
| Steam wand is blocked. Refer to 'Cleaning the Steam Wand'. | ||
| Pulsing/pumping sound while extracting espresso or steaming milk. | The machine is carrying out the normal operation of the pump. | No action required as this is the normal operation of the machine. |
| Water tank is empty. Fill tank. | ||
| Water tank is not fully inserted and locked into position. | Push water tank down completely to lock into place. | |
PROBLEM POSSIBLE CAUSES EASY SOLUTION
| Coffee not hot enough. Portafilter not pre-heated. Rinse portafilter under hot water outlet.Dry thoroughly. | ||
| Milk too hot. Jug incorrectly positioned. Ensure milk jug is correctlypositioned on sensor. Adjust milk temperature setting. | ||
| No crema. Coffee tamped too lightly. Tamp betweens or 22-33 lbs (10-15kgs) of pressure. | ||
| Coffee is ground too coarsely. Use slightly finer grind.Refer to 'Coffee Dose and Tamping' and 'Extraction Tips'. | ||
| Coffee beans or pre-ground coffee are not fresh. | If grinding fresh whole coffee beans, use freshly roasted coffee beans with a 'Roasted On' date and consume between 5-20 days after that date.If using pre-ground coffee, use within a week of grinding. | |
| The filter basket may be blocked. | Use the pin on the end of the provided cleaning tool to unblock the hole(s). | |
| Water leaking. Auto purge feature. Immediately after the steam function, the machine will purge water into the drip tray. This ensures the thermocoil is at the optimal temperature. | Ensure the drip tray is firmly pushed in place and emptied whenever the indicator is displayed. | |
| Machine is on but ceases to operate. | The safety thermal-cut out may have activated due to the pump overheating. | Press the 1 CUP and STEAM button simultaneously for 0.5 seconds to switch the machine off and unplug from the power outlet. Allow to cool for about 30-60 minutes.If problem persists, call Breville Support. |
| Too much/too little espresso is being delivered to the cup. | Grind amount and/or grind size settings and/or shot volumes require adjustment. | Adjust the grind amount and/or grind size settings. Refer to 'Coffee Dose and Tamping'. 'The Grind' and 'Extraction Tips'. |

Notes
the Bambino® Plus

natural_image
Exterior view of a modern Breville coffee maker with control knobs and a side-mounted screwdriver (no visible text or symbols on the device itself)FR-CA
MANUEL D'INSTRUCTIONS
Breville®

Table des matières
text_image
A B C D E G F H I J Ktext_image
Technical diagram showing exploded view of a mechanical component with labeled parts A through IACCESSOIRES
natural_image
Pure diagram of icons and symbols without any text, numbers, or labelstext_image
Diagram showing two hands holding sun icons with plus and minus signs, accompanied by a 'OFF' button
REMLIR LE RÉSERVOIR D'EAU
natural_image
Pure diagram of circular and rectangular shapes with icons, no text or symbols presentnatural_image
Simple line drawing of a conical object with a textured top surface (no text or symbols)1 TASSE
natural_image
Simple line drawing of a bowl with a textured lid (no text or symbols)2 TASSES
PANIERS-FILTRES À DOUBLE PARO
natural_image
Line drawing of a conical mechanical component with no text or symbols1 TASSE 2 TASSES
text_image
DUAL WALL P P
NOTE
natural_image
Diagram of a mechanical press or valve mechanism with downward force arrows and a central component (no text or symbols)
natural_image
Pure mechanical diagram showing a valve or pump assembly with no text, numbers, or symbolsnatural_image
Illustration of a hand pressing a button on a mechanical component with directional arrows (no text or symbols)natural_image
Pure diagram of icons representing a finger, circle, and various devices (no text or symbols)VOLUME PRÉPROGRAMMÉ - 2 TASSES
text_image
Diagram showing various icons including circles, a hand gesture, and various symbols like arrows, dots, and speech bubbles.
NOTE
text_image
MAX MIN LE LAIT DOIT RECOUVRIR CETTE PARTIEMOUSSAGE MANUEL DU LAIT
natural_image
Pure diagram of circular and rectangular shapes with icons, no text or symbols presentnatural_image
Simple line drawing of a spoon stirring a circular object with concentric rings (no text or symbols)PURGE DE LA BUSE VAPEUR
text_image
Diagram showing two hands holding circular objects with plus signs and icons, possibly illustrating a mechanical or electrical concept.
AVERTISSEMENT
natural_image
Illustration of a hand pouring liquid into two beakers with dark liquid, no text or symbols presentnatural_image
Illustration of a trash bin with a black triangular object and light rays, no text or symbols presenttext_image
Diagram showing a hand interacting with a circular button and a lock screen, with falling drops below indicating drop events.RINCER LE PANIER FILTRE
natural_image
Illustration of a hand pouring liquid from a bottle into two glasses (no text or symbols)natural_image
Illustration of a hand pouring liquid into two glasses with dark liquid, no text or symbols presentnatural_image
Three simple line drawings of suns and cups with a droplet, no text or symbols presentPOUR EFFECTUER UN CYCLE DE NETTOYAGE
natural_image
Three identical sun icons with a cup and coffee cup, each paired with a hand gesture (no text or symbols)text_image
Diagram showing two cloud icons with a computer monitor and a hand gesture, plus a time label '5s'natural_image
Three simple line drawings of suns and cups with different symbols, no text or labels present.natural_image
Diagram showing a mechanical component with rotational motion and a separate view of a device with a handle (no text or symbols)natural_image
Illustration showing two-step cleaning process: first with a light bulb and cloth, second with a tool pressing down on a curved pipe (no text or symbols)NETTOYER LES PANIERS FILTRES ET LE PORTE-FILTRE
natural_image
Exterior view of a modern Breville coffee maker with control knobs and a side-mounted screwdriver (no visible text or symbols on the device body)ES-MX MANUAL DE INSTRUCCIONES
Breville®

Contenido
text_image
Technical diagram showing exploded view of a mechanical component with labeled parts A through IACCESORIOS
TECNOLOGÍA THERMOJET®
natural_image
Pure diagram of icons representing camera, lens, and touch points without any text or symbolstext_image
Diagram showing two hands holding sun icons with plus and minus signs, accompanied by a 'OFF' button
text_image
Diagram showing circular and rectangular icons with icons for devices, lighting, and buttons, likely representing a device selection or navigation system.natural_image
Two identical 3D-rendered white dome-shaped objects with a textured inner layer, no text or symbols present.1 TAZA 2 TAZAS
FILTRO PRESURIZADO
natural_image
Two identical 3D-rendered dome-shaped objects with 'DUAL WALL' and 'P' symbols, no text or labels present.1 TAZA 2 TAZAS

NOTA
natural_image
Pure mechanical diagram showing two configurations of a valve or pump assembly with downward force arrows (no text or symbols)natural_image
Illustration of a hand pressing a button on a mechanical component with directional arrows (no text or symbols)natural_image
Pure diagram of icons representing a hand, circular shapes, and various symbols (no text or labels)VOLUMEN DE DOSIS PRE- PROGRAMADO - 2 TAZAS
natural_image
Pure electrical circuit lines without any symbols
NOTA
natural_image
Pure electrical circuit lines without any symbolsnatural_image
Illustration of a tool interacting with a circular object, showing concentric wave patterns (no text or symbols)text_image
Diagram showing two hand gestures with plus signs, likely illustrating a correct or incorrect action.
ADVERTENCIA
natural_image
Illustration of a hand pouring liquid into two beakers with dark liquid, no text or symbols presentnatural_image
Illustration of a trash bin with a hand holding a container and a black arrow pointing upward (no text or symbols)natural_image
Illustration of a hand pouring liquid from a bottle into two glasses (no text or symbols)natural_image
Illustration of a hand pouring liquid into two filled glasses (no text or symbols)natural_image
Three simple line drawings of suns and cups with no text or symbolsPARA REALIZAR UN CICLO DE LIMPIEZA
natural_image
Illustration of a shoe and a digital washing machine (no text or symbols)natural_image
Three identical sun icons with a coffee cup and coffee mug below, no text or symbols present.text_image
Diagram showing two hand gestures with icons and a 5-second time labelnatural_image
Three simple line drawings of suns and cups with no text or symbolstext_image
21 630Z & 630Znatural_image
Diagram showing a mechanical component with rotation and assembly, no text or symbols presentnatural_image
Illustration showing two-step cleaning process: first with a light bulb and hand cleaning a sponge, second with a tool pressing down on a curved tool (no text or symbols)LIMPIEZA DEL FILTRO Y DEL PORTAFILTRO
Breville Service Center
USA Mail: Breville USA
19400 S. Western Ave, Torrance CA
90501-1119
Phone: 1-866-273-8455
1-866-BREVILLE
Web: breville.com/us/support
Canada Mail: Breville Canada
9800 Boulevard Cavendish,
Suite 250, Saint-Laurent
Québec, H4M 2V9
Phone: 1-855-683-3535
Web: breville.ca/support
Master Every Moment*
Breville is a registered trademark of Breville Pty. Ltd. A.B.N. 98 000 092 928.
Copyright Breville Pty. Ltd. 2023.
- Due to continued product improvement, the products illustrated/photographed in this brochure may vary slightly from the actual product.
Barista-quality coffee is just a few clicks away!
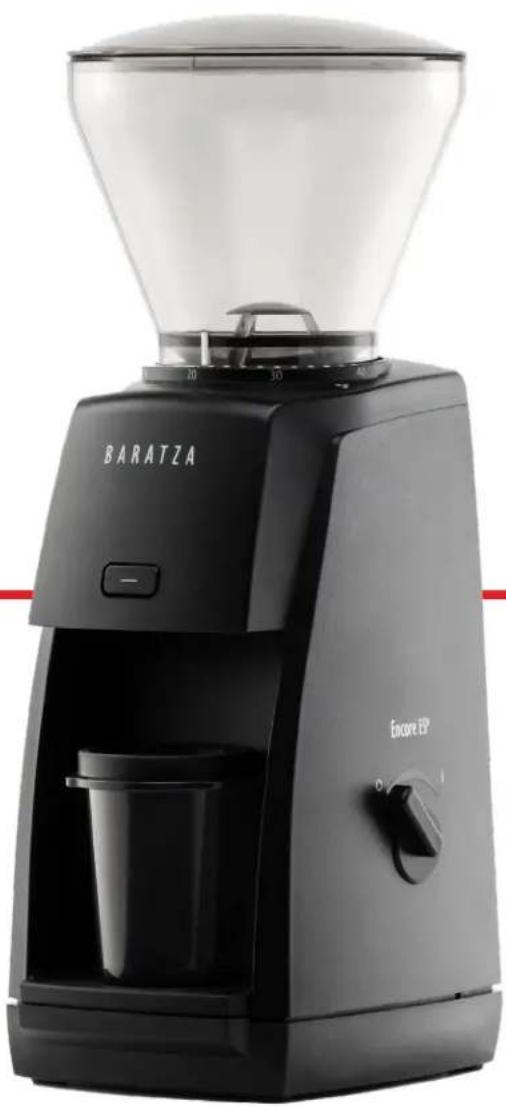
natural_image
Black Baratza coffee maker with clear glass filter and control panel (no visible text or symbols on device body)TABLE OF CONTENTS
SAFETY INFORMATION 3
PARTS IDENTIFICATION 4
OPERATION 5
CARE & CLEANING 7
CONE BURR ASSEMBLY 9
WARRANTY & SERVICE 12
SAFETY INFORMATION
Please read the information below very carefully. It contains important safety information for this appliance. Please keep these instructions for future reference.
Use only with AC current and the correct voltage. See the label on the base of the grinder to determine the correct voltage.
! Only clean the grinder housing with a dry or slightly damp cloth. Do not immerse the grinder, plug or cord in water or any other liquid.
Baratza will not accept any liability for damage, injury, or warranty if the grinder is used other than for its intended purpose (i.e. grinding roasted whole coffee beans) or is improperly operated or repaired.
Keep the appliance and its cord out of reach of children aged less than 8 years.
Do not operate the grinder with a damaged cord or plug. If the supply cord is damaged, it must be replaced by the manufacturer, its service agent or similarly qualified persons in order to avoid a hazard.
Do not leave your grinder unattended while turned ON.
This appliance can be used by children aged from 8 years and above and persons with reduced physical, sensory or mental capabilities or lack of experience and knowledge if they have been given supervision or instruction concerning use of the appliance in a safe way and understand the hazards involved.
Cleaning and user maintenance shall not be made by children without supervision.
Always unplug the grinder from the electrical supply before assembling, disassembling or cleaning. To unplug, grasp plug and remove from the outlet. Never pull on the cord.
CAUTION: ALWAYS unplug the electrical supply cord prior to cleaning the grinder.
PARTS IDENTIFICATION
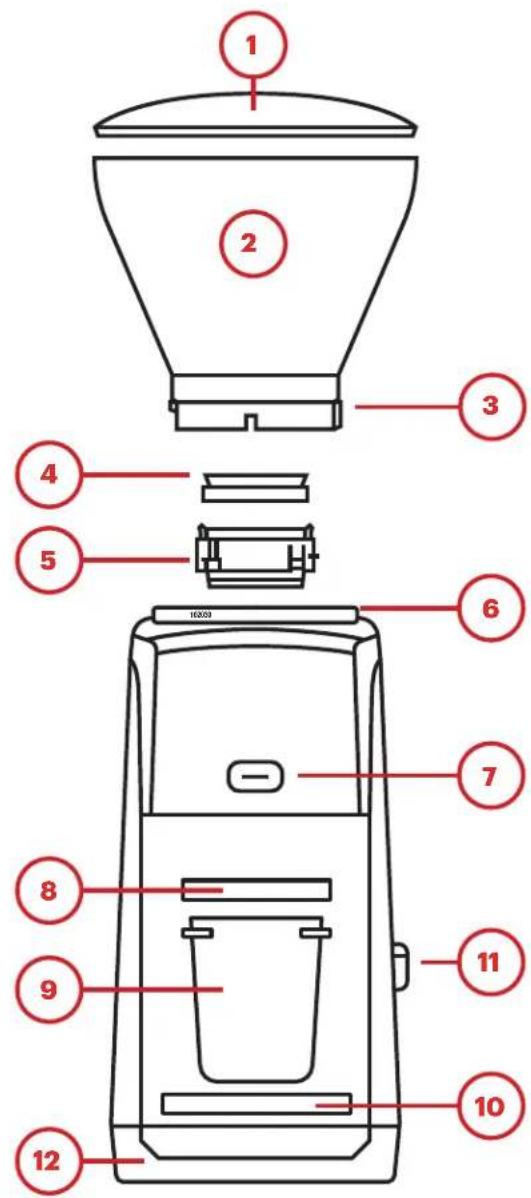
text_image
1 2 3 4 5 6 7 8 9 10 11 12- Hopper Lid 13. Grind Adjustment Ring
- Bean Hopper 14. Grind Adjustment Tab
- Grind Setting Indicator 15. Burr-Lifting Tabs
- Hopper Gasket 16. Quick-Release Knob
- Removable Ring Burr 17. Center Cone Burr
- Grind Settings 18. Brush*
- Pulse Button 19. Ground
- 58mm Adapter Ring* 20. Shims
- Dosing Cup* *Included in a
- Dosing Cup Base*
- On/Off Knob*
- Weighted Base
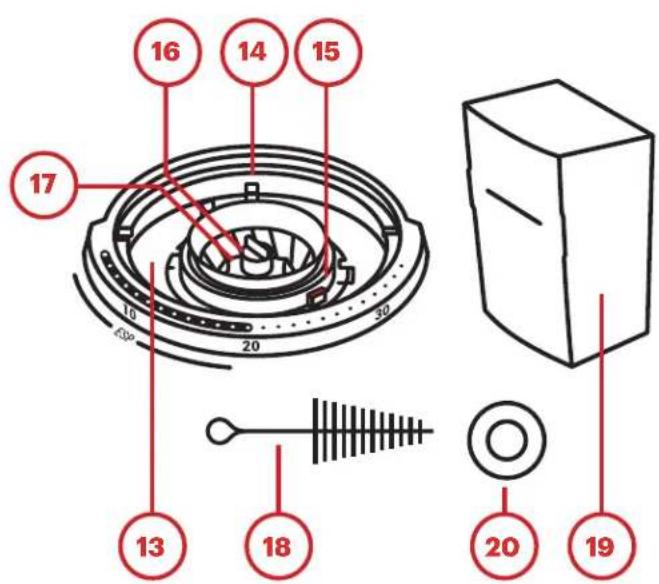
text_image
16 14 15 17 10 20 30 13 18 20 19OPERATION
INITIAL SETUP
- Remove the contents from the packaging and hand-wash the hopper lid (1), bean hopper (2), dosing cup (9), and grounds bin (19) in warm, soapy water. Let air dry. Do not wash the ring burr (5) in water or it will rust.
- To install the hopper, align the silver grind setting indicator (3) with the triangle near grind setting 40 (6). Press the hopper down and twist clockwise into place. The grinder will not start without the hopper installed.*
- If grinding for espresso, insert the dosing cup base (10) and dosing cup (9). If grinding for filter brewing, insert the grounds bin (19).
- To install the on/off knob (11), align it with the stem of the switch on the right side of the unit and press into place. Use either the on/off knob or the pulse button (7) to begin grinding.
*If there is difficulty in installing the hopper: Ensure that the ring burr (5) is fully seated in place. The grind adjustment ring (13) must be rotated fully counterclockwise using the adjustment ring tabs (14) for the hopper to be installed.
When grinding into the grounds bin, coffee tends to mound up in the center. To prevent clogging, empty the grounds before they reach the max fill line.
RECOMMENDED INITIAL GRIND SETTINGS
The Encore ESP has a unique adjustment system that is divided into two parts: the espresso range (settings 1-20) and the filter coffee range (settings 21-40). When brewing espresso, very small changes to the grind size are needed to fine-tune the perfect espresso shot. The espresso range of the Encore ESP's adjustment system allows for these precise adjustments, meaning each grind setting from 1-20 will only change the grind size by small amounts between settings. More information can be found on dialing in espresso shots in our brew guides at Baratza.com. In order for the grind range to span from the finest espresso to the coarsest cold brew in just 40 clicks, adjustments in the filter coffee range (settings 21-40) result in relatively larger changes to the grind size from setting to setting.
Below are suggested starting points for what grind settings to use for common brew methods. Coarser or finer grinding may be needed depending on recipe requirements and taste preference. More information can be found on this in our brew guides at Baratza.com.
| Espresso AeroPress Hario V60 Automatic | Brewer | Chemex French | Press | |||
| Suggested Setting 152225283032 | ||||||
Note: The espresso grind setting above is based on a medium roast and a dose of 18g of coffee. For darker roasts, or larger doses, set the grinder to a higher number. For lighter roasts, or smaller doses, set the grinder to a smaller number.
GRINDING OPERATION
- Rotate the hopper so the grind setting indicator (3) is aligned with the desired grind setting (6).
- When making grind adjustments, the grinder must either be running or completely empty of beans to prevent damage to the unit.
- If grinding for espresso, the included espresso dosing cup (9) and 58mm adapter ring (8) allow for easy transfer of coffee into a 54mm or 58mm portafilter.
- If using a 54mm portafilter, remove the adapter ring before dosing.
- Grind into the dosing cup, fit the portafilter upside-down on top of the dosing cup, and, keeping them together, flip both over to seamlessly dose the grounds into the portafilter basket.
-
To begin grinding, either the on/off switch or the pulse button can be used:
-
To use the on/off switch, rotate it to the "I" position to start grinding, and to the "O" position to stop. Do not leave the grinder unattended while grinding. If the ground coffee surpasses the maximum fill line on the grounds bin, the grinder may become clogged and damaged as a result.
• To use the pulse button to grind small amounts of coffee, or to have more precise control in how much coffee is ground, simply press and hold the pulse button. The grinder will run for as long as the button is held down, and will stop when the button is released.
CARE & CLEANING
The main components of the Encore ESP can be removed from the grinder for cleaning or maintenance.
REMOVING AND REINSTALLING THE HOPPER
The hopper may be removed for cleaning or maintenance of the burrs.
TO REMOVE:
- Remove all coffee beans from the hopper and grind any remaining beans through using either the On/Off switch or the pulse button. Unplug the grinder from the power outlet before removing the hopper.
- Rotate the hopper completely counterclockwise so that the grind setting indicator is aligned with the triangle near grind setting 40.
- Lift the hopper off of the grinder.
Note: The hopper gasket may come off with the hopper. If it does, install it on the ring burr by placing it thick side down within the plastic rim on top of the ring burr to ensure that it is not lost during cleaning.
TO REINSTALL:
- Check that the hopper gasket, ring burr, and cone burr are all installed properly.
- Grip the two grind adjustment tabs and ensure that the grind adjustment ring is rotated fully counterclockwise.
- Align the grind setting indicator on the hopper with the triangle near grind setting 40. Push down on the hopper and rotate it clockwise until it starts to click.
Caution: Do not put the hopper, hopper lid or grounds bin in the dishwasher. Hand wash only. Do not immerse the grinder housing in water. Do NOT wash the burrs with water, or they will rust.
REMOVING AND REINSTALLING THE RING BURR
The ring burr may be removed for cleaning or maintenance.
TO REMOVE:
- Grip the two grind adjustment tabs and ensure that the grind adjustment ring is rotated fully counterclockwise. Otherwise, the ring burr will be locked into place.
- Using the two burr lifting tabs, lift the ring burr straight up and out of the grinder. Ensure that the hopper gasket is not lost in the process.
TO REINSTALL:
- Ensure that the cone burr is installed properly.
- Grip the two grind adjustment tabs and ensure that the grind adjustment ring is rotated fully counterclockwise.
- Align the red burr lifting tab with the red mark on the grind adjustment ring. The three tabs protruding from the sides of the ring burr should also align with the three slots in the top of the grind adjustment ring.
- Press the ring burr down into place.
- Ensure the hopper gasket is properly installed on the ring burr, with the thicker side of the gasket sitting within the plastic rim on top of the ring burr.
REMOVING AND REINSTALLING THE CONE BURR
The Encore ESP is equipped with a quick-release knob on top of the cone burr, allowing for easy removal of the cone burr for cleaning or burr replacement.
TO REMOVE:
- Twist the quick-release knob clockwise until removed.* There will be a small washer underneath the quick-release knob. Remove along with the knob.
- Lift the cone burr straight up and out of the grinder.
*If there is difficulty in removing the quick-release knob, we recommend using a thick cloth or a glove to hold the cone burr in place, as it will rotate freely, but take care as it may be sharp. Pliers may also be used to get a better grip on the quick-release knob.
Note: There are several parts that sit below the cone burr that may also be removed for cleaning and maintenance, shown in order in the diagram on the next page. If these parts are removed with the cone burr, keep them arranged in the order shown for reinstallation.
TO REINSTALL:
- If the parts below the cone burr were removed for cleaning, place them back on the drive shaft in the order shown in the diagram.
- When placing the cone burr back onto the metal drive shaft, make sure that the two protrusions on part E are able to fit into the holes on part D and the two divots on the bottom of the cone burr.
- Place the quick-release knob onto the threaded part on top of the metal drive shaft and twist the knob counter-clockwise to tighten. Tighten until the cone burr starts to rotate when the knob is turned.
CONE BURR ASSEMBLY
A. Quick-Release Knob
B. Washer
C. Cone Burr
D. Paddle Wheel
E. Drive Shim
F. Washer Shims
G. Felt Ring
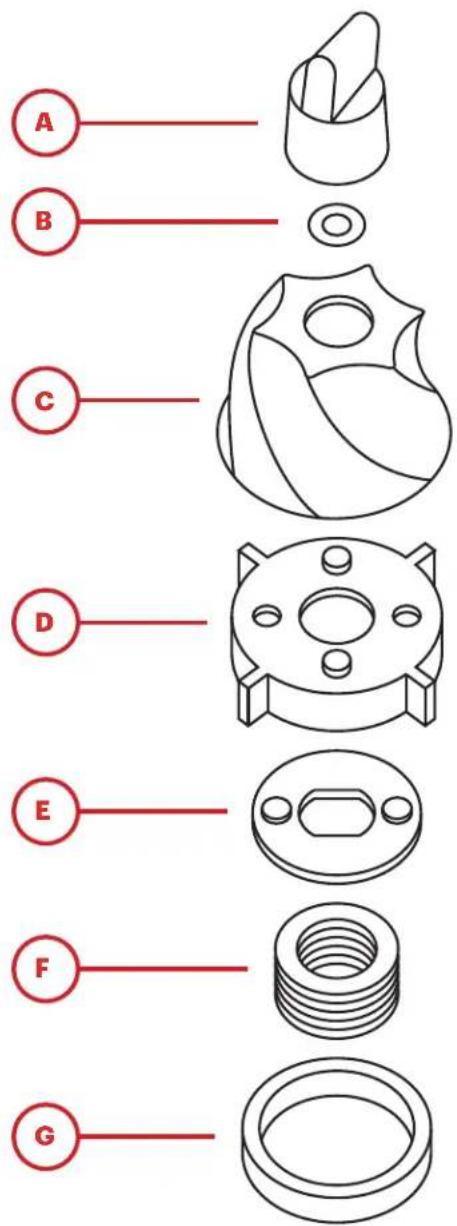
text_image
A B C D E F GCLEANING THE GROUNDS BIN, HOPPER AND BURRS
The grounds bin, hopper, hopper lid, and hopper gasket can be washed with warm, soapy water. Rinse and let air dry. Do not allow the burrs to get wet, otherwise they will rust.
If the grinder is used daily, the burrs should be brushed off regularly (about once a month) with the included brush. The burrs do not need to be removed from the grinder for cleaning, but it will allow for a more thorough cleaning. If dark, oily, or flavored coffee is used often, grinder cleaning tablets may need to be used in order to absorb the oils left behind by the coffee. Is oil is left to build up in the grinder, it may become clogged, resulting in damage to the grinder. Please follow grinder cleaning tablet manufacturer instructions for use. If a clog may have formed, see the following section for more information. Do not grind any substance other than grinder cleaning tablets to clean the internals of the grinder.
A CLOGGED GRINDER
If coffee is not falling into the grounds bin while grinding, and all parts are properly installed and functioning, a clog may be preventing the coffee from moving through the grinder. This can happen if coffee is allowed to mound up past the maximum fill line on the grounds bin, or if dark, oily coffee or flavored coffee is used often without periodically cleaning the grinder. Ground coffee can stick to built-up coffee oils in the grinder and cause a clog to form. Regular cleaning and proper use can prevent a clogged grinder.
IN THE EVENT THAT A CLOG DOES FORM:
- Follow the steps on the previous page to remove the cone burr and parts underneath. This will allow for direct access to where the clog has formed.
- Empty out as much coffee as possible in the grind chamber. The sides and bottom of the grind chamber are white plastic, and should be visible when the coffee has been cleaned out. Compacted coffee can become very hard, so it is recommended that a stiff tool, like a small hex wrench or the handle of the provided cleaning brush, be used to chip away at the compacted coffee.
- The center of the exit chute, where ground coffee exits the grind chamber and falls into the grounds bin, is found directly underneath the red marker on the grind adjustment ring when it is rotated fully counterclockwise. This chute must be completely clear for coffee to exit into the grounds bin.
- If the unclogging attempt is unsuccessful, do not hesitate to contact Baratza support. Check the warranty section on the next page to find out how to contact Baratza support in your region.
SHIM KIT USE AND INSTALLATION
As the grinder is used, parts will settle into place, and the grind settings used may slowly shift so that a finer grind setting must be used. This is a normal part of the wear process and will eventually stop as the parts are settled. However, in some cases, the finest grind settings may not be fine enough to achieve the grind necessary. In this case, the shims provided in the original packaging may be used to shift the overall grind settings of the grinder. By inserting one shim, the grind will shift by about five settings. For example, if setting 10 was used before shim installation, setting 15 will be the rough equivalent after shim installation.
TO INSTALL A SHIM:
- Follow the instructions on previous pages to remove the hopper, ring burr, and cone burr.
- After removing the cone burr, remove parts D and E as shown on the previous page.
- Place one or two shims (as needed) on top of the other washer shims (Part F).
- Reassemble.
If even after shim installation the grinder is not able to grind finely enough for espresso, there may be an issue with assembly or a part of the unit. See the warranty page for information on how to contact Baratza support in your region for assistance.
WARRANTY & SERVICE
U.S. & CANADIAN WARRANTY INFORMATION
Limited Warranty for Baratza Grinders is 1 year from the original date of purchase. This warranty covers all defects in materials and workmanship (parts and labor) including free ground transportation to and from our repair facility within the US and Canada. This warranty does not apply to: improper use, lack of cleaning, abuse, normal wear and tear, lack of proper adjustment, foreign objects (stones, screws, etc.) in the beans, or uses outside the intended use of grinding whole roasted coffee beans (roasted beyond 1st crack). If the purchased grinder fails within one year, email support@baratza.com or call +1 425-641-1245 or toll free 877-701-2021. For additional warranty, support, or troubleshooting information, go to www.baratza.com.
Please note: Grinders that are purchased in the US or Canada and shipped or taken out of the country have a one-year warranty for parts only. If the grinder fails within one year of date of purchase, simply email us at support@baratza.com or call +1 425-641-1245. Please have the following information prior to contacting Baratza: 1) Proof of date of purchase and 2) Model and serial number (located on bottom of the grinder). A Baratza representative will respond to determine the problem and suggest a solution path. The customer is responsible for paying the freight charges and any duties and taxes for replacement parts that Baratza may send. The customer is also responsible to provide any labor required to repair the grinder.
INTERNATIONAL WARRANTY INFORMATION
For all countries outside the US and Canada, the warranty, support and service is provided by the International Retailer the grinder was purchased from. If the grinder was purchased from a retailer outside of the country the customer resides in, the customer may be responsible for any shipping costs to service the grinder, and may need to pay for service.
PROOF OF PURCHASE & PRODUCT REGISTRATION
The grinder can be registered at www.baratza.com/register-your-grinder. Registration will enable us to contact the registrant in the unlikely event of a product safety notification and assist us in complying with the provisions of the Consumer Product Safety Act. The serial number is located on the bottom of the grinder. Please keep the sales receipt that shows the date of purchase.
FOR REPAIRS OR QUESTIONS
Email: support@baratza.com
For Parts and Information go to: www.baratza.com
For Troubleshooting Help:
www.baratza.com/troubleshooting