
MixPack 10 - Speaker ALTO - Free user manual and instructions
Find the device manual for free MixPack 10 ALTO in PDF.
User questions about MixPack 10 ALTO
0 question about this device. Answer the ones you know or ask your own.
Ask a new question about this device
Download the instructions for your Speaker in PDF format for free! Find your manual MixPack 10 - ALTO and take your electronic device back in hand. On this page are published all the documents necessary for the use of your device. MixPack 10 by ALTO.
USER MANUAL MixPack 10 ALTO
User Guide (English)
Introduction
Box Contents
Mixpack 10
Power Cable
(2) 1/4 (6.35 mm) Speaker Cables
User Guide
Safety & Warranty Manual
Support
For the latest information about this product (system requirements, compatibility information, etc.) and product registration, visit altoprofessional.com.
Cleaning
When necessary, use compressed air or a dry cloth to keep Mixpack 10 clean and dust-free. Do not use any solvents such as benzol or alcohol.
Installation Tips
- Place the loudspeakers in a position that allows for unobstructed sound projection. In many instances, it is beneficial to place loudspeakers on tripod stands at a suitable height in order to achieve maximum dispersion and reach.
Use high-quality cables to ensure the best possible sound. - For best results use the included loudspeakers with the Mixpack 10 powered mixer. These speakers were designed specifically to complement the power output and voicing of Mixpack 10's powered mixer. Avoid pointing the microphone directly at the loudspeaker. This can cause feedback or damage loudspeaker components as well as your hearing.
Important Safety Precautions
Please note: Alto Professional and inMusic are not responsible for the use of its products on the misuse of this information for any purpose. Alto Professional and inMusic are not responsible for the misuse of its products caused by avoiding compliance with inspection and maintenance procedures. Please also refer to the included safety and warranty manual for more information.

Caution: To reduce the risk of electric shock, do not connect Mixpack 10 to a power outlet while the mixer is open.
Stand-Mounting
Always install loudspeakers in accordance with applicable electrical and building codes.
- Install the loudspeaker according to its maximum weight. Check the specifications of your stand or pole to ensure it can support the loudspeaker's weight. Also, observe all safety precautions specified by the manufacturer.
- Do not mount multiple loudspeakers on the same stand or pole.
- Always verify that the stand or pole is on a flat, level, and stable surface. Also, fully extend the legs of tripod-style stands, and ensure its legs do not present a trip hazard.
- Inspect the stand (or pole and associated hardware) before each use and do not use equipment with worn, damaged, or missing parts.
- Always be cautious in windy, outdoor conditions. You may need to place additional weight (e.g., sandbags) on stand's base to improve stability. Do not attach banners or similar items to any part of a loudspeaker system. Such attachments could act as a sail and topple the system.
Unless you are confident that you can handle the loudspeaker's weight, ask another person to help you lift it onto the stand or pole.
- Make sure your cables are out of the way of performers, production crew, and audience so they will not trip over them, pulling the loudspeaker off the stand or pole.
Sound Level
Permanent hearing loss may be caused by exposure to extremely high noise levels. The U.S. Occupational Safety and Health Administration (OSHA) has specified permissible exposures to certain noise levels. According to OSHA, exposure to high sound pressure levels (SPL) in excess of these limits may result in hearing loss. When using equipment capable of generating high SPL, use hearing protection while such equipment is under operation.
| Hours per day | SPL (dB) | Example | |
| 8 | 90 | Small | gig |
| 6 | 92 | Train | train |
| 4 | 95 | Subway | |
| 3 | 97 | High level desktop monitors | music |
| 2 | 100 | Classical | |
| 1.5 | 102 | Riveting | machine |
| 1 | 105 | Machine | factory |
| 0.50 | 110 | Airport | |
| 0.25 or less | 115 | Rock concert |
Quick Start
Setup
Connect cables with all equipment powered off, and ensure that all main volume controls are turned down. Follow the procedure below to have a signal processed for each channel:
- Set all channel Level knobs to zero, set the Main Level knob to zero, and set EQ's flat.
- Connect your mic and then engage the Phantom Power switch if your mic requires this.
- Set the Main Level knob to no more than 70% and the Monitor knob at minimum.
- Adjust the channel Level knob and bring up the Monitor knob slowly to reach the desired level.
- Repeat Steps 1 and 2 to set up more channels.
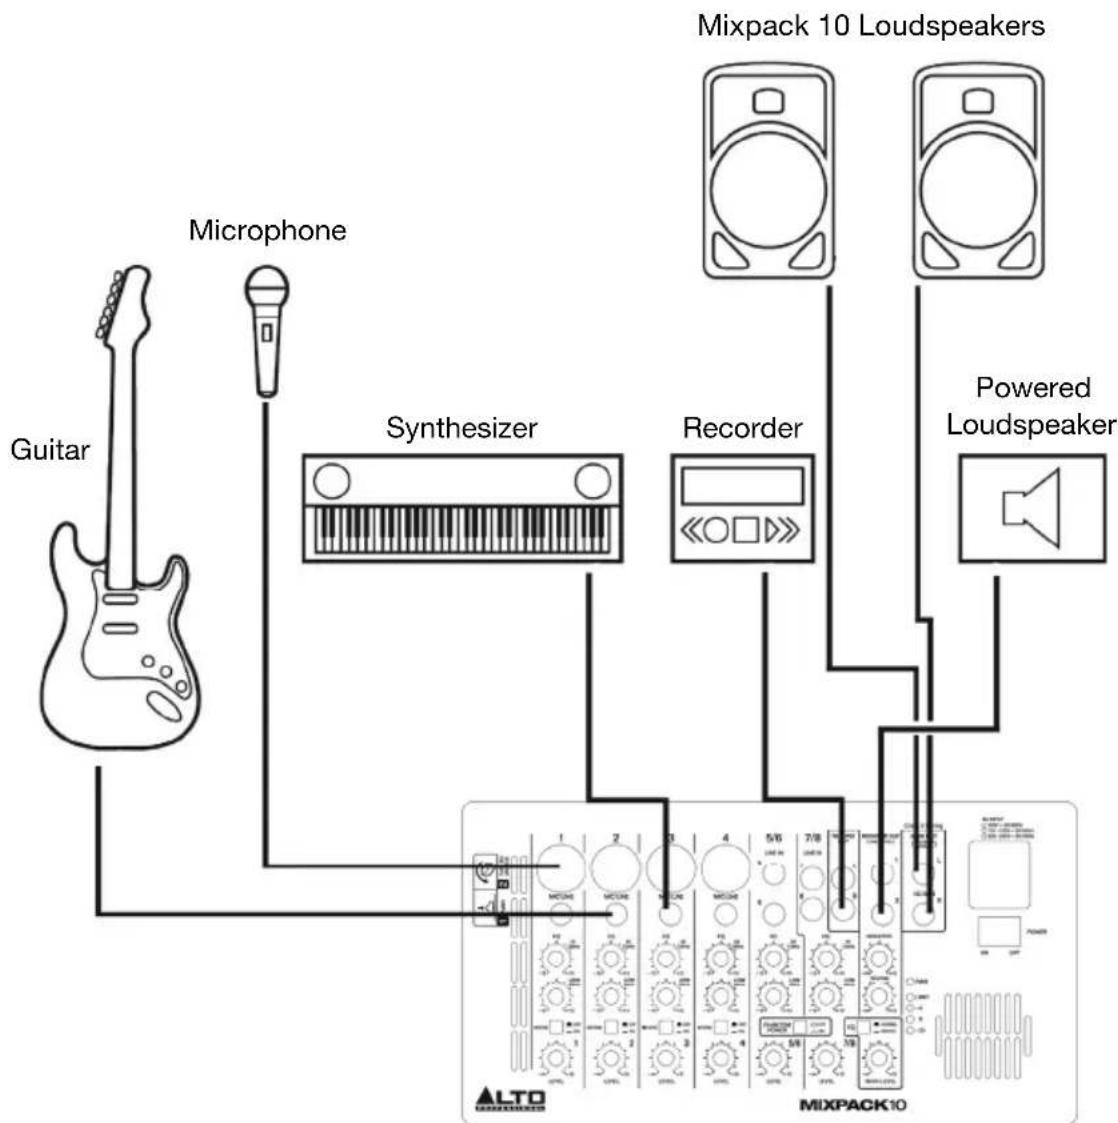
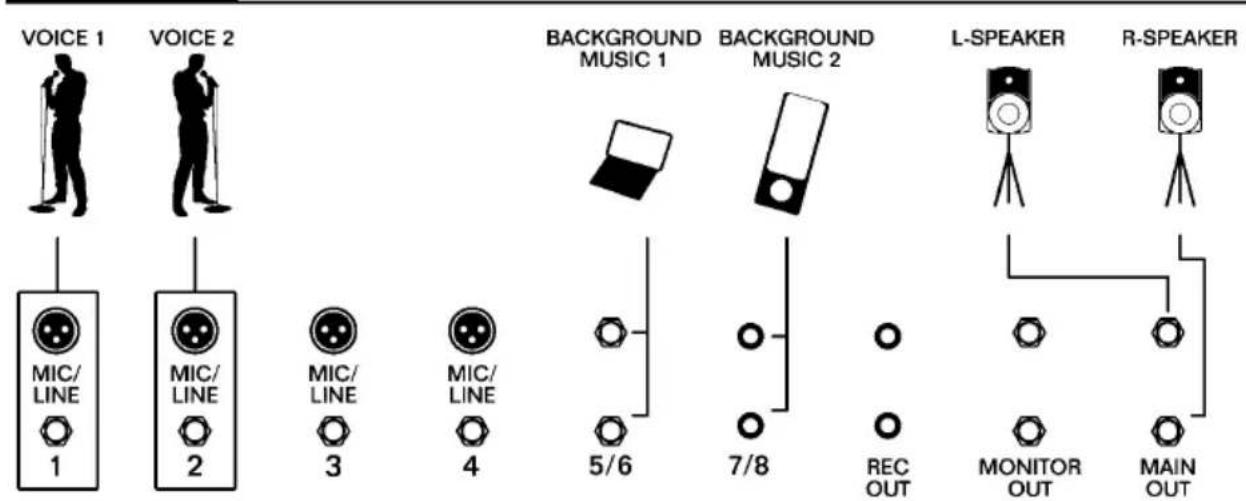
Connection Diagram
Items not listed under Introduction > Box Contents are sold separately.
Features
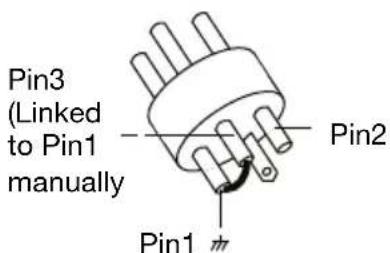
To remove the mixer from the loudspeaker, press in and turn the dial counter-clockwise. Open the back panel of the other loudspeaker to access the speaker and power cables.
To secure the mixer and storage compartment door back in the speaker enclosure for transport, push in and turn the dial clockwise until the knob's tab is vertical (see image).

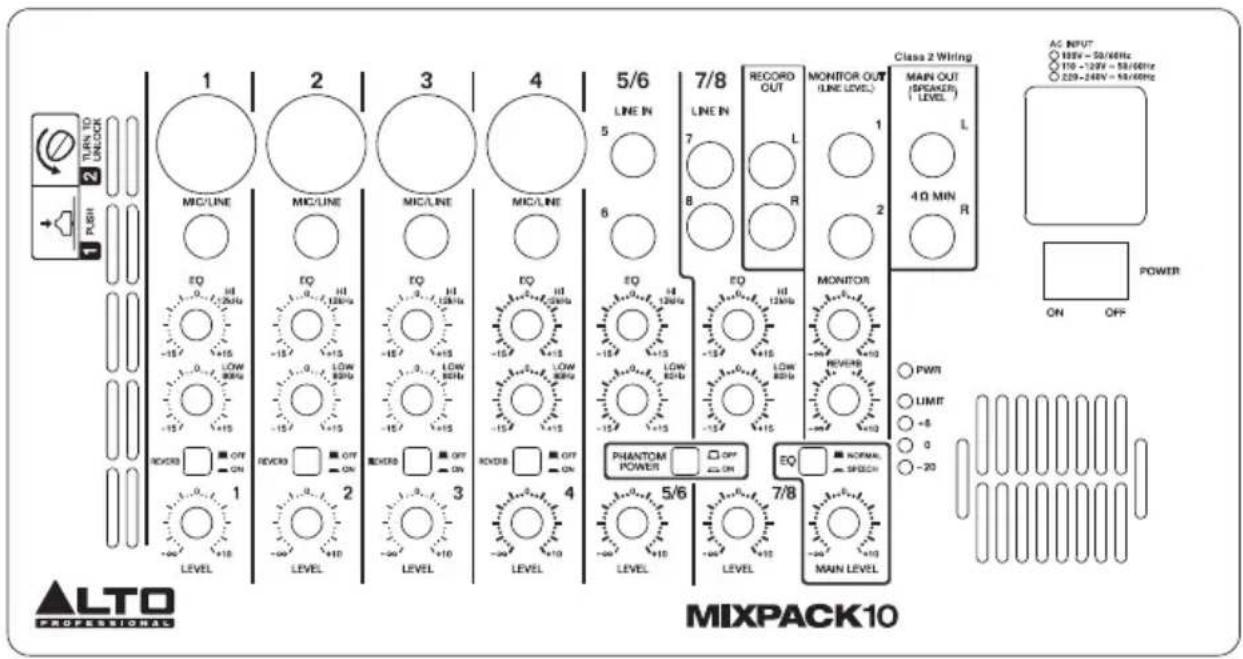
Top Panel
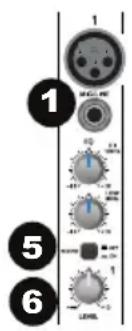
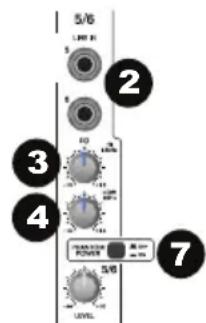
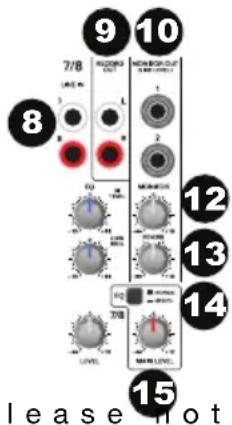
- Mono Inputs: These XLR and 1/4'' inputs are capable of accepting microphone- or line-level signals. The XLR inputs can use phantom power allowing you to connect a condenser microphone. Use the 1/4'' input to connect either a microphone or an instrument such as synthesizers, drum machines, effect processors, or any other line-level signals.
Note: When using phantom power with XLR microphones, only use correctly wired XLR cables. Using XLR cables with non-standard termination may damage microphones and other connected equipment. - Stereo Line Inputs: Connect stereo line-level devices to these inputs. When connecting to either or both inputs on Channels 5/6, the signal will come out both L and R speakers for the Main Out. Monitor Out signals will consist of a summed mono mix of the L and R Main Out signals.
- High EQ: Adjusts the high (treble) frequencies of the channel. The gain can be adjusted from -15dB to +15dB with the center frequency at 12 kHz.
- Low EQ: Adjusts the low (bass) frequencies of the channel. The gain can be adjusted from -15dB to +15dB with the center frequency at 80 Hz.
- Reverb Switch: Set this switch to the ON position to apply a reverb effect to the selected channel.
- Level Control: Adjusts the signal gain for the channel.
- Phantom Power Switch: Set this switch to the ON position to apply +48V to XLR Monol Inputs 1-4. Ple dynamic microphones do not require phantom power, while most condenser microphones do. Consult your microphone's documentation to find out whether it needs phantom power.
- RCA Line Inputs: Connect the outputs of an external device to these inputs using standard RCA cables. This can be used to connect to a CD player or mobile device (laptop, tablet, mobile phone etc.). As most mobile devices are equipped with stereo 1/8" audio outputs, you will likely need a stereo 1/8"-to-RCA adapter cable.
- Record Out: Route the main output signal into a tapedeck, computer soundcard, or a portable recorder.
- Monitor Output: Connect this output to your powered monitor speaker or amplifier system.
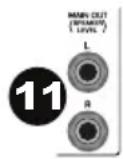
- Main Output: Outputs an amplified speaker-level signal to the included loudspeaker. The minimum loudspeaker load is 4 ohms.
- Monitor Level Control: Adjusts the level of the Monitor Output.
- FX Return (Reverb 1-4): Controls the amount of Reverb effect being sent to the Main Output and Monitor Output.
- EQ Contour: Adjusts the contour of the sound. If your application is mainly for speech, set this switch to the SPEECH position to select the SPEECH response curve.
- Main Level Control: Adjusts the overall output level.
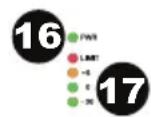
- Power LED: This LED lights up when the unit is powered on.
- Output Level LED: This 4-segment LED meter is used to indicate the output level.
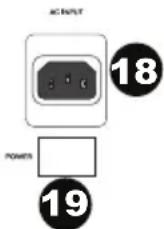
- AC Input: Connect the included power cable here.
- Power Switch: Turns the unit's power on/off.
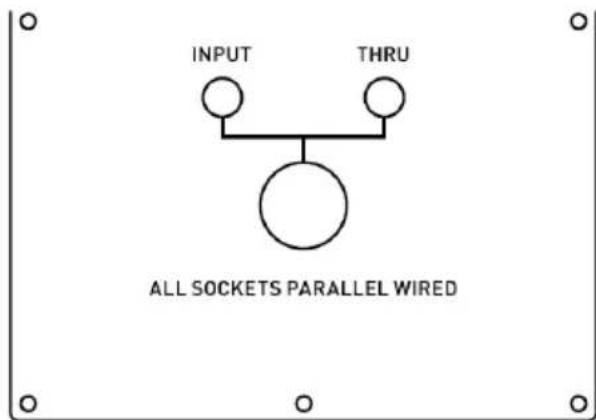
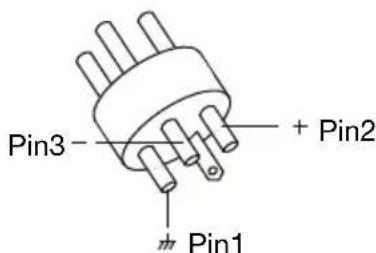
Connecting Plate
Here are the two available options to connect unpowered loudspeakers to Mixpack 10:
- Input: This receives the power coming from an external power amplifier (SPK+1/-1 connected; +2 -2 not connected).
- Thru: This is a direct link for connecting in parallel with a second loudspeaker cabinet (SPK +1/-1 connected; +2 -2 not connected).
Installation and Connection
Read this section carefully. Not paying enough attention to the input signal's level, routing, or proper cabling can result in unwanted distortion, a corrupted signal or no sound at all.
Mixpack 10 has both balanced and unbalanced connections, ensuring compatibility with other audio processors and mixers.
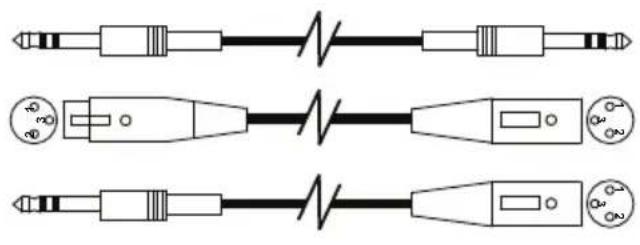
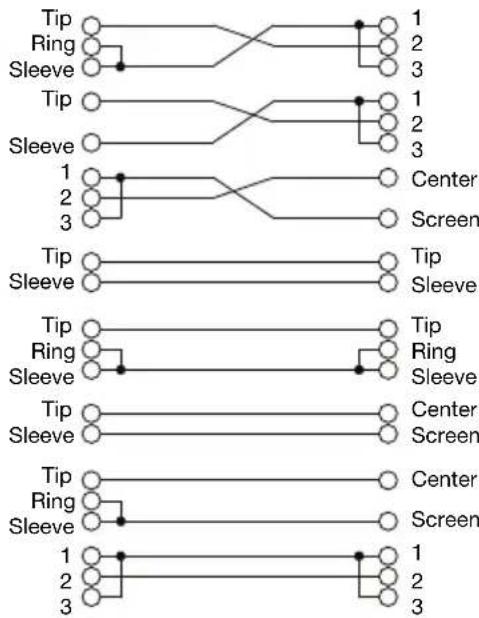
Please see the following drawings for details:
For 1/4" Phone jack
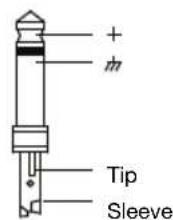
TS Type Unbalanced
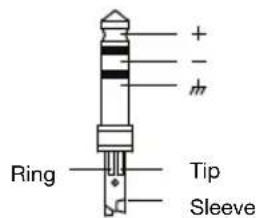
TRS Type Balanced
- For XLR connector
XLR Type Unbalanced
XLR Type Balanced
In Line Connection
Balanced
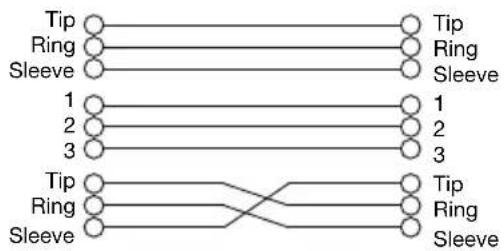
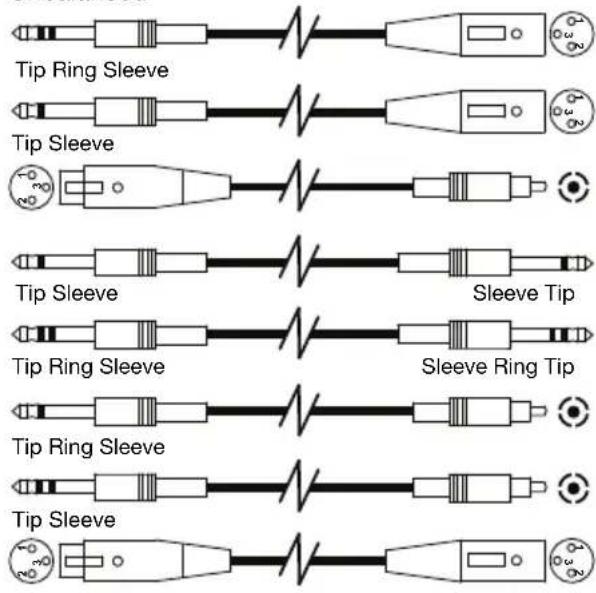
Unbalanced
Plaque de raccordement
Installation et raccordement
Trademarks and Licenses
Alto Professional is a trademark of inMusic Brands, Inc., registered in the U.S. and other countries.
All other product or company names are trademarks or registered trademarks of their respective owners.
Technical Specifications
Specifications are subject to change without notice.
Loudspeaker
| Power Handling | 200 W RMS / 400 W Peak |
| Tweeter | 1" (2.6 cm) compression driver, 1.5" (3.8 cm) voice coil |
| Woofer | Woofer 10" (25.5 cm) woofer, 1.5" (3.8 cm) voice coil |
| Max SPL | 113 dB @ 1 m |
| Frequency Response | 68 Hz – 20 kHz (-6dB) |
| Crossover Frequency | 2.2 kHz |
| Protection | PTC (Positive Temperature Coefficient) protection for high frequencies |
| Mounting | 35 mm standard pole-mount |
| Dimensions (height x width x depth) | 18.1" x 11.2" x 10.4" 46 cm x 28.4 cm x 26.4 cm |
| Weight | 15 lbs. 6.8 kg |
Mixer
| Input Channels | Microphone Input Electronically balanced, discrete input Frequency Response: 20 Hz - 22 kHz (±3 dB) Gain: 55 dB | |
| Line Input Electronically balanced, discrete input Frequency Response: 20 Hz - 22 kHz (±3 dB) Gain: 10 dB | ||
| Impedance | Microphone Input | 1.5 KΩ |
| Line Inputs | 10 KΩ or greater | |
| Record Out | 1 KΩ | |
| Monitor Outputs | 120 Ω | |
| Equalization | High Shelving +14 dB @ 12 kHz | |
| Low Shelving +14 dB @ 80 kHz | ||
| Main Mix Section | Monitor Output +22 dBu unbalanced, 1/4" jack | |
| Record Output -10 dBv unbalanced, coaxial | ||
| Power Amplifier | Output Power 200 W RMS @ 1 kHz THD 1%, 4-Ω load | |
| Frequency Response | 20 Hz - 22 kHz, ±3 dB | |
| Power | 100-120 / 220-240 V; 50/60 Hz | |
| Dimensions (width x depth x height) | 5.75" x 2.5"x 11" 14.6 cm x 6.4 cm x 27.9 cm | |
| Weight | 4.15 lbs. 1.9 kg | |
Application Chart
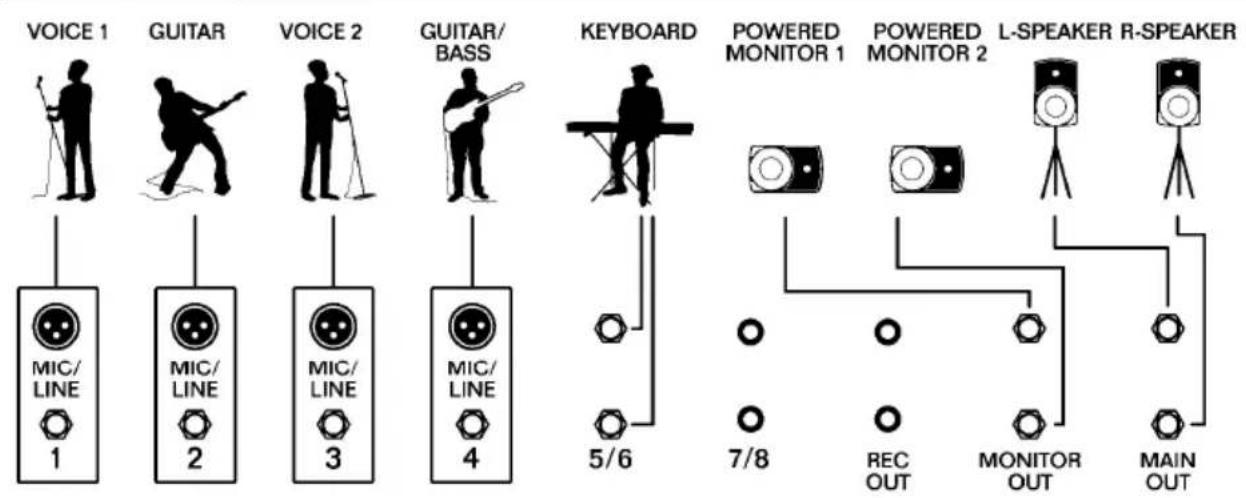
GROUP
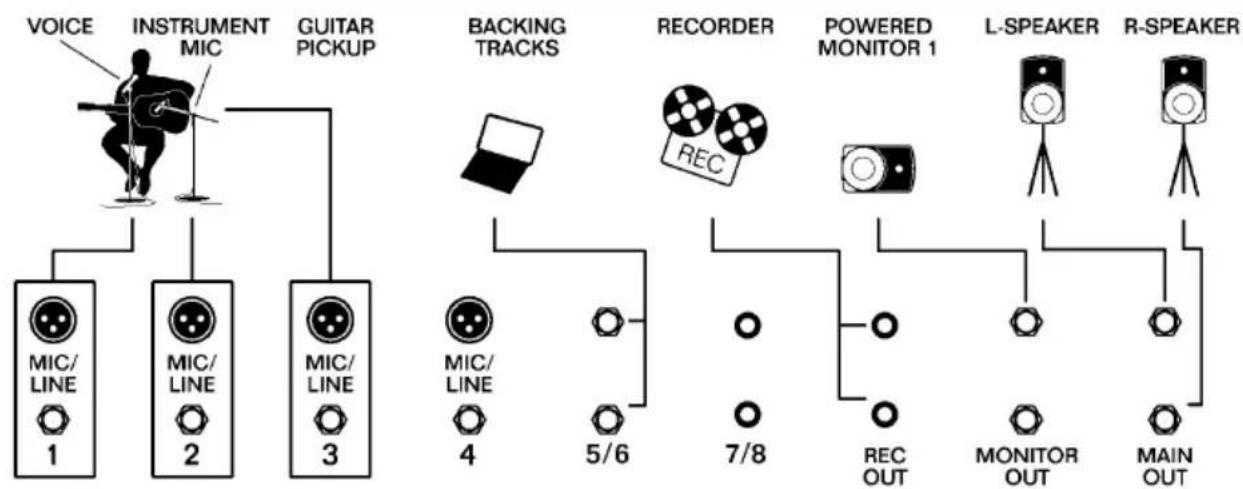
SOLO
EVENT
altoprofessional.com
- User Guide (English)
- Introduction
- Box Contents
- Support
- Cleaning
- Installation Tips
- Important Safety Precautions
- Stand-Mounting
- Sound Level
- Quick Start
- Setup
- Connection Diagram
- Features
- Top Panel
- Connecting Plate
- Installation and Connection
- In Line Connection
- Plaque de raccordement
- Installation et raccordement
- Trademarks and Licenses
- Technical Specifications
- Loudspeaker
- Application Chart
- altoprofessional.com
Brand : ALTO
Model : MixPack 10
Category : Speaker