Gimbal Steady Butler Mobile 2 - Other camera accessories ROLLEI - Free user manual and instructions
Find the device manual for free Gimbal Steady Butler Mobile 2 ROLLEI in PDF.

| Brand | Rollei |
| Model | Gimbal Steady Butler Mobile 2 |
| Product type | Smartphone gimbal stabilizer |
| Weight | 465 g |
| Maximum payload | 250 g |
| Compatible smartphone width | 53 to 88 mm |
| Operating battery life | 12 hours (well balanced) |
| Charging time | 4 hours |
| Charging voltage | 5 V |
| Charging current | 2 A |
| Powerbank output | 5 V / 1 A |
| Charging port | Micro-USB |
| Smartphone connection | Bluetooth (via Rollei Smart Gimbal 2 app) |
| Tilt angle | 330° (-155° to +155°) |
| Roll angle | 160° (-30° to +30°) |
| Pan angle | 330° (-155° to +155°) |
| Stabilization modes | Pan & Tilt, Pan follow, Lock |
| Dedicated app | Rollei Smart Gimbal 2 (iOS 10+ / Android 5.0+) |
| Package contents | Gimbal, tripod, micro-USB cable, user manual, wrist strap |
| Care and cleaning | Wipe with a soft, dry cloth. Do not use abrasive products. |
| Safety | Do not expose to heat, do not disassemble the battery, keep out of reach of children. |
| Repairability | Battery not user-replaceable. Contact the retailer for any issues. |
Frequently Asked Questions - Gimbal Steady Butler Mobile 2 ROLLEI
User questions about Gimbal Steady Butler Mobile 2 ROLLEI
0 question about this device. Answer the ones you know or ask your own.
Ask a new question about this device
Download the instructions for your Other camera accessories in PDF format for free! Find your manual Gimbal Steady Butler Mobile 2 - ROLLEI and take your electronic device back in hand. On this page are published all the documents necessary for the use of your device. Gimbal Steady Butler Mobile 2 by ROLLEI.
USER MANUAL Gimbal Steady Butler Mobile 2 ROLLEI
Steady Butler Mobile 2
Robust and ultralight smartphone Gimbal
User Guide
for German, English, French, Spanish, Italian and Dutch
Rollei
Rollei
natural_image
Person taking a selfie with a smartphone in front of a scenic sunset landscape, no visible text or symbols
natural_image
Person riding a blue bicycle on a dirt path under a rocky cliff at sunset, with a black-and-white device nearby (no visible text or symbols)4
1. Produktübersicht
natural_image
Simple line drawing of a remote control panel with two buttons and a circular dial (no text or symbols)4. Befestigen des Smartphones
natural_image
Technical line drawing of a mechanical assembly with no visible text or symbols
natural_image
Diagram of a smartphone mounted on a stand with orange arrows indicating motion or force (no text or symbols)BEACHTEN SIE:
natural_image
Three-step diagram showing mechanical assembly with curved arms and arrows indicating motion (no text or symbols)natural_image
Technical line drawing of a smartphone mounted on a stand, showing front and side views with no text or symbolsnatural_image
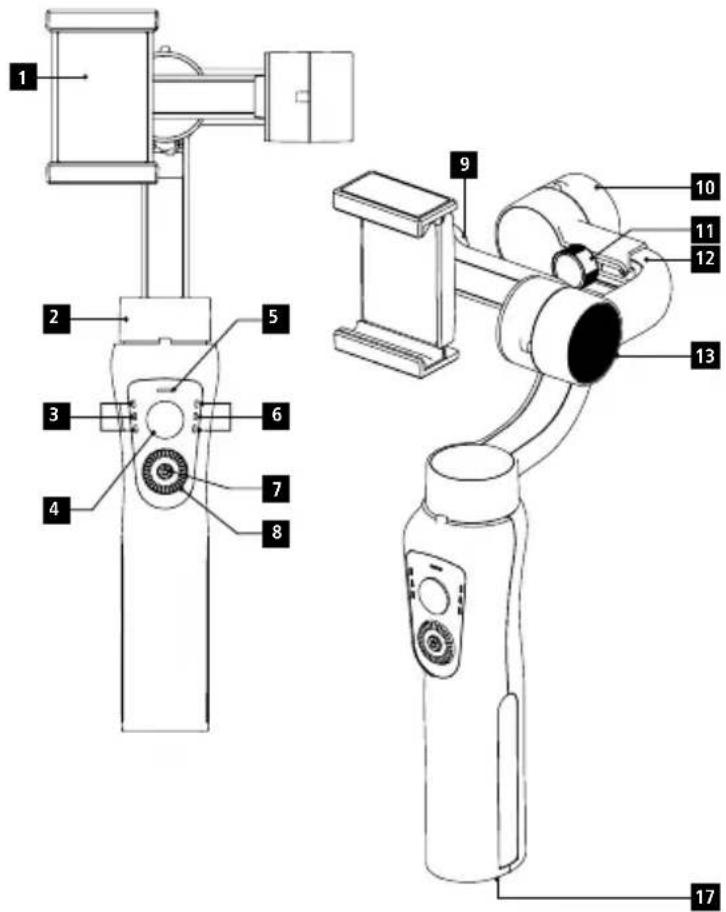
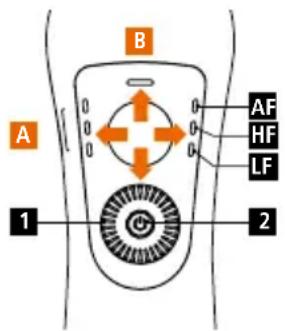
Illustration of a person operating machinery with directional arrows indicating motion (no text or symbols)1 Smartphone holder
2 Pan Motor
3 Battery status indicator
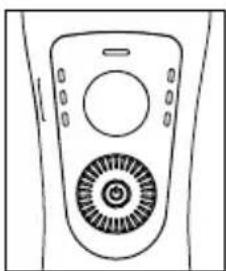
4 Joystick
5 Bluetooth LED
6 Operating indicator lamp
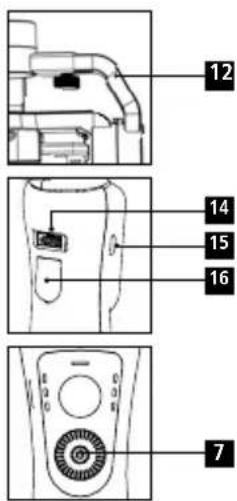
7 On/Off button / Mode button
8 Zoom wheel
9 Retaining screw
10 Roll Motor
11 Adjusting screw
12 Sliding arm
13 Tilt motor
14 Powerbank output
15 Charging connector (Micro-USB)
16 Triggers
17 1/4 inch screw thread
2. Installation
Download and install the Rollei App called "Rollei Smart Gimbal 2" onto your smartphone.
The App supports iOS 10.0 or above and Android 5.0 or above.
3. Charging of the gimbal and your smartphone
The battery needs to be fully charged before the device is used for the first time. The charging time is about 4.0 hours when it is directly charged by a power outlet (therefore an adapter is needed which is not part of the delivery).
• USB Port: For charging the smartphone
- Micro USB Port: For charging the gimbal

LED Light Indicator
L: LED light on means: battery 0–3 % charged.
L & M: LED lights on means: battery 4–66 % charged.
L, M & H: LED lights on means: battery 67–100 % charged.
When charging, the battery indicator flashes. When the charging process is complete, all LEDs on.
natural_image
Line drawing of a remote control device with two circular buttons and a rotary dial (no text or symbols)4. Mount the Smartphone
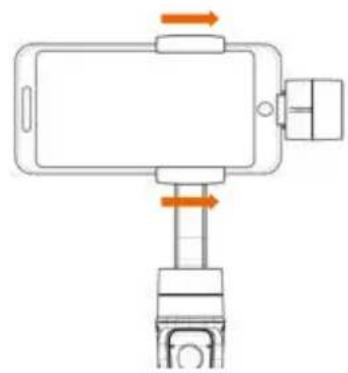
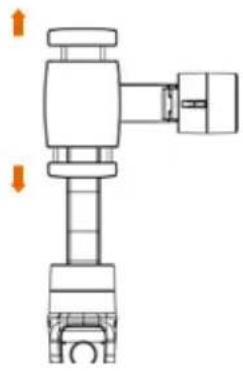
Please make sure that the gimbal is turned off. Insert the smartphone. Therefore, put it with one side into the smartphone holder, push the upper part from the holder to enlarge the holder and press the smartphone inside. Make sure that the smartphone is well inserted and that it cannot fall out.
5. Balancing the Smartphone
If the gimbal is turned on and the smartphone is balanced / levelled correctly, it will be held by the gimbal without making any sounds or any shakes. In that case the smartphone is positioned correctly. If the gimbal is vibrating in a movement, reposition your smartphone.
natural_image
Technical line drawing of a mechanical assembly with no visible text or symbols
natural_image
Diagram of a smartphone mounted on a stand with orange arrows indicating motion or force direction (no text or symbols)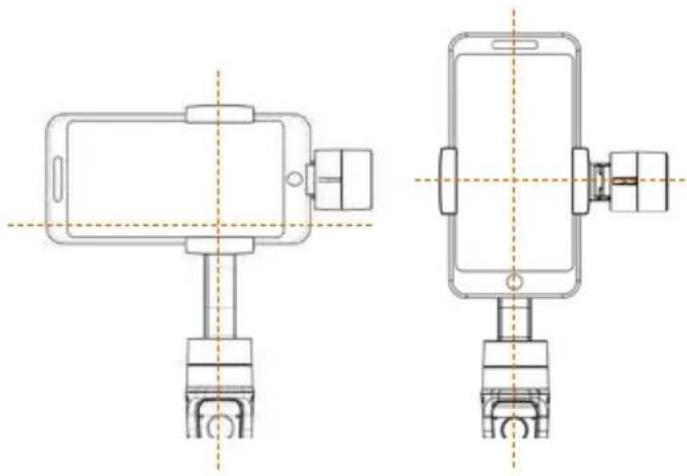
natural_image
Technical line drawing of a smartphone mounted on a stand, showing front and side views with no text or symbols.NOTE: The home button of the smartphone should be at the side near to the tilt motor. Please ensure that the smartphone is fixed tightly in order to avoid shaking of the gimbal.
If any part of the gimbal appears in the recording, gently slide the smartphone away from the tilt motor until the gimbal is no longer visible in the picture.
Please make sure that the gimbal is turned off before the smart-phone is mounted. We highly recommend to remove the phone case.
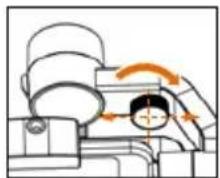
You can manually rotate the phone clamp to take photos & videos in vertical mode.
To adjust the smartphone gravity center, slide the arm until it is balanced on the tilt axis to ensure the best stabilizing status and enduration time.
natural_image
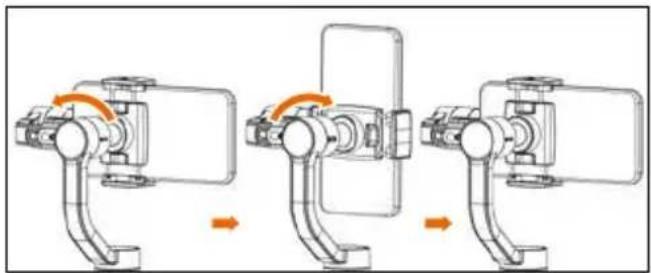
Illustration of a person operating machinery with directional arrows indicating motion (no text or symbols)You can also move the gimbal from horizontal to vertical mode while the phone is running. To do this, slowly tilt the handle 90° to the side. The gimbal then automatically aligns the phone. To return to horizontal mode, slowly return the handle to the vertical position.
natural_image
Three-step diagram showing mechanical assembly with arrows indicating motion (no text or symbols)6. Operation

A Panning right/ left
B Tilting up/ down
1 Zoom in/out and focus (setting in the app)
2 Gimbal Mode: Press the Mode button to switch between the different settings. Press twice: Re-center (back to starting point).
AF All follows: Tilt axis, roll axis and pan axis follow all movements.
HF Pan sequence: Tilt and roll axis are both locked, pan axis follows the movement
LF It's locked: The smartphone remains in its current state. Alignment/Position.
7. Connection with the Rollei App
- Make sure that your smartphone is well positioned in the smartphone holder of the gimbal. Then activate the Bluetooth®* function on your smartphone. If you use an iPhone, please deactivate "Portrait orientation".
If an Android smartphone is used, please enable the function "Auto-rotate screen". - Start the Rollei APP on your smartphone that you have downloaded before and choose the correct product.
- Start the gimbal by pressing the power button for about 3 seconds until the indicator light starts flashing.
- When the gimbal is working, it is connected to the smartphone directly (follow the instructions shown on the display of your smartphone).
You can then use the device and all functions of the app. - To turn the gimbal off also press the power-off button for about 3 seconds. The smartphone will not be levelled anymore if the device is turned off.
Note: As the Rollei app will be frequently updated, not all functions of the app might be described in this manual as well as some functions and their settings might change. Furthermore, please note that settings such as for example the video resolution depend on the smartphone that you use and are not controlled by the Rollei app or the gimbal.
8. Technical Details
| Min. Standard Max. | ||
| Input Vol. 3.4 V 3.7 V 4.2 V | ||
| Operation Current 150 mA 1500 mA 3000 mA | ||
| Operation Temperature 0°C 40°C | ||
| Operation Time (well balanced with camera mounted) | 12 hours | |
| Weight 465 g | ||
| Tilt Angle Range | 330° | |
| Roll Angle Range | 160° | |
| Pan Angle Range | 330° | |
| Compatible Models: | iPhone* XS, 8 Plus, 8, 7, Samsung Galaxy S9+, Huawei and other smartphones with a width of 53 - 88 mm (max. weight 250 g) | |
| Compatible Pitch Angle | -155° | +155° |
| Compatible Roll Angle | -30° | +30° |
| Compatible Pan Angle | -155° | +155° |
| Payload | 250 g | |
| Charging Time | 4 hours | |
| Charging Voltage | 5 V | |
| Charging Current | 2 A | |
| Power Output Voltage | 5 V | |
| Power Output Current | 1 A | |
| Box Content | Gimbal, Tripod, Micro USB Cable, User Manual, Loop | |
*The Bluetooth® word mark and logos are registered trademarks owned by Bluetooth SIG, Inc. and any use of such marks by Rollei is under license. Other trademarks and trade names are those of their respective owners. Smartphones not included in delivery. "iPhone" is registered trademark of Apple Inc.
9. Calibration:
If the gimbal has the following situations, please calibrate it:
- The tilt angle is not levelled with the horizontal surface.
- The roll angle is not parallel to the horizontal surface.
-
Under the lock mode, the pan angle is drifting.
-
Place your smartphone horizontally into the gimbal as described.
- Balance the smartphone correctly.
- Place the gimbal on the supplied tripod.
- Turn on the gimbal and wait 3 seconds.
- Connect the Steady Butler Mobile 2 to the smartphone.
- Open the rollei smart gimbal 2 app on the smartphone.
- Start the imu calibration in the app.
10. Disclaimer
- Please install and use the product according to the manual!
- Please reconfirm the gimbal and the smartphone are well installed before turning them on!
- Keep the battery away from fire and hot places!
- Any illegal purpose while using this device is prohibited. Users will be responsible for all behavior of purchasing and using the products.
- For any unknown sources or usage, we will not provide any service.
Disposal

Dispose of packaging: For disposal please separate packaging into different types. Cardboard and board must be disposed of as paper and foil must be recycled.

Disposal of Waste Electrical and Electronic Equipment and/or Battery by users in private households in the European Union. This symbol on the product or on the packaging indicates that this cannot be disposed of as a household waste. You must dispose of your waste equipment and battery by handling it over to the applicable take-back scheme for the recycling of electrical and electronic equipment and battery. For more information about recycling of this equipment and battery, please contact your city office, the shop where you purchased the equipment or your household waste disposal service. The recycling of materials will help to conserve natural resources and ensure that it is recycled in a manner that protects human health and environment.
Battery warning
- Never dismantle, crush, or pierce the battery, or allow the battery to short-circuit. Do not expose battery being placed in high temperature environment, if battery leaks or bulges, stop continue to use.
- Always charge using the charger. Risk of explosion if battery is replaced by an incorrect type.
- Keep the battery out of the reach of children.
- Batteries may explode if exposed to fire. Never throw batteries into the fire.
- Never exchange batteries by yourself, please let it be done by the retailer.
- Dispose used batteries by observing local regulations.
- Before disposing the device, please remove the battery.
Attention: It is not allowed to exchange the battery independently!
Conformity
Hereby Rollei GmbH & Co. KG, which complies with the gimbal „Rollei Steady Butler Mobile 2" of Directive 2014/53/EU.
2011/65/EC RoHS Directive 2014/53/EU RED Directive

The full text of the EU Declaration of Conformity is available at the following Internet address: www.rollei.com/EGK/SteadyButler2
natural_image
Line drawing of a device with two circular ports and a central circular element (no text or symbols)natural_image
Technical line drawing of a mechanical assembly with no visible text or symbols
natural_image
Diagram of a smartphone mounted on a stand with orange arrows indicating motion or force (no text or symbols)natural_image
Technical line drawing of a smartphone mounted on a stand, showing front and top views with no text or symbols.natural_image
Illustration of a person operating machinery with directional arrows indicating motion (no text or symbols)natural_image
Three-step diagram showing mechanical assembly with curved arms and arrows indicating motion (no text or symbols)6. Mode d'emploi
natural_image
Line drawing of a remote control device with two circular buttons and a circular fan (no text or symbols)natural_image
Technical line drawing of a mechanical assembly with no visible text or symbols
natural_image
Diagram of a smartphone mounted on a stand with orange arrows indicating motion or force (no text or symbols)natural_image
Technical line drawing of a smartphone mounted on a stand, showing front and side views with no text or symbolsnatural_image
Illustration of a person operating machinery with directional arrows indicating motion (no text or symbols)natural_image
Three-step diagram showing mechanical assembly with curved arms and orange arrows indicating motion (no text or symbols)natural_image
Line drawing of a remote control panel with circular buttons and a rotary knob (no text or symbols)natural_image
Technical line drawing of a mechanical assembly with no visible text or symbols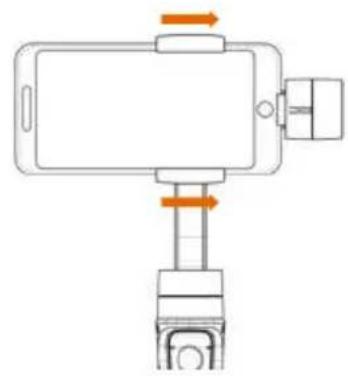
natural_image
Diagram of a smartphone mounted on a stand with orange arrows indicating motion or force direction (no text or symbols)natural_image
Technical line drawing of a smartphone mounted on a stand, showing front and side views with no text or symbolsnatural_image
Illustration of a person operating machinery with directional arrows indicating motion (no text or symbols)natural_image
Three-step diagram showing mechanical assembly with curved arms and directional arrows (no text or symbols)natural_image
Simple line drawing of a remote control device with two buttons and a circular dial (no text or symbols)4. Bevestigen van de smartphone
natural_image
Technical line drawing of a mechanical assembly with no visible text or symbols