Foldaway X2000 - Exercise bike Skandika - Free user manual and instructions
Find the device manual for free Foldaway X2000 Skandika in PDF.
User questions about Foldaway X2000 Skandika
0 question about this device. Answer the ones you know or ask your own.
Ask a new question about this device
Download the instructions for your Exercise bike in PDF format for free! Find your manual Foldaway X2000 - Skandika and take your electronic device back in hand. On this page are published all the documents necessary for the use of your device. Foldaway X2000 by Skandika.
USER MANUAL Foldaway X2000 Skandika
SCHRAUBENBEUTEL-INHALT
25 Safety precautions
26 Pre-assembly check list
27 Hardware pack / parts list
28 Parts list
29 Exploded diagram
31 Assembly instructions
35 Computer operation manual
39 Using apps
42 Warm-up and cool down / Exercise instructions
43 Cleaning and care
44 Guarantee Conditions
Please visit the Skandika Service portal on our website for setup & help videos, FAQs and downloadable instructions. For more information about Skandika, simply visit our main page www.skandika.com

WARNING
To reduce risk of injury, read and understand this instruction manual before using the device! This machine is intended for home use only in accordance with the instructions provided in this manual. Read the instruction manual carefully before using this device and keep the instruction manual for future use.
SAFETY PRECAUTIONS
- To ensure the best safety of the device, regularly check it on damages and worn parts.
- If you pass on this device to another person or if you allow another person to use it, make sure that that person is familiar with the content and instructions in these instructions.
- Only one person should use the exerciser at a time. The maximum load of this device is 130kg (287 lbs). Class: HC - not suitable for therapeutically use!
- Before the first use and regularly make sure that all screws, bolts and other joints are properly tightened and firmly seated.
- Before you start your workout, remove all sharp-edged objects around the equipment.
- Only use the exercise for your work-out if it works flawlessly.
- Any broken, worn or defective part must immediately be replaced and/or the device must no longer be used until it has been properly maintained and repaired. DO NOT use attachments not recommended by the manufacturer.
- Keep children and pets away from the machine at all times. DO NOT leave children unattended in the same room with the machine.
- Parents and other supervisory persons should be aware of their responsibility, due to situations which may arise for which the device has not been designed and which may occur due to children's natural play instinct and interest in experimenting.
- If you do allow children to use this device, be sure to take into consideration and assess their mental and physical condition and development, and above all their temperament. Children should use the device only under adult supervision and be instructed on the correct and proper use of the device. The device is not a toy.
- Make sure there is sufficient free space around the appliance when you set it up.
-
Please note that an improper and excessive work-out may be harmful to your health.
-
Please note that levers and other adjustment mechanisms are not projecting into the area of movement during the workout.
- When setting up the device, please make sure that the device is standing in a stable way and that any possible unevenness of the floor is evened out.
- Always wear appropriate clothing and shoes which are suitable for your workout on the device. The clothes must be designed in a way so that they will not get caught in any part of the device during the work-out due to their form (for example, length). Be sure to wear appropriate shoes which are suitable for the work-out, firmly support the feet and which are provided with a non-slip sole.
- Be sure to consult a physician before you start any device program. He may give you proper hints and advice with respect to the individual intensity of stress for you, your workout and sensible eating habits.
- The general rule is that devices and training devices are no toys. Therefore, they must only be used by properly informed or instructed persons.
- Be sure to set up the device in a dry and even place and always protect it from humidity. If you wish to protect the place particularly against pressure points, contamination, etc., it is recommended to put a suitable, non-slip mat under the device. DO NOT use the machine near liquids or outdoors.
- Stop your workout immediately in case of dizziness, nausea, chest pain or any other physical symptoms. In case of doubt, consult your physician immediately.
- Before beginning any exercise program, consult your physician. This is especially important for individuals with preexisting health problems.
- Children, disabled and hadicapped persons should use the device only under supervision and in presence of another person who may give support and useful instructions.
-
Be sure that your body parts and those of other persons are never close to any moving parts of the device during its use.
-
When adjusting the adjustable parts, make sure they are adjusted properly and note the marked, maximum adjusting position, for example of the saddle support, respectively. Pay attention to the warnings on the device.
- Do not work out immediately after meals!
- Before using the device, always do stretching exercises to properly warm up.
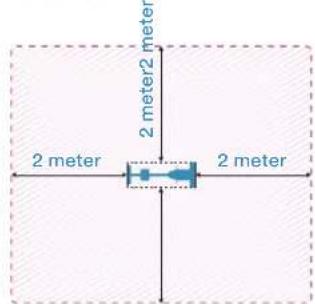
- Please exercise with a free area of 2 metres around the unit.
PRE-ASSEMBLY CHECK LIST
NO.01/02
NO. 03
NO.04/29
NO.30
NO.33
NO.05

NO.06
NO.10

NO.13/14

V1.22
NO.23/31
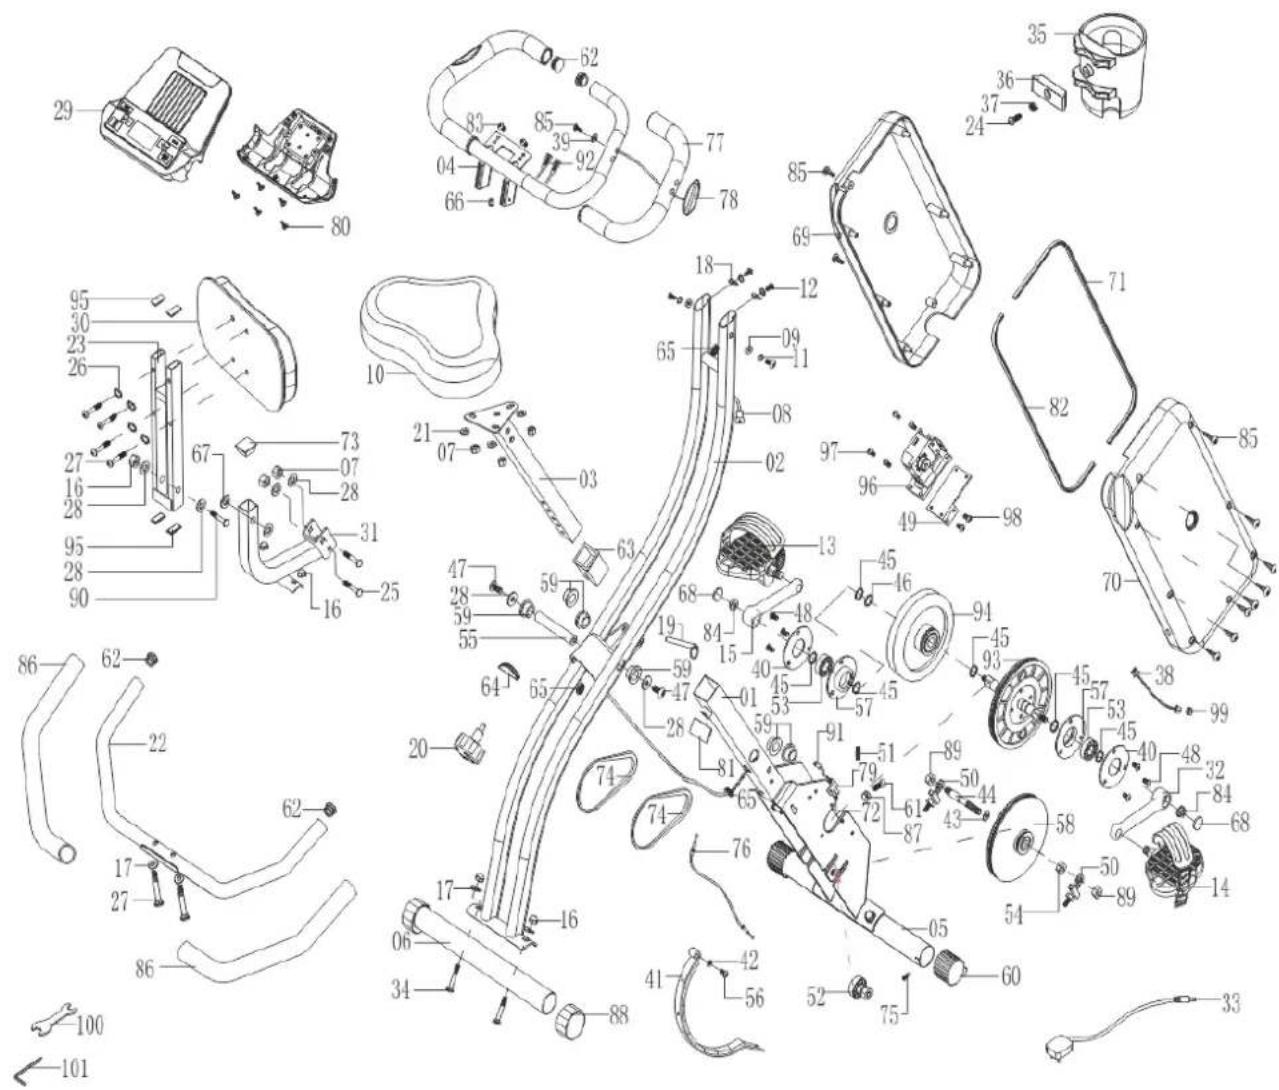
Part No. Description Q'ty
| 01/02 Main frame 1 | |
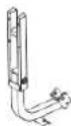
| 03 Seat Post 1 | |
| 04/29 Handlebars with computer 1 | |
| 05 Front stabilizer 1 | |
| 06 Rear stabilizer | 1 |
| 10 Seat | 1 |
| 13 Pedal (L) | 1 |
| 14 Pedal (R) | 1 |
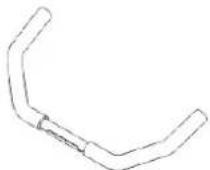
| 22 Rear handlebars | 1 |
| 23/31 Backrest holder / tube | 1 |
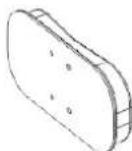
| 30 Backrest | 1 |
| 33 Adaptor | 1 |
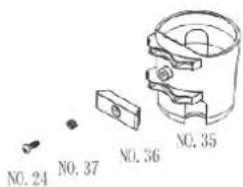
| 35/36/37/24 Bottle holder | 1 |
HARDWARE PACK / PARTS LIST
| Part No. Description Qty Drawing | |||
| 07 Nut M8 2 | |||
| 09 Flat washer ø6.5xø13x1.5t 2 | |||
| 11 Spring washer 6mm 4 | |||
| 12 Allen bolt M6 x 12L 4 | |||
| 16 Nut M8 6 | |||
| 17 Curved washer ø8.3 x ø22 x 1.5t | 6 | ||
| 18 Curved washer ø6.5 x ø13 x 1.5t | 2 | ||
| 20 Quick release knob | 1 | ||
| 25 Carriage bolt M8x50L | 2 | ||
| 26 Spring washer 8mm | 4 | ||
| 27 | Allen bolt M8x45L | 6 | |
| 28 Flat washer ø8.3xø25x2.0t | 2 | ||
| 34 Carriage bolt M8x60L | 4 | ||
| 100 | Allen wrench | 1 | |
| 101 | Allen key | 1 | |
PARTS LIST
| Part No. Description Qty | ||
| 01 Main frame (front support tube) | 1 | |
| 02 Main frame (rear support tube) 1 | ||
| 03 Seat Post 1 | ||
| 04 Handlebars 1 | ||
| 05 Front stabilizer 1 | ||
| 06 Rear stabilizer 1 | ||
| 07 Nut M8 5 | ||
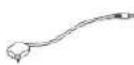
| 08 Sensor wire 1 | ||
| 09 Flat washerø6.5 x ø13 x 1.5t | 2 | |
| 10 Seat 1 | ||
| 11 Spring washer 6mm 4 | ||
| 12 Allen bolt M6x12L 4 | ||
| 13 Pedal (L) 1 | ||
| 14 Pedal (R) 1 | ||
| 15 Crank (L) 1 | ||
| 16 Nut M8 7 | ||
| 17 Curved washerø8.3 x ø22 x 1.5t | 6 | |
| 18 Curved washerø6.5 x ø13 x 1.5t | 2 | |
| 19 Lock pin 1 | ||
| 20 Quick release knob 1 | ||
| 21 Flat washerø8.3 x ø17.5 x 1.0t | 3 | |
| 22 Rear handlebars | 1 | |
| 23 Backrest holder | 1 | |
| 24 Screw M5x45L | 1 | |
| 25 Carriage bolt M8x50L | 2 | |
| 26 Spring washer 8mm 4 | ||
| 27 Allen bolt M8x45L | 6 | |
| 28 Flat washerø8.3 x ø25 x 2.0t | 6 | |
| 29 Computer 1 | ||
| 30 Backrest 1 | ||
| 31 Backrest tube | 1 | |
| 32 Crank (R) 1 | ||
| 33 Adaptor 1 | ||
| 34 Carriage bolt M8x60L 4 | ||
| 35 Bottle holder 1 | ||
| 36 Support bracket 1 | ||
| 37 Spring washer | 1 | |
| 38 Connection wire 1 | ||
| 39 Flat washerø4.5 x ø9 x 1.0t 2 | ||
| Part No. Description Qty | ||
| 40 Plate | 2 | |
| 41 Magnetic assembly | 1 | |
| 42 | Plastic washerø6.3 xø13 xø0.5t | |
| 43 | Plastic washerø10.3 xø14 xø1t | |
| 44 Axle for belt pulley | 1 | |
| 45 Circlip | 6 | |
| 46 Wavy washer | 1 | |
| 47 | Allen bolt M8x15L | |
| 48 Screw M6x10L | 6 | |
| 49 Plate | 1 | |
| 50 Flywheel adjustor | 2 | |
| 51 Spring | 1 | |
| 52 | Idler wheel | |
| 53 Bearing 2 | ||
| 54 Nut M10x8t 1 | ||
| 55 Axle for main frame | 1 | |
| 56 Screw M5x10L | 1 | |
| 57 | Bearing bracket | |
| 58 Pulley 2 1 | ||
| 59 Bushing | 6 | |
| 60 Transportation wheel | 2 | |
| 61 Hex head bolt M6x30L | 1 | |
| 62 End cap for handlebar tube | 4 | |
| 63 Bushing | 1 | |
| 64 Bumper 1 | ||
| 65 Oval grommet | 3 | |
| 66 Grommet | 1 | |
| 67 | Plastic washer | |
| 68 End cap for crank | 2 | |
| 69 Chain cover (L) | 1 | |
| 70 | Chain cover (R) | |
| 71 | Front decoration strip | |
| 72 | Screw M4x10L | |
| 73 | Square end cap | |
| 74 | Belt | |
| 75 Screw ST4.2 x 12 | 2 | |
| 76 Tension wire | 1 | |
| 77 | Foam grip | |
| 78 | Pulse sensor | |
| 79 Sensor bracket | 1 | |
| 80 Screw ST2.9 x 8L | 5 | |
| Part No. Description Qty | ||
| 81 EVA pad 1 | ||
| 82 Rear decoration strip 1 | ||
| 83 Screw M5 x 8L 2 | ||
| 84 Nut M10x7tx1.25P 2 | ||
| 85 Screw ST4.2x20L 12 | ||
| 86 | Foam grip for rear handlebar tube | 2 |
| 87 Hex head nut M6x5.0t 1 | ||
| 88 End cap for rear stabilizer 2 | ||
| 89 Hex head bolt M10x8t 2 | ||
| 90 Allen bolt M8x80L 1 | ||
| Part No. | Description Qty |
| 91 Sensor | 1 |
| 92 Sensor wire | 2 |
| 93 Pulley | 1 |
| 94 Flywheel assembly set 1 | |
| 95 Square end cap | 4 |
| 96 Motor | 1 |
| 97 Screw M5x15L | 4 |
| 98 Screw M5x10L | 2 |
| 99 Nut M12x1P | 1 |
| 100 | Allen wrench |
| 101 | Allen key |
EXPLODED DIAGRAM A
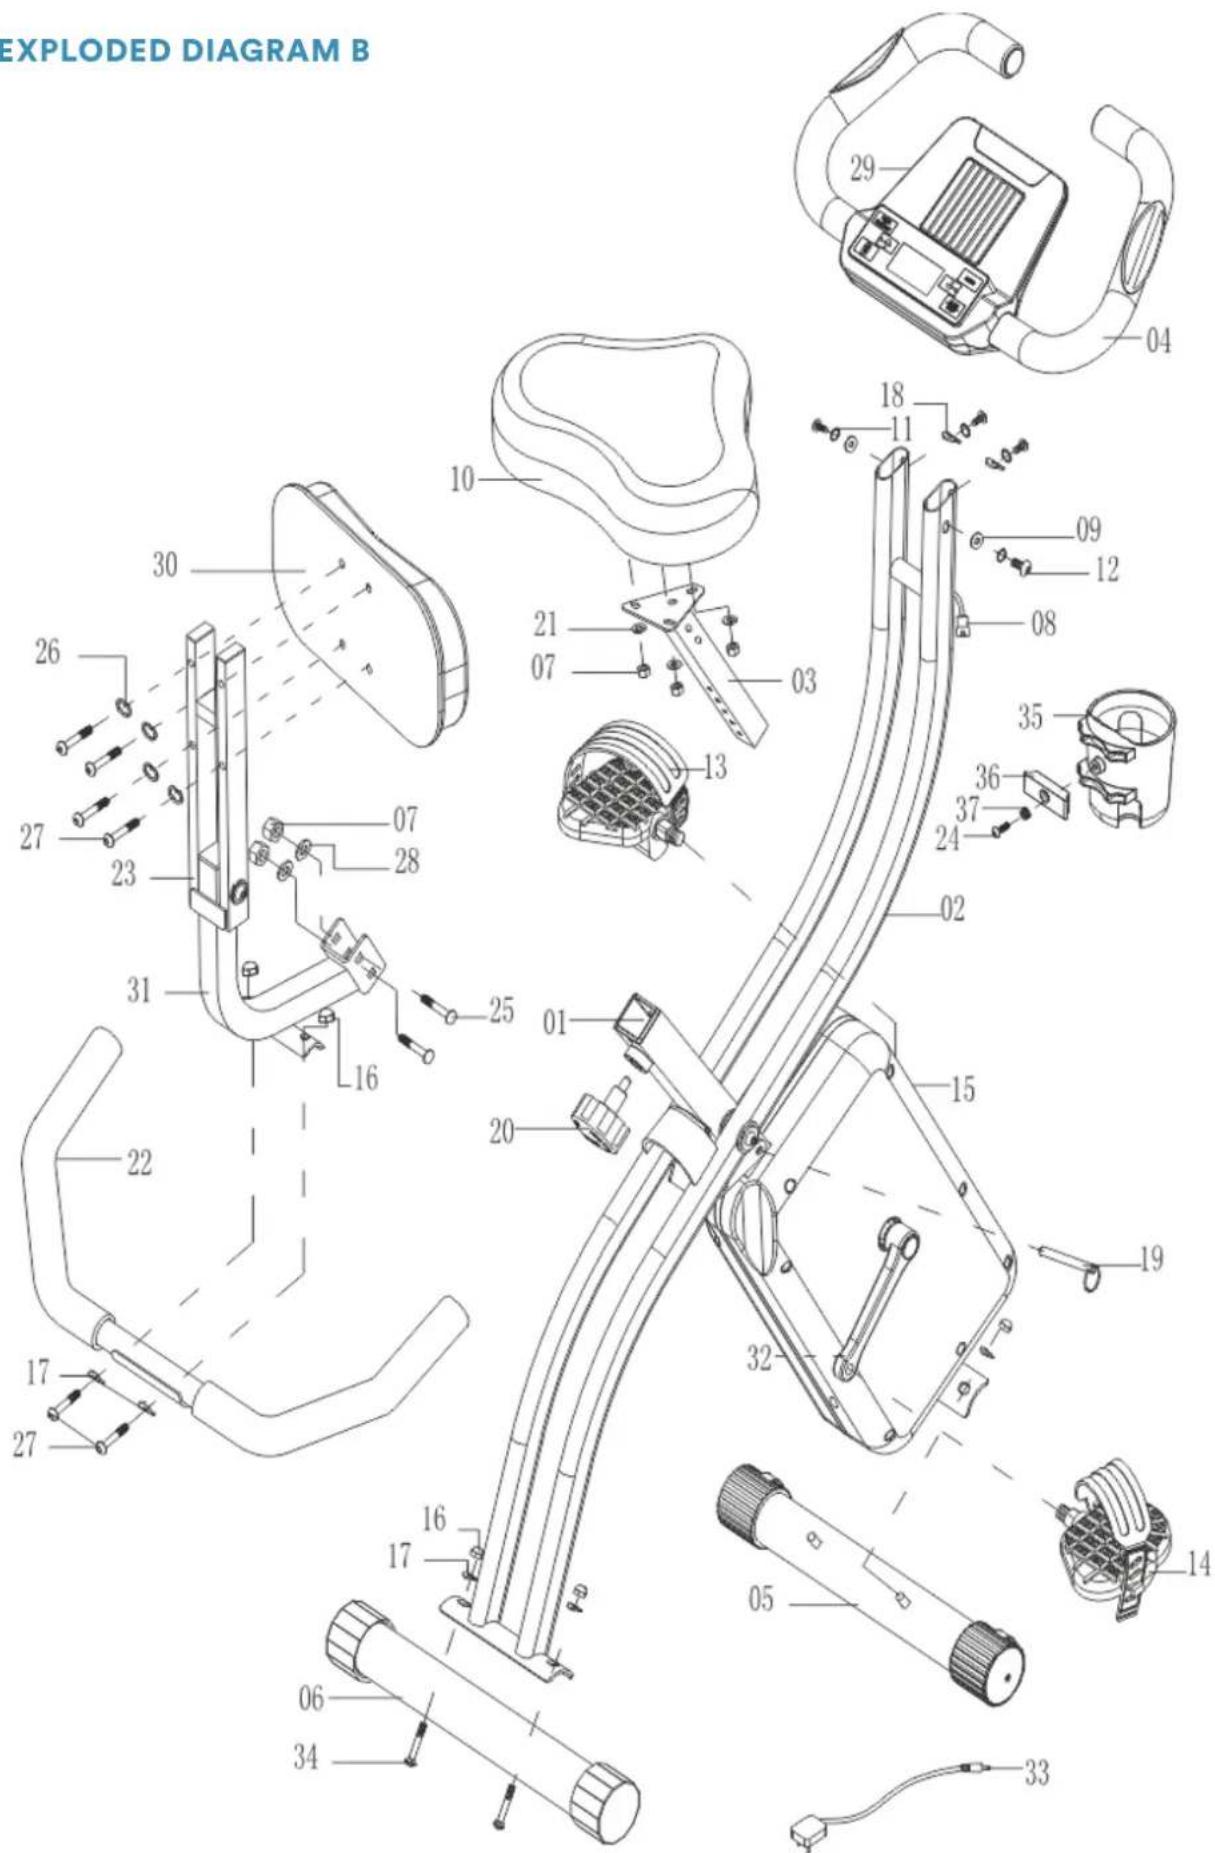
EXPLODED DIAGRAM B
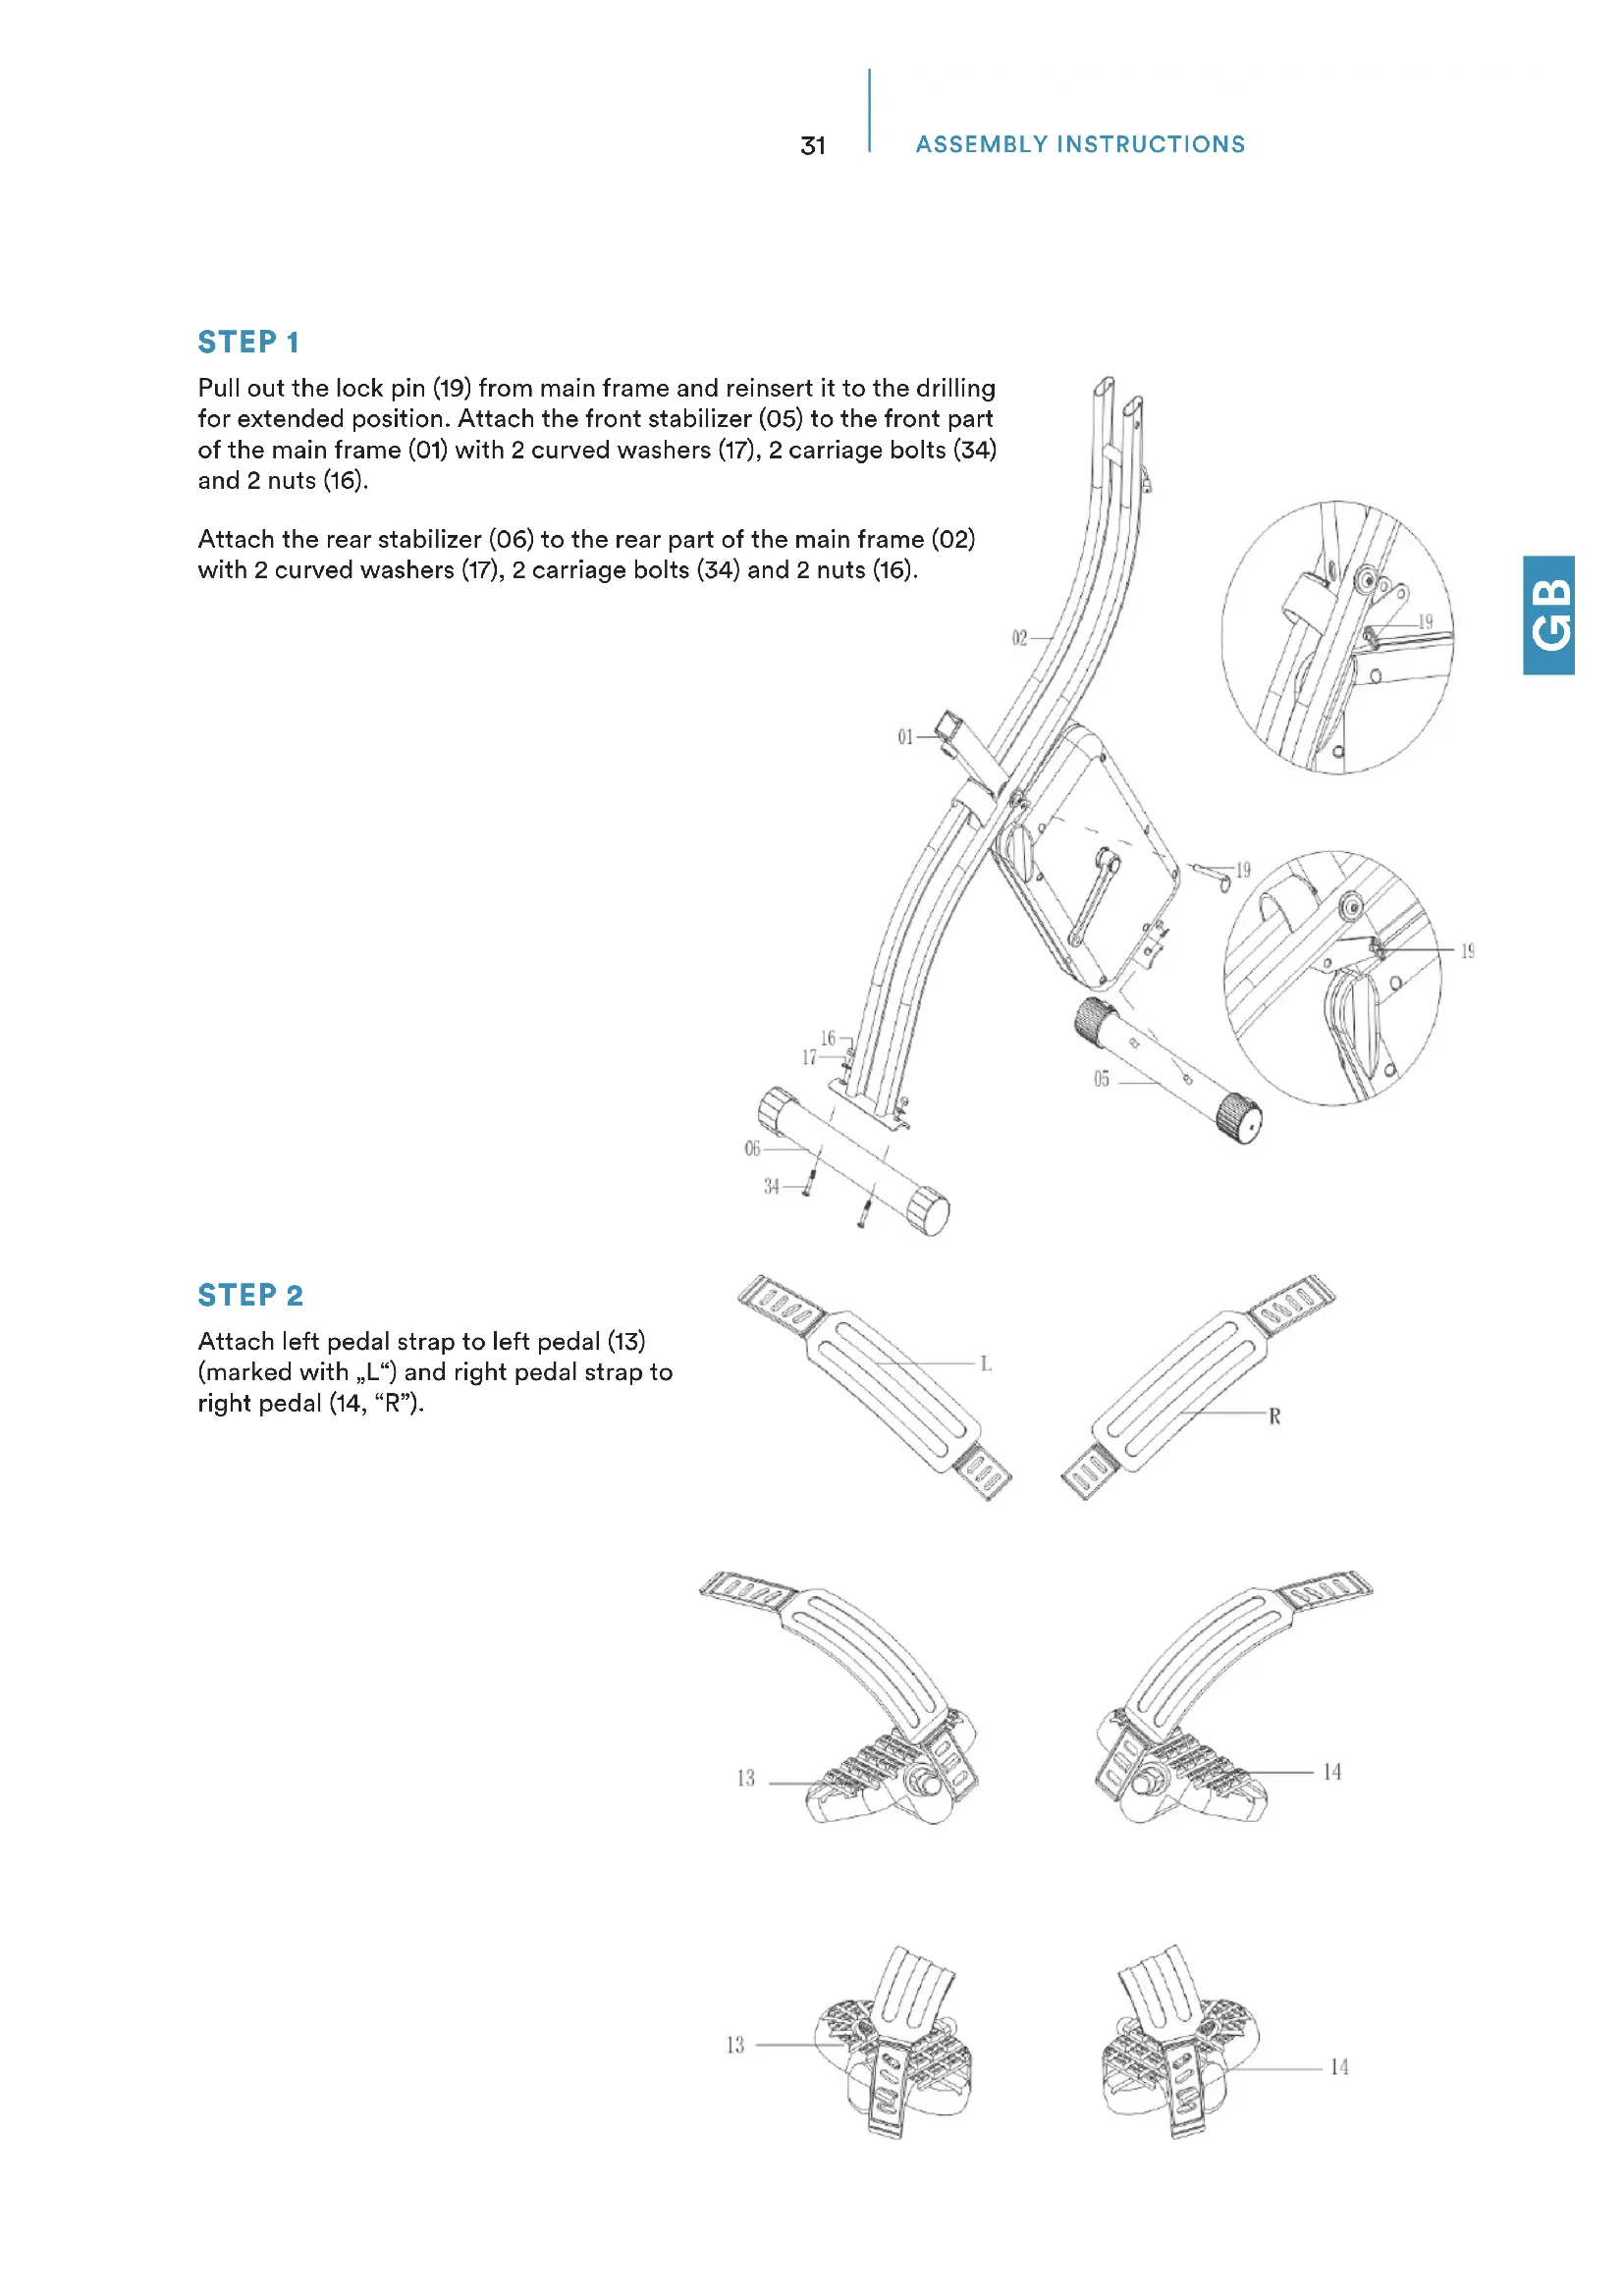
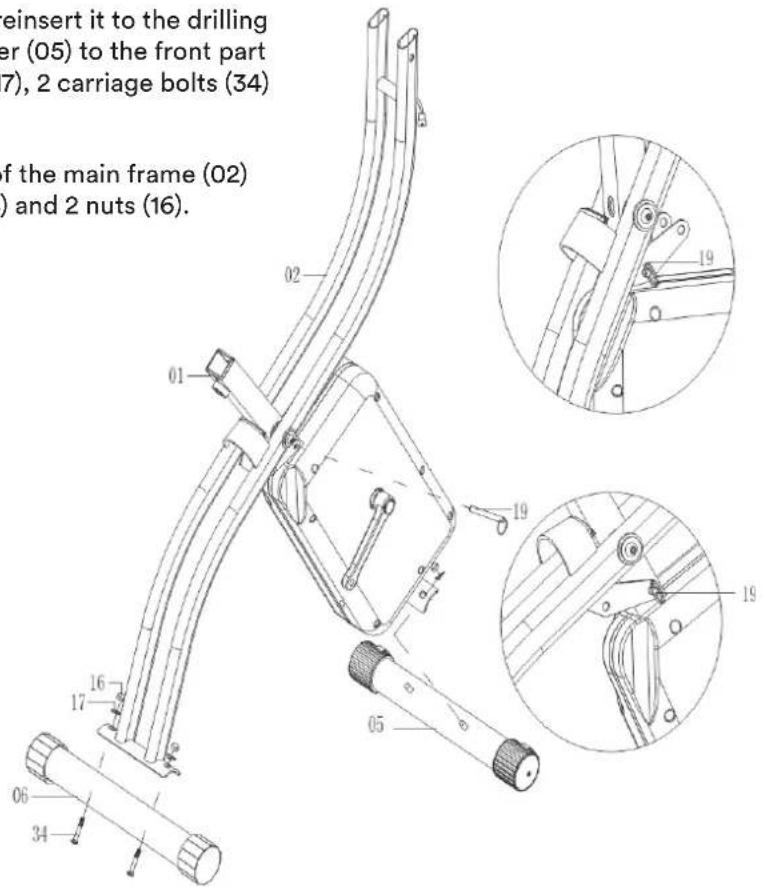
STEP1
Pull out the lock pin (19) from main frame and reinsert it to the drilling for extended position. Attach the front stabilizer (05) to the front part of the main frame (01) with 2 curved washers (17), 2 carriage bolts (34) and 2 nuts (16).
Attach the rear stabilizer (06) to the rear part of the main frame (02) with 2 curved washers (17), 2 carriage bolts (34) and 2 nuts (16).
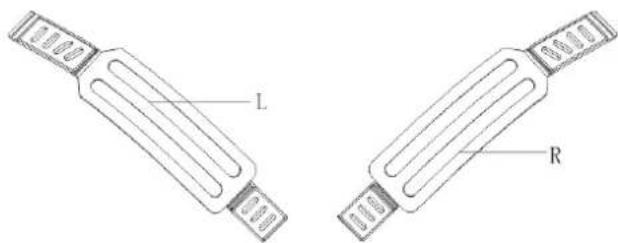
STEP2
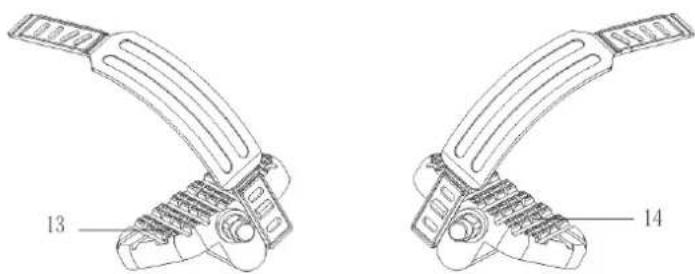
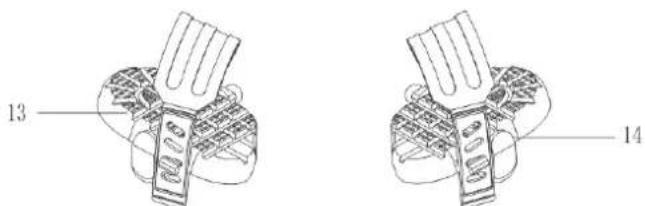
Attach left pedal strap to left pedal (13) (marked with ^ ) and right pedal strap to right pedal (14, "R").
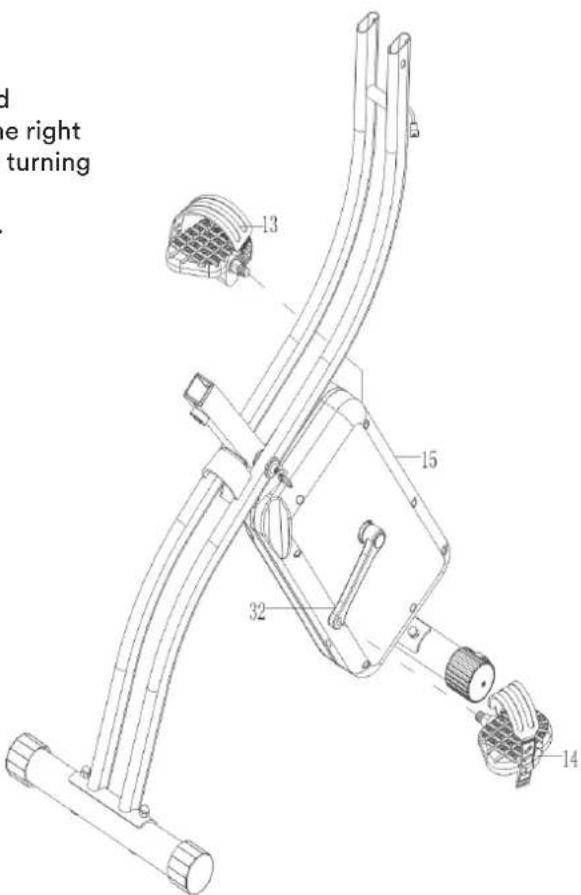
STEP3
Attach the left pedal (13) onto the left crank arm and tighten it by turning it anticlockwise. Then attach the right pedal (14) onto the right crank arm and tighten it by turning it clockwise.
The pedals are marked with "R" (right) and "L" (left).
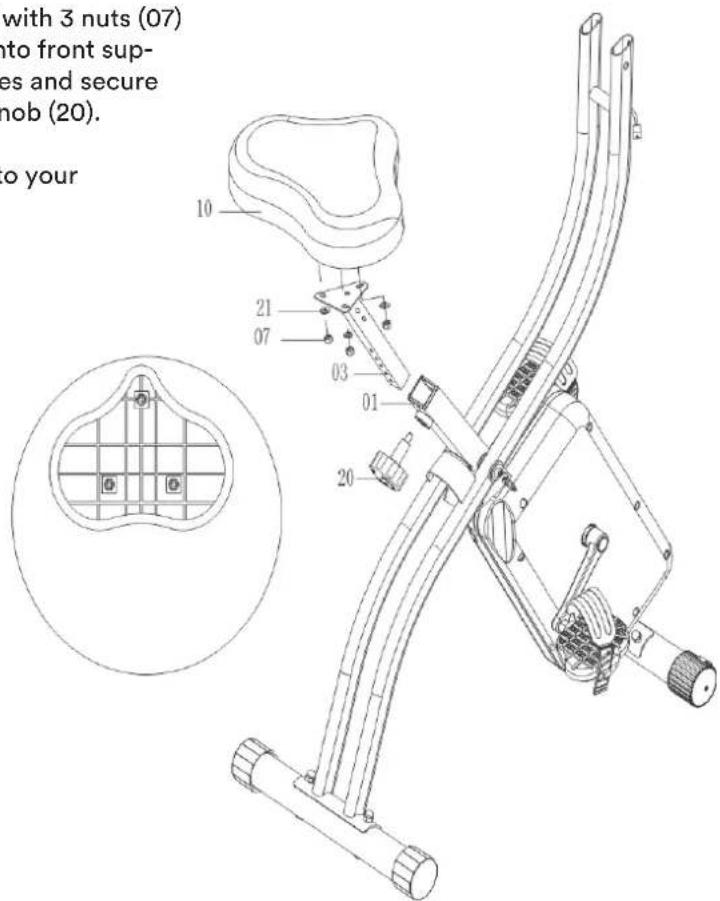
STEP4
Fix the seat (10) on top of the seat post (03) with 3 nuts (07) and washers (21). Insert the seat assembly into front support tube of main frame (01), line up the holes and secure the seat in position with the quick release knob (20).
The seat height can be adjusted according to your individual needs.
STEP5
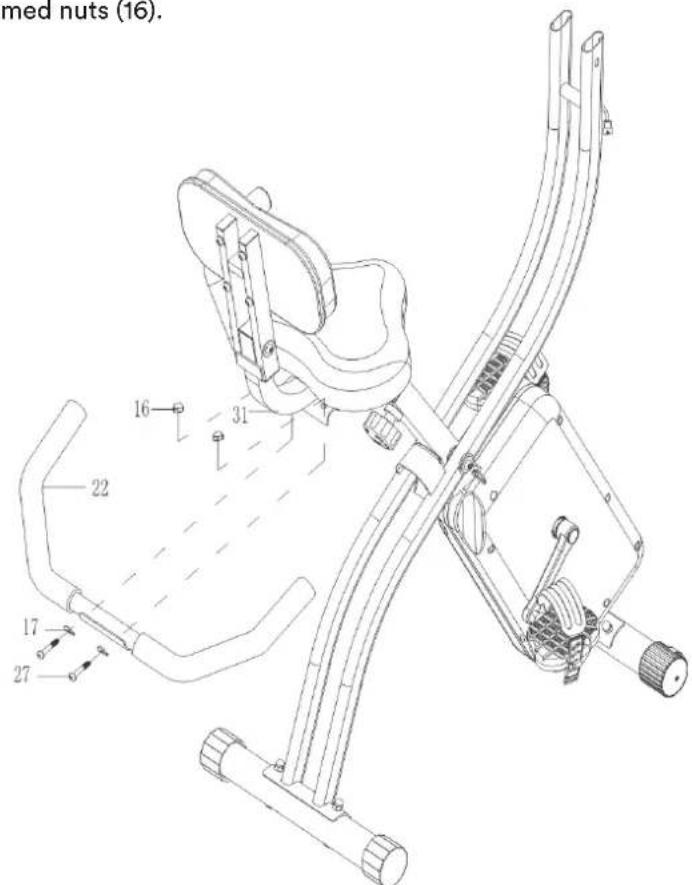
Fix the backrest tube (31) to seat post (03) with 2 carriage bolts (25), flat washers (28) and nuts (07). Fix the backrest (30) to backrest holder (23) with 4 allen bolts (27) and spring washers (26).

STEP6
Fix the rear handlebars (22) on the backrest tube (31) with 2 allen bolts (27), curved washers (17) and domed nuts (16).
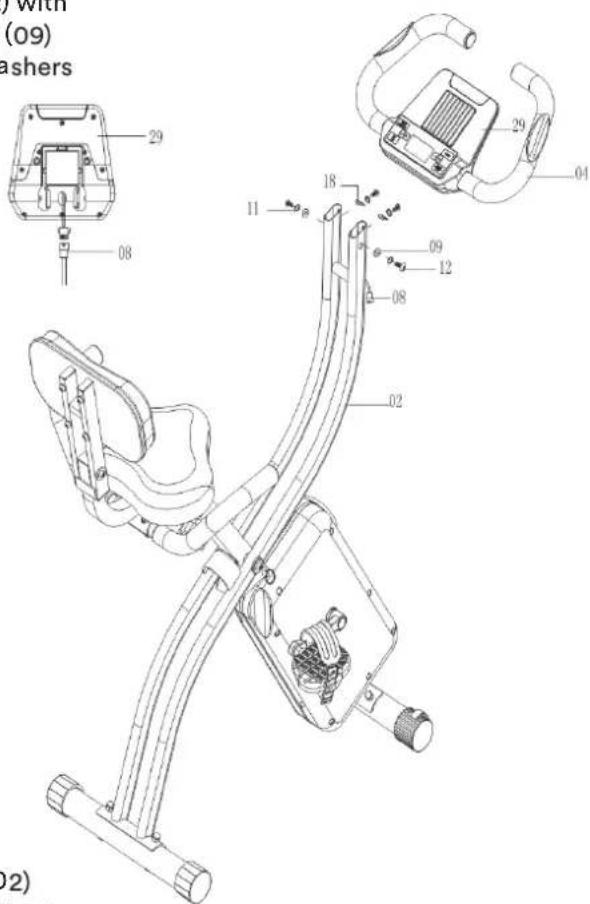
STEP7
Fix the handlebars (04) at rear part of main frame (02) with 2 allen bolts (12), spring washers (11) and flat washers (09) from lateral side and with 2 allen bolts (12), curved washers (18) and spring washers (11) from front side.
Connect sensor wire (08) to back of computer (29).
STEP8
Fix the bottle holder (35) at rear part of main frame (02) with one allen screw (24), spring washer (37) and support bracket (36). Connect the adaptor (33).
CHECK IF ALL BOLTS AND NUTS ARE TIGHTENED BEFORE USING THE DEVICE!
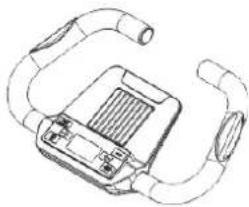
The computer gets its power supply by the included adaptor (33). The adaptor will be connected to a normal mains plug (European standard, please check the specifications resp. please use a fitting mains adaptor for your power system) and to the little plug in the cover of the device as it can be seen on the previous page.
Program selection and value presetting
- Press UP/DOWN keys to select workout mode and ENTER to confirm.
- In manual mode you may use UP/DOWN to preset TIME, DISTANCE, CALORIES or PULSE.
- Press START/STOP to exercise.
- If a preset value is reached, computer will emit an acoustic sound.
- If more than one preset value is set, press START/STOP to proceed exercising until the next preset value is reached.
This computer has an automatic on/off function so that it switches on when the pedals move or when any button is pressed and turns into stand-by mode automatically if no signal has been received for approx. 4 minutes.
Computer functions
TIME
Computer shows actual exercise time (max. 99:59 Min.). When no target value has been entered, the time will count up from 0:00.
Preset a target time: You may preset a target time before starting a workout. The time will then count down and multiple sound beeps will be emitted when reaching 0:00.
DISTANCE
The workout distance is displayed here (max. 999 km).
RPM
Computer shows the rounds per minute ("RPM") here.
SPEED
The computer shows the current speed in the display (km / h)
CALORIES
The currently burned calories (approximately) are displayed here.
PULSE
The computer is showing the user's heart rate in beats per minute. For a correct display please ensure that you fully grasp the hand sensors. It may last up to 2 minutes before the pulse frequency will be measured correctly.
PULSE RECOVERY
With this special function, you can check your hearts recovery rate after a training session. This is a very important indication for the physical condition of your body. To check your recovery rate, you need to keep your hands onto the hand pulse-sensors after your exercise. Now press the button "RECOVERY". The computer will start to countdown 60 seconds. During this period the computer will constantly measure your heart rate through the hand sensors. After this minute, your recovery rate will be displayed on the display. The range is F1 to F6 (see below details). Improve your value by intense and regular training!
1.0 means OUTSTANDING
1.0 < F < 2.0 means EXCELLENT
2.0 ≤ F ≤ 2.9 means GOOD
3.0≤ F≤ 3.9 means FAIR
4.0 ≤ F ≤ 5.9 means BELOW AVERAGE
6.0 means POOR
Error messages
"ERR" means, that the contact to the handpulse sensors was not sufficiently for a measurement. The reason for this can be, that you have not grasped the two sensors correctly. Start a new measurement with correctly placed hands!
If no pulse signal can be detected, "P" is shown in PULSE window.
ERROR 1 (E1)
Connection to gear motor (motor signal) is lost for more than 4 seconds. During power-on, the gear motor will return to initial position automatically. Contact the customer service.
ERROR 2 (E2)
Memory error. Disconnect from mains source and retry after 1 minute. If problem still exists, contact the customer service.
ERROR 3 (E3)
Motor cannot leave zero position. Contact the customer service.
Button functions
There are 6 buttons with different functions:
1. START/STOP
a. Quick Start - start the computer without selecting a program (manual workout only). Time automatically begins to count up from zero.
b. During exercise, press the button to STOP exercise.
c. During stop mode, press the button to START exercise.
2. UP
a. Press this button to increase the resistance during exercise.
b. During setting mode, press the button to adjust the values of time, distance, calories, age, gender and program.
3. DOWN
a. Press this button to decrease the resistance during exercise.
b. During setting mode, press the button to adjust the values of time, distance, calories, age, gender and program.
4. ENTER
a. During setting mode, press the button to confirm any input.
b. In stop mode, press and hold button for min. 2 seconds to reset all data.
c. During clock setting mode, press the button to confirm hour / minute.
5. PULSE RECOVERY
Press this button to start the heart recovery measurement. Please check the respective chapter in this manual for further information.
6. BLUETOOTH
Press this button to activate or deactivate the Bluetooth function.
The workout modes
P1: Manual mode
In manual mode you can adjust the load manually. After selecting „Manual“ (confirm with „ENTER“-button) and “START/STOP” you may change the tension level at any time during exercise with “UP” and “DOWN”.
You may also input target values for the following function values:
a. TIME
b. DISTANCE
c. CALORIES
d. PULSE
To enter a target value, do not press "START/STOP" after selecting the workout mode, but instead use "UP", "DOWN" and "ENTER" to input the target values. After your input, press "START/STOP" to start the exercise.
P2 to P6: Program modes
The modes P2 to P6 enable you to exercise with a program profile (preset). Mountain- and valley courses: Steps, Hill, Rolling, Valley, Fat Burn.
Select one of the modes with "UP" and "DOWN" and "ENTER". Press "START/STOP to start the exercise. You may change the tension level at any time during exercise with "UP" and "DOWN".
You may also input target values for the following function values:
a. TIME
b. DISTANCE
c. CALORIES
d. PULSE
To enter a target value, do not press "START/STOP" after selecting the workout mode, but instead use "UP", "DOWN" and "ENTER" to input the target values. After your input, press "START/STOP to start the exercise.
Adaptor specifications
Linear transformer: Input: 230V 50/60Hz, Output: 6V DC 0.5A
Switch type transformer: Input: 110V-240V 50/60Hz, Output: 9V DC 0.5A
Using apps
The computer can be connected via Bluetooth (frequency: 2.4 GHz) to communicate with the apps Delightech or KinoMap.
DELIGHTECH
Compatibility
- Turn on Wi-Fi (WLAN) to connect to the internet
- Download the app from App Store or Delightech website: appfit.biz. Alternatively, you may scan the below QR-Code. Click the green robot icon for Android and the "iOS" icon for iOS devices.
- For Android devices only: Allow "unknown sources" option in system security settings.

- Download the app and enter System Settings -> General->Profiles for iOS System and adjust Delightech Corporation as verified developer as shown below:
- Enable and connect via Bluetooth.
- Run the app.
- Switch on the fitness device.
- Enter "Setting" and touch "Connect to device" icon.
- A list will appear with available devices. First select the chest belt to link and then select the device. The chest belt display will turn off, if there are no pulse signals detected for more than 10 seconds.
- If you can see your fitness device's name on the screen (as per example below) the link is ok. To disconnect, touch the device button again.
- As the app allows multi-user records, it is recommended to fill in your personal data within the app first.
DelighTech app contents
Quick start
Start manually without any settings.
Tap "Resistance" to change resistance level. The slider bar appears for 3 seconds.
Tap the "Heart" symbol to show the heartrate chart. Tap the return arrow to exit to main screen.
Programs
Here you may select pre-defined programs for your exercise.
Map Virtual Navigation
You may select 2 points on the map. You may then virtually explore the route by exercising with your fitness device. If asked, allow to use the current location of user. Where street views are available, these will be shown in your app.
History list
The records include:
Time, Distance, Calories, Speed, Pulse, Date, Device name and other details.
Android, iOS and Bluetooth compatibility
Android System
BT-Dual mode SPP*
BT4.0-BLE(single mode) only
Android 4.3 or earlier
Android 4.4 or later
*BT-Dual mode SPP module works with both BT3(or 2) and BT4.0-BLE modes under Android.
*iOS only works in BT-BLE mode
KINOMAP
The free KinoMap app turns your device into a powerful and fun fitness product! Choose from the geotagged video on Kinomap and go! Your position is shown in the video and as icon on the map. Download the Kinomap Fitness app in the app or play store by searching for 'Kinomap Fitness' or follow one of the links below.
Install and open the app and register resp. log in. Activate Bluetooth. Now add the training device as follows:


1.
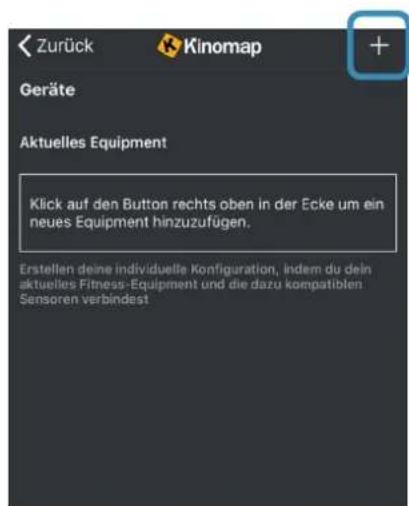
2. Tap on ,+
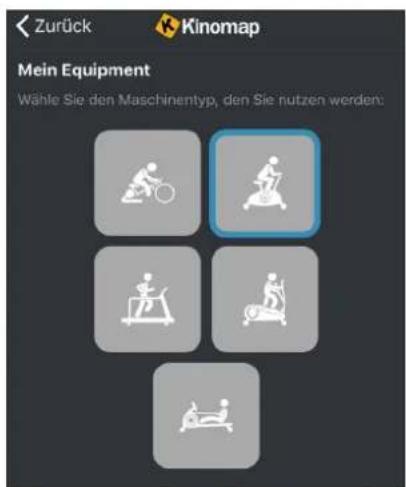
3. Exercise bike

4. Select Skandika

5. Tap on the device
Now tap on OK and return to main menu. You can now choose a course for your exercise (depending on your type of KinoMap account maybe only some free courses). Press Start and begin to exercise!

Exercise instructions
Using your foldable exercise bike will provide you with several benefits, e.g. it will improve your physical fitness, tone your muscles and - in conjunction with a calorie-controlled diet - help you to reduce weight.
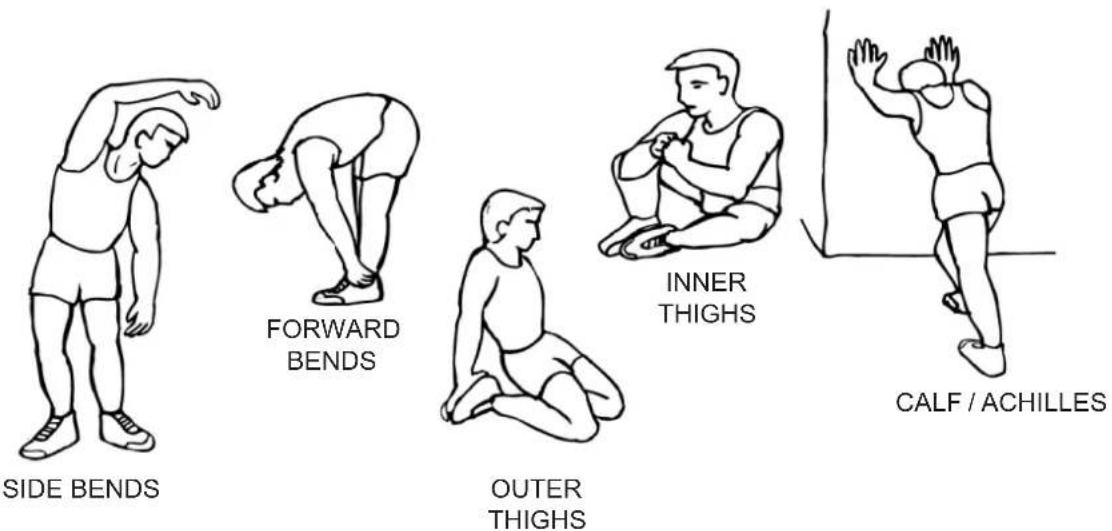
1. The warm-up phase
This stage helps to improve the blood circulation and prepares the muscles for your workout. It additionally helps to reduce the risk of injury or cramps. It is recommended to do some stretching exercises as shown here below. Hold each stretching position for approximately 30 seconds. Never force or jerk yourself into a stretching position – if you feel pain, STOP immediately.
2. The exercise phase
This stage demands the most training effort. Correct workouts will support your leg muscles becoming more flexible – however, it is important to maintain a steady workout speed throughout the complete workout session. As a guideline you can check your heart rate – it should be in the target heart rate zone as shown in the illustration below.
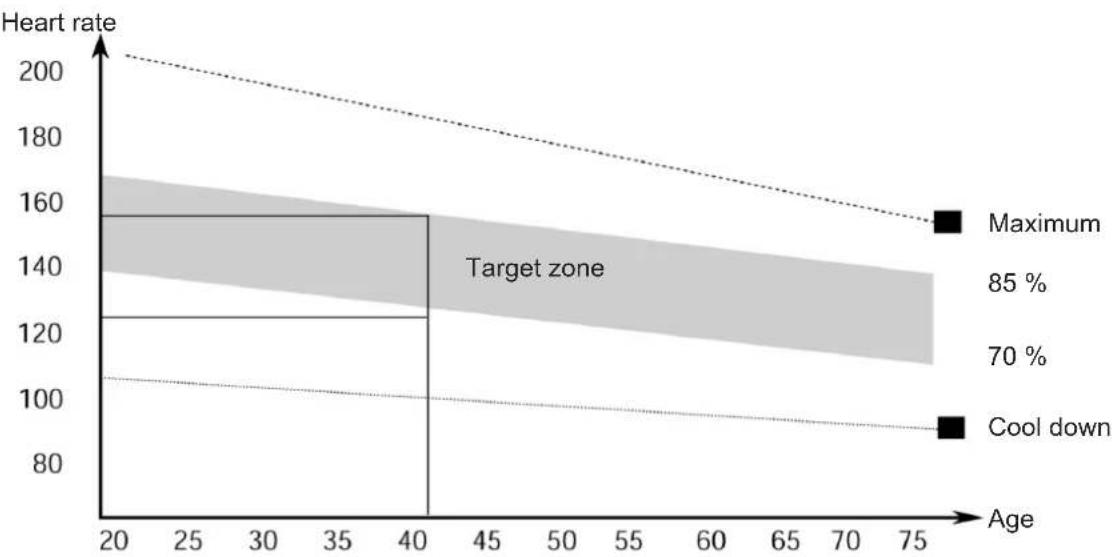
NOTE: The exercise phase should last at least 12 minutes. Most people exercise for about 15 to 20 minutes per session.
3. The cool-down phase
This stage helps to soothe your muscles and your cardiovascular system after your workout.
At the end of your workout, reduce the speed and exercise for approximately 5 minutes at this lower speed level. Afterwards, repeat the warm-up exercises as described above.
It is recommended to exercise for at least 3 times a week - you should be aware, that you need to exercise harder and longer if you get fitter. Spread your workouts evenly throughout the week.
Muscle toning
To reach a noticeable muscle toning with your device, it is necessary to set the resistance quite high. With this, your leg muscles need to work harder during the exercise - however, this may cause you to break up your exercise earlier. If you want to improve your fitness level as well, you need to modify your exercise program in this way, that you train on a moderate level for the first minutes - the more you reach the end of your exercise phase, increase the resistance setting to cause your leg muscles work harder. Reduce the speed at the same time in order to keep your heart rate within the target zone.
Weight loss
To lose weight, you need to work out comparatively hard. The longer your workout lasts, the more calories will be burned. It is almost the same way of exercise as if you want to improve your fitness level.
Cleaning and care
- Before cleaning the appliance, make sure that the appliance is switched off.
- Clean the device with a slightly damp cloth only. Never use brushes, aggressive cleaning agents, petrol, thinners or alcohol. Rub the device dry with a clean dry cloth.
- Wait until the device is completely dry before using it again.
GUARANTEE CONDITIONS
For our devices we provide a warranty as defined below.
- In accordance with the following conditions (numbers 2-5) we repair defect or damage to the device free of charge, if the cause is a manufacturing defect. Therefore, these defects / damages need to be reported to us without delay after appearance and within the warranty period of 24 months after delivery to the end user. The warranty does not cover parts, which easily break (e.g. glass or plastic). The warranty does not cover slight deviations of the product, which are insignificant for usability and value of the device and damage caused by chemical or electrochemical effects and damages caused by penetration of water or generally force majeure damage.
- The warranty achievement is the replacement or repair of defective parts, depending on our decision. The cost of material and labor will be borne by us. Repairs at customer site cannot be demanded. The proof of purchase along with the date of purchase and / or delivery is required. Replaced parts become our property.
- The warranty is void if repairs or adjustments are made,
which are not authorized by us or if our devices are equipped with additional parts or accessories that are not adapted to our devices. Furthermore, the warranty is void if the device is damaged or destroyed by force majeure or due to environmental influences and in case of improper handling / maintenance (e.g. due to non-observation of the instruction manual) or mechanical damages. The customer service may authorize you to replace or repair defective parts after telephone consultation. In this case, the warranty is not void.
- Warranty services do not extend the warranty period nor do they initiate a new warranty period.
- Further demands, especially claims for damages which occurred outside the device, are excluded as long as a liability is not obligatory legal.
- Our warranty terms - which cover the requirements and scope of our warranty conditions - do not affect the contractual warranty obligations of the seller.
- Parts of wear and tear are not included in the warranty.
- The warranty is void if not used properly or if used in gyms, rehabilitation centers and hotels. Even if most of our units are suitable for a professional use, this requires a separate agreement.
ENVIRONMENTAL PROTECTION

At the end of its life cycle, this product must not be disposed of with household waste but must be taken to a collection unit for the recycling of electric and electronic equipment. The symbol on the product, the instructions for use or the packaging express mention of this. The basic materials can be recycled as specified on the labelling. When recycling the materials and finding other utilisation for used equipment, you are making a significant contribution towards protecting our environment. Ask at your council about the respective local disposal sites.
In accordance with our policy of continual product improvement, we reserve the right to make technical and visual changes without notice.
For spare parts please contact: service@skandika.de