
PIXMA E4240 - Printer CANON - Free user manual and instructions
Find the device manual for free PIXMA E4240 CANON in PDF.
| Product Type | Inkjet Multifunction Printer |
| Brand | Canon |
| Model | PIXMA E4240 |
| Dimensions (W x D x H) | Approx. 426 x 306 x 145 mm |
| Weight | Approx. 3.5 kg |
| Power Supply | 100-240 V AC, 50/60 Hz |
| Power Consumption (standby) | Approx. 10 W |
| Main Functions | Print, Scan, Copy, Fax |
| Connectivity | Wi-Fi, USB 2.0 |
| Ink Type | FINE cartridges (black and color) |
| Paper Tray Capacity | 100 sheets (plain paper) |
| Print Speed (black) | Up to 8 ipm |
| Print Speed (color) | Up to 4 ipm |
| Print Resolution | Up to 4800 x 1200 dpi |
| Display | LCD Screen |
| Maintenance | Print head alignment via software |
| Safety | Do not touch electrical contacts; keep minimum distance of 5 cm from wall |
| Spare Parts and Repairability | User-replaceable FINE cartridges |
| General Information | Manual available in multiple languages; online support at http://ij.start.canon |
Frequently Asked Questions - PIXMA E4240 CANON
User questions about PIXMA E4240 CANON
0 question about this device. Answer the ones you know or ask your own.
Ask a new question about this device
Download the instructions for your Printer in PDF format for free! Find your manual PIXMA E4240 - CANON and take your electronic device back in hand. On this page are published all the documents necessary for the use of your device. PIXMA E4240 by CANON.
USER MANUAL PIXMA E4240 CANON
Read Safety and Important Information (addendum) first.
Connecting with Computer and Smartphone/Tablet.. page 4
Instructional Videos
Instructions video
Videoposnetki z navodili
Videoclipuri cu instructiuni
BndeocnHCTpykuu
Egitici Videolar
BundeOHCTpyklin
BideoiHcTpykui
Videozapisi uputama
a


Setting up the printer
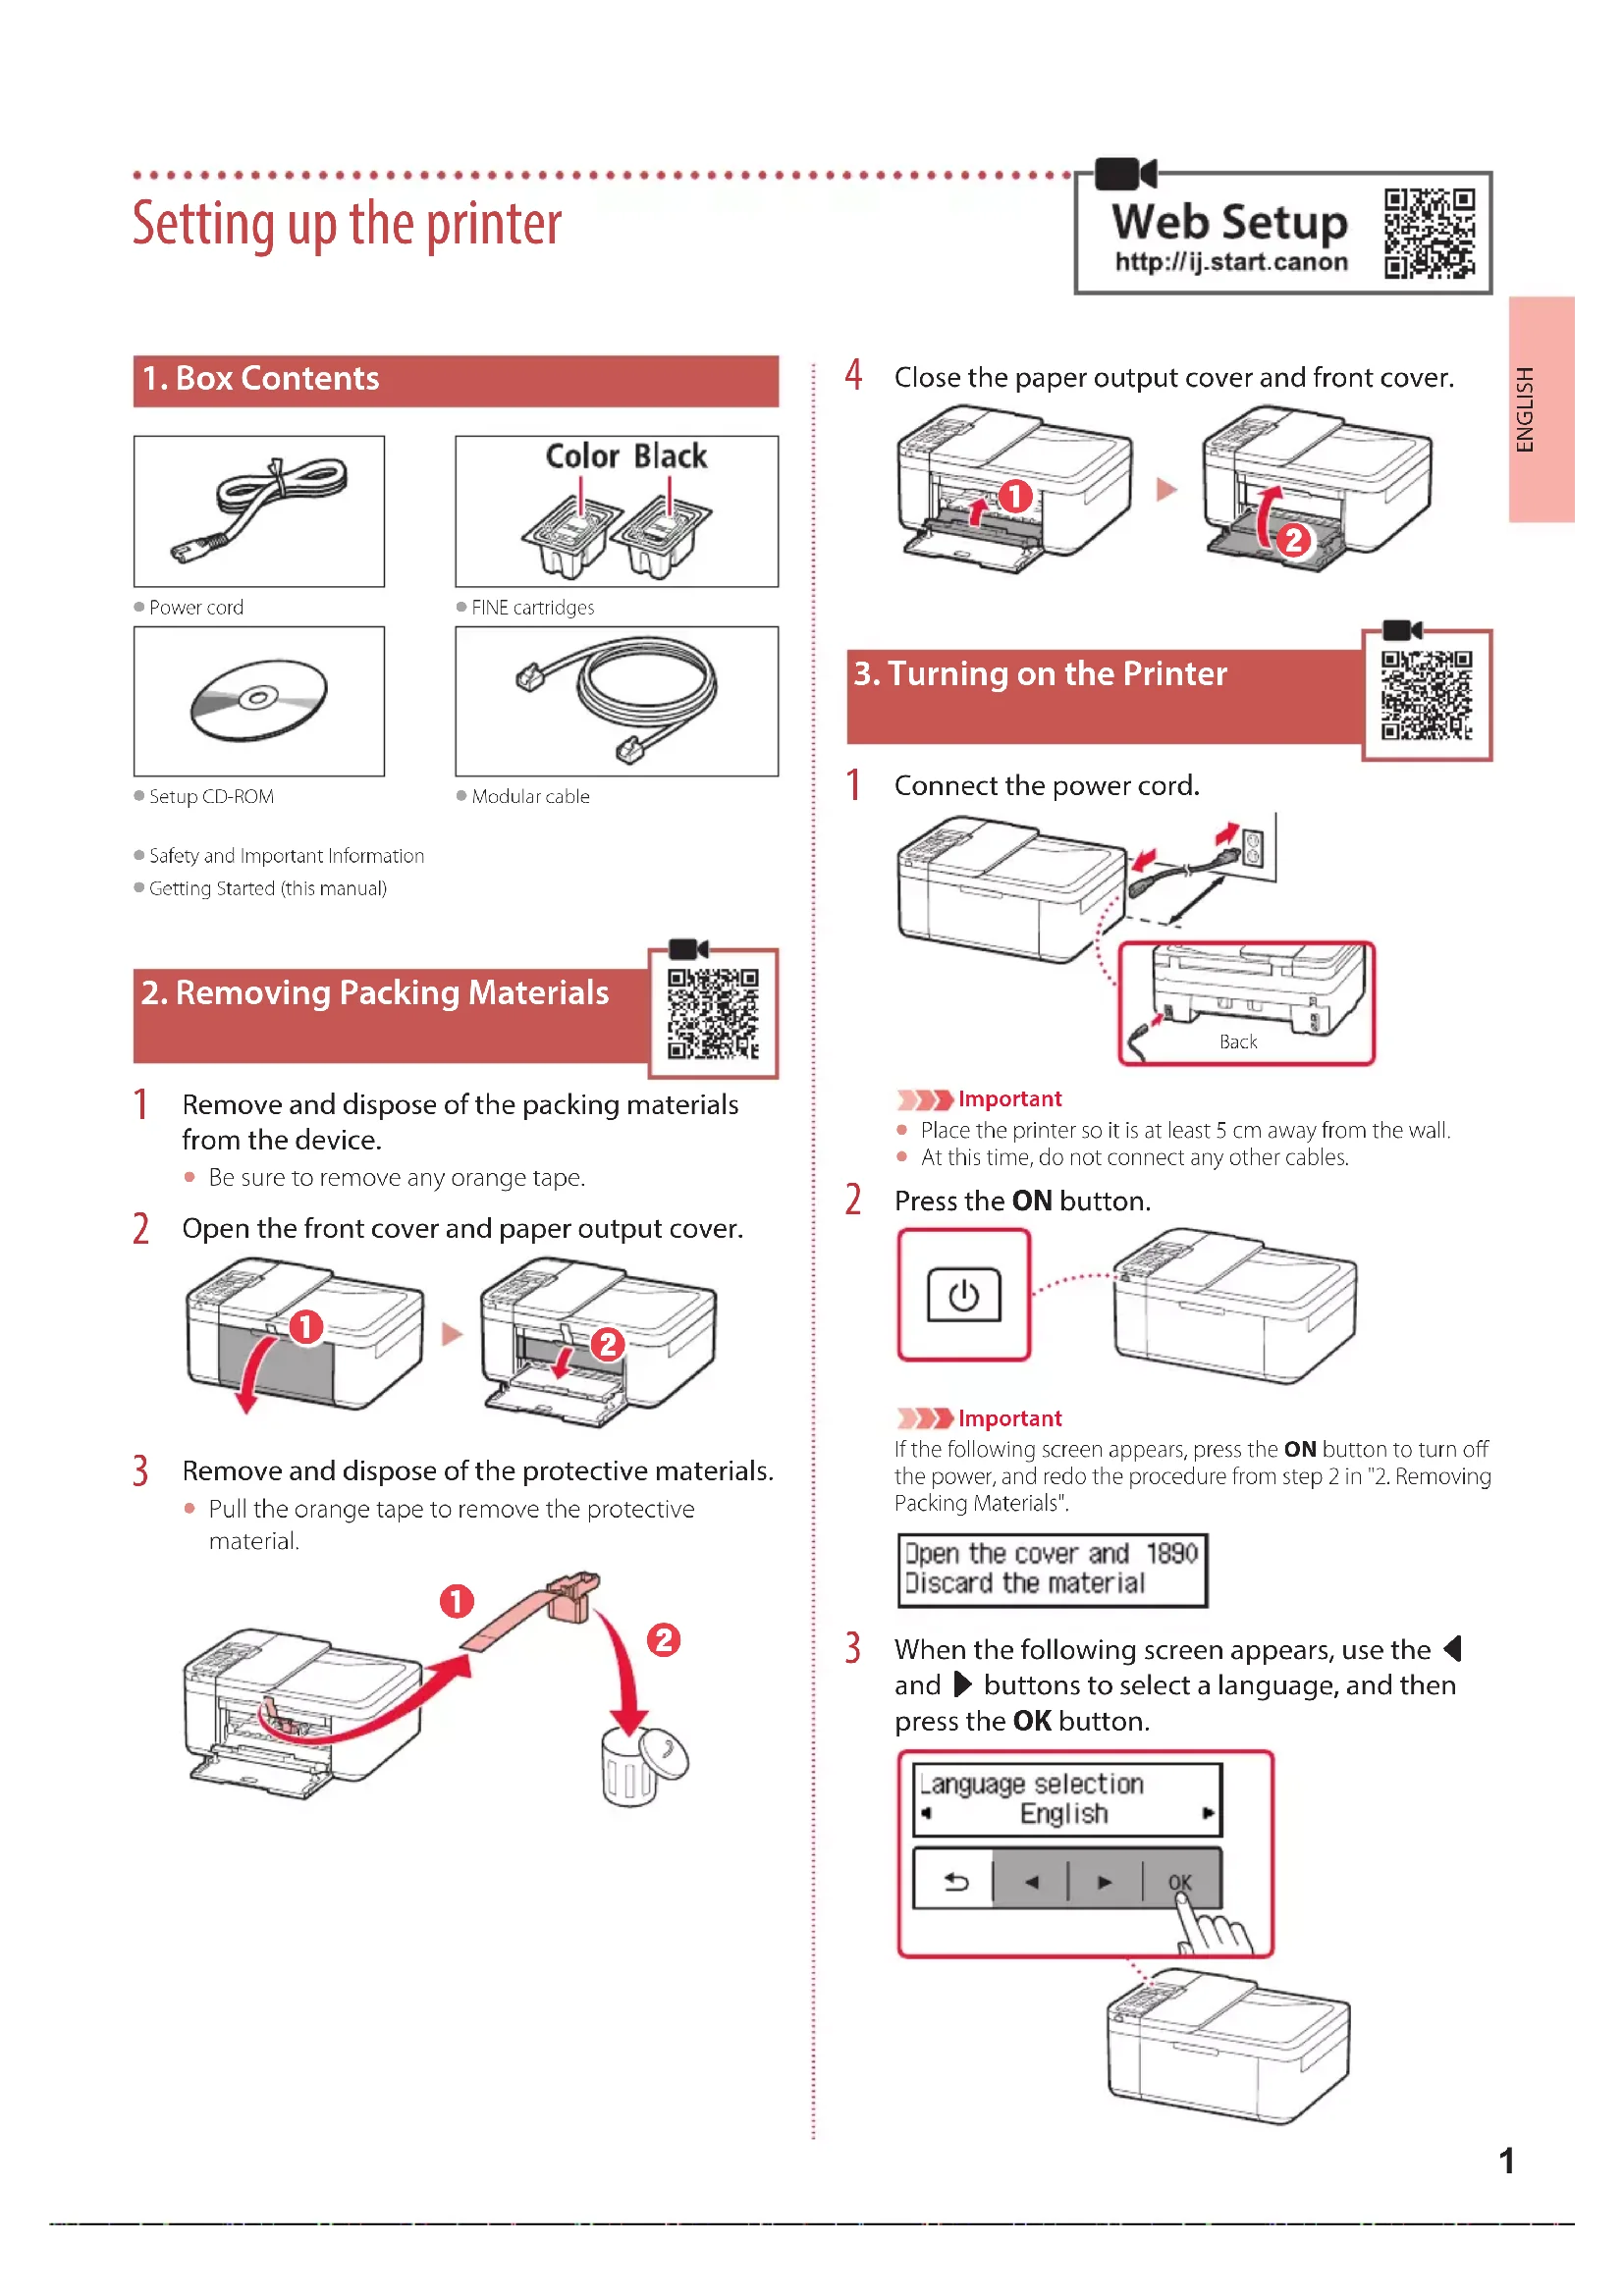
1. Box Contents

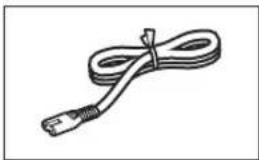
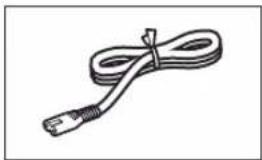
Power cord
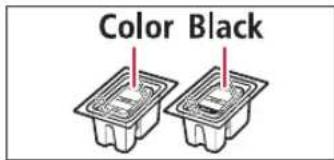
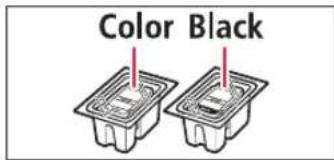
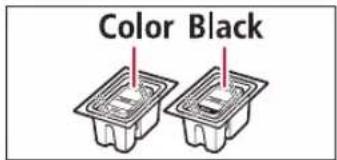
FINE cartridges
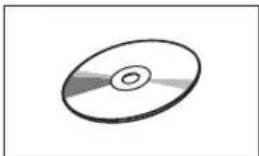
- Setup CD-ROM

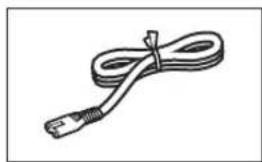
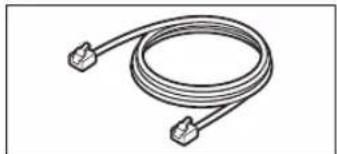
Modular cable
Safety and Important information
Getting Started (this manual)
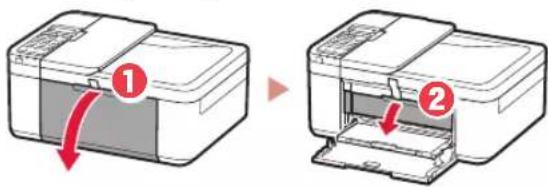
2. Removing Packing Materials

1 Remove and dispose of the packing materials from the device.
- Be sure to remove any orange tape.
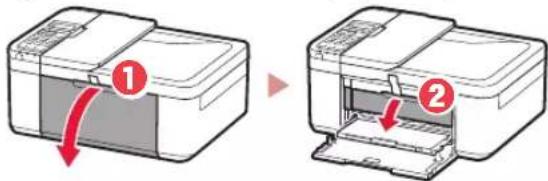
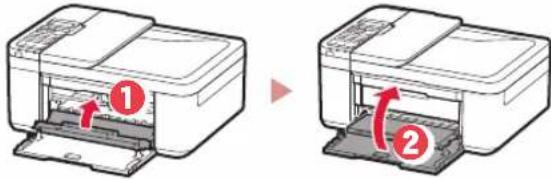
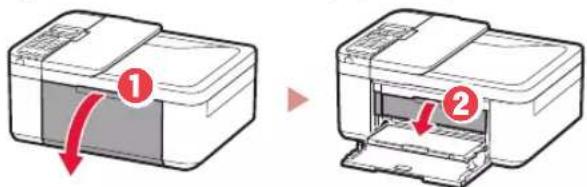
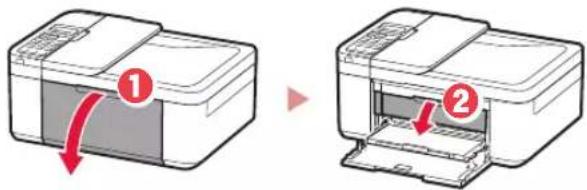
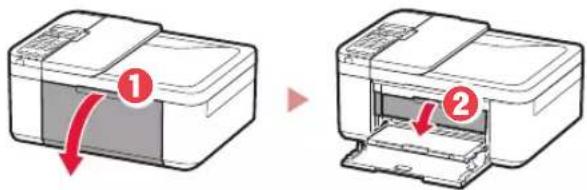
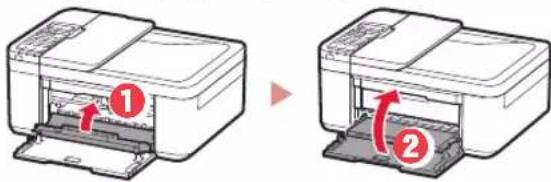
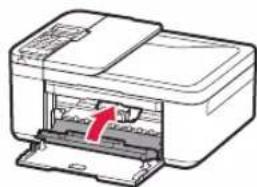
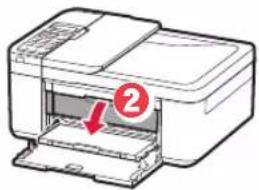
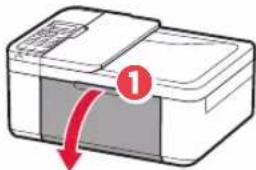
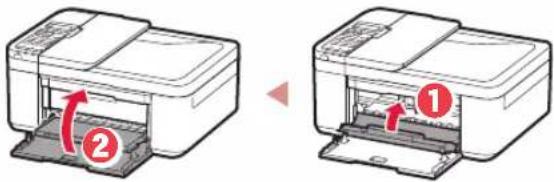
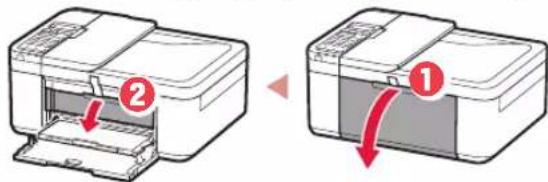
2 Open the front cover and paper output cover.
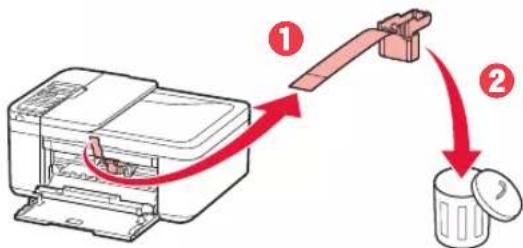
3 Remove and dispose of the protective materials.
- Pull the orange tape to remove the protective material.
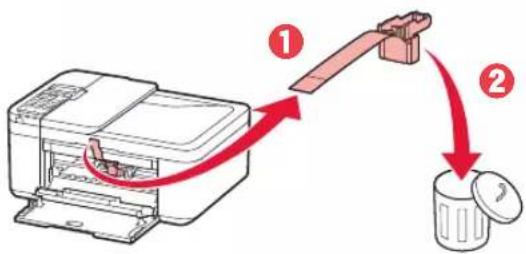
4 Close the paper output cover and front cover.
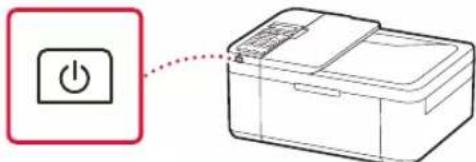
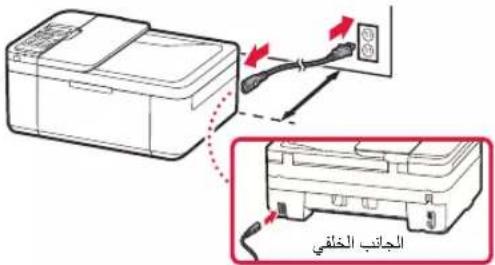
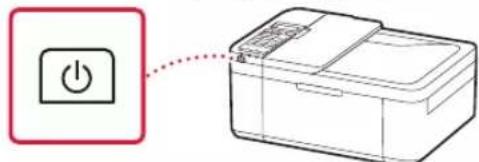
3. Turning on the Printer

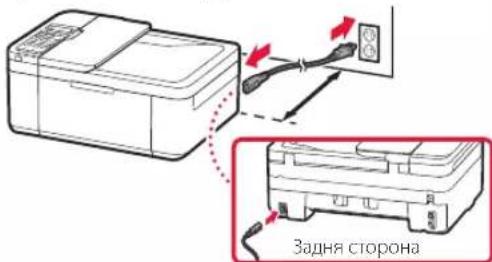
1 Connect the power cord.
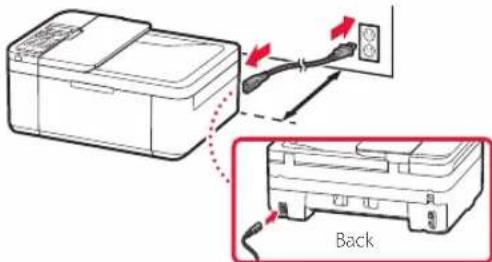

Important
- Place the printer so it is at least 5 cm away from the wall.
- At this time, do not connect any other cables.
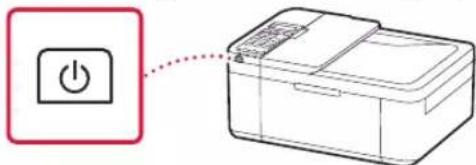
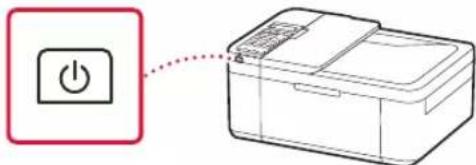
2 Press the ON button.
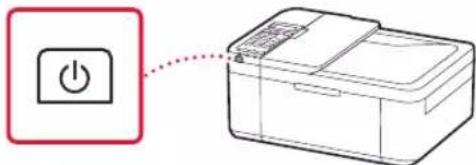

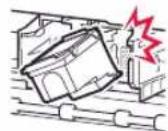
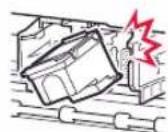
Important
If the following screen appears, press the ON button to turn off the power, and redo the procedure from step 2 in "2. Removing Packing Materials".
Open the cover and 1890 Discard the material
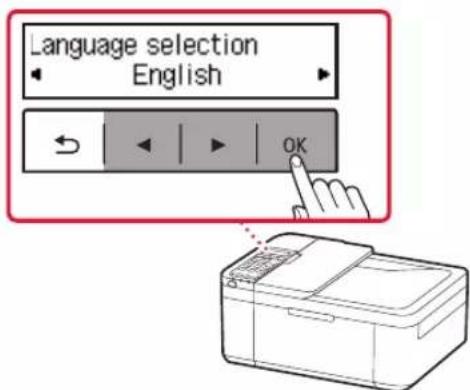
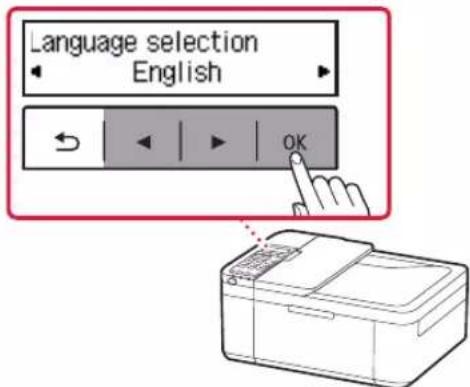
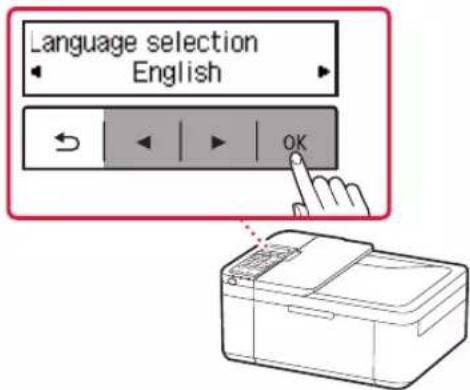
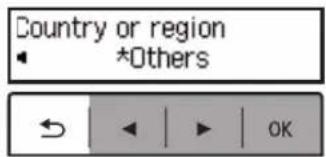
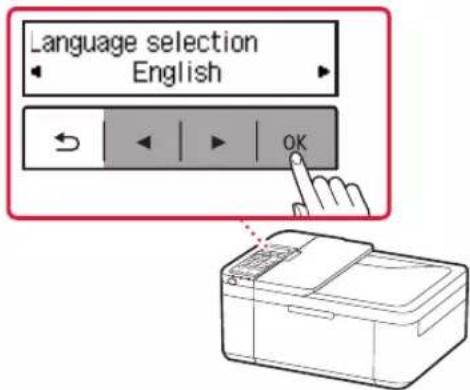
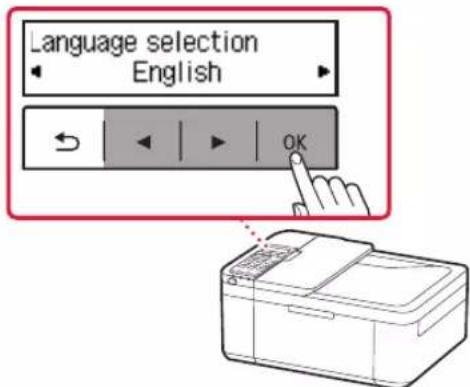
3 When the following screen appears, use the and buttons to select a language, and then press the OK button.
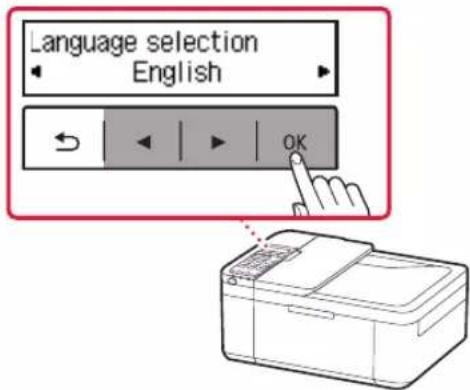
Setting up the printer
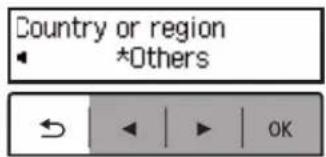
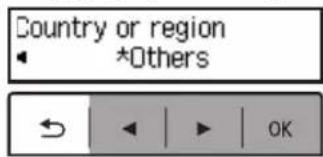
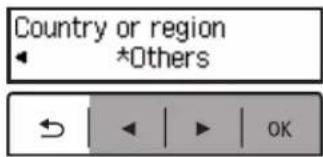
4 If the following screen appears, select your country or region, and then press the OK button.

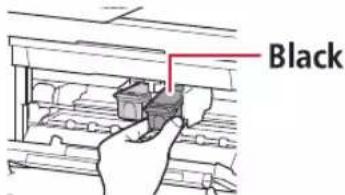
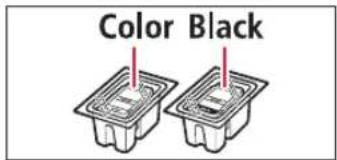
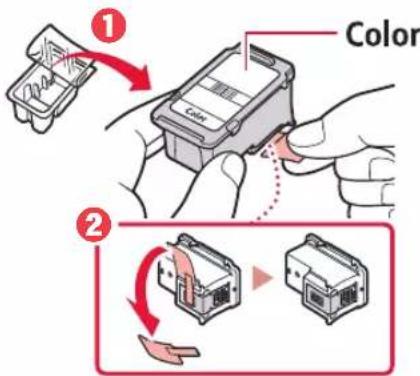
4. Installing the FINE Cartridges

1 Open the front cover and paper output cover.
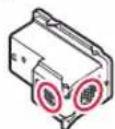
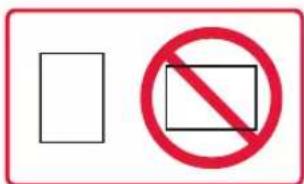
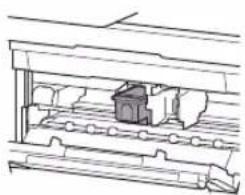
2 Remove the color FINE cartridge from the container and remove the protective tape.
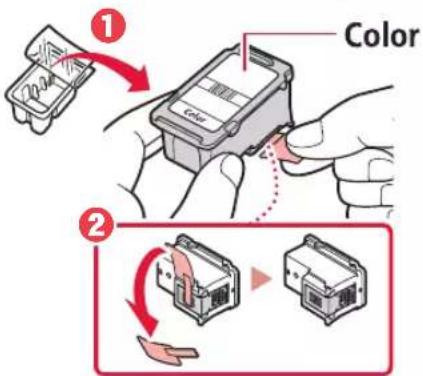
Important
-
Do not touch the ink on the protective tape. It could stain your hands or surrounding objects.
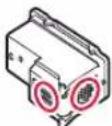
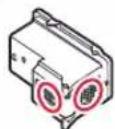
-
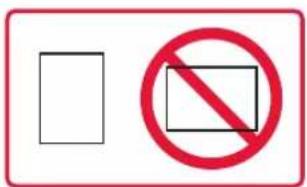
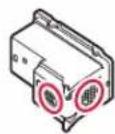
Do not touch the areas shown in the figure. Otherwise, the printer may not print correctly.
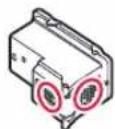
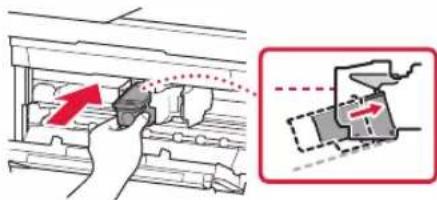
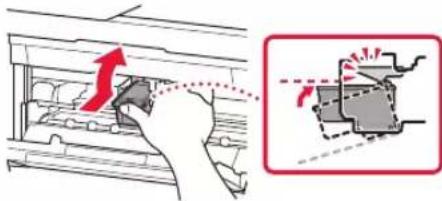
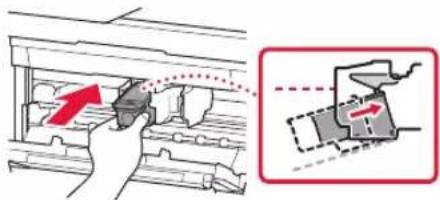
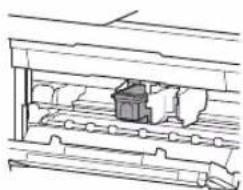
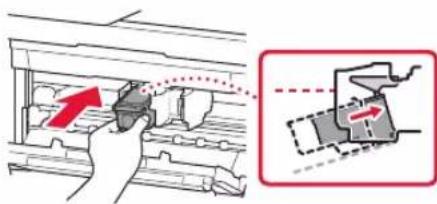
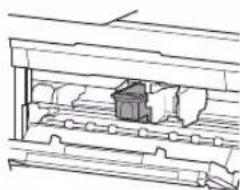
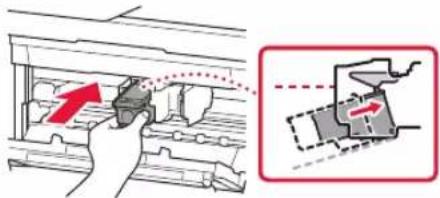
3 Install the color FINE cartridge.
The color FINE cartridge goes on the left.
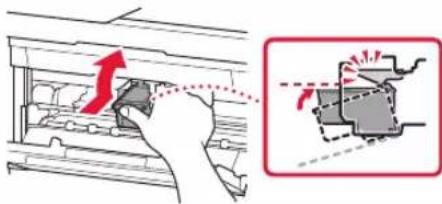
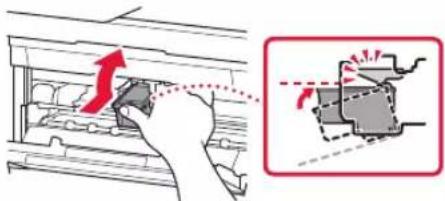
- Tilt the FINE cartridge upward at an angle and insert it into the FINE cartridge holder.
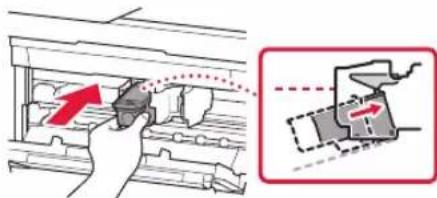
- Insert it all the way and press it upward until it clicks.
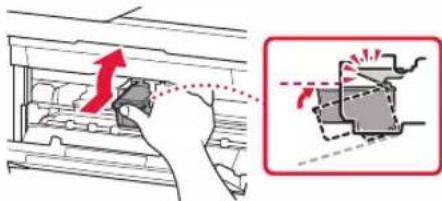
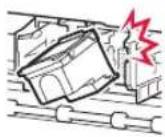
Important
Do not bump the FINE cartridge. Doing so may cause a malfunction.
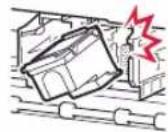
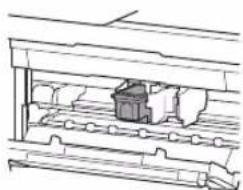
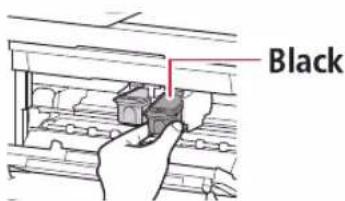
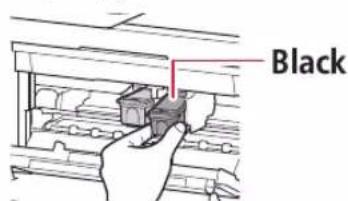
4 Confirm that the FINE cartridge is straight and level.
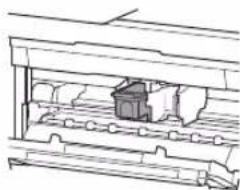
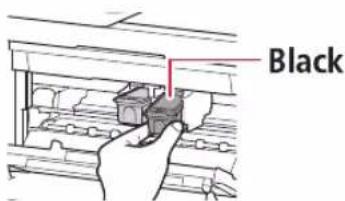
5 Repeat steps 2 to 4 to install the black FINE cartridge.
The black FINE cartridge goes on the right.
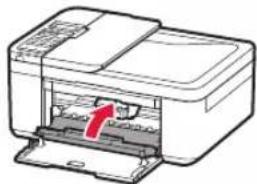
6 Close the paper output cover.

Important
If the following screen appears, return to step 3 in "4. Installing the FINE Cartridges" and confirm that the color and black FINE cartridges are positioned correctly.
Install the cartridges pro 168A
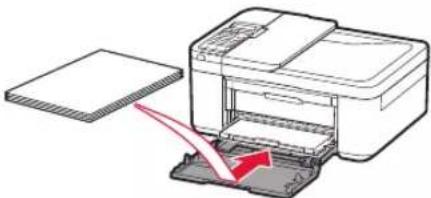
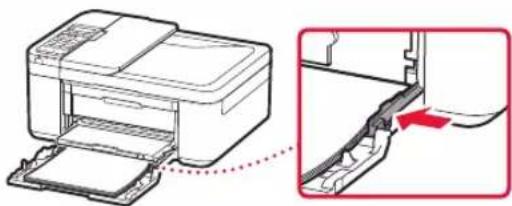
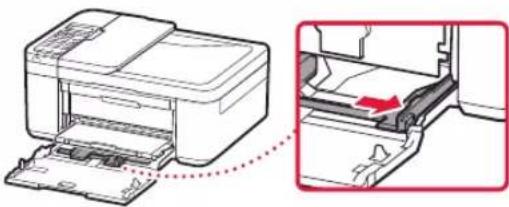
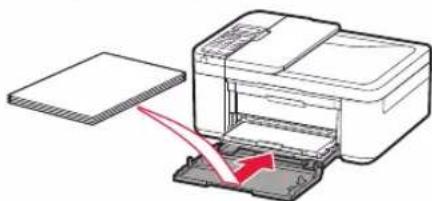
5. Loading Paper

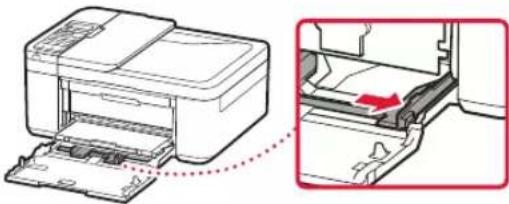
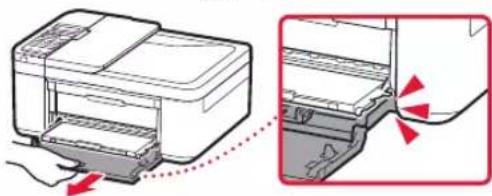
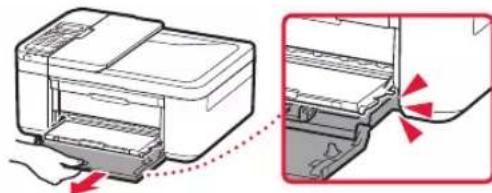
Pull out the cassette until it stops.
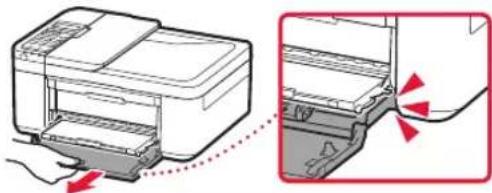
2 Slide apart the paper guides.
- Grip the right paper guide and move it to the right edge.
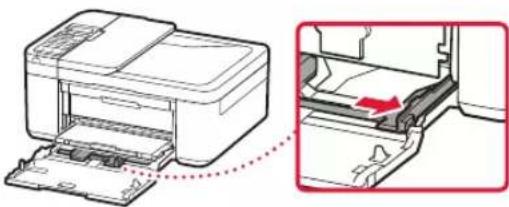
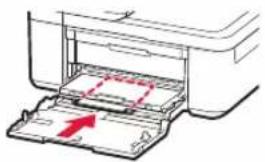
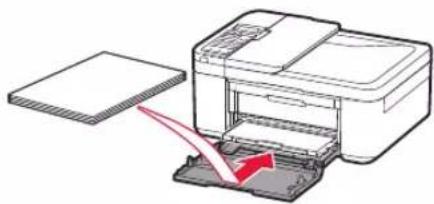
3 Load paper.
- Load plain LTR or A4 size paper with the print side facing down.
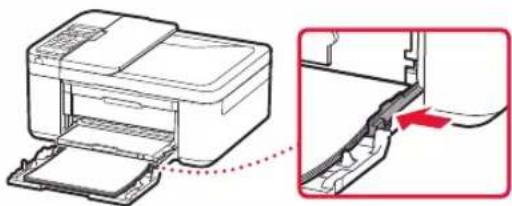
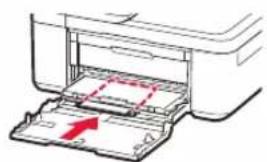
- Push the paper all the way into the cassette, and then slide the right paper guide against the edge of the paper stack.

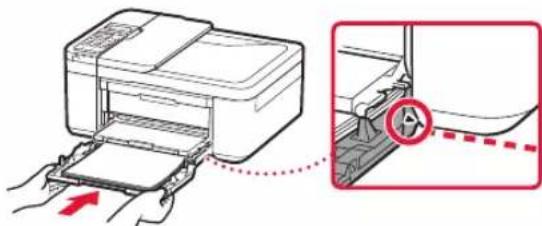
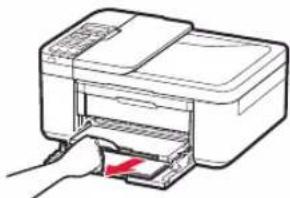
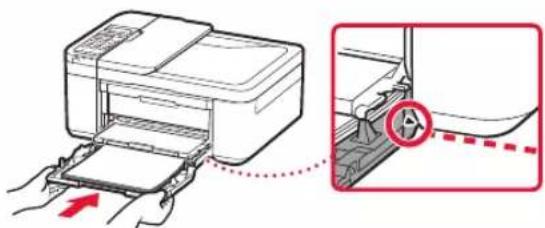
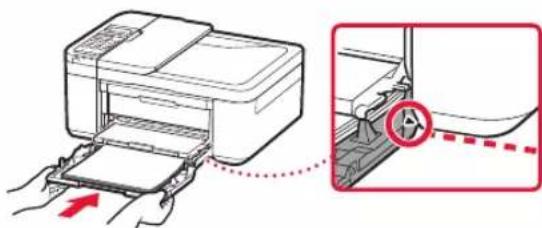
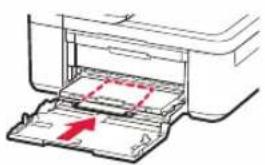
4 Push in the cassette.
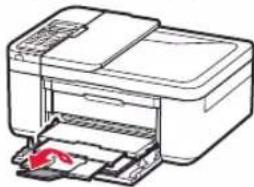
The arrow () on the front cover should align with the front edge of the printer.
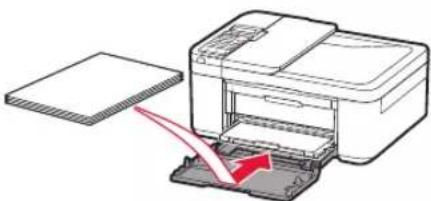
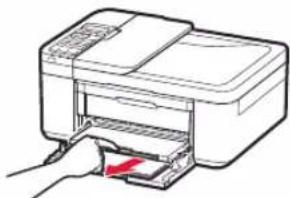
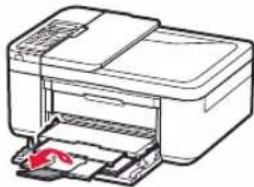
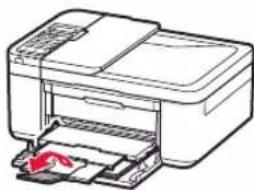
5 Pull out the paper output support of the paper output tray.
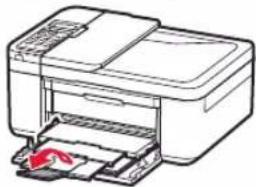
6 Open the output tray extension.
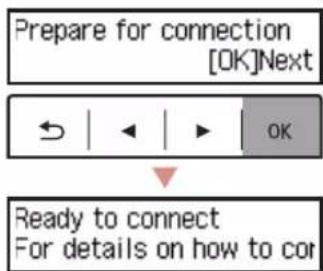
7 Check that the following screen appears, and then press the OK button.
Setting up the printer
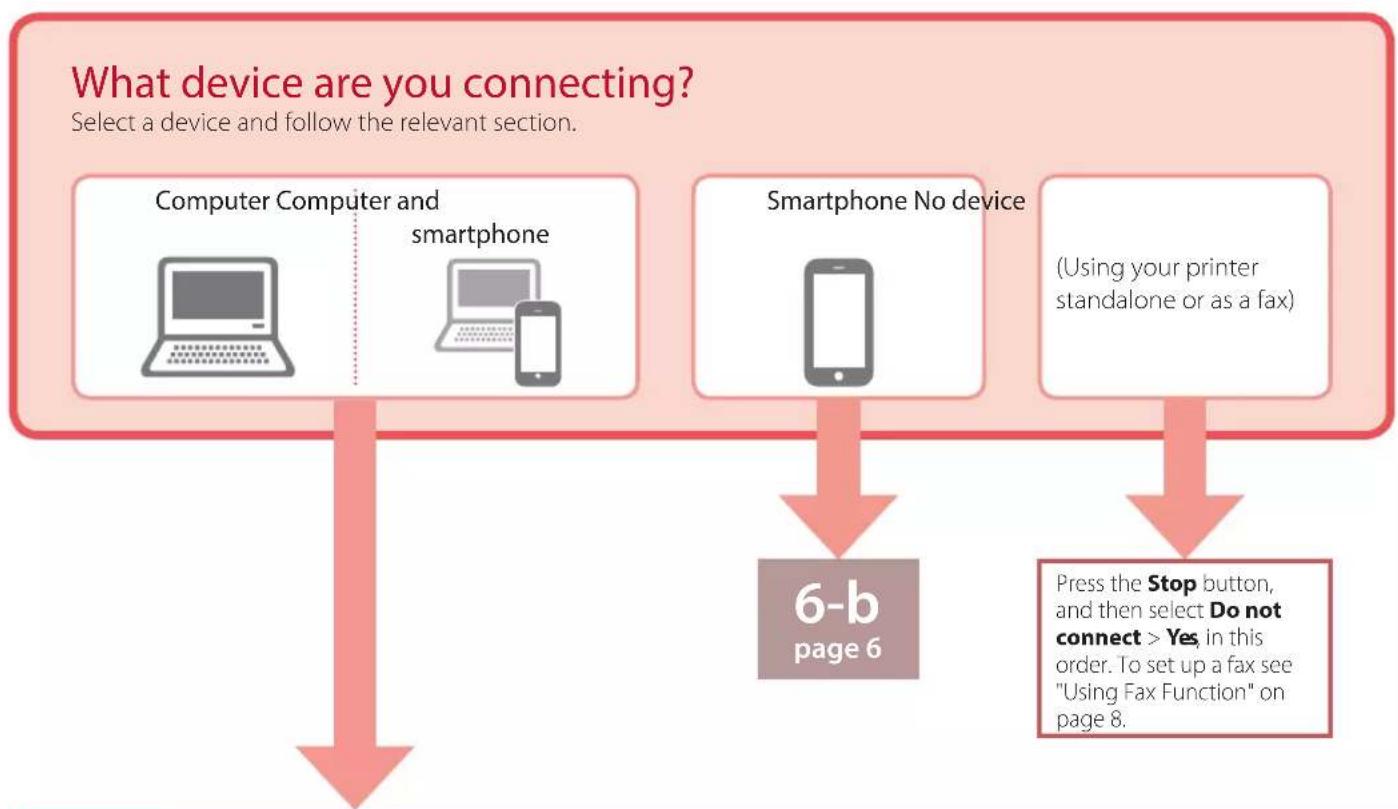
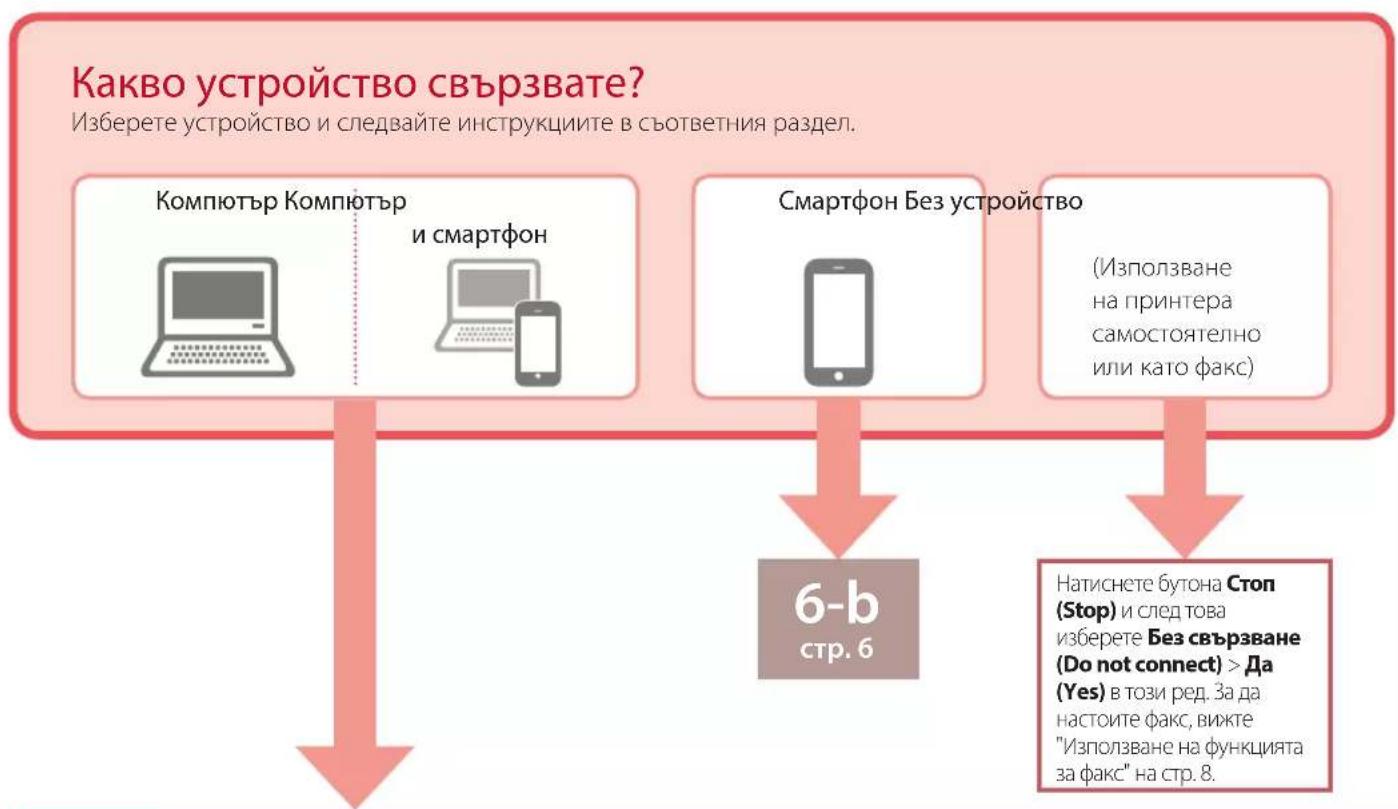
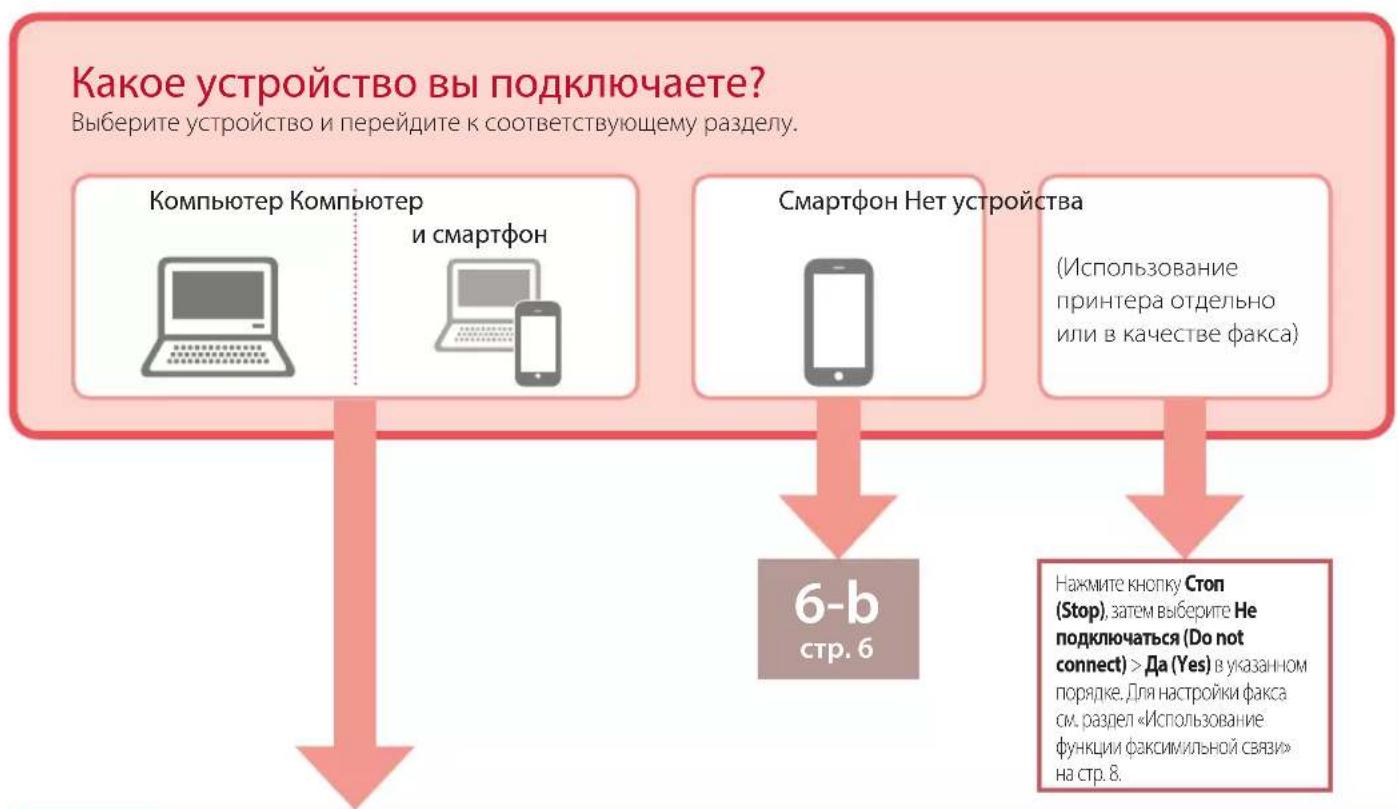
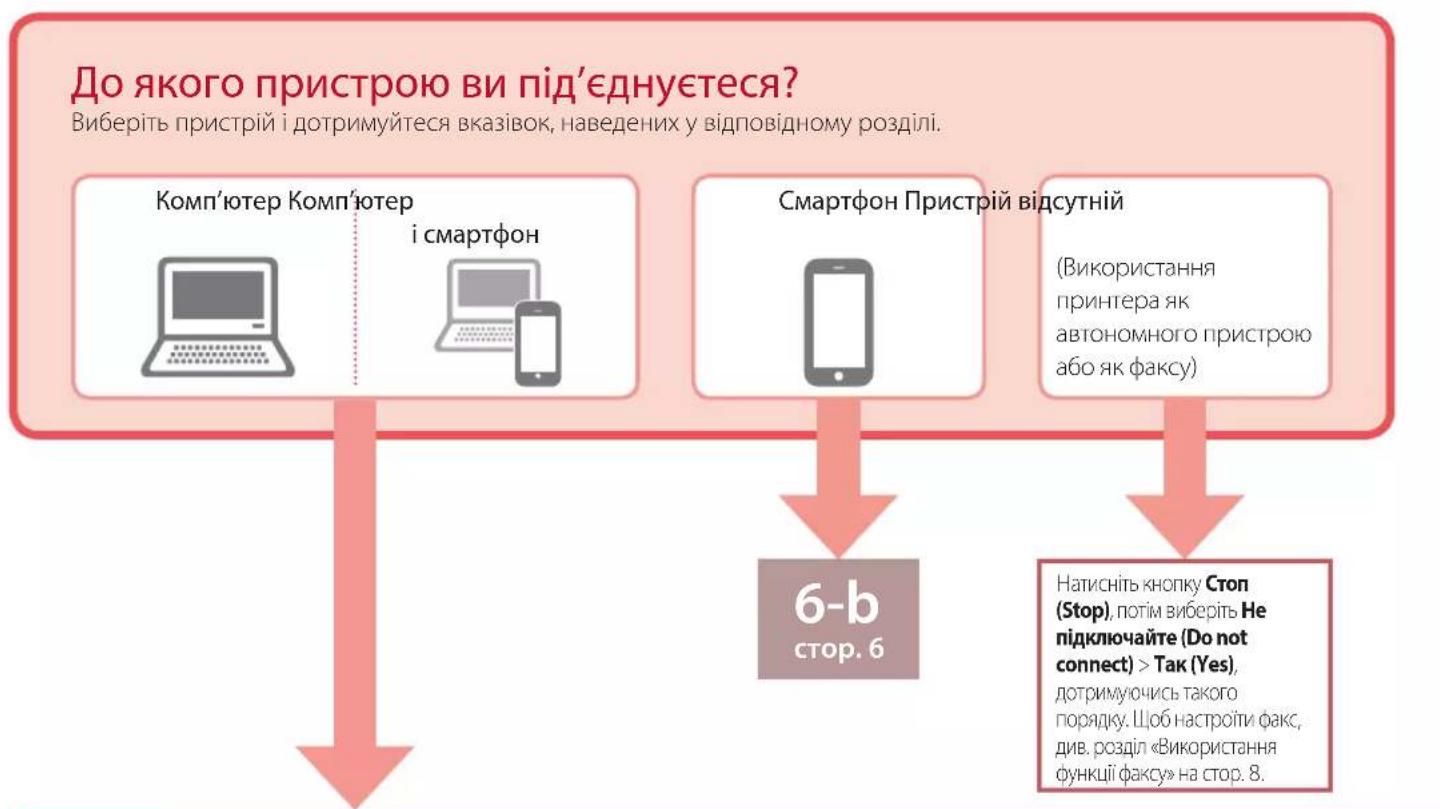
6-a
Connecting to a Computer
If you are using multiple computers, perform these steps on each computer. There are two methods, "A Online Setup" and "B ng the Setup CD-ROM (Windows Only) Provided".


Online Setup
1 Access the Canon website from a computer.
http://ij.start.canon
2 Select Set Up.
3 Enter your printer's model name and click Go.
4 Click Start.
5 Click If you have already prepared your printer, go to Connect.
Note
When you are using a computer with Windows (except for Windows 10 S) or macOS, proceed to the next step. When you are using a computer with another OS, continue the setup by following the on-screen instructions.
6 Click Download.
The setup file is downloaded to your computer.
7 Run the downloaded file.
8 Proceed to step 9 on page 5.

Using the Setup CD-ROM (Windows Only) Provided
1 Insert the Setup CD-ROM into your computer.

2 Follow the instructions for your version of Windows.
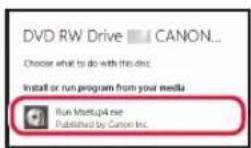
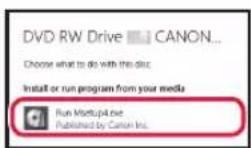
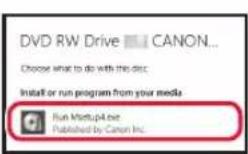
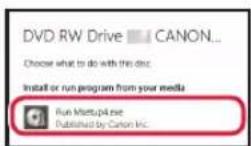
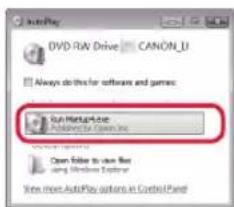
Windows 10/Windows 8.1
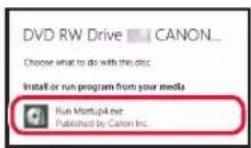
Click on the following message when it appears on the right-hand side of your computer screen.


Note
If the message does not appear (or is no longer visible), click the File Explorer icon in the taskbar. On the left-hand side of the window, click This PC. Double click the CD icon that is displayed on the right-hand side (when the content of the CD is displayed, and then double click Msetup4.exe). Proceed to 3.

Click Run Msetup4.exe.
3 If the User Account Control dialog box appears, click Yes.

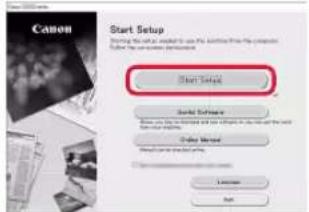
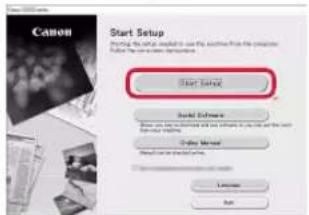
Click Start Setup.
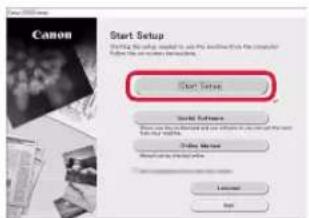
10 Follow the on-screen instructions.
These operations may take some time.
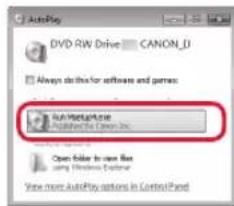
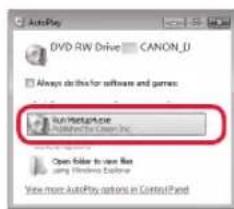
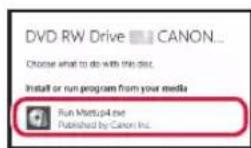
Windows 7
1 Click Run Msetup4.exe.
- When the AutoPlay screen appears, click Run Msetup4.exe.
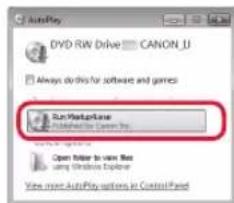

If the AutoPlay screen does not appear, in the Start menu, click Computer. On the right-hand side of the window, double click the CD icon (when the content of the CD is displayed, double click Msetup4.exe).
If the User Account Control dialog box appears, click Continue.
3 Proceed to step 9 below.
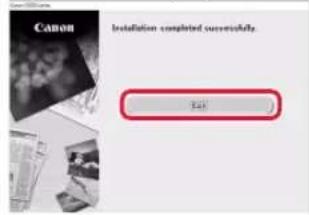
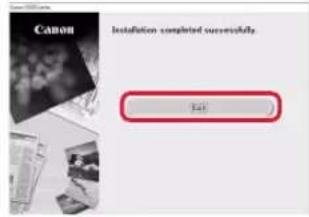
11 When the following screen appears, click Exit.
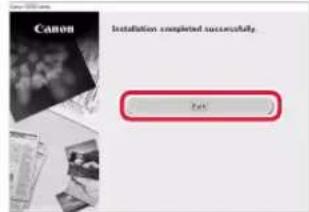
- Your printer is now connected to your computer. To connect a smartphone as well, see "6-b. Connecting to a Smartphone" on page 6.
To set up a fax, see "Using Fax Function" on page 8.
6-b
Connecting to a Smartphone
If you are using multiple smartphones, perform these steps on each smartphone.

Prepare the following before starting.
1 Enable the Wi-Fi setting on your smartphone.
2 Connect your smartphone to the wireless router (if you have a wireless router).
* See your smartphone and wireless router manuals regarding these procedures for more details.
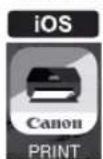
1 Install the "Canon PRINT Inkjet/SELPHY" app on your smartphone.

iOS
Search for "Canon PRINT" in the App Store.
Android
Search for "Canon PRINT" in Google Play.
Note
You can also access the Canon website by scanning the QR code shown on the right to download the app.

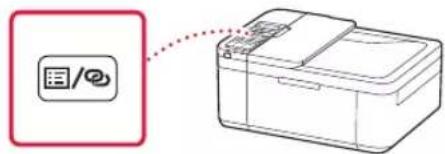
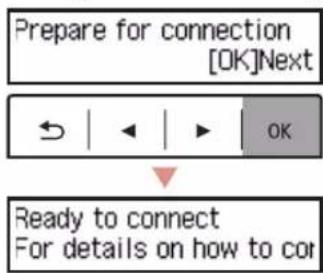
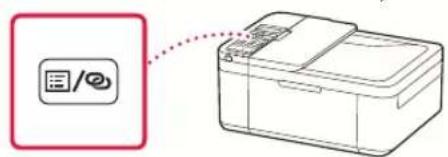
2 Check the printer's screen as you proceed through the steps.
If the following screen appears

Press the Setup button and check the screen that appears.

If appears,

If does not appear ,

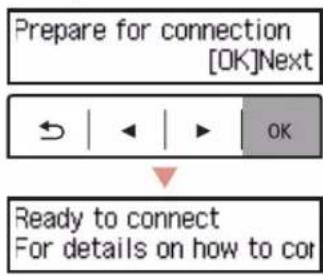
If the following screen appears
Ready to connect
Ready to connect
For details on how to cor

Note
The printer's screen turns off when the printer is idle for 10 minutes. Press a button (except the ON button) on the operation panel to turn on the screen.
If years, the printer cannot communicate by Wi-Fi connection. For details, see "Frequently Asked Questions" at http://j.start.canon/.

3 Open the installed app.
4 Follow the on-screen instructions to add your printer.
5 Check that the following screen appears.

- Your printer is now connected to your smartphone. To print photos, see "Loading Photo Paper" on page 8.
To set up a fax, see "Using Fax Function" on page 8.

Procedures vary for iOS and Android. Follow the instructions for your operating system.
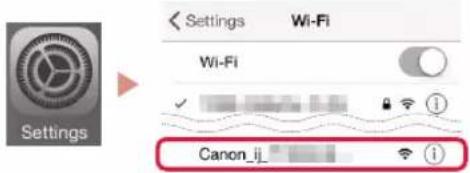
iOS
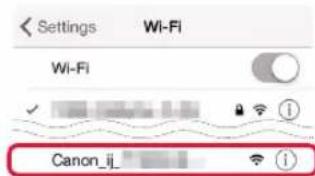
3 Tap Settings on your smartphone's home screen, and tap Canon_ij_XXXX in the Wi-Fi settings.
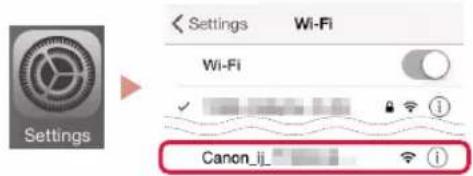
Note
If Canon_ij_XXXX does not appear, follow the procedure in E and then search for Canon_ij_XXXX again.
4 Open the installed app.
The printer is registered with the most appropriate connection method for the environment you are using.
5 Check that the following screen appears.

- Your printer is now connected to your smartphone. To print photos, see "Loading Photo Paper" on page 8.
To set up a fax, see "Using Fax Function" on page 8.

3 Press and hold the Menu/Wireless connect button for about 3 seconds.
4 When "Follow the instructions on the PC or smartphone, etc." appears on the printer's screen, proceed to D
Loading Photo Paper
1 Pull out the cassette until it stops.
2 Slide apart the paper guides.
- Grip the right paper guide and move it to the right edge.
3 Load photo paper.
- Load photo paper in portrait orientation with the print side facing down, and place it in the center of the cassette.
- Push the paper all the way into the cassette, and then slide the right paper guide against the edge of the paper stack.

4 Push in the cassette.
The arrow () on the front cover should align with the front edge of the printer.
5 Pull out the paper output support of the paper output tray.
6 Open the output tray extension.
7 When the following screen appears, press the OK button.
Register the cassette pa [OK]Next
8 Select the paper size and type, and press the OK button.
Size: L Type: Glossy
Using Fax Function
The fax function of your printer requires setup. Refer to either of the following manuals.
Online Manual
Access the Canon website.

http://ij.start.canon
Click.
3 Enter your printer's model name and click Go.
Click FAX Setup Guide
On-screen Manual (installed on your computer)
The following is an example using Windows 10.
0 Click the Start button.
Click All apps > Canon E4200 series On-screen Manual in this order, and then open the User's Manual.
3ClickFAX Setup Guide.
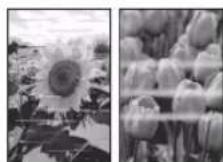
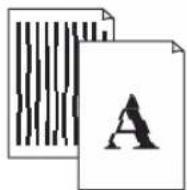
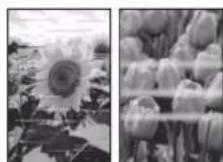
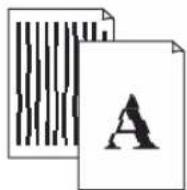
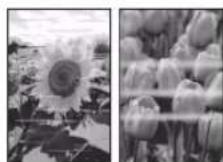
If Print Results Are Unsatisfactory
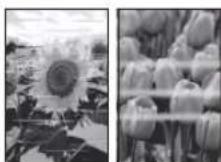
Perform Print Head Alignment if straight lines are crooked or colors are inconsistent, or print results are otherwise not what you expected.
For details, click the Maintenance on the Online Manual and refer to If Printing Is Faint or Uneven > Aligning the Print Head.
Refer to the back cover for how to open the Online Manual.
Lines Are Misaligned

Uneven or Streaked Colors
Configuration de l'imprimante
Open the cover and 1890 Discard the material
3 Ko se prikaze naslednji zaslon, z gumboma in izberite jezik ter pritisnite gumb OK.
Kliknite Zazeni
Msetup4.exe
(Run Msetup4.exe)
Register the cassette pa [OK]Next
8 Izberite velikost in vrsto papirja, nato pritisnite gumb OK.
Size: L Type: Glossy
Open the cover and 1890 Discard the material
For details on how to cor


Register the cassette pa OK]Next
Size: L Type: Glossy
Utilizarea functiei fax
2 HaTnCHeTe 6yToHa BKnIOuBaHe (ON).

Baxho
Ako ce nokakxe cnndnnt ekpaH, HATNCHTe 6yToHa BkIOUcbHe (ON), 3a da nKIOUHTe 3axpaHbAHETO, IN NOBTOpe TPOUcIpypata OT CTbNka 2 B"2.OTCTpaHbAbe Ha ONaKOBbHHTe MATEpnaI".
Open the cover and 1890 Discard the material
3 Korato ce nokaxe cneHnT ekpaH, n3noJ3BaIte 6yToHnTe n ▷, 3a da n36epeTe e3NK, cneД KoETo HaTnCHete 6yToHa OK.
HacpoBaeHa npHTepa
4 Ako ce nokaxe cneHnayt ekpaH, n36epTe DbpxaBata Hn nperoHa cn n CneT TOBa HaTnCHHe 6yToHa OK.

4. NocTaBHe Ha KacetUte FINE

1 OToBopTe npednna Kaan KanaKa Ha n3XoDa 3a XapTna.
2 ɪЗbaɪdeteцьетнаТаКасетаFINEOTKɔnteɪHepa nOTcTaHaTeпрдпэЗнТалелнka.


Baxkho
HeDOKOCBaIteMaCTnIOToNoIpeNnA3HaTaNenEHaTo MoKeJaN3uanaPbUeTeBUNNOKOJIHITe NpeDMtN.
HeDOKOcbAte30HHTe,POKa3aHNHa
fHiypata.B npOTINBEN CNYaH pInHTepbT
MOKe Da He NeCuTa NpaBUNHO.
3 NocTabete uBeTHaTa KaceTa FINE.
LbETHaTa KaceTa FINE ce noCTaB O TnABO.
- HaknoheTe Jeko Kacetata FINE noBbHarope n noCTaBeT BDbpkaHa KaCetaFINE.
BkapaTe JOKpaI HAHTCHe HArope, DOKaTo 4paKHe.

Baxkho
He ynpaTe kacetata FINE.ToBa MoKe da npuHHH He3npaBHOCT.

4 YBepete ce,ye kaceTaFINE en3npaBeHa nXOpn3OHTaJIHO NOpaBHeHa.
5 IOBTOpeTe CTbIKn OT 2do 4,3a da nocTaBnte cepHata Kaceta FINE.
- Yepnata kaceta FINE ce noctaba otЯCHO.
6 3aTbOpTe KaNaKa Ha nXoJa 3a xapTna.


BaxHo
Ako ce IokaKe CJIeHNHT ekpaH, Ce BbPHeTe Ha CTbNka 3 B "4. NocTabaHHe Ha KacETnTE FINE" n CE yBepete, Ye CBetHaTa u cepHaT a KacEtN FINE ca NoCTaBeHn npabINHO.
Install the cartridges pro 168A
5.3apejckdaHeHaXapTna

1 N3dbpnaIte HabbKacetata,doKaTO cnpe.

2 Pa3daneyeTe BODaunTe 3a xapTna.
XBaHete DecnB Odaa 3a XapTnI rO npemecTe Tdo DecnKpa.
3 3apepeetexaptna.
3apeTe 06nKHOBeHa xapTna c pa3mep LTR nn A4 CbC CTpaHATA 3a neHaT HaDony.
ByTHETeXapTnTaDOKpaB B KaceTatau CneTToBa nIb3HeTe DeCHNA BODauch aXapTna Do p6aHa TOnyeto XapTna.

4 ByTheTe KaceTaHaBbTppe.
Ctpenkata()Ha npednna kanak Tpa6ba da ce noDpaBn c npednna Kpa Ha npHTepa.

5 ⅢdIbpaIte HabbH n3XoHaTa noIIOxKa 3a XapTna Ha n3XoHaTa TaBa 3a XapTna.
6 OTBOpTe yIbJIxHeHneTo Ha n3XoJHaTa TaBa.
7 IpoBepTe daHn ce noka3Ba ekpaHbT no-dony n cneT OBa HATNCHeTe 6yToHa OK.
6-a
Cbbp3BaHe c KOMnIOTpBp
Ako n3non3BaTe HAKONKO KOMNIObpa, IN3BbPwTe Te3n CTbNK Ha BCEKn OT TAX.
Ima IBa MeToJa - "A HnaH NaCTpoKa" n " I B no3BaHe Ha npedocTaBeHn HCTanaCIOHEKOMNaKTdNCK (cAmO 3a Windows)".


OhnaH hactpoiKa
1 Bne3Te Bye6caTc Canon ot KOMnIOTp.
http://ij.start.canon
2 136epete Hactpoika.
3 BbBeTe NMeTo Ha MoEJa Ha npHtepa nIpaKHeTe Bbpxy Ctrpt.
4 LpaKHeTe Bbpxy Ctrpt.
5 ⅢpaKHeTe Bbpxy Ako Beue cTe NOaTbUIn npHtepa,OTnAteHa Cbbp3BaHe.
3a6eEckka
Ako n3nON3BaTe KOMNIOBp C Windows (C u3KlIOueHHe Ha Windows 10 S) nn macOS, npemHHeTe KbM cneBaata CTbIka. Ako n3nON3BaTe KOMNIOBp C dpya onepauOnHHa CNCTema, npoJbIXKeTe HAcTPOKaT, KaTO CNeDBAte NHCHTpyKUInTE Ha ekpaHa.
6 ⅢpaKHeBbpxy N3tern.
-ФаиьтзансторикaeиЗерпЯНКOMПИOTbpa.
7 CtaptnpaTe n3TerHeHna paJn.
8 IpemnHeTe KbM CTbnka 9 Ha cTp.5.

I3noJ3BaHe Ha npedocTaBeHn HnctanaLNoHEn KOMNaKTtdck (cmo 3a Windows)
1 IbXHeTe INHCTaIaNIOHHN KOMNaKTIDCK B KOMNIOTpba.

2 CnEaBaiTe nHctpyKuInTe 3a BaWata BepCnHa Windows.
Windows 10/Windows 8.1
1 LpaKaHHe Tbpy CneDnHOTo CbO6UeHne, KOrato Ce NOKaKe BpCHO HA KOMIKoTbpHnE ekpaH.

3a6eEckka
Ako CbO6UeHMeTO He Ce NOKaKe (MnBce He CE BnKJa), UpaKaHETe BbPxy NKoHaTaΦaINOB MeHnKbP (File Explorer) BJIeHTaHa 3aDaHte, UpaKaHETe BbPxy To3u KomnIOTpB (This PC) BnRABO Ha npOpeua. UpaKaHETe DBykPaTHo BbPxy NKoHaTa Ha KOMNtDnCKa, KOrTO CE NOKa3Ba BnCHO (KOrato Ce NOKaKe CbDbPxaHMeTo HA KOMNtDnCKa, UpaKaHETe DBykPaTHo BbPxy Msetup4.exe). IpemNHete KbM
UpaKHeTe BbpxM3nblH Msetup4.exe (Run Msetup4.exe)
3 Aco ce nokae dnaIorOBnT npOzepeu YnpaBHeHne Ha Notpe6nteKn akayHTn (User Account Control), upaKaHete bbyx y (Yes).
Windows 7
1 ⅢpaKHeTe Bbpxy M3nBlnu Msetup4.exe (Run Msetup4.exe).
Korato ce nokaxe ekpaHbT ABTomatmyHO m3nbHeHne (AutoPlay), 4paKaHete Bbpxu M3nbJHM Msetup4.exe (Run Msetup4.exe).
3a6eexka
Ako ekpaHbT ABTomauHo n3nbHeHme (AutoPlay) He ce nokaxe, B MeHO CTap (Start) npakhe Bbpxy KomnOtp (Computer). BnCHO Ha npo3opeua npakhe TdykpaTHO BbpxN KOHATA Ha KOMnAKTINCKa (KORATO Ce nOKaxe CbIbpkaHMeTO Ha KOMnAKTINCKA, npakhe DBykpaTHO Bbpxy Msetup4.exe).
Ako ce nokaxe dnaIanoBnT npo3opeu YnpaBHeHne Ha notpe6nteNckn akayHTn (User Account Control), 1paKHe T Bbpxy PpOdbJnx (Continue).
3 IpnmHeTe KbM CTbNka 9 no-dony.
9 ⅢpaKHeTe Bbpxy CtapTnpaHnHa HacTpOJa (Start Setup).
10 CneDbaiTe HnctpyKuHte Ha ekpaHa.
Te3n Oepaun MOKe Da OTHeMaT 13BecTHO BpeMe.
11 Korato ce nokake cneHnraT ekpaH, ⅢpaKHeTe Bbpxy M3xoA (Exit).
Cera npinhtepbT Behe e Cbbp3aH cKOMIIObpa. 3a da Cbbpxte Cbso n CmapTOH, BIXTE "6-b.Cbbp3BaHe Cbc CmapTOH" Ha ctp.6.
3a da HacToIe 0aKc, BnXTe "V3non3BaHe Ha cyHKuYra 3a 0aKc" Ha cTp.8.
6-b
Cbbp3BaHe cbc cMapTfoH
Ako IN3IOIN3BaTe HAKOJIKO CMapTfoHa, IN3BbpWte Te3N CTbIKn HA BCEKN OT TAX.

IodroTBete cneHTo npedn CTapTnpahe.
1 BkIIOUeTe HAcTpoKata Wi-Fi Ha cMaprfoHa.
Cbpxte cMapTfoHa c 6e3xuHn pyTe (ako mATE 6e3xuHn pyTe).
BixTe pboOoCTBaTa Ha cMapToHa n 6e3KuHn pyTep 3a NOBue neoppo6HOCTn OTHOCHO Te3n IPOUeDpyn.
1 IHCTaIpaIte npiloxeHneTo "Canon PRINT Inkjet/SELPHY" Ha cMaprfoHa.

iOS NtbpceTe "Canon PRINT" B App Store.
Android IotbpcTe "Canon PRINT" B Google Play.
3a6eJexKa
Mokete da OTniete Bye6caHtCanon n KaTo cKaHpate noka3aHnO tJACHO QR KOD, 3a Da N3terIInTe npUOnKeHHeTc.

2 IpoBepaIe eKpaHa Ha npHTepa,doKaTo npemHabate npe3 CTbNKeTe.
Ako ce nokaxe cneHnT ekpaH

HaTnCHTe 6yToHa HAcTpOKn (Setup) 84 n BnKTe ekpaHa, KOITo ige ce nokaxke.

Ako ce nokaxe
Ako He ce nokaxe
Ako ce nokaxe cneHnT ekpaH

TOTOB3a Cbbp3BaHe
Ready to connect
For details on how to cor
3a6eexka
EkpahbHa npHtepa ce n3KIOUba, KORATO npHtepbte B NOKO B npOdbNKeHHe Ha 10 MNHyTn, HATNCHTe npONB0EN 6yTOH (c n3KIOUeHHe Ha BKnOuBaHe (ON) HA OIEpaOnOHHH naHeI, 3a da BKNIOHTe ekpHa.
Ako ce noka3Ba HHTepbT He MOKe Da OcbIeCTBBA KomyHkaUaYpe3 Wi-Fi Bp3ka.3a noop6HOCTu BnKTe "Ecto 3aDaBaHb BnPocu" B "http://j.start.canon".

3 OTBOpTe HnCTaHpaHTo npNoJxHe.

4 CneBbnte HnctpyKuHrTe Ha ekpaHa, 3a da do6abnte npInHTepa.
5 IpoBepTe daHn ce noka3Ba cIeHNrT ekpaH.

Cera npnHTepbT Buee e Cbbp3aH cbccmapTfoHa.3a Da OTneuATBaTe CHIMKN, BNKTE"3apeKaHa He foTOxApTna" Ha cTp.8.
3a da HacToNte paKc, BnKTe "V3non3BaHe Ha YHKUrrTa 3a paKc" Ha Ctp.8.

IpoeDpyPnte ce pa3nHabat 3a iOS nd Android. CneBbTe INCTpyKmnte 3a BaWata OepauOnHa cInTeMa.
iOS
3ДOKOCHTe HAcTpoNn (Settings)Ha NaaHnE ekpaH Ha CMapTfoHa N DOKOCHeTe Canon_ij_XXXX B HAcTpoNKte 3a Wi-Fi.


3a6e9ekka
Ako Canon_ij_XXXX He ce noka3Ba, CneBaiTe npoueypata B E n cneT OBa NtbpceTe Canon_ij_XXXX OTHOBO.
4 OToBopete HnCTaJIpaHOTo npInOKeHne.
IpnntepbT ce pernctpupa c Hau-nOxOaMnMeTOHa Cbbp3BaHe CnopeD CpeDaTa, KOATO N3NON3BaTe.
5 IpoBepTe daIe cne noka3Ba cIeHnT eKpaH.

Cera npinhepbt Buee cBbprh CbC maptfoHa.3a da OTneuATBe TCHMKN, BNKTe "3apeXkaHe Ha foTOxapTn" Ha ctp.8.
- 3aДансOTeФaK,ВИХТe"V3nOJ3BaHеHaФyHKUЯТа3aФaK"Ha cTp.8.

3 HaTnchTe n 3aIpbXkTe 6yToHa MeHIO (Menu)/Be3xMnHo CbP3BaHe (Wireless connect) 3a OKoJIo 3 ceKyn.

4 Korato Ha dinCnIeHa npInTepa ce nOaBn "N3nBnHete NnCTpyKuHnTe Ha KOMIObPa Hn CmApTfoHa nT.H." npOdbJIKeTe c D
3apekdaheHafoToxapTna
1 ɪЗдьрnaɪte habьн kacetata,dokaTO cnpe.
2 Pa3daJeTe BODaUte 3a xapTna.
XBaHete DecnB Odaa 3a XapTn n ro npemecTeTe Do DecnKpa.
3 3apeTe foToxapTna.
3apeTe foTOxapTnB nOpTpTaHa opneHTaun CbCCTpaHata 3a neuT haOny n I noCTaBeTe B cpeTaHa Kacetata.
ByTHHeXapTnraDOKpaB B KacetataN CneT TOBa nIb3HeTe DecHna BODauch aXapTndo p6bHa H TOUHTO XAPTN.


4 Bythe Te Kacetata Habtpe.
- Ctpenkata()Ha npednna KaanK Tp6Ba da ce noapabHn c npednna Kpa H npHTepa.
5 ⅢdpnaiTe HABbH n3XoHaTa noIIOKka 3a xapTna Ha n3XoHaTa TaBa 3a XapTna.
6 OTbOpTe yIbJIkeHHeTo Ha n3XoHaTa TaBa.
7 Korato ce nokaxke ekpaHbT no-dony, HATINCHETe 6yToHa OK.
Register the cassette pa OK]Next
8 136epete pa3mepa n Tnna Ha xaptnra nHaTNCHeTe 6yToHa OK.
Size: L Type: Glossy
I3noI3BaHe Ha yHKnIyTa 3a oakc
Функциета 3a Факс Ha npintepa ИЗИСКВа HabcTpoКa. ВЖTe HЯКоE OT CJIeHnTe pБKOBODCTBa.
OHaH pBkoBOdCTBO
OTnTeBye6caHraCanon.

2 lpaKaKHeTe Bbpxy
BbBeTeMeToHaMoEHaHpNHTepaHippaKHeTbPxyCptr.
4 ⅢpaKHeTe Bbpxy PbkOBoCTBO3a HacTpoiKaHaΦaKa.
KpaHIO pBKOBOCTBO (INCTaJIpaHO HA KOMTIOTbpa BN)
DonynoocueHnT npimep e 3a onepauonHnTa cnCTema Windows 10.
1LpakHeTe Bbpxy 6yToHa CrtPt (Start)
2 ⅢpaKHeTe Bbpyx BCmUKN pnpnoKeHnA (All apps) > Canon E4200 series EkpanHo pkoBoCTBO BTo3n peD n CIEI TOBA OTBOpTe PkoBOcTBO 3a Notpe6nten.
3 ⅢpaKHeBbpxy PkoBOCTBO 3a HactpoiKa Ha kaKa.
Ako pezyltaTnte OT otneuATBaHeTo ca He3aIOBOnIteHn
I3BbPwTe IoppaBnBaHe Ha neuataaTa rnaBa (Print Head Alignment), ako npabnte IHHn ca pa3kpuBHe, cBeTObTe Ca HEPaBHomepHn nn pezytatne ot OTneuTaBAHeTo ce pa3nnuBaT no dpyr NaHn OT ouKaBAHOto.
3a noDpo6HocTn upaKHe T Bbpxy NpOdpBxKa B OHnaH PbKOBOCTBO N BNXTe Ako pezytatnte ot neyataheTo ca 6nei n HEPaBHomePn > POnpabHBaHe Ha neyataaTa rnaBa.
BnKTe 3aHaT a Kopuza 3a TOBa KaK Ja OTbOpnte OhnaH pkoBOCTBO.
JIHHInTe ca pa3MeCTeHN
LBeTObTe ca HepaBHomepH nn mAt nBu
Yaziciyi Ayarlama
1. Kutu iceriigi
Guc kablosu
FINEkartusu
Kurulum CD-ROM
Moduler kablo
Open the cover and 1890 Discard the material
For details on how to cor

Not
Register the cassette pa [OK]Next
Size: L Type: Glossy
Faks İslevini Kullanma
Pa3MeaIte npInTepe He 6nke 5cmOTCTeHb.
Ha 3TOM 3Tane He IIOKIIouaIte HIKAKINx DpynX KabeJe.
2 HaxmTe KhoNky BkI (ON).

BHHMaHne!
PnnoBHeHn CndyUoero AkaHa HAnMITE KHOKBy BKI (ON) TObb BkIOuHTb NtAHme, 3aTeM NOBTOpeI npOeDpy, HauHna c wara 2 B paZene «2.YdaHHeHne ytnakoBOUYhIX MATEpHANOB
Open the cover and 1890 Discard the material
3 Pn noBHeHn noka3aHHoro Hnke 3KpaHa BB6epnte r3bIK C NOMOuH KOHONOK a 3aTEM HaKMITE KONKy OK.
HacrtpoKa npHTepa
4Пи NOBHeHn NOKa3aHHOro HIXe 3KpaHa BbI6epntcBOIO CTpaHy nIN peHNOH n HaKMITE KHOKNy OK.
4. YctaHOBka KapTpudxei FINE

1 OtkpoTe nepedHIO KpbIshky I KpbIshky loTka npnema 6ymarn.
2 13BVeKeIte UBeTHOJ KApTpIaX FINE n3 KOHTeHepa u ydaIInTe 3aunTHyIO JeHTy.

BHMaHne!
He kacaiTecb yepHnHa 3aunTHoJIeHTe. OHN MOryT 3aNaKAtb Bauu pyKn NIN OKpykaIoune PpeMTebl.
He kacaiTecb oBnactei, nok3aHHbIX Ha pucyHke. B npotNBOM Cnyae npInTeP MOKET pa6oTaB HENpabINbHO.
3 YcTaHOBInTe CBeTHoN KaPTpNdxFINE.
LBeTHOH KapTpIxK FINE pa3Meuaetc CneBa.
- HakloHnte KaptpnIX FINE BBepx noI yrnom n BCTabBe erO B depXaTeB KaptpnIXa FINE.
BCTaBbTe ero do KOHua n npNKMnTe BBepx do uenka.

BhmuHne!
He yapnTe KaptpnK FINE.3To moKeT npBecn K owN6kam B pa6ote.
4 y6eIITecb,TO kaTpIxK FINE ycTaHOBLeH poBHO HHa HyXHOM ypoBHe.
5 IOBTOPHTeJeCTBn2-4,HTO6bIBCTaBNTb cepHbIKapTpndK FINE.
- Yerhny kaptprnIX FINE pa3Meuaetc cnpaBa.
6 3akpoTe KpbIuKy IOTka npnema 6ymaru.
BHMaHne!
PnnoBHeHn CneIyIOeO EkpaHa BepHntecb K uary 3Ba pa3dene «4.YcTaHObKa KapTpndKei FINE»u y6eDnTeCb, UTO CBETHoN UeHbIK KapTpndKINFINEyCTaHOBHebl npabunbHO.
Install the cartridges pro 168A
5.3arpy3ka6ymarn

1 N3BneKeTe KaccTeI Do OCTaHOBKn.

2 Pa3dBnHbTe HnPaBJIouIe 6ymar.
Bo3bMnte npaByIO HanpaBIAIOUyIO 6ymarnI nepemecNTe ee K npabomy kpaio.

3 3arpy3nTe 6yMary.
3arpynte 6biny6ymary fopmaTALTRnA4 nucBOB CTOPHOH BHN3.

3aBnHbTe 6yMaIy DO KOHcA B Kaccety, 3aTEM CnBnHbTe npaByIO HnpaBIAOu6yMaR N KpaO CTOnKn 6ymar.
4 3aBnHbTe Kaccety.
Ctpenka()Ha nepedHne KpbuKe DOnJkHa OKa3aTbcra HapnoTnB nepdHero Kpa npHTepa.
5 BbIBBnHbTe ynp dIy BbIXoJaeI 6ymar n3 IOTKa npneMa 6ymar.

6 OtkpoTe IOnoJIHHTeIbHbI JOTOK npnema 6ymarn.
7 Ioxnntecb nOBBneHn cIeNyUoJero 3KpaHa n HaxMNTe KHOKNy OK.
6-a
2 CnedyTe HCTpyKunm nIyBaWei BepCu Windows.
Windows 10/Windows 8.1
1 KgdaB npabO yactn kpaH aKmblotepa NOBNTC ndyuouee coocheHne, uENKHITE erO.

PpmeaHne.
Ecn coo6eHHe neonBnIeTc (nn nepeTano OTo6paKaTbC),JeKHNte 3NaOOK PPOBOHMK (File Explorer) Ha naHEn 3aDaU.B neBoi qactn OKpbIBWEROCr OKHa HAKMITE 3Tot PK (This PC). DBaKbl JeENKHITE 3NaOHK KomnKT-DnCKCa Cnpaba (KOrJa OT6paNTcCoepKmOE KOMnKT- DnCKa, 3aTeM DaKbl JeKNHtpe KaJ Msetup4.exe). NpeeiDInTe K Wary 3.
2 3anyctntb Msetup4.exe (Run Msetup4.exe)
3Пипявелендиалогob罗OKha KOnTppoIyTuHbIX 3auncei (User Account Control) HaxMITE Da (Yes).
Register the cassette pa [OK]Next
8 Bb6epnte Tn np pa3mep 6ymaru, a 3aTe HaxMnte KhoNky OK.
Size: L Type: Glossy
IcnoIb30BaHne yHKunn kaKmNbHOJ CBa3N
Heo6xOIMMa HAcTpoIka FyHKUIN FakCmUNbHO CBA3N Ha BaWem npHTepe. CM. OJHO I3 CneDyUOx pkyKOBoCTB.
OHnaH-pyKOBODTBO
OTkpOteBe6-cainCanon.

http://ij.start.canon
2IIeIeIKHnTe.
BBeInTE MMA MOEn CBOE OPiHTePA NJIeKNHTe PeepTu.
4UeKnHTe PykoBoCTBO no HAcTpoKe AFKA.
JIeKPOHHoe pyKOBOCTBO(yCTaHOBNEHO Ha BaIeM KOMNBIOTepe)
Hnke npBedeH npMep BC Windows 10.
1 LJIeKHNTE KHOKNy NcK (Start).
2 仑KHTe Bce nporpammbl (All apps) > Canon E4200 series 3neKTPOHoe pyKOBOCTBO BYk3aHHOM IopAke, a 3aTeM OTKPOITe PyKOBOCTBO NOIb3OBaTeN.
3 电KHTePykoBOCTBO NoHaCtpoKeΦAKCA
Pn HeynobIeTBOpntbHOM KaueCTBe neaTn
Ecn npmbie nHn HNCpNBHeBn Hn CBeTa HepaBHomepHb N6o pe3yNbTaTb neaTn OTnuaOTc O TOnnDaembx HAe, BbnoHnte npocdpy BbipabHBaHne neataiox roNoBok (Print Head Alignment).
IJI NOJUyeHn 6OJIe NIOpO6HO INHOpMaUN HAXMITE O6CnyKbAHNe Ha 3KpaHE OHnaH-pyKOBOCTBO n cm. pa3dE Ecn neaTb cTana 6neHNOHN HEPABHOMepHO > BbipabHbAHne neaTaIOSeI rOJOBKn.
CbeHnO TOM, KaK OTKpbITb OHnaH-pyKOBOdCTBO, CM. Ha 3aHne o6IoxKe.
HepoBhpie JINHHI
HepabHomepHbIy CBT NINIOJOCBI
HactpoIOBaHH npHTepa
1. Bmict kopo6kn
HypKnBneHH
Kaptpnki FINE

KOMNAKT-NACKI nporpamco BCTaHOBTEHHA

ModynbHnKa6enb
Hopmauii 10o063neKn BaxnBi Biomoc
-10nci6HmK 4nIIOaHTy po6oT (uei noci6HmK)
2.3HЯTTa naKyBaIbHnX MaTepiJIb

1 3HIMiMb i yTuNl3yIte naKyBaIbHi MaTepiAn 3 npNCtpoIO.
- O6ob'ra3koBO 3HimItb XOBTORapaury CTpiHKy.
2 BiKpnTe nepeHIO KpNkU KpnKU mExaHi3My BnBeDeHH naepy.
3 3himiMb i yTuNl3yNe 3axuChi MaTepiAn.
NotarHtB 3a KOBtorapuCy cTpiKy, 06 3HrTa 3axnMATEpIa.
4 3akpiTe KpUk Ky MexaHizMy BvBeDeHHnapanepy npeepHIO KpUkKy.
3.ybimkHeHH npHTepa

1 PnpEHaHTe HHyj KInBneHHa.

BaxJINBO
PozmiCTIb npINTEp Ha BiDCTaHI pInHAAHMI 5 CM BID CTIH.
- yueyacHe nip'dcHnyTe kOHNx iHnx Ka6enib.
2 HaTnCHiB KhoNky YBIMK. (ON).

Baxnbo
KJIO BIDO6paKaTbC HABeEHN HNKeEekpA, HATNCHTB KHOIky YBIMK. (ON), 106 BIMKHyTN XMBnEHH, i NOBtOpITb PPOeDpy 3 KpOKy 2 B pOzJIi «2.3HATTA NaKyBaIbHN MATEpiIIB.
Open the cover and 1890 Discard the material
3 3KIO 3'ABNTbCn HabeHn HnKue ekpaH, CKOpNCaTaeCkHONKaMn iI ,uO6 Bu6paTMOBy,a NOTIM HaTNCiTB KONKy OK.
HactpoIOBaHH npHTepa
4 RaKUO 3'ABITbCn HabeHn HnXue ekpaH, Bn6epiTb CBOIO KpaiHy a6o perioh i HaTnCHiTb KNONKy OK.
4. BcTaHOBJIeHHa KapTpUdIXiB FINE

1 BiKpnTe nepeHIO KpUkU KpUkU MexaHi3My BvBeDeHHra panepy.

2 BntaHnItb KOnbOpOBn KapTpndx FINE i3 KOHTeHepa n 3HIMtB 3axnchy CTpiKy.


Baxnbo
He TopkaIteca QOpHnHa Ha 3axnChi CTpiu.BoHO MoKe 3abpydHTn BaWi pyKn a6o HABKOJIuHi ppeMTeN.
He TopkaTec8 oBnacte, 10 no3NaueHHa MaIOHky, IHaKWe npHTep MoKeDpyKyBaTH HeHaJIeXHM YIHOm.
3 YcTaHOBITb KOJIbOpOBn KApTpIaX FINE.
KolbopOBn KapTpNx FINE Heo6xIHO po3MiCTnTn IiBopyu.
Haxniltb KaptpnIXFINEBropnyniKytomiBCTaTe IoroBTPmuaKaptpnJkaFINE.
BCTABTe Noro NOBHcTIO npNTNCHTb yropy, DOKN He NouyETe KnaaHaHH.

Baxnbo
HeBdapnTeKaptpnJxFINE.Taki DIO MOxyTb np3BcETn Do NOro HecnpaBHOCTI.
4 Ipebeipte, 06 KaptpnJx FINE po3miuBvBaC npmao npBHO.
5 Iobtopitb kpoKn 2-4, uo6 yctaHOBHTuOpHn KaTpndxFINE.
OpHnKapTpNkFINE Heo6xIHO po3mictn npabopyu.
6 3akpiTe KpuiKy MexaHizMy BvBeJeHHnanepy.


Baxnbo
Kkio BidiobpaKaTbCn HabedeHn Hxue ekpaH, noBepHtbcn Do KpOky 3 y pOzdi nI «4. BcTaHOBneHHa KapTpNkXIB FINE» Ta nepekoHaTeCe, IIO KOJIbOpOBu I OOPHn KapTpNkXIFINE po3MiUeHO npabINbHO.
Install the cartridges pro 168A
5.3aBaHTaxeHHnapepy

1 NotarHItb kaceTy do ynopy.
2 Po3cyHbTe HaprrMnKn dna nanepy.
BibMbIbC3a npabHnapmNk dna napey npecyhTe yoro do npaBoro kpaio.
3 3abaHaTe nanip.
3aBaHTaXTe 3BnuaHn nnip fOpMaTy LTR a6o A4 CTOpHOIO dIra npky DOHN3y.
- Po3mictiB nanip noBHicTIO B kaceti i nepemictiB npabn HappAMHK dna panepy do KpaO cToKNn panepy.
4 3aWTOBXHiTb KAcety.
3HaOK cTpinKn()Ha nepeHn KpnuMaE 3piBHTncs3 nepeHim Kpaem npHTepa.
5 BntaHitb niOpny Ina BnBeDeHoro nanepy 3 Notka BnBeDeHHra nanepy.

6 BiKpnTe nOobKyBaU BvBiHOro IOTka.
7 IpekeHaTeCra, 0o BiO6paKaetbca HabeHn HxKye ekpaH, Notim HaTNCiTB KHOKNy OK.

6-a
Пдклоченя до komп'tepa
Rkio BN KOpNCTyETcKINbKOMa KOMNIOTePAMN, BIKOHaIte Li KpOKn Ha KoxHOMy 3 HIX. IChye DBA cnoocB: AactpoOBaHHaYepe3 IHTepHeT]i « KopNCTaHHa KOMNaKT- DnCKA 3 nporpaMO BCTaHOBNEHHa (TInbKn DnA Windows), IO NOCTaAHcB A KOMNKeTI].


HactpoioBaHHaYepe3 IHTepHeT
1 3aɪdɪt b Ha Be6-caɪr Canon 3 KOMn'IOpTepa.
http://ij.start.canon

2 HaTnchItb HactpoOBaHHa.
3 BBeiItb Ha3By MoJeni CBoro npHTepa NkaHITb NpeeTn.
4 Klaunitb 3anyctn.
5 KnaHITb Kaio Bn Bxe niIroTyBann npHTep, npeiDitb do nyHKTu «Nikluoyehra
Ppimrka
Kaio Ha KOMnIOTepi BCTaHOBHeO OC Windows (Kpim Windows 10 S) abo macOS, nepeiDItb do HactYHOrO kpoky. Kaio Ha KOMNIOTepi BCTaHOBHeO IHsU onepauiHy CNTEmy, npodOBKyIe HAcTPOIOBaHH, DOTPMMyOuNCBA3IBOK HA ekpaHi.
6 KnaHItb 3aBaHTaxnTu.
Daiin BCTaHOBnEHn 3aBaHTaXnTbCn Ha BaW KOMN'OTep.
7 3anyctitb 3aBaHTaKeHn faai.
8 IpeenDiTb Do KpOky 9 Ha cTOp.5.

BukopntaHHKOMnKT-DnCKA3 nporpamoIO BCTAHOBHeHHa (TilbKn DnJa Windows), 10 NOCTaHaETBCB KOMnIeKTI
1 BCTaBTE KOMnAkr-DnCK i3 nporpaMoIO BCTaHOBJIeHHy CBiKoMn'IOTep.

2 IotpmyTecb iHcpykui nBawoi BepciWindows.
Windows 10/Windows 8.1
KnaHtB HabeHe Hxue NoiOMnEHn, KOI BOHO BiO6pa3ntbc npabOpuy Ha ekpaHI BaWOro KOM'IOTepa.

Ppimitka
Kkuo nobidomnHHe BIDobpaKaetcra (abo cTaE HeIOCTyNHIM DnIe nepeTnly), KnaUHtB 3HaOK IIpObiHk (File Explorer) Ha naHeni 3abDaHb. JIbOpuy y BiKi HkaunHtB LcNlIK (This PC).Dbvi KnaUHtB 3HaQOK KomnKT-DmCKA, IIO BIOcbpaKaetcra npabOpuy (3a BIOcbpaKeHH BmCTy KOMnKT-DnCKaDbii KnaUHtB Msetup4.exe). NpeepDIT do KpOKy
Knauchitb 3anyctntu Msetup4.exe (Run Msetup4.
3 韩卍 3'ЯВиТбСДДIANOROB BiKHO CnYx6a 3axuCTy KOpuCTyBaUIB (User Account Control), KNaUHiTb TaK (Yes).
Windows 7
1 Klauchnith 3anyctntm Msetup4.exe (Run Msetup4.exe).
KoIbIbO6pa3ntb8cEkpA
ABTOBIdTBOpEHn(AutoPlay),
KlaHITb 3anyctntu Msetup4.exe
(Run Msetup4.exe).
Ppimitka
KanEeKpaH ABTOBIOIbTOBepHHA (AutoPlay) He BIDobpaxaETbca, y MeHIO Iyck KnaCHITb Kom'IOTeP (Computer). DbiUc KnaCHITb 3haOk KOMnAKT-DnCKaI npabOpuy bIKHI (3a BIDobpaxeHHa BMCTy KOMnAKT-DnCKa DBiUc KnaCHITb Msetup4.exe).
2 1KIO 3'ABNTbCA DianorObe BIKHO CnyX6a 3axncty KopncTyBauiB (User Account Control), KlaunHb PpOobxntu (Continue).
3 Ipeenitb do Kpoky 9 HnXue.
9 Knauchitb 3anyck HactpoioBaHHa (Start Setup).
10 DoTpykui, Rki 3'ABNTMyTbca Ha ekpaHi.
Li dii MoKytb 3aHHTn DeKni qac.
11 RaKIO BiIO6pa3ntbCn HabeJeHn HxKYe ekpaH, KnaHtB BuxiD (Exit).
TeneB Baw npnHTep nikKIOueHo do KOMTIOTepa. Lio6 nIeHATNC TAKOX DO CMapTOHa,IMB. PO3JIN 《b. PpOeUpya NIKIOueHHo CMapTOHa HCTOP.6
山o6HactpoiTnФaKc,ДИВ.pO3dIN 《BnKOpNCtAHNHaYHKuIΦaKcy》HaCTOP.8.
6-b
IpoeDypa πiKlOueHnJ do cMaprfoHa
YKsqo BnKOpncToBcyTbcra KJIbKa CmapTfoHIB, BnKOHaiTe Zj KpOKn Ha KoxHOMy 3 HIX.

Cnepuy BnKoHaTe HaBeDeHnKHe nIroTOBcI KpOKn.
YbIMKHTb yHKUo Wi-Fi Ha CBOemy cMapToHl*.
3a HaraBHOCTI MapuPyTu3aTopa 6e3npoBOJIOBOI MepeXi* nIKIOUHTb DO HbO rMapTfOH.
* DeTaNbHluy HOpMauiO CTOCOBHO LxN PpoeDpy DnB. B Noci6HnKax 3 EKCnnyatauCi CBORo CMaprfoHa n Mapwpytn3atopa Be3npobodoboMepexki.
1 YctaHOBiB nporpamy «Canon PRINT Inkjet/SELPHY» Ha cBOeMy cMapTfoHi.
iOS
3HaHITb nporpamy «Canon PRINT» y mara3nHi App Store.

3haHdbTb nporpamy «Canon PRINT» y maraaHi Google Play.

PpMItka
Ioo6 3aabaHTaxn nporpamy,MOxHa TaKoK nepeuTu Ha Be6-caT Canon, BiCKaHyBaBUn QR-KoD, BINO6paXeHn npabOpuy.

2 IpebipraTe ekpan npntepa nIac nepexoY bI KpOky do KpOky.
Akuo 3'ABNTbcHabeHeHH HxKue ekpaH

HaTnCHiB KhoNkY HAcTpOuBaHnR (Setup) 8 i nepeBiTe ekpaH, 0o BiDio6paKaCTbca.

Kkuo Bido6pakaetbca 3Haayok
AkuoBbio6paKaεTbc8
JaKuo 3'ABNTbcra HabeDeHn HxKye ekpaH: D


PnmiTka
Ekpah npinhepa BmikKaTbCRA, Aki npinhtep nepe6yBaB Ctahi oukybaHH npotraH 10 xBNH. Lio6 yBMkHTn ekpaH, HATNCiB 6y-b-AK KhoNky (Kpim KhoNKn YBMK. ON) Ha naHeI kepybaHH.
KIO BI06paKaTaBc 3HaOK HHTep He MoKe BCTAHOBITn 3B'3OK 3a DonOMoRO Wi-Fi. IIOb OtpMaTn DOKNaHHy IHOpMaUIO, INB. PO3IN 《3anTuHHI BIDNOBIi] Ha CTOpIHJI http://ij.start.canon.

3 BiikpnTe BCTaHOBneHy nporpamy.
4 IOTpmyTecb iHCTpyKciHa ekpaHi, 0o6doaTN cbi npHTep.
5 MaOob'ra3KOBO 3'ABNTnCHaBeHeHn HxKye ekpaH.

Tenebpnntep nikkyeHO do cmaptoHa. 106 po3pykybatn fotorpaqii, niv. po3din 《3abaHTaKeHHa fotonanepy》Ha cstop.8.
山6Hactpoitn fakc,INB.p03in 《BukopncTaHHyHKuijfakcy》Ha cTOp.8.

Ipoceyni nla iOS i Android Biip3HIObC. IOpymyTeCb IHCTpyKui nnBaWoI onepauiHOI cIcTeMn.
iOS
3 Cnoatky TopkHitbcra nyHKty Napametpn (Settings)Ha CTapTOBOMy ekpaHI CBORO CMapTFOHa,a notim—nyKtY Canon_ij_XXXX y napametpax Wi-Fi.
PpM
KuO Canon_ijXXXX He BIDOppaKaetbC, DOTPMyTEcra pOueDpyn, 30 3aHaueHa B KpOci E a NOTIM 3HOBY BIKOHaTe NOWK Canon_ijXXXX.
4 BiKpnIte BCTaHOBneHy nporpamy.
PnHTep 3apeecTpObaHo cnocobom nikknoeHHa HauKpaae BiNobidae cepedOBuSy, Ake Bn BVNKOPNCOTByTe.
5 MaocO6OB'3KOB0 3'BAHTnCA HabeHeHn HnKYe ekpaH.

Android
3 BiKpnTe BcTaHOBneHy nporpaMy.
- PpInHep 3apeectpoBaHo cnocobom nikKnoyeHHn, 0n Hainkpaue BiiNobiae cepedOBu, JKe BN BnKOpNCtOByeTe.
Ppimirka
KIO NOIOMHeN No printer has been added. Perform printer setup?> He BIO6paKaCTbcB iDp3y nCn 3aNycky nporpam, DToPmUyTeca npoueypn, 3aHaueHOi B Kpoui E i NobepHITbcn do pObotn 3cMapTFOHOM.
4 Mae o6OB'ra3KOBO 3'ABNTnCn HaBeHeHn HxKye ekpaH.

TepeBaPnpInHepnDpOcMpaHa.06po3pykByaTfoTporpa,1mB.po3iJ《3abaHTaeHHFOtonanepy》Ha cTOp.8.
- Lio6 hAcToiTn fakc, nB. po3di «BukopncTaHHa yHKuji faKcy» Ha cTOp. 8.

3 Hatachitb i utpmyTe KhoNky MeHIO (Menu)/Be3npoBodobe nikluoyenna (Wireless connect) npotrarom 3 cekynd.

4 IpeenDiTb do pni noRbi «BnKoHyIe iHcTpkyuii Ha PIK a6o cMaprfoHi Too»Ha ekpaHI npInHTepa.
3aBaHTaXeHHa FOToNapepy
1 NotarHitb kaceTy do ynopy.
2 Po3cyHbTe HaprrMnKn dna nanepy.
BibMItbC3a npaBn HapmNk dna nanepy nepeCyHbTe Ioro Do npaBoro Kpaio.
3 3aBaHTaxTe foTOnanip.
3aabaTajTe npi y KnKkoBip opiHTaui CTopoHOIO dny dpky DOH3y Ta po3miCtib Noro No UeHTpy KaCETN.
- Po3mictiB nanip nobHicTIO B kaceti I nepeMictiB npabn HapramHK dIa nanepy Do KpaO cToIKN nanepy.
4 3aawTOBXHITb KaceTy.
3HaOK cTpiKn()Ha nepeHn KpnuMaε 3piBnTnca 3 nepeHm Kpaem npHTepa.
5 BntaHitb niOpny Ina BnBeDeHoro nanepy 3 Notka BnBeDeHHa nanepy.
6 BiKpnTe noOBKyBaU BvBiHOro Notka.
7 RaKIO BiIO6pa3ntbca HabeJeHn HnxKye ekpaH, HaTNCHTb KHOKNy OK.
Register the cassette pa OK]Next
8 Bn6epitb fopmat i Tn nnepy nHaTncHITb KhoNky OK.
Size: L Type: Glossy
BukopinCTaHHaYHKcii KaKcy
Функью Фakсу Ha Baшому пиHTepi Heo6xIDNo HAcTpoIiN. BiДиOBiDHy iHΦOmaJIIO DnB. B 6yDb-ЯKOMy i3 3aIpOioHOBaHnx HNKHe Noci6HnKIB.
OHJaHOBn Noci6HnK
1 Ppeinitb Ha Be6-caT Canon.

http://ij.start.canon
KnaIHiTb.
BBeInbHa3By moDeni cBOr npnHTepa KnauchitB PepeTn.
KnaHITb

Noci6HmK i3 BcTaHOBHeHHaQAKCY.
KpaHIN Noci6HnK (BCTaHOBHeHO Ha BaWOMy KOMN'OTepi)
HnKHe HabeJeNo npKJaB BC Windows 10.
HaTnCHiB KHONKy Nyck(Start).
Klaunb Yci nporpamn (All apps) > Canon E4200 series Ekpannn noci6H, dOtpmmyouchc TaKOrO npaKy, a NotIM BdknTe Noci6HKn KopucTyBaay.
3 Klauchitb Noci6HnK i3 BcTaHOBneHHAOKCY.
Open the cover and 1890 Discard the material
3 Kad se prikaze sljedeci zaslon, pomocu gumba i odaberite jezik pa pritisnite gumb U redu (OK).
Postavljanje pisača
4 Ako se prikaže sljedeci zaslon, odaberite državu ili regiju pa pritisnite gumb U redu (OK).
Register the cassette pa OK]Next
8 Odaberite velicinu i vrstupapira, te pritisnite gumb U redu (OK).
Size: L Type: Glossy
Register the cassette pa [OK]Next
.(OK) 8
Size: L Type: Glossy
1
S AOB = S COD + S BOC - S BOC
a
AaBcCgGgall GgGaa
a
J 1
a
a1 = 2,an + 1 = n1 + n2
Sallgol
aaiiie aiee eae
()
Windows 10
(Start)
Canon E4200 series < (All apps)
paaa aal yda aai jil g
a
Canon 25

http://ij.start.canon
j#
Jg jai jai aaiaiai jai jai jai jai
slll 1
i
L 15
aalll aaiiie < aigaae aaiiaaii iaiiie
i j 1
ababa g aylaa yj
jglg jglghill

y

Android
Cilll 1
3
Jusll ay jdu Jauuaydall Jusui
gaaa aill aull lla, aulia
四边形

aiaai aai jn rnnn nnnn nn nnnn nnnn
"No printer has been added. Perform printer setup?"
y
ailll llll jiee
4

iOS
(Settings)
Canon_ij_XXXX 1
.Wi-Fi 1
四边形

GJCanon_ijXXXX 2
Canon_ijXXXXX

.
all
Jusai jyj Jusai yj ball
1402111 111 111 111
4
Aailll aalil l 1
5

8aia 1
8a
Jc 100000000000000000000000000000000000000000000000000000
"Follow the instructions on the PC aalal al or smartphone, etc."
D

3
/(Menu) (Wireless connect)
3

Sijie juiy
Sicla 15 glnlllaoe aljy piaia aai gaaiaa iis
6-b
a
*siil 1i 1e Wi-Fi 1e!
(SLN 1
10 10 aalalln sll aalall aalalalalalalalal alalal
gall (ON) jll lae) jll alalal alalal alalal alalal alalal alalal alalal alalal alalal alalal alalal alalal alalal alalal alalal alalal alalal alalal alalal alalal alalal alalal alalal alalal alalal alalal alalal alalal alalal alalal alalal alalal alalal alal
ailll aillll 1

(Setup)

C. ①②
(图-1) f( x) = 1x
aill lll jie b no sae

aal 8 aai y

3
4
(Windows)

Windows 7
Msetup4.exe
(.Run Msetup4.exe)
(00)
(RunMsetup4.exe) Msetup4.exe
四边形 AOBC 为正方形
(AutoPlay)
Computer)
a
jai 1a gannall jai gai ay gao yie) 1gannal
.Msetup4.exe
aannnlll 1
(a) (User Account Control)
.Continue)
3

jai jia jia jia jia jia jia jia jia jia jia jia jia jia jia jia jia jia jia jia jia jia jia jia jia jia jia jia jia jia jia jia jia jia jia jia jia jia jia jia jia jia jia jia jia jia jia jia jia jia
3 (Msetup4.exe
J 2
Msetup4.exe
(Run Msetup4.exe)
Prepare for connection [OK]Next


Ready to connect For details on how to co
S APQ = S AOB + S_ OBC

JF1 3000000000000000000000000000000000000000000000000000000000
Install the cartridges pro 168A

5
1
2

2
A4 LTR
FINE
FINE
FINEAUBJUdlaIuuaaiaueyFINEAUBJUdlaIuuaaiauey
J 1
pale
FINE jolal 1000000000000000
- 12c
FINE FIO
FINE 42
FINE

3
4 00

FINE 4
g( x) = y^2 + 1xx^2 + 1xx^2 + ·s + 1x
aFINE a
aayaae aee
y
y

1
http://ij.start.canon

solo 1olalglg joljol


a.b1 J.3
1

j 5 1 5
(ON) juj川

(ON) 2
Open the cover and 1890 Discard the material
y 1
.(OK)


a_1 · b · ( 1 - x) = 0
yollliygian.1
FINE
4811 1
J
Ldall chglaal, jai chla
()

Aa 21
1
2
3


Access Online Manual Odprite Spletni prirocnik DoctbIdo OhnaH pbKOBOCTBO Doctyn Dokymenty OhnaH-pykOBODTO Pristupite dokumentu Prirucnik na mrezi
Acces au Manuel en ligne Accesati Manual online Cevrimici El Kitabi'na erisme IocTyIdoDokymeHa OHnHOBn nocioHK
From your browser
From the "Canon E4200 series Online Manual" desktop shortcut
OT npekn Ha pa6oTHn pIOT "OhnaH pbkoBOcTbO 3a Canon E4200 series (Canon E4200 series Online Manual)"
"Canon E4200 series Cevrimi ci El Kitabi (Canon E4200 series Online Manual)" masaustu kisayolundan
Припомошиярльka«Онайн-pуковбдюдЯ Canon E4200 series (Canon E4200 series Online Manual)» Ha pa6oчem стone
3a donomorok npnka «OhnaHOBn noicbHK Canon E4200 series (Canon E4200 series Online Manual)Ha po6oohmy ctoni
putem. Canon E4200 series Prirucnik na mrezi (Canon E4200 series Online Manual)" preca na radnoj povrsini
" (Canon E4200 series Online Manual) Canon E4200 series J 1