Citta BT5.1 - Indoor bike trainer Horizon Fitness - Free user manual and instructions
Find the device manual for free Citta BT5.1 Horizon Fitness in PDF.

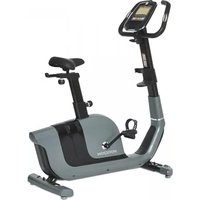
| Product type | Indoor bike (exercise bike) |
| Brand | Horizon Fitness |
| Model | Citta BT5.1 |
| Dimensions (L x W x H) | 107 x 53 x 122 cm |
| Weight | 34 kg |
| Max user weight | 136 kg |
| Resistance | Magnetic, 16 levels |
| Flywheel | 10 kg |
| Workout programs | Manual, Intervals, Weight loss, Rolling, Cadence, Random, HR zone, %HR, Custom |
| Connectivity | Bluetooth (compatible with fitness apps) |
| Display | Backlit LCD (time, speed, distance, calories, watts, heart rate, RPM, resistance level) |
| Heart rate sensors | Integrated grip heart rate handles |
| Power supply | 220-240 V, 50/60 Hz, grounded plug |
| Transport wheels | Yes, integrated |
| Adjustments | Height-adjustable saddle (knob), adjustable handlebars |
| Warranty | 2 years parts and labor (excluding normal wear) |
| Maintenance | Clean with a damp cloth and mild soap; monthly check of bolts |
| Repairability | Spare parts available from local dealer; technical support on the back of the manual |
Frequently Asked Questions - Citta BT5.1 Horizon Fitness
User questions about Citta BT5.1 Horizon Fitness
0 question about this device. Answer the ones you know or ask your own.
Ask a new question about this device
Download the instructions for your Indoor bike trainer in PDF format for free! Find your manual Citta BT5.1 - Horizon Fitness and take your electronic device back in hand. On this page are published all the documents necessary for the use of your device. Citta BT5.1 by Horizon Fitness.
USER MANUAL Citta BT5.1 Horizon Fitness
SAVE THESE INSTRUCTIONS
Read this EXERCISE. BILE GUIDE before using the OWNERS MANUAL. When using an electrical product, basic precautions should always be followed, including the following: Read all instructions before using this exercise bike. It is the responsibility of the owner to ensure that all users of this exercise bike are adequately informed of all warnings and precautions. If you have any questions after reading this guide, contact Your local dealer.
3
H2-0018750-Rn-1-And 230517908PM


DANGER
TO REDUCE THE RISK OF ELECTRICAL SHOCK:
Always unplag the exercise bike from the electrical odes immediately after using, before cleaning, performing maintenance and putting on iraking off parts.

WARNING
TO REDUCE THE RISK OF BURNS, FIRE, ELECTRICAL SHOCK OR INJURY TO PERSONS:
If you experience any kind of pain, including but not limited to chest pains, nausea, dizziness, or shortness of breath, stop exercising immediately and consult your physician before continuing.
- When exercising, always maintain a comfortable pace
To maintain balance, it is recommended to keep a grip on the handlebars while exercising, mounting or dismounting the machine. Keep hands and foot clear at all times from moving arms to avoid injury. Never turn the pedal crank by hand.
- -
Do not use the exercise bike without proper footwear. NEVER operate the exercise bike with bare feet.
Do not jump on the exercise bike.
Do not dismount the exercise bike until the pedals are at a complete STOP
- At no time should more than one person be on the exercise bike while in operation.
WARRANTY SECTION. Failure to comply will void the warranty.
This exercise bike is intended for in-home use only. Do not use this exercise bike in any commercial, rental, school or institutional
setting. Failure to comply will void the warranty.
The excriscr complies with the EN957 1/5 standard, class of exerciser: HA; braking system is adjustable.
h
To prevent electrical shock, never drop or insert any object into any opening
Ensure that adjustment levers (seal and handlebar fore-and-for) are properly secured and do not interfere with range of motion during exercise.
H2:0MST0Rn1rA 453700PM

WARNING
TO REDUCE THE RISK OF BURNS, FIRE, ELECTRICAL SHOCK OR INJURY TO PERSONS:
-
Connect this exercise product to a properly grounded outlet only.
-
Keep power cord away from heated surfaces. Do not carry this unit by its supply cord or use the core as a handle.
-
Do not use other attachments that are not recommended by the manufacturer. Attachments may cause injury.
-
Do not use other attachments that are not recommended by the manufacturer. Attachments may be used.
Use the exercise bike only as described in the exercise bike guide and enjoy the manual.
- Descarment all power before servicing or moving the equipment. To clean, wipe surfaces down with soap and slightly damp slo
only: never use sores. (See MAINTENANCE)
The exercise bike should never be left unattended when plugged in. Unplug from outlet when not in use, and before putting on or
taking off parts
Do not put under blanket or pillow. Excessive heating can occur and cause fire, electric shock, or injury to persons.
-
At 10.5 hours should children under the age of 13 go to the swimming pool
-
Shhre 1870s the age of 13 or disabled persons should not use the exercise bike without adult supervision.
-
Never operate the exercise bike if it has a damaged cord or plug, if it is not working properly, if it has been dropped or damaged, or
immersed in water. Return the exercise bike to a service center for examination and repair.
- Keep power cord away from heated surfaces. Do not carry this unit by its supply cord or use the cord as a handle.
- To disconnect turn all controls to the off position, then remove plug from outlet.
Do not remove the console covers unless instructed by Your local dealer. Service should only be done by an authorized service technician.


GROUNDING INSTRUCTIONS
If an exercise bike should malfunction or breakdown, grounding provides a path of least resistance for electrical current to reduce the risk of electrical shock. This product is equipped with a cord having an equipment-grounding conductor and a grounding plug. The plug must be plugged into an appropriate outlet that is properly installed and grounded in accordance with local codes and ordinances. Improper connection of the equipment-grounding conductor can result in a risk of electric shock. Check with a qualified electrician or serviceman if you are in doubt as to whether the product is properly grounded. Do not modify the plug provided with the product. If it will not fit the outlet, have a proper outlet installed by a qualified electrician.
It is essential that your exercise bike is used only indoors, in a climate controlled room. If your exercise bike has been exposed to colder temperatures or high moisture climates, it is strongly recommended that the exercise bike is warmed up to room temperature before first time use. Failure to do so may cause premature electronic failure.
nns
H2-08530-Rn-1Acd 87057309PM
BASIC OPERATION
CONGRATULATIONS ON CHOOSING YOUR EXERCISE BIKEI
You've taken an important step in developing an exciting exercise program. Your exercise bike is a tremendously effective tool for achieving your personal fitness goals. Regular use of your exercise bike can improve the quality of your life in so many ways.
Here are just a few of the health benefits of exercise:
1
Improved muscle
Increased daily energy levels
The key to resping these benefits is to develop an exercise habit. Your new exercise bike will help you eliminate obstacles that prevent you from exercising. Inclamant weather and darkness won't interfere with your workout when you use your exercise bike in the context of your home. This guide provides you with basic information for using and enjoying your new machine.

7

Place the exercise bike on a level surface. There should be 3 feet of clearance behind the exercise bike, 3 feet on each side and one foot in front for the power cord. Do not place the exercise bike in any area that will block any entry or air openings. The exercise bike should not be located in a garage, covered patio, near water or outdoors.
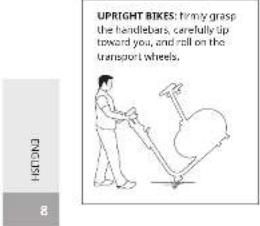
MOVING THE EXERCISE BIKE
Your exercise bike has a pair of transport wheels built into the front stabilizer tube. Remove the power supply before attempting to move the bike.

WARNING
Our exercise bikes are heavy, use can and additional help if necessary when moving. Failure to follow these instructions could result in injury.

Your exercise bike should be level for optimum use. Place your exercise bike where you intend to use it. Adjust the two rear levers so that the bike is level on the floor. Then adjust the third leveller located under the base frame just as it is snug with the floor. Once you have leveled your exercise bike, lock the levers in place by tightening the nuts against the frame. Actual levers may differ from image below and may not include the lock.

SEAT POSITIONING
To determine proper seat position, sit on the seat and position the ball of your foot on the center of the pedal. Your knee should bend slightly at the furthest pedal position. You should be able to pedal without locking your knees or shifting your weight from side to side. NOTE: It is recommended that you do not sit on the seat while adjusting its position.
UPRIGHT BIKES - SEAT ADJUSTMENT
Upright bikes feature a locking seat adjustment pin to easily and safely adjust the seat height. To adjust, get off the bike seat and loosen the adjustment knob by turning it two half turns counterclockwise. Pull out the knob to unlock the post, and adjust the post up or down to the desired setting. Release the knob to lock in place. Turn the knob clockwise until tightened. Please check to be sure seat is locked in place before each use.


H2-ONSTIO-Rn-1A+80357:30PM

POWER
Your exercise bike is powered by a power supply. The power must be plugged into the power jack, which is located in the front of the machine near the stabilizer tube. Unplug cord when not in use.

WARNING
Never operate product if it has a damaged cord or plug. ITR is not working properly, if it has been damaged, or immersed in water. Contact Your local dealer for examination and repair.
USING THE HEART RATE FUNCTION
Your exercise bike could be equipped with either heart rate pulse grip or a thumb pulse sensor. To find out what your model has, refer to the beginning of the ASSEMBLY section of your OWNERS MANUAL.
The heart rate function on this product is not a medical device. While heart rate grip or a thumb pulse sensor can provide a relative estimation of your actual heart rate, they should not be relied on when accurate readings are necessary. Some people, including those in a cardiac rehab program, may benefit from using an alternate heart rate monitoring system like a chest or waist strap. Various factors, including movement of the user, may affect the accuracy of your heart rate reading. The heart rate reading is intended as an exercise aid in determining heart rate trends in general. Please consult your physician.
PULSE GRIPS
Place the palm of your hands directly on the grip pulse handlebars. Both hands must grip the bars for your heart rate to register. It takes 5 consecutive heart beats (15-20 seconds) for your heart rate to register. When gripping the pulse handlebars, do not grip tightly. Holding the grips tightly may elevate your blood pressure. Keep a loose, cupping hold. You may experience an erratic readout if consistently holding the grip pulse handlebars. Make sure to clean the probe sensors to ensure proper contact can be maintained.
12:00ST0Rn-1.00 10:12YS1305P
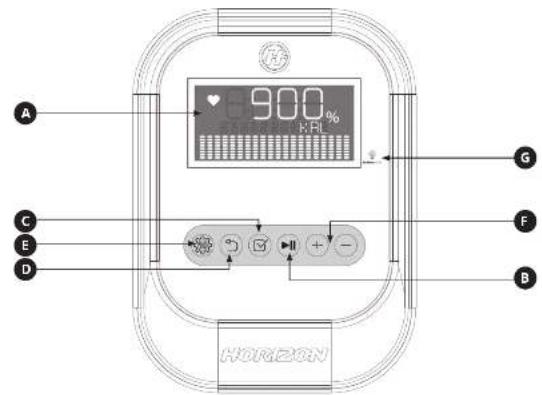
CONSOLE OPERATION


12132571 05
Note: There is a thin protective sheet of clear plastic on the overlay of the console that should be removed before use.
A) LCD DISPLAY WINDOW:TIME, SPEED, DISTANCE, CALORIES, WATTS, HR, RPM, RESISTANCE LEVEL
8) START AND STOP BUTTON: PRESS TO GEGON EXERCISING, PAUSE YOUR WORKOUT OR RESUME EXERCISING AFTER FAUSE. HOLD FOR 3 SECONDS TO RESTART THE CONSOLE
c) ENTER: PRESS TO CONTINUE SELECTION DURING PROGRAMMING SETUP, OR PRESS TO CHANGE DISPLAY DURING EXERCISE. OR PRESS AND I HOLD FOR 3 SECONDS TO ALLOW CONSOLE TO CHANCE THE DISPLAY IN SEQUENCE AUTOMATICALLY
D) BACK: PRESS TO GO BACK TO LAST SELECTION
E) PROGRAMS: PRESS TO SELECT WORKOUT
F) RESISTANCE LEVEL: PRESS TO ADJUST THE RESISTANCE LEVEL OR TO ADJUST THE VALUE IN THE SETTING SCREEN
G) ENERGY SAVOR INDICATES IF MACHINE IS IN ENERGY SAVE MODE


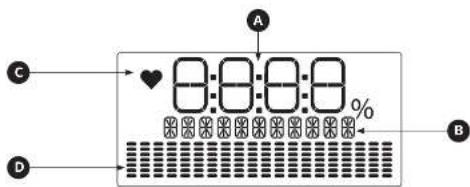
DISPLAYWINDOWS
A) WORKOUT INFORMATION: SHOW TIME, SPHD, DISTANCE, CALORIES, WATTS, HK, RPM, RESISTANCE LEVEL.
B) MEASUREMENT OF WORKOUT: SHOW AS KM, KM/H, CAL, FTC.
C) HEART RATE:WHEN CONTACT IS MADE WITH BOTH PULSE GRIPS, THE HEART RATE ICON IS BUNTING IN PULSE WINDOW.
D) PROGRAM PROFILE: REPRESENT THE PROFILE OF THE PROGRAM BEING USED.
PROGRAM INFORMATION
10 Programs Manual, Intervals, Weight Loss, Weight Loss Plus, Rolling, Candence, Random, Constant Watts, THR Zone, 67HR, Custom
1) MANUAL: Allows you to adjust the resistance level to your preference, without a preset program. Adjust your resistance manually during your workout. User sets time and resistance using (up/down arrow) and ENTER.
2.2 INTERVALS: improves your strength, speed, and endurance by raising and lowering the resistance levels throughout your workout to involve both your heart and muscles. Time based program with 16 levels to choose from. User sets time and level using (top) or (bottom).
3) WEIGHT LOSS
4. WEIGHT LOSS PLUS: Promotes weight loss and weight, loss plus by increasing and decreasing the resistance, while keeping you in your fat burning zone. Time based program with different levels to choose from and greater intensity than the weight loss program. User sets time and level using (quarantine arrows) and ENTERPlease drink enough water while and after doing exercise to enhance the weight loss results.
5) ROLLING: Maintains weight by gradually raising and lowering the resistance level to gradually raise and lower your heart rate.
6. CANDENCE: Special training program to build your muscle. This program will gradually increases resistance level and prompt you to high speed, or medium speed, or low speed to help you reach your fitness goal.
7) RANDOM: Special designed chart based program that will simulate resistance being changed randomly.
8) THE ZONE: Simulate the intensity of your favorite sport as the program resistance automatically adjusts to maintain a set Target Heart Rate range.


1) Select THR Zone program using and press ENTER.
2) Select TIME using and press ENTER.
3) The HEART RATE window will flash showing the default target heart rate of 80 beats per minute. Select your target heart rate.
from heart rate training chart using. 一 _ 一 d press ENTER
4) Process STAIH heng
HEART RATE TRAINING
The first step in knowing the right intensity for your training is to find out your maximum heart rate (max HR = 220 - your age). The age-based method provides an average statistical prediction of your max HR and is a good method for the majority of people, especially those who are to hear heart rate training. The most precise and accurate way of determining your individual max HR is to have it clinically tested by a cardiologist or exercise physiologists through the use of a maximal stress test. If you are over the age of 40, overweight, have been sedentary for several years, or have a history of heart disease in your family, clinical testing is recommended. This chart gives examples of the heart rate range for a 30 year old male exercising at 5 different heart rate ranges. For example, a 50-year-old man HR is 220 - 30 = 190 bpm and 509 max HR is 190 × 0.9 = 171 bpm.
9) 6% THR: Benefits weight loss by maintaining an optimum exercise level to burn fat, while adjusting the resistance to keep you in your target heart rate zone. First set up your personal data your machine will automatically calculate your maximum workout heart rate and select the percentage you wish to workout base or your maximum heart rate.

Notes: The heart rate program is based on your heart rate target. Resisence will change automatically according to your pedaling speed and make sure you keep your workout in your target heart rate. Please do not pedal too slow or too fast. If you are out of the target zone LED will show arrow sign beside RPM column to tell you to adjust your speed. Upper arrow for speed up your RPM and arrow down for slowing down your workout.
10) CUSTOM: Customized workout, time defaults to 30 minutes.
1) First enter the program setting and profile display will guide you through all the workout column.
21 Use upper and lower arrow to change the resistance and press enter to confirm. Console will display your current
segment number and guide you through segment 1 to segment 20
3) After finish all setting press START to begin.

H27-ONLST0R1A.1A16172YS1305P0

PROGRAMCHARTS
| INTERVALVES | ||||||
| Autumn Crop Presmier 2018 | ||||||
| Transfers | 46.00-47.00 | 50.00-51.00 | 53.00-54.00 | 55.00-56.00 | 58.00-59.00 | 59.00-60.00 |
| 4001-4003 | 38.00-38.15 | 38.15-38.25 | 38.25-38.35 | 38.35-38.45 | 38.45-38.55 | 38.55-38.65 |
| 1.1-2.25 | 1.2-1.5 | 1.5-1.8 | 1.8-2.1 | 2.1-2.4 | 2.4-2.8 | 2.8-3.1 |
| 2.1-2.5 | 2.5-2.8 | 2.8-3.2 | 3.2-3.6 | 3.6-4.0 | 4.0-4.4 | 4.4-4.8 |
| 2.6-2.8 | 2.8-3.2 | 3.2-3.6 | 3.6-4.0 | 4.0-4.4 | 4.4-4.8 | 4.8-5.2 |
| 3.1-2.5 | 4.5-4.8 | 4.8-5.2 | 5.2-5.8 | 5.8-6.2 | 6.2-6.8 | 6.8-7.2 |
| 5.2-5.5 | 5.5-5.8 | 5.8-6.2 | 6.2-6.8 | 6.8-7.2 | 7.2-7.8 | 7.8-8.2 |
| 6.2-6.5 | 6.5-6.8 | 6.8-7.2 | 7.2-7.8 | 7.8-8.2 | 8.2-8.8 | 8.8-9.2 |
| 7.5-7.8 | 7.8-8.2 | 8.2-8.8 | 8.8-9.2 | 9.2-9.8 | 9.8-10.2 | 10.2-10.8 |
| 8.2-8.5 | 8.5-9.0 | 9.0-9.5 | 9.5-10.0 | 10.0-10.5 | 10.5-11.0 | 11.0-11.5 |
| 9.5-10.0 | 10.0-10.5 | 10.5-11.0 | 11.0-11.5 | 11.5-12.0 | 12.0-12.5 | 12.5-13.0 |
| 11.0-12.0 | 12.0-12.5 | 12.5-13.0 | 13.0-13.5 | 13.5-14.0 | 14.0-14.5 | 14.5-15.0 |
| 13.0-14.0 | 14.0-14.5 | 14.5-15.0 | 15.0-15.5 | 15.5-16.0 | 16.0-16.5 | 16.5-17.0 |
| 16.0-17.0 | 17.0-17.5 | 17.5-18.0 | 18.0-18.5 | 18.5-19.0 | 19.0-19.5 | 19.5-20.0 |
| 18.0-19.0 | 19.0-20.0 | 20.0-20.5 | 20.5-21.0 | 21.0-21.5 | 21.5-22.0 | 22.0-22.5 |
| 19.5-20.0 | 20.0-20.5 | 20.5-21.0 | 21.0-21.5 | 21.5-22.0 | 22.0-22.5 | 22.5-23.0 |

5
1
There are several areas during the assembly process that special attention must be paid. It is very important to follow the assembly instructions correctly and to make sure all parts are firmly screwed. If the assembly instructions are not followed correctly, the elliptical could have frame parts that are not lightened and will seem loose and may cause irritating noises. To prevent damage to the elliptical, the assembly instructions must be reviewed and corrective actions should be taken.
Before processing, find your elliptical's serial number located on the front stabilizer tube and turn it in the space provided below to create the model name which is not to be used.
ENTER YOUR SERIAL NUMBER AND MODEL NAME IN THE BOXES BELOW.

SERIAL NUMBER LOCATION
21
2157:316PM

H2:OMBST0Rn1Aa 22222571305
TOOLS INCLUDED:
□Allen Wanchl/LA
Allen Wrench Screw Driver/LS
PARTS BOX INCLUDED:
□MaiF
Stabilizer L
Stabilizer-R
□Spear Post
Sardle
ConsolMstSer
□consoln
PRE ASSEMBLY
UNPACKING
Unpack the product where you will be losing it. Place the elliptical ribbon on a level with your head and then place it on top of your table. You place a previous covering on your floor. Never open box when it is or its side.
A. IMPORTANT NOTES
It is recommended that two people work together for ease and efficiency while assembling an elliptical.
During each assembly step, ensure that ALL nuts and bolts are in place and partially threaded. It is recommended you complete the full assembly of your unit before completely tightening any CNC bolt.
Several parts have been pre-lubricated to aid in assembly and usage. Please do not wipe this off. If you have difficulty, a light application of lithium bic grese is recommended.
NEED HELP?
If you have questions or if there are any missing parts, contact Customer Tech Support. Contact information is located on the back panel of this manual.

HS15N4
2322

ASSEMBLY STEP 1


A Connect Console WIRE-LOWER (Q) and CONSOLE WIRE-MIDDLE (N)
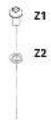
8 Attach STABILIZER-R (C) to MAIN FRAM (A) and screw by 2 x HARDWARE ASSEMBLY (Z1+Z2), please do not tighten the screws at this step.
C Attach STABILIZER-L(B) TO MAIN FRAM (A) and screw by 2 x HARDWARE ASSEMBLY (Z1+Z2), please do not tighten the screws at this stop.
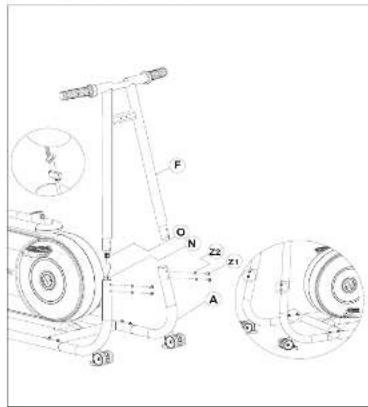
ASSEMBLY STEP 2
A. Attach CONSOLE WIRE-MIDDLE (N) and CONSOLE WIRE-UPPER (O)
B Slide the CONSOLE MAST SET (F) to STABILIZER-C and STABILIZER-L(B)
C Attach 2x HARDWARE ASSEMBLY (Z1+2Z) to the STABILIZER-R (C) and repeat on the left side, please do not tighten the screws at this step.
H2:OEtST30,Rn-1Aa 24:25

1
2524
2017-30-P4

ASSEMBLY STEP 3

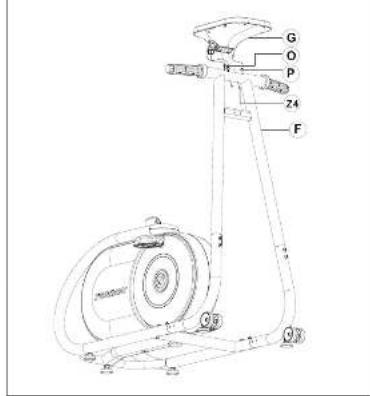
A. Correct CONSOLE WIRE-UPPER (O) and HR WIRE-UPPER (P) to the CONSOLE (G)
B Attach the CONSOLE (G) to CONSOLE MAXSET (F) and tighten by 2× SCREW (24)
24
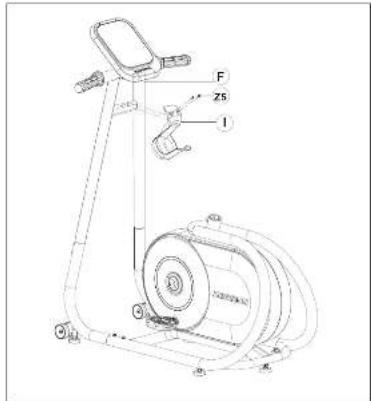
ASSEMBLY STEP 4
Attach WATER BOTTLE HOLDER (I) to the CONSOLE MAST SET (F) and tighten by 2 x SCREW (ZS)
25

2726
H2:OEtSTIO-1Aa10d2927
27317 307PM

ASSEMBLY STEP 5


A. Slide the SEAT POST (D) to the MAIN FRAME (A) and lighten by HEIGHT ADJUST KNOB (L).

ASSEMBLY STEP 6
Attach SADDLE (E) to SEAT POST (D) then tighten by SEAT ADJUST KNOB (M) and FLAT WASHER (Z3)


2928
H2:08,ST10,Rv-1,Aa 28292151r307

ASSEMBLY STEP 7

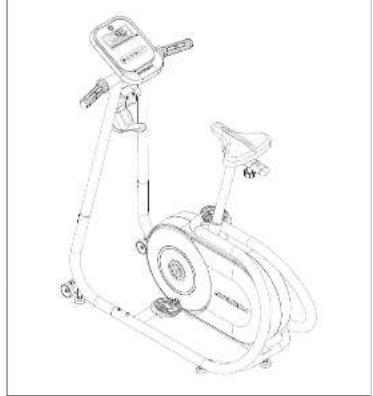
ASSEMBLY COMPLETE!
H2:ONST0Rn1A 303:2951r 307
OPTIONAL ACCESSORIES ASSEMBLY

1
31

OPTIONAL ACCESSORIES

DESK TRAY STEP 1
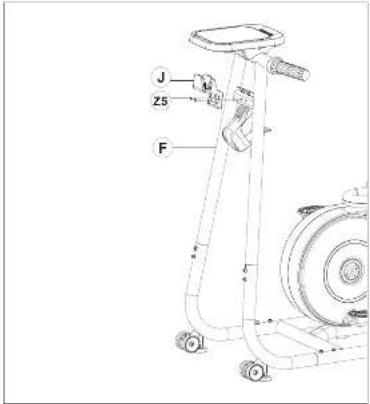
A Attach DESK TRAY HOLDER (J) to CONSOLE MAST SET (F) and tiagenten by 2 x SCREW (25)

H2:OEtST30,Rn-1AaD 52-33

OPTIONAL ACCESSORIES
DESK TRAY STEP 2
A Fold down the CONSOLE in horizontal and put the DESK TRAY on the handlebar


3332
27317 307PM

OPTIONAL ACCESSORIES


DESK TRAY STEP 3
A Attach the hands of DESK TRAY to DESK TRAY HOLDER (I) and fix DESK TRAY HOLDER COVER (K) by 4× SCREW (24)
B Buckle the safety lock.
24

OPTIONAL ACCESSORIES
H2:OMST0R1Aa 549257130

1
3534

BT5.0 EXPLODED VIEW

BT5.0 PARTS LIST
| NO. | DESCRIPTION | Q/W |
| A | MACH FREQUENCY | 1 |
| B | S AHBALZ L | 1 |
| C | STABILIZER 1 | 1 |
| D | DEPT POST 1 | 1 |
| E | SAOVO2 | 1 |
| F | COVOLUME SET SET | 1 |
| G | CONSOLE 1 | 1 |
| H | POSS NEAT ENGLAS | 1 |
| I | NATRILL BOLT TOLERER | 1 |
| J | DEKT TRAV HOLLER (OPTIONAL) | 1 |
| K | DEKT THAP ALLEN COWHOT (OPTIONAL) | 1 |
| L | DEPT AGUST INGISH | 1 |
| M | SEAT AGUST (NEW) | 1 |
| N | COVOLUME SUIVENSUS (SUPPLIED) | 1 |
| O | COVOLUME SUIVENSUS (SUPPLIED) | 1 |
| P | HOLEEL 350*70mL | 2 |
| Q | COVOLUME SUIVENSUS LOWES [SUPPLIED] | 1 |
| R | COVOLUME WHEEL | 1 |
| S | FLU VOLUME 265*80*15 | 6 |
| T | VOLUME VOLUME 265*80*15 | 1 |
| U | VOLUME VOLUME 265*80*15 | 1 |
| V | COVOLUME 45*12 | 1 |
| W | ALLEN WENCH (CREEV DRIVEN) | 1 |
| X | ALLEN WENCH (CREEV DRIVEN) | 1 |
| Y | ALLEN WENCH (CREEV DRIVEN) | 1 |
ENNGUS
H2:OEtST30,Rn-1Acd 58-7
TROUBLESHOOTING & MAINTENANCE
NOTE Following instructions might vary according to the mode you buy. Please contact your local dealer for further information.
37
27317-307PM

COMMON PRODUCT QUESTIONS
ARE THE SOUNDSD MY EXERCISE BIKEMAKES NORMAL?
Our exercise bikes are some of the quietest available because they use belt drives and friction free magnetic resistance. We use the highest grade bearings and belts to minimize noise. However, because the resistance system itself is so quiet, we will occasionally hear other slight mechanical noises. Unlike oinder, louder technologies, there are no fans, friction belts, or alternator noises to mask these sounds on our exercise bikes. These mechanical noises, which may or may not be intermittent, are normally caused by the vibration of the steering wheel. The steering wheel is usually made of steel and plastic. All bearings, belts and other rotating parts will generate some noise which will transmit through the casing and frame. It is also normal for these sounds to change slightly during a workout and over time because of thermal expansion of the parts.
WHY IS THE EXERCISE BIKE I HAD DELIVERED LOUDER THAN THE ONE AT THE STORE?
All fitness products seem quieter in a large store showroom because there is generally more background noise than in your home. Also, there will be less reverberation on a carpeted concrete floor than on a wood overlay floor. Sometimes a heavy rubber mat will help reduce reverberation through the floor. If a fitness product is placed close to a wall, there will be more reflected noise.
HOW LONG WILL THE DRIVE BELT LAST?
The computer modeling we have done indicated virtually thousands of maintenance free hours. You should not have to replace the belt as long as you have the exercise bike.
CAN I MOVE THE EXERCISE BIKE EASTLY ONCE IT IS ASSEMBLED?
Your exercise bike has a pair of transport wheels built into the front stabilizer tube. Please follow the MOVING THE EXERCISE BRIK section to transport your exercise bike. It is important that you place your exercise bike in a comfortable and inviting room. Your exercise bike is designed to use minimal floor space. Many people will place their exercise bikes facing the TV or a picture on the wall. You can also place them on an unfurnished basement. To make exercise a desirable daily activity for you, the exercise bike should be in a comfortable setting.
BASIC TROUBLESHOOTING
PROBLEM: The console does not light up.
SOLUTION: Verify the following:
The outlet the machine is plugged into is functional. Double check that the breaker has not tripped.
The correct power cord is being used. Only use the power cord included or provided by Your local dealer.
The power cord is not pinched or damaged and is properly plugged into the outlet AND the machine.
Unplug power cord, remove the console and check that all connections to the console are secure and not damaged or pinched.
PROBLEM: The console lights up but the Distance/Watts/RPMs do not count.
SOLUTION: Verify the following:
- Unplug power cord, remove the console and check that all connections to the console are secure and not damaged or pinched.
If doing the above does not fix the problem, the speed sensor and/or magnet may have become dislodged or damaged.
PROBLEM: The resistance levels seem to be incorrect, seeming too hard or too easy.
SOLUTION: Verify the following:
The correct power cord is being used. Only use the power cord provided or authorized by Your local dealer.
- Resect the console and allow the resistance to reset to the default position. Restart and retry the resistance levels.
PROBLEM: The exercise bike makes a squeaking or chirping noise.
SOLUTION: Verify the following:
The exercise bike is on a level surface.
Laosen all bolts attached during the assembly process, grease the threads, and tighten again.


PROBLEM: When MP3 player is connected there is no sound coming from the speakers or the speakers sound fuzzy. SOLUTION: Make sure audio cable is plugged in securely to both the console and MP3 Player jacks.
TROUBLESHOOTING HEART RATE
Check your exercise environment for sources of interference such as fluorescent lights, commuters, underground fencing, home security systems or appliances containing large motors. These items may cause erratic heart rate readouts. You may experience an erratic readout under the following conditions:
- Constant movement and vibration due to constantly holding the heart rate handlebars while overriding, if you are receiving erratic heart rate readouts, try to only hold the grips long enough to monitor your heart rate.
- When you are breathing heavily during a workout.
When your hands are dry or cold, try to moiess your palms by rubbing them together to warm.
Anyone with heavy arrhythmia.
- Anyone with arteriosclerosis or peripheral circulation disorder
Anyone whose skin on the measuring palm is especially thick.
If this troublesome section does not remedy the problem, discontinue use and turn the power off.
PLEASE CALL YOUR LOCAD DEALER
The following information may be asked of you when you call. Please have these items readily available:
Model Name
-Serial Number
PROB OF PURCHASE RECEIPT BY POST EARRS STATEMENT
In order for Your local dealer to service your exercise bike they may need to ask detailed questions about the symptoms that are occurring. Some troubleshooting questions that may be asked are:
How long has this problem been occurring?
Does this problem occur with every user? With every user?
If you are hearing a noise, does it come from the front or the back? What kind of noise is it (humping, grinding, squeaking, chirping etc.)?
Has the machine been lubricated and maintained per the MAINTENANCE schedule?
Answering these and other questions will give the technicians the ability to send proper replacement parts and the service necessary to get you and your exercise bike running again!

MAINTENANCE
WHAT KIND OF ROUTINE MAINTENANCE IS REQUIRED?
We use sealed bearings throughout our bikes so lubrication is not needed. The most important maintenance step is to simply wipe your perspiration off the bike after each use.
HOW DO I CLEAN MY BIKE?
Clean with soap and water cleaners only. Never use solvents on plastic parts. Cleaniness of your bike and its operating environment will keep maintenance problems and service calls to a minimum. For this reason, we recommend that the following preventive maintenance schedule be followed:
AFTER EACH USE (DAILY)
- Turn off the bike by unplugging the power cord from the wall outlet.
- Wipe down the bike with a damp cloth. Never use solvents, as they can
- In respect the power cord, the power cord is demarcated contact your
lnded
Make sure the power cord is not underneath the bike or in any other
area where it can become pinched or cut.

To remove power from the exercise bike,
the power card must be disconnected
from the wall outlet.

EVERY WEEK
Clean underneath the bike, following these steps:
Turn off the bike.
1. Mysrs bike is a rreple lscation
- Wipe or vacuum any dust particles or other objects that may have accumulated underneath the bike.
Return the bike to its previous position.
EVERY MONTH
Inspect all assembly bolts and pedals on the machine for proper tightness.
Clean any debris off of the seat quite tall.
H2:OMST0R1A 424257130
PROGRAMMINFORMATIONEN
H2:08,ST50,Rn-1A 58S:245Y307PM

PROGRAMMABELLEN
| FINANZVARIETY | ||||||
| Spenden (Millionen €) | ||||||
| 2006 | 2007 | 2008 | 2009 | 2010 | 2011 | |
| 1.12.23 | 50.50 | 51.11 | 51.24 | 51.31 | - | - |
| 2.17.23 | 32.62 | 36.82 | 36.22 | 36.71 | - | - |
| 2.17.24 | 33.33 | 35.12 | 35.29 | 35.70 | - | - |
| 3.12.25 | 44.44 | 46.44 | 46.84 | 47.21 | - | - |
| 5.24.26 | 52.32 | 53.32 | 53.96 | 54.36 | - | - |
| 6.27.27 | 58.18 | 60.18 | 60.88 | 61.48 | 7.92 | - |
| 7.28.28 | 61.87 | 61.11 | 61.91 | 61.91 | 7.93 | - |
| 8.29.29 | 63.43 | 64.44 | 64.84 | 65.29 | - | - |
| 9.45.30 | 68.18 | 71.12 | 71.56 | 72.13 | - | - |
| 10.34.31 | 74.18 | 75.45 | 75.85 | 76.15 | 74.14 | - |
| 11.35.32 | 76.13 | 76.13 | 76.13 | 76.13 | 76.13 | - |
| 12.35.33 | 76.13 | 76.13 | 76.13 | 76.13 | 76.13 | - |
| 13.35.34 | 76.13 | 76.13 | 76.13 | 76.13 | 76.13 | - |
| 14.35.35 | 76.13 | 76.13 | 76.13 | 76.13 | 76.13 | - |
| 15.35.36 | 76.13 | 76.13 | 76.13 | 76.13 | 76.13 | - |
| 16.35.37 | 76.13 | 76.13 | 76.13 | 76.13 | 76.13 | - |
| 17.35.38 | 76.13 | 76.13 | 76.13 | 76.13 | 76.13 | - |

2
| Gewichteter Einflussveränderung | ||||
| Zahlungen des Produktionsvermögens (Millionen €) | ||||
| 2018 | 2017 | 2016 | 2015 | |
| Abzüge der 01.01.2018 bis 31.12.2018 | 1.094.228.336 | 1.094.228.336 | 1.094.228.336 | 1.094.228.336 |
| 31.12.2019 | 1.122.293 | 1.122.293 | 1.122.293 | 1.122.293 |
| 31.12.2020 | 1.222.479.576 | 1.222.479.576 | 1.222.479.576 | 1.222.479.576 |
| 31.12.2021 | 1.222.479.576 | 1.222.479.576 | 1.222.479.576 | 1.222.479.576 |
| 31.12.2022 | 1.222.479.576 | 1.222.479.576 | 1.222.479.576 | 1.222.479.576 |
| 31.12.2023 | 1.222.479.576 | 1.222.479.576 | 1.222.479.576 | 1.222.479.576 |
| 31.12.2024 | 1.222.479.576 | 1.222.479.576 | 1.222.479.576 | 1.222.479.576 |
| 31.12.2025 | 1.222.479.576 | 1.222.479.576 | 1.222.479.576 | 1.222.479.576 |
| 31.12.2026 | 1.222.479.576 | 1.222.479.576 | 1.222.479.576 | 1.222.479.576 |
| 31.12.2027 | 1.222.479.576 | 1.222.479.576 | 1.222.479.576 | 1.222.479.576 |
| 31.12.2028 | 1.222.479.576 | 1.222.479.576 | 1.222.479.576 | 1.222.479.576 |
| 31.12.2029 | 1.222.479.576 | 1.222.479.576 | 1.222.479.576 | 1.222.479.576 |
| 31.12.31 | 1.122.293 | 1.122.293 | 1.122.293 | 1.122.293 |
| 31.12.30 | 1.122.293 | 1.122.293 | 1.122.293 | 1.122.293 |
H2:08,STC,O,R,u,r,s 58-992951r 307Pn
So we say on the fundamental class of the Sylentinian inner ideal _2 that every word is a subalgebra of itself and possesses an inner product. In other words, we say that
H2:08,STC0R-1A# 07:2951307P#
ZUSAMMENBAU
DES OPTIONALEN
ZUBEHÖRS

HOSIN30
71

OPTIONALES ZUBEHÖR


ABLAGE, SCHRITT 1

OPTIONALES ZUBEHOR
ABLAGE, SCHRITT 2
| M# | SCHNORTHINKS | M#T |
| A | RIGIDENFRIMNS | 1 |
| B | S#AB#DA-DM | 1 |
| C | STAM#LISATIONSTET | 1 |
| D | S#ST#EFEITFUSKUNGS | 1 |
| E | SATIEL | 1 |
| F | VORK#DE#NOMINEESAT | 1 |
| G | GROUNDSCH#E | 1 |
| H | P#AR#KEOPONY#AL | 1 |
| I | S#C#S#NTH#ICHE | 1 |
| J | ANGE#S#NT#N T##URING (OPTIONAL) | 1 |
| K | KAN#S#NT#N DE P#R#A#NE#N HAPPL#N#O#P#T#NAL | 1 |
| L | LIK#N #NAT#NT#N CH#O#NI#E | 1 |
| M | S#T#N#NTR#N#N#OKF#R | 1 |
| N | M#L#N L#N#S K#V#C#N#A#NLS (2020/2021) | 1 |
| O | D#C#R#S#ND#N#N#NAT#N (2020/2021) | 1 |
| P | P#HE#S#ND#N#N#NAT#N (2020/2021) | 1 |
| Q | J#N#N#N#N#N#NAT#N (2020/2021) | 1 |
| R | R#L#N A##N#N#N#N#N (2020/2021) | 1 |
| S | S#C#N#NLT#N#N#NAT#N (2020/2021) | 1 |
| T | S#C#N#NLT#N#N#NAT#N (2020/2021) | 1 |
| U | U#L#N A##N#NAT#N (2020/2021) | 1 |
| V | V#L#N C##NAT#N (2020/2021) | 1 |
| W | W#L#N C##NAT#N (2020/2021) | 1 |
H2:OHTSTIO-R-1A.1d 07
I haven't been feeling at ease yet in his opistems an undercodhen vanen trainingprogramm Uthonne is a very keendest of our team members middle wavy but he takes us to see some splendid films. I'm regretting Gabrielus van to have him on my back
| GARCHWEIGHTS | ||
| Exponential Energy-temperature-Like Contraction | ||
| December 20, 2015 | 3.01E+03 | 1.01E+03 |
| December 21, 2015 | 2.98E+03 | 1.01E+03 |
| January 1, 2016 | 2.94E+03 | 1.01E+03 |
| March 1, 2016 | 2.92E+03 | 1.01E+03 |
| April 1, 2016 | 2.92E+03 | 1.01E+03 |
| May 1, 2016 | 2.92E+03 | 1.01E+03 |
| June 1, 2016 | 2.92E+03 | 1.01E+03 |
| July 1, 2016 | 2.92E+03 | 1.01E+03 |
| August 1, 2016 | 2.92E+03 | 1.01E+03 |
| September 1, 2016 | 2.92E+03 | 1.01E+03 |
| October 1, 2016 | 2.92E+03 | 1.01E+03 |
| November 1, 2016 | 2.92E+03 | 1.01E+03 |
| December 1, 2016 | 2.92E+03 | 1.01E+03 |
| March 1, 2017 | 2.92E+03 | 1.01E+03 |
| April 1, 2017 | 2.92E+03 | 1.01E+03 |
| May 1, 2017 | 2.92E+03 | 1.01E+03 |
| June 1, 2017 | 2.92E+03 | 1.01E+03 |
| July 1, 2017 | 2.92E+03 | 1.01E+03 |
| August 1, 2017 | 2.92E+03 | 1.01E+03 |
| September 1, 2017 | 2.92E+03 | 1.01E+03 |
| October 1, 2017 | 2.92E+03 | 1.01E+03 |
| November 1, 2017 | 2.92E+03 | 1.01E+03 |
| December 1, 2017 | 2.92E+03 | 1.01E+03 |
H2:ON1ST0Rn-1Aa 9992571305P8
| Gewichteterwerbs Plus | |
| Chemieutische Prozessrechnungszinsfuß- Hukkaiden-Condomon | |
| Gesamt: 80.642.652.652.652.652.652.652.652.652.652.652.652.652.652.652.652.652.652.652.652.652.652.652.652.652.652.6 | |
| Name: 12.544.338.0017 12.014.1019.123.103 | |
| 1. 22.24.18.48.56.63.55.52.22 | |
| 2. 22.24.18.48.56.63.55.52.22 | |
| 3. 22.24.18.48.56.63.55.52.22 | |
| 4. 22.24.18.48.56.63.55.52.22 | |
| 5. 22.24.18.48.56.63.55.52.22 | |
| 6. 22.24.18.48.56.63.55.52.22 | |
| 7. 22.24.18.48.56.63.55.52.22 | |
| 8. 22.24.18.48.56.63.55.52.22 | |
| 9. 22.24.18.48.56.63.55.52.22 | |
| 10. 20.18.13.13.13.13.13.13.13.13.13.13.13.13.13.13.13.13.13.13.13.13.13.13.13.13.13.13.13.13.13.13.13.13.13.13 | |
| 11. 22.24.18.48.56.63.55.52.22 | |
| 12. 22.24.18.48.56.63.55.52.22 | |
| 13. 22.24.18.48.56.63.55.52.22 | |
| 14. 22.24.18.48.56.63.55.52.22 | |
| 15. 22.24.18.48.56.63.55.52.22 | |
| 16. 22.24.18.48.56.63.55.52.22 | |
| GENERAL DETAILS | |
| Description | Minimum Tolerance (mm) |
| Sensitivity | 0.6 to 0.8 |
| Temperature Range | -15 to +25 |
| Unit | K |
| 0.001 | 3.3 to 3.9 |
| 0.002 | 3.9 to 4.3 |
| 0.003 | 4.3 to 4.8 |
| 0.004 | 4.8 to 5.2 |
| 0.005 | 5.2 to 5.8 |
| 0.006 | 5.8 to 6.2 |
| 0.007 | 6.2 to 6.8 |
| 0.008 | 6.8 to 7.2 |
| 0.009 | 7.2 to 7.8 |
| 0.010 | 7.8 to 8.2 |
| 0.011 | 8.2 to 8.8 |
| 0.012 | 8.8 to 9.2 |
| 0.013 | 9.2 to 9.8 |
| 0.014 | 9.8 to 10.2 |
| 0.015 | 10.2 to 10.8 |
| 0.016 | 10.8 to 11.2 |
| 0.017 | 11.2 to 11.8 |
| 0.018 | 11.8 to 12.2 |
| 0.019 | 12.2 to 12.8 |
| 0.020 | 12.8 to 13.2 |
| 0.021 | 13.2 to 13.8 |
| 0.022 | 13.8 to 14.2 |
| 0.023 | 14.2 to 14.8 |
| 0.024 | 14.8 to 15.2 |
| 0.025 | 15.2 to 15.8 |
| 0.026 | 15.8 to 16.2 |
| 0.027 | 16.2 to 16.8 |
| 0.028 | 16.8 to 17.2 |
| 0.029 | 17.2 to 17.8 |
| 0.030 | 17.8 to 18.2 |
| 0.031 | 18.2 to 18.8 |
| 0.032 | 18.8 to 19.2 |
| 0.033 | 19.2 to 19.8 |
| 0.034 | 19.8 to 20.2 |
| 0.035 | 20.2 to 20.8 |
| 0.036 | 20.8 to 21.2 |
| 0.037 | 21.2 to 21.8 |
| 0.038 | 21.8 to 22.2 |
| 0.039 | 22.2 to 22.8 |
| 0.040 | 22.8 to 23.2 |
| 0.041 | 23.2 to 23.8 |
| 0.042 | 23.8 to 24.2 |
| 0.043 | 24.2 to 24.8 |
| 0.044 | 24.8 to 25.2 |
| 0.045 | 25.2 to 25.8 |
| 0.046 | 25.8 to 26.2 |
| 0.047 | 26.2 to 26.8 |
| 0.048 | 26.8 to 27.2 |
| 0.049 | 27.2 to 27.8 |
| 0.050 | 27.8 to 28.2 |
| 0.051 | 28.2 to 28.8 |
| 0.052 | 28.8 to 29.2 |
| 0.053 | 29.2 to 30.2 |
| 0.054 | 30.2 to 30.8 |
| 0.055 | 30.8 to 31.2 |
| 0.056 | 31.2 to 31.8 |
| 0.057 | 31.8 to 32.2 |
| 0.058 | 32.2 to 32.8 |
| 0.059 | 32.8 to 33.2 |
| 0.060 | 33.2 to 33.8 |
| 0.061 | 33.8 to 34.2 |
| 0.062 | 34.2 to 34.8 |
| 0.063 | 34.8 to 35.2 |
| 0.064 | 35.2 to 35.8 |
| 0.065 | 35.8 to 36.2 |
| 0.066 | 36.2 to 36.8 |
| 0.067 | 36.8 to 37.2 |
| 0.068 | 37.2 to 37.8 |
| 0.069 | 37.8 to 38.2 |
| 0.070 | 38.2 to 38.8 |
| 0.071 | 38.8 to 39.2 |
| 0.072 | 39.2 to 40.2 |
| 0.073 | 40.2 to 41.2 |
| 0.074 | 41.2 to 41.8 |
| 0.075 | 41.8 to 42.2 |
| 0.076 | 42.2 to 42.8 |
| 0.077 | 42.8 to 43.2 |
| 0.078 | 43.2 to 43.8 |
| 0.079 | 43.8 to 44.2 |
| 0.080 | 44.2 to 44.8 |
| 0.081 | 44.8 to 45.2 |
| 0.082 | 45.2 to 45.8 |
| 0.083 | 45.8 to 46.2 |
| 0.084 | 46.2 to 46.8 |
| 0.085 | 46.8 to 47.2 |
| 0.086 | 47.2 to 48.2 |
| 0.087 | 48.2 to 49.2 |
| 0.088 | 49.2 to 50.2 |
| 0.089 | 50.2 to 51.2 |
| 0.090 | 51.2 to 51.8 |
| 0.091 | 51.8 to 52.2 |
| 0.092 | 52.2 to 52.8 |
| 0.093 | 52.8 to 53.2 |
| 0.094 | 53.2 to 53.8 |
| 0.095 | 53.8 to 54.2 |
| 0.096 | 54.2 to 54.8 |
| 0.097 | 54.8 to 55.2 |
| 0.098 | 55.2 to 55.8 |
| 0.099 | 55.8 to 56.2 |
| 1.000 | 100 |


H2:O83ST0.Rn-1A.100-101
| 1. | 2. | 3. | 4. | 5. | 6. | 7. | 8. | 9. | 10. | 11. | 12. | 13. | 14. | 15. | 16. | 17. | 18. | 19. | 20. |
| 1 | 2 | 3 | 4 | 5 | 6 | 7 | 8 | 9 | 10 | 11 | 12 | 13 | 14 | 15 | 16 | 17 | 18 | 19 | 20 |
| 1 | 2 | 3 | 4 | 5 | 6 | 7 | 8 | 9 | 10 | 11 | 12 | 13 | 14 | 15 | 16 | 17 | 18 | 19 | 20 |
| 1 | 2 | 3 | 4 | 5 | 6 | 7 | 8 | 9 | 10 | 11 | 12 | 13 | 14 | 15 | 16 | 17 | 19 | 20 | 21 |
| 1 | 2 | 3 | 4 | 5 | 6 | 7 | 8 | 9 | 10 | 11 | 12 | 13 | 14 | 15 | 16 | 17 | 18 | 19 | 20 |
| 1 | 2 | 3 | 4 | 5 | 6 | 7 | 8 | 9 | 10 | 11 | 12 | 13 | 14 | 15 | 16 | 17 | 17 | 18 | 19 |
| 1 | 2 | 3 | 4 | 5 | 6 | 7 | 8 | 9 | 10 | 11 | 12 | 13 | 14 | 15 | 16 | 17 | 18 | 19 | 20 |
| 1 | 2 | 3 | 4 | 5 | 6 | 7 | 8 | 9 | 10 | 11 | 12 | 13 | 14 | 15 | 16 | 17 | 15 | 16 | 17 |
| 1 | 2 | 3 | 4 | 5 | 6 | 7 | 8 | 9 | 10 | 11 | 12 | 13 | 14 | 15 | 16 | 17 | 18 | 19 | 20 |
| 1 | 2 | 3 | 4 | 5 | 6 | 7 | 8 | 9 | 10 | 11 | 12 | 13 | 14 | 15 | 16 | 17 | 16 | 17 | 18 |
| 1 | 2 | 3 | 4 | 5 | 6 | 7 | 8 | 9 | 10 | 11 | 12 | 13 | 14 | 15 | 16 | 17 | 18 | 19 | 20 |
| CONTOUR FRETINER MASSES FOR CONTOUR 201 |
| Secundaries:63.89 x 20.46/62.86 x 20.45/62.86 x 20.47/62.86 x 20.48 Vorius:12.84/67.88/61.12/8.14/16.16/7.18 |
| 1.11-2.84/2.84/2.84/2.84/2.84/2.84/2.84/2.84/2.84/2.84/2.84/2.84/2.84/2.84/2.84/2.84/2.84/2.84/2.84/2.84/2.84 2.13-3.24/3.24/3.24/3.24/3.24/3.24/3.24/3.24/3.24/3.24/3.24/3.24/3.24/3.24/3.24/3.24/3.24/3.24/3.24/3.24/3.24 3.23-4.44/4.44/5.25/5.16/7.19/7.19/7.22 |
| 5.2-5.46/5.46/5.75/5.75/5.75/5.75/5.75/5.75/5.75/5.75/5.75/5.75/5.75/5.75/5.75/5.75/5.75/5.75/5.75/5.75/5.75/5.75/5.74 |
| 7.2-7.46/7.46/7.46/7.46/7.46/7.46/7.46/7.46/7.46/7.46/7.46/7.46/7.46/7.46/7.46/7.46/7.46/7.46/7.46/7.46/7.46 |
| 9.1-9.11/11.11/11.11/11.11/11.11/11.11/11.11/11.11/11.11/11.11/11.11/11.11/11.11/11.11/11.11/11.11/11.11/11.11 |
| 10.95/10.95/10.95/10.95/10.95/10.95/10.95/10.95/10.95/10.95/10.95/10.95/10.95/10.95/10.95/10.95/10.95/10. |
| 11.55/11.55/11.55/11.55/11.55/11.55/11.55/11.55/11.55/11.55/11.55/11.55/11.55/11.55/11.55/11.55/11.55/11. |
| 12.45/12.45/12.45/12.45/12.45/12.45/12.45/12.45/12.45/12.45/12.45/12.45/12.45/12.45/12.45/12.45/12.45/12. |
| 14.45/14.45/14.45/14.45/14.45/14.45/14.45/14.45/14.45/14.45/14.45/14.45/14.45/14.45/14.45/14.45/14.45/14. |
| Sachanlagebuch der Gesellschaft | Mehrere davon davon davon | Umw davon davon | Anzahlungen |
| HEKTERGUR TECHNICAL | 5-5 mm | 171-195-m | VOH: 10000000000000000000000000000000000000000000000000000000000000000000000000000000000000000000000000000 |
| KOHLIK TECHNICAL | 2-10 mm | 162-171-m | KORA: 40000000000000000000000000000000000000000000000000000000000000000000000000000000000000000000000000001 |
| GROUNDS TECHNICAL | 10-45 mm | 133-153-m | CANGEN-ERGOHERIIGEN |
| GROUNDS TECHNICAL | 20-85 mm | 116-131-m | LANGE: zu erwerbbarer haltungs. sicherungserlöse |
| HEKTERGUR TECHNICAL | 20-45 mm | 186-144-m | GRIK: 25.000 Mio € der SRT |
MONTAGE

WAARSCHUWING
E eni i t a n t h t t t t t t t t t t t t t t t t t t t t t t t t t t t t t t t t t t t t t t t t t t t t t t t t t t s liqien to zain un intevertie geilbden kunen vortezon. Con schlaan di ne piorate o workrorn, alit de the mone

ACCESSIONBLAD STAP 1
Aa KAc de ACCESSIOREBLADHOUDER (J) vst aan de CONSOLEMASTSET (F) en draai de 2 x SCHROEVEN (ZS) vst

H2:08,0350,Rn-1r=112+13

OPTIONELE ACCESSORIES
ACCESSIOIREBLAD STAP 2

OPTIONE ACCESSORIES
ACCESSIONALSTAP3
OPTIONELE ACCESSOIRES
H2-ONGSTO.Rn-1A+1141521917306PA

115114

BTS.0 OPENGEWERKTE TEKENING

BT5.0 ONDERDELENLJIST
| M# | B#CH#R#H##S | ANALY |
| A | HO#O#FRA#ME | 1 |
| B | E ABA#DA-DAI | 1 |
| C | E STABILISATORS R1 | 1 |
| D | D#G#E#EN I | 1 |
| E | Z#O#L | 1 |
| F | DOV#O#L#A#R#ST | 1 |
| G | D#CO###LEU# | 1 |
| H | PAC#SS#C#B#AD (CP#T#N#H) L1 | 1 |
| I | SIDON #U#IDER | 1 |
| J | ACC#S#R#DE#A#DH#OL## (OPPO#Y#E) | 1 |
| K | KAP#S#NING ACCS#D#H#AD#H#L#D# (CP#T#N#H) L1 | 1 |
| L | LI#O#O#NT#N#TH#N#P#1 | 1 |
| M | Z#O#L#R#ST#R#CH | 1 |
| N | C#V#O#L#Z#R#AD #A#D#N#T#[L#A#N#T] | 1 |
| O | D#CO#L#C#A#R#AD #A#D#N#T#[L#A#N#T] #7 | 1 |
| P | P#H#S#AERAD#E - 250 mm#2 | 1 |
| Q | C#V#O#L#Z#R#AD #A#D#N#T#[L#A#N#T] | 1 |
| R | X#D#R#T M#PH | 1 |
| S | X#D#R#T M#PH S | 1 |
| Z | X#D#R#T S#T#R#D#E S#T#N# P#T#S E | 1 |
| 35 | X#D#R#T S#T#R#D#E S#T#N# P#T#S E | 1 |
| 45 | X#D#R#T S#T#R#D#E S#T#N# P#T#S E | 1 |
| 55 | X#D#R#T S#T#R#D#E S#T#N# P#T#S E | 1 |
NEDLANS
H2:001ST00Rn1人rtd 118-17
PROBLEEMOPLossING EN ONDERHOUD
PROBLEEMOPLossing-HARTSLAG
Controleur uo trainingsongveing opromen do storing kumner voroanrak, zeals fluoroscere lampen, computars, ordnordre omhinei. hrioeaeigssystemen of asparaten met zaree motoren. Deze items kuoen pour un enomgatime
HOE MAAKIK MUN FIETS SCHOOL?
stopcontact worden genahal
H2:001ST10Rn-1A+122327517306PA
PRECAUTIONS IMPORTANTES
LISEZ ET CONSERVEZ CES INSTRUCTIONS
PROGRAMMES DISPONIBLES
10 programmes: Manoux (Manus), Intervens (Intervenlles), Weight Loss (Pente de pald), Weight Loss Plus (Parte de pals), Rating (Vallermanc, Candrance, Random (Waleiro), Constant, Wals (Wals consantis), Thirty Zone (Zone FCF), 97-TR (FCFC), Custom (Personalise)
| WEIGHTS (PARENT OF PARENT) | ||||
| Total Amount Segments (sub programme - Rebase Repayment) | ||||
| Gross amount | Sub total amount | Sub total amount | Sub total amount | Sub total amount |
| 10,234,569 | 39,011 | 12,134 | 10,178 | 20 |
| 11,115,180 | 25,956 | 12,134 | 10,178 | 20 |
| 2,122,348,585 | 68,585 | 34,432 | 22 | 2 |
| 3,122,348,585 | 68,585 | 34,432 | 22 | 2 |
| 2,222,348,585 | 68,585 | 34,432 | 22 | 2 |
| 5,233,667,885 | 39,011 | 12,134 | 10,178 | 20 |
| 6,215,180 | 39,011 | 12,134 | 10,178 | 20 |
| 12,115,180 | 39,011 | 12,134 | 10,178 | 20 |
| 8,339,900 | 10,114 | 4,221 | 11,108 | 2 |
| 4,545,101 | 10,114 | 4,221 | 11,108 | 2 |
| 10,311,811 | 12,134 | 4,244 | 11,108 | 2 |
| 11,950,252 | 12,134 | 4,244 | 11,108 | 2 |
| 17,500,252 | 12,134 | 4,244 | 11,108 | $2 |
H2:001ST10Rn-1Aa138-31221517306PA
| WEIGHT PLUS (PERME DE PORDS PLUS) | |
| Exhaustifont Sarmos agroprogramme Ropido 10.0000000000000000000000000000000000000000000000000000000000000000000000000000000000000000000000000000 | |
| Decenso: 2020-06-25 04:30:50 11:12 18:41:45 19:17 18:19:25 | |
| 1. 4.22.48.59.60.61.62.63.64.64.65.66.67.68.69.60.61.62.63.64.65.66.67.68.69.60.61.62.63.64.65.66.67.68.69.60.61.62.63.64.65.66.67.68.69.60.61.62.63.64.65.66,67.68.69.60.61.62.63.64.65.66.67.68.69.60.61.62.63.64.65.66.67.68.69.60.61.62.63.64.65.66.67.68.69. 60.61.62.63.64.65.66.67.68.69.60.61.62.63.64.65.66.67.68.69.60.61.62.63.64.65.66.67.68.69.60.61.62. 63.64.65.66.67.68.69.60.61.62.63.64.65.66.67.68.69.60.61.62.63.64.65.66.67.68.69.60.61.62.63.64.65. 66.67.68.69.60.61.62. 63.64.65.66.67.68.69.60.61.62. 63.64.65.66.67.68.69.60.61.62. 63.64.65.66.67.68.69.60.61.62. 63.64.65.66.67. 68.69.60.61.62. 63.64.65.66.67. 68.69.60.61.62. 63.64.65.66.67. 68.69.60.61.62. 63.64.65.66.67. 68. 69.60.61.62. 63.64.65.66.67. 68. 69.60.61.62. 63.64.65.66.67. 68. 69.60.61.62. 63.64.65.66.67. 68. 69.60.61.62. 63.64.65.66.67. 68. 69.60.61.62. 63.64.65.66.67. 68. 69.60.61.62. 63.64.65.66.67. 6 89. 60.61.62. 63.64.65. 66.67. 68. 69. 60. 61. 62. 63. 64. 65. 66. 67. 68. 69. 60. 61. 62. 63. 64. 65. 66. 67. 68. 69. 60. 61. 62. 63. 64. 65. 66. 67. 68. 69. 60. 61. 62. 63. 64. 65. 66. 67. 68. 69. 60. 61. 62. 63. 64. 65. 66. 67. 68. 69. 60. 61. 62. 63. 64. 65. 66. 67. 68. 69. 60. 61. 62. 63. 64. 65. 66. 67. 68. 69. 60. 61. 62. 63. 64. 65. 66. 67. 68. 69. 60. 61. 62. 63. 64. 65. 66. 67. 68. 69. 60. 61. 62. 63. 64. 65. 66. 67. 68. 69. 60. 61. 62. 63. 64. 65. 66. 67. 68. 69. 60. 61. 62. 63. 64. 65. 66. 67. 68. 69. 60. 61. 62. 63. 64. 65. 66. 67. 68. 69. 60. 61. 62. 63. 64. 65. 66. 67. 68. 69. 60. 61. 62. 63. 64. 65. 66. 67. 68. 69. 60. 61. 62. 63. 64. 65. 66. 67. 68. 69. 60. 61. 62. 63. 64. 65. 66. 67. 68. 69. 60. 61. 62. 63. 64. 65. 66. 67. 68. 69. 60. 61. 62. 63. 64. 65. 66. 67. 68. 69. 60. 61. 62. 63. 64. 65. 66. 67. 68. 69. 60. 61. 62. 63. 64. 65. 66. 67. 68. 69. 60. 61. 62. 63. 64. 65. 66. 67. 68. 69. 60. 61. 62. 63. 64. 65. 66. 67. 68. 69. 60. 61. 62. 63. 64. 65. 66. 67. 68. 69. 60. 61. 62. 63. 64. 65. 66. 67. 68. 69. 60. 61. 62. 63. 64. 65. 66. 67. 68. 69. 60. 61. 62. 63. 64. 65. 66. 67. 68. 69. 60. 61. 62. 63. 64. 65. 66. 67. 68. 69. 60. 61. 62. 63. 64. 65. 66. 67. 68. 69. 60. 61. 62. 63. 64. 65. 66. 67. 68. 69. 60. 61. 62. 63. 64. 65. 66. 67. 68. 69. 60. 61. 62. 63. 64. 65. 66. 67. 68. 69. 60. 61. 62. 63. 64. 65. 66. 67. 68. 69. 60. 61. 62. 63. 64. 65. 66. 67. 68. 69. 60. 61. 62. 63. 64. 65. 66. 67. 68. 69. 60. 61. 62. 63. 64. 65. 66. 67. 68. 69. 60. 61. 62. 63. 64. 65. 66. 67. 68. 69. 60. 61. 62. 63. 64. 65. 66. 67. 68. 69. 60. 61. 62. 63. 64. 65. 66. 67. 68. 69. 60. 61. 62. 63. 64. 65. 66. 67. 68. 69. 60. 61. 62. 63. 64. 65. 66. 67. 68. 69. 60. 61. 62. 63. 64. 65. 66. 67. 68. 69. 60. 61. 62. 63. 64. 65. 66. 67. 68. 69. 60. 61. 62. 63. 64. 65. 66. 67. 68. 69. 60. 61. 62. 63. 64. 65. 66. 67. 68. 69. 60. 61. 62. 63. 64. 65. 66. 67. 68. 69. 60. 61. 62. 63. 64. 65. 66. 67. 68. 69. 60. 61. 62. 63. 64. 65. 66. 67. 68. 69. 60. 61. 62. 63. 64. 65. 66. 67. 68. 69. 60. 61. 62. 63. 64. 65. 66. 67. | |
ENSEMBLE D'ACCESSIONES EN OPTION

FANACNE
151

ACCESSIONS EN OPTION

PLATEAU ETAPE1
H2:001ST0Rn-1rtd 152-13

ACCESSIONS EN OPTION
PLATEAU ETAPE 2

ACCESSIONS EN OPTION


PLATEAU ÉTAPE 3

ACCESSIONS EN OPTION
H2=008310,Rn-1A-d 154-552197300PA

FANCAIS
155154


QUESTIONS FREQUENTES RELATIVES AU PRODUIT
LES SONS QUE FAIT MON VELO D'EXERCICE SONT-ILS NORMAUX?
VISION Fitness / HORIZON Fitness / TEMPO Fitness / TREO Fitness / LIVESTRONG Fitness products are recyclable. At the end if its useful life please dispose of this article correctly and safely (local refuse sites).
VISION Fitness/HORIZON Fitness/TEMPO Fitness/TRECO Fitness/LIVESTRONG Fitness品品
()年期票,