5.0R - Indoor bike trainer Horizon Fitness - Free user manual and instructions
Find the device manual for free 5.0R Horizon Fitness in PDF.

User questions about 5.0R Horizon Fitness
0 question about this device. Answer the ones you know or ask your own.
Ask a new question about this device
Download the instructions for your Indoor bike trainer in PDF format for free! Find your manual 5.0R - Horizon Fitness and take your electronic device back in hand. On this page are published all the documents necessary for the use of your device. 5.0R by Horizon Fitness.
USER MANUAL 5.0R Horizon Fitness
natural_image
Line drawing of a stationary exercise bike with adjustable arms and wheels (no text or symbols)5.0R RECUMBENT BIKE OWNER'S MANUAL
3 ENGLISH
32 FRANÇAIS
62 ESPAÑOL
Due to the weight of the Recumbent Bike, it is recommended that two people move it. While one person lifts the back of the Recumbent Bike, the second person firmly holds the handlebar and tips the Recumbent Bike forward until it rolls on the wheels. Carefully move the Recumbent Bike to the desired location and then lower it.
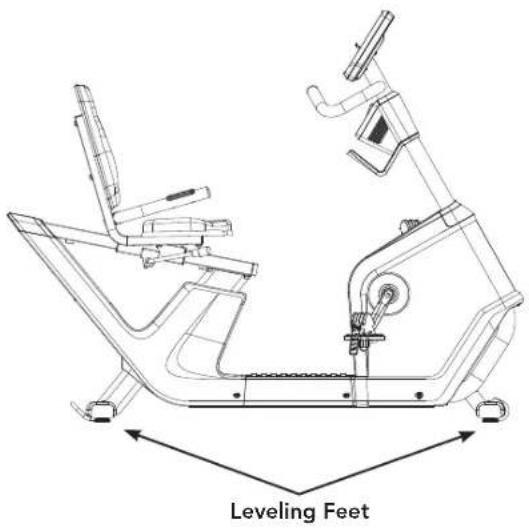
If the Recumbent Bike rocks on the floor after being set down, turn the leveling feet underneath the front or rear stabilizer until the rocking motion is eliminated.
text_image
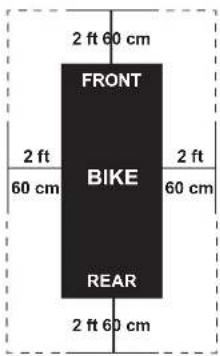
2 ft 60 cm FRONT 2 ft 60 cm BIKE 2 ft 60 cm REAR 2 ft 60 cmPlace the Recumbent Bike on a level surface. There should be 2 feet (60 cm) of each side surround the Recumbent Bike. Do not place the cycle in any area that will block any vent or air openings. The Recumbent Bike should not be located in a garage, covered patio, near water or outdoors.
WARNING
To reduce the risk of injury, use extreme caution while moving the Recumbent Bike. Do not attempt to move it over uneven surfaces and make sure there's a clear space of 24 inches (minimum) on all sides of the equipment.
text_image
Leveling FeetHOW TO ADJUST THE RECUMBENT BIKE
The Recumbent Bike can be adjusted for maximum comfort and exercise effectiveness. The instructions below describe one approach to adjusting the Recumbent Bike to ensure optimal user comfort and ideal body positioning; you may choose to adjust the Recumbent Bike differently.

text_image
Technical line drawing of a stationary exercise machine with labeled components A and BSEAT ADJUSTMENT
Proper seat height helps ensure maximum exercise efficiency and comfort, while reducing the risk of injury. Adjust the seat height to make sure it's in proper position, one that keeps a slight bend in your knee while your legs are in the extended position.
A. Seat Horizontal Position
Rotate the adjustment lever counterclockwise to slide the seat forward or backward as desired. Rotate the lever clockwise to lock the position. Test the seat slide for proper operation.
B. Pedal Straps
Place the ball of the foot into the strap until it's centered over the pedal, reach down and pull the pedal strap up to tighten prior to use. To remove your foot from the strap, loosen the strap and pull out.


WARNING
READ AND SAVE ALL INSTRUCTIONS BEFORE ASSEMBLING OR USING THIS EXERCISE BIKE. IT IS STRONGLY RECOMMENDED TO TAKE THE FOLLOWING SAFETY INSTRUCTIONS.
- CAUTION: If you experience chest pains, nausea, dizziness or shortness of breath, stop exercising immediately and consult your physician before continuing.
- Use this exercise bike for its intended purpose as described in this manual. Do not use attachments that have not been recommended by the manufacturer.
- Never operate the exercise bike if it is not working properly, or if it has been damaged. Contact Customer Tech Support or the authorized dealers for examination and repair.
- Do not use the exercise bike without proper footwear. NEVER operate the exercise bike with bare feet.
- Do not wear any clothing that might catch on any moving parts of this exercise bike.
- Keep hands and feet clear at all times from moving parts to avoid injury. Never turn the pedal cranks by hand.
- Do not dismount the exercise bike until the pedals are at a complete STOP.
- Do not attempt to ride the exercise bike in a standing position at high RPMs until you have practiced at slower speeds.
- Do not insert any object, hands or feet into any openings, or expose hands, arms or feet to the drive mechanism or other potentially moving part of the exercise bike.
- Do not use any equipment that is damaged or has worn or broken parts. Use only replacement parts supplied by Customer Tech Support or the authorized dealers.
- Do not operate where aerosol (spray) products are being used or when oxygen is being administered.
- Close supervision is necessary when used near children, invalids or disabled people.
- When the exercise bike is in use, young children and pets should be kept at least 3 meters / 10 feet away.
- Ensure that adjustment levers (seat and handlebar fore-and-aft) are properly secured and do not interfere with range of motion during exercise.
ASSEMBLY

WARNING
There are several areas during the assembly process that special attention must be paid. It is very important to follow the assembly instructions correctly and to make sure all parts are firmly tightened. If the assembly instructions are not followed correctly, the Recumbent Bike could have parts that are not tightened and will seem loose and may cause irritating noises. To prevent damage to the Recumbent Bike, the assembly instructions must be reviewed and corrective actions should be taken.
Before proceeding, find your Recumbent Bike's serial number located on the front stabilizer of the cycle and enter it in the space provided below.
ENTER YOUR SERIAL NUMBER IN THE BOX BELOW:
SERIAL NUMBER:
MODEL NAME: HORIZON
RECUMBENT BIKE

natural_image
Technical line drawing of a mechanical assembly with a bracket and mounting base (no text or symbols)» Refer to the SERIAL NUMBER and MODEL NAME when calling for service.
» Be sure to enter both the SERIAL NUMBER and MODEL NAME on your warranty card.

MODEL INFORMATION
text_image
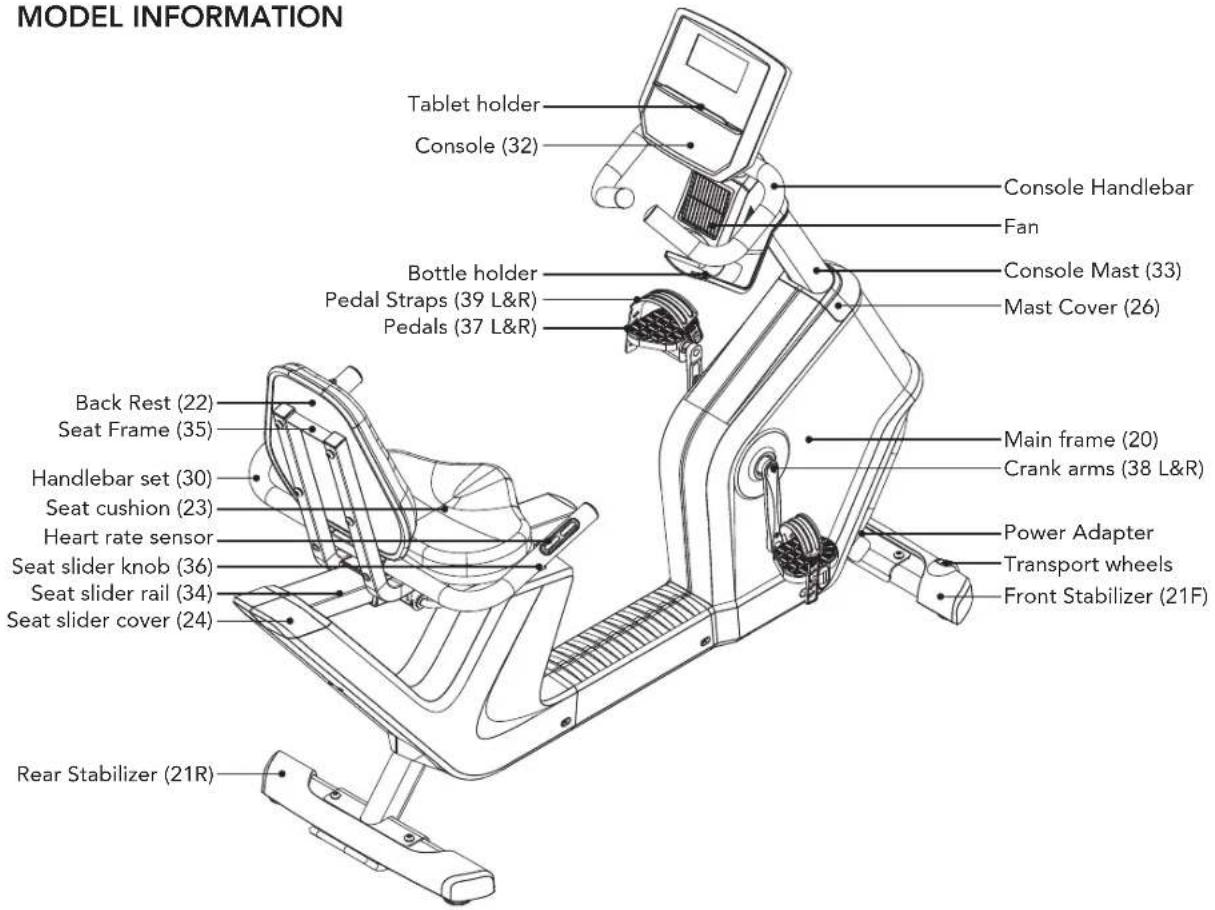
MODEL INFORMATION Tablet holder Console (32) Console Handlebar Fan Bottle holder Console Mast (33) Pedal Straps (39 L&R) Mast Cover (26) Pedals (37 L&R) Back Rest (22) Seat Frame (35) Handlebar set (30) Seat cushion (23) Heart rate sensor Seat slider knob (36) Seat slider rail (34) Seat slider cover (24) Main frame (20) Crank arms (38 L&R) Power Adapter Transport wheels Front Stabilizer (21F) Rear Stabilizer (21R)MAIN PARTS INCLUDED:
□ Main Frame (20)
□ Front Stabilizer (21F)
☐ Rear Stabilizer (21R)
☐ Handlebar Set (30)
□ Mast Cover (26)
□ Console (32)
□ Console Mast (33)
□ Pedal Set (37&39 L&R)
□ Seat Set (22, 23, 30, 34, 35 & 36)
□ Seat Slider Cover (24)
Power Adapter
□ Rear Cover Bracket (27)
PRE ASSEMBLY
UNPACKING
Due to the weight of the Recumbent Bike, it is recommended that two people perform the assembly. Unpack the product where you will be using it. It is recommended that you place a protective covering on your floor. Place the carton on a level flat surface and remove all packing materials; do not dispose of the packing materials until assembly is completed.
NOTE: During each assembly step, ensure that ALL nuts and bolts are in place and partially threaded in before completely tightening any ONE bolt.
NOTE: A light application of grease may aid in the installation of hardware. Any grease, such as lithium bike grease is recommended.
PARTS PACKING INCLUDED:
□ 1 Hardware Kit
□ 1 Owner's Manual

NEED HELP?
If you have questions or if there are any missing parts, contact Customer Tech Support. Contact information is located on the back panel of this manual.
HARDWARE KIT:
text_image
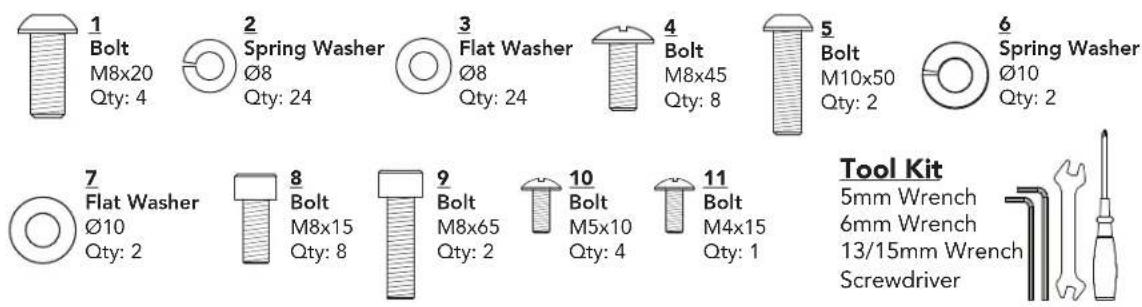
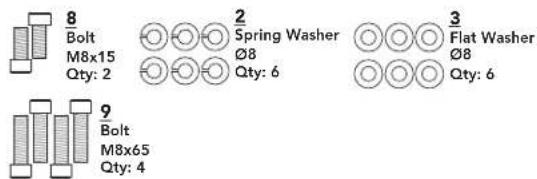
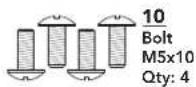
1 Bolt M8x20 Qty: 4 2 Spring Washer Ø8 Qty: 24 3 Flat Washer Ø8 Qty: 24 4 Bolt M8x45 Qty: 8 5 Bolt M10x50 Qty: 2 6 Spring Washer Ø10 Qty: 2 7 Flat Washer Ø10 Qty: 2 8 Bolt M8x15 Qty: 8 9 Bolt M8x65 Qty: 2 10 Bolt M5x10 Qty: 4 11 Bolt M4x15 Qty: 1 Tool Kit 5mm Wrench 6mm Wrench 13/15mm Wrench Screwdriver

text_image
20 21F 1 2 3 21RASSEMBLY STEP 1
STEP 1 HARDWARE :

1 Bolt M8x20 Qty: 4

2 Spring Washer Ø8 Qty: 4

3 Flat Washer Ø8 Qty: 4
1.1 Open hardware for Step 1.
1.2 Attach the Front Stabilizer (21F) and Rear Stabilizer (21R) to the Main Frame (20) using 4 Bolts (1), 4 Spring Washers (2) and 4 Flat Washers (3), and tighten firmly.
text_image
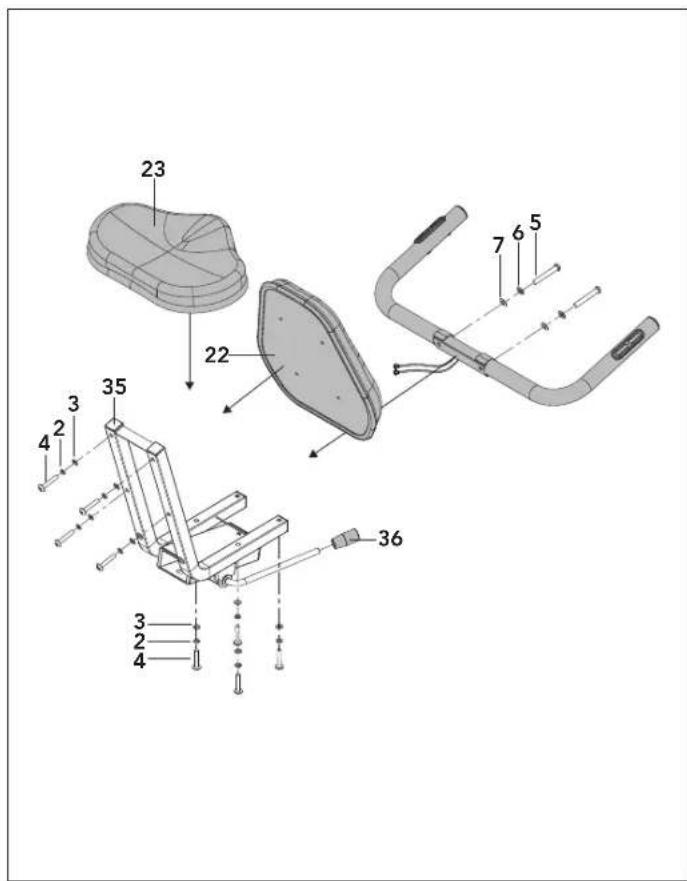
Technical diagram of a mechanical device with numbered parts, likely an exercise chair or exercise frame assembly.ASSEMBLY STEP 2

STEP 2 HARDWARE :

text_image
4 Bolt M8x45 Qty: 8 6 Spring Washer Ø10 Qty: 2 7 Flat Washer Ø10 Qty: 2 5 Bolt M10x50 Qty: 2 2 Spring Washer Ø8 Qty: 8 3 Flat Washer Ø8 Qty: 82.1 Open hardware for Step 2.
2.2 Attach the Seat Cushion (23) and Seat Back (22) to the Seat Frame (35) using 8 Bolts (4), 8 Spring Washers (2), and 8 Flat Washers (3) on each. Tighten firmly.
2.3 Attach the Handlbar Set (30) using 2 Bolts (5), 2 Spring Washers (6), and 2 Flat Washers (7). Tighten firmly
2.4 Attach the Seat Slider Knob (36) to the Seat Slider Lever.
NOTE: Be careful not to pinch any wires while assembling handlebars.


text_image
34 35ASSEMBLY STEP 3
3.1 Insert the Seat Slider Rail (34) through the Seat Frame (35).
NOTE: Make sure the seat slider lever is in the open position when inserting the slider rail.
text_image
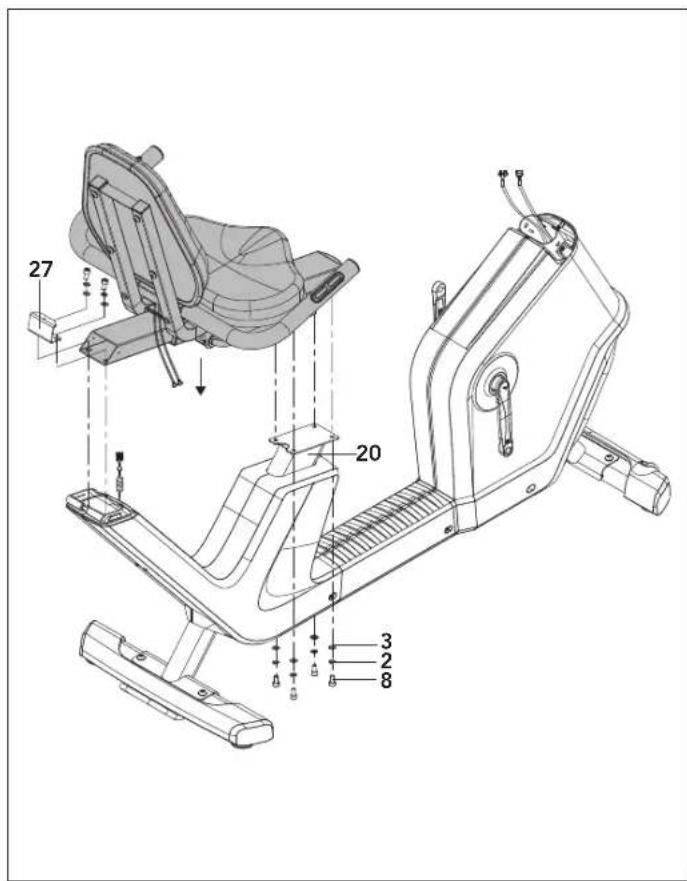
27 20 3 2 8ASSEMBLY STEP 4

STEP 4 HARDWARE :

text_image
8 Bolt M8x15 Qty: 6 2 Spring Washer Ø8 Qty: 6 3 Flat Washer Ø8 Qty: 64.1 Open Hardware for Step 4.
4.2 Attach assembled Seat Set and Rear Cover Bracket (27) to the Main Frame (20) using 6 Bolts (8), 6 Spring washers (2), and 6 Flat Washers (3). Tighten firmly.
NOTE: Be careful not to pinch any wires while assembling seat.


text_image
Technical diagram of a stationary exercise machine with labeled components and an inset showing wiring detailsASSEMBLY STEP 5
STEP 5 HARDWARE :

11
Bolt
M4×15
Qty: 1
5.1 Connect Handlebar Cable (29) to Seat Cable (28).
5.2 Attach the Seat Slider Cover (24) to the Rear cover bracket (27) using 1 Bolt (11).
NOTE: Be careful not to pinch any wires while assembling cover.

text_image
Technical diagram of a stationary exercise machine with numbered components and an inset view showing wiring details.ASSEMBLY STEP 6

STEP 6 HARDWARE :
text_image
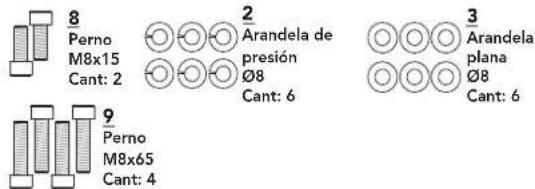
8 Bolt M8x15 Qty: 2 2 Spring Washer Ø8 Qty: 6 3 Flat Washer Ø8 Qty: 6 9 Bolt M8x65 Qty: 46.1 Open hardware for Step 6.
6.2 Wrap Lead Wire (24) around the Console Cable (25) and Heart Rate Cables (27). Pull the wires through the Mast Cover (26) and the Console Mast (33) hole.
6.3 With the Mast Cover (26) on the Console Mast (33), attach the Console Mast (33) to the Main Frame (20) using 6 Bolts (8,9), 6 Spring Washers (2), and 6 Flat Washers (3). Tighten firmly.
6.4 Slide Mast Cover (26) down onto Main Frame (20) and snap into place.
NOTE: Be careful not to pinch any wires while assembling handlebars.

text_image
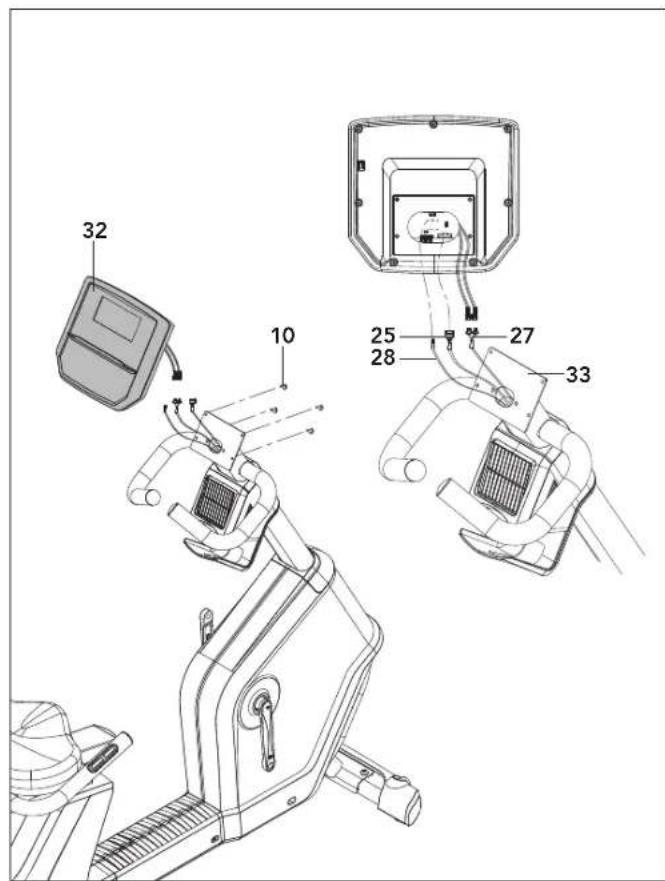
32 10 25 27 28 33ASSEMBLY STEP 7
STEP 7 HARDWARE :
7.1 Open hardware for Step 7.
7.2 Connect Console Cable (25), Heart Rate Cables (27), and Fan Cable (28) to Console (32). Tuck any wire slack into cutout on Console Mast (33).
7.3 Attach Console (32) to Console Mast (33) using 4 Bolts (10). Tighten firmly.
NOTE: Be careful not to pinch any wires while assembling console.
text_image
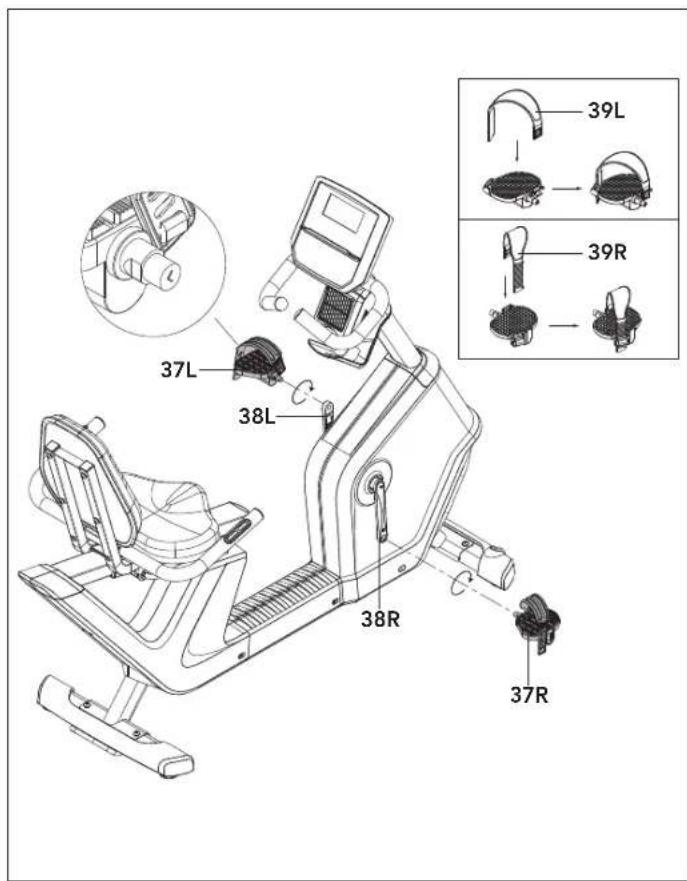
37L 38L 38R 37R 39L 39RASSEMBLY STEP 8
8.1 Identify Left Pedal (37L) which is labeled L on spindle and Right Pedal (37R) labeled R.
8.2 Insert Left Pedal Strap (39L) into Left Pedal (37L) and Right Pedal Strap (39R) into Right Pedal (37R).
8.3 Insert Left Pedal (37L) into Left Crank Arm (38L), ensure screw threads are aligned. Tighten Counter-clockwise.
8.4 Insert Right Pedal (37R) into Right Crank Arm (38R), ensure screw threads are aligned. Tighten Clockwise.
8.5 Use Wrench to fully tighten pedals. No screw threads should be visible and pedal axle should be fully seated.
NOTE: Make sure pedals are FULLY TIGHTENED before use.
NOTE: Left crank arm is reverse threaded so it is very important to tighten counter-clockwise. Tightening the opposite direction can damage pedal or crank arm.


natural_image
Line drawing of a stationary exercise machine with seat and monitor (no text or symbols)ASSEMBLY STEP 9
CONGRATULATIONS!
You have successfully assembled your Recumbent Bike.
CONSOLE OPERATION


5.0R CONSOLE

text_image
LCD Display HORIZON 5.0R MATTIS+ CAL+ TIMER+ SPEED+ CADENCE 188 RPM HR MODE 8:8:8:8 8:8:8:8 RESISTANCE 188 % TIME REMAIN +HR +DIST PROGRAMS P1 MANUAL P2 DISTANCE P3 CALORIES P4 FAT BURN P5 INTERVALS USB Port (Backside) Program Indicators Bluetooth Button Fan Speed Button TIMECAPENCE RESISTANCE SPLIT START STOP RESISTANCE 020-060 DISPLAY ENTER 8010 Quick Keys Up/Down KeysNOTE: There is a thin protective sheet of clear plastic on the overlay of the console that should be removed before use.
LCD DISPLAY WINDOWS: time, remain, distance, calories, heart rate, timer, speed, watts, cadence and resistance level.
LCD DISPLAY INDICATORS: indicates what information is being displayed.
START: press to begin exercising, start your workout, or resume exercising after pause.
STOP: press to pause/end your workout. Hold for 3 seconds to reset the console.
SPLIT: press this key to reset the Segment Time count-up timer to 0 seconds.
UP/DOWN KEYS: used to adjust resistance level.
QUICK KEYS: used to instantly jump to the desired resistance level.
ENTER/DISPLAY: used to confirm a selection. Press to change display feedback during workout.
BLUETOOTH: used to connect bluetooth devices. hold to switch between Heart Rate mode and App mode.
ENERGY SAVER: To minimize energy consumption, your machine will enter energy saver mode (ERP) automatically when not in use and the console will be woken up quickly with a touch of a button.
USB PORT: for charging and software updates, maximum output is 1A/5V.
5.0R CONSOLE DISPLAY
TIME/REMAIN: Shown as minutes: seconds. View the time remaining or the time elapsed in your workout.
HEART RATE: Shown as BPM (beats per minute). Used to monitor your heart rate (displayed when using HR straps).
DISTANCE: Shown as miles. Indicates distance traveled or distance remaining during your workout.
WATTS: Indicates your cycling rate at any moment.
CALORIES: Total calories burned or calories remaining left to burn during your workout.
TIMER: is almost identical to TIME, but will reset to 0s when the split key is pressed.
SPEED: Shown as MPH. Indicate the bike's overall speed on the road.
RESISTANCE: Shows the current level of resistance.
CADENCE: Shown as RPM. Indicates how fast the foot pedals are moving.


PROGRAM INFORMATION
P1) MANUAL: Adjust your resistance manually during your workout.
P2) DISTANCE: Push yourself and go further during your workout with 13 distance workouts. Choose from 1 mile, 2 miles, 5k, 5 miles, 10k, 8 miles, 15k, 10 miles, 20k, half marathon, 15 miles, 20 miles, and marathon goals.
P3) CALORIES: Set goals for burning calories.
P4) FAT BURN: A workout designed specifically to target fat. Promotes weight loss by increasing and decreasing the resistance, while keeping you in your fat burning zone. Includes 10 levels.
P5) INTERVALS: Improves your strength, speed, and endurance by increasing and decreasing the resistance throughout your workout to involve your heart and other muscles. Includes 10 levels.
GETTING STARTED
- Check to make sure no objects are nearby that will hinder the movement of the Bike.
- Plug in the power cord.
NOTE: The Bike does not have a power switch and will turn on when power is supplied.
QUICK START UP
Simply press the START key to begin working out. The time will count up from 0:00, the resistance level will default to level 0. OR...
SELECT A WORKOUT OR TARGET
- Select your PROGRAM with the Up/Down buttons and press ENTER when your desired PROGRAM is displayed.
- Adjust the SETTING with the Up/Down buttons and press ENTER when your desired SETTING is displayed.
- Press START to begin.
NOTE: If no WORKOUT is selected, the program will function as a MANUAL program. All changes in resistance level will need to be from the user in this setting.
TO RESET THE CONSOLE
Hold STOP key for 3 seconds.
When your workout is complete, the monitor display will beep. Your workout information will stay displayed on the console for 30 seconds and then reset.
CLEAR CURRENT SELECTION
To clear the current program selection or screen, hold the STOP button for 3 seconds.


HOW TO SWITCH BETWEEN APP MODE & BT HEART RATE MODE
Home- P1
Connecting to an App (default mode)
If using a 3rd party App, please turn on your device's Bluetooth (BT) and follow the App pairing instructions. Ensure the bike console is not connected to any other BT devices by checking that the BT symbol ✝ is not lit on the console.
If you wish to use the BT HR Strap with a 3rd party App that is capable, then connect to the HR strap from within the App interface (please follow the App instructions to find and connect to the HR Strap).
Follow the 3rd party App instructions to start the program. Some require you to start from inside the App, others require you to press the console Start button first.
To stop the workout, End Ride in the App and press Stop button on console for 3 seconds.
HORIZON CONNECTED FITNESS SYSTEM
Your Horizon machine is Bluetooth ready, allowing you to use Bluetooth 4.0 technology to wirelessly connect your device and other apps to your Horizon bike. For a complete list of 3rd party fitness apps compatible with your Horizon bike follow the link below:
http://horizonfit.co/5-0R

Connecting to HR Strap (off by default)
In order to access to HR Strap mode, make sure the console is not currently connected to any Bluetooth (BT) devices by checking that no BT Symbol ➕ is displayed on the console.
Wear the HR strap, make sure to read the strap instruction. Note: Some chest contact HR straps need to be moist to read the HR precisely.
Press and hold the Bluetooth button for a few seconds until HR MODE symbol displays on the right LCD corner. Once the console detects the BT HR strap, the BT symbol will display on the LED screen.
Hit Start to begin a workout and console should show the heart rate.
To exit HR Strap mode, disconnect the BT HR device and ensure the BT symbol disappears from the display. Then press and hold Bluetooth button for a few seconds until "HR MODE" disappears on LED screen. NOTE: it should take a few seconds for the Bluetooth to disconnect from the console.
TROUBLESHOOTING & MAINTENANCE
X

COMMON PRODUCT QUESTIONS
ARE THE SOUNDS MY Recumbent Bike MAKES NORMAL?
Our Recumbent Bikes are some of the quietest available because they use belt drives and magnetic brake resistance. We use the highest grade bearings and chains/belts to minimize noise. However, because the resistance system itself is so quiet, you will occasionally hear other slight mechanical noises. Unlike older, louder technologies, there are no fans, friction belts, or alternator noises to mask these sounds on our Recumbent Bikes. These mechanical noises, which may or may not be intermittent, are normal and are caused by the transfer of significant amounts of energy to a rapidly spinning flywheel. All bearings, chains/belts and other rotating parts will generate some noise which will transmit through the casing and frame. It is also normal for these sounds to change slightly during a workout and over time because of thermal expansion of the parts.
WHY IS THE Recumbent Bike I HAD DELIVERED LOUDER THAN THE ONE AT THE STORE?
All fitness products seem quieter in a large store showroom because there is generally more background noise than in your home. Also, there will be less reverberation on a carpeted concrete floor than on a wood overlay floor. Sometimes a heavy rubber mat will help reduce reverberation through the floor. If a fitness product is placed close to a wall, there will be more reflected noise.
HOW LONG WILL THE BELT LAST?
The computer modeling we have done indicated virtually thousands of maintenance free hours. You should not have to replace the belt as long as you have the Recumbent Bike.
CAN I MOVE THE Recumbent Bike EASILY ONCE IT IS ASSEMBLED?
Your Recumbent Bike has a pair of transport wheels built into the front stabilizer tube. Please follow the moving the Recumbent Bike section to transport your Recumbent Bike. It is important that you place your Recumbent Bike in a comfortable and inviting room. Your Recumbent Bike is designed to use minimal floor space. Many people will place their Recumbent Bikes facing the TV or a window. If at all possible, avoid putting your Recumbent Bike in an unfinished basement. To make exercise a desirable daily activity for you, the Recumbent Bike should be in a comfortable setting.
TROUBLE SHOOTING
PROBLEM: The Recumbent Bike makes a squeaking or chirping noise.
SOLUTION: Verify the following:
- The Recumbent Bike is on a level surface.
- Loosen all bolts attached during the assembly process, grease the threads, and tighten again.
If this does not remedy the problem, you may
CONTACT CUSTOMER TECH SUPPORT AT THE NUMBER ON THE BACK PANEL.
The following information may be asked of you when you call. Please have these items readily available:
- Model Name
- Serial Number
• Proof of Purchase (receipt or credit card statement)
You may find more troubleshooting suggestions on the customer support section of our website. Contact customer support using the contact information on the BACK PANEL.
In order for Customer Tech Support to service your Recumbent Bike they may need to ask detailed questions about the symptoms that are occurring. Some troubleshooting questions that may be asked are:
• How long has this problem been occurring?
- Does this problem occur with every use? With every user?
- If you are hearing a noise, does it come from the front or the back? What kind of noise is it (thumping, grinding, squeaking, chirping etc.)?
- Has the machine been lubricated and maintained per the maintenance schedule?
Answering these and other questions will give the technicians the ability to send proper replacement parts and the service necessary to get you and your Recumbent Bike running again!

MAINTENANCE
What kind of routine maintenance is required?
Minimal maintenance and cleaning is required. We use sealed bearings throughout our bikes so lubrication is not needed. The most important maintenance step is to simply wipe your perspiration off the bike after each use.
How do I clean my bike?
Clean with mild soap and water cleaners only. Never use solvents on plastic parts. Cleanliness of your bike and its operating environment will keep maintenance problems and service calls to a minimum. For this reason, we recommend that the following preventive maintenance schedule be followed.
MAINTENANCE SCHEDULE
AFTER EACH USE
Clean the Recumbent Bike using soft cloths or paper towels or other gentle solution (cleaning agents should be alcohol and ammonia free). Disinfect the saddle and handlebars and wipe off all bodily residues.
BEFORE EACH USE
Make sure that the Recumbent Bike is level and does not rock. Ensure that the pedals are tight in crank arms and not cross-threaded, all screws on pedals are tight, and pedal straps are not frayed.
MONTHLY
Inspect all assembly bolts and pedals on the machine for proper tightness.
Adhering to this schedule will extend the life of your machine.
LIMITED HOME-USE WARRANTY

WEIGHT CAPACITY = 300 lbs (136 kilograms)
FRAME • LIFETIME
Manufacturer warrants the frame against defects in workmanship and materials for the period specified above from the date of purchase, so long as the device remains in the possession of the original owner. (The frame is defined as the welded metal base of the unit and does not include any parts that can be removed.)
PARTS & ELECTRONICS • 1 YEAR
Manufacturer warrants the electronic components, finish and all original parts for a period specified above from the date of original purchase, so long as the device remains in the possession of the original owner.
LABOR • 1 YEAR
Manufacturer shall cover the labor cost for the repair of the device for a period specified above from the date of the original purchase, so long as the device remains in the possession of the original owner.
EXCLUSIONS AND LIMITATIONS
Who IS covered:
- The original owner and is not transferable.
What IS covered:
- Repair or replacement of a defective motor, electronic component, or defective part and is the sole remedy of the warranty.
What IS NOT covered:
- Normal wear and tear, improper assembly or maintenance, or installation of parts or accessories not originally intended or compatible with the equipment as sold.
- Damage or failure due to accident, abuse, corrosion, discoloration of paint or plastic, neglect, theft, vandalism, fire, flood, wind, lightning, freezing, or other natural disasters of any kind, power reduction, fluctuation or failure from whatever cause, unusual atmospheric conditions, collision, introduction of foreign objects into the covered unit, or modifications that are unauthorized or not recommended by the Manufacturer.
- Incidental or consequential damages. The Manufacturer is not responsible or liable for indirect, special or consequential damages, economic loss, loss of property, or profits, loss of enjoyment or use, or other consequential damages of whatsoever nature in connection with the purchase, use, repair or maintenance of the equipment. The Manufacturer
does not provide monetary or other compensation for any such repairs or replacement parts costs, including but not limited to gym membership fees, work time lost, diagnostic visits, maintenance visits or transportation.
- Equipment used for commercial purposes or any use other than a single family or Household, unless endorsed by the Manufacturer for coverage.
- Equipment owned or operated outside the US and Canada.
- Delivery, assembly, installation, setup for original or replacement units or labor or other costs associated with removal or replacement of the covered unit.
- Any attempt to repair this equipment creates a risk of injury. The Manufacturer is not responsible or liable for any damage, loss or liability arising from any personal injury incurred during the course of, or as a result of any repair or attempted repair of your fitness equipment by other than an authorized service technician. All repairs attempted by you on your fitness equipment are undertaken AT YOUR OWN RISK and the Manufacturer shall have no liability for any injury to the person or property arising from such repairs.
- If you are out of the Manufacturer's warranty but have an extended warranty, refer to your extended warranty contract for contact information regarding requests for extended warranty service or repair.
SERVICE/RETURNS
- In-home service is available within 150 miles of the nearest authorized Service Provider (Mileage beyond 150 miles from an authorized service center is the responsibility of the consumer).
- All returns must be pre-authorized by the Manufacturer.
- Manufacturer's obligation under this warranty is limited to replacing or repairing, at the Manufacturer's option, the same or comparable model.
- Manufacturer may request defective components be returned to the Manufacturer upon completion of warranty service using a prepaid return shipping label. If you have been advised to return parts and did not receive a label, please contact Customer Tech Support.
- Replacement units, parts and electronic components reconditioned to as-new condition by the Manufacturer or its vendors may sometimes be supplied as warranty replacement and constitute fulfillment of warranty terms.
- This warranty gives you specific legal rights, and your rights may vary from state to state.


FRANÇAIS
FONCTIONNEMENT DU VÉLO COUCHÉ

COMMENT DÉPLACER LE VÉLO COUCHÉ
EMPLACEMENT DU VÉLO COUCHÉ
natural_image
Technical line drawing of a stationary exercise machine with no text or symbolsPieds de réglage
COMMENT AJUSTER LE VÉLO COUCHÉ
text_image
Technical line drawing of a stationary exercise machine with labeled components A and BAJUSTEMENT DU SIÈGE
natural_image
Technical line drawing of a mechanical assembly with a bracket and mounting base (no text or symbols)text_image
Technical diagram of a stationary exercise chair with numbered parts for identificationASSEMBLAGE, ÉTAPE 2

MATÉRIEL, ÉTAPE 2

text_image
Technical diagram of a stationary exercise machine with labeled parts and an inset showing component details.ASSEMBLAGE, ÉTAPE 5
MATÉRIEL, ÉTAPE 5

11
Boulon
M4×15
Qté: 1
text_image
Technical diagram of a stationary exercise machine with numbered components and an inset view showing wiring details.ASSEMBLAGE, ÉTAPE 6
MATÉRIEL, ÉTAPE 6

natural_image
Line drawing of a stationary exercise machine with two seats and control panel (no text or symbols)ASSEMBLAGE, ÉTAPE 9
FÉLICITATIONS!
QUESTIONS COURANTES SUR LE PRODUIT
EST-CE QUE LES SONS QUE FAIT MON VÉLO COUCHÉ SONT NORMAUX?
natural_image
Technical line drawing of a stationary exercise machine with labeled components (A and B), no text or symbols present.AJUSTE DEL ASIENTO
natural_image
Technical line drawing of a mechanical assembly with a bracket and mounting base (no text or symbols)text_image
Technical diagram of a mechanical device with numbered parts, likely an exercise or support system.PASO DE ENSAMBLAJE 2
PASO 2. TORNILLERÍA:

text_image
4 Perno M8x45 Cant: 8 6 Arandela de presión Ø10 Cant: 2 7 Arandela plana Ø10 Cant: 2 5 Perno M10x50 Cant: 2 2 Arandela de presión Ø8 Cant: 8 3 Arandela plana Ø8 Cant: 8text_image
Technical diagram of a stationary exercise machine with labeled components and an inset showing wiring connections.PASO DE ENSAMBLAJE 5
STEP 5 HARDWARE :

11 Perno M4x15 Cant: 1
text_image
Technical diagram of a stationary exercise machine with numbered components and an inset view showing wiring connections.PASO DE ENSAMBLAJE 6
PASO 6. TORNILLERÍA:
text_image
8 Perno M8x15 Cant: 2 2 Arandela de presión Ø8 Cant: 6 3 Arandela plana Ø8 Cant: 6 9 Perno M8x65 Cant: 4natural_image
Line drawing of a stationary exercise machine with two seats and control panel (no text or symbols)PASO DE ENSAMBLAJE 9
¡FELICITACIONES!
if you have any problems during assembly or if parts are missing.
For fast and friendly service, please contact one of our trained customer technicians via phone, email or our website.
We want to know if you have a problem and we want to have an opportunity to correct it for you.
Additional product information is available on our website.

ASSISTANCE TECHNIQUE
NE PAS RETOURNER L'APPAREIL AU DETAILLANT
techsupport@horizonfitness.com
www.horizonfitness.com
https://horizonfit.co/support

Horizon 5.0R 03202023 © 2021 Horizon Fitness
Designed & Engineered in the U.S.A. • Made in Vietnam | Conçu et élaboré aux États-Unis. • Fabriqué en Vietnam | Diseñado en los EE. UU. • Hecho en Vietnam
Horizon Fitness
1600 Landmark Drive,
Cottage Grove WI, 53527