
SMART 450 - Commercial refrigerator MPM - Free user manual and instructions
Find the device manual for free SMART 450 MPM in PDF.
| Product type | Professional refrigerator |
| Brand | MPM |
| Model | SMART 450 |
| Dimensions (W x D x H) | 596 x 624 x 2014 mm |
| Net volume | 427 L |
| Net weight | 105 kg |
| Power supply | 220-240 V / 50 Hz, fuse 10-16 A |
| Defrost | Automatic |
| Refrigerant | R290 (HC) – flammable |
| Climate class | 4 (30°C, 55% RH) |
| Maximum weight per shelf | 28 kg |
| Number of shelves supplied | 5 (4 with spacer, 1 without) |
| Door | Glazed, with automatic closure |
| Lighting | LED |
| Locking device | Optional (padlock or eye lock) |
| Night cover | Optional |
| PRCD integrated into cord | Yes |
| Required rear space | 100 mm minimum |
| Cleaning | Unplug before cleaning, do not use water jet |
| Recommended cleaning frequency | 2 times per year |
| Warranty | According to sales conditions |
Frequently Asked Questions - SMART 450 MPM
User questions about SMART 450 MPM
0 question about this device. Answer the ones you know or ask your own.
Ask a new question about this device
Download the instructions for your Commercial refrigerator in PDF format for free! Find your manual SMART 450 - MPM and take your electronic device back in hand. On this page are published all the documents necessary for the use of your device. SMART 450 by MPM.
USER MANUAL SMART 450 MPM
Smart-900L HD [R290] LC
Smart-900L SD [R290] LC
Smart-1300 HD [R290] LC
Smart-1300 SD [R290] LC


natural_image
Exterior view of a FRIGOGLESS refrigeration unit with multiple side dishes (no visible text or symbols on the cabinet itself)
User Manual
This User Manual was originally written in English. Please read the instructions carefully before using this ICM.

Please see below the meaning of the symbols used throughout the manual, for your better understanding.
2.2 Climate classification 8
2.3 Technical specifications 8
2.4 Physical dimensions 8
2.5 Maximum weight per shelf 8
- Installation & operation 9
3.1 ICM placement instructions 10
3.2 Shelf installation instructions ..... 11
3.3 Connection to the mains supply 12
3.4 Operation instructions .... 12
- Electronic controller 13
4.1 Knowing your ECOBOX / HEC Controller*.... 13
4.2 Knowing your Danfoss ERC-112 Controller*.... 13
- Door blocking system*...... 13
5.1 Application with hinged door ICMs ..... 13
5.2 Application with sliding door ICMs ..... 13
- Locking system*.... 14
6.1 Instructions for using the padlock provision .... 14
6.2 Instructions for using the eye-lock ..... 14
6.3 Instructions for using the transport lock of the rotoshelf for the Smart-900 ..... 15
-
Night Cover*...... 15
-
RCCB* 16
-
PRCD* 16
-
Care & cleaning 17
-
Troubleshooting 17
-
First aid.... 19
-
Disposal of the unit and packaging ..... 19
-
Recycling information 20
-
Warranty 20
APPENDIX A: Handling & transportation guidelines 21
APPENDIX B: Preventive maintenance guidelines 21
APPENDIX C: Guidelines to prevent corrosion of the cabinet.... 22
Table des matières
-
Avant-propos ...... 23
-
Description technique 23
2.1. Généralités 23
2.2. Classification climat 23
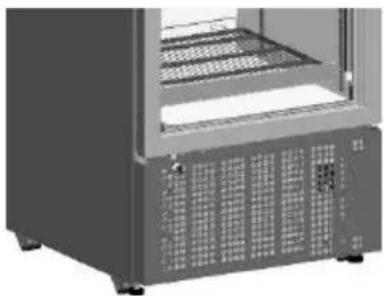
Thank you for purchasing this new Ice Cold Merchandiser (ICM) from Frigoglass. Before using this unit please read the instructions below carefully. A well-maintained Frigoglass ICM will help you increase your sales and profits.
2. Technical description
2.1 General
The merchandiser must be connected to a grounded mains outlet with fuse rating of 10-16A. The outlet must be easily accessible for the purposes of installation and servicing.
2.2 Climate classification
According to climate specifications, models Smart-300 [R290] LC, Smart-450L [R290] LC, Smart-800 [R290] LC, Smart-900L SD [R290] LC, Smart-900L HD [R290] LC, Smart-1300 HD [R290] LC and Smart-1300 SD [R290] LC are Class "4", namely ambient temperature of 30^ C and 55% humidity; model Smart-450L SZ T [R290] is Class "5", namely ambient temperature of 40^ C and 40% humidity.
2.3 Technical specifications
| Rating Voltage / Frequency 220-240 V / 50 Hz | |
| Defrosting Automatic | |
2.4 Physical dimensions
| Model | Width (mm) | Depth (mm) | Height (mm) | Volume (Lt) | Net Weight (kg) |
| Smart-300 [R290] LC 495 625 | 1 | 1619^2 | 258 75 | ||
| Smart-450L [R290] LC 596 624 | 1 | 2014^2 | 427 105 | ||
| Smart-450L SZ T [R290] 596 629 | 1 | 2014^2 427 112 | |||
| Smart-800 [R290] LC 785 785 | 1 | 2139^2 | 778 145 | ||
| Smart-900L SD [R290] LC 890 | 730 | 3 | 2000^4 | 722 159 | |
| Smart-900L HD [R290] LC 890 | 732 | 1 | 2014^2 | 823 152 | |
| Smart-1300 HD [R290] LC 1310 | 740 | 1 | 2139^2 | 1281 200 | |
| Smart-1300 SD [R290] LC 1310 | 738 | 3 2 | 125 4 | 1212 210 |
^1 Excluding handle & 80mm back spacer
^2 Including rollers & hinge cover
^3 Excluding 80mm back spacer
^4 Including rollers
2.5 Maximum weight per shelf
| Model | Maximum weight per shelf (kg) |
| Smart-300 [R290] LC | 24 |
| Smart-450L [R290] LC | 28 |
Model Maximum weight per shelf (kg)
| Smart-450L SZ T [R290] | 28 |
| Smart-800 [R290] LC | 65 |
| Smart-900L SD [R290] LC 61 | |
| Smart-900L HD [R290] LC 70 | |
| Smart-1300 HD [R290] LC 50 | |
| Smart-1300 SD [R290] LC 45 |
Models Smart-300 [R290] LC, Smart-450L [R290] LC, Smart-450L SZ T [R290], Smart-800 [R290] LC, Smart-900L SD [R290] LC, Smart-900L HD [R290] LC, Smart-1300 HD [R290] LC and Smart-1300 SD [R290] LC are equipped with HC refrigerant, and have been tested and proven to be safe according to related standards.
All necessary actions for safe usage & maintenance of this appliance are described in this manual and need to be followed carefully. This appliance must be installed only by a suitably qualified person.
3. Installation & operation

Failure to comply with the instructions may result in high-energy consumption, poor performance of the unit and void warranty.

- Keep clear of obstruction all ventilation openings in the appliance enclosure or in the structure for building-in
- Do not use mechanical devices or other means to accelerate the defrosting process, other than those recommended by the manufacturer
- Do not damage the refrigerant circuit
- Do not use electrical appliances inside the food storage compartments of the appliance, unless they are of the type recommended by the manufacturer
- If the supply cord is damaged, it must be replaced by the manufacturer, its service agent or similarly qualified persons in order to avoid a hazard.

Do not place the merchandiser:
- in direct sunlight or near heat sources (radiators, stoves & other heating equipment)
- outdoors, without protection from rain that prevents water falling directly on the merchadiser
• in climate conditions for which it is not certified - in extreme environmental conditions (i.e. exposure to saline humidity)
• on a surface with an angle more than 5°
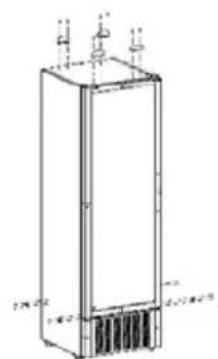
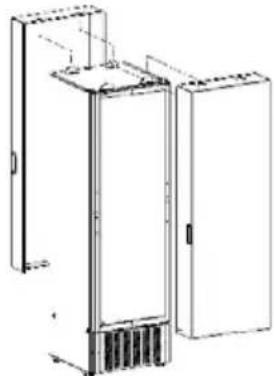
3.1 ICM placement instructions
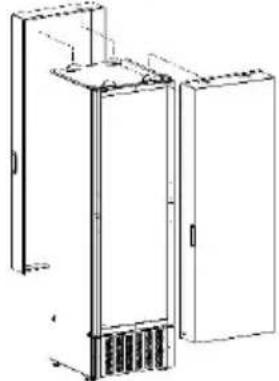
a. After unpacking, check the cabinet for any damage caused during transportation. In the event of damage, please contact the forwarding company.
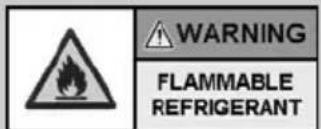
b. Always ensure that your merchandiser is installed on a stable surface/floor and is properly leveled. There are 2 adjustable feet for all models at the front under the chassis apart from Smart-1300 which has 3 adjustable feet. The level foot at the middle of the cooler must be adjusted in such a way that the lower edges of the internal cabin are aligned. The below given check points must be on the same line.
Please, adjust until the ICM levels and check using a spirit level, if available. Take necessary precautions if lifting is needed during installation. Keep unauthorised people away from the cooler until installation is completed.
c. The merchandiser must stand upright for at least 1 hour after transportation and prior to start-up. This gives the oil time to run back to the compressor after transit and installation.
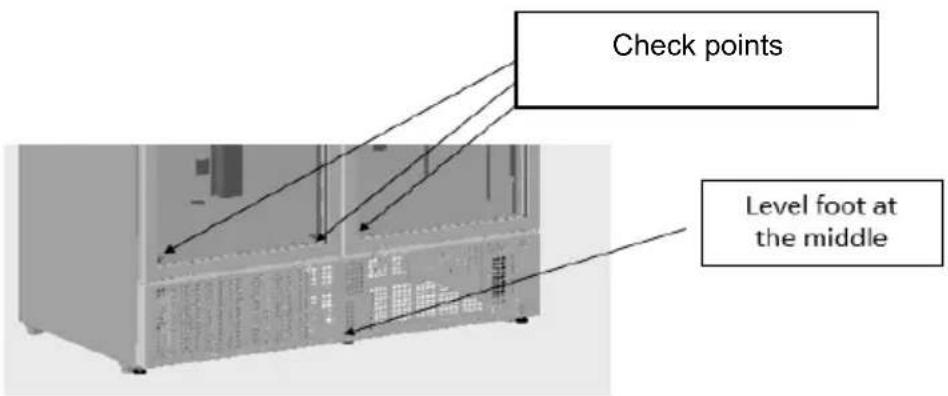
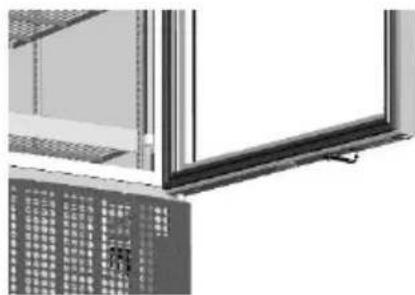
d. Allow a minimum gap of 100mm at the back. To make that possible, please turn the back spacer as shown below.
e. Do not place anything on top of the cooler.
Note: Relocation of the ICM inside the outlet
a. Empty the ICM and unplug from mains supply.
b. Fully extract the leveling feet.
c. Move the unit to the desired location with the assistance of another person.
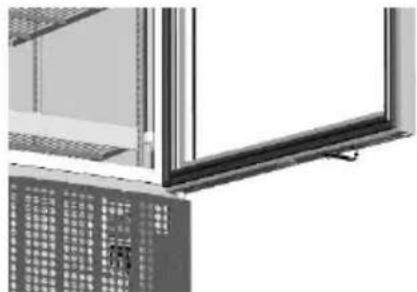
3.2 Shelf installation instructions
To adjust the shelf first unload it, lift it and unclip the shelf clips (4). Place the clips in the desired position and reposition the shelf. Make sure that the horizontal metal rods at the bottom of the shelf are between the front and back shelf clips, as shown below.

Note: Specifically, the Smart-450L, 500 & 800 models are each equipped with 4 shelves with spacers (on the back side) and one shelf without spacer.
The shelf without spacer has to be placed on top level in order to fit with the additional metal part for air circulation, as shown in below pictures.

Note: When using the optional front visibility shelving system, please follow the installation instructions included in the shelving kit.
3.3 Connection to the mains supply
Connect the ICM to a 220-240 Volts power supply on a 10-16A fused & grounded socket. Do not use extension cables.

Do not connect the merchandiser to:
- a non grounded wall socket or power line
- improper supply voltage and frequency
- power supply that does not comply with the safety regulations of the appliance or with current legislation on electrical installations

- If the mains cord supplied is not long enough, do not use an extension lead. Ask an authorised electrician to replace the cord with a longer one, if such is described in the list of authorised spare parts only.
- Do not plug the cooler into a multiple outlet strip.
- Route the mains cord in such a way that it is protected from damage and does not pose a risk of tripping.
3.4 Operation instructions

Do not use the merchandiser to store food. Do not store explosive substances such as aerosol cans with a flammable propellant in this appliance.

This appliance is not intended for use by young children or handicapped or infirm persons unless they are adequately supervised by a responsible person who will ensure the safe operation of the appliance on their part. Young children should be supervised to ensure that they do not play with the appliance.

Do not operate the appliance with any of the cover sheets and guards open.
Energy saving tips:
For energy saving and for the ICM's better performance:
- Load your ICM at night-time so that the drinks are cold once you get there in the morning.
- Store your back-up stock in a cool and/or dark place so that when reloaded, the ICM will need much less time to cool them down.
• Wipe moisture off the products before you place them in the ICM. - Avoid opening the door for long periods of time.
4. Electronic controller
4.1 Knowing your ECOBOX / HEC Controller \*
For instructions of the functionality of ECOBOX/ HEC Controller and its related optional features, please visit the following website link: http://www.frigoglass.com/manuals/.
4.2 Knowing your Danfoss ERC-112 Controller†
For instructions of the functionality of Danfoss ERC-112 Controller and its related optional features, please visit the following website link: http://www.frigoglass.com/manuals/.
5. Door blocking system \*
In using the door blocking system, please follow the steps below
5.1 Application with hinged door ICMs
To block the Door at 90 degree:
Step 1: Open the door to an angle slightly greater than 90 degrees
Step 2: Remove the door blocker from bracket below the door (as shown in the picture)
Step 3: Rotate the door blocker towards the cabin and insert it in bracket located at front grid (as shown in the picture)
To unblock the Door:
Step 1: Open the door slightly greater than 90 degrees and remove the door blocker manually from bracket located at front grid
Step 2: Rotate the door blocker towards door and snap fit in bracket below the door (Initial position)

Automatic removal of door blocker from bracket located at front grid is for accidental purpose only.
natural_image
Architectural detail showing window frame and ceiling panels with control panel (no text or symbols visible)5.2 Application with sliding door ICMs
Step 1: Open the left door (same procedure also for right door)
Step 2: Lift up and rotate the door blocker towards the cabin (as shown in the picture)
Step 3: Place door blocker vertical to door guides (as shown in the picture). Door blocker will be blocked at door guides walls and prevent the door to close.
Step 4: Release the door blocker from the stopping point and rotate to the initial position
natural_image
Exterior view of a window with a small train on the side (no signage or text visible)
natural_image
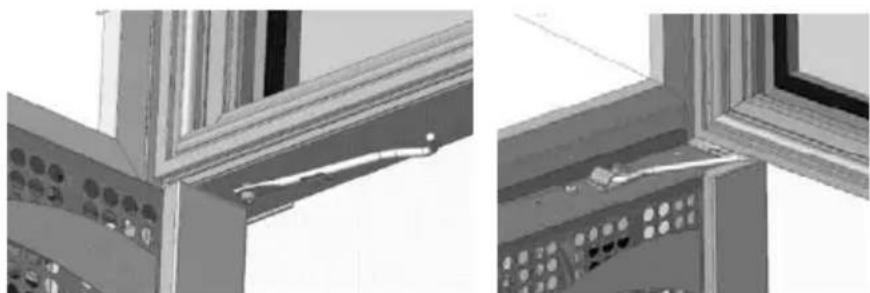
Exterior view of a building corner with window frame and brick facade (no signage or text)6. Locking system \*
6.1 Instructions for using the padlock provision
Step 1: Open the door
Step 2: Rotate the locking system blade placed on the grid (as shown in the picture)
Step 3: Rotate the locking system blade placed on the door (as shown in the picture)
Step 4: Close the door and place the pad lock through the blade holes to secure cooler

natural_image
Interior view of a refrigerator with open door and ventilation grilles (no visible text or symbols)Step 2

natural_image
Exterior view of a modern office building (no signage)Step 3
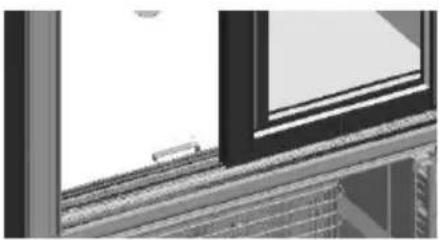
6.2 Instructions for using the eye-lock
Step 1: Close the door
Step 2: Place the key to the front grilles lock and rotate 90^ (as shown in the picture)
Step 3: Door is locked. Key withdrawals in both locked and unlocked position
natural_image
Exterior view of a server rack unit with ventilation grilles and mounting feet (no visible text or labels)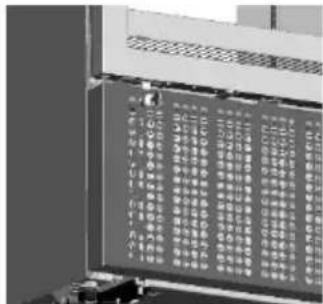
For sliding door coolers the eye-lock is positioned on the middle of external door plastic profile side
natural_image
Exterior view of a modern stainless steel refrigerator with multiple side shelves (no visible text or symbols)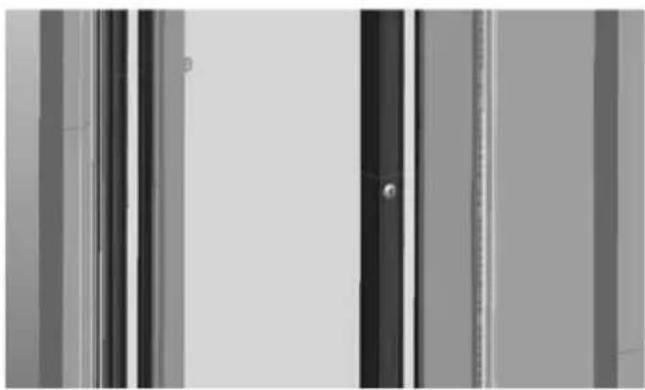
natural_image
Exterior view of a modern office building (no signage)Sliding door version coolers
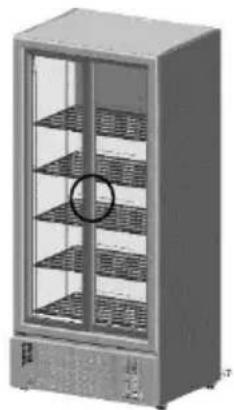
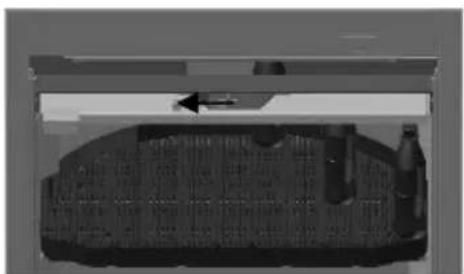
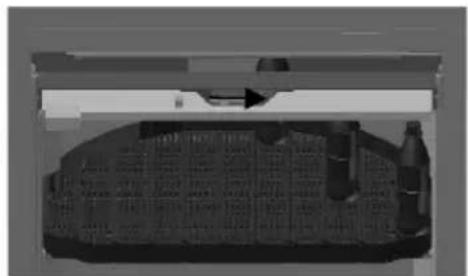
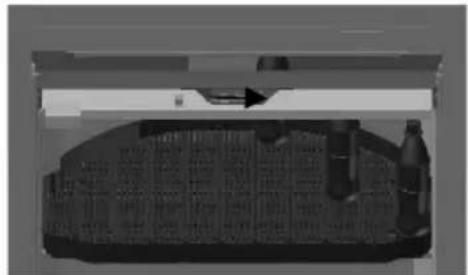
6.3 Instructions for using the transport lock of the rotoshelf for the Smart-900
Step 1: Open the door
Step 2: Slide the locking system blade (located at the middle of the top bar of the shelf holding structure).
Step 3: Rotoshelf is locked.
natural_image
3D rendered mechanical component with internal structure and directional arrow (no visible text or symbols)Locked
Unlocked
natural_image
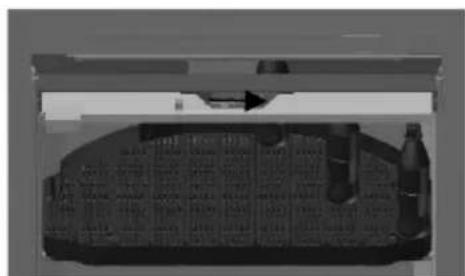
Interior view of a vehicle showing a roof, dashboard, and side mirror (no visible text or symbols)7. Night Cover \*
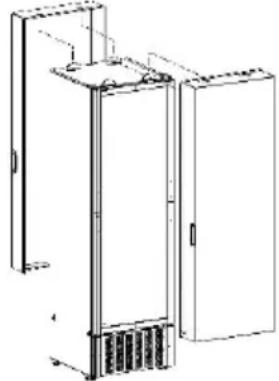
In placing the night cover, please follow the steps bellow
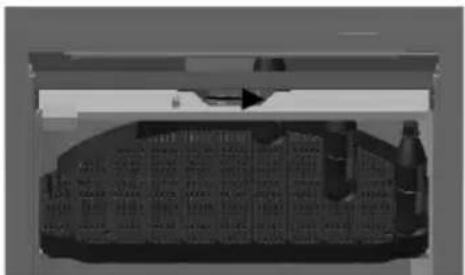
Step 1: Drill holes on top and sides of cooler and apply the supporting blades and latches (as shown in the picture and described in the installation instructions that are included in the night cover kit).
Step 2: Fix night cover on the front side of the assembly and use padlock to secure it, as shown in the picture (the back side assembly can be used to store night cover when the cooler is in use).
natural_image
Technical line drawing of a vertical rectangular device with internal components and ventilation grilles (no text or symbols)Step 1

natural_image
Technical line drawing of a cabinet or enclosure with internal components and mounting brackets (no text or symbols)Step 2
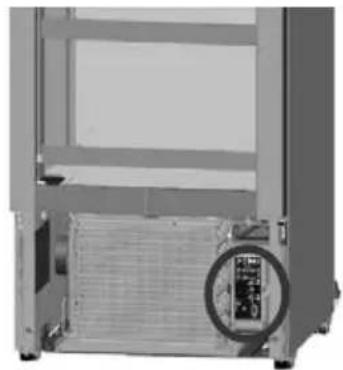
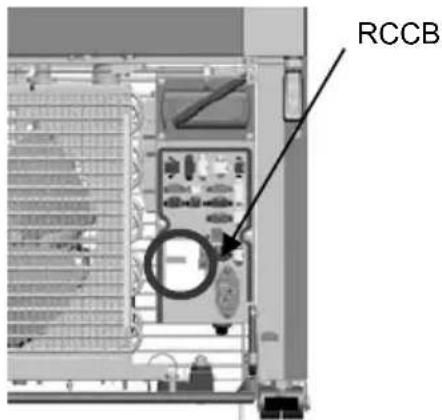
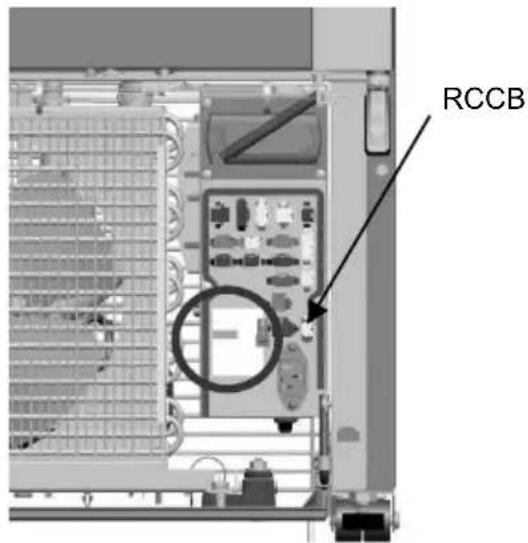
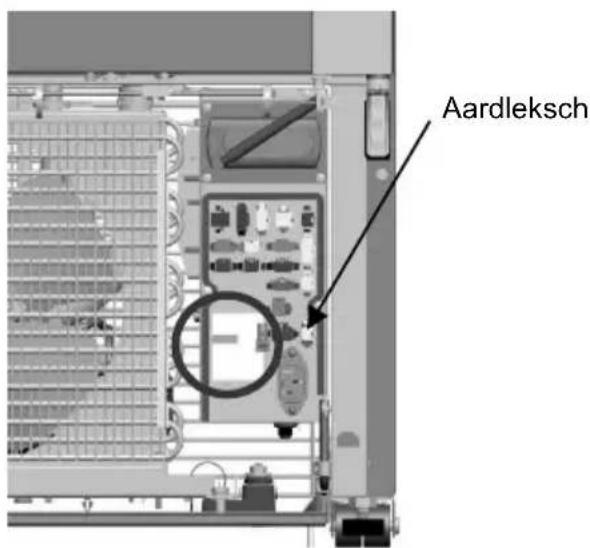
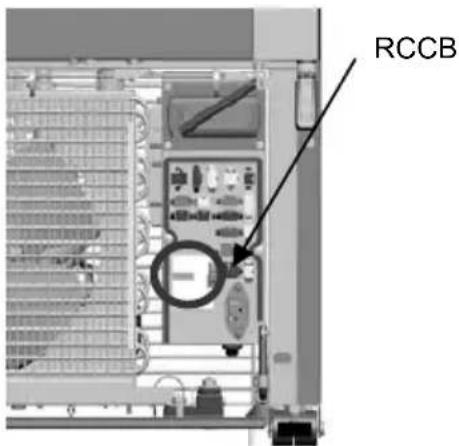
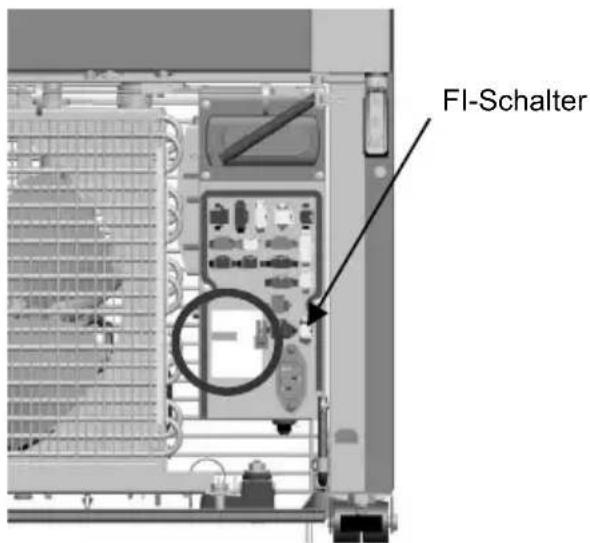
8. RCCB \*
In accessing the RCCB, please follow the steps below
Step 1: Remove the grid to get access to the electrical box (that is marked in circle in the respective picture below)
Step 2: Remove the connectors' cover of the electrical box
Step 3: Access the RCCB switch (that is marked in circle in the respective picture below and indicated also on the sticker on the front of the cover)
natural_image
Exterior view of a mechanical or electronic device casing with a circular inset showing internal components (no visible text or symbols)Step 1
Step 2, 3
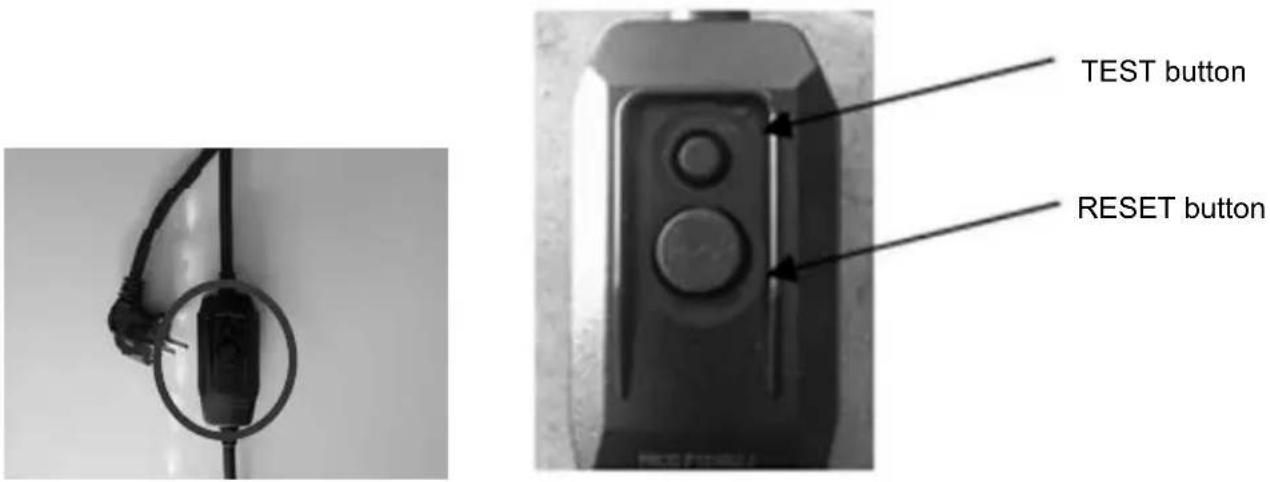
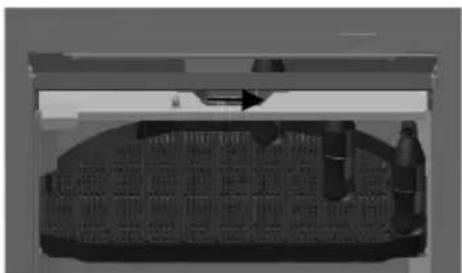
9. PRCD \*
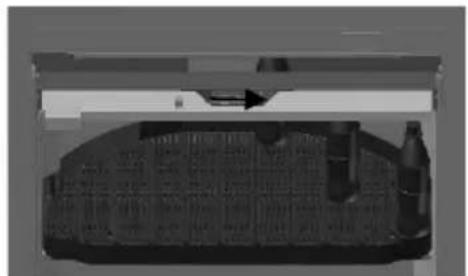
The PRCD device is integrated to the power cord of the unit (as shown in picture below), close to the wall plug.
The PRCD device features two buttons; the small one is the "test" button and is used to check the operational status of the PRCD. The bigger button is the "reset" and is used to rearm the PRCD after a triggering event.
When plugging off the power cord a test needs to be performed to ensure proper operation of the PRCD. Please follow the steps below:
Step 1: Plug into power.
Step 2: Press (small) "TEST" button. The (big) "RESET" button should pop-up.
Step 3: Press the "RESET" button again. Do not use the device if it fails!
10. Care & cleaning

- Prior to any cleaning (inside or outside the device) procedure, unplug the ICM! Remove the plug and make sure that the operator can check from any of the points which he has access that the cable is unplugged.
• Never use a water hose or high pressure jet to clean the cooler.
It is important to clean the merchandiser at least twice a year. In order to avoid mold formation, odours, etc. product compartments must be thoroughly cleaned. The interior of the ICM should be cleaned with a mildly soapy cloth and the glass surface using a window-cleaning agent.

- In case the merchandiser is placed in very dusty and/or greasy environment, the regular cleaning of the condenser by an authorised technician is mandatory.
- Keep the cooler in a stable position during cleaning, do not step on or lean over the cooler.
- Do not clean with sharp objects, flammable or corrosive liquids or sprays.
11. Troubleshooting

All access to the cooling system and electrical parts (changing lighting or refrigeration deck) must be performed by authorised personnel only.
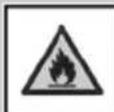
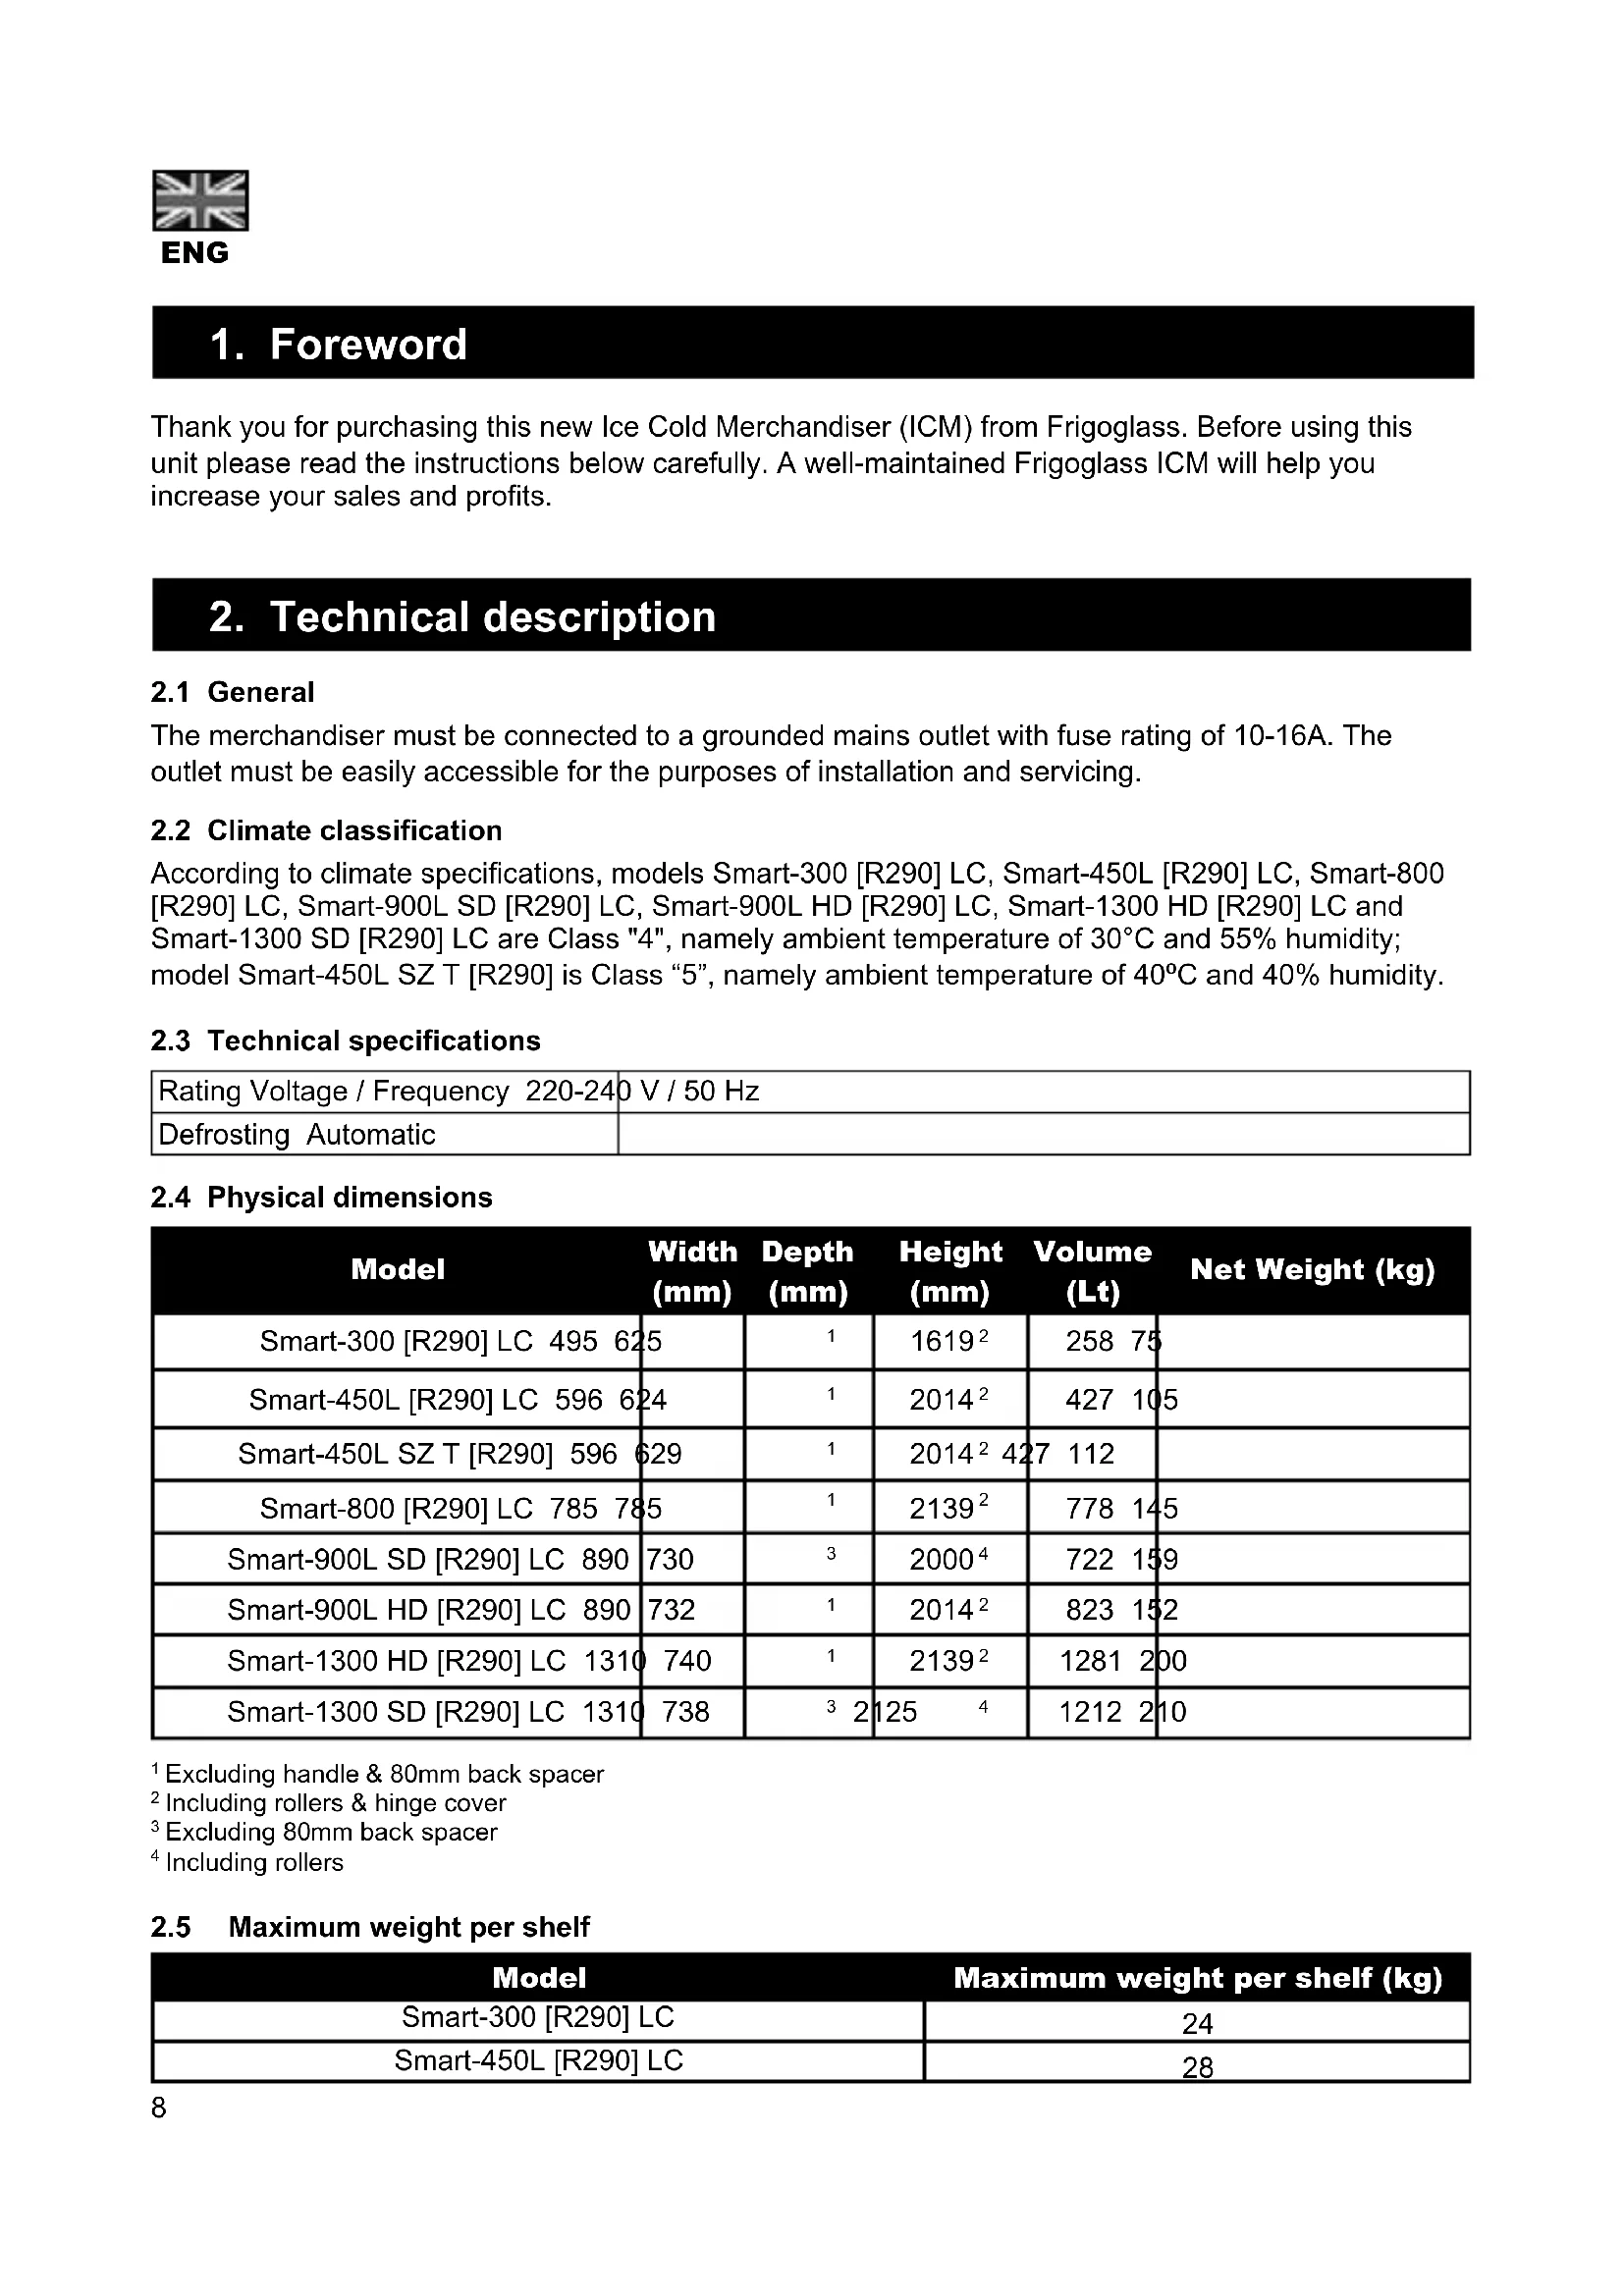
WARNING
FLAMMABLE REFRIGERANT
Models Smart-300 [R290] LC, Smart-450L [R290] LC, Smart-450L SZ T [R290], Smart-800 [R290] LC, Smart-900L SD [R290] LC, Smart-900L HD [R290] LC, Smart-1300 HD [R290] LC and Smart-1300 SD [R290] LC are equipped with HC refrigerant. All service operations on cooling mechanism & gas charging should be performed in a well-ventilated environment or in open air. Do not smoke during maintenance.

- UNPLUG THE COOLER PRIOR TO ANY MAINTENANCE OR SERVICE OPERATIONS. REMOVE THE PLUG AND MAKE SURE THAT THE OPERATOR CAN CHECK FROM ANY OF THE POINTS WHICH HE HAS ACCESS THAT THE CABLE IS UNPLUGGED.
- After maintenance operations, make sure that the grounding connections are in place before assembling the covers. Make sure you use the same fastening components and covers.

- If any electrical components need to be replaced, use only the appropriate components in the spare part list supplied by the technical service department of Frigoglass.
- Keep the glass door of the cooler closed during maintenance. If the compressor needs to be replaced, you may need to use adequate support to stabilize the cooler.
- After maintenance operations make sure that the strain relief, which supports the supply cord, is assembled properly.
If the ICM is not functioning properly or is out of order, please check the following before calling the authorised service provider:
FAULT POSSIBLE REASONS HANDLING
| The ICM does not work. | Power cord not plugged in. Plug it in. | |
| No power supply at the socket. Check the outlet fuse. | ||
| The ICM does not cool. | The ICM has recently been reloaded with warm products. It takes some time to cool warm products down. | Preferably, reload the ICM before night closing. |
| The ICM is loaded in such a way that the air circulation in the interior is getting blocked. | Load the ICM according to the standards you have been provided with by the company. | |
| The ICM does not cool. | The door does not seal properly. | Repair the doors for proper closing (this type of repair should be performed by an authorised technician). |
| Leakage in the cooling system. | Repair the leakage (this type of repair should be performed by an authorised technician). | |
| FAULT POSSIBLE REASONS HANDLING | ||
| The ICM makes noise. | Intense metallic noise. Call a Service technician. | |
| Inclined or not even floor. | Level the ICM properly by adjusting its feet. Placing a spirit level on the top of the ICM will assist you in leveling it. | |
| There is water on the floor. | The drainage hole for the condensate water is blocked. | Unblock the drainage hole. |
| There is a leakage in the tray. Call a Service technician. | ||
| The lights don’t work. | The lighting or the transformer are out of order | Call a Service technician. |
If after all the above-mentioned checks the problem with your ICM remains, contact the customer service department of your supplier and provide the following information:
- Type of ICM
- Serial number of the ICM
- Brief description of the problem / observation
12. First aid
In case of accident, it is recommended:
| ACCIDENT IMMEDIATE ACTION | |
| Inhalation of refrigerant | Take deep breaths of clean air. If irritation persists, contact a doctor. |
| Contact with eyes | Wash your eyes thoroughly with plenty of water for at least 15 minutes and then consult a doctor. |
| Contact with skin | Wash immediately with water. |
13. Disposal of the unit and packaging
For detailed information regarding the recycling of this product and its packaging, please contact your local city office, your waste disposal service or the manufacturer through its service agent. By ensuring this product and its packaging is disposed of properly, you will help prevent potential negative consequences for the environment and human health, which could otherwise incur by this product's and packaging inappropriate disposal.
Packaging consists of wooden pallets, cardboard/ plastic parts and stretch film. Cardboard, kraft paper, plastic parts and films can be disposed for recycling at your curbside collection bins or at your local recycling facility. Wooden pallets may be reused or disposed for energy recovery.
14. Recycling information
-
Based on the objectives of environmental policy according to the European Community (EC) directives for Waste Electrical and Electronic Equipment (WEEE) ^* which aim to preserve, protect and improve the quality of the environment, protect human health and utilize natural resources prudently and rationally. As an end user, you are kindly requested to do the following:
-
If the appliance has stopped working, even after troubleshooting; first check if it can be repaired, before disposing it. Contact your distributor or supplier for further information on possible repairs of your appliance, if in doubt.
- If the appliance has reached its "End of Lifecycle" (EOL), in other words, the appliance is not repairable or re-usable; do not dispose of the appliance as unsorted municipal waste. Instead, ensure that it is collected separately from a recycling company.
Note: The disposal of electronic and electrical appliances in landfill sites or through incineration creates a number of environmental problems. When obsolete materials are not recycled, raw materials have to be processed to make new products. This represents significant loss of resources as the energy, transport and environmental damage caused by these processes is considerable.
• To help in the recovery and recycling process of this appliance, do not dismantle or break parts off the appliance prior to collection. By removing parts off the appliance, you can reduce its recyclability rate.
2. The symbol shown in Fig 1 below, which is also on the Product Label inside the appliance, indicates the need for separate collection of electrical and electronic equipment based on the European Community (EC) WEEE Directive.
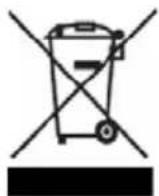
Figure 1 - Crossed-Out Wheeled Bin
- Finally, observe any recycling laws applicable to your community or country.
15. Warranty
The appliance is covered by a warranty as this has been agreed upon sale.
FOR AUTHORISED SERVICE PERSONNEL ONLY
APPENDIX A HANDLING & TRANSPORTATION GUIDELINES

The merchandiser should always be transported:
• in upright position (unless otherwise authorised by the supplier)
• with the doors closed and stoppers for the sliding door models
- in its original packaging or similar one.
Cooler temperature during storage or transportation should not be below -20°C or above + 60°C
APPENDIX B PREVENTIVE MAINTENANCE GUIDELINES

PRIOR TO ANY CLEANING (INSIDE OR OUTSIDE THE DEVICE) OR MAINTENANCE PROCEDURE, UNPLUG THE ICM! REMOVE THE PLUG AND MAKE SURE THAT THE OPERATOR CAN CHECK FROM ANY OF THE POINTS WHICH HE HAS ACCESS THAT THE CABLE IS UNPLUGGED.
It is mandatory that an authorised service agent performs the following operations during the Preventive Maintenance of an ICM once or twice a year, using a vacuum cleaner:
• Cleaning of the condenser
- Cleaning of the dust filters (if applicable).
If the ICM is placed in an environment where dust is accumulated on the condenser, then the condenser has to be cleaned more often.
Additionally, it is recommended that the following operations are carried out during preventive maintenance:
-
Mechanical system:
-
Check that the equipment is correctly positioned and leveled.
- Check that the front and back grid are fixed in place.
- Check the self-closing system of the door.
- Check that the fan support and fan grid are fixed in place.
-
Check the draining system and unclog if necessary.
-
Electrical system:
- Check the power cable (replace if needed).
- Check the illumination system.
- Check the electrical connections.
- Check that the electrical box cover of the thermostat or the electronic controller is properly installed.
ENG
- Check that components that might have been replaced during servicing are original.
- Refrigeration system:
- Check that the compressor is functioning properly.
- Check the starting relay, the overload and the capacitor. The Supplier recommends that the compressor's starting relays and overloads be replaced every 3-4 years.
- Check the fan motor condenser and fan motor evaporator.
- Check that the thermostat or the electronic controller and its components are functioning properly.
- Check the cooling performance of the ICM.
- Check the cooling circuit using the appropriate leak detector in case there is any concern or sign of refrigerant leak.
APPENDIX C GUIDELINES TO PREVENT CORROSION OF THE CABINET
-
Avoid damages resulting from improper installation & operation, improper maintenance & cleaning, as well as improper handling and transportation, as per paragraphs 3, 5 and the Appendix A above.
-
Do not perform unauthorised adaptations, modifications or adjustments to the cabinet.
1. Avant-propos
2. Description technique
2.1. Généralités
natural_image
Exterior view of a window frame with recessed panels and control panel (no text or symbols visible)natural_image
Exterior view of a window with a small train on the side (no signage or text visible)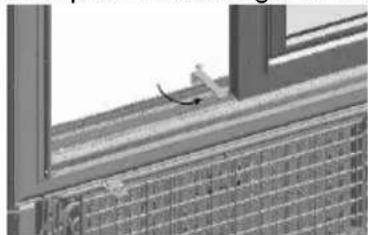
natural_image
Close-up of a window frame with a small object on top, showing no visible text or symbols.natural_image
Interior view of a refrigerator with open door and side panel (no visible text or symbols)2e étape
natural_image
Exterior view of a modern office building (no signage)3e étape
natural_image
Exterior view of a server rack unit with ventilation grilles and ventilation grilles (no text or symbols visible)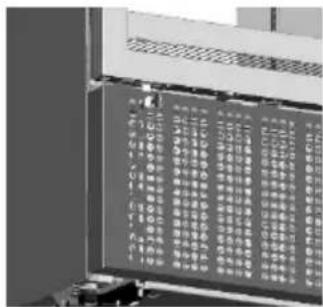
natural_image
Exterior view of a modern stainless steel refrigerator with glass doors and side grilles (no visible text or symbols)
natural_image
Exterior view of a modern office building (no signage)natural_image
Interior view of a vehicle showing a rearview mirror and dashboard with two bottles (no visible text or symbols)Verrouillé

natural_image
Cross-sectional view of a mechanical assembly or housing with internal components (no visible text or symbols)Déverrouillé
natural_image
Technical line drawing of a rectangular industrial or electrical cabinet with cooling fins and mounting feet (no text or symbols)1e étape
natural_image
Technical line drawing of a cabinet or enclosure with internal components and mounting brackets (no text or symbols)2e étape
8. RCCB\*
natural_image
Interior view of a mechanical device with a circular inset showing a close-up of a component (no visible text or symbols)1e étape
2e, 3e étapes
9. PRCD\*
natural_image
Close-up of a black cable with two connectors attached to a circular connector (no text or symbols visible)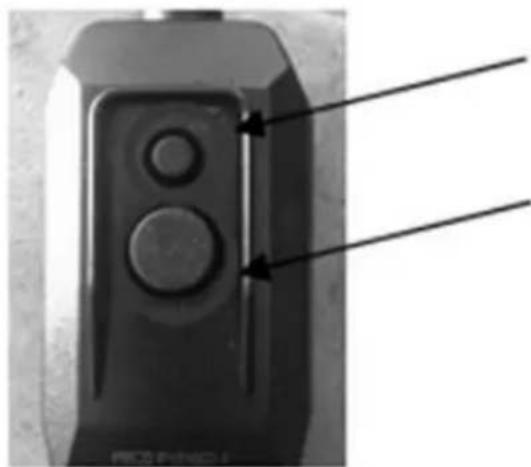
natural_image
Close-up of a black electronic device with two circular buttons and a vertical line, no visible text or symbols.Bouton TEST
Bouton RESET
10. Soin & Nettoyage

ANNEXE A INSTRUCTIONS POUR LA MANUTENTION & LE TRANSPORT

natural_image
Exterior view of a window with control panel and door panel (no text or symbols visible)natural_image
Exterior view of a window with a small object on the side (no visible text or symbols)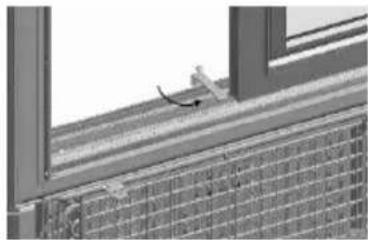
natural_image
Exterior view of a building corner with window frame and grid-patterned facade (no signage or text)6. Vergrendelsysteem \*
natural_image
Interior view of a refrigerator with open door and ventilation grilles (no text or symbols visible)Stap 2

natural_image
Exterior view of a window frame with grid pattern and ventilation grilles (no text or symbols)Stap 3
natural_image
Exterior view of a server rack unit with ventilation grilles and internal panel display (no visible text or symbols)natural_image
Exterior view of a modern refrigerator with visible dish compartments and a circular badge (no text or symbols)Stap 3: Rotoshelf is vergrendeld.

natural_image
Interior view of a vehicle showing a rear view with a bottle and a side-mounted device (no visible text or symbols)Vergrendeld
natural_image
Interior view of a vehicle showing a parking lot, battery pack, and roof structure (no visible text or symbols)Ontgrendeld
7. Nachtafdekking\*
natural_image
Technical line drawing of a rectangular industrial or electrical cabinet with internal components and mounting feet (no text or symbols)Stap 1

natural_image
Technical line drawing of a multi-level industrial cabinet or enclosure with internal components and mounting brackets (no text or symbols)Stap 2
natural_image
Interior view of a mechanical device with a circular inset showing a component (no visible text or symbols)Stap 1
Stap 2, 3
9. PRCD\*
natural_image
Close-up of a black cable with a connector attached to a wall, circled in black (no text or symbols visible)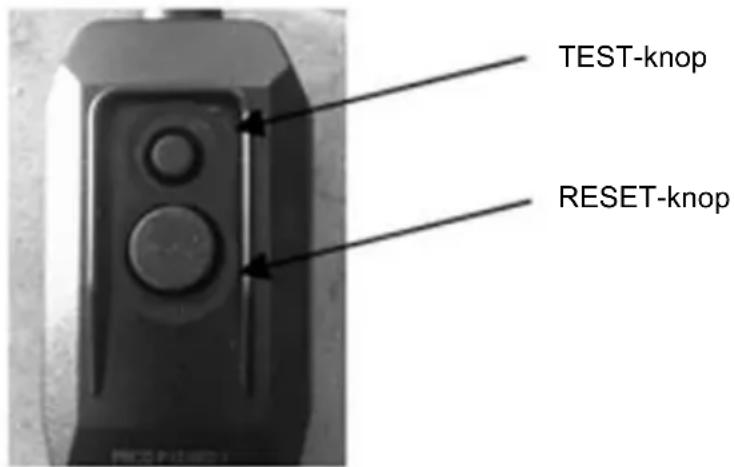
10. Verzorging en reiniging

natural_image
Architectural detail showing window frame and ceiling fixtures (no text or symbols visible)natural_image
Exterior view of a modern building corner with large windows and a small vehicle (no signage or text visible)
natural_image
Exterior view of a modern building corner with window frame and grid-patterned facade (no signage or text)natural_image
Interior view of a refrigerator with open door and ventilation grilles (no text or symbols visible)Paso 2

natural_image
Exterior view of a modern office building (no signage)Paso 3
natural_image
Exterior view of a server rack unit with ventilation grilles and control panel (no visible text or symbols)natural_image
Exterior view of a modern stainless steel refrigerator with side panels and a circular inset showing a tray (no text or symbols visible)natural_image
Interior view of a vehicle showing a grid-patterned roof and two bottles, with an arrow indicating direction (no visible text or symbols)Bloqueado
natural_image
3D rendered diagram of a mechanical component with no visible text or symbolsDesbloqueado
natural_image
Technical line drawing of a vertical rectangular device with internal components and mounting brackets (no text or symbols)Paso 1
natural_image
Technical line drawing of a multi-tiered industrial cabinet or enclosure with cooling fins and doors (no text or symbols)Paso 2
8. RCCB\*
natural_image
Interior view of a mechanical device with a circular inset showing a component (no visible text or symbols)Paso 1

Pasos 2,3
9. PRCD\*
natural_image
Close-up of a black cable with attached plug, mounted on a vertical wire (no text or symbols visible)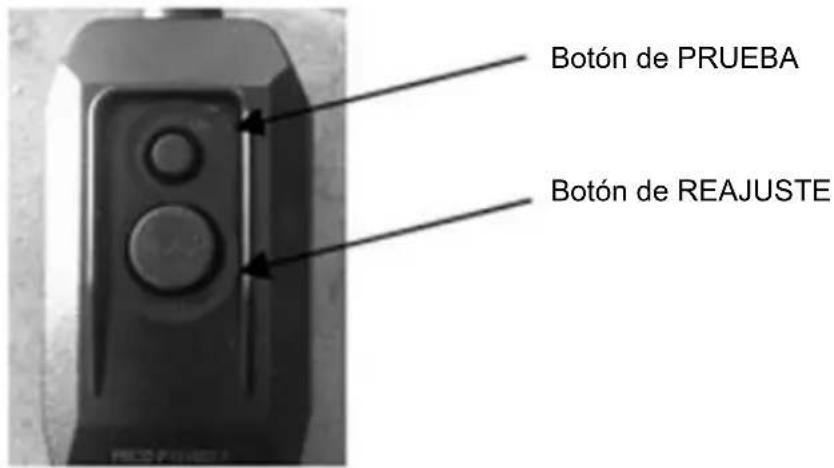
natural_image
Exterior view of a window with mounted panels and control panel (no visible text or symbols)natural_image
Exterior view of a modern building corner with large windows and a small vehicle on the roof (no signage or text visible)
natural_image
Exterior view of a modern building corner with window frame and tiled facade (no signage or text)natural_image
Interior view of a refrigerator with open door and ventilation grilles (no visible text or symbols)Βήμα 2
natural_image
Exterior view of a modern office building (no signage)Βήμα 3
natural_image
Exterior view of a modern office building (no signage)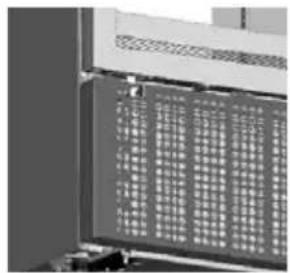
natural_image
Close-up of a computer monitor with a grid-patterned panel (no visible text or symbols)natural_image
Exterior view of a modern stainless steel refrigerator with glass doors and side grilles (no visible text or symbols)
natural_image
Exterior view of a modern office building (no signage)natural_image
3D rendering of a car interior with visible structural elements and a directional arrow (no text or symbols)Ασφαλισμένο
natural_image
3D rendered diagram of a vehicle chassis with internal compartments and battery (no text or symbols)Μη ασφαλισμένο
7. Κάλυμμα νυκτός\*
natural_image
Technical line drawing of a rectangular enclosure with internal components and mounting fixtures (no text or symbols)Βήμα 1
natural_image
Technical line drawing of a multi-compartment refrigerator unit with open doors and internal compartments (no text or symbols)Βήμα 2
8. RCCB\*
natural_image
Interior view of a computer case with a circular inset showing a device (no visible text or symbols)Βήμα 1
Βήμα 2,3
9. PRCD\*
natural_image
Close-up of a black electrical plug attached to a vertical wire, no visible text or symbols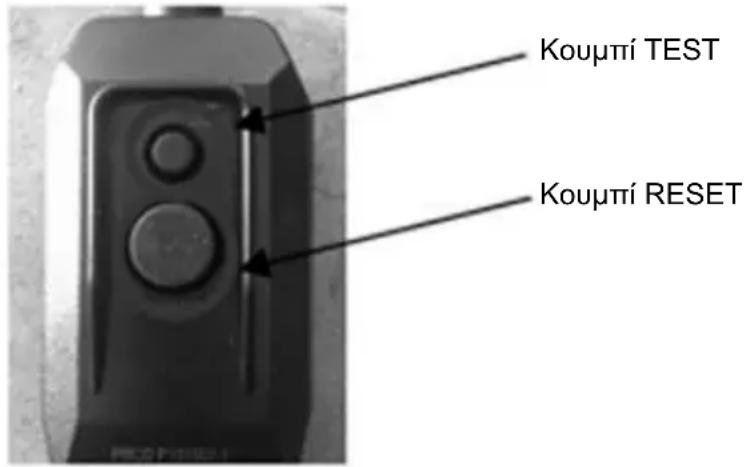
natural_image
Architectural detail showing window frame and ceiling panels with control panel (no text or symbols visible)natural_image
Exterior view of a modern building corner with window frame and brick facade (no signage or text)
natural_image
Exterior view of a brick wall with window frame and partial wooden structure (no signage or text visible)natural_image
Interior view of a refrigerator with open door and ventilation grilles (no visible text or symbols)Schritt 2
natural_image
Exterior view of a modern office building (no signage)Schritt 3
natural_image
Exterior view of a modern office or storage unit with ventilation grilles and a closed lid (no visible text or symbols)
natural_image
Exterior view of a modern stainless steel refrigerator with multiple side grilles and a circular vent (no text or symbols visible)natural_image
Abstract grayscale image with vertical stripes and a central dark rectangular shape (no text or symbols)natural_image
3D rendered mechanical component with internal grid structure and two bottles, no visible text or symbolsVerriegelt
natural_image
Interior view of a vehicle showing a large parking lot filled with vehicles (no visible text or symbols)Freigegeben
7. Nachtabdeckung\*
natural_image
Technical line drawing of a rectangular industrial or electrical cabinet with internal components and mounting brackets (no text or symbols)Schritt 1
natural_image
Technical line drawing of a cabinet or enclosure with open doors and internal compartments (no text or symbols)Schritt 2
8. FI-Schalter\*
natural_image
Interior view of a server rack unit with a circular inset showing a close-up of the internal components (no visible text or symbols)Schritt 1
natural_image
Close-up of a window with ventilation grilles and control panel, showing no text or symbolsnatural_image
Exterior view of a window with a small object on the right side, showing structural details (no text or symbols)natural_image
Interior view of a refrigerator with open door and ventilation grilles (no text or symbols visible)Steg 2
natural_image
Exterior view of a modern office building (no signage)Steg 3
natural_image
Exterior view of a server rack unit with ventilation grilles and mounting feet (no visible text or labels)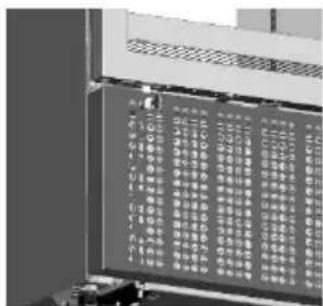
natural_image
Exterior view of a modern stainless steel refrigerator with glass doors and side grilles (no visible text or symbols)
natural_image
Exterior view of a modern office building (no signage)natural_image
Interior view of a vehicle showing a battery pack and two bottles, with an arrow indicating direction (no visible text or symbols)Låst
Ej låst
natural_image
Interior view of a vehicle showing a large parking lot filled with vehicles and a bottle (no visible text or symbols)7. Nattskydd 1
natural_image
Technical line drawing of a rectangular industrial or electrical cabinet with internal components and mounting brackets (no text or symbols)Steg 1

natural_image
Technical line drawing of a multi-chamber refrigerator unit with doors and ventilation grilles (no text or labels)Steg 2
8. RCCB\*
natural_image
Interior view of a mechanical device with a magnified inset showing internal components (no visible text or symbols)Steg 1:

Steg 2, 3
9. PRCD ^1
natural_image
Close-up of a black electrical plug with wires, no visible text or symbols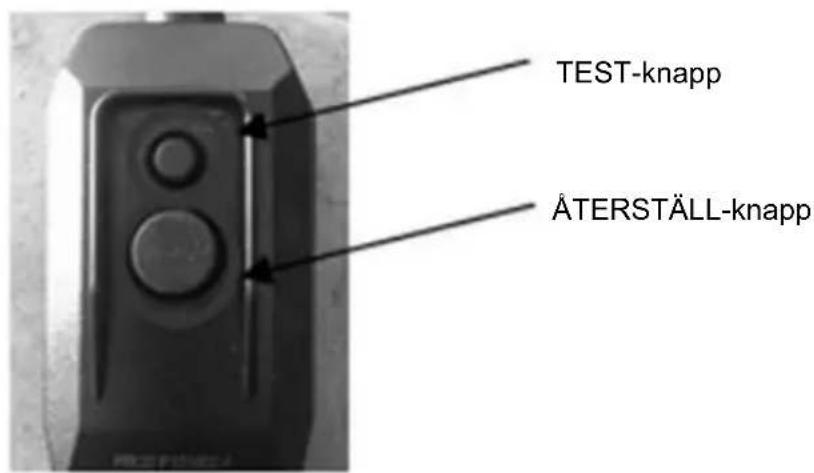
natural_image
Exterior view of a window with mounted panels and wiring (no visible text or symbols)
POL
natural_image
Exterior view of a building corner with large windows and brick walls (no signage or text)
natural_image
Close-up of a window frame with a small object on top, showing no visible text or symbols.6. System zamykania \*
natural_image
Interior view of a refrigerator with open door and ventilation grilles (no visible text or symbols)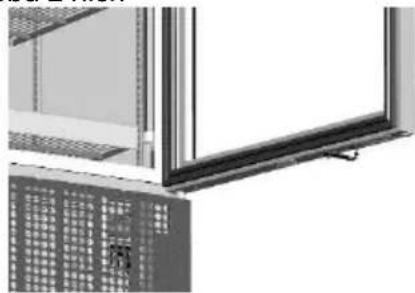
natural_image
Exterior view of a modern office building (no signage)Krok 2 Krok 3
natural_image
Exterior view of a gray server rack unit with ventilation grilles (no text or symbols visible)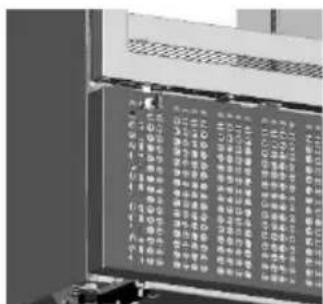
natural_image
Exterior view of a modern stainless steel refrigerator with glass doors and side grilles (no visible text or symbols)
natural_image
Abstract grayscale image with vertical stripes and a central dark rectangle, no text or symbols present.natural_image
3D rendered diagram of a mechanical assembly with no visible text or symbolsnatural_image
Technical line drawing of two rectangular electrical enclosure units with internal components and mounting brackets (no text or symbols)Krok 1 Krok 2
8. RCCB \*
natural_image
Close-up of a black cable with a circular connector attached to a wall (no text or symbols visible)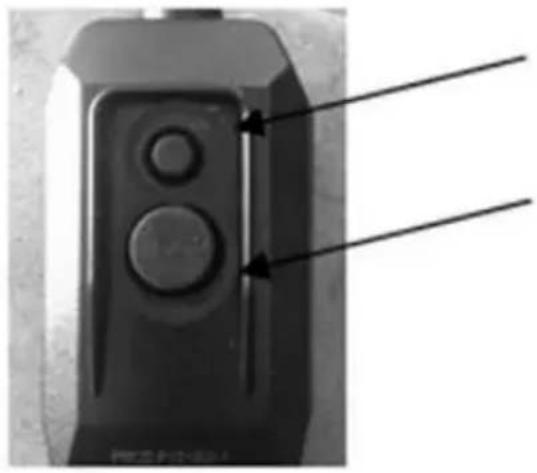
natural_image
Close-up of a black electronic device with two circular buttons and a pointer, no visible text or symbolsPrzycisk TEST
Przycisk RESET
| AFRICA | KENYA | FRIGOREX EAST AFRICA LTD | Internal Container DepotRoad Off Mombasa Road,Nairobi | +254 20 554761 |
| NIGERIA | FRIGOGLASS WESTAFRICA LIMITED | A.G. Leventis Building, Iddo House, Iddo Street 15, Lagos, Nigeria | +234 17 746265 | |
| SOUTHAFRICA | FRIGOGLASS SOUTHAFRICA (Proprietary) LTD | 16 Walton Road, Aeroton,Johannesburg | +27 112483000 |
| ASIA | INDIA | FRIGOGLASS INDIA PRIVATE LTD | Plot no.26-A, Sector 3, IMTManesar, Gurgaon 122050Haryana | +86 2032225818 |
| +91 124 4320800 | ||||
| INDONESIA | FRIGOREX INDONESIA P.T | Jababeka Industrial EstateJl. Jababeka VI Block PNo.1, Cikarang,Bekasi 17530 | +62 218934463 | |
| USA | FRIGOGLASS NORTH AMERICA | 1186 Satellite Boulevard, Suite 100,Suwanee,GA 30024 USA | +1 864 804 5610 | |
www.frigoglass.com
- User Manual
- Table des matières
- Technical description
- General
- Climate classification
- Technical specifications
- Physical dimensions
- Maximum weight per shelf
- Installation & operation
- Do not place the merchandiser:
- ICM placement instructions
- Shelf installation instructions
- Connection to the mains supply
- Do not connect the merchandiser to:
- Operation instructions
- Energy saving tips:
- Electronic controller
- Knowing your ECOBOX / HEC Controller \*
- Knowing your Danfoss ERC-112 Controller†
- Door blocking system \*
- In using the door blocking system, please follow the steps below
- Application with hinged door ICMs
- To block the Door at 90 degree:
- To unblock the Door:
- Application with sliding door ICMs
- Locking system \*
- Instructions for using the padlock provision
- Instructions for using the eye-lock
- Instructions for using the transport lock of the rotoshelf for the Smart-900
- Night Cover \*
- In placing the night cover, please follow the steps bellow
- RCCB \*
- In accessing the RCCB, please follow the steps below
- PRCD \*
- Care & cleaning
- Troubleshooting
- First aid
- Disposal of the unit and packaging
- Recycling information
- Warranty
- FOR AUTHORISED SERVICE PERSONNEL ONLY
- APPENDIX A HANDLING & TRANSPORTATION GUIDELINES
- APPENDIX B PREVENTIVE MAINTENANCE GUIDELINES
- ENG
- APPENDIX C GUIDELINES TO PREVENT CORROSION OF THE CABINET
- Avant-propos
- Description technique
- Généralités
- RCCB\*
- PRCD\*
- Soin & Nettoyage
- ANNEXE A INSTRUCTIONS POUR LA MANUTENTION & LE TRANSPORT
- Vergrendelsysteem \*
- Nachtafdekking\*
- Verzorging en reiniging
- Κάλυμμα νυκτός\*
- Nachtabdeckung\*
- FI-Schalter\*
- Nattskydd 1
- PRCD 1
- POL
- System zamykania \*
Brand : MPM
Model : SMART 450
Category : Commercial refrigerator