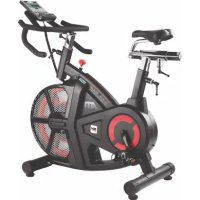
LK700IC - Indoor bike trainer BH FITNESS - Free user manual and instructions
Find the device manual for free LK700IC BH FITNESS in PDF.
User questions about LK700IC BH FITNESS
0 question about this device. Answer the ones you know or ask your own.
Ask a new question about this device
Download the instructions for your Indoor bike trainer in PDF format for free! Find your manual LK700IC - BH FITNESS and take your electronic device back in hand. On this page are published all the documents necessary for the use of your device. LK700IC by BH FITNESS.
USER MANUAL LK700IC BH FITNESS
natural_image
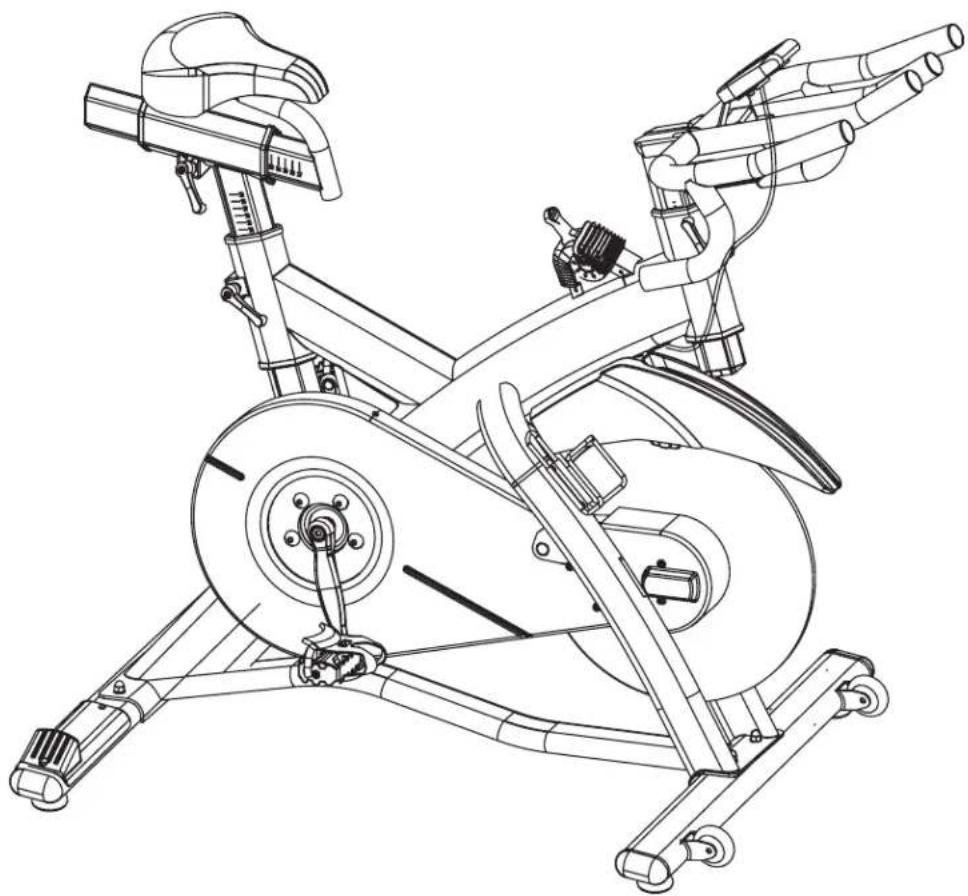
Line drawing of a stationary exercise bike with attached arm and wheels (no text or symbols)OWNER'S MANUAL
Important: Read all instructions carefully before using this product. Retain this owner's manual for future reference. BH North America | 20155 Ellipse, Foothill Ranch, California 92610 | p.949.206.0330 | f.949.206.0013 | www.BHFitnessUSA.com
BH
TABLE OF CONTENTS
| Title | Page | |||
| Introduction | 03 | |||
| Warnings & Labels | 04 | |||
| Safety | Information | 05 | ||
| Exercise | Instruction | 06 | ||
| Training | Guidelines | 07 | ||
| Workout | and | Stretching | 11 | |
| Overview | 13 | |||
| Assembly | Instructions | 14 | ||
| Instruction Use and Adjustment | 17 | |||
| Maintenance | Guide | 18 | ||
| Console | Overview | 19 | ||
| Console | Operations | 20 | ||
| Exploded | View | Drawing | 21 | |
| Parts | List | 22 | ||
| Warranty | 23 | |||
CONGRATULATIONS
Congratulations on your purchase of BH Fitness equipment. We hope you appreciate the style, quality, and value that exercisers across North America have come to expect from BH Fitness.
If you have any questions, concerns or product issues, please call our Customer Service at 1-866-325-2339 or email us at CustomerSupport@BHNorthAmerica.com.
Carefully read through the instructions contained in this manual. They provide you with important information about assembly, safety, fitness and use of the machine. Please read ALL the safety information contained on the following page.
WARNINGS AND LABELS
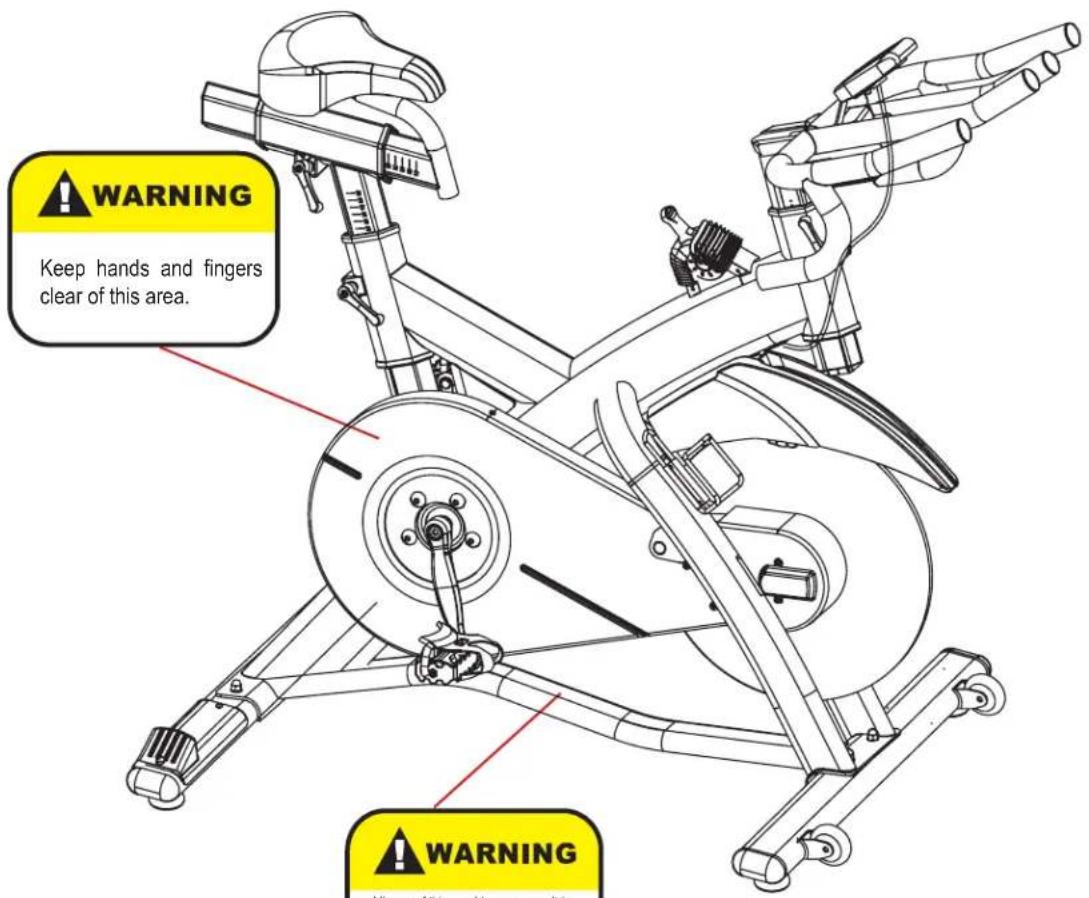
text_image
WARNING Keep hands and fingers clear of this area. WARNING
WARNING
- Misuse of this machine may result in serious injury.
- Read User's Manual prior to use and follow all warnings and instructions.
- Do not allow children on or around the machine.
• This bike does not free-wheel. Pedals continue to spin when you stop pedaling. - Spinning pedals can cause injury.
- Reduce pedal speed in a controlled manner.
• The user weight must not exceed 300 lbs/136 kgs.
• This product should always be used on a level surface. - Replace label if damaged, illegible or removed.
SAFETY INFORMATION
PRECAUTIONS
The machine has been designed and constructed to provide maximum safety. Nevertheless, certain precautions should be taken when using exercise equipment. Read the whole manual before assembling and using the machine. Please observe the following safety precautions:
- Keep children and pets away from this equipment at all times. DO NOT leave them unsupervised in the room where the machine is kept.
- If you experience dizziness, nausea, chest pains or any other symptom while using this machine STOP the exercise. SEEK IMMEDIATE MEDICAL ATTENTION!
- Use the machine on a level and solid surface. Adjust the feet for stability.
- Keep your hands away from any of the joints and moving parts.
- Wear clothing suitable for doing exercise. Do not wear baggy clothing that might get caught in the machine. Always wear athletic shoes when using the machine and tie the laces securely.
- This machine must only be used for the purposes described in this manual. DO NOT use accessories that are not recommended by BH Fitness.
- Do not place sharp objects near the machine.
- Any person with physical or coordination limitations should not use the machine without the assistance of a qualified person or doctor.
- Do warm-up stretching exercises before using the equipment.
- Do not use the machine if it is not working correctly.
- Before using the machine, thoroughly inspect the equipment for proper assembly.
- Maintain a clearance of 18 inches in front and to the sides as well as 24 inches to the rear.
- Use only authorized and trained technicians if a repair is needed.
- Please follow the advice for correct training, as detailed in the Training Guidelines.
- Use only the tools provided to assemble this machine.
- This machine was designed for a maximum user weight of 350 Lbs (158.7kg)
- The machine can only be used by one person at a time.
- The moving pedals can cause injury.
Caution: Consult your doctor before beginning to use the machine or any exercise program. Read all of the instructions before using any exercise equipment.
KEEP THESE INSTRUCTIONS SAFE FOR FUTURE USE.
EXERCISE INSTRUCTION
Use of the machine offers various benefits; it will improve fitness, muscle tone and when used in conjunction with a calorie controlled diet, it will help you lose weight.
- Consult your doctor before starting any exercise program. It is advisable to undergo a complete physical examination.
- Work at the recommended exercise level. Do not over exert yourself.
- If you feel any pain or discomfort, stop exercising immediately and consult your doctor.
- Wear appropriate clothing and footwear for the exercise; do not wear loose clothing; do not wear leather soled shoes or footwear with high heels.
- It is advised that you do warm-up stretches before working out.
- Step on to the equipment slowly and securely.
- Select the program or workout option that is most closely aligned with your workout interests.
- Start slowly and work your way up to a comfortable pace.
- Be sure to cool down after your workout.
TRAINING GUIDELINES
Exercise is one of the most important factors in the overall health of an individual. Listed among its benefits are:
- Increased capacity for physical work (strength endurance)
- Increased cardiovascular (heart and arteries/veins) and respiratory efficiency
• Decreased risk of coronary heart disease
• Changes in body metabolism, e.g. losing weight - Delaying the physiological effects of age
- Reduction in stress, increase in self-confidence, etc.
There are several components of physical fitness and each is defined below.
STRENGTH
The capacity of a muscle to exert a force against resistance. Strength contributes to power and speed.
MUSCULAR ENDURANCE
The capacity to exert a force repeatedly over a period of time, e.g. it is the muscular endurance of your legs to carry you 10 km without stopping.
FLEXIBILITY
The range of motion of your joints. Improving flexibility involves the stretching of muscles and tendons to maintain or increase suppleness, and it provides increased resistance to muscle injury or soreness.
CARDIO-RESPIRATORY ENDURANCE
The most essential component of physical fitness. It is the efficient functioning of the heart and lungs.
AEROBIC FITNESS
Is an exercise of relatively low intensity and long duration, which depends primarily on the aerobic energy system. Aerobic means "with oxygen", and refers to the use of oxygen in the body's metabolic or energy-generating process. Many types of exercise are aerobic, and by definition are performed at moderate levels of intensity for extended periods of time.
ANAEROBIC TRAINING
Is an exercise intense enough to trigger anaerobic metabolism. This means “without oxygen” and is the output of energy when the oxygen supply is insufficient to meet the body’s long term energy demands. (For example, a 100 meter sprint.)
OXYGEN UPTAKE
The effort that you can exert over a prolonged period of time is limited by your ability to deliver oxygen to the working muscles. Regular vigorous exercise produces a training effect that can increase your aerobic capacity by as much as 20 to 30%. An increased VO2 Max indicates an increased ability of the heart to pump blood, of the lungs to ventilate oxygen, and of the muscles to take up oxygen.
THE TRAINING THRESHOLD
This is the minimum level of exercise which is required to produce significant improvements in any physical fitness parameter.
OVERLOAD
This is where you exercise above your comfort level. The intensity, duration and frequency of exercise should be above the training threshold and should be gradually increased as the body adapts to the increasing demands. As your fitness level improves, the training threshold should rise. Working through your program and gradually increasing the overload factor is important.
PROGRESSION
As you become more fit, a higher intensity of exercise is required to create an overload and therefore provide continued improvement.
SPECIFICS
Different forms of exercise produce different results. The type of exercise that is carried out is specific to the muscle groups being used and to the energy source involved. There is little transfer of the effects of exercise, i.e. from strength training to cardiovascular fitness. That is why it is important to have an exercise program tailored to your specific needs.
REVERSIBILITY
If you stop exercising or do not do your program often enough, you will lose the benefits you have gained. Regular workouts are the key to success.
WARM-UP
Every exercise program should start with a warm-up where the body is prepared for the effort to come. It should be gentle and preferably use the muscles group to be involved later. Stretching should be included in both your warm-up and cool down, and should be performed after 3-5 minutes of low intensity aerobic activity or callisthenic type exercise.
This involves a gradual decrease in the intensity of the exercise session. Following exercise, a large supply of blood remains in the working muscles. If it is not returned promptly to the central circulation, pooling of blood may occur in the muscles.
HEART RATE
As you exercise, your heart beat increases. This is often used as a measure of the required intensity of an exercise. You need to exercise hard enough to condition your circulatory system, and increase your pulse rate, but not enough to strain your heart.
Your initial level of fitness is important when developing an exercise program for you. When starting, you can get a good training effect with a heart rate of 110-120 beats per minute (BPM). If you are more fit, you will need a higher threshold of stimulation.
To begin with, you should exercise at a level that elevates your heart rate to about 65 to 70% of your maximum. If you find this is too easy, you may want to increase it, but it is better to lean on the conservative side.
As a rule of thumb, the maximum heart rate is 220 minus your age. As you increase in age, your heart, like other muscles, loses some of its efficiency. Some of its natural loss is won back as fitness improves. The following table is a guide to those who are “starting fitness.”
| Age | Target | Heart | Rate | 25 | 30 | 35 | 40 | 45 | 50 | 55 | 60 | |||
| 10 | Second | Count | 23 | 22 | 22 | 21 | 20 | 19 | 19 | 18 | 18 | |||
| Beats per Minute | 138 | 132 | 132 | 126 | 120 | 114 | 114 | 108 | 108 | |||||
PULSE COUNT
The pulse count (on your wrist or carotid artery in the neck, taken with two index fingers) is done for ten seconds, taken a few seconds after you stop exercising. This is for two reasons: (a) 10 seconds is long enough for accuracy, (b) the pulse count is to approximate your BPM rate at the time you are exercising. Since heart rate slows as you recover, a longer count isn't as accurate.
The target is not a magic number, but a general guide. If you're above average with your fitness, you may work comfortably a little above that suggested for your age group. The following table is a guide.
| Age | Target | Heart | Rate | 25 | 30 | 35 | 40 | 45 | 50 | 55 | 60 | ||
| 10 | Second | Count | 26 | 26 | 25 | 24 | 23 | 22 | 22 | 21 | 20 | ||
| Beats | per | Minute | 156 | 156 | 150 | 144 | 138 | 132 | 132 | 126 | 120 | ||
Don't push yourself too hard to reach the figures on this table. It can be very uncomfortable if you over exercise. Let it happen naturally as you work through your program. Remember, the target is a guide, not a rule, a little above or below is just fine.
Two final comments: (1) don't be concerned with day to day variations in your pulse rate, being under pressure or not enough sleep can affect it; (2) your pulse rate is a guide, don't become a slave to it.
MUSCLE SORENESS
For the first week or so, muscle soreness may be the only indication you have that you are on an exercise program. This, of course, does depend on your overall fitness level. A confirmation that you are on the correct program is a very slight soreness in most major muscle groups. This is quite normal and will disappear in a matter of days.
If you experience major discomfort, you may be on a program that is too advanced, or you have increased your program too rapidly.
If you experience PAIN during or after exercise, your body is telling you something. Stop exercising and consult your doctor.
WHAT TO WEAR
Wear clothing that will not restrict your movement in any way while exercising. Clothes should be light enough to allow the body to cool. Excessive clothing that causes you to perspire more than you normally would give you no advantage. The extra weight you lose is body fluid and will be replaced with the next glass of water you drink. It is advisable to wear a pair athletic shoes.
BREATHING DURING EXERCISE
Do not hold your breath while exercising. Breathe normally as much as possible. Remember, breathing involves the intake and distribution of oxygen, which feeds the working muscles.
REST PERIODS
Once you start your exercise program, you should continue through to the end. Do not break off halfway through and then restart at the same place later on without going through the warm-up stage again. The rest period required between exercises may vary from person to person.
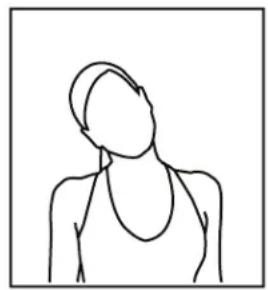
SUGGESTED STRETCHES
Head Rolls
Rotate your head to the right for one count while feeling the stretch up the left side of your neck. Next, rotate your head back for one count, stretching your chin to the ceiling. Rotate your head to the left for one count, and finally, drop your head to your chest for one count.
Shoulder Lifts
Lift your left shoulder up toward your ear for one count. Then lift your right shoulder up for one count as you lower your left shoulder.
Side Stretches
Open your arms to the side and continue lifting them until they are over your head. Reach your left arm as far upward as you can for one count. Feel the stretch up your left side. Repeat this action with your right arm.
Quadriceps Stretch
With one hand against a wall for balance, reach behind you and pull your left foot up. Bring your heel as close to your buttocks as possible. Hold for 15 counts and repeat with right foot up.
natural_image
Simple line drawing of a human figure with no text or symbols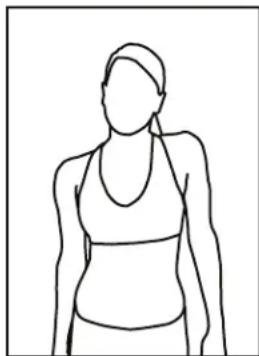
natural_image
Line drawing of a person wearing a tank top and beret (no text or symbols)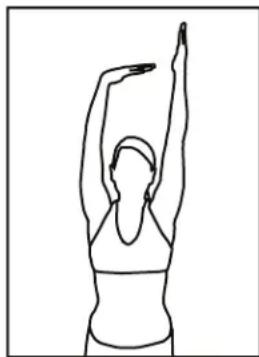
natural_image
Line drawing of a person performing a stretching or exercise pose (no text or symbols)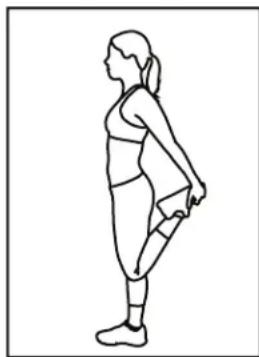
natural_image
Line drawing of a woman in athletic wear performing a stretching or exercise pose (no text or symbols)SUGGESTED STRETCHES
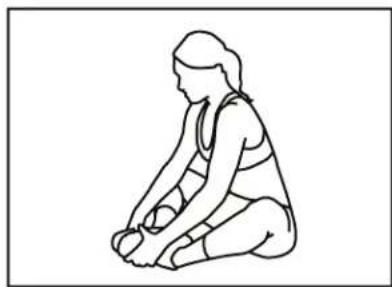
Inner Thigh Stretch
Sit with the soles of your feet together with your knees pointing outward. Pull your feet as close into your groin as possible. Gently push your knees towards the floor. Hold for 15 counts.
natural_image
Line drawing of a person in a seated posture, possibly performing a stretching or exercise (no text or symbols)Toe Touches
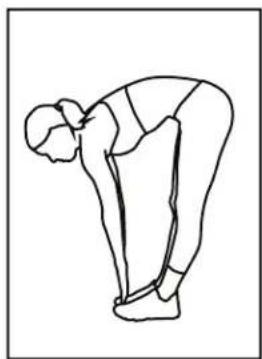
Slowly bend forward from your waist, letting your back and shoulders relax as you stretch toward your toes. Reach down as far as you can and hold for 15 counts.
natural_image
Line drawing of a person in a forward bend yoga pose (no text or symbols)Hamstring Stretches
Sit with your right leg extended. Rest the soles of your left foot against your right inner thigh. Stretch toward your toes as far as possible. Hold for 15 counts. Relax and then repeat with left leg extended.

natural_image
Line drawing of a seated woman in a kneeling pose, viewed from the side (no text or symbols)Calf/Achilles Stretches
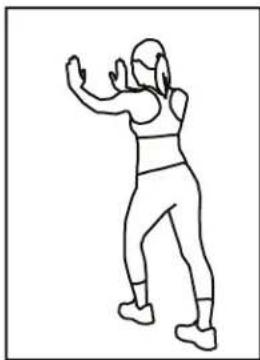
Lean against a wall with your right leg in front of the left and your arms forward. Keep your left leg straight and the right foot on the floor; then bend the right leg and lean forward by moving your hip toward the wall. Hold, then repeat on the other side for 15 counts.
natural_image
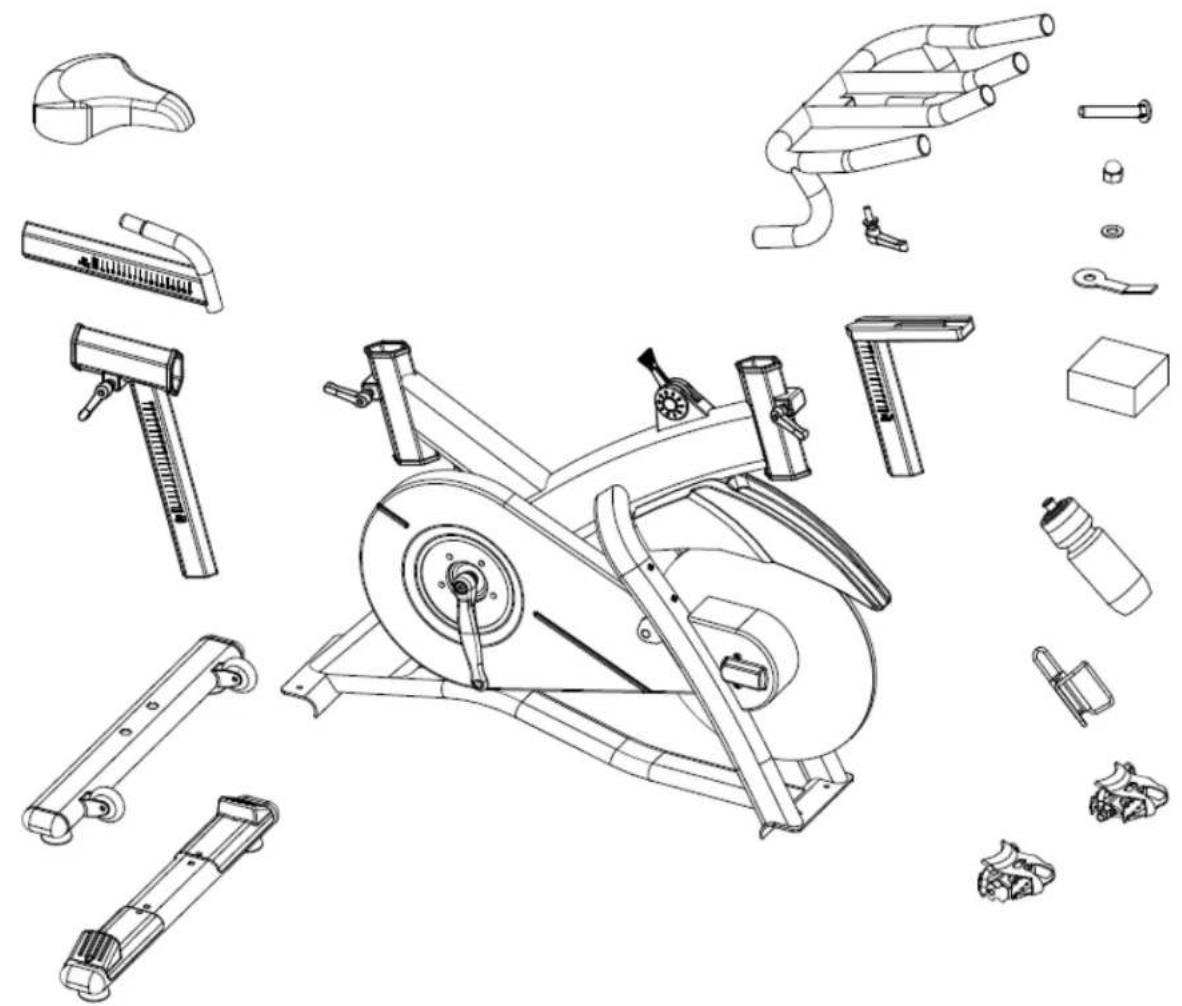
Line drawing of a person in motion, possibly dancing or gesturing (no text or symbols)OVERVIEW

natural_image
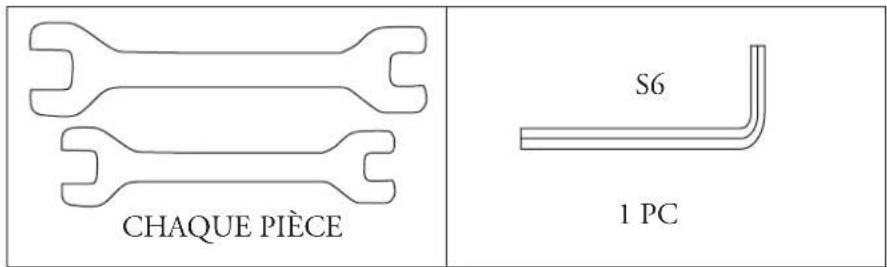
Exploded view diagram of a stationary exercise bike with various mechanical components (no text or labels)TOOLS TO USE
text_image
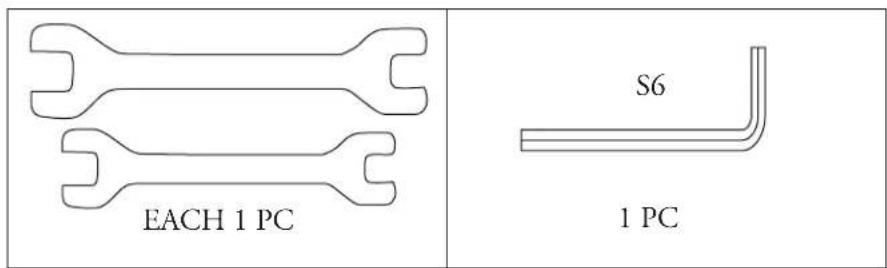
EACH 1 PC S6 1 PCNote: The following tools are included and are the only tools necessary for assembly
ASSEMBLY INSTRUCTIONS
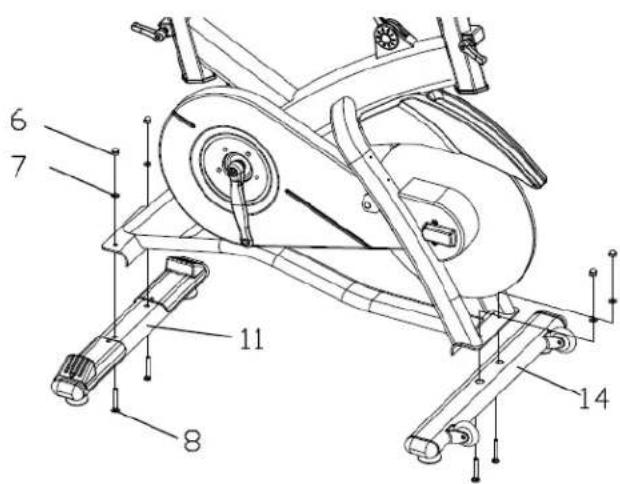
STEP 1. ATTACHING THE STABILIZERS
Attach the Rear Stabilizer first by lifting up the rear of the frame and sliding the rear stabilizer under the frame. Align the holes of the stabilizer and frame then insert Bolts (8) from below. Secure the bolts with 2 Washers (7) and 2 Nuts (6). Use the wrench provided. Use the same procedure to secure the Front Stabilizer.
text_image
6 7 11 8 14STEP 2. ATTACHING THE HANDLEBAR POST
Slide the Handlebar Post (21) into the headtube on the frame. Make sure the Release Lever (2) is loose enough so the Handlebar Post can slide down to the desired position. Tighten the Release Lever (2) to secure.
text_image
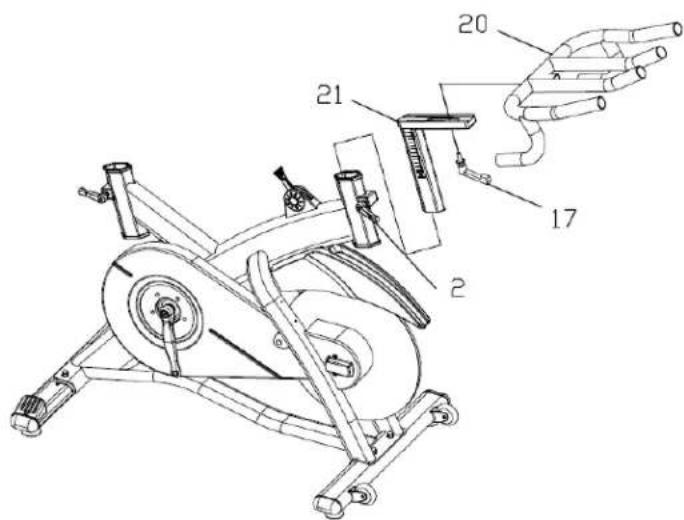
Technical diagram of an exercise machine with numbered components and a hand holding a cylindrical tubeSTEP 3. ATTACHING THE HANDLEBAR
Seat the Handlebar (20) on top of the Handlebar Post (21) and secure by screwing in the Release Lever (17) from below.
STEP 4. ATTACHING THE SEAT ASSEMBLY
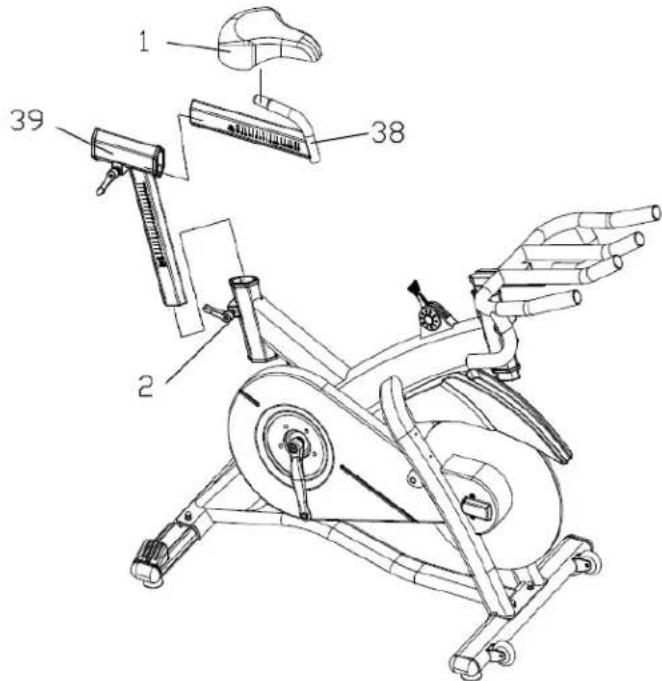
Insert the Seat Post (39) into the seat tube on the frame to the desired height and secure with the Release Lever (2). Slide the Seat Post Slider (38) into the Seat Post (39). Adjust to desired position and secure with the release lever on the bottom of the Seat Post (39). Slide the Seat (1) onto the Seat Slider (38) and secure the Seat (1) by tightening the nuts on both sides of the seat clamp on the underside of the seat. Use wrench provided.
text_image
Technical diagram of an exercise bike with labeled parts including head, armrest, and caliperSTEP 5. ATTACHING THE PEDALS
Each pedal is marked either with an (L) for Left or an (R) for Right. Thread the pedal into the Crank on the corresponding side. The Pedals tighten clockwise. Use the 15mm wrench provided to tighten.

text_image
Technical diagram of a bicycle suspension system with numbered components and directional arrows indicating motion or assembly.STEP 6. ATTACHING THE COMPUTER
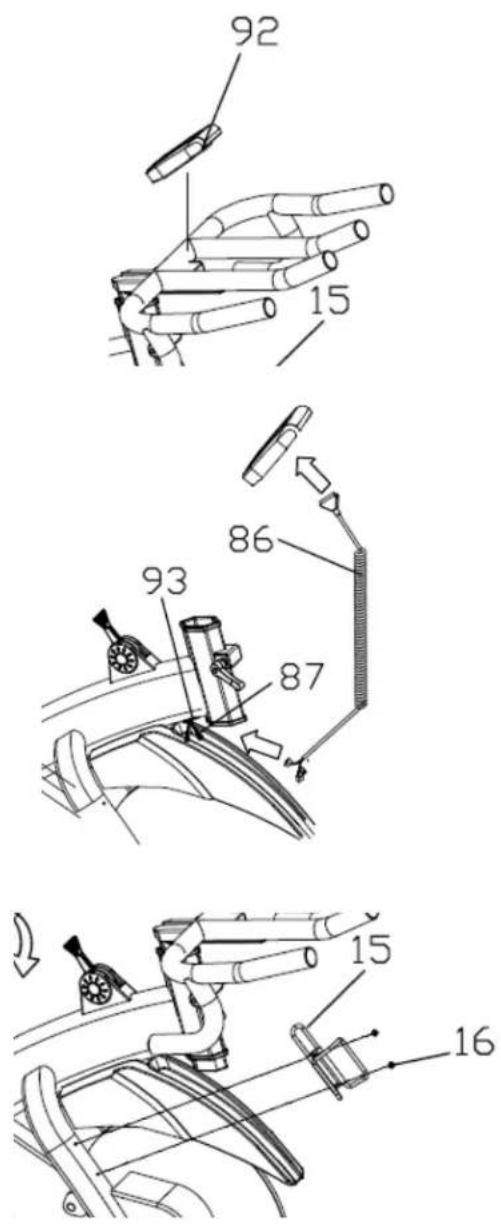
Slide the battery slot off the back of the Computer (92) and install the batteries. Replace cover. There is a screw on the back of the Computer (92), take this off and slide the Computer (92) onto the Computer Bracket. Secure the Computer to the Computer Bracket with the screw from the back of the computer.
Next, connect the Computer Cable (86) to the back of the Computer (92) and make sure the other side of the Computer Cable (86) is connected securely to the cable coming from the frame. Additionally, make sure that the Cable Stopper (93) is plugged into the hole that the lower cable connections came through.
STEP 7. ATTACHING THE WATER BOTTLE
Unscrew the Screws (16) on the front right leg of the bike. Align the holes of the water bottle holder with the holes on the leg and secure with two Screws (16).
STEP 8. INSTALLATION
After installation, please check carefully to ensure all screws and nuts are fully fastened.
INSTRUCTION USE AND ADJUSTMENT
1) This is a Direct Drive Bike and the pedals will not stop immediately after pedaling. To stop the pedals, push the resistance lever forward.
2) It is important that the handlebar and seat are set at the correct height for your body. Make sure that they are securely tightened and that there is no lateral or vertical movement.
Handlebar adjustment
a) Adjusting height - Undo the release lever that is located where the handlebar post fits into the frame. Slide the handlebar post up or down to the required height and retighten the release lever.
b) Adjusting forwards or backwards - Undo the release lever located below the handlebar slider.
Slide the handlebar assembly forward until you reach the required position. Then securely retighten the release lever.
Seat adjustment
a) Adjusting height - Undo the release lever located where the seat post fits into the frame. Slide up or down to the desired height, then retighten the release lever. Make sure it is tight enough to prevent the seat from twisting side to side.
b) Adjusting forwards and backwards - Undo the release lever located below the seat slider. Loosen the release lever then slide the seat to the required position.
Retighten the release lever.
3) Pedals and toe straps :
a. Your feet should be securely positioned in the toe clips during the exercise. Put your foot as far forwards as you can into the toe-clip and then pull the strap tight.
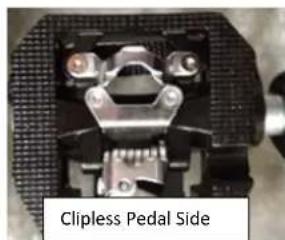
b. Clipless Pedal Tension Adjustment – The tension on the clipless pedals can be adjusted either looser or tighter. A 3mm allen wrench is required to adjust the tension. The tension adjustment screw is located on the opposite side of the pedal from the clipless pedal. When you flip the pedal over you will see the small adjustment allen screw. Use the 3mm allen wrench to loosen the tension (for easier entry and exit) turn the allen screw counterclockwise. To tighten the tension (for a more secure fit) turn the allen screw clockwise.
text_image
Clipless Pedal Side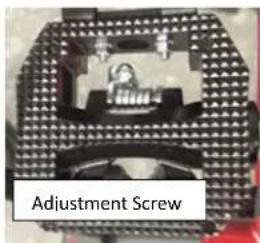
text_image
Adjustment Screw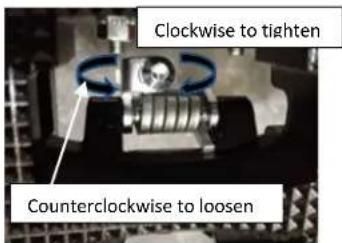
text_image
Clockwise to tighten Counterclockwise to loosen4) Movement - the bike is equipped with transportation wheels to make it easier to move The transportation wheels are located at the front of your bike. To move the bike, press down on the end of the handlebars until the wheels touch the ground, then move the bike to the desired location.
5) Emergency brake - Push the Resistance Knob (22) all the way forward to the stop.
6) Installation - The bike uses a magnetic field for resistance. Do not place within 3 ft. of household appliances as this may cause interference.
7) Maintenance - Like any other mechanical cycling device, the bike should be regularly maintained.
BH
MAINTENANCE GUIDE
| No | Description Daily Weekly Monthly Quarterly Annually | |||||
| 1 | Keep machine clean: Wipe machine down with clean & dry fabric to clear dirt & sweat. | X | ||||
| 2 | Wipe Anti-rust cream or similar on the seat post set, handlebar set | X | ||||
| 3 | Visual check X | |||||
| 4 | Check security of handle bar post & seat post X | |||||
| 5 | Check security of saddle X | |||||
| 6 | Remove handlebar post and clean tube X | |||||
| 7 | Remove seat post and clean tube X | |||||
| 8 | Check brake pads for wear-align X | |||||
| 9 | Check brake adjustment | X | ||||
| 10 | Check security of all knobs & release lever X | |||||
| 11 | Check toe straps for signs of wear | X | ||||
| 12 | Check crank bolts and re-tighten | X | ||||
| 13 | Make sure pedals are screwed in | X | ||||
| 14 | Check the magnetic holder in correct position | X | ||||
| 15 | Check belt tension | X | ||||
| 16 | Check bottom bracket | X | ||||
| 17 | Check flywheel bearings | X | ||||
| 18 | Full service-frame inspection | X |
Adjusting the belt tension – the belt is made of a flexible material. It will relax with frequent use and time. To restore belt tension, use the following steps:
- Loosen the bolts (45)(50)(67), and take off the outer chain guard (3) and front chain cover (49)(59).
- Loosen nuts (41).
- You can adjust tension by turning the adjuster bolt (60) clockwise or counterclockwise. It is suggested to rotate in 1/4 turns each time. Rotating too much will cause the tension to become too tight which will damage the axle and bearing.
- Make sure that the flywheel keeps parallel with frame while the distance on two sides between the flywheel and magnet are the same.
- After finishing the above steps, secure the nut cap on both sides. Make sure that the nut caps are tight and fixed.
CONSOLE OVERVIEW
text_image
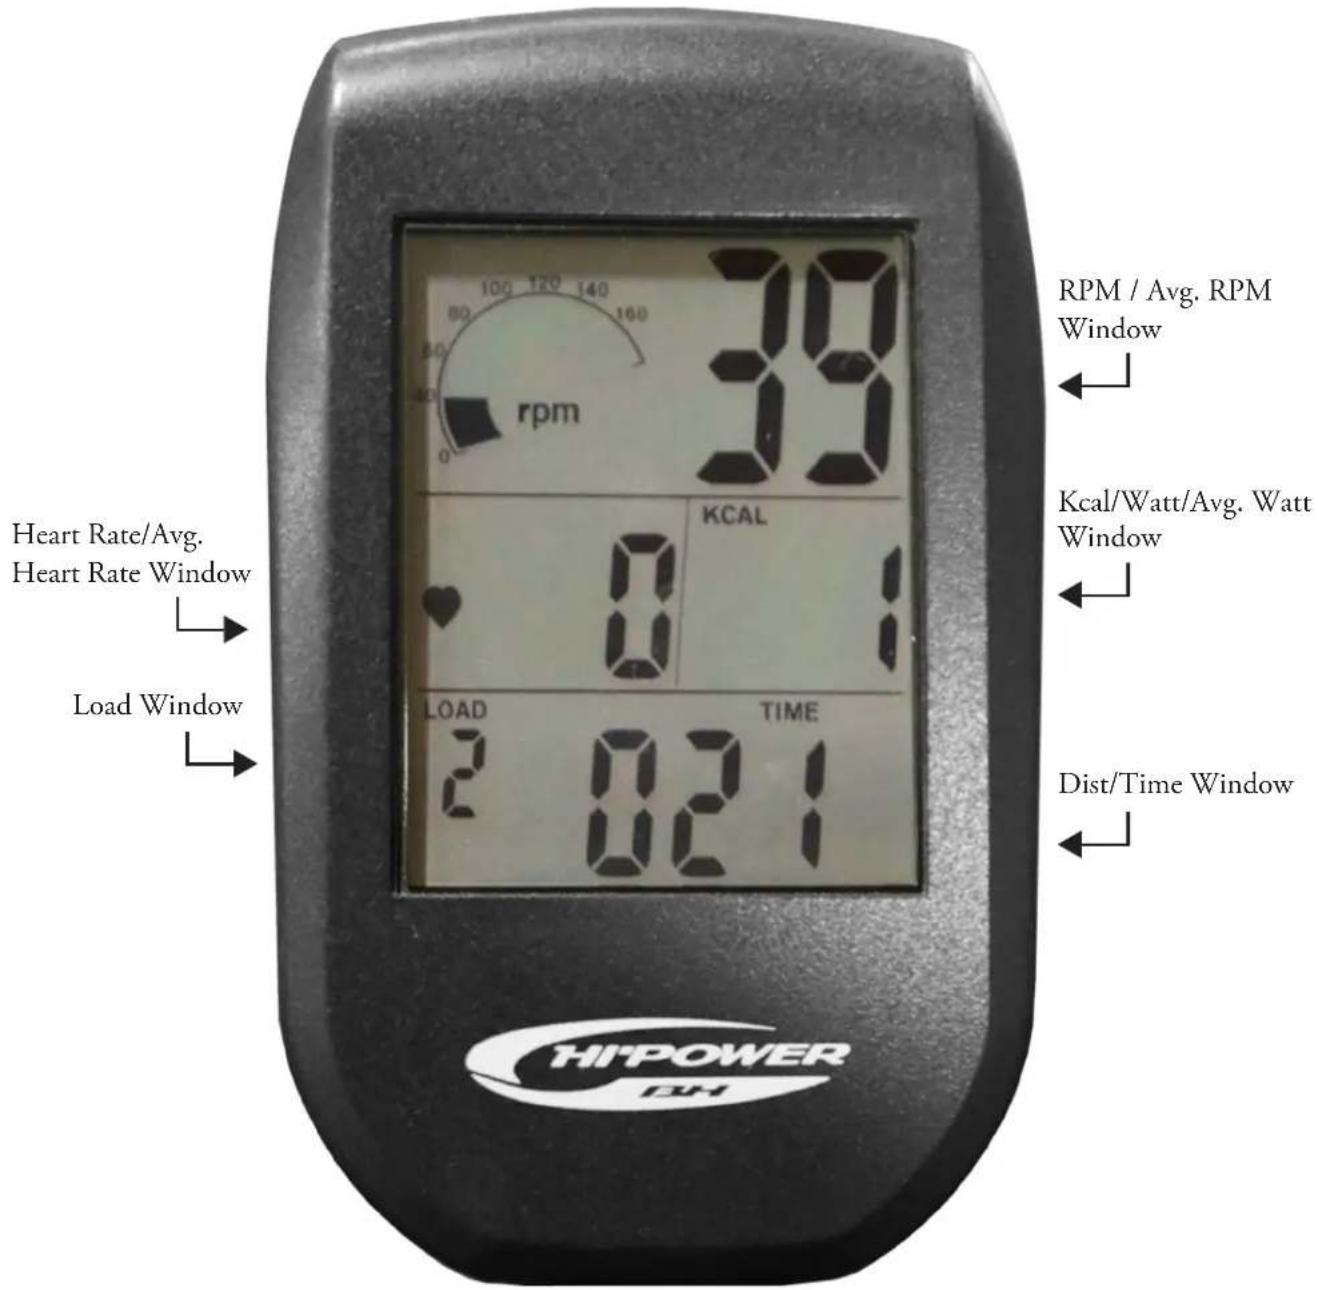
rpm 39 100 120 140 160 80 100 200 0 Heart Rate/Avg. Heart Rate Window Load Window KCAL 8 LOAD TIME 2 021 RPM / Avg. RPM Window Kcal/Watt/Avg. Watt Window Dist/Time WindowCONSOLE OPERATIONSCONSOLE OPERATIONS
GENERAL:
This console has an LCD screen which displays; RPM/Average RPM, Heart Rate/Average Heart Rate (optional), KCAL, Watts/Average Watts, Distance, Time and Load.
POWER ON/OFF
When the machine is not in use, the display shows "Sleep". The display will automatically switch on when exercise is started. The display will automatically switch off after 60 seconds of inactivity.
DISPLAY FEATURES:
RPM
Measures average revolutions per minute
HEART RATE
Average Heart Rate - a wireless chest belt is required to use the heart rate function.
KCAL
Kilocalories burned
WATT
Average watts - amount of watts being generated
LOAD
The level of magnetic resistance (16 levels)
TIME
Amount of time spent exercising
DISPLAY FUNCTIONS
When exercising, the value shown is the current value. When exercise is stopped, the average value is shown. Example, if you are pedaling, the display will show current RPM, and when you stop pedaling, it will show the average RPM value. This applies to Watts, RPM and Heart Rate.
- When exercising, in the KCAL/WATT window will display KCAL for 4 seconds then Watts for 8 seconds and will repeat the cycle.
- When exercising in the Time/Distance window, it will display Time for 4 seconds then Distance for 8 Seconds and will repeat this cycle.
• There is no speed in MPH on this computer. - When exercise is stopped or there is no Heart Rate Signal within 3-8 seconds, the value becomes 0.
EXPLODED VIEW DRAWING
text_image
View D 60 52 53 View G 86 44 39 1 38 94 95 21 20 92 78 54 71 79 23 76 77 75 90 72 70 74 23 69 26 27 28 VIEW A 24 25 47 46 61 32 31 30 29 2 67 7 88 11 85 84 12 8 10 87 51 43 35 22 82 93 83 G 59 16 15 B 48 57 58 63 55 45 42 14 80 68 62 13 40 13A - Flywheel Axle Assembly - Includes all parts in this viewPARTS LIST
To order replacement parts: provide your customer service representative with the product model number and the part number located on the Parts List below, along with the quantity you require.
| NoDescriptionNoDescription | |||
| LK700IC-1 Seat | LK700IC-49 Front Axle Cover ( R/L ) | ||
| LK700IC-2 Release Lever | LK700IC-50 Chain Guard Bolt (6mm) | ||
| LK700IC-3 Outer Chain Guard | LK700IC-51 Axle Cover | ||
| LK700IC-4 Right + Left Crank Arm | LK700IC-52 Nut | ||
| LK700IC-5 Crank Bolt | LK700IC-53 Adjuster Screw | ||
| LK700IC-6 Stabilizer Nut | LK700IC-54 Housing | ||
| LK700IC-7 Stabilizer Washer | LK700IC-55 Fender Spacer | ||
| LK700IC-8 Stainless Foot Tube Bolt | LK700IC-56 Flywheel Security Washer | ||
| LK700IC-9 Pedal (R+L) | LK700IC-57 Fender | ||
| LK700IC-10 | Adjuster Level Cushion | LK700IC-58 Fender Bolt | |
| LK700IC-11 | Rear Stabilizer | LK700IC-60 Belt Tensor | |
| LK700IC-12 | Foot End Cap | LK700IC-61 Release Lever Spring | |
| LK700IC-13 | PU Wheel | LK700IC-62 Screw | |
| LK700IC-14 | Front Stabilizer | LK700IC-63 Washer | |
| LK700IC-15 | Bottle Cage | LK700IC-64 Idler Wheel | |
| LK700IC-16 | Bottle Cage Screw | LK700IC-65 Inner Chain Guard | |
| LK700IC-17 | Handlebar Release Lever | LK700IC-66 | Magnetic Support Spring |
| LK700IC-18 | Handlebar Release Lever Washer | LK700IC-67 | Chain Guard Bolt |
| LK700IC-19 | Handlebar Release Lever Nut | LK700IC-68 Washer | |
| LK700IC-20 | Handlebar | LK700IC-69 Magnetic Support Bolt | |
| LK700IC-21 | Handlebar Post | LK700IC-70 Magnetic Support Pin | |
| LK700IC-22 | Resistance Knob Assembly | LK700IC-71 Brake Cable Holder | |
| LK700IC-23 | Screw & Nut For Brake Pad | LK700IC-72 | Brake Cable Holder Bolt |
| LK700IC-24 | Brake Pad Assembly | LK700IC-73 Fixed Pin Housing | |
| LK700IC-26 | Magnetic Support Assembly | LK700IC-74 | E-Clip/Bolt Assembly |
| LK700IC-29 | Release Lever Washer | LK700IC-75 | Magnetic Support Holder Bolt |
| LK700IC-30 | Alloy Clip ( R ) | LK700IC-76 Screw Plate | |
| LK700IC-31 | Release Lever Spring | LK700IC-77 Magnetic Support Holder | |
| LK700IC-32 | Alloy Clip ( L ) | LK700IC-78 Magnetic Support Holder Nut | |
| LK700IC-33 | Bb Bearing | LK700IC-80 Rear Fender Plate | |
| LK700IC-34 | Bb Axle W/Plate | LK700IC-81 Rubber Screw Cover | |
| LK700IC-34-1 | Belt Pulley With Screws | LK700IC-82 Cable Clip | |
| LK700IC-35 | Resistance Knob Bolt | LK700IC-83 | Cable Clip Bolt |
| LK700IC-35 | Flywheel Bearing | LK700IC-84 Rear Stablizer Cover | |
| LK700IC-36A | Flywheel Axle Assembly | LK700IC-85 Rear Bolt | |
| LK700IC-37 | Flywheel Axle | LK700IC-86 Computer Cable | |
| LK700IC-38 | Seat Slider | LK700IC-87 Sensor Cable | |
| LK700IC-39 | Seat Post | LK700IC-88 Inner Chain Guard Washer | |
| LK700IC-40 | Axle Bolt | LK700IC-89 Inner Chain Guard Bolt | |
| LK700IC-41 | Flywheel Axle Nut | LWasher | |
| LK700IC-42 | Belt | LK700IC-91 Bolt | |
| LK700IC-43 | End Cap | LK700IC-92 Computer | |
| LK700IC-44 | Bushing | LK700IC-93 Cable Stopper | |
| LK700IC-45 | Chain Guard Bolt (5mm) | LK700IC-94 Rubber Sleeve | |
| LK700IC-46 | Release Lever Washer | LK700IC-95 Rubber Sleeve Screw | |
| LK700IC-47 | Release Lever Bolt | ||
WARRANTY
CLUB COMMERCIAL WARRANTY\*
BH North America will repair or replace, free of charge, at its option, parts that are defective as a result of material or workmanship. Lifetime warranty coverage on frame and three (3) years on other parts. Labor warranty coverage is two (2) years. Warranty covers the original consumer purchaser only.
*Club Commercial Warranty Disclaimer: For all dues paying facilities, regardless of usage.
COMMERCIAL WARRANTY\*
BH North America will repair or replace, free of charge, at its option, parts that are defective as a result of material or workmanship. Lifetime warranty coverage on frame and five (5) years on other parts. Labor warranty coverage is two (2) years. Warranty covers the original consumer purchaser only.
*Commercial Warranty Disclaimer: For non-dues paying facilities, with less than 8 hours of use per day.
RESIDENTIAL WARRANTY
BH North America will repair or replace, free of charge, at its option, parts that are defective as a result of material or workmanship. Lifetime replacement warranty coverage on frame and ten (10) years on other parts. Labor warranty coverage is two (2) years. Warranty covers the original consumer purchaser only.
COSMETICS PARTS DISCLAIMER
For all products and all level of warranty, cosmetic parts shall be warranted for 1 year from date of purchase against manufactures defect. "Cosmetics" includes: External plastics, overlays/decals and covers.
THIS WARRANTY DOES NOT COVER
- Pre-delivery set-up.
- Components that require replacement due to dirt or lack of regular maintenance.
- Repairs necessary because of operator abuse or negligence or the failure to operate and maintain the equipment according to the instructions contained in the Owner's Manual.
For more detailed warranty information or to register your product warranty easily online, visit our website at: www.BHFitnessUSA.com
FOR WARRANTY REPAIRS, PLEASE DO NOT TAKE YOUR MACHINE BACK TO THE RETAIL STORE. CONTACT BH FITNESS FIRST.
BH North America Corporation
20155 Ellipse | Foothill Ranch, CA 92610
Phone: 949.206.0330; Toll Free: 866.325.2339; Fax: 949.206.0013
Web: www.BHFitnessUSA.com
Mon - Fri 8am - 5pm PST
BH
LK700IC
natural_image
Line drawing of a stationary exercise bike with adjustable arms and wheels (no text or symbols)GUIDE D'UTILISATION
natural_image
Line drawing of a human head in profile view (no text or symbols)natural_image
Line drawing of a person wearing a high-brimmed top and necklace (no text or symbols)Étirements latéraux
natural_image
Line drawing of a person performing a stretching exercise with arms raised (no text or symbols)Étirement des quadriceps
natural_image
Line drawing of a woman in athletic wear performing a stretching pose (no text or symbols)ÉTIREMENTS SUGGÉRÉS
natural_image
Line drawing of a person in a seated posture, possibly performing a stretching or exercise (no text or symbols)Flexions avant
natural_image
Line drawing of a person in a forward bend yoga pose (no text or symbols)Étirements des ischio-jambiers
natural_image
Line drawing of a person in motion, possibly dancing or performing a martial arts stance (no text or symbols)natural_image
Line drawing of a seated woman in a kneeling pose, viewed from the side (no text or symbols)APERÇU
natural_image
Line drawing of a stationary exercise bike with various components and accessories (no text or labels)OUTILS À UTILISER
text_image
CHAQUE PIÈCE S6 1 PCtext_image
Technical diagram of an exercise machine with numbered components and labeled partsÉTAPE 3. INSTALLEZ LE GUIDON
text_image
Technical diagram of an exercise bike with labeled parts including head, armrest, and caliperÉTAPE 5. INSTALLEZ LES PÉDALES
text_image
Technical diagram of a bicycle suspension system with numbered components and directional arrows indicating motion paths.ÉTAPE 6. INSTALLEZ LA CONSOLE
Measures average revolutions per minute RPM
Foothill Ranch, CA 92610