Eletta Explore ECAM450.55.G - Coffee machine DELONGHI - Free user manual and instructions
Find the device manual for free Eletta Explore ECAM450.55.G DELONGHI in PDF.
User questions about Eletta Explore ECAM450.55.G DELONGHI
0 question about this device. Answer the ones you know or ask your own.
Ask a new question about this device
Download the instructions for your Coffee machine in PDF format for free! Find your manual Eletta Explore ECAM450.55.G - DELONGHI and take your electronic device back in hand. On this page are published all the documents necessary for the use of your device. Eletta Explore ECAM450.55.G by DELONGHI.
USER MANUAL Eletta Explore ECAM450.55.G DELONGHI
1.1 Designated use.. 6
1.2 Instruction for Use.. 6
2. INTRODUCTION 6
2.1 Letters in brackets.. 6
2.2 Troubleshooting and repairs.. 6
2.3 Download the App! 6
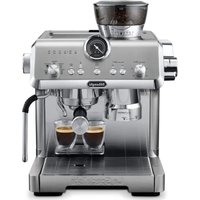
3.DESCRIPTION. 7
3.1 Description of the appliance (A) 7
3.2 Description of the control panel (B)
3.3 Description of the homepage (main screen) (C)
3.4 Description of the accessories (D) (*varies according to model)
3.5 Description of milk carafe (hot) (E)
3.6 Description of milk carafe (cold) (F). 7
4. SETTING UP THE APPLIANCE 7
5. TURNING THE APPLIANCE ON 8
6. TURNING THE APPLIANCE OFF 9
7. MENU SETTINGS 9
7.1 Rinsing 9
7.2 Descaling 9
7.3 Connectivity (certain models only) 9
7.4 Adjust grinder 9
7.5 Coffee temperature 10
7.6 Languages 10
7.7 Create and edit profiles 10
7.8 Set auto-off 10
7.9 General 10
7.10 Water filter 10
7.11 Water hardness 10
7.12 Default values 10
7.13 Drain water 10
7.14 Statistics 11
8. BEVERAGE SELECTION 11
9. MAKING COFFEE BEVERAGES 12
9.1 Prepare the machine to make coffee beverages. 12
9.2 Directly selected beverages.. 12
9.3 Customising the beverages 12
9.4 Making coffee using pre-ground coffee.....13
9.5 General indications for making coffee beverages. 13
9.6 Tips for a hotter coffee.. 13
9.7 Coffee pot. 13
9.8 Cleaning the coffee pot 14
10. MAKING MILK BEVERAGES 14
10.1 Preparing the milk carafes (E and F) 14
10.2 Which milk to use? 14
10.4 Adjusting the amount of froth.. 15
10.5 Making milk beverages 15
10.6 Cleaning the milk carafe after use 15
11. PREPARING HOT WATER AND HOT TEA 16
11.1 Preparing the appliance 16
11.2 Making hot tea 16
11.3 Preparing hot water 16
12. FAVORITE BEVERAGES 16
13. MAKING "TO GO" BEVERAGES 16
13.1 Cleaning the travel mug after use 17
14. "MY" FUNCTION ("HOT" BEVERAGES ONLY).
17
15. SELECTING YOUR PERSONAL PROFILE 念 .18
16. CLEANING 18
16.1 Cleaning the machine 18
16.2 Cleaning the internal circuit 18
16.3 Cleaning the coffee grounds container.....18
16.4 Cleaning the drip tray and drip tray grille....19
16.5 Cleaning the inside of the machine 19
16.6 Cleaning the water tank 19
16.7 Cleaning the pre-ground coffee funnel ....20
16.8 Cleaning the brewing unit.. 20
16.9 Cleaning the milk carafes (E) and (F) 20
17. DESCALING 21
18. SETTING WATER HARDNESS 22
18.1 Measuring water hardness 22
18.2 Setting water hardness 22
19.WATER SOFTENER FILTER 23
19.1 Installing the filter 23
19.2 Replacing or removing the filter 23
19.3 Tips for Energy Saving 23
20. REGULATORY COMPLIANCE (CONNECTED
MODELS ONLY) 23
21. DISPLAYED MESSAGES 25
22. TROUBLESHOOTING 28
IMPORTANT SAFEGUARDS
When using electrical appliances, basic safety precautions should always be followed, including the following.
- Read all instructions carefully.
- Make sure the voltage of your electrical system corresponds to the voltage shown on the bottom of the machine.
- Do not touch hot surfaces. Use handles or knobs.
- To protect against fire, electrical shock and personal injury, do not immerse cord, plug or appliance in water or other liquid.
- Keep the appliance out of the reach of children and do not leave appliance unattended while in operation.
- Unplug from the outlet when not in use and before cleaning.
- Do not operate with a damaged cord or plug, or after the appliance malfunctions, or has been damaged in any manner. Return the appliance to the nearest authorized service facility for examination, repair or adjustment.
- The use of accessory attachments not recommended by the manufacturer may result in fire, electrical shock, or personal injury.
- Do not use outdoors.
- Make sure the power cord does not hang over the edge of the table or counter-top to avoid getting accidentally caught or entangled.
Do not place the appliance or its electrical parts on or near electric stoves, cooking surfaces, or gas burners.
- Plug cord into the wall outlet. To disconnect, first turn machine "off", then remove plug from wall outlet.
- Do not use the appliance for other than the intended use. This appliance is to be utilized for domestic use only. The manufacturer declines all responsibility for any damage caused by improper, incorrect, or irresponsible use.
WARNING: To reduce the risk of fire or electric shock, do not remove the cover or the exterior of the unit. Don't attempt to repair or modify the machine, doing so will void the warranty. Repair should be done by authorized service personnel only!
SAVE THESE INSTRUCTIONS
THIS APPLIANCE IS FOR HOUSEHOLD USE ONLY
SHORT CORD INSTRUCTIONS
- A short power cord is provided to reduce risks resulting from becoming entangled in or tripping over a longer cord.
- Longer, detachable power supply cords or extension cords are available and may be used if care is exercised in their use.
- If an extension cord is used, the marked electrical rating should be at least as great as the electrical rating of the appliance. If the appliance is provided with 3- wire, grounding type cord, the extension should be a GROUNDING TYPE 3 - WIRE CORD. The longer cord should be arranged so that it will not drape over the counter-top or table top where it can be pulled on by children or tripped over.
- Your product is equipped with a polarized alternating current line plug (a plug having one blade wider than the other). This plug will fit into the power outlet only one way. This is a safety feature. If you are unable to insert the plug fully into the outlet, try reversing the plug. If the plug should still fail to fit, contact your electrician to replace your obsolete outlet. Do not defeat the safety purpose of the polarized plug.
1. SAFETY WARNINGS
Danger!
This is an electrical appliance and may cause electric shock.
You should therefore follow these safety warnings:
- Never touch the appliance with damp hands or feet.
- Never touch the plug with damp hands.
- Make sure the socket used is freely accessible at all times, enabling the appliance to be unplugged when necessary.
- Unplug directly from the plug only. Never pull the cord as you could damage it.
- To disconnect the appliance completely you must unplug it from the mains socket.
- If the appliance is faulty, do not attempt to repair.
Turn it off, unplug from the mains socket and contact Customer Services.
- Before cleaning the appliance, turn it off, unplug from the mains socket and allow to cool.
Important:
Keep all packaging (plastic bags, polystyrene foam) away from children.
Danger of burns!
This appliance produces hot water and steam may form while it is in operation.
Avoid contact with splashes of water or hot steam.
When the appliance is in operation, the cup shelf could become very hot.
1.1 Designated use
This appliance is designed and made to prepare coffee and milk and heat beverages.
Any other use is considered improper and thus dangerous. The manufacturer is not liable for damage deriving from improper use of the appliance.
1.2 Instruction for Use
Read this Instruction for Use carefully before using the appliance. Failure to follow this Instruction for Use may result in injury or damage to the appliance.
The manufacturer is not liable for damage deriving from failure to respect this Instruction for Use.
Please note:
Keep this Instruction for Use. If the appliance is passed to other persons, they must also be provided with this Instruction for Use.
2. INTRODUCTION
Thank you for choosing this bean to cup espresso and cappuccino machine.
Take a few minutes to read this Instruction for Use. This will avoid all risks and damage to the appliance.
2.1 Letters in brackets
The letters in brackets refer to the description of the appliance on pages 2-3.
2.2 Troubleshooting and repairs
In the event of problems, first try and resolve them by reading the information given in sections "21. Displayed messages" and "22. Troubleshooting".
If this does not resolve the problem or you require further information, you should consult customer services you should contact Costumer Service. See more information on delonghi.com
2.3 Download the App!


Download the App then follow the instructions in the App to create your account.
In the App, you can find recipes, information, tips and curious facts about the world of coffee, together with information on your machine at your fingertips.
Models with Wi-Fi connection
In connected models, you can manage a number of functions remotely from the Coffee Link App.
This symbol highlights the functions you can control or consult using the App.
You can also create new beverages and save them in your appliance.
Please note:
- Warning: Changes or modifications not expressly approved by DE LONGHI could void the user's authority to operate the equipment.
- To cancel a remote command, act directly on the machine-display by pressing "Stop" or "Cancel".
- To access the functions from the App, enable connectivity from the appliance's settings menu (see "7.3 Connectivity (certain models only)").
- Check compatible devices on "compatibledevices.delonghi.com".
3.DESCRIPTION
3.1 Description of the appliance (A)
A1. Beans container lid
A2. Beans container
A3. Grinding coarseness regulator
A4. Pre-ground coffee funnel
A5. Brewing unit flap
A6. Removable brewing unit
A7. Coffee spouts (adjustable height)
A8. Accessories connector
A9. Button: turns the appliance on and off (standby)
A10. Coffee grounds container
A11. Coffee grounds container support
A12. Condensate tray
A13. Cup tray
A14. Tray grille
A15. Drip tray
A16. Flap grille (travel mug compartment)
A17. Flap grille support (travel mug compartment)
A18. Drip tray water level indicator
A19. Water tank lid
A20.Water tank
3.2 Description of the control panel (B)
B1. "Cold" beverages menu
B2. "To go" beverages menu
B3. "Hot" beverages menu
B4. "Favorites" beverages menu
3.3 Description of the homepage (main screen) (C)
C1. Selectable beverages (direct selection)
C2. To display and customize the beverage settings
C3. Appliance settings menu
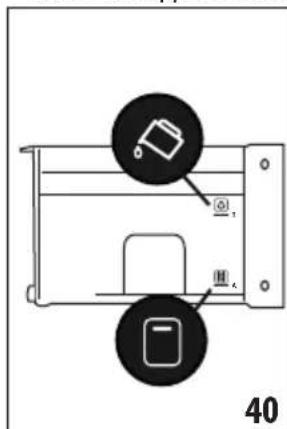
C4. Indicator lights:
*Connected models only:
Machine waiting for first connection
- active light
- No network light
All models:
- Elegy saving active light
- MK carafe cleaning required light
- Descalging required light
- Exhausted filter light
C5. Customisable profiles (see "15. Selecting your personal profile")
3.4 Description of the accessories (D) (*varies according to model)
Accessories in the Starter pack:
D1. "Total Hardness Test" indicator paper
D2. Pre-ground coffee measuring spoon
D3. Descaler
D4. Water softener filter
D5. Cleaning brush
D6. Hot water spout
D7. Ice cube tray
D8. Coffee pot
D9. Travel mug
3.5 Description of milk carafe (hot) (E)
LatteCrema
HOT

E1. Milk carafe lid
E2. Milk carafe
E3. Froth adjustment/Clean dial
E4. Milk carafe connector (removable for cleaning)
E5. Milk spout (adjustable height)
E6. Milk intake tube (silicone)
E7. Milk spout extension
3.6 Description of milk carafe (cold) (F)
LatteCrema
COOL

F1. Milk carafe lid
F2. Milk carafe
F3. Froth adjustment/Clean dial
F4. Milk carafe connector (removable for cleaning)
F5. Milk spout
F6. Milk intake tube (rigid plastic)
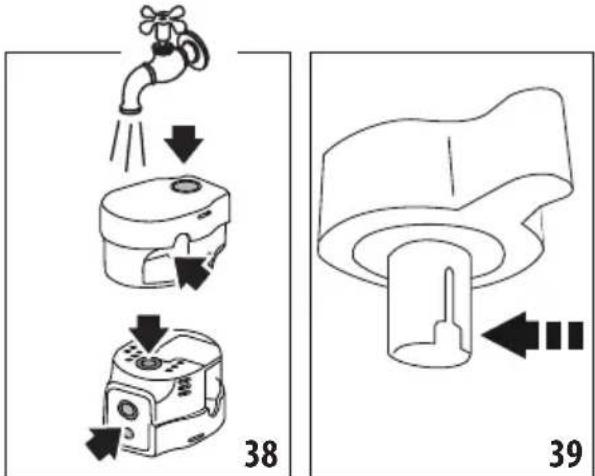
4. SETTING UP THE APPLIANCE
Please note:
- Possible traces of coffee in the grinder are the result of quality tests performed on the appliance before sale, proof of the meticulous care and attention we invest in our products.
- The first time you use the appliance, all removable accessories (milk carafe (E) and (F), travel mug (D9), coffee pot (D8), water tank (A19) and (A20)) destined to come into contact with water or milk should be rinsed with hot water. We recommend washing the milk carafes in a dishwasher.
-
You should customize water hardness as soon as possible following the instructions in section "18. Setting water hardness".
-
Connect the appliance to the mains supply (fig. 1).
- Press the flag corresponding to the desired language and confirm the selection by pressing "Done".
Now follow the instructions indicated on the display of the appliance:
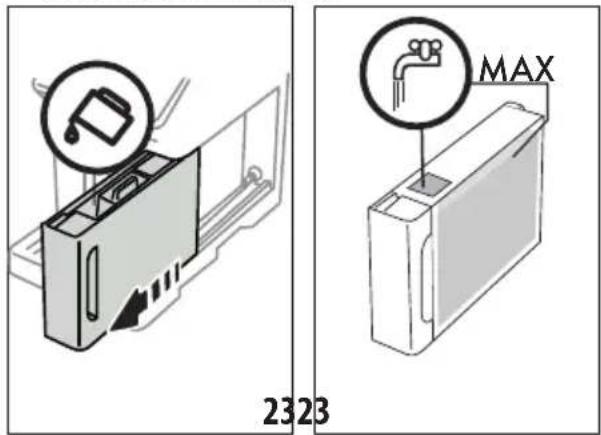
- Remove the water tank (A20) (fig. 2) and fill to the MAX line with fresh water (fig. 3);
- Then put the tank back and confirm by pressing "Next";
- Fill the beans container (A2) (fig. 4), then confirm by pressing "Next".

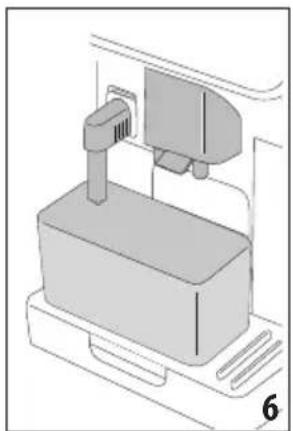
- Insert the hot water spout (D6) on the accessories connector (A8) (fig. 5) and place a container with a minimum capacity of 6,76fl oz/200 ml under the coffee spouts (A7) and hot water spout (fig. 6);
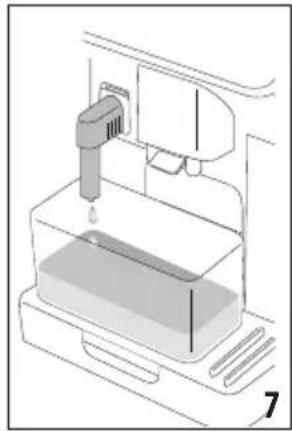
- Press "OK" to fill the water circuit. The appliance delivers water from the hot water spout (fig. 7);
- At the end of delivery, the appliance proceeds to warm up by performing a rinse cycle, delivering hot water from the coffee spouts (fig. 8).

When at temperature, the appliance proposes a tutorial on how to use the machine.
Please note:
- The first time you use the appliance, you need to make 4-5 cappuccinos before the results in the cup will be satisfactory.
The first time you use the machine, the water circuit is empty and the appliance could be very noisy. The noise becomes less as the circuit fills.
5. TURNING THE APPLIANCE ON
Please note:
Each time the appliance is turned on, it performs an automatic preheat and rinse cycle which cannot be interrupted. The appliance is not ready for use until the cycle has been completed.
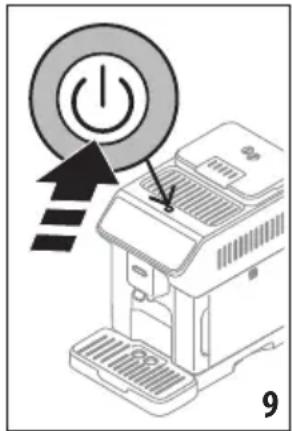
- To turn the appliance on, press the button (A9) (fig. 9): the appliance comes on
- When at temperature, the appliance performs a rinse cycle delivering hot water from the coffee spouts(A7); as well as heating the boiler, this also heats the internal circuits by circulating hot water.
6. TURNING THE APPLIANCE OFF
Whenever the coffee machine is turned off after being used to make coffee, it performs an automatic rinse cycle.
- To turn the appliance off, press the button (A9) (fig. 9).
- I f envisaged, the appliance rinses the coffee spouts (A7) with hot water, then goes off (stand-by).
Please note:
If you will not be using the appliance for some time, turn off, then unplug from the mains socket.
Important!
Never unplug while the appliance is on.
7. MENU SETTINGS
7.1 Rinsing
Use this function to deliver hot water from the coffee spouts (A7) (and, if inserted, the hot water spout (D6)), to clean and heat the appliance's internal circuit.
Place a container with a minimum capacity of 3.38 fl oz/100 ml under the spouts (fig. 6).
To enable the function, proceed as follows:
- Press the settings menu (C3);
- Display "Rinsing";
- Press "OK" to start delivery. After a few seconds, hot water is delivered to clean and heat the appliance's internal circuit (fig. 7-8);
- To stop rinsing, press "Stop" or wait for rinsing to stop automatically.
Please note:
- If the appliance is not used for more than 3-4 days, when you turn it on again, we strongly recommend performing 2-3 rinses before use;
After cleaning, it is normal for the grounds container (A10) to contain water.
7.2 Descaling
For instructions on descending, see section "17. Descaling".
7.3 Connectivity (certain models only)
Use this function to enable or disable connectivity. Proceed as follows:
- Press the settings menu (C3);
- Scroll through the pages until "Connectivity" is displayed;
- Press"Next";
- Enable the Wi-Fi connection and remote control (via the De'Longhi Coffee Link App);
- The appliance PIN, needed to connect to the App, is displayed on the screen;
- Press << to enter the settings menu;
- Press "X" to save the new selection and go back to the homepage (C).
On the homepage, the symbol (C4) indicating the connection status alternates with the other symbols (e.g. descending, etc.)
| Symbol on homepage Meaning | |
| Connectivity enabled: the machine is waiting for the first connection | |
| The appliance is connected | |
| The appliance is connected to the home Wi-Fi, but there is no network, or the cloud cannot be reached | |
| -- | Connection disabled. To enable, enter the settings menu (C3) |
Please note:
- If the remote connection is off, a number of the App's functions will not be available (e.g. beverage preparation).
-
If you change the name or password of the Wi-Fi network, or if you connect to a new Wi-Fi network, you will need to perform the reset procedure as described below:
-
Proceed as described above from point 1 to point 3;
- Press"Reset";
- Press "OK" to confirm cancellation of the network settings;
- Connect with the App again and select the new credentials.
7.4 Adjust grinder
The appliance proposes a tutorial on how to adjust grinding correctly for best results:
- Press the settings menu (C3);
- Scroll through the pages until "Adjust grinder" is displayed;
- Press "Read more" to consult the tutorial on how to adjust the grinding coarseness.
Please note:
After carrying out the above procedure, we recommend making at least 3 coffees before adjusting again. If the coffee is still not brewed correctly, repeat the procedure.
- The grinding coarseness regulator (A3) must only be turned when the coffee grinder is in operation during the initial phase of coffee preparation.
7.5 Coffee temperature
To change the temperature of the water used to make the coffee, proceed as follows:
- Press the settings menu (C3);
- Scroll through the pages until "Coffee temperature" is displayed;
- Press "Set";
- Select the required temperature from those proposed;
- Press << to enter the settings menu.
Please note:
Varying the temperature has most effect for long beverages.
7.6 Languages
To change the language on the homepage, proceed as follows:
- Press the settings menu (C3);
- Scroll through the pages until "Languages" is displayed;
- Press"Next";
- Press the flag corresponding to the language you want to set (press "Next" or "Back" to display all the languages available). The display is immediately updated with the selected language;
- Press << to save the new selection and go back to the settings menu;
- Press "X" to go back to the homepage (C).
7.7 Create and edit profiles
You can use this function to modify the image and color of the icon for each profile. To customize the icon, proceed as follows:
- Press the settings menu (C3);
- Scroll through the pages until "Create and edit profiles" is displayed;
- Press"Next";
- To create a new profile, press "Add new";
To edit an existing profile, select the profile and press "Edit";
- Customize as you wish, then press "Save" to confirm.
- Press << to save the new selection and go back to the homepage (C).
7.8 Set auto-off
Auto-off can be set so that the appliance goes off after 15 or 30 minutes, or 1 or 3 hours of inactivity.
To programme auto-off, proceed as follows:
-
Press the settings menu (C3);
-
Scroll through the pages until "Set auto-off" is displayed;
- Select the desired time interval (15 or 30 minutes, or 1 or 3 hours).
- Press "X" to save the new selection and go back to the homepage (C).
7.9 General
- Press the settings menu (C3);
- Scroll through the pages until "General" is displayed;
Here you can enable or disable the following functions with a simple touch:
- "Beep sound": when enabled, the appliance beeps whenever an operation is performed.
- "Energy saving": use this function to enable or disable energy saving. When enabled, the function reduces energy consumption in compliance with European regulations.
is displayed on the homepage to show it is active.
- Press "X" to save the new selection and go back to the homepage (C).
7.10 Water filter
For instructions on the filter (D4), see section "19. Water soften-er filter".
7.11 Water hardness
For instructions on setting water hardness, see section "18. Setting water hardness".
7.12 Default values
This resets all menu settings and user customisation back to the default values (with the exception of the language, which remains as set, and the statistics).
Proceed as follows:
- Press the settings menu (C3);
- Scroll through the pages until "Default values" is displayed;
- Press "Next":
- Select whether you want to reset the entire appliance or a single profile, then press "Next";
- Follow the instructions, then confirm the reset by pressing "OK". The machine displays the homepage (C) again.
Please note:
When the appliance (not the individual profile) has been reset to the default values, the machine proposes the introductory tutorial again.
7.13 Drain water
To avoid the water in the circuit freezing if the appliance is to be left idle for a long period of time, or before taking it to customer services, we recommend emptying the water circuit.
Proceed as follows:
1. Press the settings menu (C3);
2. Scroll through the pages until "Drain water" is displayed;
3. Press "OK" to start the guided procedure;
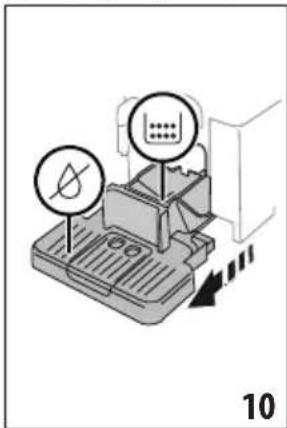
- Extract, empty and replace the grounds container (A10) and drip tray (A15) (fig. 10), then press "Next";
- Insert the spout (D6) on the connector (A8) (fig. 5);
- Position a 100ml container under the spouts (fig. 6). Press "Next";
- The appliance performs a rinse cycle with hot water from the spouts;
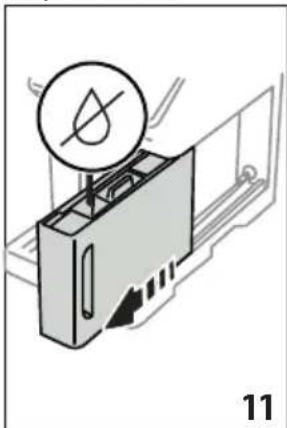
- At the end of rinsing, extract the water tank (A20) (fig. 11) and empty;
- If present, remove the water softener filter (D4) from the water tank and press "Next";
- Put the empty water tank back in the appliance and press "Next";
- Wait for the appliance to empty the circuit; (Important: hot water from the spouts!). As the water circuit empties, the appliance could become noisier. This is part of normal operation.
- When the circuit is empty, extract and empty the drip tray, put back in the appliance and press "Next";
- Press "OK". The appliance goes off (standby).
The next time the appliance is turned on, follow the instructions in section "4. Setting up the appliance u".
7.14 Statistics
This displays statistics relating to the machine. To view the statistics, proceed as follows:
-
Press the settings menu (C3);
-
Scroll through the pages until "Statistics" and the principal statistics are displayed. To view more information, press "Read more";
- Press ^ < ^ to go back to the settings menu.
8. BEVERAGE SELECTION
You can use your machine to make a great variety of beverages. the beverages indicated by this symbol are also available in the "To Go" menu.
| Hot Cold | ||
| Espresso | ✓ | × |
| 2X Espresso | ✓ | × |
| Coffee | ✓ | × |
| Doppio+ | ✓ | × |
| Long | ✓ | × |
| Americano | ✓ | ✓ |
| Coffee pot | ✓ | × |
| Over ice | × | ✓ |
| Cappuccino | ✓ | ✓ |
| Latte Macchiato | ✓ | ✓ |
| Latte | ✓ | ✓ |
| Cappuccino Mix | ✓ | ✓ |
| Espresso Macchiato | ✓ | × |
| Flat White | ✓ | ✓ |
| Cappuccino + | ✓ | × |
| Cortado | ✓ | × |
| Milk | ✓ | ✓ |
| Tea function | ✓ | × |
| Hot water | ✓ | × |
From the panel, access the type of beverage you want to make (Hot, Cold, To Go-In Travel Mug) and fit the necessary accessories.
9. MAKING COFFEE BEVERAGES
9.1 Prepare the machine to make coffee beverages Important!
Do not use green, caramelized or candied coffee beans as they could stick to the coffee grinder and damage it.
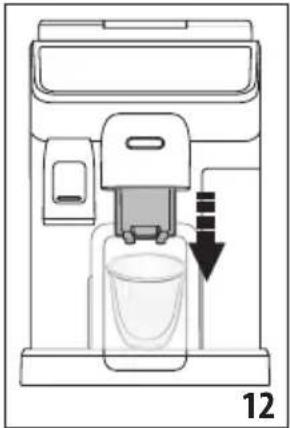
- Place 1 or 2 cups under the coffee spouts (A7);
- Lower the spouts as near as possible to the cup (fig. 12). This makes a creamier coffee.
9.2 Directly selected beverages
- Press the image on the homepage (C) corresponding to the coffee you want to make (C1) (e.g. espresso, fig. 13);

- Hot coffee beverage: the appliance starts preparation.
Cold coffee beverage:
- select to make an "Iced" or "Extra Iced" beverage: press "Next";
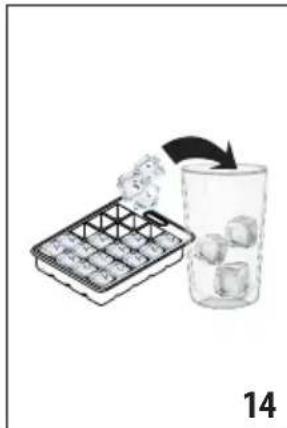
Depending on the previous selection, before delivery, the appliance suggests the quantity of ice cubes. Add the quantity of ice cubes indicated to the glass (fig. 14), then press "Brew".
The appliance starts preparation.
A description of each individual phase (grinding, brewing coffee) appears on the display.
At the end of preparation, the appliance is ready to make the next beverage.
9.3 Customising the beverages
To make coffee beverages with customized parameters, proceed as follows:
- Press (C2) at the bottom of the image corresponding to the coffee you want to make (e.g. espresso, fig. 15). The parameters that can be customized according to taste appear on the display:

- Hot coffee beverage: After setting the parameters, press "Brew". The appliance starts making the beverage and a description of each individual phase (grinding, brewing coffee) appears on the display;
Cold coffee beverage: Set the parameters, then press "Start" and proceed as follows:
- Select whether to make an "Iced" or "Extra Iced" beverage, then press "Next";
Depending on the previous selection, before delivery, the appliance suggests the quantity of ice cubes. Add
the quantity of ice cubes indicated to the glass (fig. 14), then press "Brew".
-
The appliance starts making the beverage and a description of each individual phase (grinding, brewing coffee) appears on the display.
-
At the end of delivery, press "Save" to save the new settings, or "Cancel" to retain the previous parameters.
Please note:
If you save the new settings, they are memorised ONLY in the selected profile.
4. Press "X" to go back to the homepage (C).
The appliance is ready to be used again.
9.4 Making coffee using pre-ground coffee
Important!
- Never add pre-ground coffee when the machine is off or it could spread through the inside of the machine and dirty it. This could damage the machine.
- Never use more than 1 level measuring spoon (D2) as it could soil the inside of the coffee machine or block the funnel (A4).
When using pre-ground coffee, only one cup can be made at a time.
- Making Long coffee: halfway through preparation, when requested by the appliance, add one level measuring spoon of pre-ground coffee and press "OK".
-
You cannot make Doppio+, 2x Espresso, Coffee Pot or Cappuccino+ beverages using pre-ground coffee.
-
Press (C2) at the bottom of the image corresponding to the coffee you want to make (e.g. espresso, fig. 15). The parameters that can be customized according to taste appear on the display;
-
Select the quantity and pre-ground coffee;

- Press"Brew";
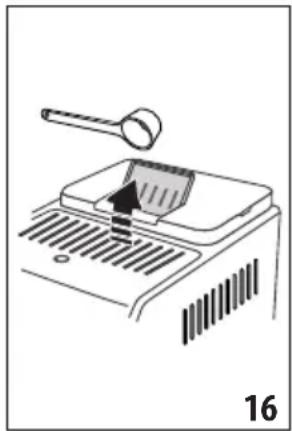
- Lift the pre-ground coffee funnel lid, make sure the funnel (A4) is not blocked, then add one level measuring spoon (D2) of pre-ground coffee (fig. 16). Press "OK" to make the beverage;
- The appliance starts making the beverage and a description of each individual phase (grinding, brewing coffee) appears on the display.
At the end of preparation, the appliance is ready to make the next beverage.
9.5 General indications for making coffee beverages
- A quantity of water above level 1 is sufficient to complete most beverages. Always filling above level 1 allows the appliance to estimate the amount of water available to make the beverages.
- While the machine is making the coffee, preparation can be interrupted at any moment by pressing "Stop" or "Cancel".
- As soon as delivery has ended, to increase the quantity of coffee, just press "Extra". When the required quantity is reached, press "Stop" or "Cancel".
- Various alarm messages could be displayed while using the appliance ("Please fill the tank with fresh water up to MAX level" etc.). Their meaning is explained in section "21. Displayed messages".
- If the coffee is delivered a drop at a time, too weak and not creamy enough, or too cold, consult the tutorial on how to adjust grinding (see section "7.4 Adjust grinder") and section "22.Troubleshooting".
- If "Energy Saving" mode is activated, there may be a few seconds delay before the first coffee is delivered.
9.6 Tips for a hotter coffee
To make a hotter coffee, proceed as follows:
perform a rinse cycle before making the coffee (section "7.1 Rinsing");
warm the cups with hot water using the hot water function (see section "11. Preparing hot water and hot tea");
- increase the coffee temperature (section "7.5 Coffee temperature").
9.7 Coffee pot
| Optional accessory in certain models: | |
| Pot (capacity 33.81 fl oz/1 liter) | |
| Type: DLSC021 | |
| EAN: 8004399333642 | |
To make the beverage, proceed as follows:
- On the homepage (C), press the image corresponding to the "Coffee Pot" beverage (C1);
- Select the number of cups to make and the desired strength;
| Number of cups | Number of grinding cycles | Total quantity (fl oz / ml)* |
| 2 2 8.45 / 2 | 50 | |
| 3 3 12.68 / | 375 | |
| 4 4 16.9 / 5 | 00 | |
| 5 5 21.13 / | 625 | |
| 6 6 25.36 / | 750 |
- The quantities indicated are approximate and may vary according to the type of coffee.
- Press "Start" to move on to the next step;
- Fill the tank (A20) with water and fill the beans container (A2) as instructed on the display (fig. 17). Once you have made sure there is sufficient water and coffee for the beverages you want to prepare, press "Next";
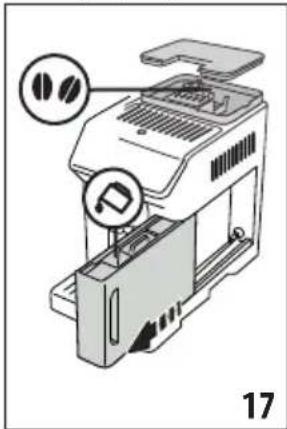
- Place the coffee pot (D8) under the coffee spouts (A7). Press "Brew";
- The appliance starts making the beverage with an appropriate number of grindings for the number of cups to be prepared and a description of each individual phase (grinding, brewing coffee) appears on the display.
Please note:
"Cancel" or Stop": press to stop preparation completely and go back to the homepage.
7. When delivery has ended, press "Save" to save the new settings, or "Cancel" to retain the previous parameters.
8. Press "X" to go back to the homepage. The appliance is ready to be used again.
Please note:
If you save the new settings, they are memorised ONLY in the selected profile.
SAFETYWARNING:
After making a pot of coffee, leave the appliance to cool for 5 minutes before making another beverage. Risk of overheating!
9.8 Cleaning the coffee pot
After each use, you should clean the coffee pot (D8) with hot water and mild detergent.
Rinse thoroughly with hot water to eliminate all detergent residues.
10. MAKING MILK BEVERAGES
10.1 Preparing the milk carafes (E and F)
Please note:
To avoid milk with poor quality froth or large bubbles, always clean the milk carafes as described in sections "10.6 Cleaning the milk carafe after use" and "16.9 Cleaning the milk carafes (E) and (F)".
10.2 Which milk to use?
The quality of the froth will vary depending on:
- the temperature of the milk or plant-based beverage (for best results, always use milk or plant-based beverages at refrigerator temperature: 41^ / 5^ );
- type of milk or plant-based beverage;
brand used; - ingredients and nutritional value.
| LatteCrema HOT | LatteCrema COOL | |
| Cow's milk | ||
| Whole milk | ✓ | × |
| Partially skimmed milk (2% or 1% milk) | × | |
| Fat Free Milk | ✓ | |
| Plant-based beverages | ||
| Soy | ✓ | ✓ |
| Almond | ✓ | ✓ |
| Oat | ✓ | ✓ |
10.3 Filling and attaching the milk carafes
- Lift the lid (E1) or (F1) (fig. 18);
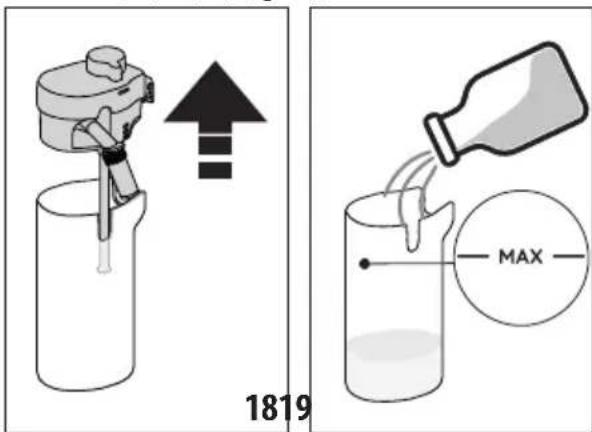
- Fill the milk carafe (E2) or (F2) with a sufficient quantity of milk, not exceeding the MAX level marked on the carafe (fig. 19);
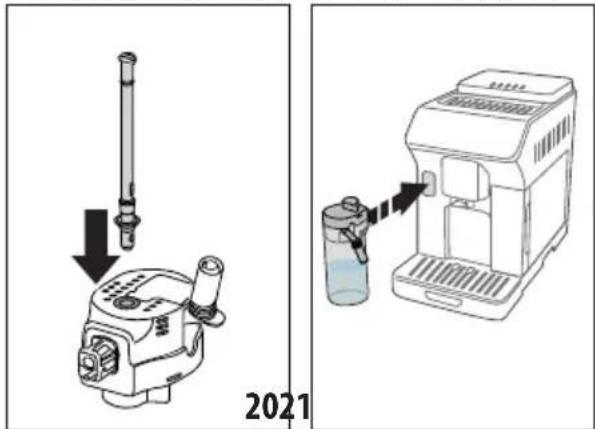
- Make sure the milk intake tube (E6) or (F6) is correctly inserted on the bottom of the milk carafe lid (fig. 20);
- Put the lid back on the milk carafe;
- Attach the carafe to the connector (A8) and push as far as it will go (fig. 21). The machine emits a beep (if the function is enabled);
- Place a sufficiently large cup under the coffee spouts (A7) and milk spout (E5) or (F5). Only the milk spout (E5) can be lengthened by adjusting the extension;
- Select the beverage you want to make as described in the following paragraphs.
Please note:
If "Energy Saving" mode is enabled (see section "7.9 General"), you may have to wait a few seconds before the appliance makes the beverage.
10.4 Adjusting the amount of froth
Turn the froth adjustment dial (E3) or (F3) to adjust the amount of froth on the milk delivered while making milk beverages.
| Dial position | Recommended for... | |
| Hot Cold | ||
| MIN froth | · Latte · Hot milk (not frothed) | · Latte |
| MED froth | · Latte Macchiato · Flat White · Cortado | · Latte Macchiato · Flat White |
| MAX froth | · Cappuccino · Cappuccino Mix · Espresso Macchiato · Cappuccino + · Hot milk (frothed) | · Cappuccino · Cappuccino Mix · Cold milk (frothed) |
10.5 Making milk beverages
On the homepage (C), press the image corresponding to the beverage you want to make (C1).
As for coffee beverages, you can make a customized beverage by pressing the (发) symbol at the bottom of the image on the homepage.
10.6 Cleaning the milk carafe after use
Each time you deliver a milk beverage, the appliance asks you to perform the CLEAN function to clean the milk carafe lid (E1) or (F1). To start cleaning, proceed as follows:
- Leave the milk carafe in the machine (you do not need to empty it);
- Place a cup or other recipient under the milk spout (E5) or (F5) (fig. 22);
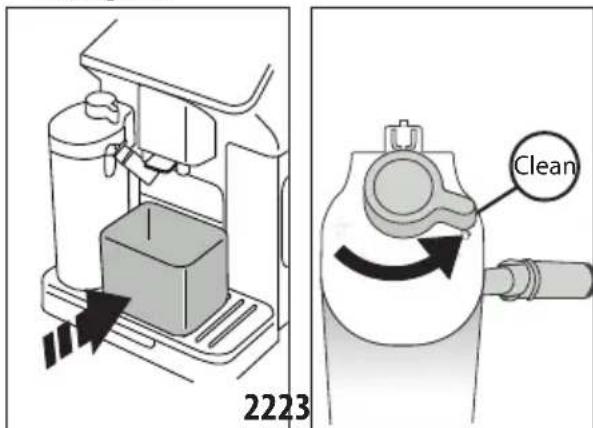
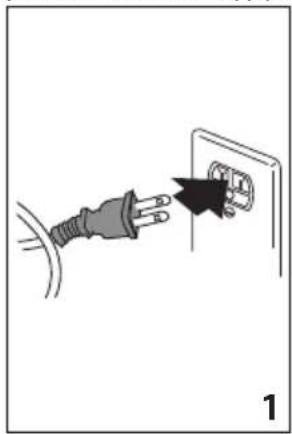
- Turn the froth adjustment/clean dial (E3) or (F3) to "Clean" (fig. 23). Hot water and steam are delivered from the milk spout. Cleaning stops automatically;
- Turn the dial back to one of the froth selections;
If you want to make a number of beverages in succession:
To proceed with making the next beverages, when the "Clean" message is displayed, press "Cancel". Clean the milk carafe after making the last beverage.
At the end of preparation, the milk carafe is empty, or there is not enough milk for other recipes
After cleaning using the "Clean" function, extract the milk carafe and clean all the components as described in section "16.9 Cleaning the milk carafes (E) and (F)"
At the end of preparation, there is enough milk left in the carafe for other recipes
After cleaning using the "Clean" function, extract the milk carafe and place it immediately in the refrigerator. The "HOT" carafe can be kept in the refrigerator for no more than 2 days and the "COOL" carafe for no more than 1 day, then all the components should be cleaned as described in section "16.9 Cleaning the milk carafes (E) and (F)".
Important:
If the milk carafe has been left out of the refrigerator for more than 30 minutes, disassemble and clean all the components as described in section "16.9 Cleaning the milk carafes (E) and (F)".
General notes after making milk beverages:
- If you do not clean the milk carafe, the symbol appears on the homepage to remind you that it needs cleaning.
- In certain cases, the appliance will need to warm up before the carafe can be cleaned.
- To ensure correct cleaning, wait for the CLEAN function to end. The function is automatic. It must not be interrupted while underway.
11. PREPARING HOT WATER AND HOT TEA
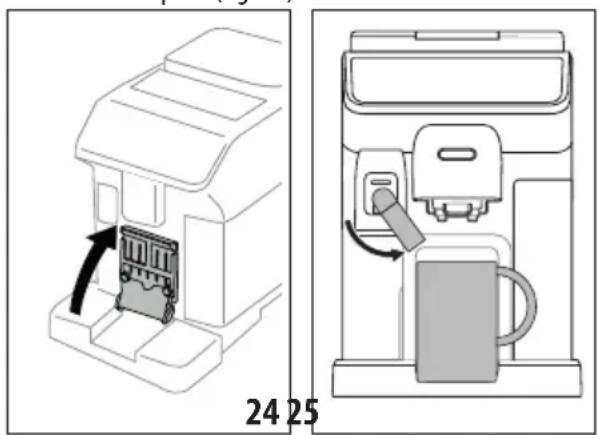
11.1 Preparing the appliance
- Insert the hot water spout (D6) in the machine (fig. 5);
- Place a cup under the spout;
To use tall glasses:
- lift the flap (A16) (fig. 24) and place the glass in the compartment;
- turn the water spout (fig. 25).
11.2 Making hot tea
- On the homepage (C), press the image corresponding to tea (C1);
- Adjust the quantity and temperature;
- Press "Brew". Preparation begins and stops automatically.
Please note:
To stop brewing, press "Stop" or "Cancel".
11.3 Preparing hot water
Direct selection:
- On the homepage (C), press the image corresponding to hot water (C1). Preparation begins and stops automatically.
Customising the quantity:
- Press (2) at the bottom of the image corresponding to hot water: the quantity to select appears on the display;
- Press "Brew". Preparation begins and stops automatically.
Please note:
To stop brewing, press "Stop" or "Cancel".
12. FAVORITE BEVERAGES
A collection of favorite beverages can be created for each profile.
Proceed as follows:
- Press (2) at the bottom of the image corresponding to the beverage you want to include in the collection;
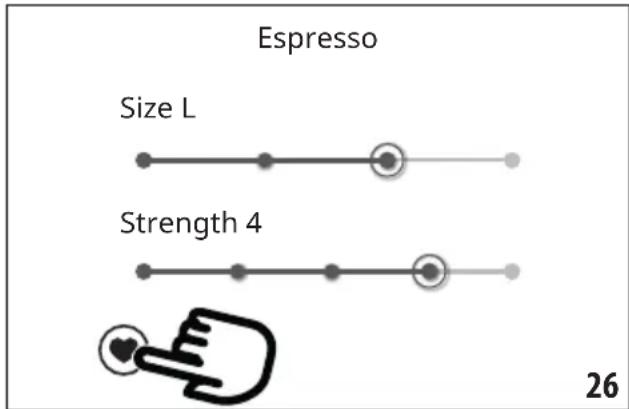
- Select the heart (fig. 26):
- Press "X" to go back to the homepage (C).
The beverage is now included in the collection and can be accessed by pressing Favorites (B4) from the control panel (B).
Please note:
The order of beverages in the collection can be changed:
- Press ;
- Select the beverage to be moved;
- Use the arrows to change the order of the beverages;
- Press "X" to go back to the homepage (C).
13. MAKING "TO GO" BEVERAGES
"The "To Go" function is perfect for all those wanting to create a customized beverage to take away with them.
| Optional accessory in certain models: | |
| Travel mug (capacity 473 ml/160 mm H) | |
| Type: DLSC073 | |
| EAN: 8004399024083 | |
- Prepare the machine with the accessories needed to prepare the beverage you want to make (E, F);
- Raise the flap (A16) (fig. 24) and place the travel mug in the compartment (fig. 27);

- Press "To Go" (B2);
The first time you use the function:
- Press "Start";
- Pressing displays information on the quantities corresponding to the size of the travel mug;
- Select the size of travel mug you are using (Small, Medium, Large) and press "Next";
- The appliance informs you that at the end of preparation, you can adjust the quantity to save the exact capacity of your mug. Press "Next".
- Select the type of beverage you want to make (Hot (B3) or Cold (B1));
- Scroll through the beverages on the homepage (C) until the one you want to make is displayed. Select the beverage and customize the parameters proposed by the appliance. Proceed with preparation;
- At the end of preparation, you can correct the quantity delivered so the next time the machine will make the right amount of beverage for the travel mug you are using.
Please note:
Each time you use a mug different from the one used previously, we recommend you remain nearby to check the quantity of beverage delivered.
- If you save the new settings, they are memorised ONLY in the selected profile.
- To maintain the temperature of hot beverages, preheat the travel mug with hot water.
- You should only use the travel mug for the beverages present on the homepage.
- To use a travel mug other than the one supplied, make sure it is no taller than 6.3in / 16cm .
Important
- Before screwing on the lid, open the closing cap to release the pressure;
-
Recipes with milk: at the end of preparation, clean the milk carafe (see section "10.6 Cleaning the milk carafe after use").
-
You should use the contents within a maximum of 2 hours. After that time, empty and clean as described in the following section.
- For more information, see the leaflet attached to the travel mug.
13.1 Cleaning the travel mug after use
For hygiene reasons, the travel mug (D9) should always be cleaned after use. Do not use abrasive materials that could damage the surface of the container.
Proceed as follows:
- Unscrew the lid and rinse the container and lid with hot water (104^ / 40^)
- Soak the components in hot water (104^ / 40^) with mild detergent for at least 30 minutes. Do not use scented detergents.
- Clean the inside of the container and the lid with a clean sponge and mild detergent removing any visible dirt.
- Rinse all components with hot water (104^ / 40^)
- Dry all components with a clean, dry cloth or paper towels, then reassemble.
- Wash the lid in the dishwasher once a week. The metal container is not dishwasher safe
14. "MY" FUNCTION ("Hot" beverages only).
With the "my function", you can customize the beverage as follows:
- Make sure the profile (C5) whose beverage you want to customize is active;
- Press (C) at the bottom of the image corresponding to the beverage you want to make;
- Press ; (my)
- Press "Start" to follow the guided procedure;
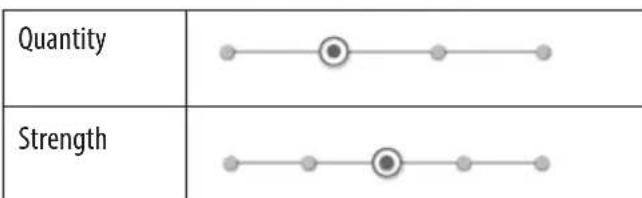
- If envisaged by the beverage, select the desired Strength and press "Next";
- Press "Brew" to begin preparation;
- When the required quantity has been delivered into the cup, press "Stop".
- If you are satisfied with the result in the cup, press "Save" to save the settings, or "Cancel" to retain the previous parameters.
- Press "X" to go back to the homepage.
The appliance goes back to the homepage (C).
Please note:
- If you save the new settings, they are memorised ONLY in the selected profile.
-
When you customize a single beverage, the respective double version is also customized and the appliance displays the message "Settings saved on both double and single recipe";
-
Press "X" to exit programming at any moment. The values will not be saved.
- When a beverage has been customized, "Reset" (under the image) and "my" (among the quantity selections) appear in the settings. Press "Reset" to reset the default values for the beverage.
| Beverage quantity table | ||
| Beverage | Standard quantity (floz/ml) | Programmable quantity (floz/ml) |
| ESPRESSO 1.35 / | 40 0.67-6.08 / 20-1 | 180 |
| 2X ESPRESSO 1.35 /40 + 1.35 /40 | 0.67-6.08 / 20-180 + 0.67-6.08 / 20-180 | |
| COFFEE 6.08 / 180 | 3.38 - 8.11 / 100-2 | 40 |
| LONG 160 / 5.41 | 3.88 - 8.45 / 115-250 | |
| DOPPIO+ 4.05 / | 120 2.70 - 6.08 / 80 | 180 |
| AMERICANO 5.07 / | 150 2.36 - 16.23 | 70-480 |
| TEA 5.07 / 150 0.67 - | 14.20 / 20-420 | |
| HOT WATER 8.45 / | 250 0.67 - 14.20 | 20-420 |
15. SELECTING YOUR PERSONAL PROFILE
You can memorise a number of different profiles, each associated with a different icon.
The customized beverage settings are saved in each profile. The order in which all the beverages are displayed is based on the frequency of selection.
To select a profile, proceed as follows:
- From the homepage (C), press the profile currently in use (C5). A list of selectable profiles appears;
- Then select the required profile.
Please note:
After making your selection, the beverage settings bars will all appear in the same color as the profile;
- You can rename your profile;
To customize the profile icon, see section "7.7 Create and edit profiles".
16. CLEANING
16.1 Cleaning the machine
The following parts of the machine must be cleaned regularly:
- the appliance's internal circuit;
- coffee grounds container (A10);
- drip tray (A15) and drip tray grille(A14);
water tank (A20); -
coffee spouts(A7);
pre-ground coffee funnel (A4); -
brewing unit (A6), extractable after opening the brewing unit flap (A5);
- milk carafes (E) and (F)
- coffee pot (D8) (see section "9.8 Cleaning the coffee pot");
travel mug (D9) (see section "13.1 Cleaning the travel mug after use").
Important!
- Do not use solvents, abrasive detergents or alcohol to clean the coffee machine.
- Do not use metal objects to remove residues or coffee deposits as they could scratch metal or plastic surfaces.
| dishwasher safe | hand wash only |
| coffee grounds container (A10) | coffee grounds container support (A11) |
| drip tray (A15) | cup tray (A13) |
| flap grille support (A17) | flap grille (A16) |
| drip tray grille (A14) water tank | k (A20) |
| "Hot" milk carafe (E) removable | le brewing unit (A6) |
| "Cold" milk carafe (F) |
16.2 Cleaning the internal circuit
If the appliance is not used for more than 3/4 days, before using it again, we strongly recommend switching it on and performing 2/3 rinse cycles by selecting the "Rinse" function (section "7.1 Rinsing").
Please note:
After cleaning, it is normal for the grounds container (A10) to contain water.
16.3 Cleaning the coffee grounds container
When "Please empty grounds container" appears on the display, the grounds container must be emptied and cleaned. The appliance cannot be used to make coffee until you have cleaned the grounds container (A10). Even if not full, the empty grounds container message is displayed 72 hours after the first coffee has been prepared. For the 72 hours to be calculated correctly, the machine must never be disconnected from the mains power supply.
Important! Danger of scalding
If you make a number of milk-based beverages one after the other, the metal cup tray (A13) becomes hot. Wait for it to cool down before touching it and handle it from the front only.
To clean (with the machine on):
- Remove the drip tray (A15) and grounds container (A10) (fig. 28);

- Empty the drip tray and grounds container and clean thoroughly to remove all residues left on the bottom. This can be done using the spatula on the brush (D5) provided.
- Put the drip tray complete with grille and grounds container back in the appliance.
Important!
When removing the drip tray, the grounds container must be emptied, even if it contains only a few grounds. If this is not done, when you make the next coffees, the grounds container will fill up more than expected and clog the machine.
16.4 Cleaning the drip tray and drip tray grille
Important!
The drip tray (A15) is fitted with a level indicator (A16) (red) showing the amount of water it contains (fig. 29).
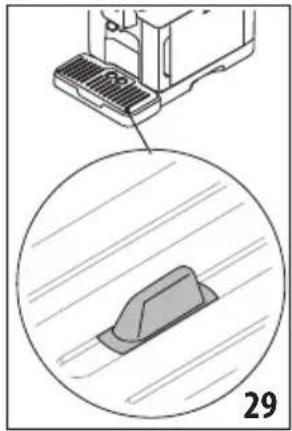
Before the indicator protrudes from the cup tray (A13), the drip tray must be emptied and cleaned, otherwise the water may overflow the edge and damage the appliance, the surface it rests on or the surrounding area. To remove the drip tray, proceed as follows:
- Remove the drip tray and coffee grounds container (A10) (fig. 28);
- Check the red condensate tray (A12) and empty if full;
- Remove the cup tray (A13) and drip tray grille (A14), then empty the drip tray and grounds container and wash all components;
- Put the drip tray complete with grille and grounds container back in the appliance.
Important!
When removing the drip tray, the grounds container must be emptied, even if it contains few grounds. If this is not done, when you make the next coffees, the grounds container will fill up more than expected and clog the machine.
16.5 Cleaning the inside of the machine
Danger of electric shock!
Before cleaning internal parts, the machine must be turned off (see section "6. Turning the appliance off") and unplugged from the mains power supply. Never immerse the machine in water.
-
Check regularly (about once a month) that the inside of the appliance (accessible after removing the drip tray (A15)) is not dirty. If necessary, remove coffee deposits with the brush (D5) supplied and a sponge.
-
Remove all residues with a vacuum cleaner (fig. 30).

16.6 Cleaning the water tank
Clean the water tank (A20) regularly, about once a month and whenever you replace the water softener filter (D4).
- Extract the water tank (fig. 2), remove the water softener filter (if present) and rinse with running water;
- Empty the water tank and clean with a damp cloth and a little mild detergent. Rinse thoroughly with water;
- Put the filter back in the appliance (fig. 31), fill the tank with fresh water up to the MAX level (fig. 3) and put the tank back;
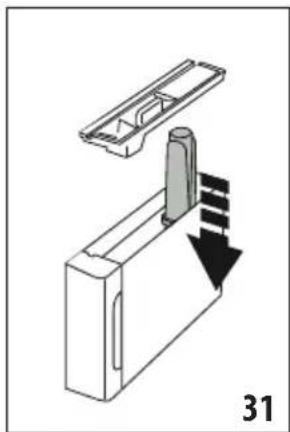
- (models with water softener filter only) Deliver 3.38 fl oz / 100ml of hot water to reactivate the filter.
Please note:
If the appliance is not used for more than 3-4 days, you should clean the tank as described above.
16.7 Cleaning the pre-ground coffee funnel
Clean the pre-ground coffee funnel (A4) regularly (about once a month) with a damp cloth. Proceed as follows:
- Turn the machine off (see chapter "6. Turning the appliance off";
- Open the funnel flap;
- Clean the funnel with the brush provided (D5);
- Close the flap.
Important!
After cleaning, make sure there are no accessories left in the funnel. The presence of foreign objects in the funnel while the machine is in operation could damage the appliance.
16.8 Cleaning the brewing unit
The brewing unit (A6) must be cleaned at least once a month.
Important!
The brewing unit cannot be extracted while the machine is on.
- Make sure the machine is correctly turned off (see section "6. Turning the appliance off");
- Remove the water tank (A20) (fig. 2);
- Open the brewing unit flap (A5) (fig. 32) on the right side of the appliance;
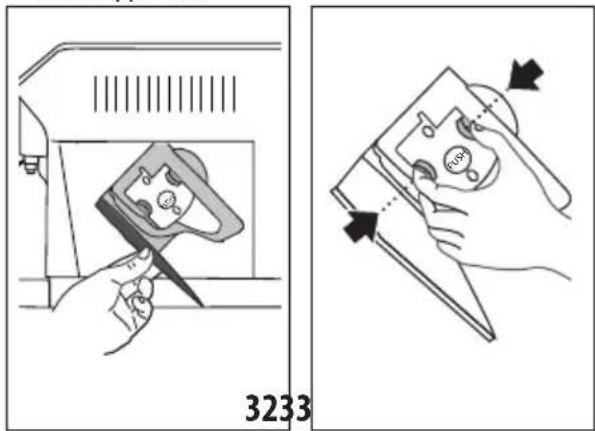
- Press the two colored release buttons inwards and at the same time pull the brewing unit outwards (fig. 33);
- Soak the brewing unit in water for about 5 minutes, then rinse under the tap;
Important!
RINSE WITH WATER ONLY
NO DETERGENTS - NO DISHWASHER
- Do not use detergents when cleaning the brewing unit, as they could damage it.
-
Use the brush (D5) to remove any coffee residues left in the brewing unit housing, visible through the brewing unit flap;
-
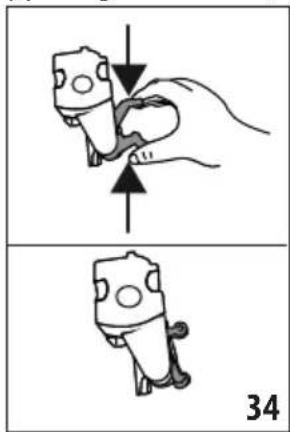
After cleaning, replace the brewing unit by sliding it onto the internal support, then push the PUSH symbol fully in until it clicks into place;
Please note:
If the brewing unit is difficult to insert, before insertion, adapt it to the right size by pressing the two levers (fig. 34).
-
Once inserted, make sure the two colored buttons have snapped out;
-
Close the brewing unit flap;
- Put the water tank back.
16.9 Cleaning the milk carafes (E) and (F)
Each time you use the milk carafe, clean as described below:
- Extract the lid of the milk carafe (E1) or (F1) (fig. 18);
- Extract the milk spout (E5) or (F5), milk spout extension (E7) ("Hot" carafe only) and milk intake tube (E6) or (F6) (fig. 35);
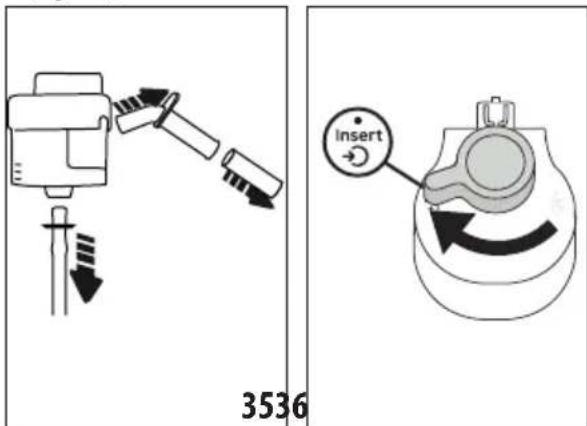
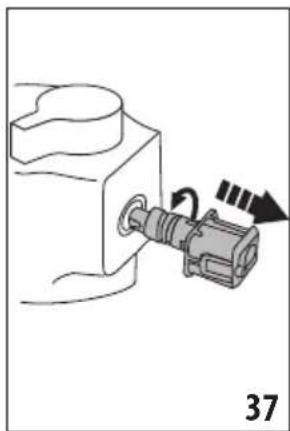
- Turn the froth adjustment dial (E3) or (F3) clockwise to the "Insert" position (fig. 36) and pull to extract;
- Turn counterclockwise and remove the milk carafe connector (E4) or (F4) (fig. 37).
-
Wash in a dishwasher (recommended) or by hand as indicated below:
-
In a dishwasher: Rinse all the above components and the milk carafe with hot running water (at least 104^ / 40^) , then place them in the top basket of the dishwasher - avoid high temperature programs
- By hand: Thoroughly rinse all the components and the milk carafe with hot running water (at least 104^ / 40^ ) to remove all visible milk residues; make sure to run the water through the holes in the lid (fig. 38). Then immerse all the components in hot water (at least 104^ / 40^ ) and mild detergent for at least 30 minutes. Rinse all the above components thoroughly under hot water, rubbing them one at a time with your hands.
- Make sure there are no milk residues on the hollow and groove under the dial (fig. 39). If necessary, scrape the groove with a toothpick;
- Check that the intake tube and spout are not clogged with milk residues;
- Dry all the components with a clean dry cloth;
- Reassemble all the lid components;
- Attach the lid back on the milk carafe.
Please note:
Each week the appliance reminds you to clean the milk carafe thoroughly and proposes the correct cleaning sequence again.
17. DESCALING
Important!
- Before use, read the instructions and labelling on the descaler pack.
- Use De'Longhi descaler only. Using unsuitable descaler and/or performing descaling incorrectly may result in faults not covered by the manufacturer's warranty.
- Descaler could damage delicate surfaces. If the product is accidentally spilt, dry immediately.
| To descale | |
| Descaler De'Longhi descaler | |
| Container Recommended capacity: 67.62 fl oz / 2 l | |
| Time ~50min | |
Descale the appliance when the corresponding message appears on the homepage (C). To descale immediately, press "OK" and follow the instructions from point (5).
To descale the appliance later, press "Cancel". The symbol (C4) appears on the homepage to remind you the appliance needs descending. (The message appears each time you turn the appliance on).
To access the descaling menu:
- Press the settings menu icon (C3) on the homepage;
- Scroll through the menu items until "Descending" is displayed;
- Press "Start" to enter the guided descending procedure;
- Press "Start" to begin;
- Insert the water spout (D6) (fig. 5);
- Remove and empty the drip tray (A15) and coffee grounds container (A10) (fig. 10), then put both back in the appliance and press "Next";
- Remove the water tank (A20), lift the lid (A19) and (if inserted) remove the filter (D4). Empty the tank completely.
- Pour the descaler into the tank up to the level A marked inside the tank (equal to one 100ml pack), then add water (33.81 fl oz / 1 l) up to level B (fig. 40). Put the water tank (with lid) back in the appliance and press "Next";
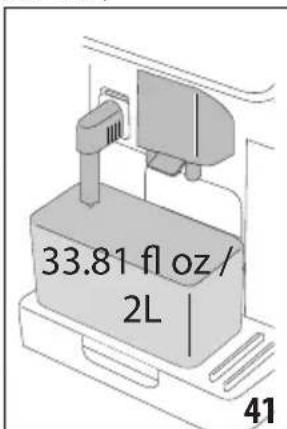
- Place an empty 67.62 fl oz / 2 l container under the spouts (fig. 41). Press "Next" to start descaling ("Back" to go back to the previous screen or "X" to exit the procedure, remembering to remove the descaling solution from the tank)
Important! Danger of scalding
Hot water containing acid flows out of the spouts. Take care to avoid contact with splashes of this solution.
- IThe descale programme starts and the descaler liquid comes out of the hot water and coffee spouts. A series of rinses is performed automatically to remove all the scale residues inside the coffee machine;
After about 40 minutes, the descending action ceases;
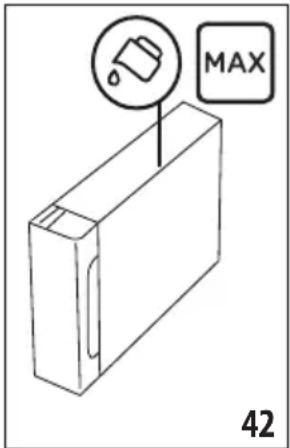
- The appliance is now ready to be rinsed through with clean water. Empty the container used to collect the descaler solution. Remove the water tank, empty, rinse under running water, fill with fresh water up to the MAX level and put back in the appliance (fig. 42). Press "Next";
- Place the container used to collect the descaler solution empty under the spouts and press "Next" to start rinsing;
- Hot water is delivered from both the hot water spout and coffee spouts;
- When the water in the tank has run out, empty the container used to collect the rinsing water;
- Extract the water tank and put back the water softener filter if removed previously. Press "Next" to continue;
- Fill the tank with fresh water up to the MAX level, put back in the appliance and press "Next" to continue;
- Place the container used to collect the descaler solution empty under the spouts and press "Next" to start another rinsing cycle;
- When the water in the tank has run out, empty the container used to collect the rinsing water, remove and empty the drip tray (A15) and grounds container (A10), then put back in the appliance;
-
Extract the water tank, top up to the max level, put back in the appliance and press "Next"
-
The descending process is now complete". Press "OK". The appliance performs a rapid preheat cycle and then goes back to the homepage.
Please note:
- If the descending cycle is not completed correctly (e.g. electrical power failure) it is advisable to repeat the procedure;
- After descending, it is normal for the grounds container (A10) to contain water.
- If the water tank has not been filled to the MAX level after descending, the appliance prompts for a third rinse to ensure that the descaler solution has been completely eliminated from the machine's internal circuits. Before starting rinsing, remember to empty the drip tray.
18. SETTING WATER HARDNESS
The descending alarm is displayed after a period of time established according to water hardness. The machine can also be programmed according to the actual hardness of the local water supply, so that the descending procedure will be required less frequently.
18.1 Measuring water hardness
- Remove the "Total hardness test" indicator paper (D1) from its pack (attached to the Quick Guide).
- Immerse the paper completely in a glass of water for about one second.
- Remove the strip from the water and shake lightly. After about a minute, 1, 2, 3, or 4 red squares appear, depending on the hardness of the water. Each square corresponds to 1 level.
18.2 Setting water hardness
- Press the settings menu icon (C3) on the homepage (C);
- Scroll the pages and select "Water hardness";
- Press "Set";
- Carry out the procedure described in the previous section and measure water hardness;
- Press the dot corresponding to the water hardness measured previously as indicated in the following table:
| Total Hardness Test (D1) Water hardness | |
| Green Red | Level 1 |
| Green Red | Level 2 |
| Green Red | Level 3 |
| Red | Level 4 |
- The machine is now reprogrammed with the new water hardness setting.
- Press < to go back to the settings menu.
19. WATER SOFTENER FILTER
Certain models are fitted with a water softener filter (D4). If this is not the case with your model, you are recommended to purchase one from De'Longhi Customer Services.
To use the filter correctly, follow the instructions below.
19.1 Installing the filter
- Press the settings menu (C3);
- Scroll through the pages and select "Water filter";
- Press "OK" to enter the guided procedure
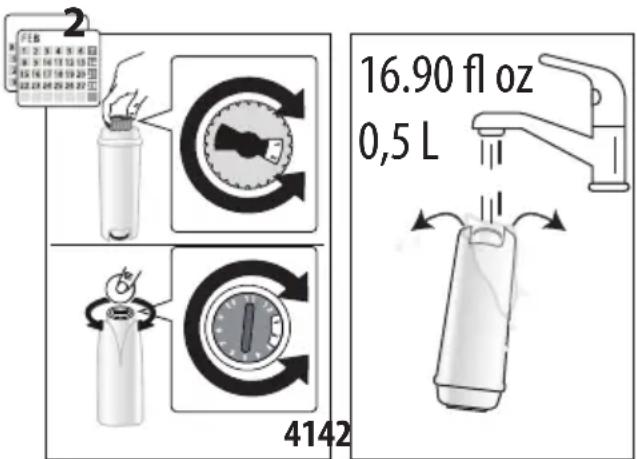
- Remove the filter from the packaging and turn the date indicator to view the next 2 months (fig. 41);
Please note:
The filter lasts about two months if the appliance is used normally. If the machine is left unused with the filter installed, it will last a maximum of 3 weeks.
- Press "Next" to continue ("Back" to go back to the previous screen; "X" to cancel the operation);
- To activate the filter, run tap water through the hole in the centre of the filter until water comes out of the openings at the side for more than a minute (fig. 42). Press "Next";

- Extract the water tank (A20) (fig. 2) and fill with water; insert the filter in the water tank and immerse it completely for
about ten seconds, sloping it and pressing it lightly to enable the air bubbles to escape (fig. 43). Press "Next";
- Insert the filter in the filter housing (fig. 44) and press as far as it will go;press "Next";
- C lose the tank with the lid (A19), then put the tank back in the machine.
- Insert the hot water spout (D6). Press "Next";
- Position an empty container with a minimum capacity of 16.90 fl oz / 0,5 l under the hot water spout (fig. 6) and press "Next" to activate the filter;
- The appliance delivers hot water, then stops automatically. Press "OK" to go back to the homepage;
- The filter is now active and you can use the coffee machine.
19.2 Replacing or removing the filter
Replace the filter (D4) when the replace filter message appears on the homepage (C). To replace the filter immediately, press "OK" and follow the instructions from point 3 of the previous section. To replace the filter later, press "Cancel". The filter symbol appears on the display to remind you the filter needs replacing.
To replace, proceed as follows:
- Press the settings menu (C3);
- Scroll through the pages until "Water filter" is displayed, then press "OK";
- Press "OK" to enter the guided procedure;
- Extract the water tank (A20) and exhausted filter.
- To remove the filter, press "OK" ("Back" to go back to the previous screen; "Cancel" to cancel the operation);
- To replace the filter, press "Next" and follow the operations described in the previous section from point (4).
Please note:
After two months (see date indicator) or when the appliance has not been used for 3 weeks, you should replace the filter even if the message has not yet been displayed.
19.3 Tips for Energy Saving
- To reduce energy consumption, after delivering one or more beverages, remove the milk carafes or accessories.
- Set auto-off to 15 minutes (see section "7.8 Set auto-off");
- Enable Energy Saving (see paragraph "7.9 General");
- Always carry out the descending cycle when prompted by the machine.
20. REGULATORY COMPLIANCE (CONNECTED MODELS ONLY)
FCC for USA
This equipment has been tested and found to comply with the limits for a Class B digital device, pursuant to part 15 of the FCC rules. These limits are designed to provide reasonable protection against harmful interference in a residential installation. This equipment generates, uses and can radiate radio
frequency energy and, if not installed and used in accordance with the in-strictions, may cause harmful interference to radio communications. However, there is no guarantee that interference will not occur in a particular installation. If this equipment does cause harmful interference to radio or television reception, which can be determined by turning the equipment off and on, the user is encouraged to try to correct the interference by one or more of the following measures:
- Reorient or relocate the receiving antenna.
- Increase the separation between the equipment and receiver.
- Connect the equipment into an outlet on a circuit different from that to which the receiver is connected.
- Consult the dealer or an experienced radio/TV technician for help.
IC for CND
This device complies with Industry Canada licence-exempt RSS standard(s). Operation is subject to the following two conditions: (1) this device may not cause interference, and (2) this device must accept any interference, including interference that may cause undesired operation of the device.
De'Longhi reserves the right to modify the technical specification and styling of its products at any moment, without compromising their functionality and quality.
21. DISPLAYED MESSAGES
| DISPLAYEDMESSAGE MEANING | SOLUTION | |
| Please fill the tank with fresh water up to MAX level. Be sure to fill above Level 1 | Insufficient water in the tank (A20). Extract the tank, fill with fresh water to above Level 1 and put back in the appliance. | |
| I don't have enough water for your beverage. Please fill the tank with fresh water up to MAX level. Be sure to fill above Level 1 | ||
| Please insert the water tank | The tank (A20) is not correctly in place. Insert the tank correctly and press as far as it will go. | |
| Fill the tank with fresh water. Please empty drip tray and grounds container | The amount of water in the tank is not enough to make the beverage and the message to empty the grounds container will be displayed shortly. | The appliance asks for both operations to be performed so that no further intervention will be necessary and more beverages can be made one after the other without interruption. |
| Please insert the brewing unit | The brewing unit (A6) has not been replaced after cleaning. | Insert the brewing unit as described in section "16.8 Cleaning the brewing unit" |
| Please empty grounds container | The grounds container (A10) is full. Clean as described in section "16.3 Cleaning the coffee grounds container" | |
| Please insert grounds container and drip tray | The grounds container (A10) and/or drip tray (A15) is not correctly in place or is missing. | Insert the drip tray complete with grounds container and press as far as it will go. |
| Please add your preferred pre-ground coffee. - max: one measure! | Preparation with pre-ground coffee has been selected. | Make sure the funnel (A4) is not blocked, then add one level measuring spoon (D2) of pre-ground coffee, press "Next" on the display and follow the instructions in section "9.4 Making coffee using pre-ground coffee". |
| Fill the beans container and press "OK" to resume brewing | The coffee beans have run out. Fill the beans container (A2) and press "OK" to resume brewing | |
| Please insert the water spout The spout (D6) is not correctly in place or is missing. | Insert the spout and push as far as it will go (fig. 5). The appliance emits a beep (if the beep function is enabled). | |
| Please insert the cold/hot milk carafe | The milk carafe (E) or (F) is not inserted correctly or is missing. | Insert the milk carafe and push as far as it will go. The machine emits a beep (if the beep function is enabled). |
| Just doing a little cleaning. I'll be back in a few seconds | The appliance has detected impurities in its internal circuits. | Wait for the appliance to be ready again and reselect the required beverage. Contact customer services if the problem persists. |
| The new settings have not been saved | While customising the beverages (see section "14. "My" function ("Hot" beverages only)"), preparation has been deliberately interrupted by pressing "X" or an alarm has been triggered. | Press "X" to go back to the homepage (C) to view the alarm causing the interruption. Follow the instructions corresponding to the alarm displayed (see section "21. Displayed messages") |
| I am unable to complete your beverage. Reduce the strength and try again | The grinding is too fine and the coffee is delivered too slowly or not at all. | Select a milder "Strength" (see "9.3 Customising the beverages") |
| If the water softener filter (D4) is present, an air bubble may have been released in- side the circuit, obstructing delivery. | Press "OK" and deliver a little water (see section "11. Preparing hot water and hot tea") until the flow is regular. If the problem continues, remove the filter (see section "19.2 Replacing or remov-ing the filter") | |
| I am unable to complete your beverage. Adjust the coffee grind- er, increasing the dial position one unit at a time | The grinding is too fine and the coffee is delivered too slowly or not at all. | Press "OK" and adjust the coffee grinder (see "7.4 Adjust grinder"). |
| Please select a lighter strength or reduce pre-ground coffee quantity | Too much coffee has been used. | Select a milder "Strength" (see "9.3 Custom-ising the beverages") or reduce the quantity of pre-ground coffee (maximum 1 measuring spoon). Press "OK to go back to the homepage or wait until the message disappears. |
| Please store the milk carafe in the fridge | A milk-based beverage has been prepared and the milk carafe is still inserted in the appliance | Remove the carafe and place in the refrigerator. |
| The machine needs to be descaled. Press OK to start (~50min) | The machine must be descaled. To proceed | with descending, press "OK" and follow the guided procedure, otherwise press "Cancel". In this case, the symbol (C4) appears on the homepage (C) to remind you that descending is needed (see section "17. Descaling"). |
| Please replace the water filter. Press OK to start | The water softener filter (D4) is exhausted. | Press "OK" to replace or remove the filter, or "Cancel" to carry out the procedure later. Follow the instructions in section "19. Water softener filter". |
| General alarm: Please refer to user manual / Coffee Link App | The inside of the appliance is very dirty. Clean | the inside of the appliance thoroughly, as described in section "16. Cleaning". If the message is still displayed after cleaning, contact De'Longhi Customer Services. |
| Water circuit empty. Press OK to start filling process | The water circuit is empty | Press "OK" to fill the circuit. Delivery stops automatically. It is normal for there to be water in the drip tray (A15) after filling. If the problem persists, make sure the water tank (A20) is fully inserted. |
| A new water softener filter has been inserted (D4) | Make sure you have followed the instructions for inserting the new filter (sections "19.1 Installing the filter" and "19.2 Replacing or removing the filter"). If the problem continues, remove the filter (section "19.2 Replacing or removing the filter"). | |
| Energy saving is enabled. To disable energy saving, proceed as described in section "7.9 General". | ||
| The machine must be descaled. The descaling procedure described in section "17. Descaling" needs to be performed. | ||
| The filter must be replaced (D4) Replace the filter or remove it as described in section "19. Water softener filter". | ||
| Remember to clean the milk carafe (E) or (F). | Turn the froth adjustment dial (E3) or (F3) to CLEAN. | |
| *Models with Wi-Fi connectivity: | ||
| The connection is configured in the appliance settings menu (C3). | Connect to the Coffee Link App. | |
| Indicates that the appliance is connected. | To disable the connection, proceed as described in section "7.3 Connectivity (certain models only)". | |
| Connectivity is active, but the cloud cannot be reached. | If just turned on, wait for the appliance to complete the start up procedure. | |
| If the problem continues, disable the connec-tion then enable again as described in section "7.3 Connectivity (certain models only)". | ||
| Make sure the lights on the router indicate that the network is active. | ||
| If the problem continues, turn the appliance and home router off then on again. | ||
22. TROUBLESHOOTING
Below is a list of some of the possible malfunctions.
If the problem cannot be resolved as described, contact customer services.
| PROBLEM POSSIBLE CAUSE SOLUTION | ||
| The appliance does not turn on It is not plugged into the mains socket. Plug into the mains socket (fig. 1). | ||
| The coffee is hot. The internal circuits of the appliance have cooled down because 2-3 minutes have elapsed since the last coffee was made. | Before making the coffee, heat the internal circuits by rinsing using the rinse function (see section "7.1 Rinsing"). | |
| Coffee temperature setting too low. | Set a hotter coffee temperature in the settings menu (C3) (see section "7.5 Coffee temperature"). | |
| The cups were not preheated. Warm the cup | cups by rinsing them with hot water (Please note: you can use the hot water function). | |
| The machine must be descaled | Proceed as described in section "17. Des-cal-ing". Next, check the water hardness ("18.1 Measuring water hardness") and make certain the machine setting matches the local water supply hardness ("18.2 Setting water hardness"). | |
| The coffee is weak or not creamy enough (under extracted). | The coffee is ground too coarsely. Access the settings menu (C3) and follow the instructions to adjust grinding. The effect is only visible after delivering 3 coffees (see section "7.4 Adjust grinder"). | |
| The coffee is unsuitable. Use coffee for expresso machines. | ||
| Coffee not fresh. The coffee pack has been opened for too long and has lost its taste. | ||
| The coffee is delivered too slowly or a drop at a time (over extracted). | The coffee is ground too finely. Access the settings menu (C3) and follow the instructions to adjust grinding. The effect is only visible after delivering 3 coffees (see section "7.4 Adjust grinder"). | |
| Coffee does not come out of one or both spouts. | The coffee spouts (A7) are clogged. Clean the coffee spouts with a sponge or toothpick. | |
| The coffee delivered is watery. | The funnel (A4) is clogged. Clean the funnel with the help of the brush (D5) as described in section "16.7 Cleaning the pre-ground coffee funnel". | |
| Too little beverage is delivered | Insufficient water in the tank | Always fill the tank above Level 1. |
| The appliance does not make coffee. | The appliance has detected impurities in its internal circuits. "Just doing a little cleaning..." is displayed. | Wait for the appliance to be ready again and reselect the required beverage. Contact customer services if the problem persists. |
| → | ||
| The brewing unit (A6) cannot be extracted. | The appliance has not been turned off correctly | Turn the appliance off by pressing the button (A9) (see section “6. Turning the appliance off”). |
| At the end of descaling, the appliance requests a third rinse. | During the two rinse cycles, the water tank (A20) has not been filled to the MAX level | Follow the instructions displayed by the appliance, but first empty the drip tray (A15) to avoid the water overflowing. |
| Milk does not flow from the milk spout (E5) or (F5). | The milk carafe lid (E1) or (F1) is dirty Clean | the milk carafe lid as described in section “16.9 Cleaning the milk carafes (E) and (F)”. |
| The lid (E1) or (F1) is not assembled correctly. | Assemble all the components correctly as described in sections “10.1 Preparing the milk carafes (E and F)” and “10.4 Adjusting the amount of froth”. | |
| The milk contains large bubbles and squirts out of the milk spout (E5) or (F5) there is little froth. | The milk is not cold enough or not suitable for the beverage requested | For best results, make sure to use the right type of milk to prepare hot or cold beverages (see section “10.2 Which milk to use?”). Use beverages at refrigerator temperature (about 5°C). |
| The milk carafe lid (E1) or (F1) is dirty Clean | the milk carafe as described in section “10.6 Cleaning the milk carafe after use” | |
| There is water in the groove under the froth adjustment dial (E3) or (F3) | Extract the dial and dry thoroughly. | |
| Plant-based beverages have been used. | For best results, use beverages at refrigerator temperature (about 5°C). Adjust the amount of froth as described in section “10.4 Adjusting the amount of froth” | |
| The cup shelf (A13) is hot. A number of beverages have been prepared in rapid succession | This is part of normal operation. | |
| After cleaning, you can’t put the drip tray back in the machine | The condensate tray(A12) is not in the correct position | Make sure the condensate tray is inserted correctly |
| The machine emits noises or small puffs of steam while not in use | The machine is ready for use, or has recently been turned off, and condensate is dripping into the hot vaporiser | This is part of normal operation. To limit the phenomenon, empty the drip tray. |
| The appliance emits puffs of steam from the drip tray (A15) and/or there is water on the surface the appliance rests on. | The drip tray grille (A14)has not been put back after cleaning. | Put the drip tray grille back in the drip tray. |
| The To Go beverage is too much or has spilled out of the travel mug | An unsuitable quantity has been selected | Choose a smaller quantity (Medium or Small ) |
| Adjust the quantity in the mug so that the next beverage is prepared correctly | ||
| → | ||
| Too little To Go beverage is prepared An unsuitable quantity has been selected | Choose a larger quantity (Medium or Large CL ) | |
| Adjust the quantity in the mug so that the next beverage is prepared correctly | ||
| The travel mug cannot be inserted in the appliance | The travel mug compartment flap (A16) is closed and/or the coffee spouts (A7) are lowered | Open the flap and/or raise the coffee spouts |
| *Models with Wi-Fi connectivity: | ||
| The App is not working App malfunction | Close the App, then run it again | |
| The App indicates a problem, but there is no problem with the appliance | The data between the appliance and App are not synchronized | Disable and re-enable connectivity (section "7.3 Connectivity (certain models only)" |
TABLE DES MATIÈRES
MISES EN GARDE IMPORTANTES 32
INSTRUCTIONS POUR LE CORDON COURT. 32
1. MISES EN GARDE DE SECURITE 33
| Hot Cold | ||
| Espresso | ✓ | × |
| 2X Espressos | ✓ | × |
| Coffee | ✓ | × |
| Doppio+ | ✓ | × |
| Long | ✓ | × |
| Americano | ✓ | ✓ |
| Carafe de café | ✓ | × |
| Over ice | × | ✓ |
| Cappuccino | ✓ | ✓ |
| Latte Macchiato | ✓ | ✓ |
| Latte | ✓ | ✓ |
| Cappuccino Mix | ✓ | ✓ |
| Espresso Macchiato | ✓ | × |
| Flat White | ✓ | ✓ |
| Cappuccino + | ✓ | × |
| Cortado | ✓ | × |
| Lait | ✓ | ✓ |
| Fonction Thé | ✓ | × |
| Eau chaude | ✓ | × |
7.2 Descalcification
| Hot Cold | ||
| Espresso | ✓ | × |
| 2X Espresso | ✓ | × |
| Café | ✓ | × |
| Doppio+ | ✓ | × |
| Long | ✓ | × |
| Americano | ✓ | ✓ |
| Cafeteria | ✓ | × |
| Over ice | × | ✓ |
| Cappuccino | ✓ | ✓ |
| Latte Macchiato | ✓ | ✓ |
| Latte | ✓ | ✓ |
| Cappuccino Mix | ✓ | ✓ |
| Espresso Macchiato | ✓ | × |
| Flat White | ✓ | ✓ |
| Cappuccino + | ✓ | × |
| Cortado | ✓ | × |
| Leche | ✓ | ✓ |
| Función de té | ✓ | × |
| Agua caliente | ✓ | × |