
StyleShaver Pro QS6160 - Electric mower PHILIPS - Free user manual and instructions
Find the device manual for free StyleShaver Pro QS6160 PHILIPS in PDF.

| Brand | Philips |
| Model | StyleShaver Pro QS6160 |
| Category | Electric trimmer / 2-in-1 shaver |
| Power supply | Mains adapter (included) and built-in rechargeable battery |
| Charging time | 1 hour (QS6160 model) |
| Runtime | Approximately 50 minutes |
| Battery indicator | Flashing white (charging), solid white (full), flashing orange (<10 min), fast orange (empty) |
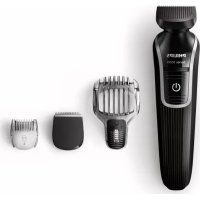
| Cutting lengths (comb) | 3 to 10 mm, adjustable in 0.5 mm increments |
| Precision trimmers | 15 mm and 32 mm integrated into the trimming head |
| Shaving head | Yes, removable, with foil and blades |
| Cleaning | Washable under water (heads); cleaning brush included for connectors |
| Maintenance | No lubrication needed |
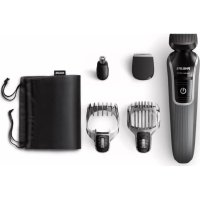
| Included accessories | Comb, precision comb, protective cap, cleaning brush, storage pouch, charging stand |
| Safety | Automatic shut-off if blocked; transport lock |
| Compliance | IEC standards, electromagnetic compatibility |
| Recommended use | Facial hair only (beard, mustache, sideburns) |
| Replacement | Shaving foil and blades to be replaced annually |
| Warranty | International (see supplied leaflet) |
Frequently Asked Questions - StyleShaver Pro QS6160 PHILIPS
User questions about StyleShaver Pro QS6160 PHILIPS
0 question about this device. Answer the ones you know or ask your own.
Ask a new question about this device
Download the instructions for your Electric mower in PDF format for free! Find your manual StyleShaver Pro QS6160 - PHILIPS and take your electronic device back in hand. On this page are published all the documents necessary for the use of your device. StyleShaver Pro QS6160 by PHILIPS.
USER MANUAL StyleShaver Pro QS6160 PHILIPS
Register your product and get support at
www.philips.com/welcome
QS6160, QS6140
ENGLISH 6
DANSK 17
DEUTsCH 28
EAAHNIKA 40
ESPANOL 52
SUOMI 64
FRANÇAIS 75
ITALIANO 87
NEDERLANDS 99
NORSK 111
PORTUGUES 122
SVENSKA 134
TÜRKÇE 145
Introduction
Congratulations on your purchase and welcome to Philips! To fully benefit from the support that Philips offers, register your product at www.philips.com/welcome.
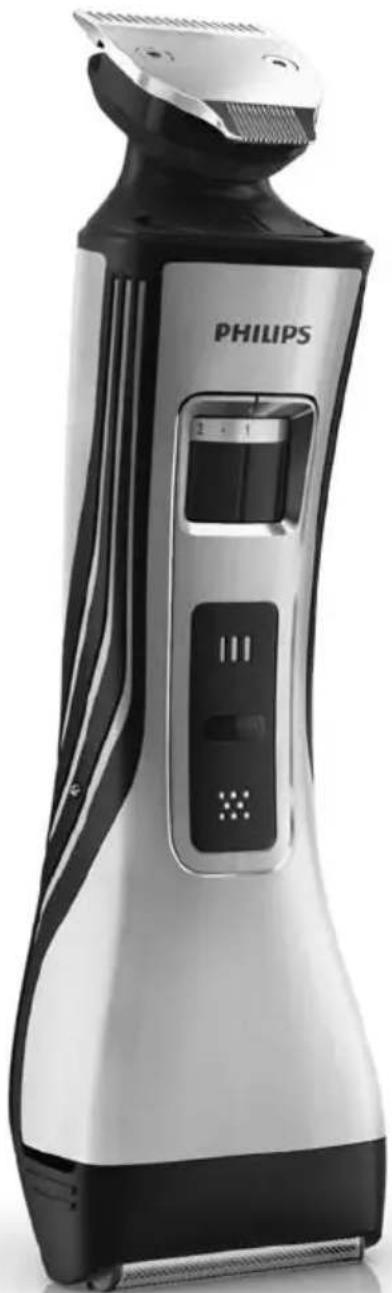
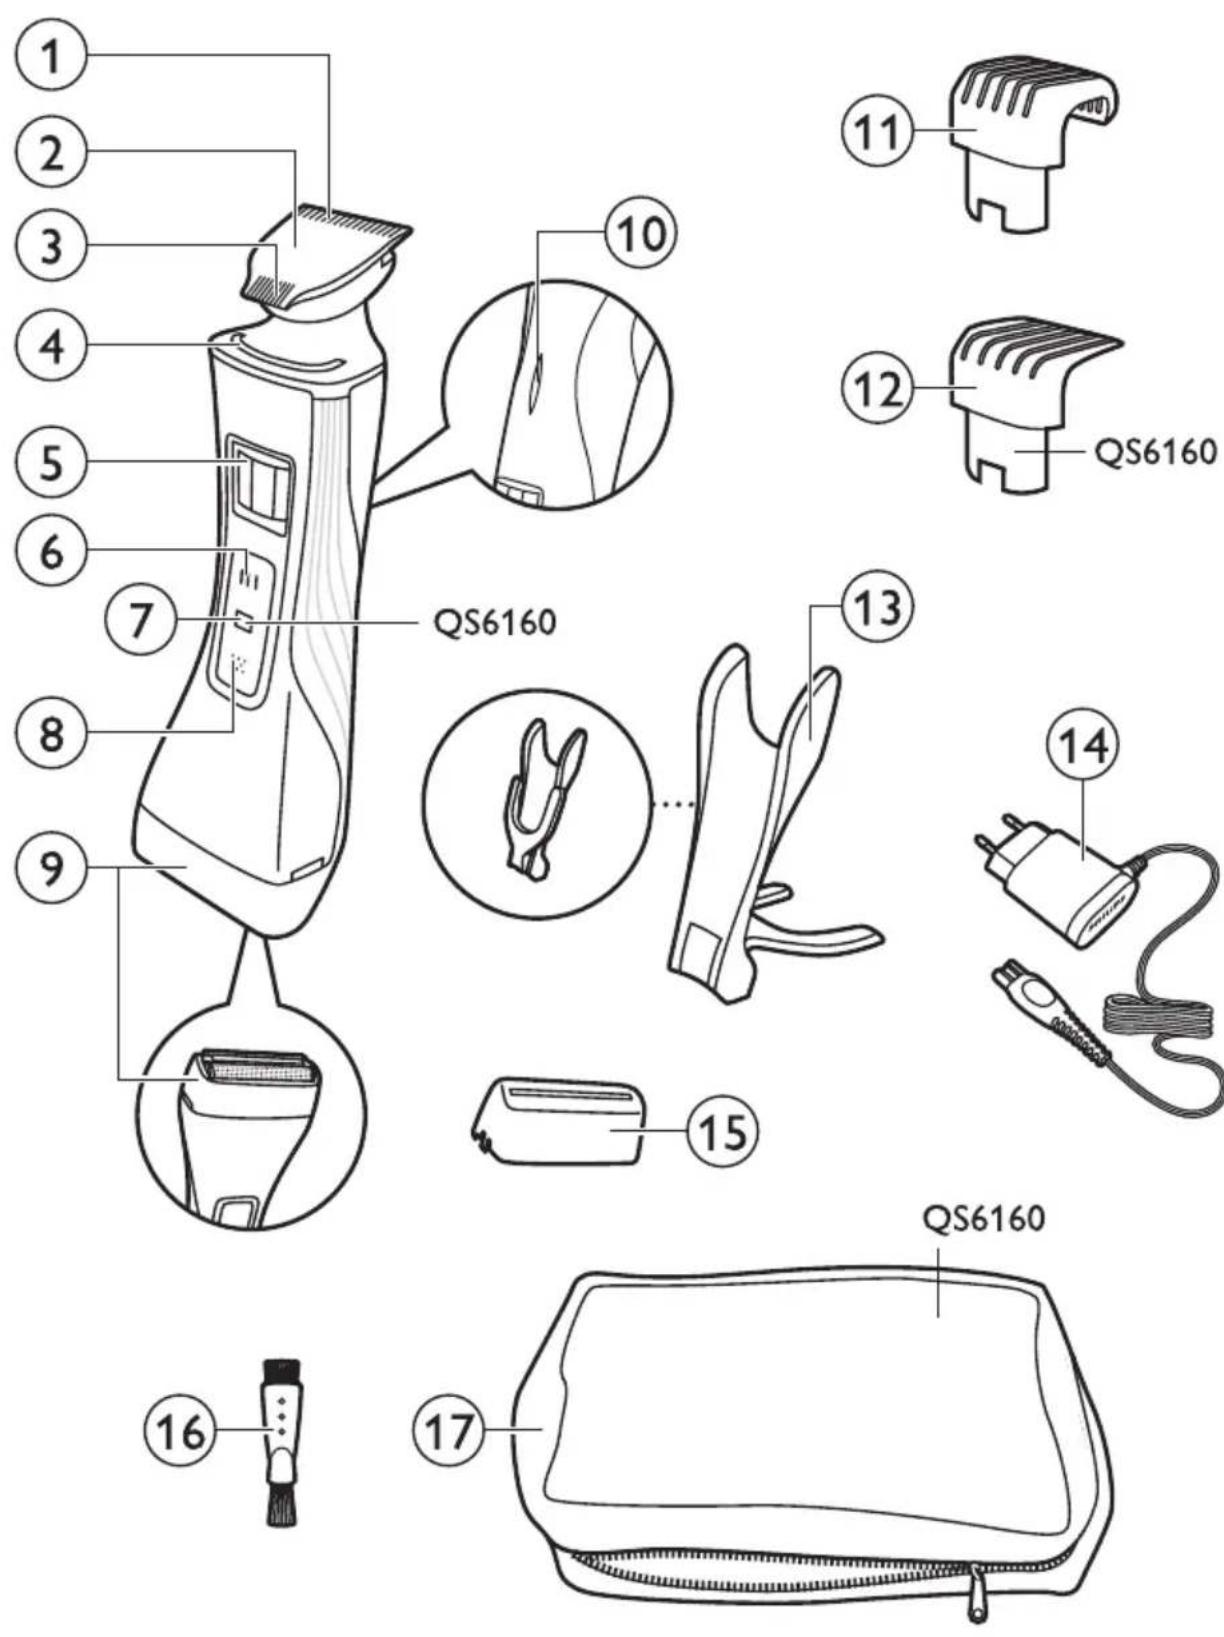
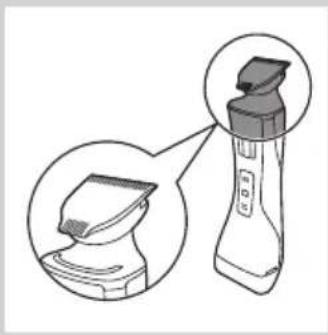
General description (Fig. 1)
1 Precision trimmer (32 mm)
2 Trimming head
3 Precision trimmer (15 mm)
4 Guiding groove
5 Hair length setting selector
6 Trimming head on/off button
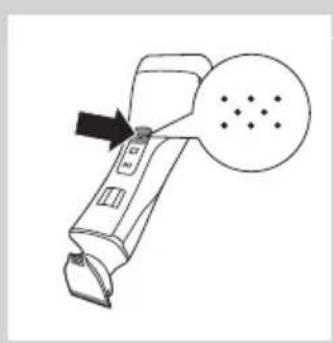
7 Travel lock indication (QS6160 only)
8 Shaving head on/off button
9 Shaving head
10 Battery status indicator
11 Trimming comb
12 Trimming comb (QS6160 only)
13 Charging stand
14 Adapter with small plug
15 Protection cap
16 Cleaning brush
17 Storage pouch (QS6160 only)
Important
Read this user manual carefully before you use the appliance and save it for future reference.
Danger
- Keep the adapter dry.
Warning
- Check if the voltage indicated on the adapter corresponds to the local mains voltage before you connect the appliance.
- The adapter contains a transformer. Do not cut off the adapter to replace it with another plug, as this causes a hazardous situation.
- This appliance is not intended for use by persons (including children) with reduced physical, sensory or mental capabilities, or lack of experience and knowledge, unless they have been given supervision or instruction concerning use of the appliance by a person responsible for their safety.
- This appliance is not intended for use by children. Children should be supervised to ensure that they do not play with the appliance.
Caution
- Use, charge and store the appliance at a temperature between 5^ and 35^ .
- Do not charge the appliance in the storage pouch.
- Only use the adapter and the charging stand supplied.
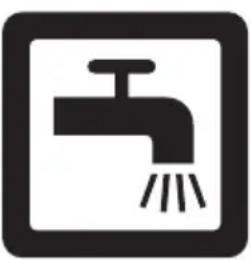
- Never immerse the appliance in water or any other liquid, nor use it in the shower. Only rinse the appliance under the tap to clean it.
- If the appliance is subjected to a major change in temperature, pressure or humidity, let the appliance acclimatise for 30 minutes before you use it.
- If the adapter or the charging stand is damaged, always have it replaced with one of the original types in order to avoid a hazard.
- Do not use the appliance if the shaving head or one of the trimming combs is damaged or broken, as this may cause injury.
- This appliance is only intended for trimming and dry shaving facial hair (beard, moustache and sideburns).
General
- The appliance complies with the internationally approved IEC safety regulations and can be safely cleaned under the tap.
Compliance with standards
This Philips appliance complies with all standards regarding electromagnetic fields (EMF). If handled according to the instructions in this user manual, the appliance is safe to use based on scientific evidence available today.
Charging
QS6160 only: Charging normally takes approx. 1 hour.
QS6140 only: Charging normally takes approx. 4 hours.
When the appliance is fully charged, it has an operating time of 50 minutes. Battery status indicator:
- When the battery status indicator flashes white, the battery is being charged.
- When the battery status indicator lights up white continuously, the battery is fully charged. This indication is shown for 30 minutes and then the battery status indicator goes out.
- When the battery status indicator flashes orange, the battery is almost empty (approx. 10 minutes of operating time left).
- When the battery status indicator flashes orange quickly, the battery is empty and you have to charge the appliance before you can use it again.
Note: The appliance can only be charged in the charging stand.
1 Insert the small plug into the charging stand.
Note: The small plug is easiest to insert when the charging stand is folded.
2 Unfold the charging stand ('click').
3 Put the adapter in the wall socket.
Put the appliance in the charging stand.
The battery status indicator starts to flash white to indicate that the appliance is charging.
- When the battery is fully charged, the battery status indicator lights up white continuously.
Using the appliance
You can use the appliance to trim or dry shave facial hair (beard, moustache and sideburns). This appliance is not intended for shaving or trimming lower body parts.
Tip: Take your time when you first start to shave. You have to acquire practice with the appliance. Your skin also needs some time to adjust to the procedure.
Trimming with comb
The trimming combs allow you to trim to different lengths.
Start at the highest setting to acquire practice with this appliance.
See the table below for an overview of the hair length settings and the corresponding hair lengths.
| Setting Hair length after trimming |
| 1 1 mm - 3/64 inch |
| . 1.5 mm - 1/16 inch |
| 2 2 mm - 5/65 inch |
| . 2.5 mm - 3/32 inch |
| 3 3 mm - 1/8 inch |
| 4 4 mm - 5/32 inch |
| 5 5 mm - 3/16 inch |
| 6 6 mm - 1/4 inch |
| 7 7 mm - 9/32 inch |
| 8 8 mm - 5/15 inch |
Setting Hair length after trimming
9.9 mm - 3/8 inch
10 10 mm - 13/32 inch
- no comb = 0.5mm - 1/32 inch
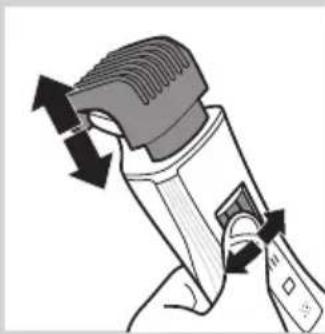
1 Hold the appliance in the trimming position, with the trimming head pointing upwards and the shaving head pointing downwards.
2 Slide the comb into guiding groove of the appliance ('click').
3 Press the hair length setting selector and then move it from left to right or right to left to select a setting.
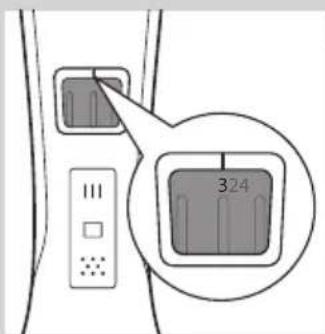
- The line above the hair length setting selector shows which setting you have selected.
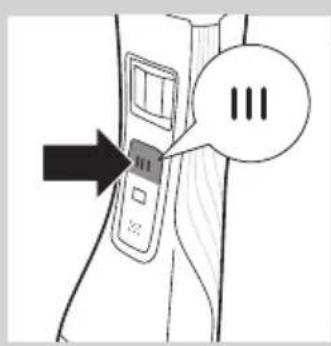
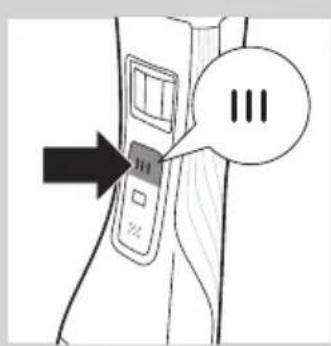
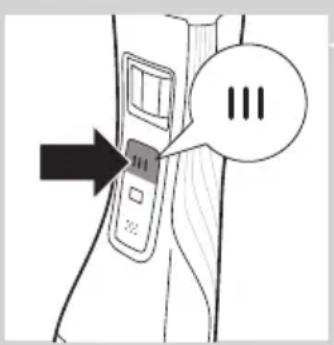
4 Press the trimming head on/off button once to switch on the trimming head.
QS6160 only: The on/off button lights up to indicate that the trimming head is operating.

5 To trim the hair, move the trimming comb through the hair slowly.
Tips
- Always make sure that the tip of the trimming comb points in the direction in which you move the appliance.
- Make sure that the flat part of the trimming comb is always in full contact with the skin to obtain an even hair length result.
- Since hair grows in different directions, you need to move the appliance in different directions as well (upward, downward or across).
- You can switch on the trimming head while the shaving head is operating. If you do this, the shaving head is switched off immediately.
- Trimming is easier when the skin and hair are dry.
6 When you are finished, press the trimming head on/off button again to switch off the trimming head.
Trimming without comb
The comb keeps the trimming head at a set distance from your head. You can use the trimming head without comb. If you use the trimming head without comb, your hair is cut off close to the skin (approx. 0.5mm ).
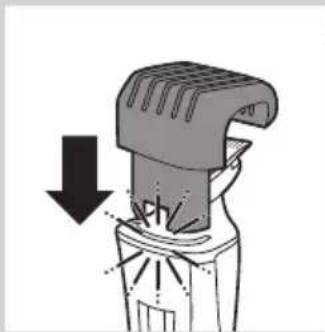
1 To remove the comb, pull it off the appliance.
Never pull at the flexible top of the comb. Always pull at the bottom part.
Press the trimming head on/off button to switch on the trimming head.
Hold the appliance with the trimming head pointing upwards and make downward strokes with the broad side of the trimming head.
Using the precision trimmer
The precision trimmer is only half as wide as the broad side of the trimming head. It therefore allows more precise styling of the area around the ears, the sideburns and also around the mouth and under the nose.
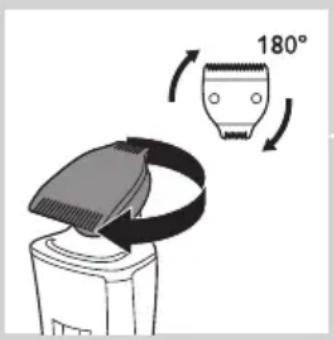
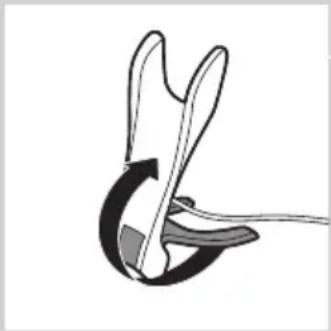
1 To use the precision trimmer, simply turn the cutting unit until the precision trimmer points towards the front of the appliance.
Press the trimming head on/off button to switch on the trimming head.
3 Hold the appliance with the trimming head pointing upwards and make downward strokes with the precision trimmer.
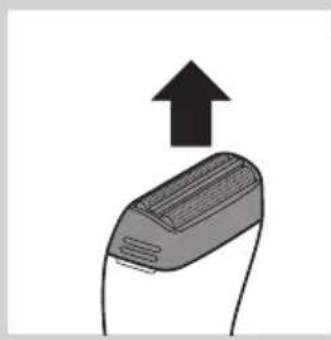
Shaving
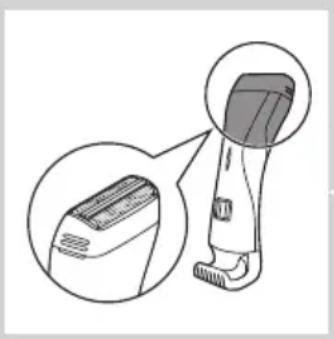
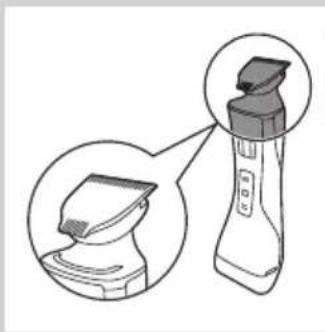
Before you use the shaving head, always check it for damage or wear. If the shaving head is damaged or worn, do not use it, as injury may occur. Replace a damaged shaving head before you use it again (see chapter 'Replacement').
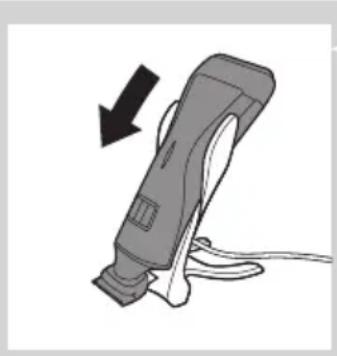
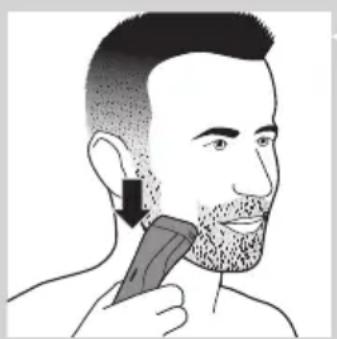
1 Hold the appliance in the shaving position, with the shaving head pointing upwards and the trimming head pointing downwards.
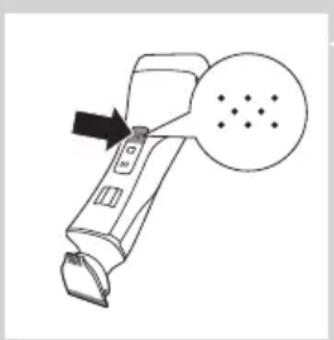
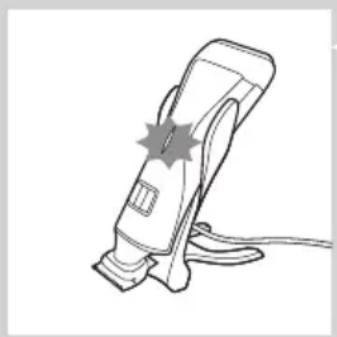
Press the shaving head on/off button once to switch on the shaving head.
QS6160 only:The on/off button lights up to indicate that the shaving head is operating.

Place the shaving head on the skin and move the appliance against the direction of hair growth while you press it lightly.
Tip
- Make sure that the shaving head is in full contact with the skin.
- You can switch on the shaving head while the trimming head is operating. If you do this, the trimming head is switched off immediately.
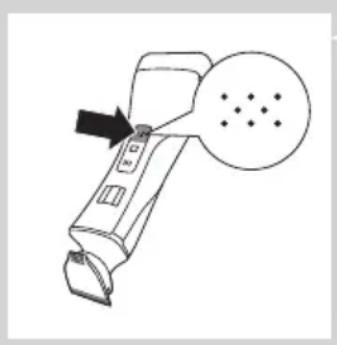
4 To switch off the shaving head after use, press the shaving head on/off button again.
Overload protection
If you press the trimming head or shaving head too hard onto your skin or if its cutting element gets blocked (e.g. by clothes etc.), the on/off button of the blocked trimming head or shaving head flashes quickly (QS6160 only) and the appliance switches off automatically. Remove whatever is blocking the cutting elements before you use the appliance again.
Cleaning and maintenance
Clean the appliance after every use.
Never use compressed air, scouring pads, abrasive cleaning agents or aggressive liquids such as petrol or acetone to clean the appliance.
Only clean the appliance and the adapter with the cleaning brush supplied.
Note: The trimming head and shaving head do not need any lubrication.
Cleaning the trimming head
1 Switch off the appliance.
2 Pull the comb off the trimming head.
3 Clean the trimming head under the tap.
Cleaning the trimming head connector
Note: Make sure you clean the trimming head connector at least once every three months.
Switch off the appliance.
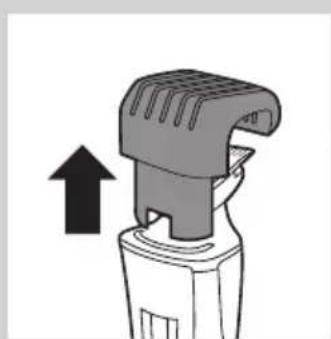
Gently pull the trimming head off the appliance.
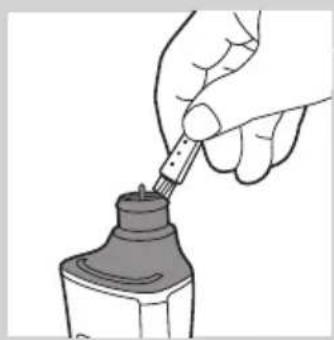
3 Remove the hairs from the inside of the trimming head connector with the cleaning brush.
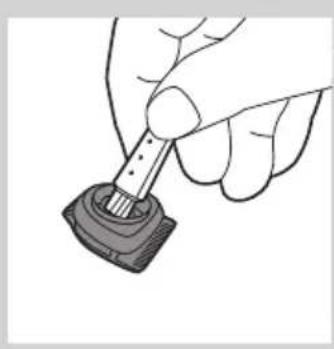
4 Clean the inside of the trimming head with the cleaning brush.
5 After cleaning, put the trimming head back onto the appliance.
Cleaning the shaving head
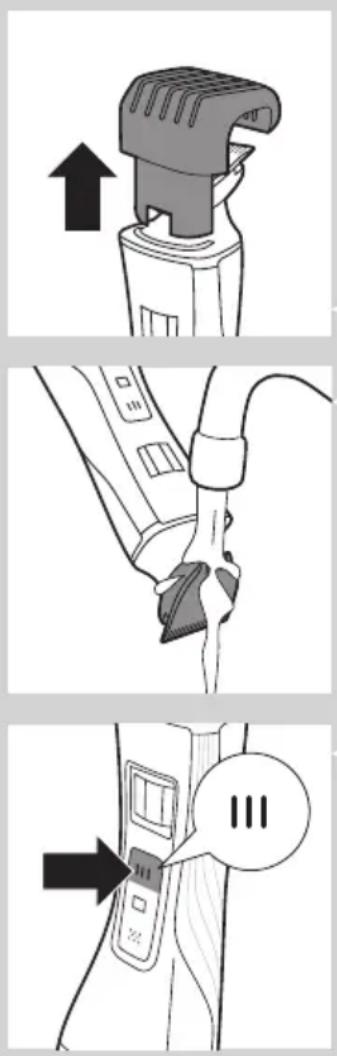
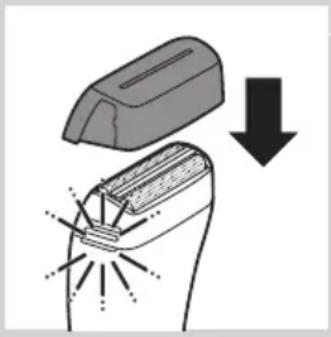
Switch off the appliance.
Pull the shaving head off the appliance.
Note: The shaving head is very delicate. Handle it carefully. Replace the shaving head if it is damaged.
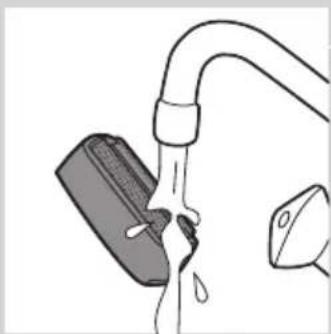
3 Rinse the shaving head with lukewarm water.
Do not clean the shaving head with the cleaning brush, as this may cause damage.
4 Remove hairs from the cutters with the cleaning brush.

After cleaning, snap the shaving head back onto the appliance ('click').
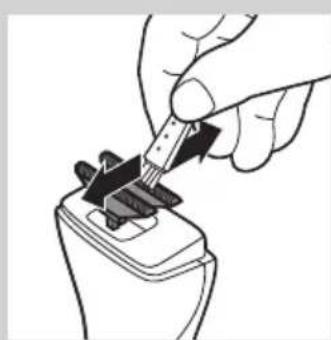
Replacement
In case of frequent use, replace the shaving foil and the cutters every year. Shaving foil
Pull the shaving head off the appliance.
2 Remove the old shaving foil from the shaving head.
3 Snap the new shaving foil into the shaving head ('click').
Cutters
Pull the shaving head off the appliance.
2 Remove the cutters.
3 Snap the new cutters onto the appliance ('click').
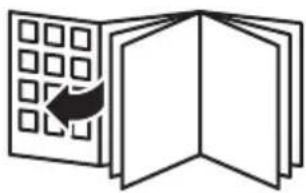
Storage
You can fold the charger for easy travelling or storage.
1 To fold the charger: fold the base of the charger against the appliance holder.
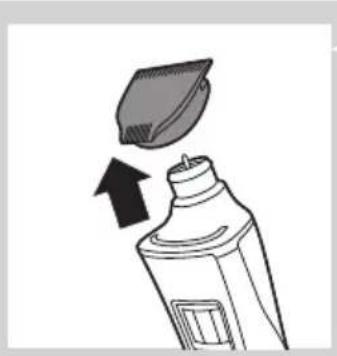
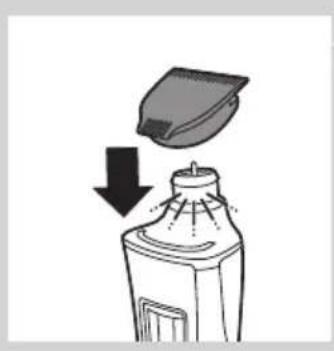
Put the protection cap on the shaving unit.
Travel lock (QS6160 only)
The appliance has an integrated travel lock which prevents the appliance from accidentally being switched on during travel.
1 To activate the travel lock, press and hold the trimming head on/off button, the shaving head on/off button or both for at least 4 seconds while the travel lock indication flashes 3 times.
The travel lock is only activated when the indication lights up continuously.
2 To deactivate the travel lock, press and hold the trimming head on/off button, the shaving head on/off button or both for at least 4 seconds while the travel lock indication flashes 4 times.
The travel lock is now deactivated and the appliance switches on.
Note: The travel lock can also be deactivated by charging the appliance.
Ordering accessories
To purchase accessories for this appliance, please visit our online shop at www.shop.philips.com/service. If the online shop is not available in your country, go to your Philips dealer or a Philips service centre. If you have any difficulties obtaining accessories for your appliance, please contact the Philips Consumer Care Centre in your country. You find its contact details in the worldwide guarantee leaflet.
Environment
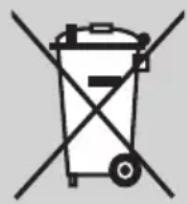
- Do not throw away the appliance with the normal household waste at the end of its life, but hand it in at an official collection point for recycling. By doing this, you help to preserve the environment.
- The built-in rechargeable battery contains substances that may pollute the environment. Always remove the battery before you discard and hand in the appliance at an official collection point. Dispose of the battery at an official collection point for batteries. If you have trouble removing the battery, you can also take the appliance to a Philips service centre. The staff of this centre will remove the battery for you and will dispose of it in an environmentally safe way.
Removing the rechargeable battery
Only remove the rechargeable battery if it is completely empty.
1 Disconnect the appliance from the mains and let the appliance run until the motor stops.
2 Remove the shaving head and the cutters from the appliance.
3 Undo the four screws of the top cover with a screwdriver.
4 Remove the cover.
5 Insert a screwdriver under the back panel and remove the panel.
6 Insert the screwdriver under the cover of the basic body and remove the cover.
Now you see a printed-circuit board.
7 Break the battery from the printed-circuit board.
Be careful, the battery strips are very sharp.
Guarantee and service
If you need service or information or if you have a problem, please visit the Philips website at www.philips.com/support or contact the Philips Consumer Care Centre in your country. You find its phone number in the worldwide guarantee leaflet. If there is no Consumer Care Centre in your country, go to your local Philips dealer.
Introduktion
Kun QS6160: On/off-knappen lyser for at vise, at shaverhovedet er i drug.
1.1 mm
.1,5mm
22mm
.2,5mm
Protection anti-surcharge
1 1 mm
.1,5mm
22mm
.2,5mm
| Stand Haarlengthe na het trimmen |
| 3 3 mm |
| 4 4 mm |
| 5 5 mm |
| 6 6 mm |
| 7 7 mm |
| 8 8 mm |
| 9 9 mm |
| 10 10 mm |
| * Geen kam = 0,5 mm |
Kun QS6160: Ladingen tar normalt ca. 1 time.
Kun QS6140: Ladingen tar nomalt ca. 4 timer.
Nár apparatet er fulladet, har det opptil 50 minutters brukstid.
Batteristatusindicator:
- När batteristatusindikatoren blinker hvitt, lades batteriet.
- När batteristatusindikatoren lyser hvitt kontinuierlig, er batteriet fulladet. Denne indikasjonen vises i 30 minutter og deretter slukkes batteristatusindikatoren.
- När batteristatusindikatoren blinker oranges, er batterietNSTEN tomt for strøm (ca. 10 minutter brukstid gjenstår).
- Nár batteristatusindikatoren blinker oransje raskt, er batteriet tomt og du ma lade apparatet for du kan bruke det igjen.
Merk: Apparatet kan bare lades i Iadestativet.
1 Sett den lille kontakten i ladestativet.
Merk: Den lille kontakten er enklest Å sette inn nr ladestativet er slättSAMmen.
Encomendar acessórios

- Introduction
- General description (Fig. 1)
- Important
- Danger
- Warning
- Caution
- General
- Compliance with standards
- Charging
- Using the appliance
- Trimming with comb
- Setting Hair length after trimming
- Tips
- Trimming without comb
- Using the precision trimmer
- Shaving
- Tip
- Overload protection
- Cleaning and maintenance
- Cleaning the trimming head
- Cleaning the trimming head connector
- Replacement
- Cutters
- Storage
- Travel lock (QS6160 only)
- Ordering accessories
- Environment
- Removing the rechargeable battery
- Guarantee and service
- Introduktion
- Protection anti-surcharge
- Encomendar acessórios
Brand : PHILIPS
Model : StyleShaver Pro QS6160
Category : Electric mower