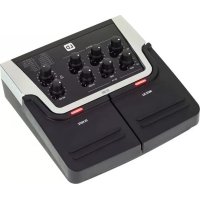
FX 300 - Musical instrument LD Systems - Free user manual and instructions
Find the device manual for free FX 300 LD Systems in PDF.


| Product type | Artist pedal / Two-channel mixer with built-in effects |
| Brand | LD Systems |
| Model | FX 300 |
| Number of channels | 2 (1 mic, 1 instrument) |
| Mic input | Combo XLR/6.3 mm jack, balanced, with +48 V phantom power |
| Instrument input | High impedance 6.3 mm jack (unbalanced) |
| Line outputs | 1 balanced XLR (max. +17 dBu), 1 unbalanced 6.3 mm jack (max. +5 dBV) |
| Instrument channel insert | 1 (6.3 mm stereo jack, return/tip, send/ring) |
| Effects processor | Digital, 16 presets |
| Equalizers | Mic channel: +5/-8 dB at 8 kHz; Instrument channel: +7/-8 dB at 10 kHz |
| Power supply | 9 V battery (approx. 4-5 h battery life) or 9 V DC / 250 mA power adapter (not included, 5.5/2.1 mm plug, negative center) |
| Dimensions (W x H x D) | 160 x 55 x 163 mm |
| Weight | 0.65 kg |
| Operating temperature | 0 °C to +40 °C |
| Relative humidity | < 80%, non-condensing |
| Microphone stand mount | Provisions, optional adapter (LDVIBZMSADAPTOR) |
| Safety | Do not open, do not expose to water or flames, maintain ventilation distances (20 cm), use only approved accessories |
| Maintenance and cleaning | Use a dry cloth, do not use liquid products |
| Disposal | Follow local regulations, do not dispose of with household waste (WEEE symbol) |
| Warranty | See terms on manufacturer's website |
Frequently Asked Questions - FX 300 LD Systems
User questions about FX 300 LD Systems
0 question about this device. Answer the ones you know or ask your own.
Ask a new question about this device
Download the instructions for your Musical instrument in PDF format for free! Find your manual FX 300 - LD Systems and take your electronic device back in hand. On this page are published all the documents necessary for the use of your device. FX 300 by LD Systems.
USER MANUAL FX 300 LD Systems
SAFETY INFORMATION 3
INTRODUCTION 4
CONNECTIONS, OPERATING AND DISPLAY ELEMENTS 4
CABLING EXAMPLE 7
TECHNICAL DATA 8
MANUFACTURER'S DECLARATIONS 9
DEUTSCH
We have designed this product to operate reliably over many years. LD Systems stands for this with its name and many years of experience as a manufacturer of high-quality audio products. Please read this User's Manual carefully, so that you can begin making optimum use of your LD Systems product quickly.
You can find more information about LD-SYSTEMS at our Internet site www.LD-SYSTEMS.COM
SAFETY INFORMATION
- Please read these instructions carefully.
- Keep all information and instructions in a safe place.
- Follow the instructions.
- Observe all safety warnings. Never remove safety warnings or other information from the equipment.
- Use the equipment only in the intended manner and for the intended purpose.
- Use only sufficiently stable and compatible stands and/or mounts (for fixed installations). Make certain that wall mounts are properly installed and secured. Make certain that the equipment is installed securely and cannot fall down.
- During installation, observe the applicable safety regulations for your country.
- Never install and operate the equipment near radiators, heat registers, ovens or other sources of heat. Make certain that the equipment is always installed so that is cooled sufficiently and cannot overheat.
- Never place sources of ignition, e.g., burning candles, on the equipment.
- Ventilation slits must not be blocked.
- Keep a minimum distance of 20cm around and above the device.
- Do not use this equipment in the immediate vicinity of water (does not apply to special outdoor equipment - in this case, observe the special instructions noted below. Do not expose this equipment to flammable materials, fluids or gases. Avoid direct sunlight!
- Make certain that dripping or splashed water cannot enter the equipment. Do not place containers filled with liquids, such as vases or drinking vessels, on the equipment.
- Make certain that objects cannot fall into the device.
- Use this equipment only with the accessories recommended and intended by the manufacturer.
- Do not open or modify this equipment.
- After connecting the equipment, check all cables in order to prevent damage or accidents, e.g., due to tripping hazards.
- During transport, make certain that the equipment cannot fall down and possibly cause property damage and personal injuries.
- If your equipment is no longer functioning properly, if fluids or objects have gotten inside the equipment or if it has been damaged in another way, switch it off immediately and unplug it from the mains outlet (if it is a powered device). This equipment may only be repaired by authorized, qualified personnel.
- Clean the equipment using a dry cloth.
- Comply with all applicable disposal laws in your country. During disposal of packaging, please separate plastic and paper/cardboard.
- Plastic bags must be kept out of reach of children.
- Please note that changes or modifications not expressly approved by the party responsible for compliance could void the user's authority to operate the equipment.
FOR EQUIPMENT THAT Connects TO THE POWER MAINS
- CAUTION: If the power cord of the device is equipped with an earthing contact, then it must be connected to an outlet with a protective ground. Never deactivate the protective ground of a power cord.
- If the equipment has been exposed to strong fluctuations in temperature (for example, after transport), do not switch it on immediately. Moisture and condensation could damage the equipment. Do not switch on the equipment until it has reached room temperature.
- Before connecting the equipment to the power outlet, first verify that the mains voltage and frequency match the values specified on the equipment. If the equipment has a voltage selection switch, connect the equipment to the power outlet only if the equipment values and the mains power values match. If the included power cord or power adapter does not fit in your wall outlet, contact your electrician.
- Do not step on the power cord. Make certain that the power cable does not become kinked, especially at the mains outlet and/or power adapter and the equipment connector.
- When connecting the equipment, make certain that the power cord or power adapter is always freely accessible. Always disconnect the equipment from the power supply if the equipment is not in use or if you want to clean the equipment. Always unplug the power cord and power adapter from the power outlet at the plug or adapter and not by pulling on the cord. Never touch the power cord and power adapter with wet hands.
- Whenever possible, avoid switching the equipment on and off in quick succession because otherwise this can shorten the useful life of the equipment.
- I important information: Replace fuses only with fuses of the same type and rating. If a fuse blows repeatedly, please contact an authorised service centre.
- To disconnect the equipment from the power mains completely, unplug the power cord or power adapter from the power outlet.
- If your device is equipped with a Volex power connector, the mating Volex equipment connector must be unlocked before it can be removed. However, this also means that the equipment can slide and fall down if the power cable is pulled, which can lead to personal injuries and/or other damage. For this reason, always be careful when laying cables.
-
Unplug the power cord and power adapter from the power outlet if there is a risk of a lightning strike or before extended periods of disuse.
-
The appliance is not to be used by persons (including children) with reduced physical, sensory or mental capabilities, or lack of experience and knowledge.
- Children must be instructed not to play with the device.
- If the power cord of the device is damaged, do not use the device. The power cord must be replaced by an adequate cable or assembly from an authorized service center.

CAUTION:
To reduce the risk of electric shock, do not remove cover (or back). There are no user serviceable parts inside. Maintenance and repairs should be exclusively carried out by qualified service personnel.

The warning triangle with lightning symbol indicates dangerous uninsulated voltage inside the unit, which may cause an electrical shock.

The warning triangle with exclamation mark indicates important operating and maintenance instructions.

Warning! This device is designed for use below 2000 metres in altitude.

Warning! This product is not intended for use in tropical climates.
CAUTION! HIGH VOLUMES IN AUDIO PRODUCTS!
This device is meant for professional use. Therefore, commercial use of this equipment is subject to the respectively applicable national accident prevention rules and regulations. As a manufacturer, Adam Hall is obligated to notify you formally about the existence of potential health risks.
Hearing damage due to high volume and prolonged exposure: When in use, this product is capable of producing high sound-pressure levels (SPL) that can lead to irreversible hearing damage in performers, employees, and audience members. For this reason, avoid prolonged exposure to volumes in excess of 90 dB.
INTRODUCTION
The LD Systems FX300 is an intuitive 2-channel mixer with an integrated effects module. It is equipped with a high-impedance instrument input for stringed instruments with pickups. Thanks to its built-in phantom power, the microphone channel is suitable for both dynamic and condenser microphones.
CONNECTIONS, OPERATING AND DISPLAY ELEMENTS

DC SOCKET
Low-voltage socket for the power supply of the device (mains adapter not supplied, 9 V DC 250 mA, centre-negative barrel plug, 5.5 mm external diameter, 2.1 mm internal).
2 POWER
On/off switch. Upon switching on, the SIG and FX CLIP indicator LEDs light up briefly.
3 MIC CH
Microphone input with combined XLR and jack socket for connecting dynamic or condenser microphones. 48 V phantom power is always present at the XLR socket. The microphone channel's jack socket is of a higher impedance than the XLR socket and is also suitable for microphones with a high output level. Use the MUTE ALL button to mute the device before connecting or disconnecting a microphone.
4
INSTRCHINPUT
High-impedance instrument input with 6.3 mm jack socket. Use the MUTE ALL button to mute the device before connecting or disconnecting an instrument.
5
INSTRCHINSERT
Series insert for the instrument channel. The insert socket facilitates the insertion of an external effects unit (e.g. phaser, flanger or chorus) to the instrument channel. To do so, you require an insert cable with a 6.3 mm stereo jack plug on one end (Ring = Send, Tip = Return) and two 6.3 mm mono jack plugs on the other end.
6
MIX OUT UNBAL
Unbalanced line output for connection to an instrument amplifier (6.3 mm jack socket). The signal is a mix of the instrument and microphone channels.
7
MIX OUT BAL
Balanced line output with male 3-pin XLR socket. The signal is a mix of the instrument and microphone channels. This output is used with an XLR microphone cable to connect the mixer to an active speaker, for example.

8
INSTRCH
Operating and display elements for the instrument channel.
GAIN - Controls amplification of the instrument signal. The corresponding SIG LED indicator lights up white when a signal is present. If the signal is 1 dB below the distortion threshold, the LED lights up violet. If the instrument input is driven beyond the distortion threshold, the SIG LED lights up red and signal distortion may occur. Set the Gain control so that the SIG LED does not light up red when there are volume peaks.
TONE - 10 kHz high-shelf equalizer. In the centre position, the signal is unaffected. Turn to the left to reduce highs by up to 8 dB. Turn to the right to increase highs by up to 7 dB.
FX SEND - Level control for mixing the instrument signal with the internal digital effects processor. Ensure that the red FX CLIP LED does not light up.
9
MICCH
Operating and display elements for the microphone channel.
GAIN - Controls amplification of the microphone signal. The corresponding SIG LED indicator lights up white when a signal is present. If the signal is 1 dB below the distortion threshold, the LED lights up violet. If the instrument input is driven beyond the distortion threshold, the SIG LED lights up red and signal distortion may occur. Set the Gain control so that the SIG LED does not light up red when there are volume peaks.
TONE - 8 kHz high-shelf equalizer. In the centre position the signal is unaffected. Turn to the left to reduce highs by up to 8 dB. Turn to the right to increase highs by up to 5 dB.
FX SEND - Level control for mixing the microphone signal with the internal digital effects processor. Ensure that the red FX CLIP LED does not light up.
DIGITAL EFFECTS PROCESSOR
Rotate the encoder to select one of the 16 effects preset. A list of available effects is printed above the preset encoder. The red FX CLIP LED lights up if the signal reaches the distortion threshold of the internal effects processor. To avoid signal distortion, ensure that the FX CLIP LED does not light up if there are volume peaks. Reduce the effects send level control FX SEND on the affected channel.
1 MIX OUT
Level control for the combined Mix OUT line out signal. Rotate to the left to decrease and to the right to increase the volume.
12 FX MUTE
Button for muting the effects signal. Push the button to mute the effects signal and once again to unmute it. When muted, the corresponding red indicator LED lights up.
MUTE ALL
Button for muting the combined signal. Push the button to mute the combined signal and once again to unmute it. When muted, the corresponding red indicator LED lights up.

14 BATTERY COMPARTMENT
Battery compartment for the 9 V block battery. To replace the battery, open the battery compartment by pushing the compartment lid lever in the direction marked "OPEN" and flip the lid upwards. Remove the used battery, attach the clip to the new battery (1 x 9 V block, alkaline) and insert it in the battery compartment. Replace the battery compartment cover on the housing and click it into place. If you do not use the device for a long period, remove the battery to prevent damage to the device from a leaking battery.
PLEAe Note: If the 9 V block battery's voltage falls to below 6 V, the SIG indicator LEDs on both channels will light up white simultaneously. Insert a fresh battery or use a suitable mains adapter.
15 MOUNTING POINTS
Mounting points for the optionally available microphone stand adapter LDVIBZMADAPTOR

CABLING EXAMPLE
TECHNICAL DATA
| Product number: LDFX300 | |
| Product type: Artist Pedal | |
| Type: Live/home recording | |
| No. of channels: 2 | |
| Microphone channels | |
| Microphone channels: 1 | |
| Microphone channel input connections: XLR/6.3 mm combination jack | |
| Microphone channel xLR input type: Electronically balanced | |
| Microphone channel frequency response: 50 Hz (HPF) to 20 kHz (-3 dB) | |
| Microphone channel XLR input gain range: 42 dB | |
| Microphone channel XLR input THD: <0.03% | |
| Microphone channel XLR input impedance: 6 kohm | |
| Microphone channel XLR input S/N ratio: <103 dB (a) | |
| Phantom power: +48 V DC on XLR input | |
| Microphone channel jack input type: Electronically balanced | |
| Microphone channel jack input gain range: 20 dB | |
| Microphone channel jack input THD: <0.045% | |
| Microphone channel jack input impedance: 10 kohm | |
| Microphone channel jack input S/N ratio: 106 dB | |
| Microphone channel EQ: +5/-8 dB @ 8 KHZ | |
| Microphone channel controls: GAIN, TONE, FX SEND | |
| Microphone channel display elements: Channel signal, tri-colour LED (SIG) | |
| Instrument channels | |
| Instrument channels: 1 | |
| Instrument channel input type: Unbalanced high impedance | |
| Instrument channel gain range: 23 dB | |
| Instrument channel THD: <0.03% | |
| Instrument channel impedance: 1M ohm | |
| Instrument channel S/N ratio: 115 dB | |
| Instrument channel EQ: +7/-8 dB @ 10 KHz | |
| Instrument channel insert: 1 | |
| Instrument channel insert connections: 6.3 mm stereo jack (TIP = Return/RING = Send) | |
| Instrument channel controls: GAIN, TONE, FX SEND | |
| Instrument channel display elements: Channel signal, tri-colour LED (SIG) |
Main section
Line outputs: 2
Line output connections: XLR and 6.3 mm jack
XLR output level: Max. +17 dBu, balanced
XLR output impedance: 150 ohms
Jack output level: Max. +5 dBV, unbalanced
Jack output impedance: 40 ohms
Digital effects processor: 1
No.ofpresets:16
Main section operating controls: DFX preset encoder, MIX OUT, POWER, FX MUTE, MUTE ALL
Main section display elements: Effects clip, red LED (FX CLIP), FX MUTE LED, MUTE ALL LED
General specifications
Power supply: - 9 V block battery (approx. 4-5 hours operating time with alkaline battery)
- External mains adapter 9 V DC/250 mA with barrel plug external diameter 5.5mm , internal 2.1mm , centre negative polarity (not supplied)
Ambient operating temperature: 0^ to +40^
Relative air humidity: < 80% , non-condensing
Dimensions (W x H x D): 160 x 55 x 163 mm
Weight: 0.65kg
Additional features: Microphone stand-mount ready
(adapteryoptionallyavailable:LDVIBZMSADAPTOR)
MANUFACTURER'S DECLARATIONS
MANUFACTURER'S WARRANTY & LIMITATIONS OF LIABILITY
You can find our current warranty conditions and limitations of liability at: https://cdn-shop.adamhall.com/media/pdf/MANUFACTURERS-DECLARATIONSLD SYSTEMS.pdf To request warranty service for a product, please contact Adam Hall GmbH, Adam-Hall-Str. 1,61267 Neu Anspach / Email: Info@adamhall.com / +49 (0)6081 / 9419-0.

CORRECT DISPOSAL OF THIS PRODUCT
(valid in the European Union and other European countries with a differentiated waste collection system)
This symbol on the product, or on its documents indicates that the device may not be treated as household waste. This is to avoid environmental damage or personal injury due to uncontrolled waste disposal. Please dispose of this product separately from other waste and have it recycled to promote sustainable economic activity. Household users should contact either the retailer where they purchased this product, or their local government office, for details on where and how they can recycle this item in an environmentally friendly manner. Business users should contact their supplier and check the terms and conditions of the purchase contract. This product should not be mixed with other commercial waste for disposal.
CE Compliance
Adam Hall GmbH states that this product meets the following guidelines (where applicable):
R6TTE (1999/5/EC) or RED (2014/53/EU) from June 2017
Low voltage directive (2014/35/EU)
EMV directive (2014/30/EU)
ROHS (2011/65/EU)
The complete declaration of conformity can be found at www.adamhall.com.
Furthermore, you may also direct your enquiry to info@adamhall.com.
EU DECLARATION OF CONFORMITY
Hereby, Adam Hall GmbH declares that this radio equipment type is in compliance with Directive 2014/53/EU.
The full text of the EU declaration of conformity is available at the following
internet address: www.adamhall.com/compliance/
DEUTsCH
APPAREILS RELIÉS AU SECTEUR
Valid in the European Union and other European countries with waste separation)
DEKLARACJA ZGODNOSCI WE
- DEUTSCH
- SAFETY INFORMATION
- FOR EQUIPMENT THAT Connects TO THE POWER MAINS
- CAUTION:
- CAUTION! HIGH VOLUMES IN AUDIO PRODUCTS!
- INTRODUCTION
- CONNECTIONS, OPERATING AND DISPLAY ELEMENTS
- DC SOCKET
- POWER
- MIC CH
- 4
- INSTRCHINPUT
- 5
- INSTRCHINSERT
- 6
- MIX OUT UNBAL
- 7
- MIX OUT BAL
- 8
- INSTRCH
- 9
- MICCH
- DIGITAL EFFECTS PROCESSOR
- MIX OUT
- FX MUTE
- MUTE ALL
- BATTERY COMPARTMENT
- MOUNTING POINTS
- TECHNICAL DATA
- Main section
- General specifications
- MANUFACTURER'S DECLARATIONS
- MANUFACTURER'S WARRANTY & LIMITATIONS OF LIABILITY
- CORRECT DISPOSAL OF THIS PRODUCT
- CE Compliance
- EU DECLARATION OF CONFORMITY
- APPAREILS RELIÉS AU SECTEUR
- DEKLARACJA ZGODNOSCI WE
Brand : LD Systems
Model : FX 300
Category : Musical instrument