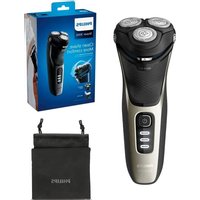
AquaTouch AT884 - Shaver PHILIPS - Free user manual and instructions
Find the device manual for free AquaTouch AT884 PHILIPS in PDF.
User questions about AquaTouch AT884 PHILIPS
0 question about this device. Answer the ones you know or ask your own.
Ask a new question about this device
Download the instructions for your Shaver in PDF format for free! Find your manual AquaTouch AT884 - PHILIPS and take your electronic device back in hand. On this page are published all the documents necessary for the use of your device. AquaTouch AT884 by PHILIPS.
USER MANUAL AquaTouch AT884 PHILIPS
Always here to help you
Register your product and get support at www.philips.com/welcome
AT9XX,AT8XX,AT7XX

PHILIPS
ENGLISH 4
DANSK 18
DEUTSCH 32
EAAHNIKA 46
ESPANOL 61
SUOMI 75
FRANÇAIS 88
ITALIANO 102
NEDERLANDS 116
NORSK 130
PORTUGUES 144
SVENSKA 158
TÜRKÇE 172
Introduction
Congratulations on your purchase and welcome to Philips!
To fully benefit from the support that Philips offers, register your product at www.philips.com/welcome. Please read this user manual, as it contains information about the wonderful features of this shaver as well as sometips to make shaving easier and more enjoyable.
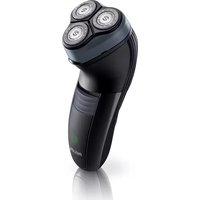
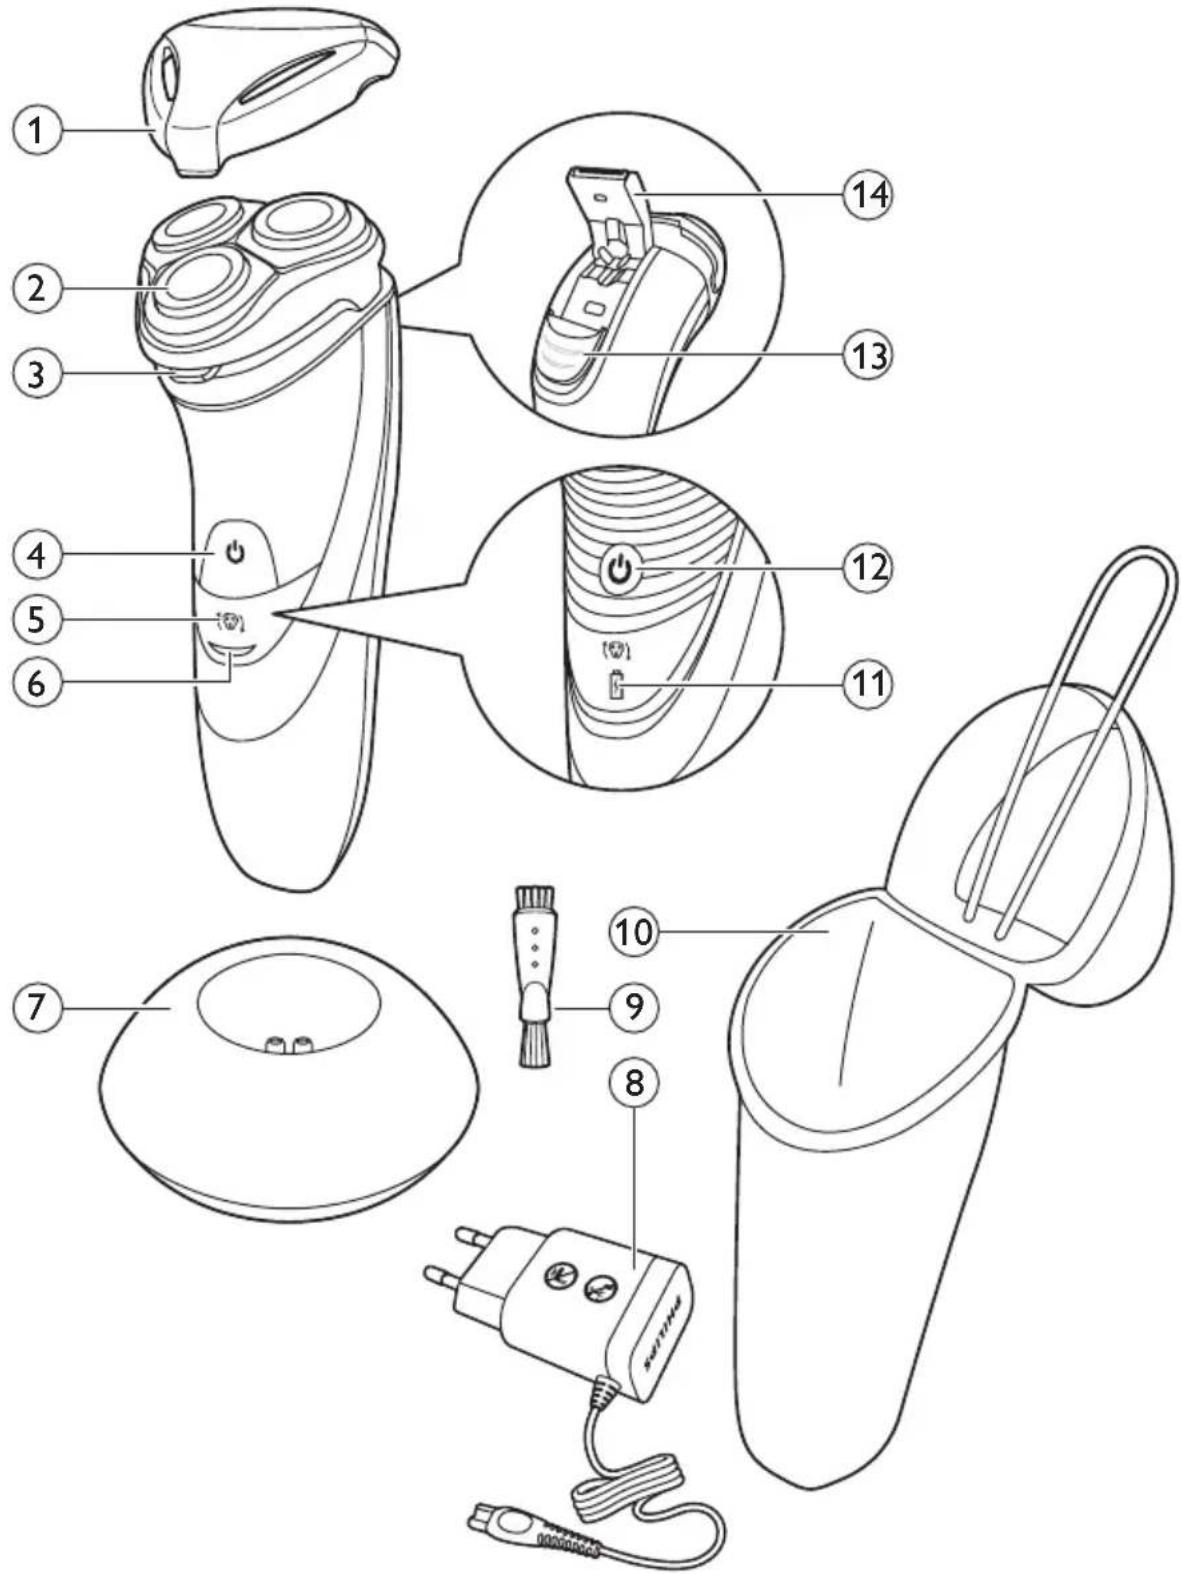
General description (Fig. 1)
1 Protection cap
2 Shaving unit
3 Shaving unit release button
4 Shaver on/off button (AT899/AT896/AT894/AT892/AT891/AT890/ AT811/AT790/AT756/AT753/AT751/AT750 only)
5 Shaving head symbol
6 Charging light (AT899/AT896/AT894/AT892/AT891/AT890/AT811/ AT790/AT756/AT753/AT751/AT750 only)
7 Charging stand (AT941/AT940 only)
8 Adapter
9 Cleaning brush
10 Storage pouch (AT941/AT940/AT897/AT894/AT891/AT890/AT796/ AT790 only)
11 Battery symbol and shaving head symbol (AT941/AT940/AT897 only)
12 Shaver on/off button (AT941/AT940/AT897 only)
13 Trimmer release slide (AT941/AT940/AT918/AT897/AT896/AT894/ AT891/AT890/AT889/AT887/AT886/AT872/AT811/AT799/AT797/ AT796/AT790/AT756 only)
14 Trimmer (AT941/AT940/AT918/AT897/AT896/AT894/AT891/AT890/ AT889/AT887/AT886/AT872/AT811/AT799/AT797/AT796/AT790/ AT756 only)
Note: You can find the type number on the back of the shaver.
Important safety information
Read this important information carefully before you use the appliance and its accessories and save it for future reference. The accessories supplied may vary for different products.
Danger
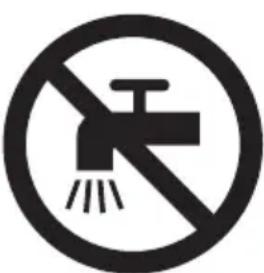
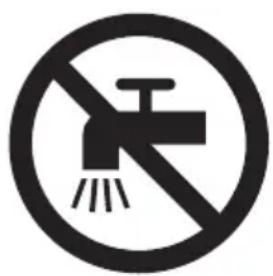
- Keep the adapter dry.
Warning
- The adapter contains a transformer. Do not cut off the adapter to replace it with another plug, as this causes a hazardous situation.
- This appliance can be used by children aged from 8 years and above and persons with reduced physical, sensory or mental capabilities or lack of experience and knowledge if they have been given supervision or instruction concerning use of the appliance in a safe way and understand the hazards involved. Children shall not play with the appliance. Cleaning and user maintenance shall not be made by children without supervision.
- Always unplug the shaver before you clean it under the tap.
- Always check the appliance and its accessories before you use it. Do not use the appliance or its accessories if it is damaged, as this may cause injury. Always replace a damaged part with one of the original type.
Caution
- Never immerse the charging stand in water nor rinse it under the tap.
- Only use this appliance for its intended purpose as shown in the user manual.
- For hygienic reasons, the appliance should only be used by one person.
- Do not use the adapter in or near wall sockets that contain or have contained an electric air freshener to prevent irreparable damage to the adapter.
- Never use compressed air, scouring pads, abrasive cleaning agents or aggressive liquids such as petrol or acetone to clean the appliance.
- Water may drip from the socket at the bottom of the shaver when you rinse it. This is normal and not dangerous because all electronics are enclosed in a sealed power unit inside the shaver.
Electromagnetic fields (EMF)
- This Philips appliance complies with all applicable standards and regulations regarding exposure to electromagnetic fields.
General
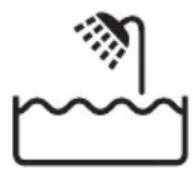
- This shaver is waterproof. It is suitable for use in the bath or shower and for cleaning under the tap. For safety reasons, the shaver can therefore only be used without cord.
- The appliance is suitable for mains voltages ranging from 100 to 240 volts.
- The adapter transforms 100-240 volts to a safe low voltage of less than 24 volts.
Maximum noise level: Lc = 69dB(A)
Charging
Note: The shaver cannot be used directly from the mains.
When you charge the shaver for the first time or after a long period of disuse, let it charge until the charging light lights up continuously.
See the table below for the charging time of your shaver.
Charging time 1 hour 8 hours
| AT941, AT940, AT918 | AT899, AT896, AT872, |
| AT897, AT896, AT894 | AT799, AT799, AT797, |
| AT892, AT891, AT890 | AT796, AT790 AT770, |
| AT889, AT887, AT886 | AT756, AT753 AT751, |
| AT811 | AT750 |
The shaving time may be less than stated below in the table as a result of your shaving behaviour, your cleanings habits or your beard type.
| Shaving minutes | 60 min. | 50 min. | 45 min. | 40 min. |
| AT941 | AT897, AT894, AT892 | AT899 | AT790, AT756, AT753 | |
| AT940 | AT891, AT890, AT811, | AT896 | AT751, AT750 |
Charge indications
Battery low
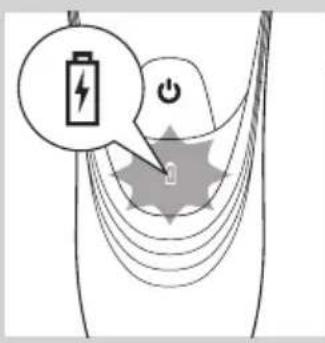
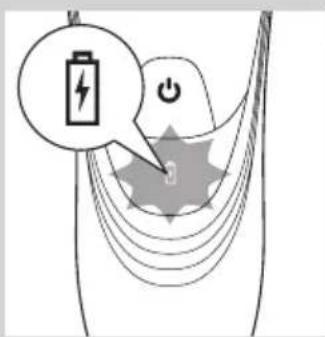
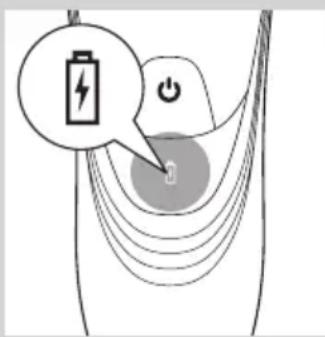
- AT941/AT940/AT897: When the battery is almost empty (when there are only 5 or fewer shaving minutes left), the orange battery symbol starts to flash. When you switch off the shaver, the orange battery symbol continues to flash for a few seconds.

- AT899, AT896, AT918, AT896, AT894, AT891, AT890, AT889, AT887, AT886, AT872, AT811, AT799, AT797, AT796, AT790, AT770, AT756, AT753, AT751, AT750: When the battery is almost empty (when there are only 5 or fewer shaving minutes left), the charging light starts to flash orange. When you switch off the shaver, the charging light continues to flash orange for a few seconds.
Quick charging (AT941, AT940, AT918, AT897, AT896, AT894, AT891, AT890, AT889, AT887, AT886, AT811 only)
- AT941/AT940/AT897: When you start charging the empty battery, the battery symbol flashes orange and white.
Note: When the battery symbol flashes white and orange towards only white, you can have a quick shave of three minutes.
- AT918, AT896, AT894, AT891, AT890, AT889, AT887, AT886, AT811: When you start charging the empty battery, the charging light alternately flashes orange and green.
Note: When the charging light flashes orange and green towards only green, you can have a quick shave of three minutes.

Charging
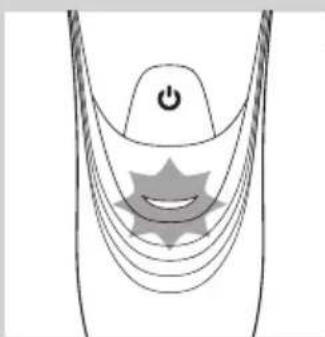
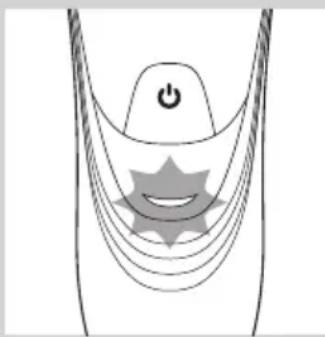
- AT941/AT940/AT897: When the shaver is charging, the white battery symbol flashes.
- AT899,AT896,AT872,AT799,AT797,AT796,AT790,AT770,AT756,AT753,AT751,AT750:
When the shaver is charging, the charging light flashes green.
Battery fully charged
- AT941/AT940/AT897: When the battery is fully charged, the white battery symbol lights up continuously.
Note: After approx. 30 minutes, the battery symbol goes out to save energy.

- AT899, AT896, AT918, AT896, AT894, AT891, AT890, AT889, AT887, AT886, AT872, AT811, AT799, AT797, AT796, AT790, AT770, AT756, AT753, AT751, AT750: When the battery is fully charged, the charging light lights up green continuously.
Note: After approx. 30 minutes, the charging light goes out to save energy.
Charging
1 Put the small plug in the shaver.
Put the adapter in the wall socket.
The charging light shows the charging status of the shaver (see section 'Charge indications' in this chapter).
Charging in the charging stand (AT941/AT940 only)
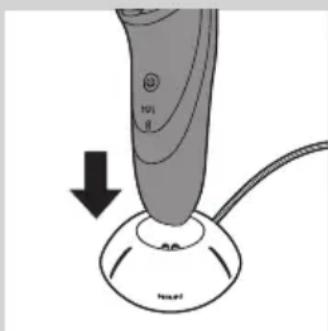
Put the small plug in the charging stand.
Put the adapter in the wall socket.
3 Place the shaver in the charging stand.
The charging light shows the charging status of the shaver (see section 'Charge indications' in this chapter).
Using the shaver
Note: This shaver can be used in the bath or shower. It can therefore not be used directly from the mains for safety reasons.
Shaving tips and tricks
- This shaver is suitable for both wet and dry use. Use the shaver with shaving gel or foam for extra skin comfort, or use the shaver dry for extra convenience.
Note: We advise you to use the shaver with shaving gel or foam when you use it for a wet shave. Do not use thick shaving cream or shaving oil with this shaver.
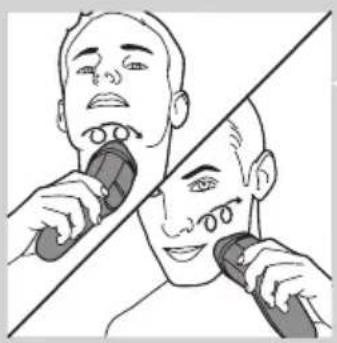
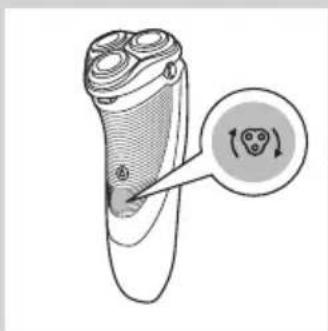
- For optimal shaving results, make circular movements during use.
- The shaver is waterproof and can be used in the bath or shower.
- Your skin may need 2 or 3 weeks to get accustomed to the Philips shaving system.
Wet shaving
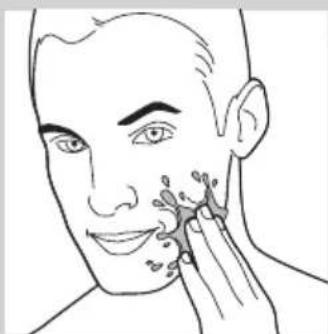
Apply some water to your skin.
2 Apply shaving foam or shaving gel to your skin.
3 Rinse the shaving unit under the tap to ensure that the shaving unit glides smoothly over your skin.
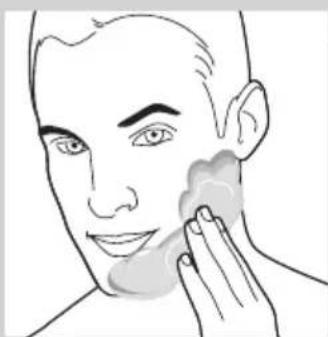
4 Press the on/off button once to switch on the shaver.
Move the shaving heads in circular movements over your skin.
Note: Rinse the shaver under the tap regularly to ensure that it continues to glide smoothly over your skin.
6 After shaving, press the on/off button once to switch off the shaver and dry your face.
Clean the shaver (see chapter 'Cleaning and maintenance').
Note: Make sure you rinse all foam or shaving gel off the shaver.
Dry shaving
1 Press the on/off button once to switch on the shaver.
2 Move the shaving heads in circular movements over your skin.
After shaving, press the on/off button once to switch off the shaver.
4 Clean the shaver (see chapter 'Cleaning and maintenance').
Trimming (AT941/AT940/AT918/AT897/AT896/AT894/AT891/ AT890/AT889/AT887/AT886/AT872/AT811/AT799/AT797/AT796/ AT790/AT756 only)
You can use the trimmer to groom your sideburns and moustache.
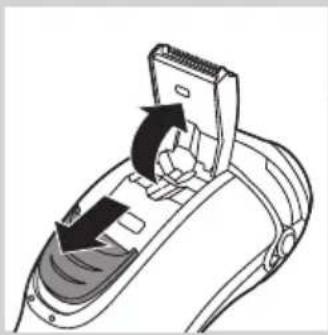
1 Push the trimmer slide downwards to open the trimmer.
Press the on/off button once to switch on the shaver.
You can now start trimming.
After trimming, press the on/off button once to switch off the shaver.

4 Clean the trimmer (see chapter 'Cleaning and maintenance').
5 Close the trimmer ('click').
Cleaning and maintenance
Never use compressed air, scouring pads, abrasive cleaning agents or aggressive liquids such as petrol or acetone to clean the shaver and the charging stand (AT941/AT940 only).
Always unplug the shaver before you clean it under the tap.
- Clean the shaver after every shave for optimal shaving performance.
- Regular cleaning guarantees better shaving performance.
- For the best cleaning results, we advise you to use the Philips Cleaning spray (HQ110).
- Be careful with hot water. Always check if the water is not too hot, to prevent your hands from getting burnt.
Note: Water may leak from the socket at the bottom of the shaver when you rinse it. This is normal and not dangerous because all electronics are enclosed in a sealed power unit inside the shaver.
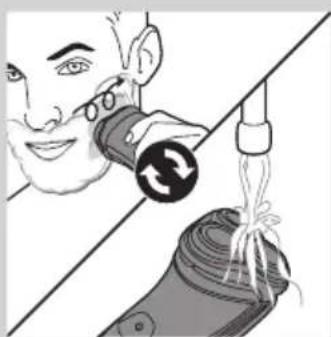
Cleaning the shaving unit under the tap

1 Switch off the shaver.
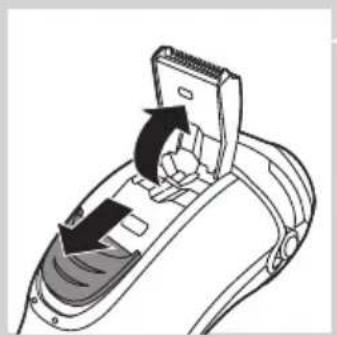
Press the release button to open the shaving unit.
3 Rinse the shaving unit and hair chamber under a hot tap for 30 seconds.
Be careful with hot water. Always check if the water is not too hot, to prevent your hands from getting burnt.
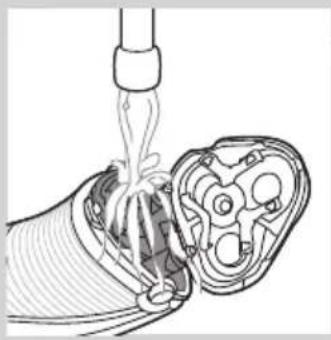
- Rinse the hair chamber and the inside of the shaving unit.
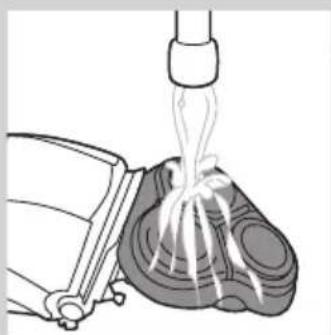
- Rinse the outside of the shaving unit.
4 Close the shaving unit and shake off excess water.
Be careful not to hit the shaving unit against anything while shaking off excess water.
Never dry the shaving unit and the hair chamber with a towel or tissue, as this may damage the shaving unit.
5 Open the shaving unit again and leave it open to let the shaver dry completely.
Cleaning the shaving unit with the cleaning brush
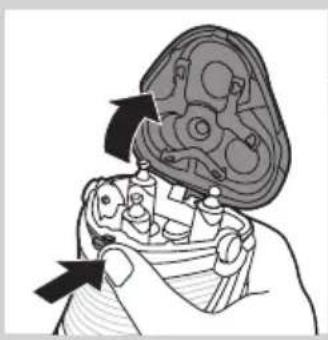
Switch off the shaver.
Press the release button to open the shaving unit.
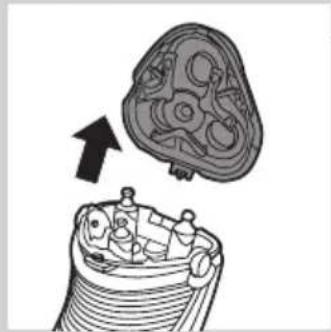
3 Pull the shaving unit off the shaver.
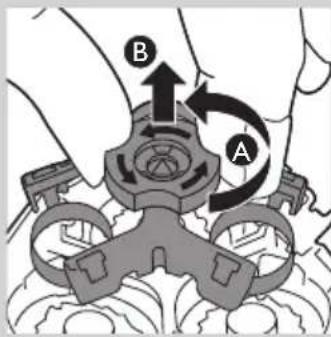
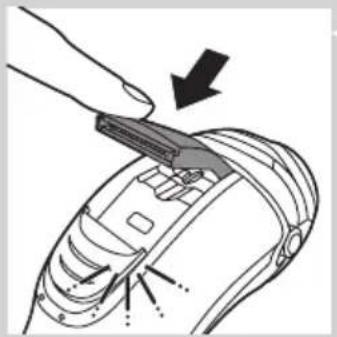
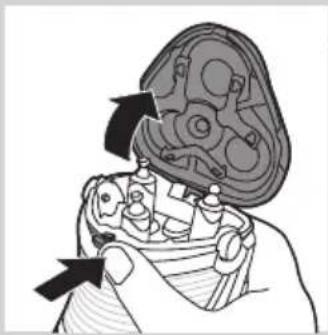
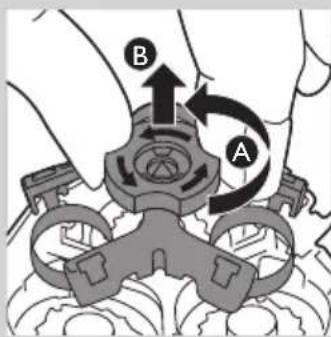
4 Turn the lock anticlockwise (A) and remove the retaining frame (B).
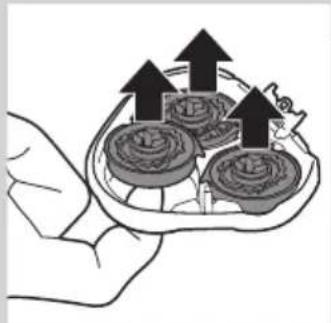
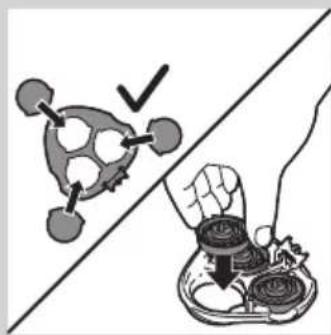
5 Remove and clean one shaving head at a time. Each shaving head consists of a cutter and a guard.
Note: Do not clean more than one cutter and guard at a time, since they are all matching sets. If you accidentally mix up the cutters and guards, it may take several weeks before optimal shaving performance is restored.
- Remove the cutter from the shaving guard and clean it with the brush.
ENGLISH12
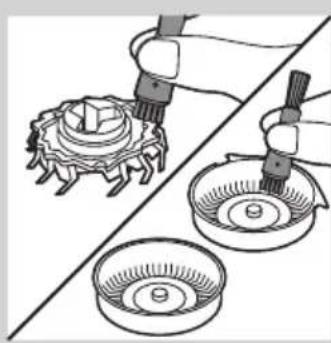
- Clean the inside and outside of the shaving guard with the brush.
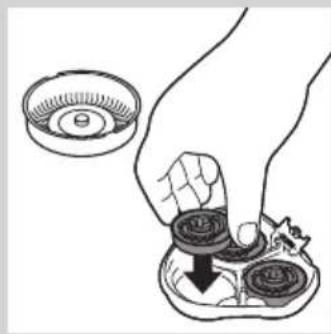
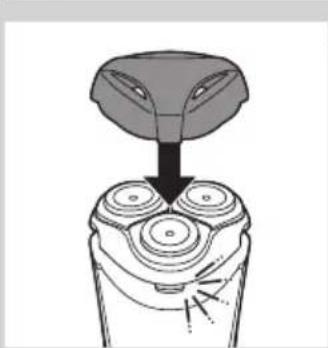
Put the shaving heads back into the shaving unit.
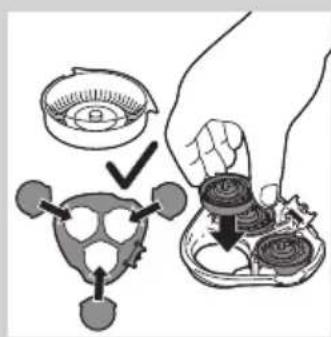
Make sure that the projections of the shaving heads fit exactly into the recesses.
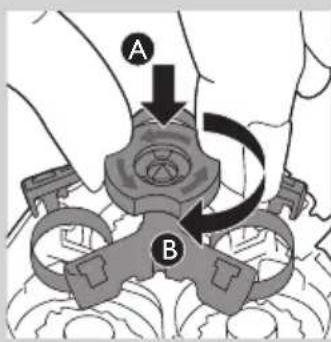
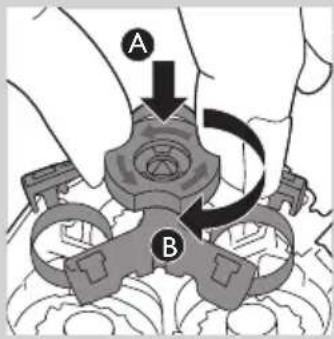
Put the retaining frame back into the shaving unit (A) and turn the lock clockwise (B).
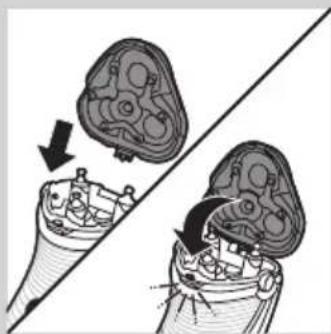
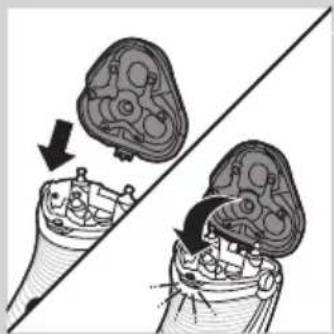
Insert the lug of the shaving unit into the slot in the top of the shaver. Then close the shaving unit.
Note: If the shaving unit does not close smoothly, check if you have inserted the shaving heads properly and if the retaining frame is locked.
Cleaning the trimmer with the cleaning brush (AT941/AT940/AT918/ AT897/AT896/AT894/AT891/AT890/AT889/AT887/AT886/AT872/ AT811/AT799/AT797/AT796/AT790/AT756 only)
Clean the trimmer every time you have used it.
1 Switch off the shaver.
2 Push the trimmer slide downwards to open the trimmer.
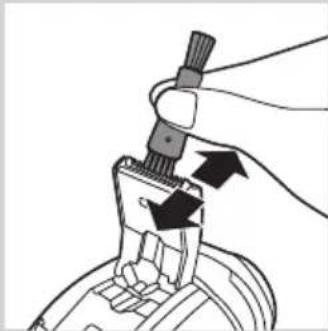
3 Clean the trimmer with the short-bristled side of the cleaning brush. Brush up and down along the trimmer teeth.
4 Close the trimmer ('click').
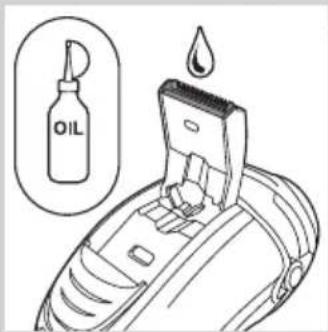
Tip: For optimal trimming performance, lubricate the trimmer teeth with a drop of sewing machine oil every six months.
Storage
- Put the protection cap on the shaver to prevent damage.
- AT941/AT940/AT897/AT894/AT892/AT891/AT890/AT796/AT790 only: Store the shaver in the pouch supplied.
Replacement
Replacement reminder
The shaving head symbol will light up to indicate that the shaving heads need to be replaced. Replace damaged shaving heads right away. Only replace the shaving heads with original HQ9 (AT941/AT940/AT918) or HQ8 (AT897/AT896/AT894/AT891/AT890/AT889/AT887/AT886/AT872/AT811/AT797/AT796/AT790/AT770/AT756/AT753/AT751/AT750) Philips Shaving Heads.
1 The shaving head symbol lights up orange continuously.
Switch off the shaver. Disconnect the shaver from the mains or remove it from the charging stand (AT941/AT940 only).
Press the release button to open the shaving unit.
4 Pull the shaving unit off the shaver.
5 Turn the lock anticlockwise (A) and remove the retaining frame (B).
6 Remove the shaving heads and place new ones in the shaving unit.
Make sure that the projections of the shaving heads fit exactly into the recesses.
Put the retaining frame back into the shaving unit (A) and turn the lock clockwise (B).
Insert the lug of the shaving unit into the slot in the top of the shaver. Then close the shaving unit.
Note: If the shaving unit does not close smoothly, check if you have inserted the shaving heads properly and if the retaining frame is locked.
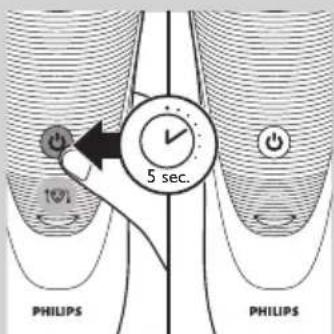
9 Press and hold the on/off button for 5 seconds to reset the replacement reminder on the shaver. The orange light will go out.
Ordering accessories
To buy accessories or spare parts, visit www.shop.philips.com/service or go to your Philips dealer. You can also contact the Philips Consumer Care Centre in your country (see the worldwide guarantee leaflet for contact details). To retain the top performance of your shaver, make sure you clean it regularly and replace its shaving heads at the recommended time.
Shaving heads
- We advise you to replace your shaving heads every two years. Always replace with HQ9 (AT941/AT940) or HQ8 (AT897/ AT896/AT894/AT891/AT890/AT889/AT887/AT886/AT872/AT811/ AT799/AT797/AT796/AT790/AT770/AT756/AT753/AT751/AT750) Philips Shaving Heads.
Cleaning
- Use Cleaning spray (HQ110) to clean the shaving heads thoroughly.

Recycling
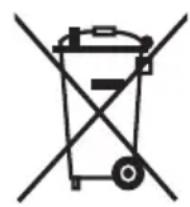
- This symbol on a product means that the product is covered by European Directive 2012/19/EU.
- This symbol means that the product contains a built-in rechargeable battery covered by European Directive 2006/66/EC which cannot be disposed of with normal household waste. We strongly advise you to take your product to an official collection point or a Philips service centre to have a professional remove the rechargeable battery.
- Inform yourself about the local separate collection system for electrical and electronic products and rechargeable batteries. Follow local rules and never dispose of the product and rechargeable batteries with normal household waste. Correct disposal of old products and rechargeable batteries helps prevent negative consequences for the environment and human health.
Removing the rechargeable shaver battery
Only remove the rechargeable battery when you discard the shaver.
Make sure the rechargeable battery is completely empty when you remove it.
1 Undo the screws in the back of the shaver and in the hair chamber.
2 Remove the front panel and the back panel.
3 Bend the 6 hooks aside and take out the power unit.
Be careful, the hooks are sharp.
4 Remove the rechargeable battery.
Guarantee and support
If you need information or support, please visit www.philips.com/support or read the separate worldwide guarantee leaflet.
Guarantee restrictions
The shaving heads (cutters and guards) are not covered by the terms of the international guarantee because they are subject to wear.
Troubleshooting
This chapter summarises the most common problems you could encounter with the appliance. If you are unable to solve the problem with the information below, visit www.philips.com/support for a list of frequently asked questions or contact the Consumer Care Centre in your country.
Problem Possible cause Solution
| The shaver does not shave as well as it used to. | The shaving heads are damaged or worn. | Replace the shaving heads (see chapter 'Replacement'). |
| Foam or gel residues clog up the shaving heads. | Rinse the shaving unit under a hot tap (see chapter 'Cleaning and maintenance'). | |
| Long hairs obstruct the shaving heads. | Clean the shaving heads one by one (see chapter 'Cleaning and maintenance'). | |
| You have not inserted the shaving heads properly. | Make sure that the projections of the shaving heads fit exactly into the recesses (see chapter 'Cleaning and maintenance'). | |
| The shaver does not work when I press the on/off button. | The rechargeable battery is empty. | Recharge the battery (see chapter 'Charging'). |
| The temperature of the shaver is too high. In this case, the shaver does not work. | As soon as the temperature of the shaver has dropped sufficiently, you can switch on the shaver again. | |
| The shaver does not work, although it is connected to the mains. | The shaver is not designed to be used directly from the mains. | Recharge the battery (see chapter 'Charging') and disconnect it from the mains. |
Introduktion
Commanded accessoires