
ZHRN320K - Cooker ZANUSSI - Free user manual and instructions
Find the device manual for free ZHRN320K ZANUSSI in PDF.
| Brand | Zanussi |
| Model | ZHRN320K |
| Product type | Built-in hob |
| Cooking type | Radiant |
| Number of cooking zones | 2 |
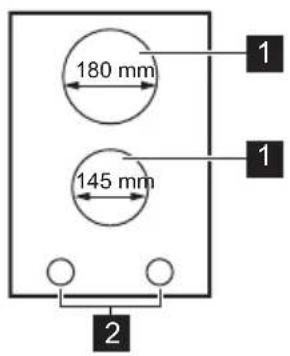
| Front zone diameter | 14.5 cm |
| Rear zone diameter | 18.0 cm |
| Front zone power | 1200 W |
| Rear zone power | 1700 W |
| Energy consumption | 188.5 Wh/kg |
| Power supply | Electric |
| Rated voltage | 220-240 V (estimate) |
| Control type | Rotary knobs |
| Maintenance | Clean after each use with a soft cloth and non-abrasive detergent; use a special scraper for stubborn dirt |
| Safety | Safety instructions for children and vulnerable persons; residual heat indicator; automatic shut-off not specified |
| Spare parts | Use only original parts |
| Repairability | Contact authorized after-sales service for any repairs |
| Warranty | Consult the provided warranty booklet |
Frequently Asked Questions - ZHRN320K ZANUSSI
User questions about ZHRN320K ZANUSSI
0 question about this device. Answer the ones you know or ask your own.
Ask a new question about this device
Download the instructions for your Cooker in PDF format for free! Find your manual ZHRN320K - ZANUSSI and take your electronic device back in hand. On this page are published all the documents necessary for the use of your device. ZHRN320K by ZANUSSI.
USER MANUAL ZHRN320K ZANUSSI
www.zanussi.com/support
5. SVAKODNEVNA UPORABA

UPOZORENJE!
Get usage advice, brochures, trouble shooter, service and repair information: www.zanussi.com/support
Subject to change without notice.
CONTENTS
1.SAFETY INFORMATION 37
2.SAFETYINSTRUCTIONS 39
3. INSTALLATION 41
4.PRODUCT DESCRIPTION 43
5.DAILYUSE 43
6.HINTS AND TIPS 44
7.CARE AND CLEANING 44
8.TROUBLESHOOTING 45
9. TECHNICAL DATA 46
10. ENERGY EFFICIENCY 46
1. SAFETY INFORMATION
Before the installation and use of the appliance, carefully read the supplied instructions. The manufacturer is not responsible for any injuries or damage that are the result of incorrect installation or usage. Always keep the instructions in a safe and accessible location for future reference.
1.1 Children and vulnerable people safety
- This appliance can be used by children aged from 8 years and above and persons with reduced physical, sensory or mental capabilities or lack of experience and knowledge if they have been given supervision or instruction concerning the use of the appliance in a safe way and understand the hazards involved.
- Children between 3 and 8 years of age and persons with very extensive and complex disabilities shall be kept away from the appliance unless continuously supervised.
-
Children of less than 3 years of age should be kept away from the appliance unless continuously supervised.
-
Do not let children play with the appliance.
- Keep all packaging away from children and dispose of it appropriately.
- WARNING: Keep children and pets away from the appliance when it operates or when it cools down. Accessible parts become hot during use.
- If the appliance has a child safety device, it should be activated.
- Children shall not carry out cleaning and user maintenance of the appliance without supervision.
1.2 General Safety
- WARNING: The appliance and its accessible parts become hot during use. Care should be taken to avoid touching heating elements.
- WARNING: Unattended cooking on a hob with fat or oil can be dangerous and may result in fire.
- NEVER try to extinguish a fire with water, but switch off the appliance and then cover flame e.g. with a lid or a fire blanket.
- CAUTION: The appliance must not be supplied through an external switching device, such as a timer, or connected to a circuit that is regularly switched on and off by a utility.
- CAUTION: The cooking process has to be supervised. A short term cooking process has to be supervised continuously.
- WARNING: Danger of fire: Do not store items on the cooking surfaces.
- Metallic objects such as knives, forks, spoons and lids should not be placed on the hob surface since they can get hot.
- Do not use the appliance before installing it in the built-in structure.
- Do not use a steam cleaner to clean the appliance.
- If the glass ceramic surface / glass surface is cracked, switch off the appliance and unplug it from the mains. In
case the appliance is connected to the mains directly using junction box, remove the fuse to disconnect the appliance from power supply. In either case contact the Authorised Service Centre.
- If the supply cord is damaged, it must be replaced by the manufacturer, an authorized Service or similarly qualified persons in order to avoid a hazard.
- WARNING: Use only hob guards designed by the manufacturer of the cooking appliance or indicated by the manufacturer of the appliance in the instructions for use as suitable or hob guards incorporated in the appliance. The use of inappropriate guards can cause accidents.
2. SAFETY INSTRUCTIONS
2.1 Installation

WARNING!
Only a qualified person must install this appliance.

WARNING!
Risk of injury or damage to the appliance.
- Remove all the packaging.
- Do not install or use a damaged appliance.
- Follow the installation instructions supplied with the appliance.
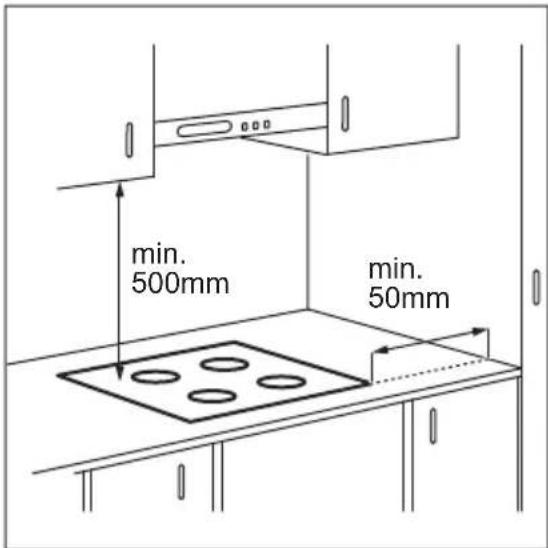
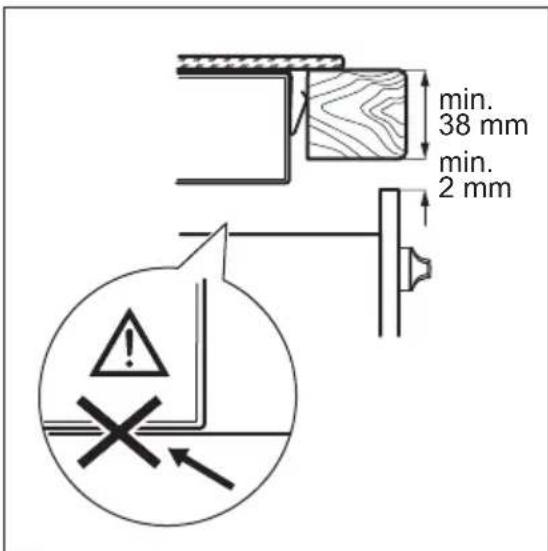
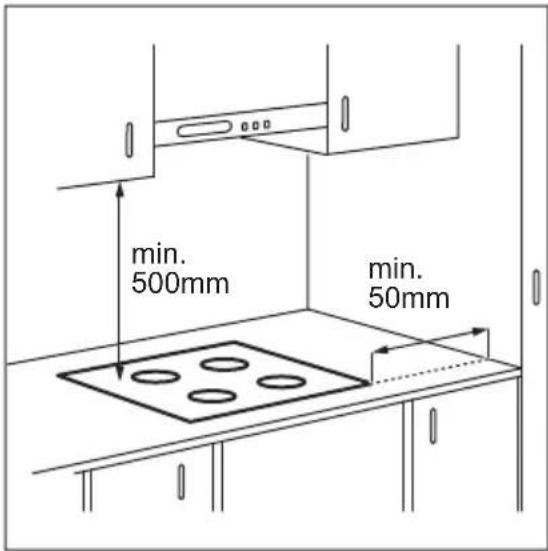
- Keep the minimum distance from other appliances and units.
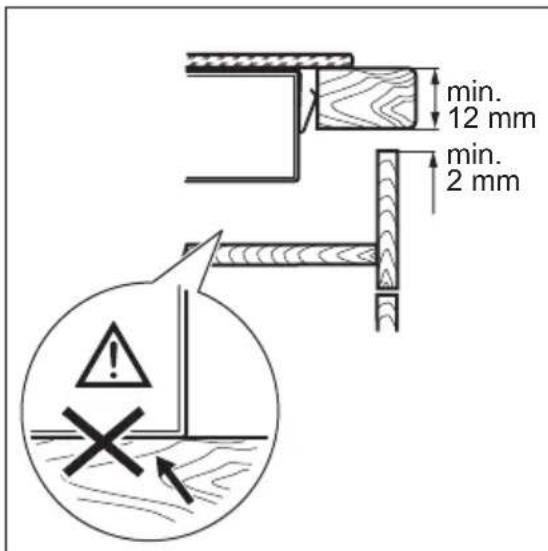
Always take care when moving the appliance as it is heavy. Always use safety gloves and enclosed footwear. - Seal the cut surfaces with a sealant to prevent moisture from causing swelling.
- Protect the bottom of the appliance from steam and moisture.
- Do not install the appliance next to a door or under a window. This prevents hot cookware from falling from the appliance when the door or the window is opened.
-
If the appliance is installed above drawers make sure that the space, between the bottom of the appliance and the upper drawer is sufficient for air circulation.
-
The bottom of the appliance can get hot. Make sure to install a separation panel made from plywood, kitchen carcass material or other non-flammable materials under the appliance to prevent access to the bottom.
- The separation panel has to cover the area under the hob completely.
2.2 Electrical Connection

WARNING!
Risk of fire and electric shock.
- All electrical connections should be made by a qualified electrician.
- The appliance must be earthed.
- Before carrying out any operation makesure that the appliance is disconnectedfrom the power supply.
- Make sure that the parameters on the rating plate are compatible with the electrical ratings of the mains power supply.
- Make sure the appliance is installed correctly. Loose and incorrect electricity mains cable or plug (if applicable) can make the terminal become too hot.
- Use the correct electricity mains cable.
- Do not let the electricity mains cable tangle.
Make sure that a shock protection is installed.
- Use the strain relief clamp on the cable.
- Make sure the mains cable or plug (if applicable) does not touch the hot appliance or hot cookware, when you connect the appliance to the near sockets.
- Do not use multi-plug adapters and extension cables.
- Make sure not to cause damage to the mains plug (if applicable) or to the mains cable. Contact our Authorised Service Centre or an electrician to change a damaged mains cable.
- The shock protection of live and insulated parts must be fastened in such a way that it cannot be removed without tools.
- Connect the mains plug to the mains socket only at the end of the installation. Make sure that there is access to the mains plug after the installation.
- If the mains socket is loose, do not connect the mains plug.
- Do not pull the mains cable to disconnect the appliance. Always pull the mains plug.
- Use only correct isolation devices: line protecting cut-outs, fuses (screw type fuses removed from the holder), earth leakage trips and contactors.
- The electrical installation must have an isolation device which lets you disconnect the appliance from the mains at all poles. The isolation device must have a contact opening width of minimum 3 mm.
2.3 Use

WARNING!
Risk of injury, burns and electric shock.
- Remove all the packaging, labelling and protective film (if applicable) before first use.
- This appliance is for household use only.
- Do not change the specification of this appliance.
Make sure that the ventilation openings are not blocked. - Do not let the appliance stay unattended during operation.
-
Set the cooking zone to "off" after each use.
-
Do not put cutlery or saucepan lids on the cooking zones. They can become hot.
- Do not operate the appliance with wet hands or when it has contact with water.
- Do not use the appliance as a work surface or as a storage surface.
- If the surface of the appliance is cracked, disconnect immediately the appliance from the power supply. This to prevent an electrical shock.
- When you place food into hot oil, it may splash.

WARNING!
Risk of fire and explosion
- Fats and oil when heated can release flammable vapours. Keep flames or heated objects away from fats and oils when you cook with them.
- The vapours that very hot oil releases can cause spontaneous combustion.
Used oil, that can contain food remnants, can cause fire at a lower temperature than oil used for the first time. - Do not put flammable products or items that are wet with flammable products in, near or on the appliance.

WARNING!
Risk of damage to the appliance.
- Do not keep hot cookware on the control panel.
- Do not put a hot pan cover on the glass surface of the hob.
- Do not let cookware boil dry.
- Be careful not to let objects or cookware fall on the appliance. The surface can be damaged.
- Do not activate the cooking zones with empty cookware or without cookware.
- Do not put aluminium foil on the appliance.
- Cookware made of cast iron, aluminium or with a damaged bottom can cause scratches on the glass / glass ceramic. Always lift these objects up when you have to move them on the cooking surface.
- This appliance is for cooking purposes only. It must not be used for other purposes, for example room heating.
2.4 Care and cleaning

WARNING!
Do not remove the buttons, knobs or gaskets from the control panel. Water may get inside the appliance and cause damage.
- Clean the appliance regularly to prevent the deterioration of the surface material.
- Switch off the appliance and let it cool down before cleaning.
- Do not use water spray and steam to clean the appliance.
- Clean the appliance with a moist soft cloth. Use only neutral detergents. Do not use abrasive products, abrasive cleaning pads, solvents or metal objects.
2.5 Service
To repair the appliance contact the Authorised Service Centre. Use original spare parts only.
- Concerning the lamp(s) inside this product and spare part lamps sold separately: These lamps are intended to withstand extreme physical conditions in household appliances, such as temperature, vibration, humidity, or are intended to signal information about the operational status of the appliance. They are not intended to be used in other applications and are not suitable for household room illumination.
2.6 Disposal

WARNING!
Risk of injury or suffocation.
- Contact your municipal authority for information on how to discard the appliance correctly.
- Disconnect the appliance from the mains supply.
- Cut off the mains electrical cable close to the appliance and dispose of it.
3. INSTALLATION

WARNING!
Refer to Safety chapters.
3.1 Before the installation
Before you install the hob, write down the information below from the rating plate. The rating plate is on the bottom of the hob.
Model
PNC
Serial number
3.2 Built-in hobs
Only use the built-in hobs after you assemble the hob into correct built-in units and work surfaces that align to the standards.
3.3 Connection cable
-
The hob is supplied with a connection cable.
-
To replace the damaged mains cable, use the cable type: H05V2V2-F which withstands a temperature of 90^ or higher. Speak to your local Service Centre. The connection cable may only be replaced by a qualified electrician.
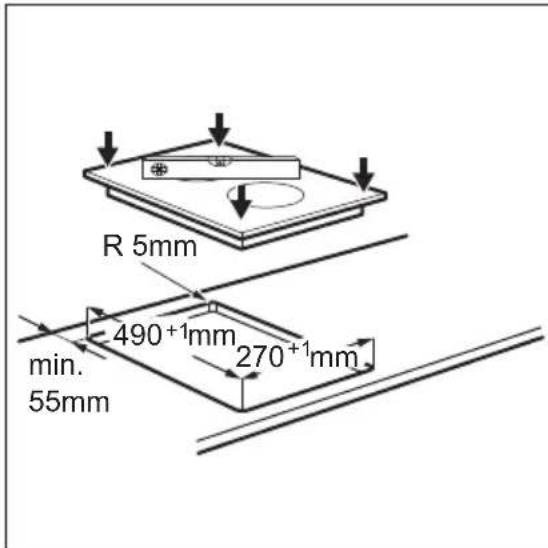
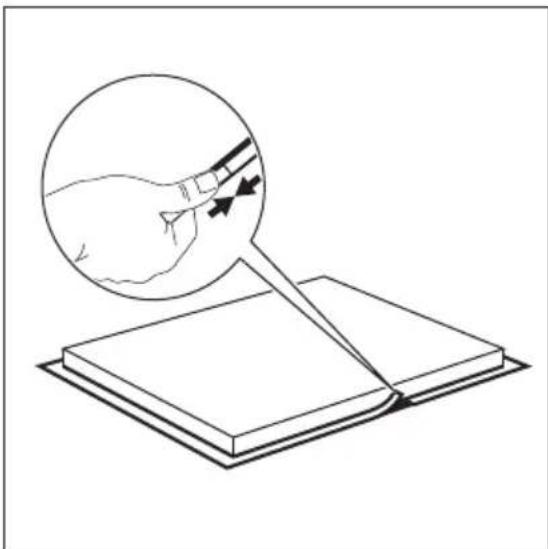
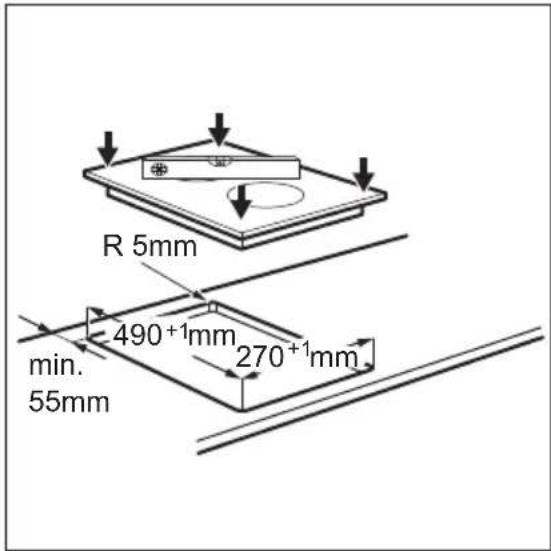
3.4 Attaching the seal - On-top installation
- Clean the worktop around the cut out area.
- Attach the supplied 2 × 6 ~mm seal stripe to the lower edge of the hob, along the outer edge of the glass ceramic. Do not stretch it. Make sure that the ends of the seal stripe are located in the middle of one side of the hob.
- Add some millimetres to the length when you cut the seal stripe.
- Join the two ends of the seal stripe together.
3.5 Assembly
3.6 Installation of more than one hob
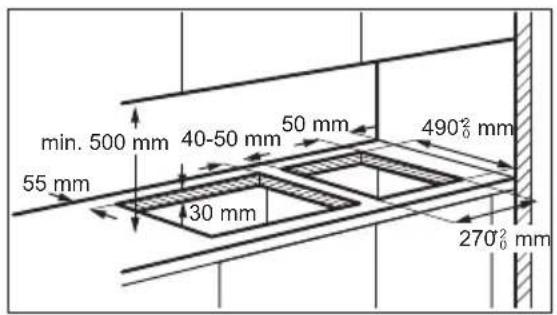
4.PRODUCT DESCRIPTION
4.1 Cooking surface layout

4.2 Control knob
| Symbol | Function |
| 0 | Off position |
| 1 - 9 | Heat settings |
5. DAILY USE

WARNING!
Refer to Safety chapters.
1 Cooking zone
2 Control knobs
4.3 Residual heat

WARNING!
There is a risk of burns from residual heat.
5.1 The heat setting
To set or change the heat setting turn the knob to the correct heat setting. To deactivate turn the knob to off position.
6. HINTS AND TIPS

WARNING!
Refer to Safety chapters.
6.1 Cookware
- The bottom of the cookware must be as thick and flat as possible.
- Ensure pan bases are clean and dry before placing on the hob surface.
- In order to avoid scratches, do not slide or rub the pot across the ceramic glass.

Cookware made of enamelled steel and with aluminium or copper bottoms can cause a colour change on the glassceramic surface.
6.2 Examples of cooking applications

The data in the table is for guidance only.
| Heat setting Use to: Time | Hints (min) |
| 1 Keep cooked food warm. as neces- | Put a lid on the cookware. |
| sary | |
| 1 - 2 Hollandaise sauce, melt: butter, choco- late, gelatine. | 5 - 25 Mix from time to time. |
| 1 - 2 Solidify: fluffy omelettes, baked eggs. 10 - 40 Cook with a lid on. | |
| 2 - 3 Simmer rice and milkbased dishes, heat up ready-cooked meals. | 25 - 50 Add at least twice as much liquid as rice, mix milk dishes halfway through the procedure. |
| 3 - 4 Steam vegetables, fish, meat. 20 - 45 Add a couple of tablespoons of liquid. | |
| 4 - 5 Steam potatoes. 20 - 60 Use max. ¼ l of water for 750 g of po- tatoes. | |
| 4 - 5 Cook larger quantities of food, stews and soups. | 60 - 150 Up to 3 l of liquid plus ingredients. |
| 6 - 7 Gentle fry: escalope, veal cordon bleu, cutlets, rissoles, sausages, liver, roux, eggs, pancakes, doughnuts. | as neces- sary Turn halfway through. |
| 7 - 8 Heavy fry, hash browns, loin steaks, steaks. | 5 - 15 Turn halfway through. |
| 9 Boil water, cook pasta, sear meat (goulash, pot roast), deep-fry chips. | |
7. CARE AND CLEANING

WARNING!
Refer to Safety chapters.
7.1 General information
-
Clean the hob after each use.
-
Always use cookware with a clean base.
- Scratches or dark stains on the surface have no effect on how the hob operates.
- Use a special cleaner suitable for the surface of the hob.
- Use a special scraper for the glass.

It is not recommended to remove the knobs.
7.2 Cleaning the hob
- Remove immediately: melted plastic, plastic foil, sugar and food with sugar, otherwise, the dirt can cause damage to
the hob. Take care to avoid burns. Use a special hob scraper on the glass surface at an acute angle and move the blade on the surface.
- Remove when the hob is sufficiently cool: limescale rings, water rings, fat stains, shiny metallic discoloration. Clean the hob with a moist cloth and a non-abrasive detergent. After cleaning, wipe the hob dry with a soft cloth.
- Remove shiny metallic discoloration: use a solution of water with vinegar and clean the glass surface with a cloth.
8. TROUBLESHOOTING

WARNING!
Refer to Safety chapters.
8.1 What to do if...
Problem Possible cause Remedy
You cannot activate or operate the hob.
The hob is not connected to an electrical supply or it is connected incorrectly.
Check if the hob is correctly connected to the electrical supply.
The fuse is blown. Make sure that the fuse is the cause of
the malfunction. If the fuse is blown again and again, contact a qualified electrician.
8.2 If you cannot find a solution...
If you cannot find a solution to the problem yourself, contact your dealer or an Authorised Service Centre. Give the data from the rating plate. Give also three digit letter code for the glass ceramic (it is in the corner of the glass surface). Make sure, you
operated the hob correctly. If not the servicing by a service technician or dealer will not be free of charge, also during the warranty period. The instructions about the Service Centre and conditions of guarantee are in the guarantee booklet.
9. TECHNICAL DATA
9.1 Cooking zones specification
| Cooking zone | Nominal Power (Max heat setting) [W] | Cooking zone diameter [mm] |
| Middle front 1200 145 | ||
| Middle rear 1700 180 |
For optimal cooking results use cookware no larger than the diameter of the cooking zone.
9.2 Labels supplied with the accessories bag
Stick the adhesive labels as indicated below:
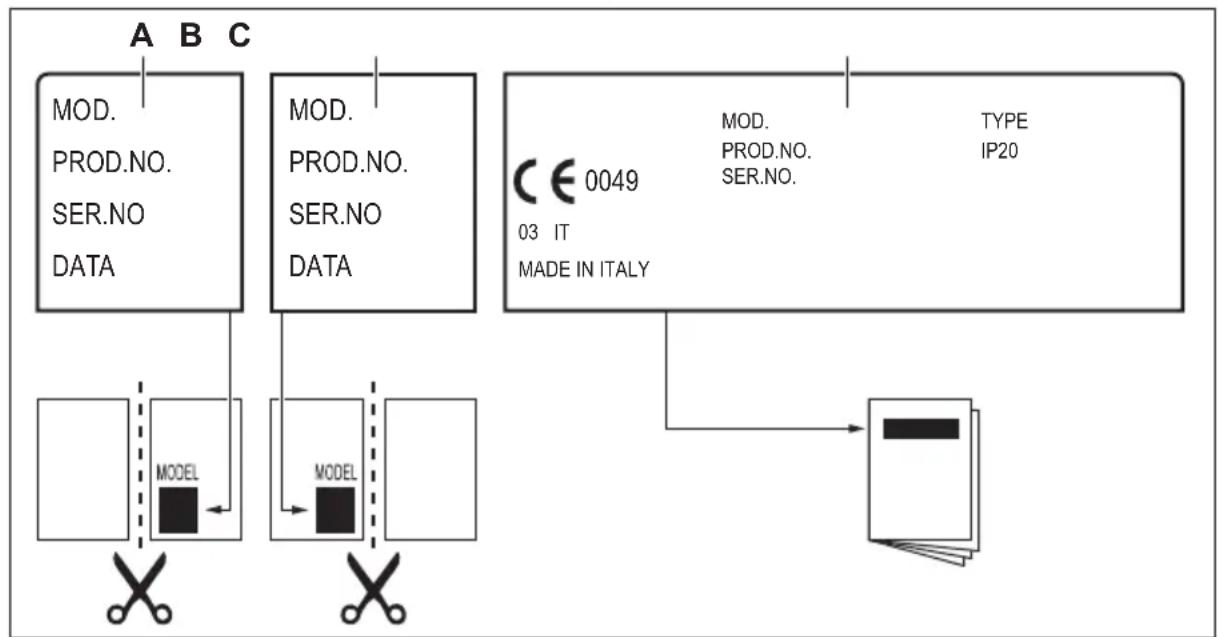
A. Stick it on Guarantee Card and send this part (if applicable).
B. Stick it on Guarantee Card and keep this part (if applicable).
C. Stick it on instruction booklet.
10. ENERGY EFFICIENCY
10.1 Product information*
Model identification ZHRN320K
Type of hob Built-In Hob
Number of cooking zones 2
Heating technology Radiant Heater
| Diameter of circular cooking zones (Ø) Middle front | Middle rear | 14.5 cm 18.0 cm |
| Energy consumption per cooking zone (EC electric cooking) | Middle front | 185.8 Wh / kg |
| Middle rear | 191.2 Wh / kg | |
| Energy consumption of the hob (EC electric hob) 188.5 Wh / kg | ||
- For European Union according to EU 66/2014. For Belarus according to STB 2477-2017, Annex A. For Ukraine according to 742/2019.
EN 60350-2 - Household electric cooking appliances - Part 2: Hobs - Methods for measuring performance
10.2 Energy saving
You can save energy during everyday cooking if you follow below hints.
- When you heat up water, use only the amount you need.
- If it is possible, always put the lids on the cookware.
-
Before you activate the cooking zone put the cookware on it.
-
The cookware bottom should have the same diameter as the cooking zone.
- Put the smaller cookware on the smaller cooking zones.
- Put the cookware directly in the centre of the cooking zone.
- Use the residual heat to keep the food warm or to melt it.
11. ENVIRONMENTAL CONCERNS
Recycle materials with the symbol Put the packaging in relevant containers to recycle it. Help protect the environment and human health by recycling waste of electrical and electronic appliances. Do not dispose of
appliances marked with the symbol with the household waste. Return the product to your local recycling facility or contact your municipal office.
GA NAAR ONZE WEBSITE VOOR:

www.zanussi.com/support
www.zanussi.com/support
HOCTe 3aHTnTH paKaBnI npInIOxHeTe OByBKn.
3aeneTe r3aceeHnte NOBpHHn CO 3aNTiBaay 3a da cnpeHTe BnaRaTa da npedn3BnKa HaDnHyBaHe.
3aHTTeTe rDHOTo Ha anapaTOT oI napea I Bnara.
He ro mONTupajte anapaTOT BO 6Jn3nHa Ha Bpata nn noi npo3opeu. Ha oBoj NaHn Ke cnpueHTe HeKoJ XeKoK ca3a RotBeHe da naHe od anapaTOT Kora BpaTATA nn npo3opeuOT ce OTBOpEH.
- Ako anapaTOT e MOHTnpaH naΦnOKn, BHIMaBajTe npocSTOP nOmeIy dHOTO Ha anapaTOT n RopHaTa Φnoka Da e DOBOJeh 3a cIpyuaujHa Hb03dyx.
-ДНOTOOD anapaTOMOKe da ce 3arpee. YBepete ce deka cTe MOHTnpaIe Wnepnloya, nOua HnpaBeHa Od INBepuca nIi HeKoJ dpyr He3apaniB
MaTepnjAn 3a pa3DBojYBaHBe nOd anapatOT 3a da cnpeuHte npncTan do HOTO.
-Плочаразадуваье морада ѳ пок pine oblacta pod nobpshinata 3a roTBeHbe BeHaI.
2.2 Nobp3yBaHbe co cTpyja

PPEyPENEYBAHe!
Pn3nk oJ nojkap n ctpyeH yap.
- Cekoe NOBp3yBaHBe co cTpyja Tpe6a da 6nnde HAnpaBeHo Od KBAJIINΦNkYBaH eNEKTPnUap.
AnapaTOMopa da 6nide 3a3emjeH. - PpeI da ce n3BeyBaat KaKbN 6nlo pa60TN, npOBepTe dann anapatot e NCKnyueH oD cTpyja.
- PpOBepTe dann npaMeTpne Ha nIOyKaTa CO cNeuOkaunCe KOMnATnBnHn CO eNEKtpnHaT a MOkHOCT Ha MpeKaTa Ha eNEKtpnHa eHeprJa.
- PpOBepTe dAn anapatOT e npaBnHOMontpaH. Ja6abN HecooDBeTeH Ka6eJ3a cTpyja nn npKnyuok (ako enpimEnIbO) MoKe Da npEiN3BnKa nperepeBaHe Ha TepMNHaNoT.
KopncTeTe cooBeteH Ka6eI 3a cTpyja.
He octabajte ng ka6nnte da ce 3aJIeTKaT.
PpOBepTe daHn e MOHTnpaHa 3aWTntata oD cTpyeH ynap.
KopncTeKe Nema 3a Da ro ocno6oJte Ka6eNoT OHaNoH.
-ПроверетадамкабелOTастура ппнлунокOT(ako e пименлво) ro Догира толлnot anapat Ил.TОЛNTe caIDOBN 3a rOTBeHbe KORA ro NOBp3yBaTe anapaTOT co WTEkePN BO 6n3nHa.
He Kopnctete aanTepn co nobKe npKnyOu n npoDOnxHn ka6nn.
-NotpydTe ce da He ro OwTeNTe npNKnyOkOT 3a cTpyja (ako e npIMeHnIBO) nIN Ka6eNt 3a cTpyja. KOHTaKTIpaJTe ro HaUNOT ObNacteH cepBnCeH ueHTap INI eJIeKTPuYap 3a da Iro CMeHInTe OwTeTEHNO T Ka6eN.
3aHTnTaT aOEKeTpueH yap Ha aKTHBnTe N 30JnpaHnTe DeIOBN Mopa Da ce NOBp3e Ha TAKOB HauIN ITO HeMa Da MoKe Da ce n3BaDn 6e3 aNaTKn.
-Поврзete ro npNKJnyokot 3a ctpya co WTekepot Ha Kpajot OJ MOHTaKaTа.
PpOBepTe dani npKnyokOT 3a cTpyja e npCTaneH NO MOHTnpaHbeto.
-ДOKONkyштЕКЕРOT e na6aB, He npNKnyyBaJTe ro npNKnyOkOT 3a cTpyja.
He BneyeTe ro Ka6enot 3a da ro ncknyuHte anapatOT od ctpya.CekoraW noBlekyBaJTe ro npNKnyUOKOT 3a ctpya.
KopncTeTe cAmO COoDBeTHN ypei 3a H30Naunja: 3aHTnTHN npeKHyBaun Ha JInHjA,OCnrypBaun (ocnrypBaun Ha BpTeBe N3BaDeHn OJ dpXkaOT), 3a3emjyBaHe I KOHTaKTOpN.
- EneKtpnHaTaNHCTaJauJa Mopa Da nMa H3OJaUncN ypeD KoJ wTO Bn OBO3MOKyBa Da rN NCKIyUHTe anapaTOT oN pRnKJIyUOKOT 3a CTPyJa OD CNTe NOJOBN. H3OJaUcNtO ypeD Mopa Da nMa KOHTaKTeh OTBOp CO WnPnHa OD HajMaJIky 3 MM.
2.3 ynotpe6a

PPEyPENEYBAHe!
IocToOn onacHocT oN IOBpeDa, n3ropeHnCn nn CTpyeH yDap.
- OtcpaheTe ja ueNaTa ambaJaxa, etnkeTata n 3aHTuHata foJna (ako e npImeHInBO) nped npBaTa ynotpe6a.
- Oboj anapat e camo 3a DomaSHA ynoTpe6a.
He meHybajTe rH cneuΦkaunTe Ha OBOJ anapat. - NorpnxTe ce OTBOpnte 3a BEHTnlaunja Da He 6ndat 6nokupaH.
He octabajte ro anapatot 6e3 ha30p dokeka pa6oTu. - NocTaByBajTe ja pHrIaTa Ha "NCKnyeHo" (off) no cekoja ynoTpe6a.
He ctaBajTe npnbop 3a jaede he nn KaanaOn od TeHepnHa ha pInrInte. Tne MoKe Da cTaHaT XeIKN. - He pakybajte co anapaTc CO BnaJHn paue nn KOra Toj NMa KOHTaKT Co BOda.
He ynoTpe6yBajTe ro anapaTOT kako pa60THa NOBpHnHa IIN KAKO npocToP 3a CKnaDnpaHe.
Ako nobpunHaTa Ha anapatOT e ncykaHa, BeDnHaNcknyute ro anapatOT od ctpyjata. ObaKe cnpeu n ctpyen ynap.
Kora ctabate xpaHa BO XeUKO MacNo, MoKe Da npcka.

PPEyPENEYBAHbE!
OnachocToIpoXapN n3ropeHn
- Pn3 3arpeBaHe, MaCHOTnTe n MacNoTo MoKaT Da NcnyuTaaT 3anAInBn napen. DpxKeTe ro orHot nnn 3arpeAHnte npedMeTu NOdaJeKy OJ MaCHOTnTe n MacJaTa KOra RotBnTe CO HnB.
- Papeata wTo ja nCnyuTa macNoTO KOeUTo e MHOry JKeUko MoKe da npedn3Bnka cNoHTaHo 3anaJyBaHe.
- NcKOpNCTeHOTo MacNo KOe MoKe Da CODpXn OCTaTOU nOxpaHa, MOKe Da npEiN3BnKa NoXap Ha NOHnCKa TemNepaTpyo Od MaCNoTO wTO ce KOpNCTn 3a npB nAT.
He ctabajTe 3anaJIbN npOn3BOJn nn npedMeTn HATONEH CO 3anaJIbN CpeCTBa BO,6JNCy Do,nn Ha anapatOT.

PPEyPENEYBAHbE!
3.4 CtabaHe Ha neYaTOT - MoNTaKaHa roPHNOT deJ
1.Исунша окoly ncehena o6nact.
2. Ctabete ja doctabehaTaJIeHTa 3a 3aneuatybaBe od 2x6mm okony DOIHHOT pa6 Ha NOBpuHnHaTa 3a ROTBeHe IpeKy HAdBOpeUHNOT pa6 Ha cTakNO-KePamNkata. PpntoA, He pacterHybajTe ja. BHMAbajTe KpaEBnTe Ha JeHTaTa 3a 3aneuatyBaBe Da ce CTabeHn BO CpeDHNOT DeI od eDHaTa CtpaHa Ha NOBpuHnHaTa 3a rotBeHe.
3.ДоадаTe HeKoIky mm DoJxHa Kora Ke ja ceuTe JENTaTa 3a 3aneaTyBaHe.
4. NobneyeTe r3aeNo Dbata Kpaja Ha JeHTaTa 3a 3aneYaTaYBaHe.
3.5 CkIonyBaHbe


3.6 MoNTpaHbe Ha noBeKe oEHa nloya 3a rotBeHbe

4.ОПИСHA ПОН3ВОДOT
4.1 Wema Ha noBpunHaTa 3a rotBeHe
4.2 KoHTpoJHo KOnye
| 3нak | Функциja |
| 0 | Положба на是我国 |
| 1-9 | Поставки за топлина |
5. CEKOДHEBHA YNOTPEBA

IPEyIpeyBAHe!
Bnnde Bo norgnaBJata 3a 3aHTNTN CnrgpHOCT.
1 PnHJna
2 KoHTpOJIHn KOnUHbA
4.3Ппесданотонина

PNEyPENEYBAHbE!
IocToOn onaCHOCT Ondn3ropeHnI npaInpoeOCTaHaTa TOnnHa.
5.1 NocTaByBaIbe Ha jaUnHaTa Ha TOnJIuHaTa
3a da ja noctabute nnn npomehnte jaunhaTHa TOnnHaTa, CBpTeTe ro konyeTo DO COODBeTHata NoCTabka 3a jaunHa Ha TOnnHaT. 3a da ncknyuHte, CBpTeTe ro KOnyeto Ha N03njuJa 3a NCKnyeHo.
6. リOMOUSH COBETN

PENEYNPENEYBAHbE!
Bnnde Bo norgnbjata 3a 3aHTNTN CnrgpHocT.
6.1 CaIOBn 3a roTBeHbe
-ДНOTO Ha caIOBnTe 3a rotBeHbe Mopa Da 6nIe KOLky ITO MoKe NOpEbEno n NopamHo.
Ocnypete ce deka dHOTO Ha TeHepeto e uNCTo n cyBO nped da rO CTABNTe Ha NOBpunHa Ta HIOyata 3a rOTBeHe.
3a da ce n36erHaT rpe6HaTuHn, He nn3rajTe ja nn He TpujTe ro TeHuepeTo Bp3 KepamuKOTO CTAKNo.

CaIOBnTe 3a roTBeHe oEmajIINpaH yeJIHK n OHne coaanyMNHyMCKO IIN bakapHO dHOMOKAT Da npedN3BNUKaatnpomeHa Ha 6oJATA Ha cTaKnOkepaMnKcTa NOBpUHa.
6.2 Пгимери на anлкади 3a ROTBeHbe

IpaToUte Bo TabelaTacamO npenopaka.
| Посравва bene temпература | Унотpeбуна ща: Врeme (min) | Совети (мг) |
| 1 Одожува bene на толоча на Зготвенataх рана. | Колкушто Треба | Ставete калak на садовite за ГOTBEWE. |
| 1 - 2 Холандах сок, тонеь: путор, чекладо, желати. | 5 - 25 Мewsajte od врeme на врeme. | |
| 1 - 2 3aцьрства bene: ровки омлети, пожени щajca. | 10 - 40 Готвete пошиево с калak. | |
| 2 - 3 Готveны ориги и joadingа со м静脉, погг reasonably goTobи joadingа. | 25 - 50 Добajte Нajмалку дыалати nobеke Тechост od КOLINCHATA на оригOT, Мewsajte Ги joadingа со м静脉 на ПОLOВИНА на ГOTbeHETo. | |
| 3 - 4 Зеленчuk, р�ба, месо, goTBeHи на пAPEA. | 20 - 45 Добajte НжOLKу golemп лжици ТechOST. | |
| 4 - 5 Komпири на паea. 20 - 60 Уnotpeбete макс. ¼ I вoda за 750 g komпири. | ||
| 4 - 5 Готveны golemп кolyчесвахраha, чорби и суни. | 60 - 150 Do 3 пітpresу чungoc рільс coctojkITE. | |
| 6 - 7 Благо пожны: унizлл, телшко kopdon bny, kotlentи, кфтуны, Колбаси, сигер, задшka, jajca, палачинki, крфни. | Колкушто Треба | Пrel'veртete на палови на од времeto. |
| 7 - 8 Селосно пожны, р envдани komпири, бифтыци, стекови. | 5 - 15 Пrel'veртete на палови на од времeto. | |
| 9 Зоврива bene вoda, вареныеtouchеньи, заджуне месо (гулаш, месо за песене), помфрит bo многу масло. | ||
7. HEGA UN YNCTEHBE

PPEyPENEYBAHe!
Bnnde Bo norgnbjata 3a 3aHTNTN CnrgpHocT.
7.1 OnuTn HOpMaun
- Ynctete ja noBpHnHaTa 3a roTBeHe no cekoja ynoTpe6a.
- Cekoraaw ynoTpe6yBajTe caIOBN 3a TOTBeHbe CO YNCTO dHO.
-Pe6aHnCHTe HnTEmHNTe dAMKn Ha NOBpUnHaTa HeMaat eΦeKT Ha Toa KaKo ΦyHKUOHnpa NOBpUnHaTa 3a rOTBeHbe.
KopncTeTe cneuJaHNO cpeCTBO 3a uNCTeHe HameHTo 3a NOBpHHn 3a rotBeHe.
KopncTeTe cneuJaHa rpe6aIka 3a CTAKNOTO.

He ce npenopayba da rnoTctpaHyBaTe KOnuHbTa.
7.2 YncTeHe Ha nIoouaTa 3a RotBeHe
- BeDnaw oTcTaHete: cToNeHa nIaCTnKa, nIaCTnHa fOnjia, Wekep I XpaHa co
8. PEUABAHBE IPOBJEMN

PPEyPENEYBAHbE!
Budete Bo norgnabjata 3a 3aHTNTa N CnryphoCT.
8.1 WTo Da Ce HappaN ako...
PpO6IeM MoXHa npuHnHa PeSeHne
He moxete da ja BknyuHte nIa pakyBaTe co IIOyata 3a rotBeHe.
IIOyata 3a roTBeHbe He e NOBp3aHa CO eNEKTPnHO HANOjYBaHe IIN He e npabuHNOBp3aHa.
PpOBepTe daHn nNoyata 3a rotBeHe e npabINHO NOBp3aHa co eNeKTpnuHo HanojyBaHe.
I36nOcnrpyBa. YBepTe ce deKa OcnrpyBaoye
npuHaTa 3a HeucnpaBnocTa. Ako OcnrypyBaoyntocTojaHO n36nBa, CTanTe BO KOHTaKT CO KBaINΦnkyBaH eNeKtpuap.
8.2 Ako He moxete da HajdeTe peweHne...
Ako He MoKeTe cAmTe da ro peWnte npo6IemOT, o6paTeTe ce kaj Baunot npOdaBaU nIN BO OBlaCTeHnOT cepBuceN ueHTap. HabeTe rNoTaTOuNTe od nOoukata 3a cneuФnKaun. NcTo TaKa HabeTe ja n TpoUΦpeHaT a uΦpa 3a CTakNO-KePAMka (ce HaOra BO aroJOT ha CTakLeHaT NOBpUnHa).OcnrypTe ce deKa
IpaBnHIO pa6oTnte co NOBpHnHaTa 3a roTBeHe. Ako HnPaBnHcO cTe paKyBaJe co IOBpHnHaTa 3a roTBeHe, cepBncpaHeTo Od CtpaHa Ha cepBnCHNOT TexHnUap NnHa npOdaBaOHemA Da 6nide 6ecnNaTHo, Dypu IN BO rapaHTHnOT nepNoJ. YnaTCTBaTA 3a cnjkbata 3a Ondocn Co KopNCnUte n 3a ycNoBtne Ha rapaHcuijata ce HabeDeHN BO rapaHTHnOT JnCT.
9. TEXHnUKNIPOJATOUN
9.1 CneunphiKaun 3a pHrnte

- SVAKODNEVNA UPORABA
- UPOZORENJE!
- CONTENTS
- SAFETY INFORMATION
- Children and vulnerable people safety
- General Safety
- SAFETY INSTRUCTIONS
- Installation
- WARNING!
- Electrical Connection
- Use
- Care and cleaning
- Service
- Disposal
- INSTALLATION
- Before the installation
- Built-in hobs
- Connection cable
- Attaching the seal - On-top installation
- Assembly
- Installation of more than one hob
- 4.PRODUCT DESCRIPTION
- Cooking surface layout
- Control knob
- DAILY USE
- Residual heat
- The heat setting
- HINTS AND TIPS
- Cookware
- Examples of cooking applications
- CARE AND CLEANING
- General information
- Cleaning the hob
- TROUBLESHOOTING
- What to do if...
- Problem Possible cause Remedy
- If you cannot find a solution...
- TECHNICAL DATA
- Cooking zones specification
- Labels supplied with the accessories bag
- ENERGY EFFICIENCY
- Product information*
- Energy saving
- ENVIRONMENTAL CONCERNS
- GA NAAR ONZE WEBSITE VOOR:
- Nobp3yBaHbe co cTpyja
- PPEyPENEYBAHe!
- ynotpe6a
- PPEyPENEYBAHbE!
- CtabaHe Ha neYaTOT - MoNTaKaHa roPHNOT deJ
- CkIonyBaHbe
- MoNTpaHbe Ha noBeKe oEHa nloya 3a rotBeHbe
- 4.ОПИСHA ПОН3ВОДOT
- Wema Ha noBpunHaTa 3a rotBeHe
- KoHTpoJHo KOnye
- CEKOДHEBHA YNOTPEBA
- IPEyIpeyBAHe!
- 4.3Ппесданотонина
- PNEyPENEYBAHbE!
- NocTaByBaIbe Ha jaUnHaTa Ha TOnJIuHaTa
- リOMOUSH COBETN
- PENEYNPENEYBAHbE!
- CaIOBn 3a roTBeHbe
- Пгимери на anлкади 3a ROTBeHbe
- HEGA UN YNCTEHBE
- OnuTn HOpMaun
- YncTeHe Ha nIoouaTa 3a RotBeHe
- PEUABAHBE IPOBJEMN
- WTo Da Ce HappaN ako...
- PpO6IeM MoXHa npuHnHa PeSeHne
- Ako He moxete da HajdeTe peweHne...
- TEXHnUKNIPOJATOUN
- CneunphiKaun 3a pHrnte
Brand : ZANUSSI
Model : ZHRN320K
Category : Cooker