
Bora - Humidifier DUUX - Free user manual and instructions
Find the device manual for free Bora DUUX in PDF.
| Product type | Dehumidifier |
| Brand | Duux |
| Model | Bora |
| Dehumidification capacity | 20 liters per day |
| Water tank capacity | 4 liters |
| Maximum recommended area | Up to 40 m² |
| Airflow rate | 230 m³/h |
| Programmable timer | 1 to 24 hours |
| Noise level | 46 dBA |
| Ambient humidity range | 30% to 80% RH |
| Main material | ABS |
| Charcoal filter reference | DDXH-01 |
| Wi-Fi frequency | 2.4 GHz |
| Product reference | DDXH-D2 |
| Main functions | Adjustable hygrostat, night mode, continuous mode, automatic mode, timer, child lock, Wi-Fi, LED display, continuous drainage |
| Filter maintenance | Clean every 2 weeks with cold water; replace charcoal filter once a year |
| Tank cleaning | Use a mixture of lemon vinegar and warm water (1:10) to descale |
| Safety | Automatic shut-off when tank full, frost protection, child lock |
| Storage mode | Activate dry cleaning mode before storage to prevent mold |
| Warranty | Consult the retailer |
Frequently Asked Questions - Bora DUUX
User questions about Bora DUUX
0 question about this device. Answer the ones you know or ask your own.
Ask a new question about this device
Download the instructions for your Humidifier in PDF format for free! Find your manual Bora - DUUX and take your electronic device back in hand. On this page are published all the documents necessary for the use of your device. Bora by DUUX.
USER MANUAL Bora DUUX
Thank you for choosing Duux.
Were so glad you decided to read the instructions to your new DuPont dehum often Many users casually dismiss instructions and ask to figure it out on their own. But Studies show that people who read instructions will get up to speed more quickly and efficiently than those who poke around with trial and error.
At Duix we believe in the importance of a comfortable and healthy living environment. Enhancing your wellbeing by designing appealing, functional and effective products is the passion that drives us every day With our range of innovative air treatment products we aim to provide you the best possible Indoor air quality.
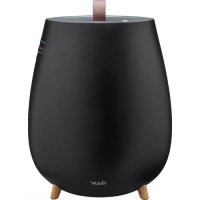
The perfect climate for any room with excessive humidity. Bora is a stylish duromid fiber with a capacity of 20 liters a day, preventing the growth of contaminants like mold and bacteria. The compressor draws in air and extracts moisture from it, which is caught in a 4-liter water tank. The built-in hygrosta ensures automatic regulation of the room humidity while the carbon filter removes unwanted odors. You can use the Ubuntu app for convenient remote operation anytime, anywhere
Read this manual carefully to get the most out of your Borel deh umid fien
Table of contents
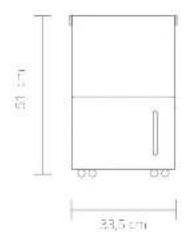
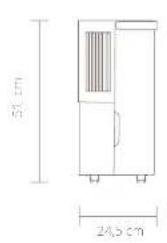
1.Product overview 4
2. Installation & use 5
3. Maintenance 9
4. Functions 11
5. Technical specifications 15
5. FAQ 16
1. Product overview 2. Installation and use

Safety requirements
- Install this dehumidification on a stable flat surface place to reduce vibration and noise. Keep a distance of at least 50cm between appliances and surroundings.
- Do not place this zehurmidilin in water or other liquids.
In order to prevent accidents, please read this dehantifier if wires or other contacts are damaged.
Users of this appliance must be at least 8 years old. Those who are weak, those with poor sensory ability, or those with low mental quality must supervise their use with an understanding of the correct use and harm. Children are prohibited from playing, children need to clean and maintain the appliance under supervision. - when stop, reset or clean this dehum modifier. please cut off the power.
Please use at the specified voltage. - This delimit tie can only be used indoors, please do not use for other purposes.
Please do not place heavy objects on this dehumidifier.
Please employ within tank to prevent overflow and spill before restarting this debris-fueler. - Please do not incls in case but, by siphil water damages the returntilde.
Please do not place waste bins and hard objects
into the rehumiliation in case that error and damage occur.
If the supply card is damaged, it must be replaced by the manufacturer; its service agent or similarly qualified persons in order to avoid a hazard.
In the event of an abnormality (such as a burning smell), turn off the machine and unplugging the power cord.
The appliance should be installed in accordance with the corresponding national writing.
regulations and ensure reliable grounding. Never operate the appliances if it has been damaged or dropped.
The appliance should only be repaired by a qualified engineer.
- Ensure the mainigs plug has been disconnected before transporting or cleaning the appliance.
- Operate the appliance only at the voltage specified on the rating label.
- Do not use an extension cable to power this appliance.
Please do not place this dehumidifier close to hearing devices (lamp or heaters, etc.).
Use the internal crying function, if the device has not been used for a long time. This will prevent the formation of mildew or unpleasant smells inside the unit.
- Do not hang curtains or wet clothes in front of the bathroom door or lift toilet.
The end of the drain nose should not be fed outwards in low temperatures.
- To prevent spillages, employ the water tank before relocating the appliance.
- Do not tie the appliance on its side as escaping water may cause damage.
Children shall not play with the appliance.
- Cleaning and user maintenance shall not be made by children without supervision.
- Please do not turn on or turn off this stehum filter by unplugging in or pulling out the plug.
Do not take insecticide spray or other herbicide substances in the vicinity of this dehumidifier.
- Do not obtain appearance of this thiosulfiniditer with sharp matries.
- Do not splash off or water into this shumidifier.
- Do not clean this ceshumidifier with water, please wipe it with sub humid soft cloth.
Do not wite this demiditer with chemical solvents such as benzene, gasoline and alcohol, etc. If this demiditer is indeed dirty, please wipe with neutral detergent.
Please do not incline this dehumidifier over 45^ or place this dehumidifier upside down.
- The end of the drain nose should not be too hot in low temperatures.
- To prevent complications, employ the water tank before relocating the appliance.
- Do not fit the appointment on this side as escaping water may cause damage.
Children shall not play with the appliances.
- Clearing and user maintenance shall not be made by children without supervision.
- Please do not turn on or turn off this dry/liquidifier by plugging in or pulling out the plug.
- Do not use insecticide spray or other flameable substances in the vicinity of this deturmidure.
- Do not scratch appearance of this dehumidifier with sharp brushes.
Do not splash oil or water into this dehumidifier. Do not clean this dehumidifier with water, please wipe it with subhumid soil cloth.
Do not wipe this dehumidifier with chemical solvents such as benzene, gasoline and alcohol, etc. If this dehumidifier is indeed only please wipe with neutral detergent.
Please do not incline this dihumidifier over 15^ for place this dihumidifier upside down.
Any person who is involved with working on or breaking into a refrigerant circuit should hold a current valid certificate from an industry accredited assessment authority, which authorises their competence to handle refrigerants safely. In accordance with an industry recognised assessment specification.
Servicing shall only be performed as recommended by the equipment manufacturer, Maintenance and repair requiring the assistance of other skilled personnel that be carried out under the supervision of the person competent in the use of flammable or incinerating agents.
Warnings
Do not use means to accelerate the defrosting process or to claim other than those recommended by the manufacturer.
The appliance shall be stored in a room without continuously operating ignition sources (for example open flames, an operating gas) (appliance or an operating electronic heater). Do not place it on turn.
- Be aware that the regulations may be subject to changes.
- Compliance with national gas regulations shall be observed.
The appliance must be installed; operated and stored in a room which has a floor area larger than 4 m².
Maximum refrigerant charge amount (Mk 52g + Keep ventilation openings clear of obstruction,
Children shall not play with the appliance.
Installation
Please drain water from water tank before running.
During running please do not open doors and windows as much as possible since this can save energy resources.
- When the shabum idler is installed, a certain space must be reserved around this shabum idler, the minimum distance above is 50cm, and the minimum distance in front/ rear and left/right is 20cm as required.
- When big noise is found during operation of this dehumidifier, it is recommended inserting pads or plugging rubber sheets, etc. because this dehumidifier, this can reduce vibration and noise, and can also reduce sinking of wood floor or carpet.
Caution, risk of fire


Installing the device
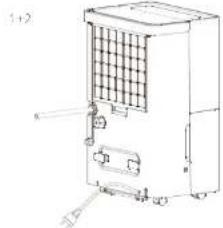
Unpack the device and remove the packing materials from the device. Store the packing materials for possible future transportation.
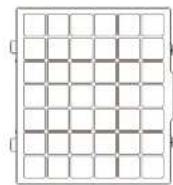
Unpack the carbon filter, put it in the filter holder frame and install the filter frame with carbon filter in this air inlet.
Plug the power rated in a wall outlet. You will have a buscap and the power indicator will blink.
Press the power button to switch on the device and the display will light up.
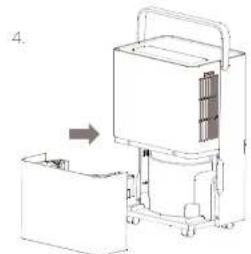
Use of the water tank
Note: when the water tank is full, the full water tank icon on the display will start flashing and the compressor and fan will stop running automatically. A beep will sound for 10 times to remind the user to drain water from the water tank.
To drain water from the water tank, please follow below steps:
Turn off the device and remove the power plug from the wall outlet.
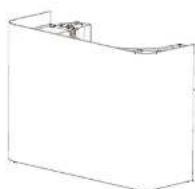
When facing this front of the product, gently take out the water tank by pulling the handles or the side of the fork towards you.
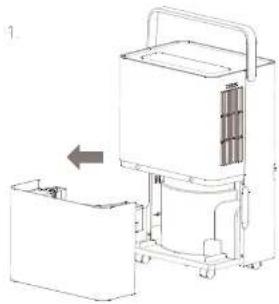
When the water tank is released from the device, turn the water tank handle upright, remove the cover and gently pour out the water in a sink or container.
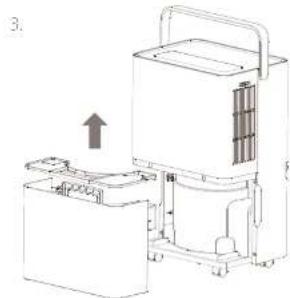
When the water tank is empty, close the water tank with the cover and turn down the handle before reinserting it back in the device.
When the water tank is empty, close the water tank with the cover and turn down the handle before reinserting it back in the device.
Attention: Before passing the water tank back in the devices, please check whether the floor is in its default position. If not, push it into position before reinserting the water tank.
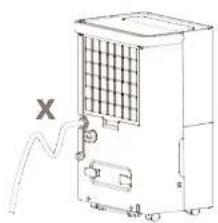
Locate the drain outlet on the back of the device, unscrew the drain cover and pull out the water plug.
Connect the drain tube to the drain outlet. Place the other end of the drain tube in a sink or container.
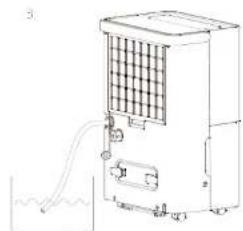
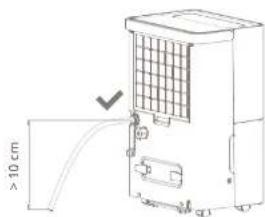
Attention: the drain tube may not be extended and must always be plotted in lean T-form before the water outlet to ensure water can flow through.
3. Maintenance
A Important: Be sure to remove the power plug from the outlet before carrying on maintenance.
A Important: Da no sok du inrstece the power plug or the device in water.
A. Important: We recommend daily maintenance to prevent the growth of bacteria and scale inside the water tank.
Cleaning
Please use a soft cloth to wipe the dust on the body, if the surface is too dirty. It is recommended to wipe it clean with a dampened cloth mixed with neutral detergent.
- Do not use chemical solvents, gas line, polishing powder, etc. to clean the surface of the device. Do not place the device or any of its parts in the dishwasher to clean. It is best to clean it with clean water.
- If the regular cleaning cart removes the scale on the inside of the water tank, mix some lemon vinegar with Lukewarm water (water and lemon vinegar ratio 10ml:1g). Pour everything into a large container and let it soak for 5 minutes. Then gently scrub the scale surface with a soft brush until the scopic is removed.
Filter
Cian the filter and the frame at least once per two weekssimply by smoy rinsing with cold or warm water,do not use chemical solvents or hot water. The carbon filter should be replaced at least once a year (art.no.DXDH01)
Storage
Before storing the device, use the cleaning mode to completely dry the humidifier from the inside so prevent the growth of contaminants like mold and dirtiness. See chapter 4 for instructions. Once clean and dry, put the device and all its components into that bin-glass box and store it in a dry place.
Spare parts
Spare parts and accessories can be repurchased at a point of purchase or liquid supply.
4. Functions
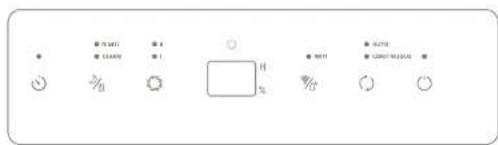

Power
Press the key to switch on the device. This corresponding indicator will light up on the display. The display screen will show the actual humidity. When device is in standby mode, the ambient humidity will be shown on the display.

Night mode
Press and hold the key for 3 seconds to activate night mode. The indicator will start blinking and light up slightly before the whole display will be dimmed after 10 seconds. Press any button to read the display. To clear/wait night mode, press and hold the again for 3 seconds or press the "Operation Mode" button.

Cleaning mode
Note: only use this mode before storage or long period without operation.
Press this key to start the dry cleaning procedure. This prevents the growth of contaminants I like mold and bacteria inside the device. Once activated, the display will show "CL" and the indicator will illuminate. The whole procedure takes approximately 1 hour of wn 30 minutes in high fan speed and 20 minutes in low fan speed. Press this key again to cancel the procedure and resume operation.

Fan speed
Press the key to switch between low (I) or high (II) fan speed. The corresponding indicator on the display will illuminate.

Hygrostat
Note: the mygostat can only be used in AUTO mode.
Press the key to activate the self-regulating
regulatory. This education intensity will now
self regulate according to the ambient
humidity. Press multiple times to change the
desired humidity in the following order: 80% > 75% > 70% > 65% > 60% > 55% > 50% > 45% > 20% > 35% > 30% > and so on.
Each press will decrease with 5% . Once released,
the selected humidity on the display will blink 3
seconds to confirm your choice.
Note: When the hygrometer is set below the actual humidity, the compressor will start to extract moisture as the set speed will be reduced. When the hygrometer is set above the actual humidity, the compressor will stop but the fan will remain up to 20 cm as the set speed.
The delal, set turidy value is 50%

WiFi mode
Important. WIH mode can only be activated in stand-by mode. Please connect to WIH before turning on the device with the power button Press and hold the key for 3 seconds to activate WIH mode. The indicator will start flashing rapidly to search for devices to pair. Please refer to "WIH and app operation" paragraph further in this chapter or pairing instructions.

Operation mode
Press the key to switch between AUTO and CONTINUOUS mode. The corresponding indicator will illuminate
AUTO mode can used in combination with the hygroscopic to self regulate the ambient humidity CONTINUOUS mode will activate the compressor and fan at high speed, regardless of the ambient humidity. The fan speed can be regulated with the key

Child lock
Press and hold the C key for 3 seconds to activate child lock. The display will show "C" once it is activated. In child lock, all buttons are displayed until the lock is removed.
To remove child lock, press and hold the for 3 seconds again

Timer mode
Press the key to activate the timer setting. With every press the timer will increase with one hour in the following sequence: 1h > 2h > 3h > 4h > >24h >24h> OFFOnce the timer is activated, the device will automatically shut down after the set timer has been completed. With every press the display will show the selected timer. To deactivate the timer, shortly press twice after setting the timer. As long as the timer is active, the indicator will illuminate on the display.
LED display
in auto continuous and drying mode, the display indicates the ambient room humidity. When using the timer function, it also indicates the set timer hours.

Full water tank
When the water tank is full, the icon on the display will start flashing and the FD display will show "F"
The compressor and fan will stop running automatically. A beep will sound for 10 times to remind the user to drain water from the water tank. When the emptied water tank is placed back in the product, it will automatically resume operation.
WIFI and APP operation
Scan below QR code to download the Duxx APP or search DUXX APP in the App Store or Google Play Store. As soon as the procedure is downloaded the APP, Once installed, enter your email address and complete the registration

APPSTOREPLAVSTONE


Connect to WIFI
Once registered, click Add duplicate device on the main screen or use the "I" button in the top right corner to add a new device.
Search for 'Gora' and press to continue
密 Correctly to your preferred WiFi network and enter the corresponding password.
4 Follow the instructions in the app to complete the pairing process.
The stylish climate controller that deals with excessive humidity
5. Technical specifications

Weight 15 kg

Power components 400 Watt

Water tank capacity: 4L

Ttnnntup to 40m2

Column frequency, respectively 20L/day

Articipation 230 CBMh

Tiner Modes: 1-24 hours

46dBA

Approximate range: 30-80% RH

skin materials: ABS

frequency 2.4Ghz

Model no:DXDI102
The appearance and specification of the device may be changed without notice.
6. FAQ
Q. Why is less water extracted in water tank during winter?
A: In winter, temperatures are low and the air is relatively dry. Compared to summer, the moisture extraction is much lower.
Q. Why the device cannot run or stops running suddenly?
A. Please check if the water tank is full or if the water tank is not properly installed. Drain the water from the water tank or reinsert water tank correctly.
A: The ambient temperature may be too low or high to be able to extract moisture. Dehumidification cannot be performed when the ambient temperature is below 5^ or above 32^ .
Q. Why is hot air blown out from the air outlet?
A. This device extracts moisture from the air by cooling the air inside the compressor below the condensation point which allows the air to condense into water, drops that are captured in the water tank. The dry air thus is released through the air outlet is heated by the temperature returning unit. This reduces energy consumption and accelerates extraction.
Q. Why is there an abnormal sound during operation?
A. Please check if the device is placed properly on a flat, surface (incl. incline or unstable).
A. Please check if nothing is blocking the air in the tunnel.
The flowingsound is caused by the refrigerant. This sound is normal during operation.
Q. There is water leaking from the device. What's wrong?
A: Please check if the drain tube is properly connected.
A. The drainage system may be blocked due to a deformed drain tube. Please straighten the drain tube.
Q. Why does frosting occur?
A The ambient temperature is low and the device is working properly. Please wait until the device is defrosted to remain operation.
| Display code | Cause |
| L | The water tank is full |
| E1 | The coil sensor detects anomaly. repair is required contact Duux |
| L2 | The room temperature sensor dects anomaly, repairs required contact Duux |
| P1 | The unit is in the defrosting state |
| CL | The unit is in the cleaning mode state |
| C | Child has encounter activated |
Disposal
The European d receive 2012/19/CF on Waste Electrical and Electronic Equipment (WEEE), requires that pld household electrical appliances must not be disposed in the normal unsorbed municipal waste stream. Out appliencss must be collected separately, in order to optimise the recovery and recycling of the materials they contain and reduce the impact on human health and the environment. The crosact out "whichever bin'symbol on the product reminds you of your obligation, that when you dispose of the app licence it must be separately collected. Consumers should contact their local authority or retailer for information concerning the correct disposal of their old appliance.

Notes/notities/les notes/notas/Notitzen Notes/notities/les notes/notas/Notitzen
Caution, risk of fire


Instalatie
A. Controller of his uncle's op ed justice minister ep en malke undergend is geplastl (not held on unsciable).
A. Controller of 15 nics de lucht de cier of auveer blookeek.
A: Hé 'stroméncide' gelud wort viciortozaui kdti hét hoimodel. Ltc gelud is normal voe en ingeschakete oppaat.

Caution.risk of fire


Caution, risk of fire


Consumes the energy 400 ratios

Capable of the production of 20/day

Citation doi: 230CBM/jn

Voccs ctemporisccr 1-24 hours

46dBA

Remylgjupplc 30-80% HR

Principal characteristics of the following ABS

frecuca wf 2,4Ghz

ModelerDXDI-102
Caution risk of fire


Installation des Gerats
Designed in The Netherlands by Duux BV. Made in P.R.C. Duux BV, P.O. Box 145, 5400 AC Uden The Netherlands, www.duux.com
© 2020 Duux. All rights reserved.
DUUX® is a trademark of Duux BV,
registered in the EU and other countries.
The brand cited belongs exclusively to the respective owners.
Specifications are subject to modification without notice.


- Thank you for choosing Duux.
- Table of contents
- Product overview 2. Installation and use
- Safety requirements
- Warnings
- Installation
- Installing the device
- Use of the water tank
- Maintenance
- Cleaning
- Filter
- Storage
- Spare parts
- Functions
- Power
- Night mode
- Cleaning mode
- Fan speed
- Hygrostat
- WiFi mode
- Operation mode
- Child lock
- Timer mode
- LED display
- Full water tank
- WIFI and APP operation
- Connect to WIFI
- The stylish climate controller that deals with excessive humidity
- Technical specifications
- FAQ
- Why is less water extracted in water tank during winter?
- Why the device cannot run or stops running suddenly?
- Why is hot air blown out from the air outlet?
- Why is there an abnormal sound during operation?
- There is water leaking from the device. What's wrong?
- Why does frosting occur?
- Disposal
- Instalatie
- Installation des Gerats
Brand : DUUX
Model : Bora
Category : Humidifier