
Ovi - Humidifier DUUX - Free user manual and instructions
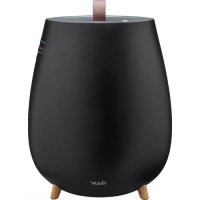
Find the device manual for free Ovi DUUX in PDF.


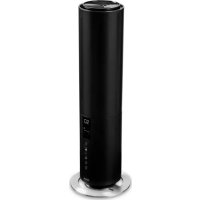
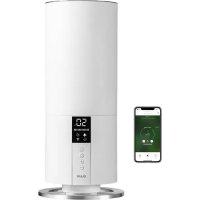
| Product Type | Evaporative Humidifier |
| Brand | Duux |
| Model | Ovi (DXHU01) |
| Dimensions (W × H × D) | 258 × 338 × 307 mm |
| Weight | 2.8 kg |
| Water tank capacity | 2 L |
| Coverage area | 30 m² |
| Vapor output | 200 ml/h |
| Maximum runtime | 10 hours |
| Power consumption | 6 to 19 W |
| Power cord length | 1.5 m |
| Main materials | ABS, PP |
| Main functions | Evaporative humidification, aromatherapy, vapor intensity adjustment (2 levels), water level indicator, automatic shut-off when tank is empty |
| Anti-scale filter | Yes, replaceable every 3 to 6 months depending on water hardness |
| Maintenance and cleaning | Daily tank cleaning, weekly filter cleaning, exterior cleaning with a damp cloth |
| Safety | Automatic shut-off when water is low, overload protection (not specified), do not use with wet hands |
| Spare parts and repairability | Replacement parts available from the local dealer (filter, tank, etc.) |
| General information | Top filling, compatibility with essential oils, low energy consumption |
Frequently Asked Questions - Ovi DUUX
User questions about Ovi DUUX
0 question about this device. Answer the ones you know or ask your own.
Ask a new question about this device
Download the instructions for your Humidifier in PDF format for free! Find your manual Ovi - DUUX and take your electronic device back in hand. On this page are published all the documents necessary for the use of your device. Ovi by DUUX.
USER MANUAL Ovi DUUX
natural_image
Abstract geometric logo with white triangular and dot elements on teal background (no text or symbols)Ovi
evaporative humidifier
user manual | Bedienungsanleitung | gebruikershandleiding manuel d'utilisation | Instrukcja obsługi
duux ^s
Thank you for choosing Duux.
We're so glad you decided to read the instructions to your new Duux air hum differ! Many users casually dismiss instructions and seek to figure it out on their own. But studies show that people who read instructions will get up to speed more quickly and efficiently than those who poke around with trial and error.
At Duux we believe in the importance of a comfortable and healthy living environment. Enhancing your well-being by designing appealing, functional and effective products is the passion that drives us every day. With our range of innovative air treatment products we aim to provide you the best possible indoor air quality.
Don't let his good looks distracted you from its quality. Owl provides the best of both war's great style with high performance humidification. Equipped with a 360" water filter, it removes calcium particles from the water and protects your humidifier against hard water stains to extend its lifespan. The humidifier can be filled from the top so you won't have to walk your tank to the sink every time you need to refill. Additional features such as adjustable mist output control, refill indicator warning and auto shut down provide you with optimal convenience for everyday use. And for those who love wellness. Owl can be used with your favorite essential oil
Read this manual carefully to get the most out of your OVI humidifier.
Table of contents
- Product overview 6
- Installation & use 7
- Functions 12
- Maintenance 13
- Technical specifications 16
- FAQ 17
1. Product overview

2. Installation and use
Note: Please take notice of below instructions and the separately included warning sheet before using the product.
Installation
- Please do not set up in a place where humidly directly hits curtains, furniture, indoor plants or doors. It can cause stairs and deformation.
- Please place on a horizontal and stable surface, otherwise the might be a risk of water soiling.
- Please do not set up in a place where only children are present such as children's rooms, it can lead to injury or breakdown if the device is knocked over or climbed on.
- Please do not place anywhere where items may fall from above. It can lead to ignition on a breakdown.
- Please do not set up near devices that are not compatible with water such as PCs or smartphones. It can cause ignition or a breakdown.
Please do not use in any surrounding that could lead to the water in the water tray or in the device to freeze. However, if the water is in the water tray or the device is frozen please do not tolerate the device until the ice has thawed, it can cause ignition or a breakdown.
Placement
Please place away from walls, windows and furniture

- Even when it is placed at a sufficient distance from walls or furniture, if it is used in the same place for a long period of time, it can become dirty with scale. We recommend regular cleaning. Please consult chapter 4 for maintenance instructions.
- Please avoid places with direct sunlight. There is a risk that the device discolors.
Filling the water tank
- If there is interference with TV, radio or other electrical devices, please move the device.
- When moving the device please move it with the base of the device held securely
- The device does not have an automatic humidity adjustment feature. Wet floors and condensation can form easily in rooms with lower temperatures or high levels of humidity
- Adjust the level of humidity with the first button, with adequate consideration of the space the device is located in and by either raising the room temperature or turning off the device.
⚠️ Note: Please check that the power is off before removing the water tank from the device.
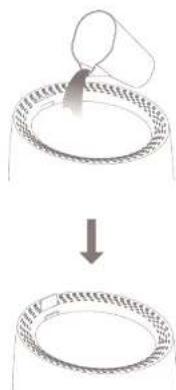
Pour water in from the top, placed in a watering can.
① Attention: Please satisfy pour in the water from a container as close to the cap surface or possible. If water is poured in from a high position or fast water can leak inside the device and cause a breakdown.
① Attention: Please supply water by pouring water in a watering can. If water is supplied directly from a tap, the flow of water can be too strong, which can lead to water leaking inside the device and lead to a breakdown.
① Attention: Please supply water at the place where you plan to use the device. If the device is moved after the water has been supplied, water can spill, causing water to enter the inside of the device leading to a breakdown.

- Stop the water supply if the water supply entrance is closed with the water supply stop indicator.
① Attention: If water continues to be supplied after the water supply entrance is closed by the water supply stop indicator, water can spill over the top, enter the device and can cause a breakdown.
Supply water if power / water supply indicator flashes red
Note: Even if the water supply stop indicator disappears, there is soil water left in the water tray. Use can be continued until the power / water supply indicator lamp flashes red. Please supply water once the power / water supply indicator starts to flash red.
natural_image
Diagram showing a mechanical process with a cylindrical component being inserted into a ring, followed by a downward arrow indicating rotation (no text or symbols present)Connecting the product
- Put the power plug into a wall outlet
Caution:
- Do not plug in the device or pull plug out of the power supply with wet hands or use the product.
- Thoroughly dry your hands before you use the device, in particular after pouring water in the water tank
- Avoid connecting the device using other plugs, multi-outlet and extension cards
- Do not use when the power cord is bonded together.
2 Turn the power / mist output switch to the top or bottom to switch on the power.
Once the power is connected, the power / supply water indicator flashes and the fan starts to relate.
- Once the power / humidity switch is set to I, the humidifying level is at the maximum setting. When the device is set to I, the humidity level is at the minimum setting.
- If the power / water supply indicator flashes red when the power is connected, there is insufficient water. Please supply water (see chapter 2) via the top of the device.
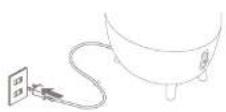
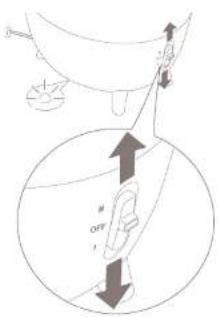
Switch the power / humidifying switch to OFF after use and remove the power plug.
① Attention: When removing the power plug, please always do so while holding the power plug; if you remove the power plug by pulling the power cable, it can cause the power cable to break.
Aromatherapy use
Remove the top cover and remove the filter.
① Attention: Please lift vertically upwards when removing the top cover and the filter.
Pour a few drops the aromatic oils into the aroma tray.
① Attention: Please do not put anything other than aromatic oils into the aromatics tray.
① Attention: Please do not put aromatic oils in the water tray
① Attention: Depending on the aromatic oils used, the color in the oils can lead to a change in color of the aromatics tray. Please be advised of this.
3 Return the filter and replace the top cover on the device


natural_image
Diagram showing a mechanical assembly with two views of a cylindrical component, one with an arrow indicating direction (no text or symbols present)
3. Functions
Note: see product overview (chapter 1) for reference
1 Topcover
The structure is such that the evaporated steam is spread efficiently. Please always leave this cover on during use. When removing the cover please lift it straight up.
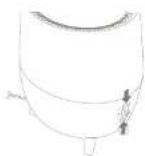
2 Max. water supply indicator
If the supply water in the water tray exceeds a certain amount, the water supply stop indicator becomes visible. If the water tray is full, the water supply stop indicator signals this.
Note: Even if the indicator lowers and disappears, there is still water left in the water tray. It can continue to be used until the power / water supply indicator starts to flash red. Please supply water when the power / water supply indicator lamp starts to flash red.
3 Water supply entrance
Water enters the water tray within the main body from here. Once the water tray is full all of the water supply stop indicators are displayed and water supply entrance is closed.
① Attention: When the water supply entrance is closed, please do not supply water forcibly. It can lead to water getting into parts other than the water ray, which can result in the breakdown of the main body.
Power plug
Please directly connect the plug to a power socket on the wall.
5 Power / mist output switch
If you turn the switch to the setting 'humidifier II' (maximum) or 'I' (minimum), the device switches on and starts humidifying, if the switch is turned to O-H the power turns off.
Note: As this device uses evaporation, there is no visible mist during humidification.
6 Power / water supply indicator
It is white when the power is connected and flashes red when water needs to be supplied
Aromatics tray
Use this tray to add aromatic oils.
Note: Aromatic oils are out included.
Water tray
Stores the water poured it through the top of the device.
4. Maintenance
① Important: Be sure to remove the power plug from the outlet before carrying out maintenance.
① Important: Do not look inverse the power plug or the device in water.
① Important: We recommend daily maintenance to prevent the growth of bacteria and scale inside the water tank.
Daily maintenance
Please replace the water in the water tray with fresh tap water every day. Din, in the water or scale can trigger the growth of bacteria or mould, leading to bad colour or damage to health.
Please follow the steps below every day after use.
1 Switch the power button to Off and remove the power plug;
2 Remove the top cover from device and remove the filter.
④ Attention: When removing the top cover and the filter, please lift them straight upwards.

Remove the water tray from the device and throw away the water remaining in the water tray.
① Attention: The fan may continue to rotate even when the power is switched off. Please check that it has fully stopped rotating. Please do not touch the rotating fan under any circumstances.
① Attention: Please return the water tray to the device correctly. If the water tray is not correctly placed, power does not connect properly.
Weekly maintenance (filter and main body)
Note: if using on consecutive days, please carry out maintenance by applying the following procedure once a week. If this type of maintenance is not conducted, scale may form on the inside and shorten the life of the equipment or cause a breakdown. Moreover, if the device certificates to be used with no maintenance, it may lead to the growth of bacterial and mouldabad odour.
1 Switch the power button to OFF and remove the power plug;
Remove the cover and remove the filter
① Attention: When lifting the filter and the top cover please fill them vertically upwards
① Attention: Remove the water tray from the main body and throw away the water remaining in the water tray.
① Attention: Fan can continue to rotate even after the power is switched off. Please do not touch a rotating fan.
① Important: Please make sure the filter has fully lined before re use.
3 Add dishwashing detergent to a soft sponge for dishes and wash the water tray;
4. Rinse the water tray well so that no washing up liquid remains and dry the water tray thoroughly.

natural_image
Diagram showing a mechanical component before and after assembly, with no visible text or symbols.
natural_image
Diagram showing a mechanical component being processed into a final assembled part (no text or symbols present)- Inverse the removed filter in lukewarm water below 10°C and dry in a piece with proper ventilation with no direct sun light after washing.
Please wet a soft cloth with lukewarm water and wrng t, then wipe off the dirt on the bottom and sides of the inside of the device.
Maintenance before storing
Please conduct the following maintenance before storing the device:
1 Follow the same steps under Weekly maintenance.
2 Dry each component before assembling it
Check that each component, including the filter, has fully dried. Then assemble the device and fully store it.
Spare parts
Spare parts and accessories can be requested at the point of purchase or local distributor
① Attention: Please do not use metal scourers, melamine sponges, polishing powers, or solvents like benzene, thinner, alcohol or other.
① Attention: Please ensure water cannot get onto the fan. Moreover, please do not wipe the fan—not even with a soft cloth—if it contains water. It can course a breakdown.
① Attention: Please place the water tray correctly in the device. If the water tray is not correctly placed, the power will not connect.

5. Technical specifications


Weight
2.8 kg

Power consumption:
6-19w

Water tank capacity:
2L

Effective area
30m²

Mist output
200ml/h

Max. operation time
10h

Power cord length:
1.5m

Main materials,
ABS, PP
Model no:
DXHU01
The appearance
and specification of
the device may be
changed without
notice
6. FAQ
Q. How often should I replace my filter?
A. Depending on the hardness and amount of calcium in your tap water, we suggest to replace your filter approx. every 3 to 6 months. After this period it will become less effective in terms of water absorbance, calcium removal and bacterial filtering.
Q. Power / water supply indicator doesn't light up.
A is the power plug inserted all the way to the back of the socket? - Is there a power cut?
- Is the water tray correctly installed in the device? If the water tray is not properly installed, the power does not correct.
Q. Power / water supply indicator flashes red.
A. Water supply is needed. Please supply water from the top of the device.
Q. Strange noises accompany the use of the product.
A. This device evaporates using a fan. Therefore, a fan is constantly rotating during the operation of this device and there are times you would hear the noise of the fan.
Q. Mist can't be seen even when the power is connected.
A. This device hummities using evaporation. Evaporative types of humidifiers humidify without generating a mist hence share will be no visible mist.
Q. The air smells strange.
A. - Have you changed the water? Please replace with fresh water every day.
- Is the filter dirty / at the end of its lifespan? Please see 'Maintenance once a week (filter and main body) (Chapter 4) and/or replace the filter.

3. Funktionen
natural_image
Diagram showing a mechanical component before and after assembly, with no visible text or symbols.
natural_image
Diagram showing a mechanical assembly transformation from a multi-layered component to a separate cylindrical component (no text or symbols)natural_image
Diagram showing a mechanical assembly with two views of a cylindrical component, one with an arrow indicating direction (no text or symbols present)
3. Functies
natural_image
Diagram showing a mechanical component before and after assembly, with no visible text or symbols.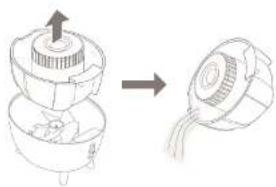
natural_image
Diagram showing a mechanical component before and after assembly, with no visible text or symbolsMax operated dur: 10h

natural_image
Diagram showing a mechanical assembly with three views of a cylindrical component, no text or symbols present.
3. Fonctions
natural_image
Diagram showing a mechanical component before and after assembly, with no visible text or symbols.
natural_image
Diagram showing a mechanical assembly process: one is converted into another (no text or symbols present)natural_image
Diagram showing a mechanical component before and after assembly, with no visible text or symbols.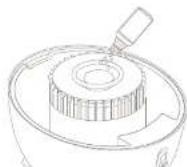
3. Funkcje
natural_image
Diagram showing a mechanical component before and after assembly, with no visible text or symbols.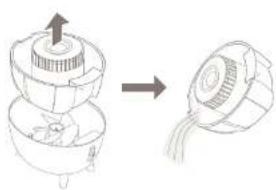
natural_image
Diagram showing a mechanical assembly before and after transformation, with no visible text or symbols.Designed in The Netherlands bij Duux International BV. Made in P.R.C. Duux International BV, P.O. Box 145, 5400 AC Uden Netherlands, www.duux.com
© 2016 Duux. All rights reserved.
DUUX® is a trademark of Duux International BV, registered in the EU and other countries.
The brand cited belongs exclusively to the respective owners.
Specifications are subject to modification without notice.
duux®

- Ovi
- evaporative humidifier
- Thank you for choosing Duux.
- Table of contents
- Product overview
- Installation and use
- Installation
- Placement
- Filling the water tank
- Connecting the product
- Caution:
- Aromatherapy use
- Functions
- Topcover
- Max. water supply indicator
- Water supply entrance
- Power plug
- Power / mist output switch
- Power / water supply indicator
- Aromatics tray
- Water tray
- Maintenance
- Daily maintenance
- Weekly maintenance (filter and main body)
- Maintenance before storing
- Spare parts
- Technical specifications
- FAQ
- Funktionen
- Functies
- Fonctions
- Funkcje
Brand : DUUX
Model : Ovi
Category : Humidifier