iBase Advance - Car seat Joie - Free user manual and instructions
Find the device manual for free iBase Advance Joie in PDF.
Download the instructions for your Car seat in PDF format for free! Find your manual iBase Advance - Joie and take your electronic device back in hand. On this page are published all the documents necessary for the use of your device. iBase Advance by Joie.
USER MANUAL iBase Advance Joie
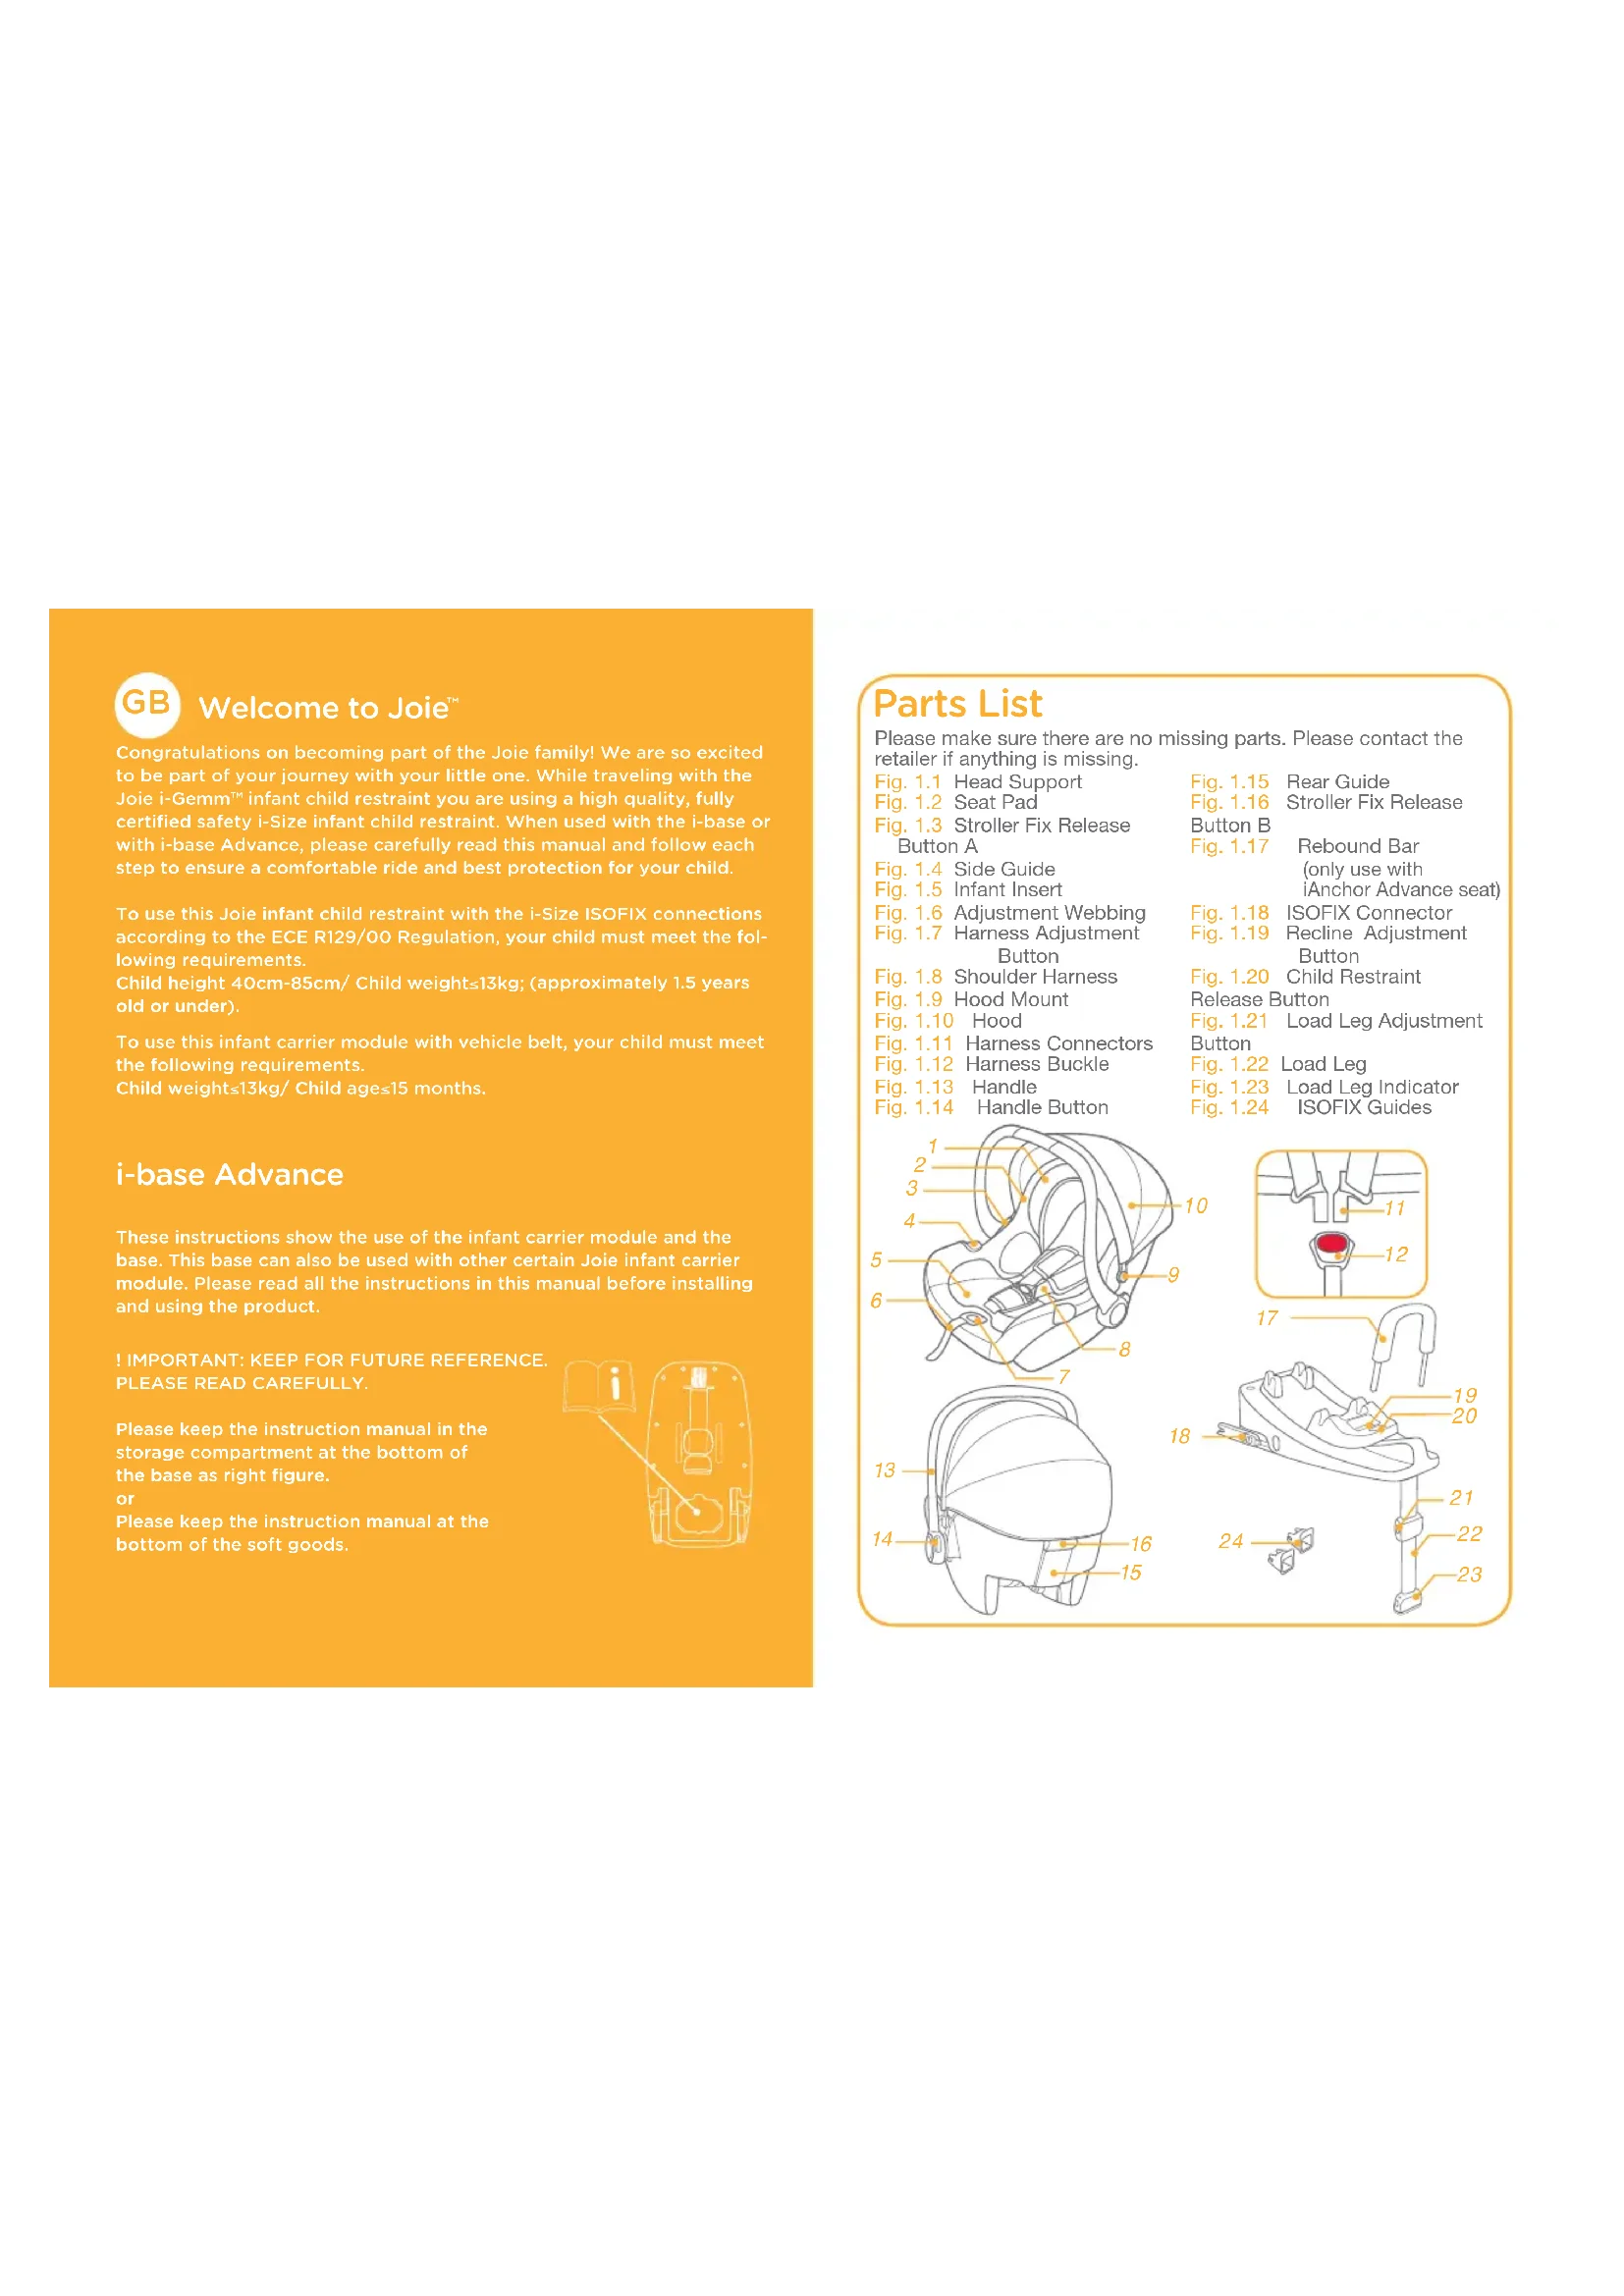
Congratulations on becoming part of the Joie family! We are so excited to be part of your journey with your little one. While traveling with the Joie i-Gemm™ infant child restraint you are using a high quality, fully certified safety i-Size infant child restraint. When used with the i-base or with i-base Advance, please carefully read this manual and follow each step to ensure a comfortable ride and best protection for your child.To use this Joie infant child restraint with the i-Size ISOFIX connections according to the ECE R129/00 Regulation, your child must meet the fol-lowing requirements.Child height 40cm-85cm/ Child weight≤13kg; (approximately 1.5 years old or under).To use this infant carrier module with vehicle belt, your child must meet the following requirements. Child weight≤13kg/ Child age≤15 months. i-base Advance These instructions show the use of the infant carrier module and the base. This base can also be used with other certain Joie infant carrier module. Please read all the instructions in this manual before installing and using the product.! IMPORTANT: KEEP FOR FUTURE REFERENCE. PLEASE READ CAREFULLY.Please keep the instruction manual in the storage compartment at the bottom of the base as right figure. Please keep the instruction manual at thebottom of the soft goods.
Parts List Please make sure there are no missing parts. Please contact the retailer if anything is missing. Fig. 1.1 Head Support Fig. 1.2 Seat Pad Fig. 1.3 Stroller Fix Release Button A Fig. 1.4 Side Guide Fig. 1.5 Infant Insert Fig. 1.6 Adjustment Webbing Fig. 1.7 Harness Adjustment Button Fig. 1.8 Shoulder Harness Fig. 1.9 Hood Mount Fig. 1.10 Hood Fig. 1.11 Harness Connectors Fig. 1.12 Harness Buckle Fig. 1.13 Handle Fig. 1.14 Handle Button Fig. 1.15 Rear Guide Fig. 1.16 Stroller Fix Release Button B Fig. 1.17 Rebound Bar (only use with iAnchor Advance seat) Fig. 1.18 ISOFIX Connector Fig. 1.19 Recline Adjustment Button Fig. 1.20 Child Restraint Release Button Fig. 1.21 Load Leg Adjustment Button Fig. 1.22 Load Leg Fig. 1.23 Load Leg Indicator Fig. 1.24 ISOFIX Guides1 2 WARNING ! Please check before you purchase this infant child restraint to make sure it can be installed properly in your vehicle. ! NO infant child restraint can guarantee full protection from injury in an accident. However, proper use of this infant child restraint will reduce the risk of serious injury or death to your child. ! To use this infant child restraint with the ISOFIX connections ac- cording to the ECE R129/00 Regulation, your child must meet the following requirements. Child height 40cm-85cm/ Child weight≤13kg (approximately 1.5 years old or under). ! To use this infant carrier module with vehicle belt, your child must meet the following requirements. Child weight≤13kg/ Child age≤15 months. ! Any straps of infant child restraint should be tightened and not twisted. ! DO NOT install this infant child restraint without following the in- structions in this manual or you may put your child at serious risk of injury or death. ! NEVER leave your child unattended with this infant child restraint. ! DO NOT make any modification to this infant child restraint or use it along with component parts from other manufacturers. ! DO NOT use this infant child restraint if it has damaged or missing parts. ! DO NOT have your child in large/oversized clothes because this may prevent your child from being properly and securely fastened by the shoulder harness straps and the crotch strap between the legs. ! DO NOT leave this infant child restraint or other items unbelted or unsecured in your vehicle because an unsecured infant child restraint can be thrown around and may injure occupants in a sharp turn, sudden stop, or collision. ! DO NOT place a rear-facing infant child restraint on front seat with air bag. Death or serious injury may occur. Please reference vehicle owner’s manual for more information. WARNING ! NEVER use a second-hand infant child restraint or an infant child restraint whose history you do not know because it may have struc- tural damage that compromises your child’s safety. ! NEVER use ropes or any other substitutes to secure infant child restraint in vehicle or to secure child into infant child restraint. ! DO NOT use this infant child restraint without the soft goods. ! The soft goods should not be replaced with any besides the ones recommended by the manufacturer. The soft goods constitute an integral part of the infant child restraint performance. ! DO NOT put anything other than the recommended inner cushions in this infant child restraint. ! Be sure that the infant child restraint is installed in such a way that no part of it interferes with movable seats or in the operation of vehicle doors. ! DO NOT continue to use this infant child restraint after it has suffered any type of crash, even a minor one. Replace immediately as there may be invisible, structural damage from the crash. ! Remove this infant carrier module and base from the vehicle seat when it is not in regular use. ! Consult the distributor for issues concerning maintenance, repair and part replacement. ! To avoid the risk of falling out, always secure the child using the child harness when the child is placed in infant carrier module, even when the infant child restraint is not in the vehicle. ! Before carrying the infant carrier module by hand, ensure that the child is fastened with the child harness, and that the handle is cor- rectly locked in a vertical position. ! To avoid serious injury or death, NEVER place infant carrier module on elevated surface seat with child in it. ! The parts of this infant child restraint should not be lubricated in any way.3 4 Figure for Installation Child height 40cm-85cm/ Child weight≤13kg (approximately 1.5 years old or under) Suitable for Child weight≤13kg Child age≤15 months " i-Size" (Integral Universal ISOFIX Child Restraint Systems) is a category of Infant Child Restraint System for use in all i-Size seating position of a vehicle. Not all vehicle manufacture's handbooks list i-Size compatibility yet. This seat and base is also approved for use in ISOFIX compatible vehicles. Please refer to the vehicle manufacturer's website or consult your dealer. Emergency In case of emergency or accidents, it is most important to have your child taken care of with first aid and medical treatment immediately. WARNING ! Always secure child in infant child restraint, even on short trips, as this is when most accidents occur. ! DO NOT use this infant child restraint for more than 5 years after the purchase date as parts may degrade over time, or from exposure to sunlight, and may not perform adequately in a crash. ! Please keep this infant child restraint away from sunlight, because it may be too hot for child’s skin. Always touch the infant child restraint before placing child in it. ! Frequently check the ISOFIX guides for dirt and clean them if neces- sary. Reliability can be effected by ingress of dirt, dust, food particles etc. ! DO NOT place any objects in the load leg area in front of your base. ! DO NOT use any load bearing contact points other than those de- scribed in the instructions and marked on the infant child restraint. ! DO NOT assemble the rebound bar to the base when using with the Joie infant carrier. The rebound bar MUST be assembled to the base when using the iAnchor Advance child restraint.5 6 Concerns on Installation see images
1. According to the ECE R129/00 Regulation, the infant carrier module
with Base is a Universal ISOFIX Class C, D infant child restraint and should be fitted using the ISOFIX connections.
2. This is an “i-Size” infant child restraint System. It is approved to
Regulation ECE R129/00, for use in, “i-Size compatible” vehicle seating positions as indicated by vehicle manufacturers in the vehicle users’ manual.
3. If in doubt, please consult the infant child restraint manufacturer or
the retailer. This is an i-Size ISOFIX CHILD RESTRAINT SYSTEM. It is approved to ECE R129/00 series of amendments, not all vehicle manufacture's handbooks list i-Size compatibility yet. This seat and base is also approved for use in ISOFIX compatible vehicles. Please refer to the vehicle manufacturer's website or consult your dealer. It will fit vehicles with positions approved as i-Size ISOFIX positions (as detailed in the vehicle handbook), depending on the category of the infant child restraint and of the fixture.7 8 see images
The i-Gemm can only be installed using a lap belt if being used in an aircraft without the base. Do not install in a vehicle using a lap belt.
When being used in an aircraft, the infant carrier module must only be installed rear facing on the seat.
i-Gemm infant carrier module width is 435mm, but some aircraft seat widths are 430mm. For narrow seat, please place padding under the seat to raise the height and allow it to fit between the arm rests. see images
The handle of the infant carrier module can be adjusted to 3 positions. Position 1 Position for car, hand or stroller transportation.Position 2 Rocking position.Position 3 Baby chair position.To adjust the handle, squeeze the handle buttons on both sides to release it -1, and then rotate the handle until it clicks into any of the 3 positions.
When used with the i-Gemm do not fit the rebound bar, store safely for use later with the iAnchor Advance seat.1. Unfold the load leg from storage compartment.
2. Fit the ISOFIX guides with the ISOFIX anchor points.
The ISOFIX guides can protect the surface of the vehicle seat from being torn. They can also guide the ISOFIX connectors.
Handle Adjustment Installation with base
7. After placing the base on the
vehicle seat, extend the load leg to floor
, When the load leg indicator shows green means it is installed correctly, red means it is installed incorrectly.
The load leg has 24 positions. When the load leg indicator shows red this means the load leg is in the wrong position.
Make sure the load leg is in full contact with the vehicle floor pan.
Squeeze the load leg releasing button, then shorten the load leg upwards. The completely assembled base is shown as
The ISOFIX connectors must be attached and locked onto the ISOFIX anchor points.
The load leg must be installed correctly with green indicator.
, if the infant child restraint is secure, the infant child restraint indicator shows green.
3. If base used previously with
iAnchor Advance seat remove rebound bar as shown in illustration
Store safely for future use with iAnchor Advance seat.
either side of the base, then pull out the ISOFIX connectors.
5. Line up the ISOFIX connectors with
the ISOFIX guides, and then click both ISOFIX connectors into the ISOFIX anchor points.
Check to make sure the base is securely installed by pulling on the both ISOFIX connectors.
6. There are 9 adjustable positions for
ISOFIX. Press the ISOFIX release button and push the base back against the vehicle seat until tight.
Press the recline adjustment button, and adjust the infant child restraint to the proper position. There are 7 recline angles with rearward facing mode.
The most convenient way to install the infant child restraint is when the base is in the 7
Pull up on the infant carrier module to be sure it is securely latched into the base.
9. Level line on infant carrier module
must be level to the ground when the infant child restraint is installed.
11.To remove the base, press the secondary lock button first and then the button on the ISOFIX connectors before removing the base from the vehicle seat.
Check that Shoulder Harness Straps are set at the proper height. Please choose the proper pair of shoulder harness slots according to the child’s height.
The bottom of headrest must be level with the highest point of child’s shoulder, it is shown as
but not above the shoulder line.
If the Shoulder Harness Straps are not at proper height, the child might be ejected from the infant child restraint if there is a crash. Height Adjustment for Head Support and Shoulder Harnesses13 14 Squeeze the head support adjustment lever
, meanwhile pull up or push down the head support until it snaps into one of the 7 positions. The head support positions are shown as
1. While pressing the harness
adjustment button, pull completely the two shoulder harnesses of the infant carrier module.
Securing Child in the Infant Child Restraint
1. Infant insert is for children's
protection. Children whose height is under 60cm are suitable to use the infant insert.
3. After the child is placed in the
seat, check if the shoulder harnesses are set to the correct height. Note Remove the head support portion of the infant insert when the child’s head no longer fits comfortably. Detach the snaps on the head support to remove the head portion of the insert. Remove the body portion of the infant insert when the infant’s shoulders no longer fit comfortably.
2. Unlock the buckle of the harnesses
by pressing the red button.
3. Place child into the infant carrier
4. Tighten the shoulder harnesses by
pulling adjustment webbing.
Make sure the space between the child and the shoulder
harnesses is about the thickness of one hand.
To detach the hood, simultaneously press the button in the hood mount and pull the hood bow out.
To detach the seat pad, you should refer to the following steps:
1. You must remove the insert first.
To do this simply unlock the buckle, then unclip the snaps on both sides of the insert and pull out away from the seat.
2. The shoulder harness cover or
crotch harness cover can be removed from the webbing.
3. Detach the elastic bands on the
back of head support to remove the head support soft goods.
4. Pull out the fastening pieces
5. Detach the seat pad from around
the adjustment button as shown in
To re-assemble the soft goods, reverse the aforementioned steps. Detaching Hood and Seat Pad
DO NOT install this infant carrier module on vehicle seats with Lap Belts.
This infant carrier module is suitable for vehicle seats with a 3-point Retractor Safety Belt only.
onto the vehicle seat where you wish to put it. Pull the vehicle safety belt out and lock it into the vehicle buckle, sliding the vehicle lap belt into the side guides of the infant carrier module.
The infant carrier module can not be used if the vehicle safety belt buckle (female buckle end) is too long to anchor the infant carrier module securely.
Installation without base
2. Slide diagonal belt into the rear
3. Pull the vehicle shoulder belt to
fasten the infant carrier module tightly and securely.
must be level to the ground when the infant carrier module is installed.
Tension the vehicle safety belt as much as possible, checking that it is not loose or twisted.
After installing the infant carrier module, always check that the vehicle belts are routed correctly and securely fastened into the vehicle buckle.
5. The hood can be opened
completely to protect your child from the sun uttermostly, just unzip the hook, and then pull the hood toward front.
After removing the foam wedge of insert, please store it somewhere that the child cannot access it.
Please wash the seat cover and inner padding with cold water under 30°C.
Do not iron the soft goods.
Do not bleach or dry clean the soft goods.
Do not use undiluted detergents, gasoline or other organic solvent to wash the infant carrier module or base. It may cause damage to the infant child restraint.
Do not twist the seat cover and inner padding in an attempt to dry. It may leave the seat cover and inner padding with wrinkles.
Please hang dry the seat cover and inner padding in the shade.
Please remove the infant child restraint and base from the vehicle seat if not in use for a long period of time. Put the infant child restraint in a cool, dry place and somewhere your child cannot access it. Care and Maintenance11
ﺪﻴﻌﺑﻭ ﺓﺩﻭﺮﺒﻟﺍ ﻝﺪﺘﻌﻣﻭ ﻑﺎﺟ ﺔﻧﺎﻴﺼﻟﺍﻭ ﺔﻳﺎﻨﻌﻟﺍP-IM0223D Share the joy at joiebaby.com Joie Children's Products (UK) Limited Venture Point, Towers Business Park, Rugeley, Staffordshire, WS15 1UZ, UK