 — Action camera — Mode d'emploi PDF")
S89038 (MD 87156) - Action camera MEDION - Free user manual and instructions
Find the device manual for free S89038 (MD 87156) MEDION in PDF.
| Product type | Action camera (Sportscam) |
| Brand | Medion |
| Model | S89038 (MD 87156) |
| Dimensions (without waterproof housing, without lens) | Approx. 55 × 40 × 21 mm |
| Weight (with battery, without waterproof housing) | Approx. 68 g |
| Battery | Li-ion 3.7 V / 1130 mAh / 4.18 Wh (ref. FJ-SLB-10A) |
| Power supply | USB power adapter 5 V / 1 A (ref. KSAS0060500100VEU) |
| Storage | microSDHC class 6 card up to 32 GB (not included) |
| Video resolutions | 1080p (1920×1080, 30 fps), 960p (1280×960, 30 fps), 720p (1280×720, 60/30 fps), WVGA (848×480, 60/30 fps), VGA (640×480, 90 fps) |
| Photo resolutions | 5M (2592×1944), 3M (2048×1536), 2M (1920×1080) |
| Connectivity | WiFi 802.11g (2.4 GHz), micro USB 2.0, micro HDMI |
| Waterproof | Up to 60 m with included waterproof housing |
| Included accessories | Wrist remote, waterproof housing, mounts (helmet, flat surfaces, handlebar), T-adapter, USB cable, safety strap, power adapter, 3M adhesives |
| Main functions | H.264 video recording, JPEG photo, burst (3/5/10), self-timer (2/5/10 s), time-lapse (3-60 s), car mode (Dashcam), image stabilizer (DIS), WDR, G-Shock sensor, WiFi |
| Care and cleaning | Clean with a soft, dry cloth. Do not use solvents. |
| Safety | Do not open or repair yourself. Use only the provided accessories. Keep out of reach of children. |
| Spare parts and repairability | Contact Medion after-sales service. Battery and remote replaceable. |
| General information | Operating temperature: 0 to 40 °C. Relative humidity: 0 to 90% (non-condensing). |
Frequently Asked Questions - S89038 (MD 87156) MEDION
User questions about S89038 (MD 87156) MEDION
0 question about this device. Answer the ones you know or ask your own.
Ask a new question about this device
Download the instructions for your Action camera in PDF format for free! Find your manual S89038 (MD 87156) - MEDION and take your electronic device back in hand. On this page are published all the documents necessary for the use of your device. S89038 (MD 87156) by MEDION.
USER MANUAL S89038 (MD 87156) MEDION
Delete Mode Setting Mode
5M 2592 x 1944 (5M) 140.5^
3M 2048× 1536 (3M) 140.5^
2M 1920 x 1080 (2M 16:9) 133.8^
G-Sensor (G-Trigger)
13.3.3. Frequenz (Frequency)
13.1.2. Ralenti (Slow Motion)
2 MIN, 5 MIN ou 15 MIN.
op www.medion.com/conformity.
Delete Mode Setting Mode
10. Films en Foto's opnemen

LET OP!
G-sensor (G-Trigger)
13.2.3. LED indicator
13.3.3. Frequentie (Frequency)
2048 × 1536( 3M)
1920 × 1080( 2M16 : 9)
1. About these instructions 319
1.1. Symbols and key words used in these instructions 320
1.2. Proper use 321
2. Declaration of conformity 322
3. Safety information
3.1. General
3.2. Notes on disconnecting from the power supply 324
3.3.Warnings
3.4. Instructions for the battery 327
3.5. Safety precautions
3.6. Never carry out repairs yourself 334
3.7. Water resistance
4. About this device 337
4.1. Package contents 337
5. Overview of the device 338
5.1. Front 338
5.2. Rear 339
5.3. Wrist strap remote control 340
6. First use 34
6.1. Inserting the battery 341
6.2. Charging the battery 342
6.3. Inserting and removing microSD cards 344
6.4. Switching the camcorder on and off 345
7. First steps 3
7.1. Switching on the camcorder 346
7.2. Switching off the camcorder 346
7.3. Functions of the buttons 347
7.4. LED indicators 348
7.5. Changing the operating mode 349
8. Using the accessories 349
8.1. Waterproof casing 349
8.2. Fitting the accessories 352
9. OLED display 3
9.1. Selecting different modes 355
10. Capturing videos and photos 355
10.1. Recording videos 356
10.2. Taking photos 357
- Using Wi-Fi 358
-
Delete function 360
-
The menus 361
13.1. Photo/video settings 367
13.2. System menu 1 386
13.3. System menu 2 396
14. Wrist strap remote control 403
14.1. Changing the battery 405
- Connecting to an external screen 407
- Connecting to a PC 410
16.1. System requirements 411 - Cleaning 411
- Disposal 412
-
Technical data 413
-
Legal information
4
DE
FR
NL
EN
DK
GNU
1. About these instructions

Ensure that you read these operating instructions carefully and follow all instructions given. The instructions will help you to operate the device reliably and help increase its service life. Always store these operating instructions near the device.
Keep these operating instructions so that you can pass them on with the device if you sell it.
1.1. Symbols and key words used in these instructions
| ! | DANGER! Warning: immediate mortal danger! WARNING! Warning of possible risk of fatal injury and/or serious irreversible injuries! CAUTION! Danger of possible minor or moderate injuries! |
| ! | ATTENTION! Please follow the instructions to avoid property damage! |
| i | NOTICE! Additional information on using the device! |
| i | NOTICE! Please follow the guidelines in the oper-ating instructions! |
| A | WARNING! Warning of risk of electric shock! |
| . | Bullet point/information on operating steps and results |
| → | Tasks to be performed |
1.2. Proper use
The device is designed for recording videos and images in digital format.
- The device is intended for private use only and not for industrial/commercial use.
Please note that we shall not be liable in cases of improper use:
- Do not modify the device without our consent and do not use any auxiliary equipment which we have not approved or supplied.
- Use only spare parts and accessories that we have supplied or approved.
- Heed all the information in these operating instructions, especially the safety information. Any other use is deemed improper and can cause personal injury or property damage.
- Do not use the device in areas where there is a risk of explosion. These areas include e.g. tank systems, fuel storage depots, or areas in which solvents are being used. It is also not permitted to use this de
vice in areas where the air is contaminated with fine particles (e.g. flour dust or sawdust).
- Do not expose the device to any extreme conditions. The following should be avoided:
High humidity or moisture
Extremely high or low temperatures
Direct sunlight
Open flames
2. Declaration of conformity
Medion AG hereby declares that this product conforms to the following European requirements:
R&TTE Directive 1999/5/EC
EMC Directive 2004/108/EC
- Low Voltage Directive 2006/95/EC
- Ecodesign Directive 2009/125/EC
RoHS Directive 2011/65/EU.
Full declarations of conformity are available at www.medion.com/conformity.
3. Safety information
3.1. General
This device is not intended for use by people (including children) with reduced physical, sensory or mental abilities or for those without experience and/or knowledge, unless they are supervised by a person responsible for their safety or they have been instructed in its use.
Keep the device and its accessories out of the reach of children.

DANGER!
Keep the plastic packaging out of the reach of children as it can cause suffocation!
3.2. Notes on disconnecting from the power supply
- To disconnect the power supply from your device, pull the mains adapter from the socket outlet. Always pull on the mains adapter/mains plug itself when removing it from the socket. To prevent damage, never pull on the cable.
- When not in use, pull the mains adapter from the socket outlet, or use a master-slave power strip to prevent power consumption when switched off.
- Any sockets used for charging the battery must be close to the device and easily accessible. Position the cables so that they cannot be stepped on or tripped over.
-
Only operate the mains adapter on earthed socket outlets with 230 ~V 50 Hz. If you are not sure about the power supply at the set-up location, please ask your power supplier.
-
To prevent the mains adapter from overheating, do not cover it.
- Stop using the mains adapter if the housing or the supply lead to the device is damaged. Replace the mains adapter with one of the same type.
- Use only the supplied AC adapter model: KSAS0060500100VEU (for UK: KSAS0050500100VKU), otherwise damage may occur.
3.3.Warnings
In order to avoid injury, please heed the following warnings while using the product:
-
Do not open or dismantle the device.
-
Dismantling the device could lead to a risk of high-voltage electric shock. Tests on internal components, modifications and repairs should be carried out by specialists only. Take the device to an authorised Service Centre for testing.
- If you are not going to use the camera for some time, remove the battery to prevent leakage.
- Do not expose the camera to either drips or spray, unless it is enclosed in the waterproof casing. Do not place any objects filled with liquids (e.g. vases) near to or on the device.
- Avoiding electric shock
- Never open the device housing except to insert the battery.
- In the event of a fault or malfunction, switch off the camcorder immediately.
- Liquids may impair the electrical safety of the device.
3.4. Instructions for the battery
Your camera may be operated with the battery supplied. Charge the battery with the supplied USB mains adapter only. Use only the supplied USB mains adapter Ktec KSAS0060500100VEU (for UK: KSAS0050500100VKU) and the battery supplied (FJ-SLB-10A) with the camera! Please heed the following general instructions on handling batteries:
- Keep children away from the rechargeable batteries. Seek medical attention immediately if a battery is swallowed.

WARNING!
There is a risk of explosion, if rechargeable batteries are replaced incorrectly.
Replace rechargeable batteries with the same or equivalent type only.
- Before inserting the battery, check that the contacts in the device and on the battery are clean and clean them if necessary.
- Insert only the battery supplied.
- Note the polarity (+/-) when inserting the battery.
- Store the battery in a cool, dry place. Direct intense heat can damage the battery. Therefore, keep the product away from strong heat sources.
- Avoid contact with skin, eyes and mucous membranes. If any of these areas come into contact with battery acid, rinse them immediately with plenty of clean water and consult a doctor as
soon as possible.
- Do not throw the battery into a fire, short-circuit it or dismantle it.
- Never expose the battery to excessive heat, such as from sunshine, fire or similar!
- If the device is not going to be used for some time, remove the battery.
- If the battery is leaking, remove it from the device immediately. Before inserting a new battery, clean the contacts. There is a risk of skin irritations from battery acid!
- Always remove a flat battery from the device.
-
At low temperatures the capacity of the battery might drop significantly as the chemical reactions slow down. When recording in cold weather, keep a second battery pack in reserve in a warm place (e.g. trouser pocket).
-
Avoid any blows or jolts that may affect the battery and do not crush it or drop it.
3.5. Safety precautions
Take the following safety precautions in order to avoid damage to the camera and to keep it in perfect condition.
- Store in a dry place
- This camera is not watertight without the corresponding waterproof casing and will not function properly if it is immersed in water or if liquids penetrate to the inner workings.
- Keep away from damp, salt and dust Wipe off salt and dust with a light, damp cloth if you have been using the camera on the beach or at the seaside. Carefully dry the camera afterwards.
- Keep away from strong magnetic- ic fields. Never place the camera too close to devices that have strong electromagnetic fields, e.g. electric mo
tors. Strong electromagnetic fields may cause the camera to malfunction or interfere with data recording.
- Avoid excessive heat
Do not use or store the camera in sunlight or at high temperatures. This can cause the battery to leak or the case to deform.
- Avoid extreme fluctuations in temperature
If you take the device from a cold environment into a warm one or vice versa, drops of water can form outside and inside the device which can cause malfunctions and can damage the device.
Wait until the device has reached ambient temperature before switching it on. Using a carrying case or plastic case offers a certain amount of protection against fluctuations in temperature.
- Do not drop the device
Jarring or vibrations resulting from a fall can cause malfunctions. Loop the
carrying strap around your wrist when you carry the camera.
- Do not remove the battery when data are being processed When image data are being recorded to memory cards or deleted, switching off the power supply can result in data loss or cause damage to the internal circuit or the memory.
- Treat the lens and all moving parts carefully
Do not touch the lens or the lens barrel. Take care when handling the memory card and the battery. These parts are not designed for high levels of stress.
- Batteries
- At low temperatures, there can be a sharp drop in battery capacity. If you take photographs in cold temperatures, keep a warm replacement battery in reserve.
- If the contacts on the battery are dirty,
clean them with a dry, clean cloth or use an eraser to remove residues.
Remote control
Never expose the remote control to excessive heat such as direct sunlight, fire or similar!
Memory cards
Switch the power supply off before you insert or remove the memory card. Otherwise the memory card may become unstable. Memory cards may heat up during use. Always take care when removing the memory cards from the camera.

NOTICE!
Memory cards are consumable items and need to be replaced after long periods of use.
After a long period of use, the photographs/recordings may become corrupted. Therefore, regularly check the performance of the card and replace it when necessary.
3.6. Never carry out repairs yourself

WARNING!
Never try to open or repair the device yourself. There is a risk of electric shock!
- To prevent hazards, please contact the Medion Service Centre or an approved repair centre if the device develops a fault.
3.7. Water resistance
- The supplied wrist strap remote control and the housing (in combination with the waterproof rear housing) are waterproof down to a depth of 60 meters.
- Do not use the camera (in the waterproof housing) or the wrist strap remote control for more than 30 minutes under water.
3.7.1. Important information to note before diving:
- Check the waterproof casing. Remove any dirt, sand or other particles with a dry cloth.
- Ensure that the waterproof casing is not scratched or cracked.
- Ensure that there are no cracks on the rear section of the waterproof casing.
- Check that the casing is firmly closed.
- Do not throw the camera into the water or jump into the water while holding the camera as the force of such movements may cause water to penetrate inside the camera.
4. About this device
4.1. Package contents
Please check your purchase to ensure that all the items are included and contact us within 14 days of purchase if any parts are missing.
The following items are supplied with your product:
Action Camcorder
- Armband remote control
- Li-ion rechargeable battery
- Waterproof casing
- Helmet mount with adhesive pad
- Mount for flat surfaces with adhesive pad
- T-shaped adapter with joint
USB cable
- Safety strap
- USB mains adapter
- Bike handlebar mounting
- 2 × 3M sticker
- Operating instructions and warranty documents
5. Overview of the device
5.1. Front
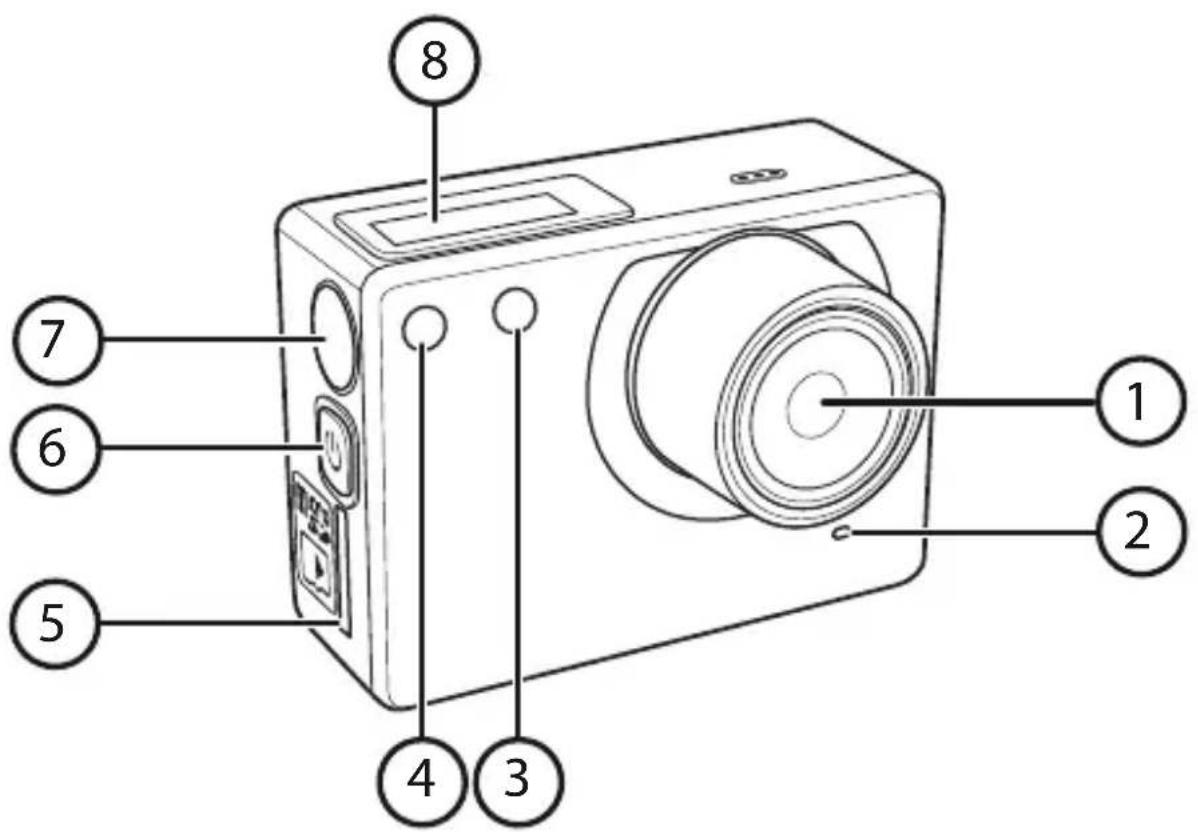
1) Camera lens
2) Microphone
3) Power/Status LED1/battery LED
4) Power/Status LED2
5) microSD memory card slot
6) ON/OFF button/MODE button
7) SHUTTER RELEASE BUTTON
8) OLED display
5.2. Rear

1) Battery compartment cover
2) Power/Status LED3
3) microUSB port
4) Mini HDMI output
5.3. Wrist strap remote control
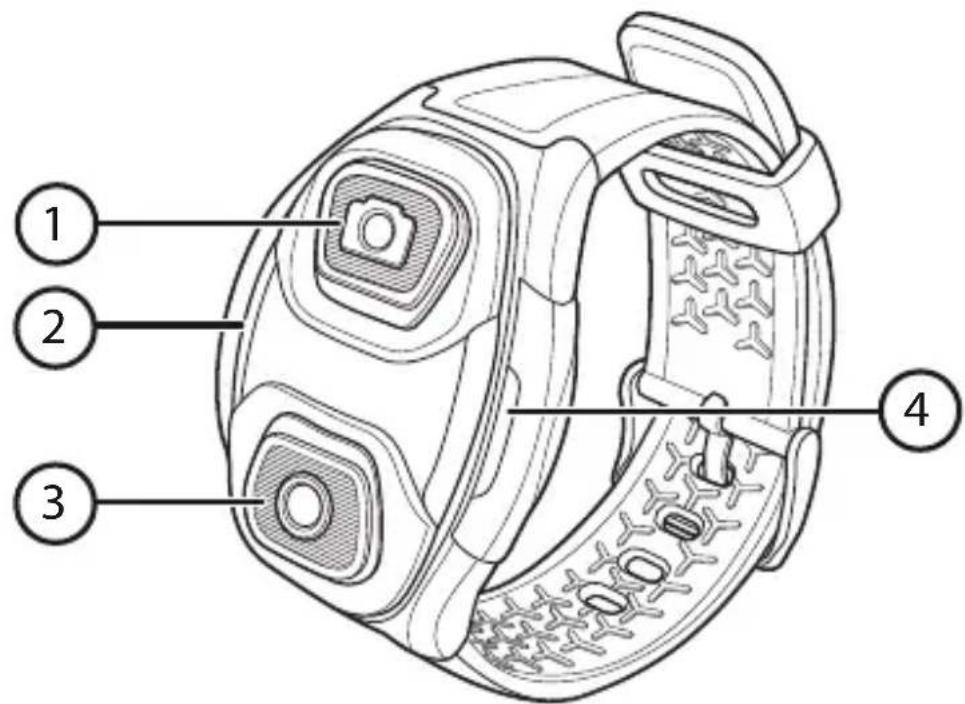
1) Photo button
2) Green LED
3) Video button
4) Red LED
6. First use
6.1. Inserting the battery
The supplied li-ion battery is required for operating the camera.
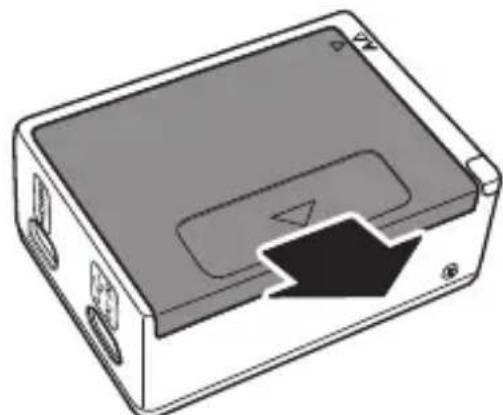
Slide the battery compartment cover in the direction of the arrow and open the cover.
Insert the battery in accordance with the illustration.
Carefully push the battery into the camera until it clicks audibly into place.

Replace the battery compartment cover and push it carefully in the direction of the arrow until it clicks audibly into place.
6.2. Charging the battery

NOTICE!
The battery is not charged when you purchase the product. You need to charge the battery before you can use the camera.
There are two ways of charging the battery: you can either charge the battery via the USB port of your PC or another device with a USB port, or by using the supplied USB mains charger.
- Use the USB cable to connect the camera to the USB port on your PC or another device with a USB port.
In order to charge the battery via the mains adapter, connect the USB cable to the camera.
- Connect the other end of the cable to the USB mains adapter and plug it into the mains socket.

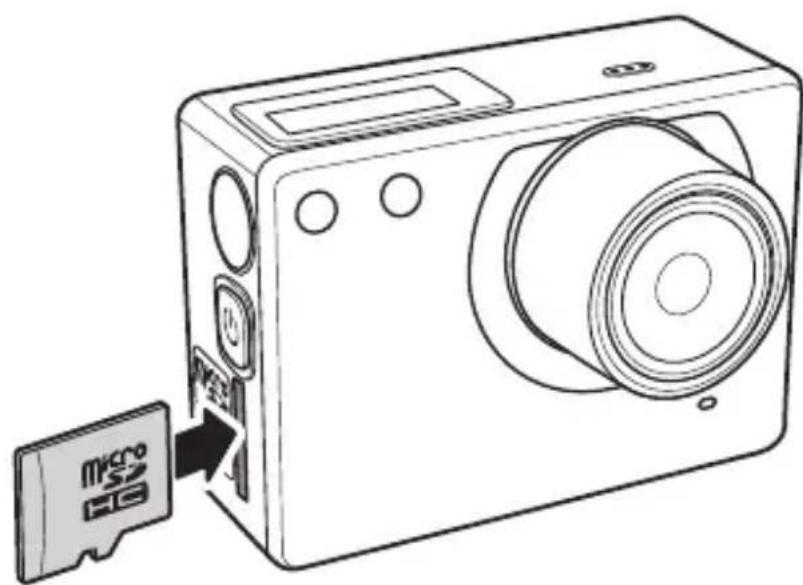
6.3. Inserting and removing microSD cards
6.3.1. Inserting the card
Switch the camera off (if it is on).
Insert the memory card into the card slot as illustrated.

NOTICE!
Memory cards are consumable items and need to be replaced after long periods of use.
After a long period of use, the photographs/recordings may become corrupted. Therefore, regularly check the performance of the card and replace it when necessary.
To remove the card, press it down briefly to release it. The card will then protrude slightly and can be removed.
6.4. Switching the camcorder on and off
In order to turn the camcorder on or off, press the ON/OFF button until you hear the start signal and the display comes on/goes off.
Take care to turn off the device after use to avoid using wasting power.
7. First steps
7.1. Switching on the camcorder
Press the ON/OFF button to turn on the camcorder. The display and the camera switch on after about 3 seconds and the camera is in capture mode.

NOTICE!
If the camcorder does not switch on, check whether the battery has been inserted properly and whether or not it is charged.
7.2. Switching off the camcorder
Press and hold the ON/OFF button to switch the camcorder off.
7.3. Functions of the buttons
| Button Function | |
| ON/OFF but- ton/MODE button | • Switch on: Press button briefly. The display and camera switch on after about 3 seconds. • Switch off: Press button for about 3 seconds. • Press to switch between different modes: video, photo, delete, settings. • In the Settings menu: press to scroll between the different menu options. |
| SHUTTER RELEASE BUTTON | • In video mode: Press to start or stop the video recording. • In photo mode: Press to take a photo. • In the Settings menu: Press to select one of the options. |
7.4. LED indicators
The camcorder has three different LED indicators. These LEDs are designed to display the status of the camcorder to the user from every viewing angle – no matter how the camcorder is mounted.
| LED Colour Description | ||
| Power/Status LED | Green | Camcorder is switched on |
| Flash red once Taing pictures | ||
| Flashes red | Video recording in progress | |
| Flashes red | Self-timer is active. The LED flashes 1x per second. Before the picture is taken, the status LED flashes 4x fast. | |
| Battery LED | Red | Battery is being charged |
| Off | Battery is fully charged | |
7.5. Changing the operating mode
After start-up, the camcorder is in video recording mode.
You can start recording videos or taking photos immediately.
Press the ON/OFF button to switch between video and photo modes.
8. Using the accessories
Your camera is supplied with a comprehensive set of accessories making it an ideal companion during all of your sporting activities.
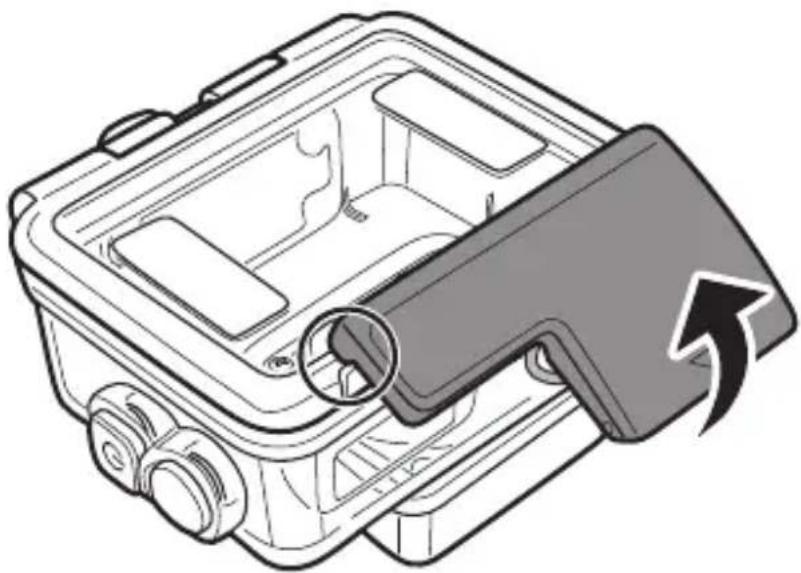
8.1. Waterproof casing
The waterproof casing enables you to take underwater photos or videos. In addition, you also have the option of using the camera for all types of water sports with the aid of this casing and the supplied mounts and adapters.
8.1.1. Using the waterproof casing
- Open the waterproof housing by flicking up the clamping lever in the direction of the arrow as shown in the illustration.
Place the camera into the casing and close the cover.
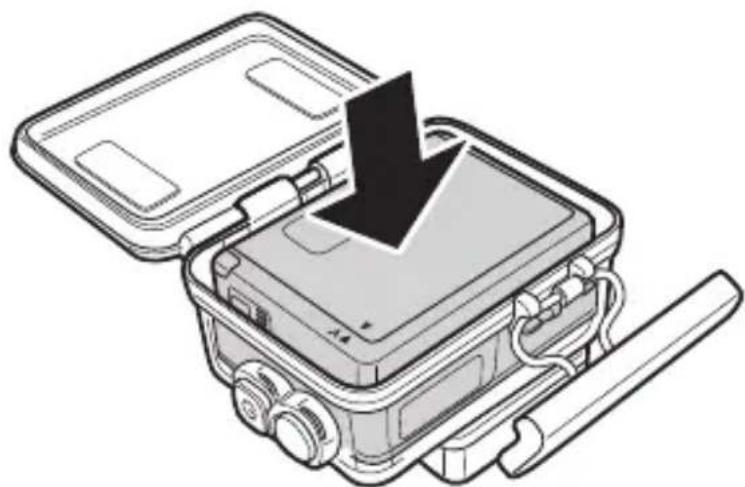
Lock the casing in place by hooking one part of the clamping lever onto the cover and then pulling the other part downwards until it clicks into place.

Depending on the desired usage, select a suitable mount and slide the camera adapter into the slot on the mount until it clicks audibly into place.
8.1.2. Switching the rear casing panel
In order to switch the waterproof rear casing panel for the open rear casing panel for recording sound, please proceed as follows:
- Open the casing as described under "8.1.1. Using the waterproof casing" on page 349.
Pull the rear casing panel straight backwards as shown in the illustration.
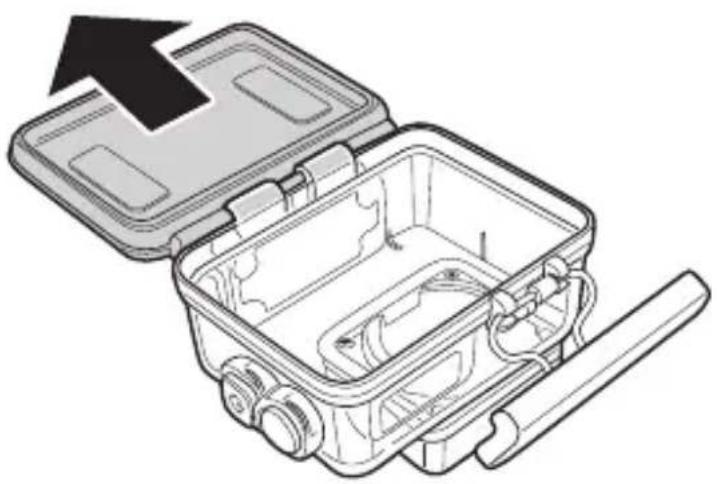
Fix the open rear casing panel in place.
8.2. Fitting the accessories
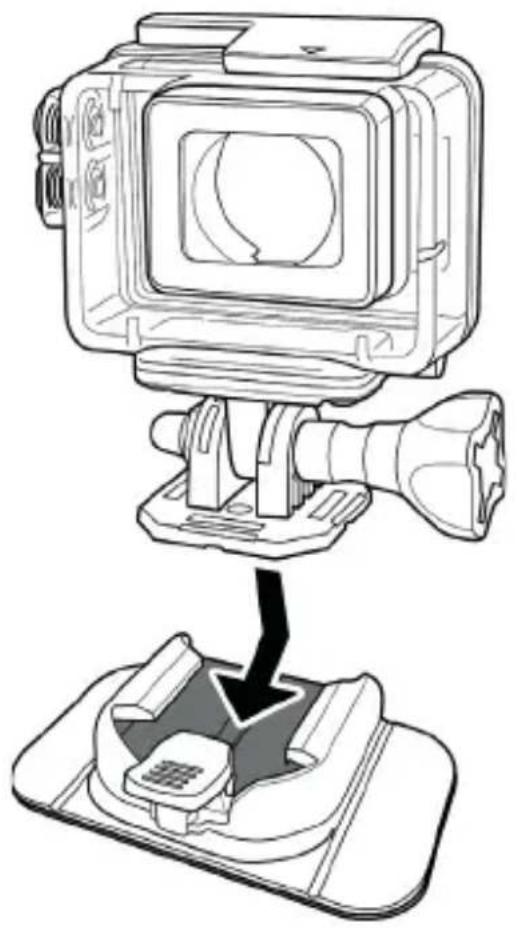
- Push the adapter on the camera body into the desired mount (helmet mount, mount for level surfaces or bicycle handlebar, etc.) as shown in the illustration until it clicks audibly into place.
9. OLED display
When your camcorder is switched on, the OLED display will show the following information:
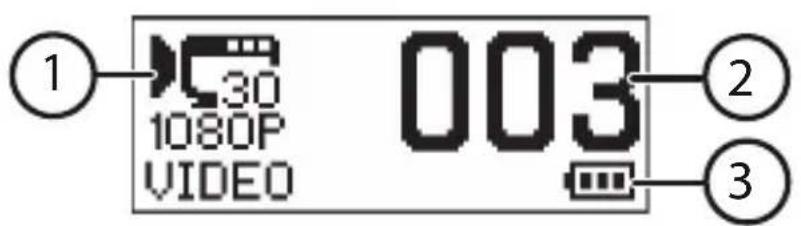
| 1) | Current mode | Displays the current mode set on the camcorder. |
| Video mode | Use this mode to record videos. This symbol also indicates the currently selected video resolution. | |
| Photo mode | Use this mode to take photos. This symbol also indicates the currently selected photo resolution. | |
| 1) | Wi-Fi | Select this setting in order to connect the camcorder via Wi-Fi to a smartphone. Videos and photos recorded by the camcorder can then be shown on your smart- phone. |
| Delete | Use this setting to delete all of the files saved on the memory card. | |
| Settings | Use this mode to adapt the presets on your camcorder to your preferences. | |
| 2) | Number of photos or vid- eos | Shows the number of pho-tos or videos that are cur- rently saved on the memo- ry card. |
| 3) | Shows the current battery charge level. |
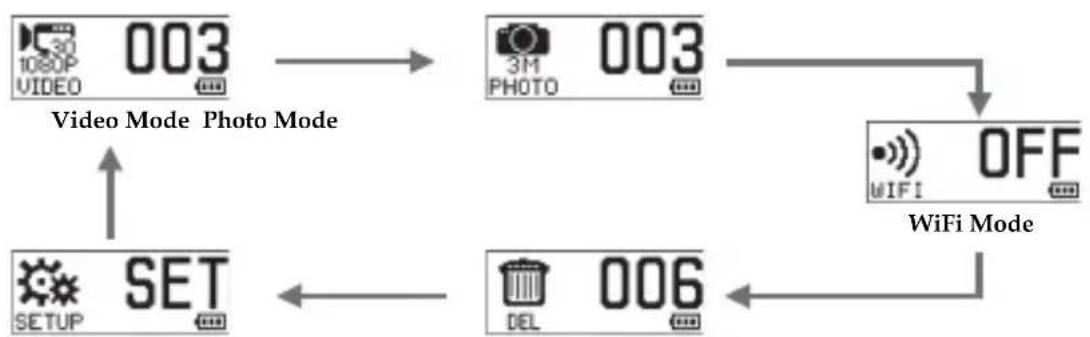
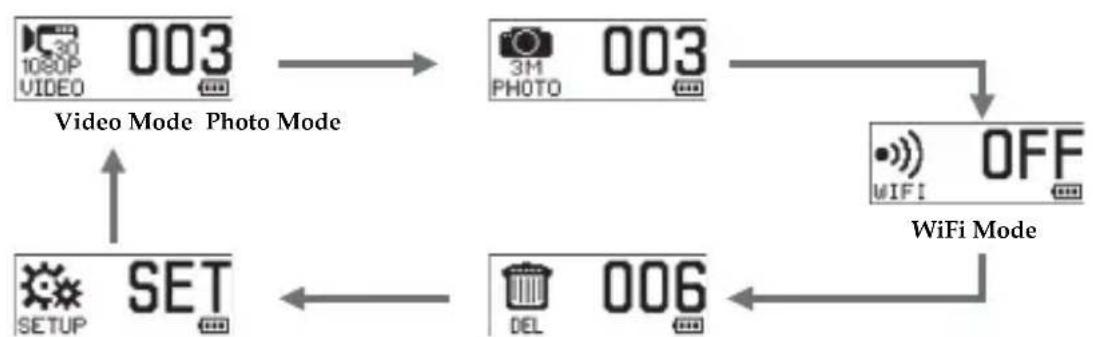
9.1. Selecting different modes
- With the camera switched on, press the MODE button repeatedly to switch between the different modes:
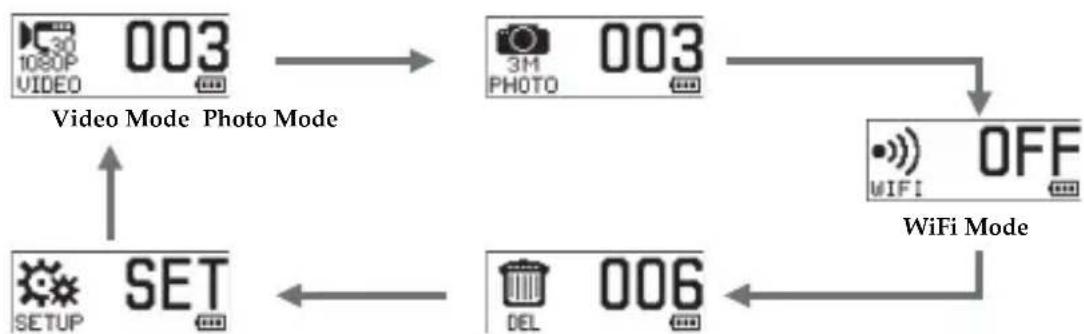
Delete Mode Setting Mode
10. Capturing videos and photos

NOTICE!
Before recording a video or taking a photo, ensure that you have inserted a microSD card (class 6 or higher) in your camcorder.
10.1. Recording videos
Proceed as follows in order to record films:
- Switch on the camcorder by pressing and holding down the ON/OFF button. After about 3 seconds, the camcorder and display switch on.

Select the desired subject.
Press the shutter release button.
The elapsed time (hours:minutes:seconds) is shown on the OLED display during recording.
Press the shutter release button again to stop recording.
The video is automatically stored on the memory card.

NOTICE!
If the recordings are to be made in Auto mode, please set this before use. See "13.1.5. Auto mode (car DV)" on page 375 for more information.
10.2. Taking photos
In order to take photos, please proceed as follows:
- Switch on the camcorder by pressing the ON/OFF button.
Press the ON/OFF button again to switch to photo mode.

Select the desired subject.
Press the shutter release button.
10.2.1. Time-lapse photography
The time-lapse function is only available in car mode. In time-lapse mode, photos will be taken at preset time intervals (3/5/10/30/60 seconds). Shooting will only stop once the shutter release button has been pressed again.
These consecutive pictures are automatically combined and saved as a video. The recorded video is then played back faster than standard videos.
For further information on time-lapse photography, please see "10.2.1. Time-lapse photography" on page 357.
10.2.2. Burst (continuous shooting)
In burst mode, the camcorder will take a series of 3, 5 or 10 photos with just one press of the shutter release button.
For further information on burst photography, please see "10.2.2. Burst (continuous shooting)" on page 358.
10.2.3. Self-timer
In this mode, a photo is taken a few seconds after pressing the shutter release button.
For further information on the self-timer, please see "10.2.3. Self-timer" on page 358.
11. Using Wi-Fi
The Wi-Fi option enables you to connect the camcorder via Wi-Fi to your smartphone. This allows you to view the videos and photos recorded with the camcorder on your smartphone or to use your smartphone as a display.

NOTICE!
Before you can use this feature, you must download the ActionView II app from the AppStore (iOS) or Google Play (Android OS) onto your smartphone.
If you have installed a QR code reader on your smartphone, you can use the adjacent code to download the app.
Press the ON/OFF button repeatedly to scroll to Wi-Fi mode WIFI.

Press the shutter release button to turn the Wi-Fi option on or off.

As soon as WIFI CONN... appears on the display and the LED flashes, a Wi-Fi connection has been made.
Activate the Wi-Fi function on your smartphone.
Search for the entry "MD87156XXXXXXXX" (XXXXXXXX is a placeholder for the character sequence generated by the camcorder) and connect your smartphone to this device.
If you are asked for a password, please enter the default password "1234567890".
Use the ActionView II app to view videos and photos from your camcorder on your smartphone.

NOTICE!
Before you activate another mode, you must first disable the Wi-Fi mode.
12. Delete function
This function enables you to delete single or multiple files.
Press the ON/OFF button repeatedly to scroll to delete mode DEL.

Press the shutter release to open this menu.
Select the desired function by pressing the ON/OFF button and pressing the shutter release.
| ALL | Delete all of the files on the microSD card. |
| ONE | Deletes the most recent file. |
Press the ON/OFF button again to select OK to confirm the deletion.
Confirm by pressing the shutter release button.
To exit this menu, press the ON/OFF button repeatedly until the EXIT icon is highlighted.

Confirm by pressing the shutter release button.

CAUTION!
Make sure that there is no important data left on the SD card before starting the deletion process.
13. The menus
In order to change the settings on the camcorder, please press the ON/OFF button repeatedly to scroll to the SET menu option.
- Confirm your selection of this menu option by pressing the shutter release button.
The various setting options can be found in this table:
| 1) | Sport mode | |
| MODE Video Mode | Use this mode to set the video resolution. | |
| MODE Photo Mode | Use this mode to set the photo resolution. | |
| 1) | FLIP Sensor Flip | Use this mode to set the sensor flip to AUTO, on (ON) or off (OFF). For more information about this function, see “13.1.4. Sensor Flip” on page 374. |
| CAR Car DV | Use this mode to activate the auto mode. | |
| Auto mode | ||
| MODE Video Mode | Use this mode to set the video resolution in car mode. | |
| Looping | The oldest video recorded in loop mode will be replaced by the newly recorded video when the memory capacity has been exhausted. Switch loop mode ON or OFF. | |
| 1) | FLIP Sensor Flip | Use this mode to set the sensor flip to AUTO, on (ON) or off (OFF). For more information about this function, see “13.1.4. Sensor Flip” on page 374. |
| 2) | G Trigger | Switches the G sensor on or off. This sensor registers heavy braking and vibrations. |
| G Sensitivity | Sets the sensitivity of the G sensor. | |
| Microphone | Switches the microphone on and off. | |
| SYSTEM menu 1 | ||
| “DIS” DIS | Switches the image stabiliser (Digital Image Stabiliser) on or off. | |
| WDR | Switches the dynamic contrast (Wide Dynamic Range) on or off. | |
| 2) | LED LED | Switches the LEDs on or off |
| OSD OSD Flip | Changes the orientation of the OLED display. | |
| OSD Brightness | Changes the display brightness. | |
| Beep | Changes the volume of the signal tones. | |
| JUN Date Stamp | Switches the date stamp on or off. | |
| zz Auto-Off | Here you can select the length of time before the camcorder switches itself off when not in use. | |
| Exit | Closes the current menu and takes you back to the previous screen. | |
| 3) | SYSTEM menu 2 | |
| Date & Time | Change the date/time. Format: YYMMDD, HHMMSS | |
| (RF) Remote | Select to pair the camcorder with the wrist strap remote control. | |
| Hz Frequency | Here you can set the mains frequency (reduces flicker when filming in artificial lighting). | |
| Format | Format memory card. | |
| Default | Reset the camcorder to the factory settings. | |
| WiFi Password | Change the Wi-Fi password. | |
| Version | Shows the firmware version. | |
| 3) | Exit | Closes the current menu and takes you back to the previous screen. |
13.1. Photo/video settings
13.1.1. Video menu
In order to change the video resolution, please proceed as follows:
Press the ON/OFF button repeatedly until the SET (settings) option is displayed.
Press the shutter release button to enter the settings menu.

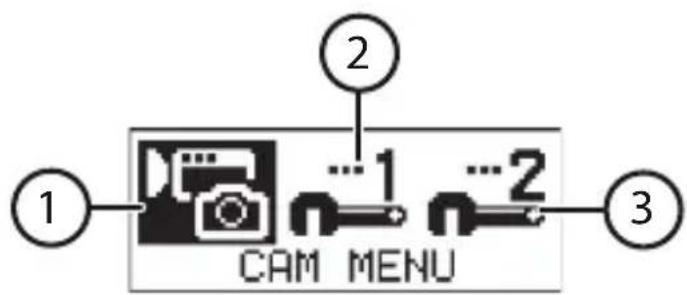
Highlight the CAM option and confirm your selection by pressing the shutter release button.
Press the shutter release button again to enter theVIDEO submenu.
Open the NORMAL menu.

Press the ON/OFF button repeatedly to scroll through the resolution options.
| 30 1080P | 16:9 full HD video, 1080P (1920x1080, 30 fps) |
| 30 960P | 4:3 widest HD Video, 960P (1280x960, 30 fps) |
| 60 720P | 16:9 HD video, 720P (1280x720, 60 fps) |
| 30 720P | 16:9, 720P (1280x720, 30 fps) |
| 60 WVGA | 16:9, WVGA (848x480, 60 fps) |
| 30 WVGA | 16:9, WVGA (848x480, 30 fps) |
| 90 VGA | 4:3, VGA (90 fps) |
Press the shutter release button to select an option.
To exit the menu, press the ON/OFF button again until the EXIT option appears and confirm your selection by pressing the shutter release button.

13.1.2. Slow motion
In this menu, you can set whether you want to record videos in slow motion.
Press the ON/OFF button repeatedly until the SET (settings) option is displayed.
Press the shutter release button to enter the settings menu.

Highlight the CAM option and confirm your selection by pressing the shutter release button.
Press the shutter release button again to enter the VIDEO submenu.
Open the SLOW menu.

Press the ON/OFF button repeatedly to scroll through the available options: 1 / 2 x, 1 / 3 x and 1 / 4 x .
Press the shutter release button to select an option.
To exit the menu, press the ON/OFF button again until the EXIT option appears and confirm your selection by pressing the shutter release button.


13.1.3. Photo mode
In this menu you can set the photo resolution as well as the modes time-lapse, burst and the self-timer.
Photo resolution
Press the ON/OFF button repeatedly until the SET (settings) option is displayed.
Press the shutter release button to enter the settings menu.


Highlight the CAM option and confirm your selection by pressing the shutter release button.
Press the ON/OFF button and then the shutter release to call up the PHOTO submenu.
Open the NORMAL menu.


Press the ON/OFF button repeatedly to scroll through the resolution options: 16M, 5M, 3M
and 2M.
Press the shutter release button to select an option.
To exit the menu, press the ON/OFF button again until the EXIT option appears and confirm your selection by pressing the shutter release button.


EXIT

EXIT

NOTICE!
Please note that the field of view (FOV) differs at different resolutions
| Setting Resolution Field of view | ||
| 5M | 2592 x 1944 (5M) 140.5° | |
| 3M | 2048 x 1536 (3M) 140.5° | |
| 2M | 1920 x 1080 (2M 16:9) 133.8° | |
Burst
In burst mode, the camcorder will take a series of 3, 5 or 10 photos with just one press of the shutter release button.
Press the ON/OFF button repeatedly until the SET (settings) option is displayed.
Press the shutter release button to enter the settings menu.


Highlight the CAM option and confirm your selection by pressing the shutter release button.
Press the ON/OFF button and then the shutter release to call up the PHOTO submenu.
Open the BURST menu.


Press the ON/OFF button repeatedly to scroll through the available options: 3, 5 and 10.
Press the shutter release button to select an option.
To exit the menu, press the ON/OFF button again until the EXIT option appears and confirm your selection by pressing the shutter release button.


Self-timer
In this mode, a photo is taken a few seconds after pressing the shutter release button.
Press the ON/OFF button repeatedly until the SET (settings) option is displayed.
Press the shutter release button to enter the settings menu.

Highlight the CAM option and confirm your selection by pressing the shutter release button.
Press the ON/OFF button and then the shutter release to call up the PHOTO submenu.
Open the SELFTIMER menu.

Press the ON/OFF button repeatedly to scroll through the available options: 2 SEC, 5 SEC or 10 SEC.
Press the shutter release button to select an option.
To exit the menu, press the ON/OFF button again until the EXIT option appears and confirm your selection by pressing the shutter release button.


13.1.4. Sensor Flip
Activating this menu option enables you to record videos or shoot photos upside down. This function is useful when you mount the camcorder hanging upside down, because then the recorded files will be replayed with the correct orientation on a television or computer (menu option ON).
Here you can also set the orientation of the acquired image to change automatically (menu option AUTO) or that pictures should only be captured in the standard orientation (menu option OFF).
Press the ON/OFF button repeatedly until the SET (settings) option is displayed.
Press the shutter release button to enter the settings menu.


Highlight the CAM option and confirm your selection by pressing the shutter release button.
Press the ON/OFF button twice and then the shutter release to call up the FLIP submenu.

Press the ON/OFF button repeatedly to scroll through the available options: AUTO, ON or OFF.
Press the shutter release button to select an option.
To exit the menu, press the ON/OFF button again until the EXIT option appears and confirm your selection by pressing the shutter release button.

13.1.5. Auto mode (car DV)
Activate this mode if you want to use the camcorder while driving (dash cam function).
Press the ON/OFF button repeatedly until the SET (settings) option is displayed.
Press the shutter release button to enter the settings menu.

Highlight the CAM option and confirm your selection by pressing the shutter release button.
Press the ON/OFF button three times and then the shutter release to call up the CAR DV submenu.
To activate Auto mode, select OK and confirm by pressing the shutter release.
To exit the menu, press the ON/OFF button again until the EXIT option appears and confirm your selection by pressing the shutter release button.


NOTICE!
In Auto mode there are a lot of extra settings available, for instance, time lapse or "Looping" function. In addition, the camera starts an automatic recording when power is supplied via the USB socket. When the power supply via USB is switched off, the camera turns off automatically after a few seconds. You can find more detailed information in the following sections.
Video resolution
To change the resolution of the videos taken in Auto mode, proceed as described in "13.1. Photo/video settings" on page 367.
Time-lapse
In time-lapse mode, photos will be taken at preset time intervals (3/5/10/30/60 seconds). Shooting will only stop once the shutter release button has been pressed again.
These consecutive pictures are automatically combined and saved as a video. The recorded video is then played back faster than standard videos.
Press the ON/OFF button repeatedly until the SET (settings) option is displayed.
Press the shutter release button to enter the settings menu.

Highlight the CAM option and confirm your selection by pressing the shutter release button.
Press the ON/OFF button and then the shutter release to call up the PHOTO submenu.
Open the LAPSE menu.


Press the ON/OFF button repeatedly to scroll through the available options: 3 SEC, 5 SEC, 10 SEC, 30 SEC, AND 60 SEC.
Press the shutter release button to select an option.
To exit the menu, press the ON/OFF button again until the EXIT option appears and confirm your selection by pressing the shutter release button.

Looping
The loop function enables you to record videos on a constant loop. The length of the individual sequences is set via the menu. When your storage medium is full, the oldest video files with be overwritten with the newest ones. If the loop function has not been switched on, it is not possible to record any videos when the memory is full.

NOTICE!
This function is only available when the video resolution is set to 1080p30.
Press the ON/OFF button repeatedly in the SET (settings) option is displayed.
Press the shutter release button to enter the settings menu.
Highlight the CAMENU and confirm your selection by pressing the shutter release button.
Highlight the LOOPING option and confirm your selection by pressing the shutter release button.

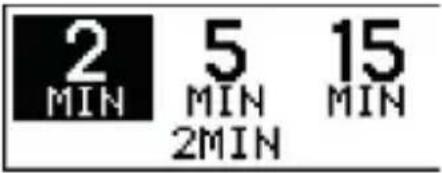
Press the ON/OFF button repeatedly to scroll through the available options: 2 MIN, 5 MIN or 15 MIN.
Press the shutter release button to select an option.
To exit the menu, press the ON/OFF button again until the EXIT option appears and confirm your selection by pressing the shutter release button.


NOTICE!
In Auto mode, the camcorder switches off automatically as soon as the time set in the AUTO POWER OFF menu has elapsed.

NOTICE!
When you switch the camera back on manually, you must also manually restart the video recording.

NOTICE!
If the loop function has been switched on, recording will begin automatically when a power supply is connected to a switched off camera via the AC adapter. The camera will switch itself on and the recording will begin. If the power supply is interrupted, the recording will stop and the camera will switch itself off.

NOTICE!
The loop function is only available for videos with a resolution of 1080p30.

NOTICE!
In loop mode, there are two different selection options available in the DELETE function:
only deletes the video recordings that have been made in loop mode.
deletes all event recordings that have been created automatically following impacts or heavy steering motions.

NOTICE!
If you have activated the automatic switch-off function (AUTO-OFF), the loop recordings will automatically switch off when the battery is empty. When the camera is switched on again, you will need to restart recording.
Sensor flip
To edit the Sensor Flip option, please proceed as described in "13.1.4. Sensor Flip" on page 374.
G sensor (G trigger)
Your camera has an integrated G sensor. This sensor registers heavy braking and impacts, and starts a recording fully automatically.
The sequences captured in this way are stored.
Press the ON/OFF button repeatedly until the SET (settings) option is displayed.
Press the shutter release button to enter the settings menu.
Highlight the CAM MENU and confirm your selection by pressing the shutter release button.
Highlight the G TRIGGER option and confirm your selection by pressing the shutter release button.

Press the ON/OFF button repeatedly to scroll through the available options: ON or OFF.
Press the shutter release button to select an option.
To exit the menu, press the ON/OFF button again until the EXIT option appears and confirm your selection by pressing the shutter release button.

Setting the sensitivity of the G sensor (G sensitivity)
In this menu, you can change the sensitivity of the G sensor.
Press the ON/OFF button repeatedly until the SET (settings) option is displayed.
Press the shutter release button to enter the settings menu.
Highlight the CAM MENU and confirm your selection by pressing the shutter release button.
Highlight the G SENSITIVITY option and confirm your selection by pressing the shutter release button.

Press the ON/OFF repeatedly to scroll through the options: HIGH, MID or LOW.
Press the shutter release button to select an option.
To exit the menu, press the ON/OFF button again until the EXIT option appears and confirm your selection by pressing the shutter release button.

Microphone
With this menu you can set whether or not the microphone should be switched on during the video recording.
Press the ON/OFF button repeatedly until the SET (settings) option is displayed.
Press the shutter release button to enter the settings menu.
Highlight the CAM MENU and confirm your selection by pressing the shutter release button.
Highlight the MIC PHONE option and confirm your selection by pressing the shutter release button.

Press the ON/OFF button repeatedly to scroll through the available options: ON or OFF.
Press the shutter release button to select an option.
To exit the menu, press the ON/OFF button again until the EXIT option appears and confirm your selection by pressing the shutter release button.

Enable Sport mode (sport DV)
To return to the normal Sport mode, proceed as described below:
13.1.6. Microphone
With this menu you can set whether or not the microphone should be switched on during the video recording.
Press the ON/OFF button repeatedly until the SET (settings) option is displayed.
Press the shutter release button to enter the settings menu.
Highlight the CAMENU and confirm your selection by pressing the shutter release button.
Highlight the SPORT DV option and confirm your selection by pressing the shutter release button.

Highlight the OK option and confirm your selection by pressing the shutter release button.
13.2. System menu 1
In this menu you can make general recording and display settings.
13.2.1. Stabiliser (DIS)
To switch on the image stabiliser (Digital Image Stabiliser - DIS), proceed as follows:
Press the ON/OFF button repeatedly until the SET (settings) option is displayed.
Press the shutter release button to enter the settings menu.

SETUP


SYS MENU1
Highlight the SYS MENU1 option and confirm your selection by pressing the shutter release button.
Press the shutter release button to enter the DIS submenu.


LED
DIS

OFF
ON
Press the ON/OFF button repeatedly to switch the stabiliser on or off (ON/OFF).
Press the shutter release button to select an option.
To exit the menu, press the ON/OFF button again until the EXIT option appears and confirm your selection by pressing the shutter release button.

13.2.2. Dynamic contrast (WDR)
To switch on the dynamic contrast (Wide Dynamic Range – WDR), proceed as follows:
Press the ON/OFF button repeatedly until the SET (settings) option is displayed.
Press the shutter release button to enter the settings menu.

Highlight the SYS MENU1 option and confirm your selection by pressing the shutter release button.
Highlight the WDR option and confirm your selection by pressing the shutter release button.

Press the ON/OFF button repeatedly to switch the function on or off (ON/OFF).
Press the shutter release button to select an option.
To exit the menu, press the ON/OFF button again until the EXIT option appears and confirm your selection by pressing the shutter release button.

13.2.3. LED indicator
Use this function to switch the LED indicators on or off.
Press the ON/OFF button repeatedly until the SET (settings) option is displayed.
Press the shutter release button to enter the settings menu.

Highlight the SYS MENU1 option and confirm your selection by pressing the shutter release button.
Highlight the LED INDICATOR option and confirm your selection by pressing the shutter release button.

Press the ON/OFF button repeatedly to switch the function on or off (ON/OFF).
Press the shutter release button to select an option.
To exit the menu, press the ON/OFF button again until the EXIT option appears and confirm your selection by pressing the shutter release button.

13.2.4. OSD Flip
In this menu, you can change the orientation of the OLED display.
Press the ON/OFF button repeatedly until the SET (settings) option is displayed.
Press the shutter release button to enter the settings menu.

Highlight the SYS MENU1 option and confirm your selection by pressing the shutter release button.
Highlight the LED INDICATOR option and confirm your selection by pressing the shutter release button.

Press the ON/OFF button repeatedly to switch the function on or off (ON/OFF).
Press the shutter release button to select an option.
To exit the menu, press the ON/OFF button again until the EXIT option appears and confirm your selection by pressing the shutter release button.

13.2.5. Display brightness
This function enables you to adjust the display brightness.
Press the ON/OFF button repeatedly until the SET (settings) option is displayed.
Press the shutter release button to enter the settings menu.

Highlight the SYS MENU1 option and confirm your selection by pressing the shutter release button.
Highlight the OSD BRIGHTNESS option and confirm your selection by pressing the shutter release button.


Press the ON/OFF button repeatedly to select the required option (100%, 60% or 30%).
Press the shutter release button to select an option.
To exit the menu, press the ON/OFF button again until the EXIT option appears and confirm your selection by pressing the shutter release button.

13.2.6. Sound (Beep)
This function can be used to set the sound (beep) for the ON/OFF button and the shutter release button louder or quieter, or to turn it off completely.
Press the ON/OFF button repeatedly until the SET (settings) option is displayed.
Press the shutter release button to enter the settings menu.

Highlight the SYS MENU1 option and confirm
your selection by pressing the shutter release button.
Highlight the BEEP VOLUME option and confirm your selection by pressing the shutter release button.

Press the ON/OFF button repeatedly to select the required option (100%, 60% or OFF).
Press the shutter release button to select an option.
To exit the menu, press the ON/OFF button again until the EXIT option appears and confirm your selection by pressing the shutter release button.

13.2.7. Date stamp
You can use this function to add a date stamp to the images.
Press the ON/OFF button repeatedly until the SET (settings) option is displayed.
Press the shutter release button to enter the settings menu.


Highlight the SYS MENU1 option and confirm your selection by pressing the shutter release button.
Highlight the DATE STAMP option and confirm your selection by pressing the shutter release button.

Press the ON/OFF button repeatedly to select the required option (ON or OFF).
Press the shutter release button to select an option.
To exit the menu, press the ON/OFF button again until the EXIT option appears and confirm your selection by pressing the shutter release button.

13.2.8. Automatic switch-off (Auto Power Off)
Press the ON/OFF button repeatedly until the
SET (settings) option is displayed.
Press the shutter release button to enter the settings menu.

Highlight the SYS MENU1 option and confirm your selection by pressing the shutter release button.
Highlight the DATE STAMP option and confirm your selection by pressing the shutter release button.

Press the ON/OFF button repeatedly to select the required option (60 MIN, 30 MIN, 10 MIN or OFF).
Press the shutter release button to select an option.
To exit the menu, press the ON/OFF button again until the EXIT option appears and confirm your selection by pressing the shutter release button.

13.3. System menu 2
In this menu you can make basic settings such as date and time or frequency on your camcorder.
13.3.1. Date and time
Press the ON/OFF button repeatedly until the SET (settings) option is displayed.
Press the shutter release button to enter the settings menu.

Highlight the SYS MENU2 option and confirm your selection by pressing the shutter release button.
Press the shutter release button to enter the DATE & TIME submenu.


Press the shutter release button to select the desired year.
Press the ON/OFF button to confirm the set year. The highlight jumps automatically to the month.
Now set the month, the day, the current hour and also the minutes and seconds (in this order) as de
scribed above.
Following this, the OK button will appear automatically. Confirm this by pressing the ON/OFF button.
The camera then jumps back into System Menu 2.
13.3.2. Remote control
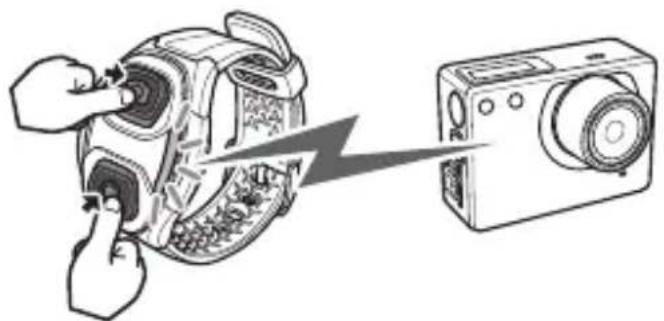
This function allows you to pair your camcorder with the wrist strap remote control.

NOTICE!
The remote control supplied with the device has already been connected up to your camcorder and does not need to be paired.
Press the ON/OFF button repeatedly until the SET (settings) option is displayed.
Press the shutter release button to enter the settings menu.

Highlight the SYS MENU2 option and confirm your selection by pressing the shutter release button.
Press the shutter release button to enter the REMOTER submenu.


Select the menu option Scanning.
The camcorder can now be paired with the wrist strap remote control.
Press both buttons – the video button and the photo button – on the wrist strap remote control at the same time to carry out the pairing process. If the red LED on the remote control lights up, the pairing has been successful.

NOTICE!
For further information on the wrist strap remote control.
After successful pairing, the camera jumps back to System Menu 2.
13.3.3. Frequency
This function allows you to change the frequency of your camcorder.
Press the ON/OFF button repeatedly until the SET (settings) option is displayed.
Press the shutter release button to enter the settings menu.

SETUP


SYS

MENU2

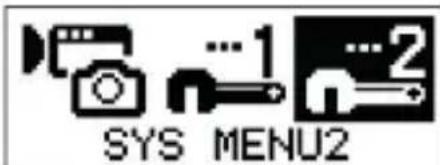
Highlight the SYS MENU2 option and confirm your selection by pressing the shutter release button.
Press the shutter release button to enter the FREQUENCY submenu.


60HZ
50HZ
Press the ON/OFF button repeatedly to select the required option (50 HZ or 60 HZ).
Press the shutter release button to select an option.
After confirmation, the camera jumps back to System Menu 2.
13.3.4. Format
You can use this function to format the memory card.
Press the ON/OFF button repeatedly until the SET (settings) option is displayed.
Press the shutter release button to enter the settings menu.

Highlight the SYS MENU2 option and confirm your selection by pressing the shutter release button.
Press the shutter release button to enter the FOR-MAT submenu.

Press the ON/OFF button to select the OK option.
Press the shutter release button to select an option.
After confirmation, the camera jumps back to System Menu 2.

CAUTION!
Make sure that there is no important data left on the SD card before starting the deletion process.
13.3.5. Reset to factory defaults
This function enables you to reset the camcorder to the factory settings and thus delete all of the settings you have subsequently made.
Press the ON/OFF button repeatedly until the SET (settings) option is displayed.
Press the shutter release button to enter the settings menu.


Highlight the SYS MENU2 option and confirm your selection by pressing the shutter release button.
Press the shutter release button to enter the DEFAULT submenu.

Press the ON/OFF button to select the OK option.
Press the shutter release button to select an op-
tion.
After confirmation, the camera jumps back to System Menu 2.
13.3.6. Change Wi-Fi password
In this menu, you can change the Wi-Fi password.
Press the ON/OFF button repeatedly until the SET (settings) option is displayed.
Press the shutter release button to enter the settings menu.

Highlight the SYS MENU2 option and confirm your selection by pressing the shutter release button.
Press the shutter release button to enter the WIFI PASSWORD submenu.

- With the help of thON/OFF button, enter your password and confirm each selected digit with the shutter release.
Afterwards, confirm the selected password with OK.
After confirmation, the camera jumps back to System Menu 2.
13.3.7. Version
This shows the current version of the firmware of your camcorder.
14. Wrist strap remote control

NOTICE!
The wrist strap remote control supplied with the device is already paired with your camcorder. In order to pair a subsequently purchased wrist strap remote control with your camcorder.
In order to take photos, please press the photo button on the wrist strap remote control.
In order to record videos, please press the video button on the wrist strap remote control.

NOTICE!
In order to take photos in time-lapse, self-timer or burst mode, please set the corresponding program in the camera's menu and then press the photo button on the remote control.

NOTICE!
Even if your camcorder is set to video mode, it is nevertheless still possible to take a photo by pressing the photo button on the wrist strap remote control.
In time-lapse mode, it is only possible to start a video recording. It is not possible to take photos.

NOTICE!
The maximum range of the wrist strap remote control is around 5m (maximum range of the signal under optimal conditions, e.g. outside in the open/with an unimpeded line of sight).
14.1. Changing the battery
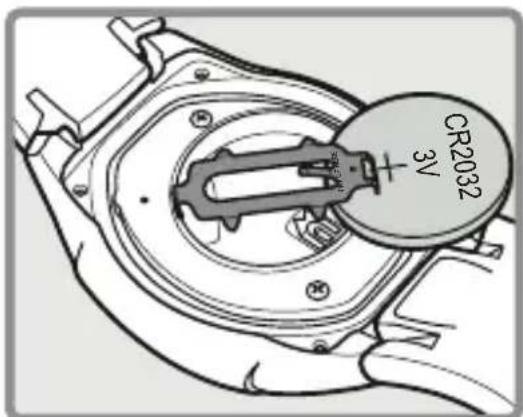
The remote control requires one type CR2032 3 V button battery.

WARNING!
There is a risk of explosion if batteries are replaced incorrectly.
Replace batteries only with the same or equivalent type.
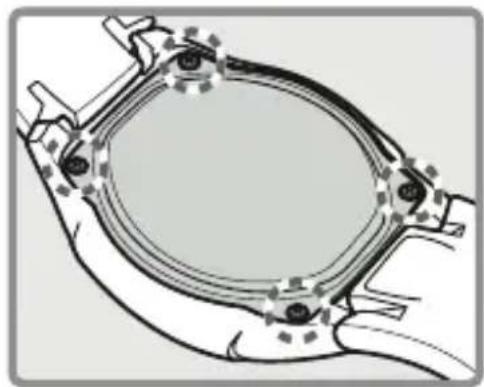
- Remove the four screws from the back of the housing of the wrist strap remote control as shown in the illustration.
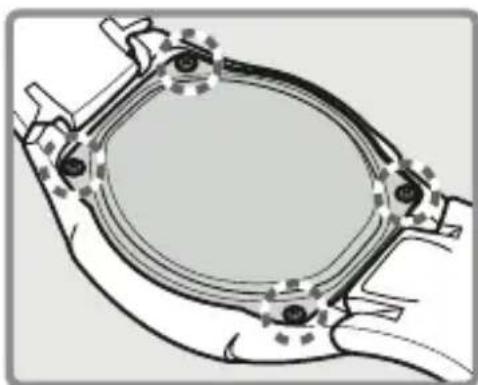
- Use a suitable tool to lift up the outer section of the battery retaining clip.
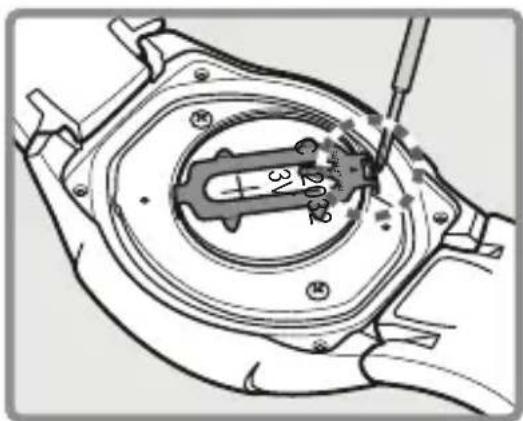
- Remove the old battery and take it to a used battery collection point for proper disposal.
Insert a fresh CR 2032 battery into the battery compartment with the positive pole facing up. Ensure the +/- terminals are correct. - Carefully replace the battery retaining clip over the battery.
- Reattach the rear housing of the wrist strap remote control by fixing it in place with the four screws.

CAUTION!
In order to guarantee the water resistance of the remote control, ensure that the sealing ring is correctly positioned before screwing the rear housing back in place.
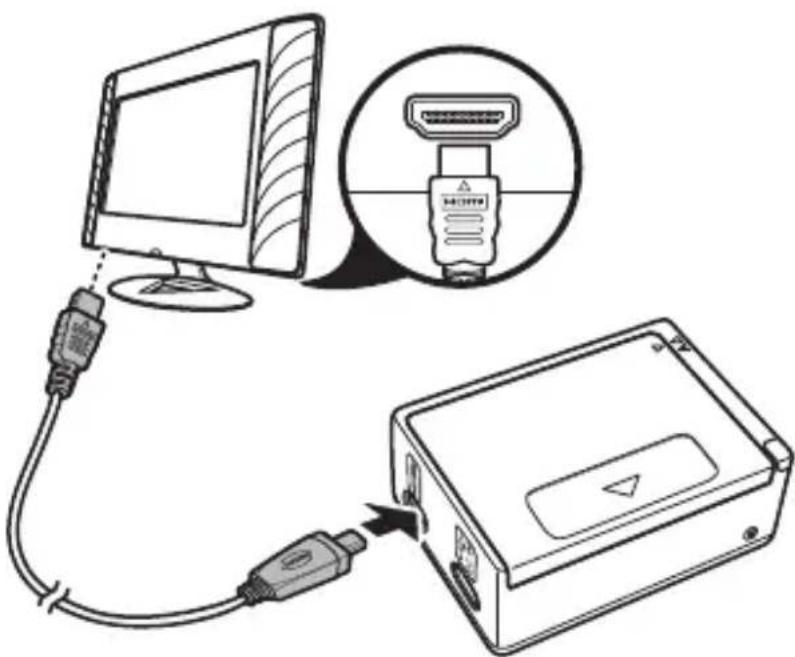
15. Connecting to an external screen
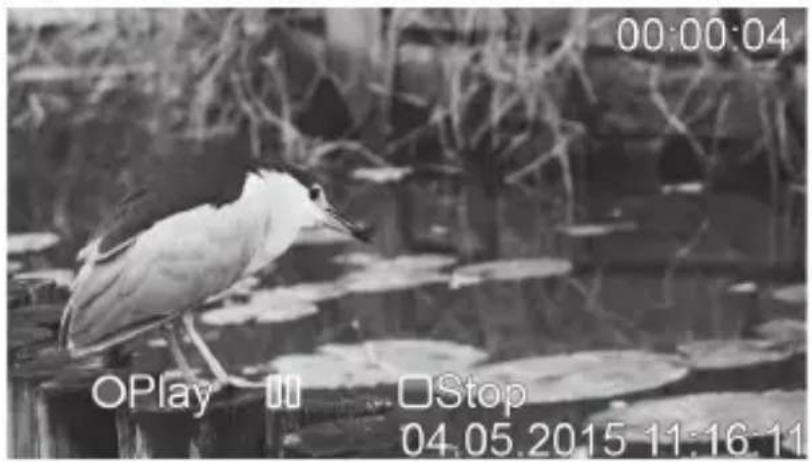
To display videos or photos on an external screen, proceed as follows:
- Connect the camcorder to a television that has a digital HDMI input using an HDMI cable (not supplied) in order to view the HD images you recorded with the camera in high resolution.
Select the HDMI input on your TV.
- Switch the camcorder on.
A selection screen appears on the TV.
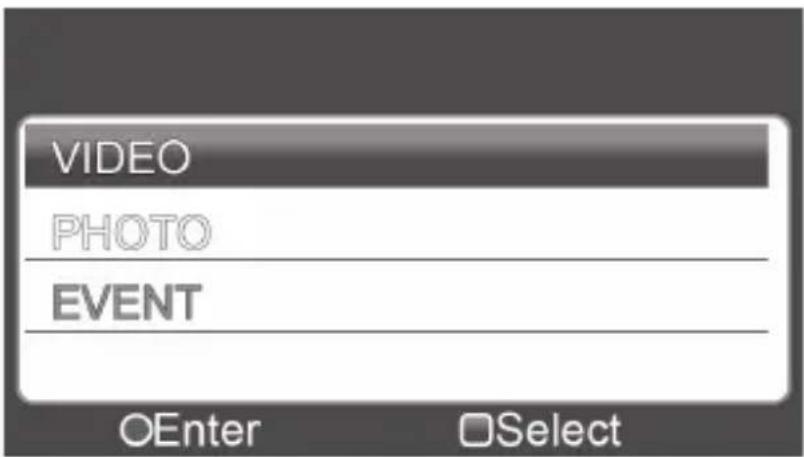
Use the ON/OFF button to select the required directory (Video, Photo, Event).
Pressing the SHUTTER RELEASE will open the corresponding directory. The recordings/photos taken by the camera will be displayed.

Select a file using the ON/OFF button. This is now highlighted.
When you press the SHUTTER RELEASE the highlighted file will be played.
Press and hold the shutter release to return to the previous menu.
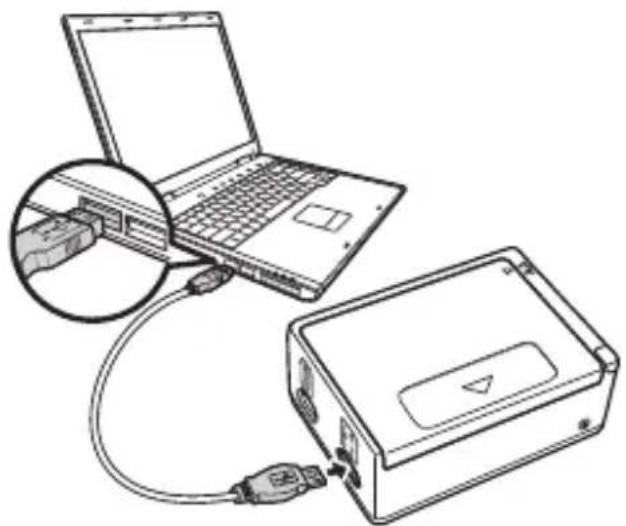
16. Connecting to a PC
Proceed as follows to connect the camcorder to a PC or notebook:
- Connect the camcorder to your PC with the aid of the supplied microUSB cable.
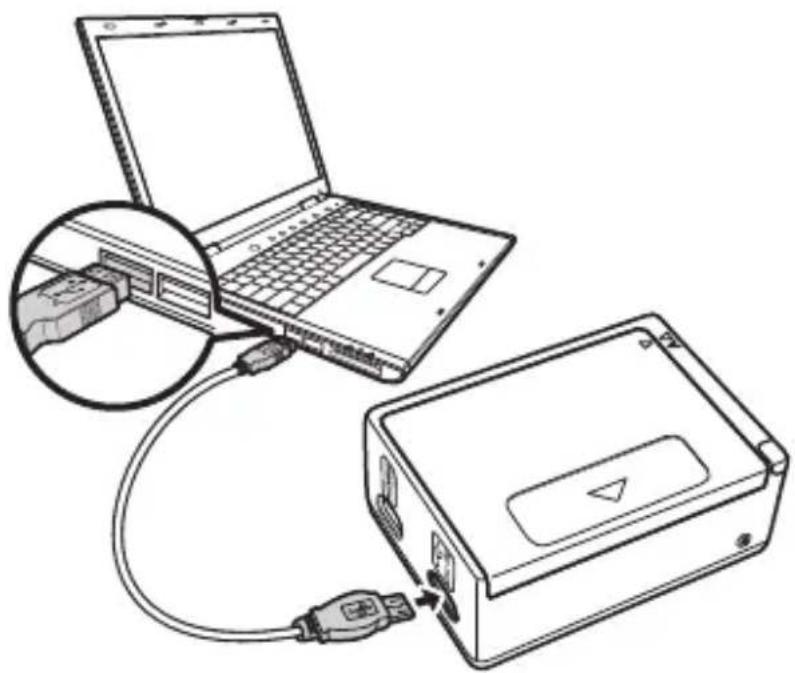
- Switch on the camcorder so that the system can automatically detect the type of connected storage device.

NOTICE!
In USB mode, the memory will switch to "Read only" operation – meaning that the saved data can only be read. It is not possible to save data onto the camcorder in USB mode.
16.1. System requirements
- Microsoft® Windows 8.1 /Windows 8/Windows® 7
- 1 GB free RAM recommended
- 1 GB free hard disk space recommended
USB port - CD-ROM drive
16.1.1. Control via a smartphone/tablet
- Smartphone/tablet with Wi-Fi 802.11 g
- Android™ platform 4.1 or higher
iOS 7.0 or higher - Installation of the freely available app
17. Cleaning
Only use a dry, soft cloth to clean the device. Do not use chemical solutions and cleaning products because these may damage the surface and/or the inscriptions on the product.
18. Disposal

Packaging
The product has been packaged to protect it from damage in transit. The packaging is made of materials that can be recycled in an environmentally friendly manner.

Appliance
Old devices should not be disposed of with the normal household rubbish.
In accordance with Directive 2012/19/EU, the device must be properly disposed of at the end of its service life.
This involves separating the materials in the device for the purpose of recycling and avoiding any impact on the environment. Take old devices to a collection point for electrical scrap or a recycling centre.
Contact your local waste disposal company or your local authority for more information on this subject.

Batteries
Batteries must be properly disposed of. Retailers who stock batteries and local authority collection points have appropriate disposal containers for this purpose. You can contact your local waste disposal company or municipal authorities for further information.
19. Technical data
Image sensor 5 megapixel CMOS
Multifunction modes HD video camera, digital camera
Lens f 1:2.4 (F2.4 mm)
Display 17.2 ~mm / 0.68" OLED display
Storage medium Card slot for microSDHC cards of up to 32 GB, Class 6
File formats Image: JPEG; film: AVI (H.264)
Resolution:
Video:
1080p (16:9): 30fps
960p (4:3): 30 fps
720p (16:9): 60, 30 fps
WVGA (16:9): 60, 30 fps
VGA: 90 fps
Photos:
2592 × 1944 (5 M)
2048 × 1536 (3 M)
1920 × 1080 (2M 16:9)
PC connection Micro USB 2.0 High-Speed
connection
TV output micro HDMI
Wi-Fi standard Wi-Fi 802.11 g 2.4 GHz
Dimensions approx. 55 × 40 × 21 ~mm
(camera only, without the waterproof casing, without taking into account the protruding lens)
approx. 55 × 40 × 35 ~mm
(camera only, without the waterproof casing, taking into account the protruding lens)
Weight approx. 68 g (incl. battery,
without the waterproof casing)
Temperatures in operation 0 - 40^
While charging 0 - 40^
Storage
-30°C-6
Relative humidity (non-condensing) in operation 0 90%
While charging 0 90%
Storage 0 95%
USB MAINS ADAPTER
Model number: KSAS0060500100VEU (EU) KSAS0050500100VKU
Manufacturer: Ktec, China
Input voltage: 100 - 240V 50 / 60Hz0.18A
Output voltage: 5.0V 1.0 A
BATTERY
Model number: FJ-SLB-10A
Manufacturer: Fuji Electronics (Shenzen) Co., LTD.
Technical data: 3.7 V/1130 mAh/4.18 Wh
REMOTE CONTROL
Battery: 1x button cell battery 3 V, type CR2032
Frequency band: 2403-2477 MHz

Subject to technical and optical changes as well as printing errors.
20. Legal information
Copyright © 2016
All rights reserved.
These operating instructions are protected by copyright.

Mechanical, electronic and any
other form of reproduction is prohibited without the written permission of the manufacturer.
Copyright is owned by the company:
Medion AG
Am Zehnhof 77
45307 Essen
Germany
These instructions can be ordered again from the Service Hotline and are available for download via the service portal at
www.medionservice.de.
You can also scan the QR code above to download the instructions onto your mobile device from the Service website.
Indholdsfortegnelse
DE
1. Om donne brugsanvising 421
1.1. Symboler og advarsler, der anvendes i donne brugsanvisning 422
1.2. Korrekt anvendelse NL
2. Overensstemmelseserklaering 424
G-sensor (G-Trigger)
13.2.6. Toner (Beep)
13.3.3. Frekvens (Frequency)
2048 × 1536( 3M)
1920 x 1080 (2M 16:9)
Pc-stik Micro USB 2.0 High-Speed-stik
TV-udgang
micro
HDMI
WLAN-standard WLAN 802.11 g 2,4 GHz
Mäl ca. 55 × 40 × 21 mm (kun ka-
Opbevaring 0 95%
USB-STRØMFORSYNING
Modelnummer: KSAS0060500100VEU
KSAS0050500100VKU
Producent: Ktec, China
Version 2.1, February 1999
Copyright (C) 1991, 1999 Free Software Foundation, Inc.
51 Franklin Street, Fifth Floor, Boston, MA 02110-1301 USA
Everyone is permitted to copy and distribute verbatim copies of this license document, but changing it is not allowed.
[This is the first released version of the Lesser GPL. It also counts as the successor of the GNU Library Public License, version 2, hence the version number 2.1.]
Preamble
The licenses for most software are designed to take away your freedom to share and change it. By contrast, the GNU General Public Licenses are intended to guarantee your freedom to share and change free software--to make sure the software is free for all its users.
This license, the Lesser General Public License, applies to some specially designated software packages--typically libraries--of the Free Software Foundation and other authors who decide to use it. You can use it too, but we suggest you first think carefully about whether this license or the ordinary General Public License is the better strategy to use in any particular case, based on the explanations below.
When we speak of free software, we are referring to freedom of use, not price. Our General Public Licenses are designed to make sure that you have the freedom to distribute copies of free software (and charge for this service if you wish); that you receive source code or can get it if you want it; that you can change the software and use pieces of it in new free programs; and that you are informed that you can do these things.
To protect your rights, we need to make restrictions that forbid distributors to deny you these rights or to ask you to surrender these rights. These restrictions translate to certain responsibilities for you if you distribute copies of the library or if you modify it.
For example, if you distribute copies of the library, whether gratis or for a fee, you must give the recipients all the rights that we gave you. You must make sure that they, too, receive or can get the source code. If you link other code with the library, you must provide complete object files to the recipients, so that they can relink them with the library after making changes to the library and recompiling it. And you must show them these terms so they know their rights.
We protect your rights with a two-step method: (1) we copyright the library, and (2) we offer you this license, which gives you legal permission to copy, distribute and/or modify the library.
To protect each distributor, we want to make it very clear that there is no warranty for the free library. Also, if the library is modified by someone else and passed on, the recipients should know that what they have is not the original version, so that the original author's reputation will not be affected by problems that might be introduced by others.
Finally, software patents pose a constant threat to the existence of any free program. We wish to make sure that a company cannot effectively restrict the users of a free program by obtaining a restrictive license from a patent holder. Therefore, we insist that any patent license obtained for a version of the library must be consistent with the full freedom of use specified in this license.
Most GNU software, including some libraries, is covered by the ordinary GNU General Public License. This license, the GNU Lesser General Public License, applies to certain designated libraries, and is quite different from the ordinary General Public License. We use this license for certain libraries in order to permit linking those libraries into non-free programs.
When a program is linked with a library, whether statically or using a shared library, the combination of the two is legally speaking a
combined work, a derivative of the original library. The ordinary General Public License therefore permits such linking only if the entire combination fits its criteria of freedom. The Lesser General Public License permits more lax criteria for linking other code with the library.
We call this license the "Lesser" General Public License because it does Less to protect the user's freedom than the ordinary General Public License. It also provides other free software developers Less of an advantage over competing non-free programs. These disadvantages are the reason we use the ordinary General Public License for many libraries. However, the Lesser license provides advantages in certain special circumstances.
For example, on rare occasions, there may be a special need to encourage the widest possible use of a certain library, so that it becomes a de-facto standard. To achieve this, non-free programs must be allowed to use the library. A more frequent case is that a free library does the same job as widely used non-free libraries. In this case, there is little to gain by limiting the free library to free software only, so we use the Lesser General Public License.
In other cases, permission to use a particular library in non-free programs enables a greater number of people to use a large body of free software. For example, permission to use the GNU C Library in non-free programs enables many more people to use the whole GNU operating system, as well as its variant, the GNU/Linux operating system.
Although the Lesser General Public License is Less protective of the users' freedom, it does ensure that the user of a program that is linked with the Library has the freedom and the wherewithal to run that program using a modified version of the Library.
The precise terms and conditions for copying, distribution and modification follow. Pay close attention to the difference between a "work based on the library" and a "work that uses the library". The former contains code derived from the library, whereas the latter must be combined with the library in order to run.
TERMS AND CONDITIONS FOR COPYING, DISTRIBUTION AND MODIFICATION
- This License Agreement applies to any software library or other program which contains a notice placed by the copyright holder or other authorized party saying it may be distributed under the terms of this Lesser General Public License (also called "this License"). Each licensee is addressed as "you".
A "library" means a collection of software functions and/or data prepared so as to be conveniently linked with application programs (which use some of those functions and data) to form executables.
The "Library", below, refers to any such software library or work which has been distributed under these terms. A "work based on the Library" means either the Library or any derivative work under copyright law: that is to say, a work containing the Library or a portion of it, either verbatim or with modifications and/or translated straightforwardly into another language. (Hereinafter, translation is included without limitation in the term "modification".)
"Source code" for a work means the preferred form of the work for making modifications to it. For a library, complete source code means all the source code for all modules it contains, plus any associated interface definition files, plus the scripts used to control compilation and installation of the library.
Activities other than copying, distribution and modification are not covered by this License; they are outside its scope. The act of running a program using the Library is not restricted, and output from such a program is covered only if its contents constitute a work based on the Library (independent of the use of the Library in a tool for writing it). Whether that is true depends on what the Library does and what the program that uses the Library does.
- You may copy and distribute verbatim copies of the Library's complete source code as you receive it, in any medium, provided that you conspicuously and appropriately publish on each copy an appropriate copyright notice and disclaimer of warranty; keep intact all the notices that refer to this License and to the absence of any warranty; and distribute a copy of this License along with the
Library.
You may charge a fee for the physical act of transferring a copy, and you may at your option offer warranty protection in exchange for a fee.
- You may modify your copy or copies of the Library or any portion of it, thus forming a work based on the Library, and copy and distribute such modifications or work under the terms of Section 1 above, provided that you also meet all of these conditions:
a) The modified work must itself be a software library.
b) You must cause the files modified to carry prominent notices stating that you changed the files and the date of any change.
c) You must cause the whole of the work to be licensed at no charge to all third parties under the terms of this License.
d) If a facility in the modified Library refers to a function or a table of data to be supplied by an application program that uses the facility, other than as an argument passed when the facility is invoked, then you must make a good faith effort to ensure that, in the event an application does not supply such function or table, the facility still operates, and performs whatever part of its purpose remains meaningful.
(For example, a function in a library to compute square roots has a purpose that is entirely well-defined independent of the application. Therefore, Subsection 2d requires that any application-supplied function or table used by this function must be optional: if the application does not supply it, the square root function must still compute square roots.)
These requirements apply to the modified work as a whole. If identifiable sections of that work are not derived from the Library, and can be reasonably considered independent and separate works in themselves, then this License, and its terms, do not apply to those sections when you distribute them as separate works. But when you distribute the same sections as part of a whole which is a work based on the Library, the distribution of the whole must be on the terms of this License, whose permissions for other licensees extend
to the entire whole, and thus to each and every part regardless of who wrote it.
Thus, it is not the intent of this section to claim rights or contest your rights to work written entirely by you; rather, the intent is to exercise the right to control the distribution of derivative or collective works based on the Library.
In addition, mere aggregation of another work not based on the Library with the Library (or with a work based on the Library) on a volume of a storage or distribution medium does not bring the other work under the scope of this License.
- You may opt to apply the terms of the ordinary GNU General Public License instead of this License to a given copy of the Library. To do this, you must alter all the notices that refer to this License, so that they refer to the ordinary GNU General Public License, version 2, instead of to this License. (If a newer version than version 2 of the ordinary GNU General Public License has appeared, then you can specify that version instead if you wish.) Do not make any other change in these notices.
Once this change is made in a given copy, it is irreversible for that copy, so the ordinary GNU General Public License applies to all subsequent copies and derivative works made from that copy.
This option is useful when you wish to copy part of the code of the Library into a program that is not a library.
- You may copy and distribute the Library (or a portion or derivative of it, under Section 2) in object code or executable form under the terms of Sections 1 and 2 above provided that you accompany it with the complete corresponding machine-readable source code, which must be distributed under the terms of Sections 1 and 2 above on a medium customarily used for software interchange.
If distribution of object code is made by offering access to copy from a designated place, then offering equivalent access to copy the source code from the same place satisfies the requirement to distribute the source code, even though third parties are not compelled to copy the source along with the object code.
- A program that contains no derivative of any portion of the Library, but is designed to work with the Library by being compiled or linked with it, is called a "work that uses the Library". Such a work, in isolation, is not a derivative work of the Library, and therefore falls outside the scope of this License.
However, linking a "work that uses the Library" with the Library creates an executable that is a derivative of the Library (because it contains portions of the Library), rather than a "work that uses the library". The executable is therefore covered by this License. Section 6 states terms for distribution of such executables.
When a "work that uses the Library" uses material from a header file that is part of the Library, the object code for the work may be a derivative work of the Library even though the source code is not. Whether this is true is especially significant if the work can be linked without the Library, or if the work is itself a library. The threshold for this to be true is not precisely defined by law.
If such an object file uses only numerical parameters, data structure layouts and accessors, and small macros and small inline functions (ten lines or less in length), then the use of the object file is unrestricted, regardless of whether it is legally a derivative work.
(Executables containing this object code plus portions of the Library will still fall under Section 6.)
Otherwise, if the work is a derivative of the Library, you may distribute the object code for the work under the terms of Section
-
Any executables containing that work also fall under Section 6, whether or not they are linked directly with the Library itself.
-
As an exception to the Sections above, you may also combine or link a "work that uses the Library" with the Library to produce a work containing portions of the Library, and distribute that work under terms of your choice, provided that the terms permit modification of the work for the customer's own use and reverse engineering for debugging such modifications.
You must give prominent notice with each copy of the work that the Library is used in it and that the Library and its use are covered by this License. You must supply a copy of this License. If the work
during execution displays copyright notices, you must include the copyright notice for the Library among them, as well as a reference directing the user to the copy of this License. Also, you must do one of these things:
a) Accompany the work with the complete corresponding machine-readable source code for the Library including whatever changes were used in the work (which must be distributed under Sections 1 and 2 above); and, if the work is an executable linked with the Library, with the complete machine-readable "work that uses the Library", as object code and/or source code, so that the user can modify the Library and then relink to produce a modified executable containing the modified Library. (It is understood that the user who changes the contents of definitions files in the Library will not necessarily be able to recompile the application to use the modified definitions.)
b) Use a suitable shared library mechanism for linking with the Library. A suitable mechanism is one that (1) uses at run time a copy of the library already present on the user's computer system, rather than copying library functions into the executable, and (2) will operate properly with a modified version of the library, if the user installs one, as long as the modified version is interface-compatible with the version that the work was made with.
c) Accompany the work with a written offer, valid for at least three years, to give the same user the materials specified in Subsection 6a, above, for a charge no more than the cost of performing this distribution.
d) If distribution of the work is made by offering access to copy from a designated place, offer equivalent access to copy the above specified materials from the same place.
e) Verify that the user has already received a copy of these materials or that you have already sent this user a copy.
For an executable, the required form of the "work that uses the Library" must include any data and utility programs needed for reproducing the executable from it. However, as a special exception, the materials to be distributed need not include anything that
is normally distributed (in either source or binary form) with the major components (compiler, kernel, and so on) of the operating system on which the executable runs, unless that component itself accompanies the executable.
It may happen that this requirement contradicts the license restrictions of other proprietary libraries that do not normally accompany the operating system. Such a contradiction means you cannot use both them and the Library together in an executable that you distribute.
- You may place library facilities that are a work based on the Library side-by-side in a single library together with other library facilities not covered by this License, and distribute such a combined library, provided that the separate distribution of the work based on the Library and of the other library facilities is otherwise permitted, and provided that you do these two things:
a) Accompany the combined library with a copy of the same work based on the Library, uncombined with any other library facilities. This must be distributed under the terms of the Sections above.
b) Give prominent notice with the combined library of the fact that part of it is a work based on the Library, and explaining where to find the accompanying uncombined form of the same work. - You may not copy, modify, sublicense, link with, or distribute the Library except as expressly provided under this License. Any attempt otherwise to copy, modify, sublicense, link with, or distribute the Library is void, and will automatically terminate your rights under this License. However, parties who have received copies, or rights, from you under this License will not have their licenses terminated so long as such parties remain in full compliance.
- You are not required to accept this License, since you have not signed it. However, nothing else grants you permission to modify or distribute the Library or its derivative works. These actions are prohibited by law if you do not accept this License. Therefore, by modifying or distributing the Library (or any work based on the Library), you indicate your acceptance of this License to do so, and all its terms and conditions for copying, distributing or modifying
the Library or works based on it.
-
Each time you redistribute the Library (or any work based on the Library), the recipient automatically receives a license from the original licensor to copy, distribute, link with or modify the Library subject to these terms and conditions. You may not impose any further restrictions on the recipients' exercise of the rights granted herein. You are not responsible for enforcing compliance by third parties with this License.
-
If, as a consequence of a court judgment or allegation of patent infringement or for any other reason (not limited to patent issues), conditions are imposed on you (whether by court order, agreement or otherwise) that contradict the conditions of this License, they do not excuse you from the conditions of this License. If you cannot distribute so as to satisfy simultaneously your obligations under this License and any other pertinent obligations, then as a consequence you may not distribute the Library at all. For example, if a patent license would not permit royalty-free redistribution of the Library by all those who receive copies directly or indirectly through you, then the only way you could satisfy both it and this License would be to refrain entirely from distribution of the Library.
If any portion of this section is held invalid or unenforceable under any particular circumstance, the balance of the section is intended to apply, and the section as a whole is intended to apply in other circumstances.
It is not the purpose of this section to induce you to infringe any patents or other property right claims or to contest validity of any such claims; this section has the sole purpose of protecting the integrity of the free software distribution system which is implemented by public license practices. Many people have made generous contributions to the wide range of software distributed through that system in reliance on consistent application of that system; it is up to the author/donor to decide if he or she is willing to distribute software through any other system and a licensee cannot impose that choice.
This section is intended to make thoroughly clear what is believed to be a consequence of the rest of this License.
- If the distribution and/or use of the Library is restricted in certain countries either by patents or by copyrighted interfaces, the original copyright holder who places the Library under this License may add an explicit geographical distribution limitation excluding those countries, so that distribution is permitted only in or among countries not thus excluded. In such case, this License incorporates the limitation as if written in the body of this License.
- The Free Software Foundation may publish revised and/or new versions of the Lesser General Public License from time to time. Such new versions will be similar in spirit to the present version, but may differ in detail to address new problems or concerns.
Each version is given a distinguishing version number. If the Library specifies a version number of this License which applies to it and "any later version", you have the option of following the terms and conditions either of that version or of any later version published by the Free Software Foundation. If the Library does not specify a license version number, you may choose any version ever published by the Free Software Foundation.
- If you wish to incorporate parts of the Library into other free programs whose distribution conditions are incompatible with these, write to the author to ask for permission. For software which is copyrighted by the Free Software Foundation, write to the Free Software Foundation; we sometimes make exceptions for this. Our decision will be guided by the two goals of preserving the free status of all derivatives of our free software and of promoting the sharing and reuse of software generally.
NO WARRANTY
- BECAUSE THE LIBRARY IS LICENSED FREE OF CHARGE, THERE IS NO WARRANTY FOR THE LIBRARY, TO THE EXTENT PERMITTED BY APPLICABLE LAW. EXCEPT WHEN OTHERWISE STATED IN WRITING THE COPYRIGHT HOLDERS AND/OR OTHER PARTIES PROVIDE THE LIBRARY "AS IS" WITHOUT WARRANTY OF ANY KIND, Either EXPRESSED OR IMPLIED, INCLUDING, BUT NOT LIMITED TO, THE IMPLIED WARRANTYES OF MERCHANTABILITY AND FITNESS FOR A PARTICULAR PURPOSE. THE ENTIRE RISK AS TO THE QUALITY AND
PERFORMANCE OF THE LIBRARY IS WITH YOU. SHOULD THE LIBRARY PROVE DEFECTIVE, YOU ASSUME THE COST OF ALL NECESSARY SERVICING, REPAIR OR CORRECTION.
- IN NO EVENT UNLESS REQUIRED BY APPLICABLE LAW OR AGREED TO IN WRITING WILL ANY COPYRIGHT HOLDER, OR ANY OTHER PARTY WHO MAY MODIFY AND/OR REDISTRIBUTE THE LIBRARY AS PERMITTED ABOVE, BE LIABLE TO YOU FOR DAMAGES, INCLUDING ANY GENERAL, SPECIAL, INCIDENTAL OR CONSEQUENTIAL DAMAGES ARISING OUT OF THE USE OR INABILITY TO USE THE LIBRARY (INCLUDING BUT NOT LIMITED TO LOSS OF DATA OR DATA BEING RENDERED INACCURATE OR LOSSES SUSTAINED BY YOU OR THIRD PARTIES OR A FAILURE OF THE LIBRARY TO OPERATE WITH ANY OTHER SOFTWARE), EVEN IF SUCH HOLDER OR OTHER PARTY HAS BEEN ADVISED OF THE POSSIBILITY OF SUCH DAMAGES.
END OF TERMS AND CONDITIONS
MEDION

- G-Sensor (G-Trigger)
- Frequenz (Frequency)
- Ralenti (Slow Motion)
- MIN, 5 MIN ou 15 MIN.
- Films en Foto's opnemen
- LET OP!
- LED indicator
- Frequentie (Frequency)
- About these instructions 319
- Declaration of conformity 322
- Safety information
- About this device 337
- Overview of the device 338
- First use 34
- First steps 3
- Using the accessories 349
- OLED display 3
- Capturing videos and photos 355
- Wrist strap remote control 403
- About these instructions
- Symbols and key words used in these instructions
- Proper use
- Declaration of conformity
- General
- DANGER!
- Notes on disconnecting from the power supply
- 3.3.Warnings
- Instructions for the battery
- WARNING!
- Safety precautions
- NOTICE!
- Never carry out repairs yourself
- Water resistance
- Important information to note before diving:
- About this device
- Package contents
- Overview of the device
- Front
- Rear
- Wrist strap remote control
- First use
- Inserting the battery
- Charging the battery
- Inserting and removing microSD cards
- Inserting the card
- Switching the camcorder on and off
- First steps
- Switching on the camcorder
- Switching off the camcorder
- Functions of the buttons
- LED indicators
- Changing the operating mode
- Using the accessories
- Waterproof casing
- Using the waterproof casing
- Switching the rear casing panel
- Fitting the accessories
- OLED display
- Selecting different modes
- Capturing videos and photos
- Recording videos
- Taking photos
- Time-lapse photography
- Burst (continuous shooting)
- Self-timer
- Using Wi-Fi
- Delete function
- CAUTION!
- The menus
- Photo/video settings
- Video menu
- Slow motion
- Photo mode
- Photo resolution
- Burst
- Self-timer
- Sensor Flip
- Auto mode (car DV)
- Video resolution
- Time-lapse
- Looping
- Sensor flip
- G sensor (G trigger)
- Setting the sensitivity of the G sensor (G sensitivity)
- Microphone
- Enable Sport mode (sport DV)
- Microphone
- System menu 1
- Stabiliser (DIS)
- Dynamic contrast (WDR)
- OSD Flip
- Display brightness
- Sound (Beep)
- Date stamp
- Automatic switch-off (Auto Power Off)
- System menu 2
- Date and time
- Remote control
- Frequency
- Format
- Reset to factory defaults
- Change Wi-Fi password
- Version
- Wrist strap remote control
- Changing the battery
- Connecting to an external screen
- Connecting to a PC
- System requirements
- Control via a smartphone/tablet
- Cleaning
- Disposal
- Packaging
- Appliance
- Batteries
- Technical data
- USB MAINS ADAPTER
- BATTERY
- REMOTE CONTROL
- Legal information
- Indholdsfortegnelse
- Om donne brugsanvising 421
- Overensstemmelseserklaering 424
- Toner (Beep)
- Frekvens (Frequency)
- USB-STRØMFORSYNING
- Preamble
- TERMS AND CONDITIONS FOR COPYING, DISTRIBUTION AND MODIFICATION
- NO WARRANTY
- END OF TERMS AND CONDITIONS
- MEDION
Brand : MEDION
Model : S89038 (MD 87156)
Category : Action camera