USER MANUAL DIE 2B19 A INDESIT
THANK YOU FOR BUYING AN INDESIT PRODUCT
In order to receive more complete assistance, please register your appliance at: www.Indesit.com/register

WWW
You can download the Safety Instructions and the User Manual by visiting our website docs.indesit.eu and following the instructions on the back of this booklet.
Before using the appliance, carefully read the Safety Instructions guide.
PRODUCT DESCRIPTION
APPLIANCE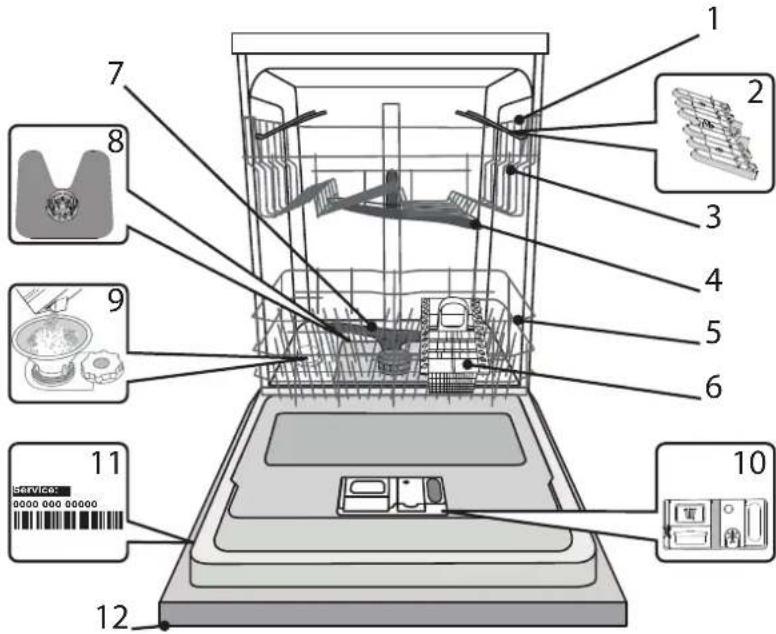
- Upper rack
- Foldable flaps
- Upper rack height adjuster
- Upper spray arm
- Lower rack
- Cutlery basket
- Lower spray arm
- Filter Assembly
- Salt reservoir
- Detergent and Rinse Aid dispensers
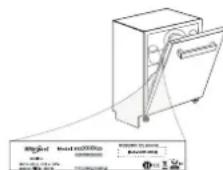
- Rating plate
- Control panel
CONTROL PANEL
- ON-OFF / Reset button with indicator light
- Program selection button / Push&GO
- Salt refill indicator light
- Program indicator lights
- START/Pause button with indicator light
FIRST TIME USE
SALT, RINSE AID AND DETERGENT
ADVICE REGARDING THE FIRST TIME USE
After installation, remove the stoppers from the racks and the retaining elastic elements from the upper rack.
FILLING THE SALT RESERVOIR
The use of salt prevents the formation of limescale on the dishes and on the machine's functional components.
- It is mandatory that the salt reservoir never be empty. It is important to set the water hardness.
The salt reservoir is located in the lower part of the dishwasher (see product description) and must be filled when the salt refill indicator light on the control panel is lit.
- Remove the lower rack and unscrew the reservoir cap (counterclockwise).
- Only the first time you do this: fill the salt reservoir with water.
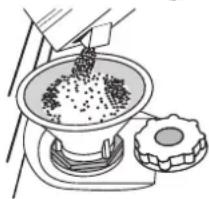
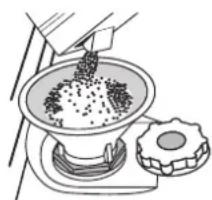
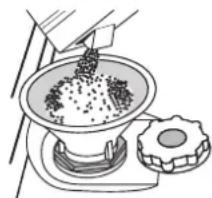
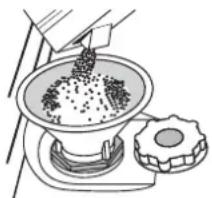
- Position the funnel (see figure) and fill the salt reservoir right up to its edge (approximately 1 kg); it is not unusual for a little water to leak out.
- Remove the funnel and wipe any salt residue away from the opening.
Make sure the cap is screwed on tightly, so that no detergent can get into the container during the wash program (this could damage the water softener beyond repair).
Whenever you need to add salt, it is mandatory to complete the procedure before the beginning of the washing cycle to avoid corrosion.
SETTING THE WATER HARDNESS
To allow the water softener to work in a perfect way, it is essential that the water hardness setting is based on the actual water hardness in your house. This information can be obtained from your local water supplier.
The factory sets the default value for the water hardness.
- Switch on the appliance by pressing the ON/OFF button.
- Switch off the appliance by pressing the ON/OFF button.
- Hold down button P for 5 seconds, until you hear a beep.
- Switch on the appliance by pressing the ON/OFF button.
- The program indicator light of the current set level flashes.
- Press button P to select the desired hardness level (see WATER HARDNESS TABLE).
| Water Hardness Table |
| Level | °dH German degrees | °fH French degrees | °C Clark English degrees |
| 1 | Soft | 0 - 6 | 0 - 10 | 0 - 7 |
| 2 | Medium | 7 - 11 | 11 - 20 | 8 - 14 |
| 3 | Average | 12 - 16 | 21 - 29 | 15 - 20 |
| 4 | Hard | 17 - 34 | 30 - 60 | 21 - 42 |
| 5 | Very hard | 35 - 50 | 61 - 90 | 43 - 62 |
- Switch off the appliance by pressing the ON/OFF button.
Setting is complete!
As soon as this procedure is complete, run a program without loading.
Only use salt that has been specifically designed for dishwashers.
After the salt has been poured into the machine, the SALT REFILL indicator light switches off.
If the salt container is not filled, the water softener and the heating element may be damaged as a result of limescale accumulation.
Using salt is recommended with any type of dishwasher detergent.
FILLING THE RINSE AID DISPENSER
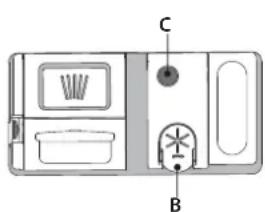
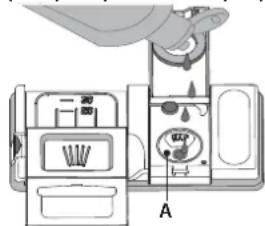
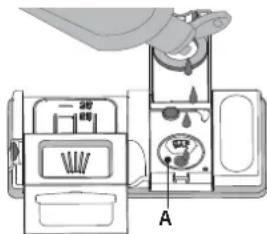
Rinse aid makes dish DRYING easier. The rinse aid dispenser A should be filled when the dark optical indicator on the dispenser door C becomes transparent.
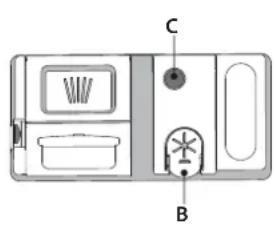
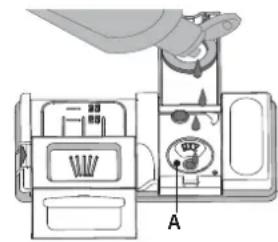
- Open the dispenser B by pressing and pulling up the tab on the lid.
- Pour in the rinse aid (max. 110 ml), making sure it does not overflow from the dispenser. If this happens, clean the spill immediately with a dry cloth.
- Press the lid down until you hear a click to close it.
Never pour the rinse aid directly into the appliance tub.
Adjusting the dosage of rinse aid
If you are not completely satisfied with the drying results, you can adjust the quantity of rinse aid used.
- Switch the dishwasher on using the ON/OFF button.
- Switch it off using the ON/OFF button.
- Press button P three times - a beep will be heard.
- Switch it on using the ON/OFF button.
- The program indicator light of the current set level flashes.
- Press button P to select the level of rinse aid quantity to be supplied.
- Switch it off using the ON/OFF button. Setting is complete!
If the rinse aid level is set to 1 (ECO), no rinse aid will be supplied. A maximum of 5 levels can be set according to the dishwasher model. The factory setting is specific to the model, please follow the instruction above to check this for your machine. - If you see bluish streaks on the dishes, set a low number (2-3). - If there are drops of water or limescale marks on the dishes, set a mid-range number (4-5).
Filling the detergent dispenser
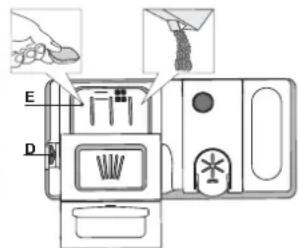
To open the detergent dispenser use the opening device D. Introduce the detergent into the dry dispenser E only. Place the amount of detergent for pre-washing directly inside the tub.
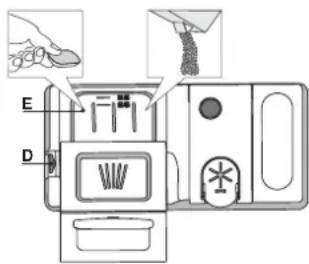
- When measuring out the detergent refer to the information mentioned earlier to add the proper quantity. Inside the dispenser E there are indications to help the detergent dosing.
- Remove detergent residues from the edges of the dispenser and close the cover until it clicks.
- Close the lid of the detergent dispenser by pulling it up until the closing device is secured in place.
The detergent dispenser automatically opens up at the right time according to the program.
Usage of detergent not designed for dishwashers may cause malfunction or damage to the appliance.
PROGRAM TABLE
| Program | Drying phase | Duration of wash program (h:min)* | Water consumption (litres/cycle) | Energy consumption (kWh/cycle) |
| 1. Eco 50° ECO | ✓ | 3:20 12.0 1.05 | | |
| 2. Intensive 65° 2:30 16.0 1.50 | ✓ | | | |
| 3. Mixed 55° 2:25 16.0 1.35 | ✓ | | | |
| 4. Fast&Clean 28' 45° | - | 0:28 9.0 0.60 | | |
| 5. Push&GO 50° PUSH& GO | ✓ | 1:25 11.5 1.10 | | |
ECO program data is measured under laboratory conditions according to European Standard EN 60436:2020.
Note for Test Laboratories:
For information on comparative EN testing conditions, please send an email to the following address: dw_test_support@whirlpool.com
Pre-treatment of the dishes is not needed before any of the programs.
*) Values given for programmes other than the eco programme are indicative only. The actual time may vary depending on many factors such as temperature and pressure of the incoming water, room temperature, amount of detergent, quantity and type of load, load balancing, additional selected options and sensor calibration. The sensor calibration can increase program duration up to 20 min.
PROGRAMS DESCRIPTION
Instructions on wash cycle selection.
1 ECO
Eco program is suitable to clean normally soiled tableware, that for this use, it is the most efficient program in terms of its combined energy and water consumption, and that it is used to assess compliance with the EU Ecodesign legislation.
2 INTENSIVE
Program recommended for heavily soiled crockery, especially suitable for pans and saucepans (not to be used for delicate items).
3 MIXED
Mixed soil. For normally soiled dishes with dried food residues.
4 FAST&CLEAN 28'
Program to be used for half load of lightly-soiled dishes with no dried food residues. Does not have drying phase.
5 PUSH&GO
Everyday wash and dry cycle that ensures great cleaning performance in a short time without the need to pre-treat dishes.
Notes:
Please note that cycle Fast&Clean 28' is dedicated for lightly soiled dishes.

PUSH&GO
Push&GO (P) button is an easily distinguishable button that allows you direct access to the Push&GO program, a wash and dry cycle that ensures great cleaning performance in a short time. You don't have to worry which program to choose, Push&GO cycle will do the work for you.
To select Push&GO program, switch on appliance, press only P button for 3 seconds (corresponding indicator lights up) and close the door within 4 seconds.
LOADING THE RACKS
UPPER RACK
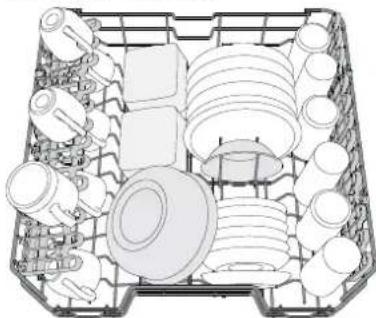
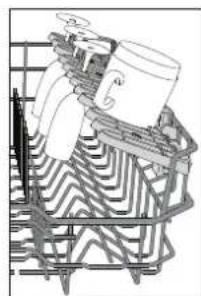
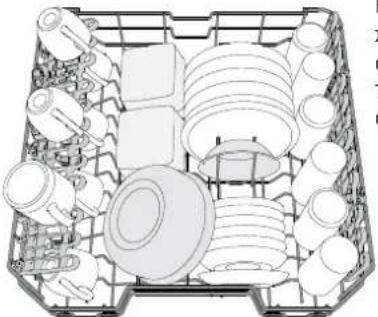
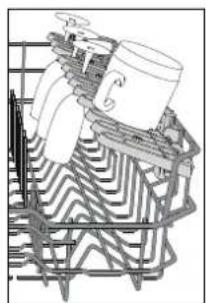
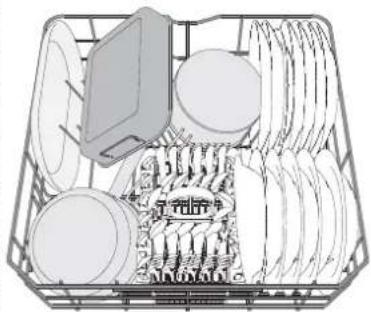
Load delicate and light dishes: glasses, cups, saucers, low salad bowls.
(loading example for the upper rack)
ADJUSTING THE HEIGHT OF THE UPPER RACK
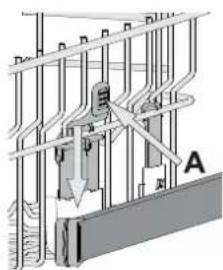
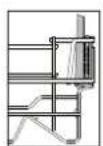
The height of the upper basket can be adjusted: high position to place bulky crockery in the lower basket and low position to make the most of the tip-up compartments by creating more space upwards.
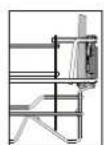
The upper rack is equipped with a Upper Rack height adjuster (see figure), without pressing the levers, lift it up by simply holding the rack sides, as soon as the rack is stable in its upper position. To restore to the lower position, press the levers (A) at the sides of the rack and move the basket downwards.
We strongly recommend that you do not adjust the height of the rack when it is loaded.
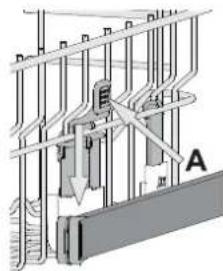
NEVER raise or lower the basket on one side only.
FOLDABLE FLAPS WITH ADJUSTABLE POSITION
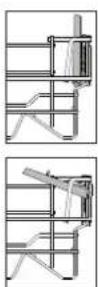
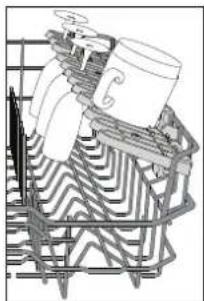
The side foldable flaps can be fold or unfold to optimize the arrangement of crockery inside the rack.
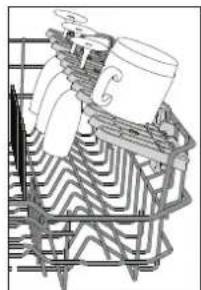
Wine glasses can be placed safely in the foldable flaps by inserting the stem of each glass into the corresponding slots.
Depending on the model:
to unfold the flaps there is needed to slide it up and rotate or release it from the snaps and pull it down.
to fold the flaps there is needed to rotate it and slide flaps down or pull it up and attach flaps to the snaps.
LOWER RACK
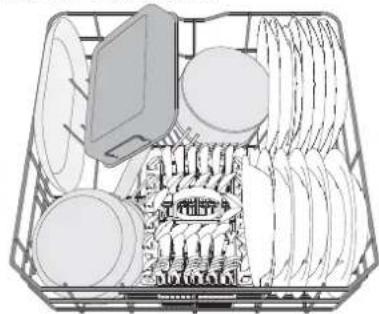
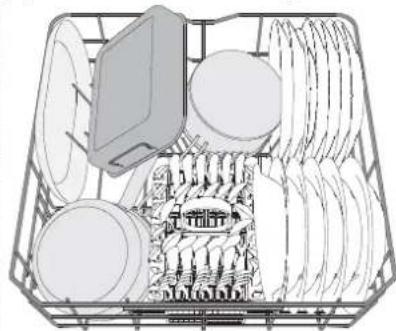
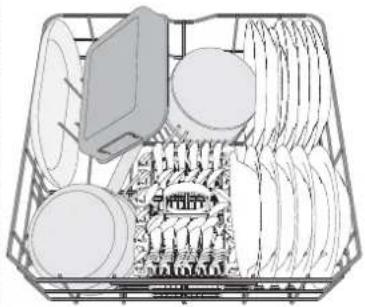
For pots, lids, plates, salad bowls, cutlery etc... Large plates and lids should ideally be placed at the sides to avoid interferences with the spray arm.
(loading example for the lower rack)
CUTLERY BASKET
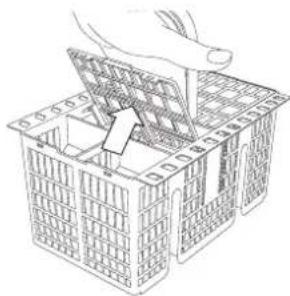
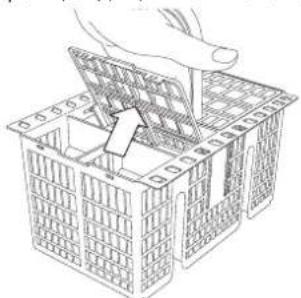
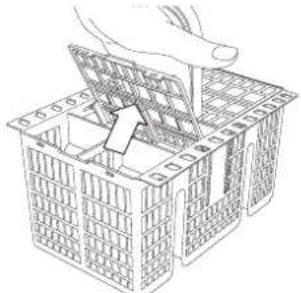
The basket is equipped with top grilles for improved cutlery arrangement. The cutlery basket should be positioned only at the front of the lower rack.

Knives and other utensils with sharp edges must be placed in the cutlery basket with the points facing downwards or they must be positioned horizontally in the tip-up compartments on the upper rack.
DAILY USE
1. CHECK WATER CONNECTION
Check that the dishwasher is connected to the water supply and that the tap is open.
2. SWITCH ON THE DISHWASHER
Open the door and press the ON/OFF button.
- LOAD THE RACKS (see LOADING THE RACKS)
4. FILLING THE DETERGENT DISPENSER
5. CHOOSE THE PROGRAM AND CUSTOMISE THE CYCLE
Select the most appropriate program in accordance with the type of crockery and its soiling level (see PROGRAMS DESCRIPTION) by pressing the P button.
6. START
Start the wash cycle by pressing START/Pause button (led is lit) and closing the door within 4 sec. When the program starts you hear a single beep. If the door was not closed within 4sec., the alarm sound will be played. In this case, open the door, press START/Pause button and close the door again within 4 sec.
7. END OF WASH CYCLE
The end of the wash cycle is indicated by beeps and by the flashing of the indicator light of the selected program. Open the door and switch off the appliance by pressing the ON/OFF button. Wait for a few minutes before removing the crockery - to avoid burns. Unload the racks, beginning with the lower one.
The machine will switch off automatically during certain extended periods of inactivity, in order to minimise electricity consumption. If the crockery is only lightly soiled or if it has been rinsed with water before being placed in the dishwasher, reduce the amount of detergent used accordingly.
MODIFYING A RUNNING PROGRAM
If a wrong program was selected, it is possible to change it, provided that it has only just begun: open the door, press and hold the ON/OFF button, the machine will switch off. Switch the machine back on using the ON/OFF button and select the new wash cycle and any desired options; Start the wash cycle by pressing START/Pause button and closing the door within 4 sec.
Without switching off the machine, open the door (START/Pause led starts blinking) (be ware of HOT steam!) and place the crockery inside the dishwasher. Press the START/Pause button and close the door within 4 sec., the cycle will resume from the point at which it was interrupted.
ACCIDENTAL INTERRUPTIONS
If the door is opened during the wash cycle, or if there is a power cut, the cycle stops. Press the START/Pause button and close the door within 4 sec., the cycle will resume from the point at which it was interrupted.
ADVICE AND TIPS
TIPS
Before loading the baskets, remove all food residues from the crockery and empty the glasses. You do not need to rinse beforehand under running water.
Arrange the crockery so that it is held in place firmly and does not tip over; and arrange the containers with the openings facing downwards and the concave/convex parts placed obliquely, thus allowing the water to reach every surface and flow freely.
Warning: lids, handles, trays and frying pans do not prevent the sprayer arms from rotating.
Place any small items in the cutlery basket.
Very soiled dishes and pans should be placed in the lower basket because in this sector the water sprays are stronger and allow a higher washing performance.
After loading the appliance, make sure that the sprayer arms can rotate freely.
UNSUITABLE CROCKERY
Wooden crockery and cutlery. - Delicate decorated glasses, artistic handicraft and antique crockery. Their decorations are not resistant. - Parts in synthetic material which do not withstand high temperatures. Copper and tin crockery. Crockery soiled with ash, wax, lubricating grease or ink.
The colours of glass decorations and aluminium/silver pieces can change and fade during the washing process. Some types of glass (e.g. crystal objects) can become opaque after a number of wash cycles too.
DAMAGE TO GLASS AND CROCKERY
- Only use glasses and porcelain guaranteed by the manufacturer as dishwasher safe.
- Use a delicate detergent suitable for crockery.
- Collect glasses and cutlery from the dishwasher as soon as the wash cycle is over.
TIPS ON ENERGY SAVING
- When the household dishwasher is used according to the manufacturer's instructions, washing tableware in a dishwasher usually consumes less energy and water than hand dishwashing.
- In order to maximize dishwasher efficiency it is recommended to initiate the wash cycle once dishwasher is fully loaded. Loading the household dishwasher up to the capacity indicated by the manufacturer will contribute to energy and water savings. Information on correct loading of tableware can be found in Loading chapter. In case of partial loading it is recommended to use dedicated wash options if available (Half load/ Zone Wash, Multizone), filling up only selected racks. Incorrect loading or overloading the dishwasher may increase resources usage (such as water, energy and time, as well as increase noise level), reducing cleaning and drying performance.
- Manual pre-rinsing of tableware items leads to increased water and energy consumption and is not recommended.
HYGIENE
To avoid odour and sediment which can be accumulated in the dishwasher please run a high temperature program at least one a month. Use a tea spoon of detergent and run it without the loading to clean your appliance.
CARE AND MAINTENANCE
CLEANING THE FILTER ASSEMBLY
Regularly clean the filter assembly so that the filters do not clog and that the waste water flows away correctly.
Using the dishwasher with clogged filters or foreign objects inside the filtration system or spray arms may cause the unit to malfunction, resulting in loss of performance, noisy operation, or higher resource usage.
The filter assembly consists of three filters which remove food residues from the washing water and then recirculate the water.
The dishwasher must not be used without filters or if the filter is loose.
At least once per month or after each 30 cycles, check the filter assembly and if necessary clean it thoroughly under running water, using a non-metallic brush and following the instructions below:
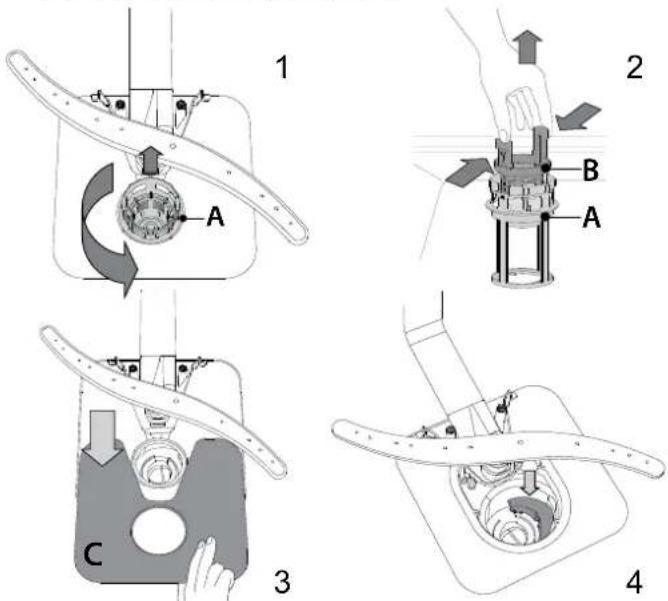
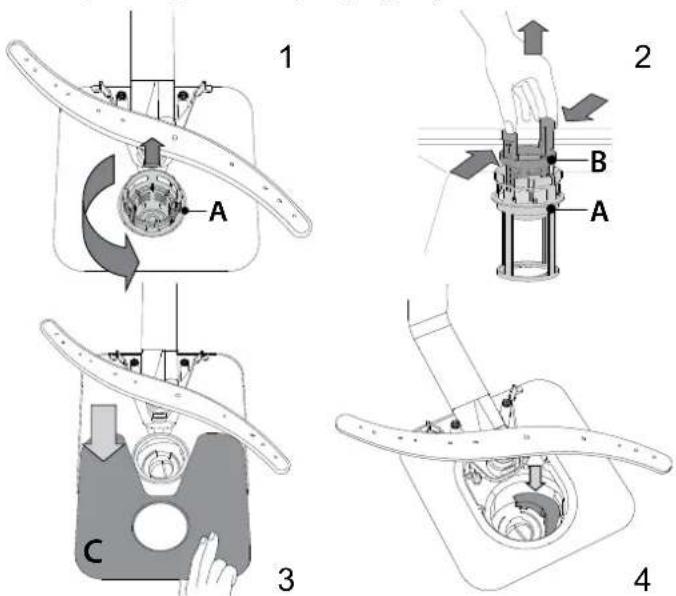
- Turn the cylindrical filter A in an anti-clockwise direction and pull it out (Fig 1).
- Remove the cup filter B by exerting a slight pressure on the side flaps (Fig 2).
- Slide out the stainless-steel plate filter C (Fig 3).
- In case you find foreign objects (such as broken glass, porcelain, bones, fruit seeds etc.) please remove them carefully.
- Inspect the trap and remove any food residues. NEVER REMOVE the wash-cycle pump protection (black detail) (Fig 4).
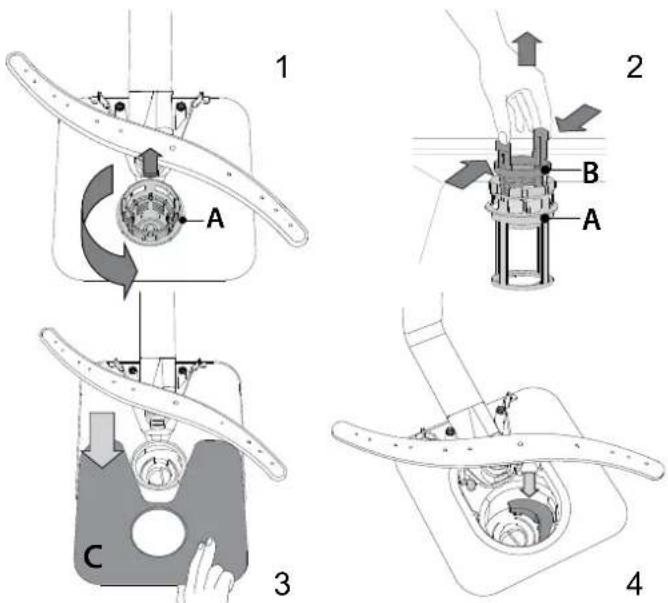
After cleaning the filters, re-place the filter assembly and fix it in position correctly; this is essential for maintaining the efficient operation of the dishwasher.
CLEANING THE WATER INLET HOSE
If the water hoses are new or have not been used for an extended period of time, let the water run to make sure it is clear and free of impurities before performing the necessary connections. If this precaution is not taken, the water inlet could become blocked and damage the dishwasher.
CLEANING THE SPRAY ARMS
On occasions, food residue may become encrusted onto the spray arms and block the holes used to spray the water. It is therefore recommended that you check the arms from time to time and clean them with a small non-metallic brush.
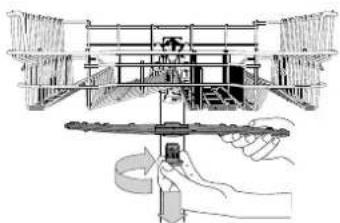
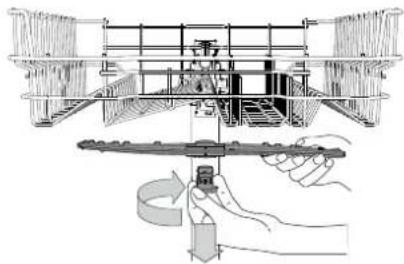
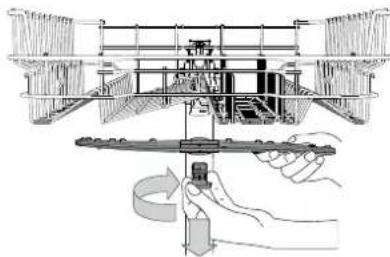
To remove the upper spray arm, turn the plastic locking ring in a clockwise direction. The upper spray arm should be replaced so that the side with the greater number of holes is facing upwards.
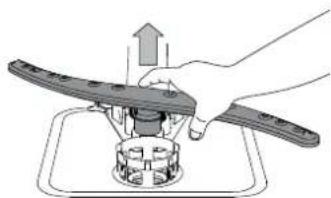
The lower spray arm may be removed by pulling it upwards.
WATER SOFTENING SYSTEM
Water softener automatically reduces water hardness, consequently preventing scale buildup on heater, contributing also to better cleaning efficiency.
This system regenerates itself with salt, therefore it is required to refill salt container when empty.
Frequency of regeneration depends on water hardness level setting regeneration takes place once per 5 Eco cycles with water hardness level set to 3.
Regeneration process starts in final rinse and finishes in drying phase, before cycle ends.
- Single regeneration consumes: ~3.5 L of water;
- Takes up to 5 additional minutes for the cycle; Consumes below 0.005 kWh of energy.
TROUBLESHOOTING
In case your dishwasher doesn't work properly, check if the problem can be solved by going through the following list. For other errors or issues please contact authorized After-sales Service which contact details can be found in the warranty booklet. Spare parts will be available for a period of either up to 7 or up to 10 years, according to the specific Regulation requirements.
| PROBLEMS POSSIBLE CAUSES SOLUTIONS | |
| Salt indicator is lit | Salt reservoir is empty. (After refill the salt indicator may remain lit for several wash cycles). | Refill reservoir with salt (for more information - see page 2). Adjust water hardness - see table, page 2. |
| The dishwasher won't start or does not respond to commands. | The appliance has not been plugged in properly. | Insert the plug into the socket. |
| Power outage. | For safety reasons, dishwasher will not re-start automatically when power returns. Open dishwasher door, press START/Pause button and close the door within 4 seconds. |
| The dishwasher door is not closed. Vigorous | y push the door until you hear the "click". |
| Cycle is interrupted by door opening for more than 4 seconds. | Press START/Pause and close the door within 4 seconds. |
| It does not respond to commands. | Switch off the appliance by pressing the ON/OFF button, switch it back on after approximately one minute and restart the program. If problem persists, unplug the appliance for 1 minute, then plug it back in. |
| The dishwasher won't drain. | The wash cycle has not finished yet. Wait until the wash cycle finishes. | |
| The drain hose is bent. Check that the drain hose is not bent (see INSTALLATION INSTRUCTION). | |
| The sink drain pipe is blocked. Clean the sink | drain pipe. |
| The filter is clogged up with food residues. | Clean the filter (see CLEANING THE FILTER ASSEMBLY). |
| The dishwasher makes excessive noise. | The dishes are rattling against each other. | Position the crockery correctly (see LOADING THE RACKS). |
| An excessive amount of foam has been produced. | The detergent has not been measured out correctly or it is not suitable for use in dishwashers (see FILLING THE DETERGENT DISPENSER). Restart the current cycle by switching OFF the dishwasher, then switch it on again, select a new program, press START/Pause and close the door within 4 seconds. Please do not add any detergent. |
| The dishes are not clean. | The crockery has not been arranged properly. | Arrange the crockery correctly (see LOADING THE RACKS). |
| The spray arms cannot rotate freely, being hindered by the dishes. | Arrange the crockery correctly (see LOADING THE RACKS). |
| The wash cycle is too gentle. Select an appropriate wash cycle (see PROGRAMS TABLE). | priate wash cycle (see PROGRAMS TABLE). |
| An excessive amount of foam has been produced. | The detergent has not been measured out correctly or it is not suitable for use in dishwashers (see FILLING THE DETERGENT DISPENSER). |
| The cap on the rinse aid compartment has not been shut correctly. | Make sure the cap of the rinse aid dispenser is closed. |
| The filter is soiled or clogged. Clean the filter | assembly (see CARE AND MAINTENANCE). |
| There is no salt. Fill the salt reservoir (see FILLING THE SALT RESERVOIR). | |
| The dishwasher does not fill the water. | No water in the water supply or the tap is closed. | Make sure there is water in the water supply or the tap running. |
| All LEDs are blinking rapidly. | The inlet hose is bent. | Make sure the inlet hose is not bent (see INSTALLATION) reprogram the dishwasher and reboot. |
| The sieve in the water inlet hose is clogged; it is necessary to clean it | After having carried out the verification and cleaning, turn off and turn on the dishwasher and restart a new program. |
| Dishwasher finishes the cycle prematurely. | Drain hose positioned too low or siphoning into home sewage system. | Check if end of drain hose is placed at correct height (see INSTALLATION). Check for siphoning into home sewage system, install air admittance valve if necessary. |
| Air in water supply. Check water supply for leaks or other issues letting air inside. | aks or other issues letting air inside. |

- Visiting our website docs.ingesit.eu and parts-selfservice.whirlpool.com Using QR Code
- Alternatively, contact our After-sales Service (See phone number in the warranty booklet). When contacting our After-sales Service, please state the codes provided on your product's identification plate.
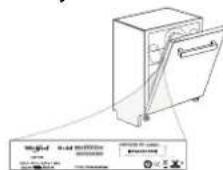
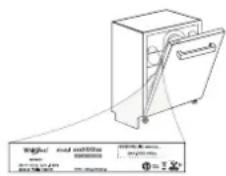
The model information can be retrieved using the QR-Code reported in the energy label. The label also includes the model identifier that can be used to consult the portal of the registry at https://eprel.ec.europa.eu.
РыковдостBO 3A BCEKNДHEBHA
CπPABKA

BJIAGOJAPIM BUNY3AKUYNXTE IPOJKT HA
INDESIT.3a da nonyuabaTe no-ntbHcBdEueCTBne, perncpupaTe Baunu ypei Ha:
www.indesit.com/register

WWW
Moxkete da n3TeIne VHCTpyKuNTe 3a 6e3oNaCHOCTn PkoBDCTBTO 3a NOTpe6nte, KATO NOcEteHauny e6caT docs.ingesit.eu n CNEBaTe yka3aHnraTa Ha 3aHaTAt Kopuca Ha Ta3N KHnKKa.
Ipeu da n3non3BaTe ypea, npooyete BnHMaTeHo INcTpyKmnte 3a 6e3onacHocT.
Описиме на порodyкта
yPEN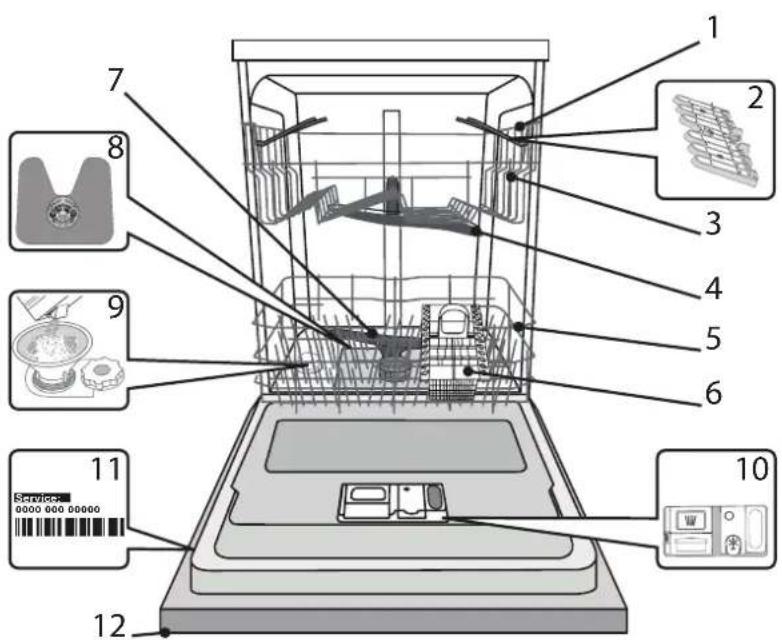
- TopHa KooHnHa 2.CrbBaemn kana
- PerylaTOp 3a BnCOUnHaTa Ha roPHaTa KoUHnIa
- TOpHo pa3npbckBaAio pAmO 5.Донна кошница
- KoUSHnUka 3a npn6Opn 7.Долно pa3npbckBaaso paMo 8.ФнтbpenВb3eI
- Pe3epBoap 3a con 10.Доэтори за пpenapat Иnomошно cpeICTBO 3a nIJIaKBAHe
- Table with data
- Control panel
CONTROL PANEL
- Button BkI.-N3K.I./Hynnpahe cbc CBetnHEn HndkaTOp
- Button for program selection/ Push&GO
- Light indicator for charging
- Light indicator for program
- Start/Stop button with LED indicator
For household use only
With the help of a cleaning and washing agent
Light for use for the first time
Remove the protective plugs from the ends and the packaging parts from the top end.
FILLING THE SALT RESERVOIR
The use of salt prevents the formation of limescale on the surfaces and functional components of the machine.
Always keep the salt reservoir filled, never leave it empty.
The water hardness is set.
The salt reservoir is located in the lower part of the machine (see PRODUCT DESCRIPTION) and must be filled when the salt indicator light is on.
- Remove the lower basket and unscrew the cap of the reservoir (counterclockwise).
- Only the first time you do this: fill the salt reservoirs with water.
- Place the funnel (see figure) and fill the salt reservoir up to the rim (about 1 kg); it is not unusual for a little water to overflow.
- Remove the funnel and wipe away any salt residue.
Make sure the cap is screwed on tightly, so that during the washing program it cannot come off and enter the reservoir (this could irreparably damage the water softener).
When you need to add salt, it is essential to do this before starting a wash cycle, to avoid corrosion.
SETTING THE WATER HARDNESS
For the water softener to work perfectly, it is especially important that the hardness setting is based on the actual hardness of the water in your home. You can obtain this information from your local water supplier.
The default water hardness setting is factory-set.
Turn on the appliance by pressing the ON/OFF button. - Turn off the appliance by pressing the ON/OFF button. - Press and hold the P button for 5 seconds until you hear a sound signal. Turn on the appliance by pressing the ON/OFF button. The indicator light for the current set level will flash. - Press the P button to select the desired hardness level (see TABLE OF WATER HARDNESS).
| Таблиca на Тьрдостта на Ворадао |
| Ниво | °dH
Германский
градусn | °FH
Фреенский
градусn | °CClark
Англиский
градуca |
| 1 | Meka | 0 - 6 | 0 - 10 | 0 - 7 |
| 2 | Умeperна | 7 - 11 | 11 - 20 | 8 - 14 |
| 3 | Среда | 12 - 16 | 21 - 29 | 15 - 20 |
| 4 | Тьрда | 17 - 34 | 30 - 60 | 21 - 42 |
| 5 | Мноgo Тьрда | 35 - 50 | 61 - 90 | 43 - 62 |
- Turn off the appliance by pressing the ON/OFF button.
The setting is complete!
After completing the procedure, run the program without dishes.
This appliance is intended for household use only.
When you put salt in the machine, the salt indicator light goes out.
If the salt container is not filled, it is possible that the water softener and the heating element may be damaged as a result of rinsing.
The use of salt is recommended for all types of detergent.
FILLING THE RINSE AID DISPENSER
The use of rinse aid improves drying. The rinse aid reservoir must be filled when the indicator on the reservoir cap is clear.
- Open the dispenser by pressing and pulling the tab or cap.
- Carefully add rinse aid up to the maximum (110 ml) reference mark on the filling opening - avoid spilling. If this happens, wipe up the spill immediately with a dry cloth.
- Press the cap down until you hear a click to close it. Never pour rinse aid directly into the tub.
ADJUSTING THE RINSE AID DOSAGE
If you are not satisfied with the drying results, you can adjust the amount of rinse aid used. Turn on the dishwasher with the ON/OFF button. - Turn off with the ON/OFF button. - Press the P button three times - you will hear a sound signal. Turn on the ON/OFF button. The indicator light for the current setting level will flash. Press the P button to select the desired level of rinse aid quantity.
- Turn off with the ON/OFF button.
The setting is saved! If the rinse aid level is set to 1 (ECO), no rinse aid will be dispensed. Depending on the model of the dishwasher, a maximum of 5 levels can be set. The factory setting is specific to each model; follow the instructions above to check the setting for your machine. - If you see water stains on your dishes, set a lower level (2-3). - If there are water drops or limescale on your dishes, set a higher level (4-5).
FILLING THE DETERGENT DISPENSER
To open the detergent dispenser, use the accessory D. Pour the detergent into the dry dispenser E. Place the amount of detergent for the pre-wash directly into the tub.
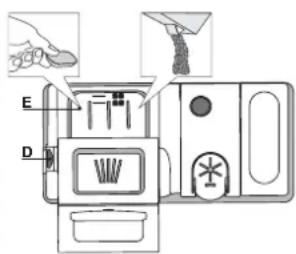
- For measuring the preparation, use the information provided to add the right amount. The dispenser is an indicator to help with the dosing and the preparation.
- Remove the remaining preparation from the dispenser and close the cap, while it is still in place.
- Close the cap of the dispenser for the preparation by turning it upwards, until the locking mechanism is securely in place.
The dispenser for the preparation is released automatically at the correct time according to the program.
Using the preparation with a machine that is not intended for it may cause malfunction or damage to the device.
FILLING THE CONTAINERS
TOP CONTAINER
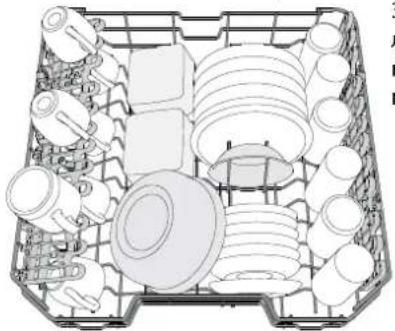
Fill the containers with the following: thickeners, powders, liquids, and cups for the salad.
(Example of filling the top container)
ADJUSTING THE HEIGHT OF THE TOP CONTAINER
The height of the top container can be adjusted: high position for placing large containers in the lower container, low position for extended use of the supports, by lifting the container upwards and releasing it from the lower container.
The top container is equipped with a height regulator (see figure). Without pressing the buttons, lift upwards, simply hold the container and remove the upper part until the container becomes stable in the higher position.
To return to the lower position, press the buttons and lower the container downwards.
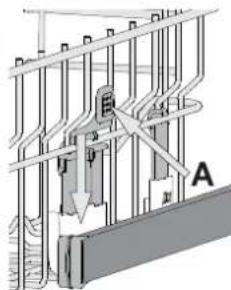
We recommend not adjusting the height of the container when it is filled.
Never lift or lower the container with only one hand.
Position the hoses so that they can be connected without damaging the hoses in the cabinet.
The hoses for the inlet can be placed safely in the cabinet, as each hose should be inserted into the corresponding one.
Depending on the model:
- To remove the hoses, it is necessary to lift them up and turn them to release them from the clamps and then pull them out.
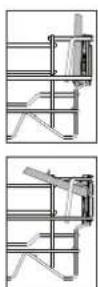
- To install the hoses, it is necessary to turn and lift the hoses up or lower them and then secure them with the clamps.
DISHWASHER
For cutlery, hoses, fittings, and similar items, the fittings and hoses should be placed on the left in all cases to avoid obstructing the rotating arm.
(example for arranging the lower basket)
CUTLERY BASKET
It is equipped with a top grid for better protection of the items. It should be positioned only on the front side of the lower basket.
Knives and other sharp items with sharp blades should be placed in the cutlery basket with the sharp end down and positioned horizontally in the compartments of the top grid.
DAILY USE
1. CHECKING THE WATER CONNECTION
Check that the dishwasher is connected to the water supply and that the tap is open.
2. LOADING THE DETERGENT AND SOFTENER
Open the detergent drawer.
3. SELECTING THE PROGRAM
(See. PROGRAM SELECTION)
4. DOSING THE DETERGENT FOR THE WASH CYCLE
5. SELECT AND PERSONALIZE THE PROGRAM
Select the appropriate program according to the type of fabric and the degree of soiling (see. PROGRAM DESCRIPTION) by pressing the P button.
Select the desired options (see. OPTIONS AND FUNCTIONS).
6. START
Start the wash cycle by pressing the START/PAUSE button (the indicator light comes on) and close the door within 4 seconds. When the program starts, a beep will sound. If the door is not closed within 4 seconds, an audible alarm will sound. In this case, open the door, press the START/PAUSE button again, and close the door within 4 seconds.
7. END OF PROGRAM
The end of the wash cycle is signaled by a beep, and the indicator light of the selected program on the display goes off. Open the door and turn off the appliance by pressing the ON/OFF button.
Unplug the appliance before cleaning it to avoid danger. Clean the appliance starting from the top of the drum.
The machine switches off automatically after a certain period of inactivity to minimize energy consumption.
If the fabrics are only slightly soiled or if they have been rinsed in water before being placed in the washing machine, reduce the amount of detergent used accordingly.
If you have chosen the wrong program, you can change it, provided that the current program has not started yet: Open the door, press the START/STOP button, the machine will turn off. Turn the machine back on with the START/STOP button and select the new program for washing and drying; Start the program by pressing the START/PAUSE button and close the door within 4 seconds.
ADDING LAUNDRY
Without turning off the machine, open the door (the START/PAUSE light will go off) (be careful with the hot water) and place the laundry in the machine. Press the START/PAUSE button and close the door within 4 seconds. The program will resume from the point where it was interrupted.
INTERRUPTED PROGRAMS
If the door was opened during a washing program, the program stops. To resume the program, close the door, press the START/PAUSE button, and close the door within 4 seconds.
USEFUL TIPS
TIPS
Before loading the laundry, remove all leftover food from the dishes and empty the containers. It is not necessary to rinse them with hot water beforehand.
Arrange the dishes so that they are well covered and do not turn over; arrange the dishes and place the cutlery/basket parts so that the water can reach every surface and flow freely.
Warning: knives, forks, spoons and other sharp items must not protrude beyond the racks.
Place the cutlery basket in the appliance. Very dirty dishes and pans should be placed in the lower basket, as in this sector the water jets are stronger and allow better washing efficiency. After loading the dishes, check that the spray arms can rotate freely.
DISHES NOT SUITABLE
- Wooden dishes and cutlery. - Delicate items with decorations, artistic handcrafted dishes and antiques. Their decorations are not resistant. - Parts made of synthetic materials that are not resistant to high temperatures. - Dishes with metal decorations. - Very dirty dishes with burnt-on food, ash, or abrasive materials. - Colored decorations on glass and parts made of aluminum/silver may change and fade during the washing process. - Some glass items (e.g., crystal items) may become opaque after repeated washing.
DAMAGE TO THE APPLIANCE AND DISHES
This appliance is intended for household use only and the warranty is not valid if it is used for commercial purposes. Use only detergents and additives suitable for dishwashers. Improper use or maintenance of the dishwasher may void the warranty.
ENERGY SAVING TIPS
When the household dishwasher is used according to the manufacturer's instructions, washing dishes in the dishwasher usually consumes less energy and water than washing by hand. To maximize the efficiency of the dishwasher, it is recommended to start the cycle only when the machine is fully loaded. Loading the household dishwasher to its capacity, the dishwasher will help to save energy and water. Information about the correct loading of the dishes can be found in the chapter LOADING THE DISHES. Partial loading is recommended to use the specially designed programs (Half load/Zone Wash/Multizone), filling only the selected baskets. Incorrect loading or overloading of the dishwasher may increase the consumption of resources (such as water, energy and time, as well as increase the noise level), which will reduce the efficiency of washing and drying. - Pre-rinsing the dishes by hand with water will increase the consumption of water and energy, so it is not recommended.
CLEANING
To avoid unpleasant odors that can accumulate in the dishwasher, run a program with a high temperature at least once a month. Use a dishwasher cleaner and run the empty appliance without loading dishes, to clean it.
MAINTENANCE
CLEANING THE FILTERS
Clean the filters regularly, so that the filters do not get clogged and the water can be drained properly.
Using the dishwasher with clogged filters or with filters that are not properly installed in the filtration system can cause damage to the appliance and lead to deterioration of the working characteristics, noise during operation or increased consumption of resources.
The filter system consists of three filters that trap food residues from the washing water and thus recycle the water.
The dishwasher must not be used without filters if the filters are loose.
At least once a month or every 30 cycles, check the filter block and if necessary clean it carefully with warm water, using a soft brush and following the instructions below:
1. Turn the coarse filter counterclockwise to remove it (Fig.2.1). 2. Remove the flat filter B, applying light pressure on the side tabs (Fig.2). 3. Pull out the fine filter - the cylinder from the bottom of the tub (Fig.2.3). 4. In case you find foreign objects (such as broken glass, coins, bones, fruit seeds, etc.) remove them carefully. 5. Clean the filters and remove the food residues. NEVER remove the drain pump cover (black element) (Fig.4).
After cleaning the filters, put the filter block back in place and secure it properly; this is of key importance for maintaining the efficient operation of the dishwasher.
FILLING THE WATER TANK
If the water tank is new or has not been used for a long time, let the water run to make sure it is free of blockages before lifting the tank. If this tank is not taken, the water inlet may be blocked or damaged.
CLEANING THE SPRAY ARMS
The remaining food residue can dry on the spray arms and clog the water spray holes. It is therefore recommended to check the arms from time to time and clean them with a soft non-metallic brush.
To remove the upper spray arm, unscrew the
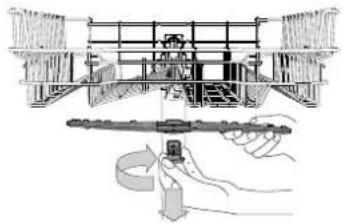
nut for the upper spray arm, unscrew the plastic locking ring in the direction of the arrow. The upper spray arm should be positioned so that the side with the larger number of holes is facing up.
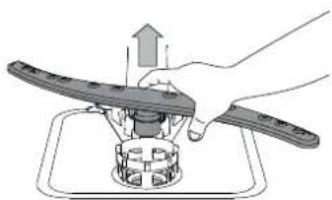
You can remove the lower spray arm by pulling it upward.
WATER SOFTENING SYSTEM
The softener automatically hardens the water, which through this process converts the pressure of the valve to the heater and increases the efficiency of the supply.
The system regenerates itself with salt, so it is necessary to fill the container with salt when it is empty.
The frequency of regeneration depends on the setting of the water hardness level - regeneration is performed every few cycles with the water hardness level set to 3. The regeneration process starts at the beginning of the last rinse and ends at the beginning of the drying phase, when it is about to finish.
- One regeneration uses: ~3.5 liters of water; 5 additional minutes are added to the cycle; less than 0.005 kWh of energy is consumed.
TROUBLESHOOTING
In case the dishwasher does not work normally, check if the problem can be solved by reading the following list. For other types of malfunctions, contact the after-sales service department, and you can find the contact details in the warranty booklet. Spare parts will be available for a period of 7 to 10 years, in accordance with the regulatory requirements.
| ПОНБЛЕМВВБЗМОЖН ПРИЧИН PEШЕНИЯ |
| SbIинданкововлдддддддддддддддддддддддддддддддддддддддддддддддддддддддддддддддддддддддддддддддддддддддддддддддддддд徳п. | Релервоггьт 3а сол e праэен. (След дочьвае на сол Инданкововлдддддддддддддддддддддддддддддддддддддддддддддддддддддддддддддддддддддддддддддддддддддддддддддд徳п. OБеяларгьт TBрсDocTы на ВODа - ВЖКТа TбДицата, CTAPТПауэи 3a и Зотькалы. | Наллгете OTНОВе релервоггьддддддддддддддддддддддддддддддддддддддддддддддддддддд徳п. CBПССССССССССССССССССССССССССССССССССССССССССССССССССССССССССССССССССССССССССССССССССССССССССССССССССССCS |
| Сыдмогината Машлиа He STAPТИпЯп He PEARIPA Na KOMAHДи. | Уретгьт He E BKNIOUeB H KOHTA KaKTO TrPABBA. | Клочete сцпеса в контakta. |
| Спираны He zaxpaHANHeTo. | Оп сьбражени за 6ьзонохостсьдмогинata машина можеда He STAPТИп气но StEDпсКане He IeKTPOZaXpAHBaHTo. OТВоретe bPavtchka, HatИснс悔уюп STAPТПауэи 3a andВorotete bPavtchka в рамкinte Ha 4 ceKunHДи. |
| Вразчката Ha CBdOMIMANHATA He e 3a TbOpeHepa. | Иснс havе bPavtchka tca cInno,doKato chyete uprakbahe. |
| LICKlbT e ppekbschat ot STBparHne Ha Bpavtchka tza loobuee ot 4 cekuHДи. | HATINCHETe CTAPT/Play3a n 3aTbOpTe Bpavtchka b PAMKITE Ha 4 ceKunHДи. |
| He pearupa Na Komahm. | ИЗКПLOЧЕу урета,kaToHaTINCHETe 6byOHa BKL./N3KJI, BKNIOUeTeЯ OTHOBO cIed Okolnye edna MUNHnHa H NUYIpaNTe pRORpAMTa. Ako proBleMST He 6bIe ot cTpaHEn, n3KlIOUeTeурета ot sIeCenela 3a 1 MInTuHa n OTHOBO BKNIOUeTe cIeCENcena. |
| Сыдмогината Машлиа He I3TOUvBa. | Порогама Тб ооше He e 3abPbUnna. Ичakaite | порогамада zabpui. |
| Mapkytsb 3a 3aTOUVAbe e nperebHnat. | Поровете дади Маркуньт 3a 3aTOUVAbe He e nperebHnat (6x. INHCTPYKLIYIA 3A MOHTAK). |
| Трьбата 3a 3aTOUVAbe Ha MNBKATA e 3aIyUSeHа.ПОчс havete Trb6bata 3a 3aTOUVAbe Ha MNBKATA. | ПОчс havete Trb6bata 3a 3aTOUVAbe Ha MNBKATA. |
| ФИПТьрьt e 3aIyUSeH c OStaTbUoi O XPaHа | ПОчс havete ФИПТьрь. |
| Сыдмогината CBZdaba NPEKOMERHO MNGO shum. | Сыдоветe TrpakaT e edinb In Dpyr. | Поровете сьдоветe павинho (6x. 3APEXDAHE HA KOLIIHILNTE). |
| Сыздало ce e nperekalero rolamco Kolniuchte Bo pHa. | Порерathне He e n3Mpehen npavlnho mii He e noDxohuaq 3a n3NOnL3BaHe B cbDOMIMH Maishinu Ha (6x.ДOTbJIBAHE HA JDO3ATOPA 3A IOUCHCTBAUc IPENAPAT). |
| Сыздало ce e nperekalero rolamco Kolniuchte Bo pHa. | Ростаргайт e КУSUZmaKbI, KaTo n3KlIOUChte I OTHOBO BKNIOUeTe CBDOMIMH Maishinu Ha 3a6pebete HOBA pRORpAMa, HATINCHET CANT/Pla7a3Iz aZbTbOpTe bPavtchka TBA. |
| Калачкata Ha OTdelenHTo 3a nOmoUHc opeCTBO 3a n3PAnKBaHBe He e 3aTbOpeHa npavlnho. | Ростоветe CE,укалчКаТа Ha DOZaTApOHa nOmoUHc opeCTBO 3a n3PAnKBaHc e 3aTbOpeHa. |
| ФИПТьрьt e 3aMbpcH e nIi 3aIyUSeH. | ПОчс havete ФИПТьрь. МEXANBcM. |
| Hama coI. | Домлгетe релервогра 3a con (6x.ДOTbJIBAHE HA PE3EPBOAHPA 3A COI). |
| Сыдмогината Машлиа He zapeяда BODa. | He ce podabva BODa nIi KpaHbT e 3aTbOpeH. | Уberетe сe,чс pe podabva BODa nIi KpaHbT e 3oTbOpeH. |
| Mapkytsb 3a Podabva He BODa e nperebHnat. | Уberетe сe,чс mapkytsb 3a Podabva He BODa He e nperebHnat (6x. IMXme INHCTAJIPOAHE), BKNIOUeTe HoBA pRORpAMa Ha CBDOMIMH NAta Ha I reptaprtipaiye. |
| МржecTGITnBmpKya 3a Podabva He BODa e 3aIyUSeH; HeobxodimoMo e da ro NOCTHite. | След ИЗПьнlaMuHа Н р�оверкота и почstВанeto n3KlIOUeTe He BKNIOUeTe CBDOMIMH Maishinu Ha MAsHIna NRe pRORpAMa. |
| Сыдмогината Машлиа CBZdunaцюпс da Mira 6bIрZO | Mapkytsb 3a 3aTOUVAbe e nOCTaBHe TbPdRE HICKO IRI BODA tce nI3TOUBA B DomauHata KaHAlIN3aUONHc SiCTema. | Поровете дani Краян Маркуньт 3a 3aTOUVAbe e nOCTaBHe Ha nPapavlnHata B VINOHINH (6x. IMXme INHCTAJIPOAHE). Поровете сa nI3TOUBA Be DOMAUHATA KaHAlIN3aUONHc SiCTema I AKO e NEOxOIMINO, MONTpapi Te B3duShen BENTIN. |
| Вьзduxв СИСТЕмТАЗЯ PodabAVHe Ha BODa. | Поровете сИСТЕмТАЗЯ PodabAVHe Ha BODa 3a TcOvBe nIi Дугп prOБLEMn, BVDeuzn Do HabINZAHe Ha B3duX. |
Filter policies, standard documentation, spare parts order and additional product information can be found at::

- Nocetinte hauin yecain: docs.ingesit.eu n parts-selfservice.whirlpool.com
- I3non3BaTe QR kOda Kato anTepeHaTbMa MoKeTe da ce CbPKeTe cOtDena 3a cIeInpoJaX6eHo 06CnyXBaHe (BxTe
TeleohnHn Homep B rapaunOHnHa TKNKk).PnKoHTaCOTeJa 3a CneInpOdaXbeHo 06cnyKBHe Ha KIneHTN cbo6uBaAte KOIOBeTe, NocOeyHn Ha 3aBOckaTa Ta6eKa Ha Bauny ype.
Инфорmaцята 3a мода може дбдп n3Bleueha урз санрае на QR-KODа на etiketa 3a eheprinHnKaIac. Ha etiKeTa cblso TaKa e daEN HeHTNФКaTOp Ha mOda, KoTo Moke da ce n3non3Ba 3a Doctbdo npotana Ha perncTbpa Ha adpec https://eprel.ec.europa.eu.
UNEXPECTED INTERRUPTIONS
ANFAWKbI PET NAIДАЛAHY T¥3, WIAFblS KYPAL MEH Jyfbll KYPAL
AJFAUKbI PET PAJDAJAHyFA KATbICTbl KEHEC
OpHaTkaHHaH KeiH Top cepeIepDen TBbIpbIKTapblkHe yCTIHrTop cepeHbTBfBldaBc epinneni 3JemeHTepdi aIbn TaTaHbI3.
TY3BAFbIHTOJTbIPY
Ty3dbI KOJNaHy bIDbICTapda JxHe KypblfBiHbH JxMbIC KypamDaCTapbHaKAK ty3inyiHAnDbH anaBbI.
- T¥3 CAYbITbIH EUKKAUAH BOC KAJDbIPMAYdbIH MaHbI3bl 3Op.
CydblH kepmekiriH opHaTydbH MaHb3bl 3Op.
Ty3 pe3epByapbI Nduu Jxuyu MaunHaBnTHeMeHpyeK KaBHJa KnaRauKan (EHIM CNITATTAMACbI KapaHb3) Kana Ke3EmJeOaHeNHe TY3 TOITbIPY HndkaTop uambl KapbIK BoTROHOToTYPnyuKepe.
- Tomehri cepeni anbIn tacan, 6ak KaNafBn 6ypan anbHb3 (caraT tiniHe Kapcb 6afttta).
- Byhbl TeK 6ipHwi pet naDanaHaHaOpbIHday KepeK: Ty3 CaybITbHa cy KyuBhl3.
- The salt (medium taps) is poured into the water heater (see Figure 1 kg); the water supply is then opened.
- Remove the cap and pour the required amount of salt into the funnel.
If the cap is not installed, during operation, it is necessary to add salt to the container twice (to avoid the formation of dry salt crust).
When it is necessary to add salt, to prevent corrosion, this procedure should be performed in a well-ventilated area.
WATER HARDNESS SETTING
To ensure the softener operates efficiently, the water hardness parameter must be set based on the measured water hardness. This parameter can be adjusted using the control panel.
The water heater is equipped with a bypass valve for maintenance.
Press and hold the SELECT button for 5 seconds. The display will show the current hardness setting. Use the + or - buttons to adjust the value. Press the SELECT button again to confirm the setting.
| Су кермektiri kecteci |
| Дени | °dH
Германя
денинорi | °FH
Фразчuzски
градусы | °CClark
Альшьша
градустap | |
| 1 | Жуmsak | 0-6 | 0-10 | 0-7 |
| 2 | Ортаа | 7-11 | 11-20 | 8-14 |
| 3 | Шamамен | 12-16 | 21-29 | 15-20 |
| 4 | Каты | 17-34 | 30-60 | 21-42 |
| 5 | ΘteΚаты | 35-50 | 61-90 | 43-62 |
Press the SELECT button to confirm.
Parameter set!
After this procedure, the appliance is ready for use. Only use salt specifically designed for water softeners.
After filling the salt, the salt level indicator may still show that salt is needed. If the salt does not dissolve, check the injector and the brine valve for blockages.
The salt should be added to the water softener only when the appliance is in operation.
SALT LEVEL INDICATOR
The salt level indicator is located on the top of the control panel. The indicator light will illuminate when the salt level is low.
- The injection needles are sharp, use them carefully.
- The syringe must be filled with the drug solution (110 ml) before use. If it is not filled, fill it with the drug solution.
- Do not reuse the syringe after use. Dispose of the used syringe properly.
REPLACING THE SYRINGE FILTER
Do not touch the filter with your hands; use the syringe filter replacement tool.
Press the filter replacement button and remove the old filter. Insert the new filter. - Press the button three times, then check. Press the filter replacement button and remove it. The indicator lights on the device will flash. Press the button to identify the new filter. Insert the new filter.
Parameters are set!
If the syringe filter 1 (ECO) is installed, the syringe is ready.
The exhaust fan will start automatically when the filter is installed. If the parameters are set, the machine will operate normally.
- If the indicators are not lit, check the power supply (2-3).
- If the indicators or lights are not working, check the power supply (4-5).
FILLING THE SYRINGE
To fill the syringe, press the fill button. Fill the syringe only with the correct solution. Do not overfill the syringe beyond the marked level.
- When filling the syringe, check the device for any leaks. The indicator lights will help you monitor the syringe filling process.
- On the basis of the test results, the characteristics of the faucet and the taps are determined in accordance with the requirements of the standard.
- If the faucet is used without a pressure reducer, the flow rate of the tap may be affected.
The flow rate of the tap is automatically adjusted to the set value when the pressure changes.
The high pressure may cause damage to the seals or the faucet body, resulting in leakage or malfunction.
Test results table
| Баftарлама | Курату
сатын | Ддителбость
пPORРамы
(ч:мен) | Сydын ТУТынБИль轼
(лиtrp/aйналын) | Зергеляны ТУТын
(KВт/aйналын) |
| 1. Эко | ECO | 50° | √ | 3:20 12,0 1,05 | |
| 2. Карлы | | 65° 2:30 | 1,50 | | |
| 3. Apалac | | 55° 2:25 | 1,35 | | |
| 4. Fast&Clean 28' | | 45° | - | 0:28 9,0 0,60 | |
| 5. Push&Go | | 50° | √ | 1:25 11,5 1,10 | |
The eco values are determined according to the European standard EN 60436:2020. For any questions regarding the test results, please contact the technical support team: dw_test_support@whirlpool.com
The test results should not be used for advertising purposes.
*) The values given in the eco table are indicative. The actual values may vary depending on the water pressure, temperature, flow rate of the tap, water hardness, and other factors. The calibration of the device may take up to 20 minutes.
Test results description
Instructions for using the device.
1 ECO
The eco value is determined by the test results, which are carried out under specific conditions. These conditions are described in the standard and are used for comparison purposes.
2 TAPS
Press the button and hold it for at least 3 seconds to activate the program (depending on the element type).
CHARGE
Discharge. For items that have been washed and are still wet.
4 FAST&CLEAN 28
Press and hold the button for at least 3 seconds to start the drying program for wet items. Release the button.
5 PUSH&GO
For quick drying of slightly damp items, the Push&Go function is ideal for drying and refreshing clothes.
Experts:
Fast&Clean 28: Before first use, clean the drum and dry it thoroughly.
PUSH& GO
PUSH&GO
Push&GO (P) button - for quick drying of slightly damp items, the Push&GO program is ideal. It is not intended for heavy soiling. Before starting the program, make sure the drum is empty. Push&GO will start automatically.
To start the Push&GO program, close the door, press and hold the P button for 3 seconds (the indicator will light up), then release it after 4 seconds.
DRYING
HIGH TEMPERATURE
The following kitchen utensils: glasses, plates, bowls, spoons, forks.
ADJUSTING THE HEIGHT OF THE HANGING ROD
To adjust the height of the hanging rod, you need to: loosen the screws on the lower bracket and the upper bracket, then move the rod up or down to the desired height, and then tighten the screws.
Make sure the rod is level. When the hanging rod is in place, the hanging rod is fixed with the height adjustment screws (see figure). If the rod is tilted, loosen the screws and adjust it to be horizontal.
To move the lower bracket, press the buttons on the sides of the rod and slide it down.
After adjustment, we recommend checking the height of the rod. If necessary, remove the rod and reinstall it.
ADJUSTABLE SHELVES
To optimally organize the space on the shelves, you can use adjustable shelves. You can place the shelves at different heights by inserting the shelf supports into the holes on the shelf posts.
To install:
- To install the shelves, first insert the shelf supports into the holes at the desired height, then place the shelf on the supports. To remove the shelves, lift them slightly and pull them out, then remove the supports.
TOP SHELF
Designed for plates, cups, bowls, and cutlery. The upper shelves and cups are equipped with a special holder to prevent them from falling.
(top shelf with cup holder)
ACCESSORIES FOR HOOKS
This device is intended for use in industrial environments. It is not intended for use by the general public.
If the device is used by the general public or other unauthorized persons, it may cause interference with radio communications and should be used with caution.
TURNING ON THE DEVICE
- CONNECTING THE DEVICE
Before turning on the device, check the power supply and the connection cables.
- TURNING OFF THE DEVICE
Press and hold the power button for a few seconds.
- CHARGING THE BATTERY
(See the section on charging the battery).
- FULLY CHARGING THE BATTERY
5. To check the battery level, refer to the battery indicator on the display (see the section on indicators). Press the power button, then check the battery level. To check the remaining battery life, see the section on battery and charging.
- START (BEGIN)
Press and hold the START/BEGIN button for 4 seconds to turn on the device. When the device is turned on, a beep will sound. If the device does not turn on within 4 seconds, press the START/BEGIN button again and hold it for 4 seconds.
- END OF DEVICE OPERATION
The end of device operation is indicated by the battery indicator on the display. Press and hold the power button to turn off the device. To prevent data loss, turn off the device properly. Do not disconnect the power supply abruptly.
3neKtp 3nepnacbihb TyTnbIyBH a3aHTy ywiH, eHXapblkTBH apHaBbY3apTbIrfaH Mep3iMe Ke3IHDe Kypblf bATOMaTTb Tpyeewipinei.
Ac iweTin caImAhbl a3dan nactaHraH 6onca hemece bIdbc KYrbIIMaunHara cAnbH6ac 6ypbH cyMeH uanBlnraH 6onca, CaeKeciHwe KondaHbnraH Ta3anay KypaNbHbH MeuWepih a3aTbHbI3.
OPbIHDAJIbIJKATKAH BAFDAPLAMAHbI Θ3rEPTY
ErepBafapnamaDpybIC TaHdAmaraH 60nca,ONXaHaFaHa BactanraH XaDa,OnbI e3epTRe 60nBaIb:ecKiAusbin KOCY/EUIPY TYmecih BacIn YCTAN TpybIH3,KpyblfB Ewipinei. KOCY/EUIPY TYmecih KOnDaHbIN KpyblfBHI Kepi KocbIH3,KaHa xyy aHaNbIMbH XeNe KaNarAH OnuNaIapDb TaHaDbI3;
BACTAY/Kiipic 6aTbIpMacBn 6acBn (HdKATop XaHbIn Tpy), ecKi4 cekynd iwiHne ecKi xab6 apkbln jyy uKnih bactah3.
KOCbIMUa bIDbc-ARK CAJY
MaunhaHb eipmecTe, eci a bih3 (BACTAY/Kidipic HnDkATOpb JbblbKtaa6Tae) (bICTbIK 6yhan caK 60nbI31)da,bbc-aykapdtbblbcjxfbu MaunHa cabHb3. BACTAY/Kiipic 6BaTbpMacbH 6acbHb3da,4ceynd iWHe de eciKTJka6bHb3, uKn ToKTaBfAH Kepen KaTa 6actanaBl.
KE3DEICOK TOKTATY
Jyy uKni 6apb6cbHda ecik aubnabH bOnca Hemece Tok eWetIH 60IcA, uNK TOKTaNb. BACTAY/KlIpic 6taBpMacbH bAcBtHb3da, 4 cekyHd iuiHde eciKTI Ka6bHb3, uNK TOKTaBnFAH KepDen KaTaNbactanaDb.
AKblJ-KEHEC
KEHECTEP
KawikTepdi Kyttemec BypbH, bldtapdah 6apnbk Taram KaIbIKTapBH anBn Tactan, ctaKaHndpbl 6ocatbHb3. Onapdu Ana aBih cydbH actbHa JyDh Kaxetj xok. On opbHa mbkTan canbHbaHHa JxHe cbiptbHa 6bIrapJMaibHua bIbCTapMb peTTeH3; JxHe bIdCTapB ay3bH TemEH kapaBn XHe oyBb/ubKn beniKTei enKeitin canbHb3, 6yn cybH ep6ip beTke rtniohe xe Hepi arbyBaMymkiHdk bepdi.
Eckenpy: KaKnakTapbl, TyTkanapbl, Hayanapbl KHe Kybipy Tabanapbl WaBipatkbIu TyTkanapdbI aHanyra Keepri KeTTipmey Kepek.
KluekeTaN bIbIcTapBbI ac IwEtIH caImaHdap XawiriHe cAnbHb3. KaTbI NaCTaHrAN bIDCTAP MEH Ta6anapDbI TEmHI XawIKKE KOHO kepk,ce6ebi 6yn beJIke cy WAsbIpaTKbIITap KaTbI 60nAbJx He KaTbI Kyy EHIMdiNirHE MymKiHdk bepei. KpyblfBiHb JyKTEREH COH, WAsbIpaTKbIW TYKanapbIHn OHaH aHanybHa MymKiHdk bepiH3.
KOLAIJIbEMECbIDbICTAP
The device is designed for household use. Before starting operation, read the safety instructions carefully. The manufacturer is not responsible for damage caused by improper use. The temperature of the water should not exceed the recommended limits. Do not immerse the device in water. Keep the device away from children and pets.
The cups and accessories should be checked for damage before use. If the cups are made of glass or crystal, they may break if subjected to sudden temperature changes.
FILLING THE CUP WITH WATER AND PLACING IT IN THE DEVICE
- The device is designed for household use only. Do not use it for commercial purposes.
- After the device has been turned off, wait for it to cool down before removing the cups and accessories from the device.
ENERGY SAVING TIPS
The device is designed to be energy efficient. To save energy, fill the cups with the recommended amount of water and avoid overfilling. The device automatically switches off when the water has boiled. Do not open the lid during operation. To reduce energy consumption, descale the device regularly. If the device is not working properly, contact a qualified technician. Do not attempt to repair the device yourself.
CLEANING AND MAINTENANCE
Before cleaning the device, unplug it and allow it to cool down completely. Do not immerse the device in water. Wipe the exterior with a damp cloth.
TROUBLESHOOTING
DESCALING
To descale the device, fill the water tank with a descaling solution and let it sit for a while. Then rinse thoroughly.
If the device is not working properly, check the power cord and plug. If the cord is damaged, do not use the device. Contact a qualified technician for repair.
To clean the device, wipe the exterior with a soft cloth. Do not use abrasive cleaners.
If the device is not working properly, do not attempt to repair it yourself. Contact a qualified technician.
Remove the water tank cap by turning it counterclockwise, then pour in clean water up to the 30-liter mark. After filling, close the cap tightly. To clean the inside of the tank, use a soft cloth or brush, not metal, to wipe the inner surface.
1. Turn the water tank cap counterclockwise and remove it (Figure 1). 2. Open the drain valve at the bottom and let the water flow out completely (Figure 2). 3. Rinse the inside of the tank with clean water through the opening (Figure 3). 4. Remove any debris (such as leaves, sand, dirt, or other particles) and clean them out. 5. If the filter is clogged, remove and clean it. Do not use abrasive cleaners (dark-colored pads) on the filter (Figure 4).
After cleaning the water tank, reassemble it and check that it is properly installed; this will help extend the life of the machine.
CLEANING THE WATER TANK
If the water tank has not been used for a long time, clean it to remove any deposits and odors. If these contaminants are not removed, the water inlet may become blocked and the machine may be damaged.
CLEANING THE FILTERS
The filter mesh may become clogged with debris. Clean the filter regularly with a soft brush, not metal, to remove any buildup.
To remove the filter, press the latch and pull it out together with the filter holder. Be careful not to damage the filter mesh when removing it.

Do not operate the machine without the filter installed.
WATER SOFTENER SALT
The water softener automatically softens the water, reducing the amount of detergent needed and improving cleaning results.
This unit uses regeneration salt. When the salt level is low, refill it with salt.
The regeneration process starts automatically when the water softener is in use. The regeneration cycle occurs every 5 liters of water used, and the salt is replenished accordingly.
The regeneration process is carried out automatically, and the salt level is checked during the cycle.
- Each regeneration uses approximately 3.5 liters of water; the cycle takes about 5 minutes; and it consumes less than 0.005 kWh of energy.
This appliance is intended to be used in household and similar applications such as: staff kitchen areas in shops, offices and other working environments; farm houses; by clients in hotels, motels and other residential type environments; bed and breakfast type environments. It is not intended for professional use. Do not use the appliance outdoors.
| AKAYNbIKTAP | bIKTNMAJ CEBENTEPI WELIMDEP | |
| Tu3 uHdikatopby
XaHbIn Tpy | Tu3 caytbs boc. (Tu3 canfahnah KeiH,
Tu3 uHdikatopby biphe me xyy uckni
boBy XaHbIn Typy MymKIn). | KonteHepre kaiTadaH Tu3 toTbipbHb3 (Kocbimsha aknapat any yuHin 2-6eTTi
kapaHb3).
CydBuH KepMeKTirH petTeH3 - keCTeni KaPbH3, 2-6eT. |
| bldbc Jyfbbl Maunha
bactaMaiaBHe Hemece
nepmeHepre Jxayan
6epMeiDi | KypbIbI dybIc jaxlanFbAraH. AushbI posetkara caIbH3. | |
| ToKtbH eShy.I | |
| bldbc Jyfbbl Maunha eciri JxabkE mec.
EcIX 4 cekHydtAn aptbY kyaBtka
aushlbTaNHa, zukN ToKtaIaDbI. | |
| On nepmeHepre Jxayan bepMeiDi. | |
| bldbc Jyfbbl Maunha
cyu AkpndbI. | Jxuy aHnAbMbI eJIy AeytanMafan. Jxuy aHnAbMbI aaytanFbAraH. | |
| Arb3y shnaHrci 6yRinIN kalran. | |
| Arb3y JxueCinIH KdybIbI bIeTrenr. Arb3y Xw | |
| Cy3r Taam KaIbIbIbApMen bIeTrenr | |
| bldbc Jyfbbl Maunha apTbK Shy
5bIgapadbI. | bldbcIstap 6bp-6ipHe cokTbIbCbI
rpcindeye. | |
| KenipuikTbI aptbK meIsepi
5bIgapbIbHaH. | |
| bldbcIstap ta3a emec. | Ac iuetih bIdbc dUpbc peTtenmener. | |
| CnpRe TytKaIaBbI bIdbcIctarmen
apanaBcIn epKin Kozrana anMaiaB. | |
| Jxuy zukNbTBm XeHil. | |
| KepuikTbI aptbK meIsepi
5bIgapbIbHaH. | |
| LlaO KuPbIb6eIirH kacNaRaIb duPbC
Xa6bImarH. | |
| Czri IaTaHraH Hemece 6iteTrenr. | |
| Tu3 xok. | |
| bldbc Jyfbbl Maunha
cy ToTbIpMaiaB. | Cy kpaHbHa cy xox Hemece kpan Jxabk | |
| Baplkb JxapbIK
DIOITaBb
NOITaBbIMdNdkAtOpbI
KATAP Te3
XbIbIbIKTaeBb. | Cy kyaTbH shuaHr 6yRinIN kalran. | |
| Cy kyaTbH shuaHrH In TopbI bIeTlenr
KanFaH; onbI Taalay kaxet. | |
| TekcepIn, ta3anan BocnH coH, blybc Jxybl Maunha H bUipin, kayta KocbHb3
XeH e XaHa KaPdAmAH bIeTcoTbIP. | |
| bldbc Jyfbbl Maunha
zuklnda YakbTbHn
6yphn aaykTbIb. | Cy aBy3aTbH shuaHr TbIM TEmeh
opHauacKan Hemece yudH kahanizazoun
XyueCine he aByIn XaTbip. | |
| Cymen JxabkItay kyyecinde aya 6ap. | |
The safety instructions and standards regarding the use of the appliance are provided in the following pages, along with the installation instructions.

- Visit our website docs.ingesit.eu or parts-selfservice.whirlpool.com
- Use the QR code on the appliance or contact our after-sales service (see the telephone numbers in the warranty booklet). When contacting our after-sales service, please state the product's serial number.
The appliance's energy label can be viewed by scanning the QR code on the energy label. This label is also available on the EU EPREL database at https://eprel.ec.europa.eu.
QUICK REFERENCE GUIDE
USER MANUAL

THANK YOU FOR PURCHASING AN INDESIT PRODUCT.
LOADING THE SALT
The use of salt prevents the formation of limescale on the dishes and on the functional components of the dishwasher.
THE SALT RESERVOIR MUST BE EMPTY.
- Set the water hardness level.
The salt reservoir is located in the lower part of the dishwasher (see the description of the appliance). It must be filled when the indicator light for the absence of salt lights up on the control panel.
1. Remove the lower rack and unscrew the cap of the reservoir (counterclockwise). 2. Only for the first use: fill the reservoir with water. 3. Insert the funnel (see figure) and fill the reservoir with salt (about 1 kg). A small amount of water may overflow. 4. Remove the funnel and wipe away any salt residue around the opening.
Close the lid to prevent detergent from entering the tank during washing (the rinse aid may run out).
If you need to add salt, you must complete the procedure before loading the dishes to avoid corrosion.
WATER HARDNESS SETTING
To ensure proper operation of the appliance, the water hardness parameter must correspond to the actual water hardness in your home. The corresponding information can be obtained from your local water supply organization.
The default value for water hardness, set at the factory.
Turn on the appliance by pressing the ON/OFF button. - Turn off the appliance by pressing the ON/OFF button. - Press and hold the P button for 5 seconds until a sound signal is heard. Turn on the appliance by pressing the ON/OFF button. - The program indicator corresponding to the selected level lights up. Press the P button to select the desired hardness level (see water hardness table).
Never pour rinse aid directly into the washing chamber.
RINSE AID DOSAGE ADJUSTMENT
If the drying quality does not satisfy you, you can adjust the rinse aid dosage.
Turn on the dishwasher by pressing the ON/OFF button. - Turn off the appliance by pressing the ON/OFF button. - Press the P button three times: a sound signal is heard. Turn on the appliance by pressing the ON/OFF button. - The program indicator corresponding to the selected level lights up. Press the P button to select the rinse aid level. - Turn off the appliance by pressing the ON/OFF button.
Setting complete!
The rinse aid level can be set to 1 (off), in which case the rinse aid is not used.
Depending on the dishwasher model, up to 5 setting levels are available. Factory settings are indicated for the model; to find out the settings for your machine, follow the instructions above. - If dishes remain wet, set a lower value (2-3). - If dishes have water stains or limescale, set a higher value (4-5).
LOADING DETERGENT
To open the detergent dispenser, use the fastener D. Load the detergent only into the dry dispenser E. The detergent can be placed directly into the washing chamber beforehand.
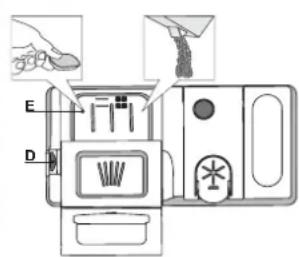
1. Determine the required amount of detergent as indicated above. The inner side of the dispenser has measuring marks that allow correct dosing of the detergent. 2. Remove any remaining detergent from the edges of the dispenser and close the lid completely. 3. Close the detergent dispenser lid, pushing it up until it clicks into place.
The detergent dispenser opens automatically at the right moment according to the selected program.
Using detergents not intended for dishwashers may cause malfunctions and damage to the appliance.
PROGRAM TABLES
PUSH & GO
The "PUSH & GO" button (P) is easy to notice; it allows you to directly start the "PUSH & GO" program. This program ensures high cleaning efficiency in a short time. Now you don't need to worry about which program to choose; "PUSH & GO" will do it for you. To select the "PUSH & GO" program, turn on the appliance, press and hold the P button for 3 seconds (the corresponding indicator light will turn on), and close the door within 4 seconds.
LOADING THE BASKETS
UPPER BASKET
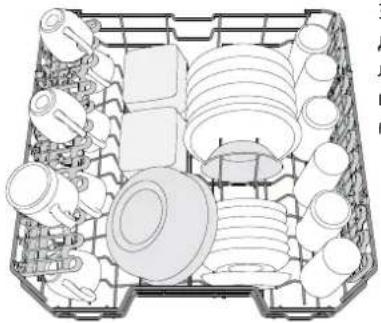
This basket is intended for easily breakable items
such as glasses, cups, plates, and small saucers.
(Example of loading the upper basket)
ADJUSTING THE HEIGHT OF THE UPPER BASKET
The height of the upper basket can be adjusted: the upper position allows placing large dishes in the lower basket, the lower position allows using fold-down racks (to increase free space above without
creating obstacles for dishes loaded in the lower basket).
Upper basket
The height of the upper basket can be adjusted (see figure). To raise the upper basket, simply lift it up by the edge, without pressing the lever, until it clicks into the upper position.
To return the basket to the lower position, press the lever located on the side walls and slide the basket down.
Do not adjust the height of the upper basket when it is loaded with dishes. Never raise or lower the basket by holding it only on one side.
FOLD-DOWN HOLDERS WITH ADJUSTABLE POSITION
Side fold-down holders
You can fold them down or
lay them flat to
optimize the arrangement of dishes on the rack.
Wine glasses can be securely fastened in the fold-down holders by inserting the stems into the special slots.
Depending on the model:
- To unfold the holders,
you need to push them up or turn them or pull them out of the catches and pull them down.
- To fold the holders, you need to turn them and push them down or pull them up and attach the holders to the catches.
LOWER BASKET
(lower basket loading)
The basket is intended for pots, lids, plates, salad bowls, cutlery, etc.
CUTLERY BASKET
The basket is equipped with a top grid for more convenient placement of cutlery. The modular basket must be placed only in the front part of the lower basket.
Knives and other sharp objects should be placed in the cutlery basket with the sharp ends down, or placed horizontally on the folding sections of the upper basket.
DAILY USE
1. CHECKING WATER SUPPLY
Make sure that the dishwasher is connected to the water supply and that the inlet tap is open.
2. SWITCHING ON THE DISHWASHER
Open the door and press the ON/OFF button.
3. LOADING THE BASKETS
(see BASKET LOADING)
4. ADDING DETERGENT
5. SELECTING A PROGRAM
Select the most suitable program according to the type of dishes and their degree of soiling (see PROGRAM DESCRIPTION), press the P button. Select the required options (see OPTIONS AND FUNCTIONS).
6. START
Press the START/PAUSE button (the indicator light will come on) and close the door within 4 seconds. When the program starts, you will hear a short audible signal. If the door is not closed within 4 seconds, an audible signal will sound. In this case, open the door, press the START/PAUSE button, and close the door again within 4 seconds.
7. END OF PROGRAM
The end of the washing program is indicated by an audible signal and the indicator light of the selected program goes off. Open the door and switch off the appliance using the ON/OFF button. To avoid burns, wait a few minutes before removing the dishes. Unload the dishes from the basket, starting from the bottom.
To save energy, the machine switches off automatically after a certain period of inactivity. If the dishes are only slightly dirty or were previously rinsed with water, reduce the amount of detergent.
CHANGING THE PROGRAM IN PROGRESS
If you have selected the wrong program, you can change it as long as it has just started: open the door, switch off the machine by pressing and holding the ON/OFF button. Switch the machine back on with the ON/OFF button and select the new program with the program selector. Close the door and start the cycle by pressing the START/PAUSE button (the indicator light is on) and close the door within 4 seconds.
ADDING DISHES
Without switching off the machine, open the door (the START/PAUSE indicator starts flashing) (be careful of hot steam) and place the dishes in the dishwasher. Press the START/PAUSE button and close the door within 4 seconds. The washing cycle will resume from the point where it was interrupted.
ACCIDENTAL INTERRUPTION
If the door was opened during the wash cycle or the power supply was interrupted, the cycle stops. Press the START/PAUSE button and close the door within 4 seconds. The washing cycle will resume from the point where it was interrupted.
USEFUL TIPS
TIPS
Before loading the basket, remove food residues from the dishes and empty the contents of glasses. Rinsing the dishes under water is not necessary.
When loading the dishes, make sure they are securely in place and do not fall over. Place the containers with the opening facing down and so that the convex/concave parts are inclined: this allows water to reach all parts of the dishes and to drain freely.
Warning: make sure that the lids, handles, trays and pans do not obstruct the rotation of the spray arms. Place the items to be washed in the basket for cutlery. Heavily soiled pans and skillets are recommended to be placed in the lower basket, since the more powerful water jets in this area ensure a better wash. After loading, make sure that the spray arms can rotate freely.
DISHWARE NOT SUITABLE FOR WASHING IN THE DISHWASHER
- Wooden dishes and cutlery. Fragile decorated glasses, works of art and antique dishes. Decorative elements of such dishes may be damaged. - Items made of synthetic materials that are not resistant to high temperatures. - Copper and tin dishes. - Dishes soiled with ash, wax, technical greases or paints.
Decorative patterns on glass and aluminum/silver parts may change color or become dull during the wash process. Some types of glass (e.g., crystal) may become cloudy after a certain number of wash cycles.
DAMAGE TO GLASS AND DISHWARE
- Wash glass and porcelain items only if their manufacturer guarantees that they are dishwasher-safe.
- Use a delicate detergent suitable for dishes. Remove glass items and dishes from the dishwasher immediately after the wash cycle ends.
TIPS FOR SAVING ENERGY AND WATER
- When using the dishwasher in accordance with the instructions, water and energy consumption is generally lower than when washing by hand.
- To achieve maximum efficiency of the dishwasher, it is recommended to run wash cycles only when the machine is fully loaded. Maximum (within permissible limits) loading of the dishwasher will help save energy and water. Information on correct loading of the dishes can be found in the section LOADING THE BASKETS. In case of partial loading, it is recommended to use the corresponding wash options at the start (Half Load / Zone Wash / Multizone), filling only the selected zone. Incorrect loading or overloading of the dishwasher may lead to increased resource consumption (water, energy and time, as well as increased noise level), and reduce the effectiveness of washing and drying. Pre-rinsing dishes is not recommended as it increases water and energy consumption.
CARE
To prevent the formation of unpleasant odors and deposits in the dishwasher tub, use a high-temperature wash program at least once a month. For cleaning the appliance, pour a suitable amount of detergent into the dispenser and run a program without loading dishes.
CLEANING AND MAINTENANCE
CLEANING THE FILTER ASSEMBLY
Regularly clean the filter assembly to prevent clogging of the filters and difficulties in water drainage.
Using the dishwasher with clogged filters or foreign objects inside the filtration system can lead to equipment malfunction, reduced performance, increased noise levels during operation, and more intensive resource consumption. The filter unit consists of three filters that retain food residues from the water before it is recirculated to the spray arms.
Do not use the dishwasher without filters or with loose filter mounting.
Check the filter unit at least once a month or after every 30 cycles. If necessary, carefully clean it under running water using a non-metallic brush. To do this, follow the instructions below:
- Turn the cylindrical filter A counterclockwise and remove it (Fig. 1).
- Remove the filter cup B by pulling it sideways (Fig. 2).
- Remove the flat filter made of stainless steel C (Fig. 3). 4. If foreign objects (glass shards, ceramics, bones, fruit pits, etc.) are found, carefully remove them.
- Inspect the sump and remove any food residues from it. Never remove the working pump protection (black rubber part) (Fig. 4).
After cleaning the filters, install them back in place and securely fasten the filter unit: this is important for the correct operation of the dishwasher.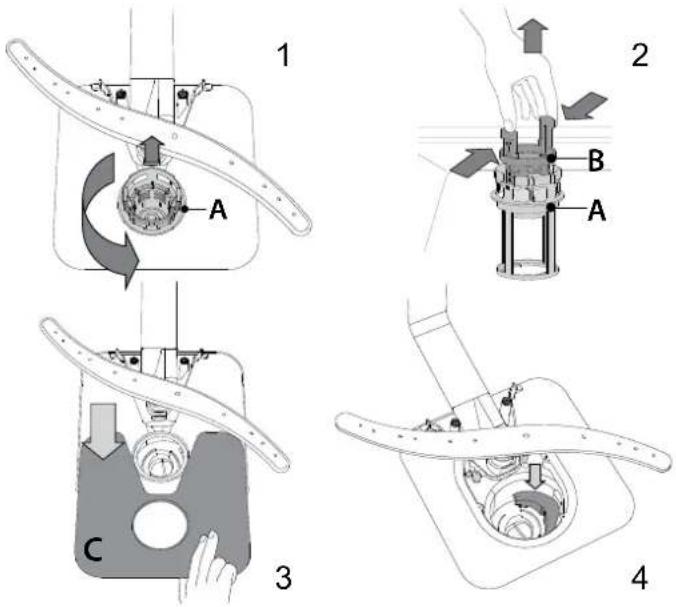
CLEANING THE INLET HOSE
If the hose is new or has not been used for a long time, flush it to remove any possible blockages before connecting. Failure to take this precaution may lead to clogging of the inlet pipe and damage to the dishwasher.
CLEANING THE SPRAY ARMS
Food residues may get onto the spray arm impellers and block the water outlet holes. Therefore, it is recommended to periodically check the impellers and clean them with a small non-metallic brush.
To remove the upper impeller, turn the plastic retaining ring clockwise. Install the upper impeller so that the side with more holes faces upward.
The lower impeller can be removed by pulling it upward.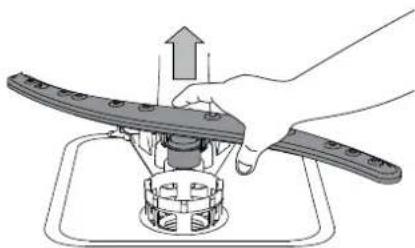
WATER SOFTENING SYSTEM
The machine automatically reduces water hardness, preventing scale formation on the heating element, which also contributes to increased washing efficiency.
The system performs regeneration using salt, so it is necessary to fill the salt container as it empties.
The regeneration frequency depends on the set water hardness level - regeneration occurs every 5 wash cycles, or if the 3-level water hardness is set.
The regeneration process begins at the end of the last rinse and ends at the drying stage until the cycle is complete.
- For regeneration, approximately 3.5 liters of water are required; - 5 additional minutes to the cycle time; less than 0.005 kWh of electricity.
TROUBLESHOOTING
If the washing machine does not work properly, check if you can fix the problem using the following list. If other errors or problems occur, contact an authorized service center, whose contact information is indicated in the warranty table. Spare parts will be available for 7-10 years from the date of the normative documents for the product.
TROUBLESHOOTING

THANK YOU FOR BUYING AN INDESIT PRODUCT. To receive more complete assistance, register your appliance on the website: www.indesit.com/register

To download the safety instructions and the user instructions, visit our website docs.indesit.eu and find the instructions for your model.
Before using the appliance, read the safety instructions carefully.
PRODUCT DESCRIPTION
PRODUCT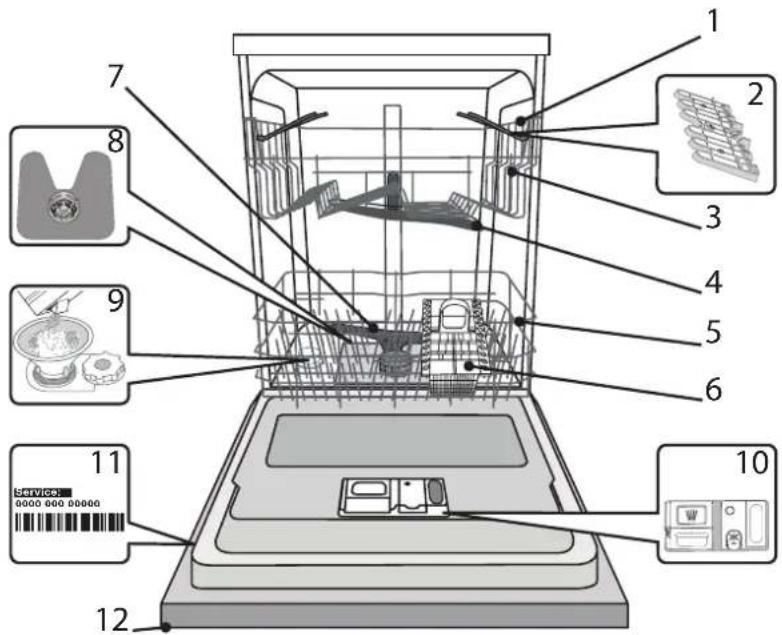
- Top cover
- Control panel
- Upper switch actuator
- Upper disconnector
- Lower switch
- Switch for tabletop instruments
- Lower disconnector
- Fuse holder
- Fuse with 10 A rating for auxiliary power supply
- Ta6nUka 3 TeXHiHuHMn DaHmN
- Control panel.
CONTROL PANEL
- Button «ON/OFF» and indicator lamp
- Button for program selection / Push&GO (quick start) and indicator lamp
- Program indicator lamps 5. START/PAUSE button with indicator lamp
FIRST USE
Salt, rinse aid and detergent
Install the supplied fixing elements from the kit and the lower elements from the upper cover.
FILLING WITH SALT
Using salt prevents the formation of scale on the dishes and on the functional components of the machine.
- It is important to ensure that the salt container is never empty.
Before first use, fill the salt container with water. The salt container is located at the bottom of the dishwasher (see "DESCRIPTION"), so it should be filled when the control panel indicator lamp for salt is lit.
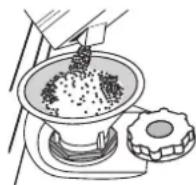
- Remove the lower rack and unscrew the cap of the container (counterclockwise).
- Do this only at first use: fill the container with water. 3. Insert the funnel (see figure) and fill the container with salt up to the edge (approximately 1 kg); a small amount of water overflowing is normal.
- Remove the funnel and wipe off any salt residue from the opening.
Make sure the cap is tightly closed before starting a wash program, so that the detergent does not come into contact with the container (this could cause damage to the appliance that is not covered by warranty).
If you need to add salt, be sure to complete the procedure before starting a wash cycle to prevent corrosion.
SETTING WATER HARDNESS
For the appliance to function properly, it is very important that the water hardness setting is based on the actual water hardness in your home. This information can be obtained from your local water supply authority.
Standard water hardness values set at the factory.
- Turn on the appliance by pressing the ON/OFF button. Turn off the appliance by pressing the ON/OFF button. Press and hold the P button for 5 seconds until an audible signal sounds.
- Turn on the appliance by pressing the ON/OFF button. The indicator lamp corresponding to the currently set level will light up. Press the P button to select the water hardness level (see the "WATER HARDNESS" table).
| Таблиcaхорсткостi ВODи |
| iВени солi | °dH
Himeцьki
градусn | °fH
Фразцуstьki
градусn | °Clark
Англильский
градусn |
| 1 | Мяka 0-60-100-7 | | | |
| 2 | Середни 7-11 | 11-20 | 8-14 | |
| 3 | Звачаима 12-16 | 21-29 | 15-20 | |
| 4 | Жорстka | 17-34 | 30-60 | 21-42 |
| 5 | Дужехорстka | 35-50 | 61-90 | 43-62 |
Turn on the appliance by pressing the ON/OFF button.
Setting is complete!
After the procedure is complete, start the program without loading.
Use only salt specifically intended for dishwashers.
When the salt is filled up to the machine, the indicator lamp for "REFILL SALT" will turn off.
The container for salt is filled; it may cause water overflow from the heating element due to scale buildup.
It is recommended to use salt with a grain type suitable for dishwashers.
FILLING THE SALT CONTAINER
The salt container is located under the lower basket. The container must be filled when the indicator on the control panel shows that it is empty.
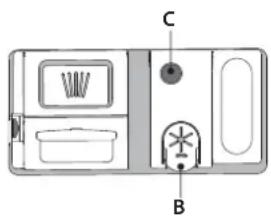
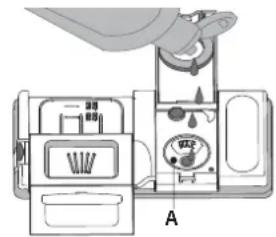
- Open the container by pressing and turning the cap counterclockwise.
- Carefully pour the maximum amount of salt (about 1 kg) up to the control mark in the container, avoiding spills. If this happens, wipe the salt with a dry cloth.
- Press the cap down until you hear a click.
Never pour rinse aid directly into the tub.
ADJUSTING THE RINSE AID DOSAGE
The user is satisfied with the result, the used amount of rinse aid can be adjusted.
- Turn on the dishwasher using the "ON/OFF" button. Turn it off using the "ON/OFF" button.
- Pressing the P button is accompanied by a sound signal.
- Turn on using the "ON/OFF" button. The indicator lamp of the program corresponding to the currently set level lights up. Press the P button to select the rinse aid level, it is displayed. Turn it off using the "ON/OFF" button.
Setting is temporary!
The rinse aid level is set to 1 (ECO), the rinse aid supply will be reduced.
Up to 5 levels can be set depending on the dishwasher model. Thanks to the settings, the specified levels are set, to find out the settings for your machine, follow the instructions below.
- If stains appear on the dishes, set a lower value (2-3).
- If water or limescale stains appear on the dishes, set a higher value (4-5).
FILLING THE RINSE AID DISPENSER
To open the rinse aid dispenser, use the opening mechanism. Add rinse aid only to the dry dispenser. Add the appropriate amount of rinse aid directly into the tank.
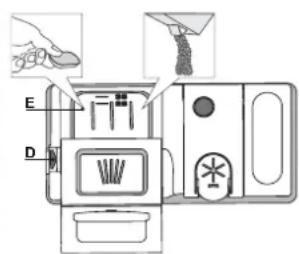
- To add the required amount, when filling the rinse aid, refer to the information above. Inside the dispenser there are indicators that ensure correct dosing of the rinse aid.
- Wipe off any spilled rinse aid from the dispenser and close the lid until you hear a click.
- Close the lid of the rinse aid dispenser, pressing until the mechanism locks.
The rinse aid dispenser opens automatically at the right moment according to the program.
Using a detergent not certified for dishwashers can cause malfunction or damage to the appliance.
PROGRAM TABLE
| Прорама | Сухшия
цимл. | Туравлисть
прорам
MUTTA
(rхВ)^1 | Стохиновни
БODи
(lитрич./цимл) | Стохиновни
е lektroэрrii
(KВТ/цимл) |
| 1.Еко 50°
ECO | ✓ | 3:20 12,0 1,05 | | |
| 2.Итейсвна 65° 2:30 16,0 1,30 | ✓ | | | |
| 3.Змшани Ткашии 55° 2:25 16,0 1,35 | ✓ | | | |
| 4.Fast&Clean 28'
(Швдко я чосто 28') | - | 0:28 9,0 0,60 | | |
| 5.Push&GO
(Швдкий за跟不上) | PUSH &
GO | ✓ | 1:25 11,5 1,10 | |
The "ECO" program data was selected in laboratory conditions in accordance with the European standard EN 60436:2020.
Test laboratory conditions: for information on the conditions for conducting comparative tests according to EN, contact: dw_test_support@whirlpool.com
When the program does not provide for pre-treatment of dishes.
*) The values given for these programs, except for the "ECO" program, are indicative. The actual time may vary depending on many factors, such as the temperature and pressure of the water at the inlet, the ambient temperature, the amount of detergent, the amount of loaded dishes, the balancing of the load, additional options and the calibration of the device. Due to the calibration of the device, the duration of the program may increase by up to 20 minutes.
PROGRAM DESCRIPTION
Instructions for selecting the washing cycle.
1 ECO
The Eco program is suitable for cleaning normally soiled dishes and is the most energy- and water-efficient combination, and is used in accordance with ecological requirements for construction within European standards.
2 INTENSIVE
The program is for heavily soiled pots and pans (do not use for delicate dishes).
3 MIXED
The program is for pots and pans with a medium degree of soiling.
4 FAST&CLEAN 28' (Quick and clean 28')
The appliance is intended for loading lightly or moderately soiled dishes without prior rinsing. Do not exceed the maximum load.
5 Push&GO (Quick start)
Cycles of intensive washing and rinsing ensure high washing efficiency and short time without the need for pre-treatment of dishes.
Notes:
Please note that the "Fast&Clean 28'" (Quick and clean 28) program is intended for washing dishes with light soiling.
PUSH& PUSH&GO (QUICK START)
GO
The "Push&GO (Quick start)" button (P) is an easy-to-press button that allows you to directly start the "Push&GO (Quick start)" program, which ensures high washing efficiency in a short time. You no longer need to bother choosing a program; "Push&GO (Quick start)" will do it for you. To select the "Push&GO (Quick start)" program, turn on the appliance, press and hold button P for 3 seconds (the indicator will light up), and close the door within 4 seconds.
LOADING THE BASKETS
UPPER BASKET
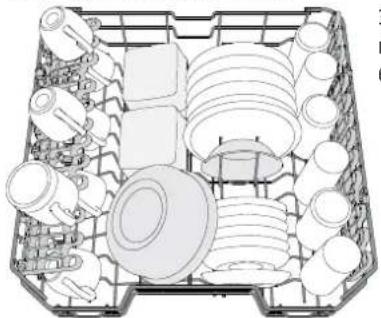
Load the upper basket with small and delicate dishes: cups, glasses, plates, small salad bowls.
(example of loading the upper basket)
ADJUSTING THE HEIGHT OF THE UPPER BASKET
The height of the upper basket can be adjusted: the upper position allows you to place bulky items in the lower basket, while setting the upper basket to the lower position allows you to place larger items in the upper basket and avoid collisions with dishes loaded in the lower basket.
The upper basket is equipped with a height adjuster (see figure). To raise it, do not press the lever; simply hold it by the side handles until the basket reaches the upper position. To lower it, press the lever A on the side handles of the basket and move it down.
It is recommended not to adjust the cat's position while it is in the bowl.
Never lift or lower only one side of the bowl.
ASSEMBLY INSTRUCTIONS
The bowl can be assembled or disassembled using the latches on the base.
The bowls can be installed in the instructions, insert the leg of each bowl into the corresponding slot.
For the latches:
- To disassemble the bowl, press them inward and turn or pull from the latches and pull upward.
- To assemble the bowl, turn them and press down or push upward and attach the bowl to the latches.
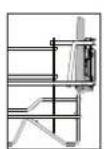
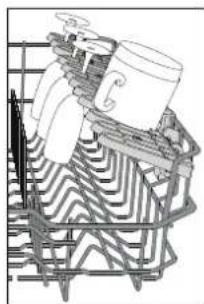
LOWER BOWL
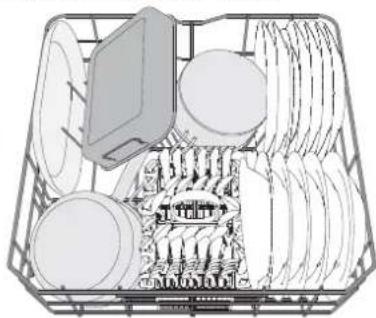
Designed for pots, hooks, plates, salad bowls, cutlery, etc. The large bowls should be ideally placed on the sides so they do not interfere with the sprayer operation.
(Example of lower bowl placement)
OPERATING INSTRUCTIONS
1. PREPARATION FOR USE
It is recommended to connect the sprayer to the water supply and open the tap.
2. TURNING ON THE DISHWASHER
BiDkpniTe DBepTa i HAtncHtB KOnkY «YBMKH./BUMKH.
3. 3ABAHTAXEHHKOLIKIB
(du8.3ABAHTAXEHHKOLINKIB)
4. HANOBHEHHI O3ATOPAMMIOQTO 3ACO6Y
5.BV6IPIPOPGAMIHHAJITYBAHHLUKIY
06epitb haibnbi npxodny nporpamy Biinobidno do Tny nocdy i cyneHIO no 3a6pydHeHHa (duB. 一ONC PPOPAM), HATNCKAQUH KNONKy P. B6epitb notpi6hi onu (duB. 一ONLII TA 一OYHKLII ).
6. NYCK
3anyctitb uKn MTT,HaTNCHyBn KONky CTAPT/Pay3a (cBITnciHnKaTOp) i 3akpmbuDBepuTa protrom 4 cek. Pid cac 3nycky nporpaM npolye oDINH 3BykOBn CnHAn. Raio He 3akpntu DBepuTa protrom 4 cekyH, npolye CnHAn nonepedxehn. B Takomy pa3i BiKnpyTe DBepuTa, HATNCHTb KHONky CTAPT/Pay3a i 3HOBY 3akpniTe DBepuTa protrom 4 cek.
7.3ABEPUHEHHLUMKJYMUTTR
3aBepueHHNcIKNyMNTTcynpOBOJyETbC3ByKOBUMn CnHnAAMn i 36bnmaHHm IHnKaTOpHoi namnn o6paHO nporpamn. BiKnpuTe dBepuraI bIMKHTb npnlaD, HATNCHyBn KONky YBMKH./BMHKH. 3aKeKaTe KInbKa XBNNH Npeq TmM, AKNrTHyTN NOcyd, 06 yHNKHYtOnikIB. PoBaHTaXe KOUKN, NOuHaOuN 3 HxNHBoro.
Yepe3 neBn trpBnH nepio npocToIO MaunHa ABTomauHO Bmukacbca, 06 mihim3yBaTH cnoXnBuHna eekTpoeHeprI. kNo nocSy He3NaHo 3a6pydHeHn a6o KaIO noRTO npomBaHn BOHO peed TMM, kNoklaCTn Do nocydomnHOi MaunHn, cnID BiNDOBIDHO 3MeHNHTBnKOpNCBOByaHny KInkictb MIOUoO 3aco6y.
3MIHA DIIOYOI IPOPTPAMN
Ypasi HebipHoro Bn60py nporpaM MoKHa 3MiHTN II 3a yMOBn,IO BnKoHaHHn nporpaM Tlkbn po3noaIoc: BiDunHtB DBepcraT, HAtnCHt b iYtpmMyTe KONkY (YBMKH./BUMKH.》,MaUNHa BIMKHeTbcR.
3HOBy yBIMKHITb MaunHy 3a donomoroKHNKn YBIMKH./BMKH. i o6epiHb HOBNI ZIKN MMTT Ta 6yNb-aki 6axaHI onu; 3anyCTtB uKN,HaTNCHYBUN KHONKY CTAPT/Na3a] 3aunHNBUN DEpuraT protAROM4ceK.
DOABAHNPOCYD
Before starting the dishwasher, open the door (the START/PAUSE indicator will start blinking) (be careful with hot steam!) and load the dishes into the dishwasher. Press the START/PAUSE button and close the door for 4 seconds. The wash cycle will resume from the point where it was interrupted.
UNINTERRUPTED OPERATION
If the wash cycle is interrupted due to an open door or if the dishes are not properly loaded, the cycle will stop. To resume the cycle from the point where it was interrupted, press the START/PAUSE button and close the door for 4 seconds.
TIPS AND RECOMMENDATIONS
TIPS
Before loading the dishwasher, remove all food residues from the dishes and rinse the surfaces. There is no need to pre-rinse the dishes under running water.
Arrange the dishes so that they are stable and do not tip over; arrange the cutlery so that the openings face downward, with the concave/convex parts facing down, so that water reaches all surfaces and drains completely.
Warning: Lids, handles, trays, and frying pans with handles should not be placed in the dishwasher.
Do not place any items on the dishwasher or on the countertop. Very dirty dishes and pans should be placed in the lower basket, as the water jets are stronger there, ensuring better cleaning performance.
After loading the dishwasher, ensure that the spray arms can rotate freely.
UNSUITABLE DISHES
- Dishes and cutlery made of wood, decorative glass, plastic items, and antique dishes. Their decoration is not resistant.
- Parts made of synthetic material that cannot withstand high temperatures. ·Dishes with glued parts.
- Dishes stained with ash, wax, grease, or paint.
Colored glass may fade and become dull during the wash cycle. Some types of glass (e.g., crystal glass) may also become opaque after several wash cycles.
Using the dishwasher according to the manufacturer's recommendations can safely wash dishes in the dishwasher. Use a delicate detergent suitable for dishes, load the dishes and cutlery into the dishwasher immediately after finishing the washing cycle.
RECOMMENDATIONS FOR LOADING THE DISHWASHER
- When the household dishwasher is used in accordance with the manufacturer's instructions, washing dishes in the dishwasher usually consumes less energy and water than washing dishes by hand. To achieve maximum efficiency of the dishwasher, it is recommended to run the dishwasher only when it is fully loaded. Loading the household dishwasher to the quantity specified by the manufacturer saves energy and water. For proper loading of the dishwasher, see the section "LOADING THE DISHWASHER".
In case of partial loading, it is recommended to use special programs if available (e.g., half load/zone wash/multizone), filling only the corresponding baskets. Incorrect loading or overloading of the dishwasher can lead to increased consumption of resources (such as water, energy, and time), as well as reduced washing and drying performance.
Pre-rinsing items by hand before loading leads to increased water and energy consumption and is not recommended.
TIPS
To remove stubborn dirt that may be on the dishes in the dishwasher, it is recommended to run a high-temperature program. To clean the dishwasher, use a special cleaning agent and run an empty cycle.
Never use abrasive cleaners; wipe them off with a damp cloth.
WATER SOFTENING SYSTEM
The water softening system reduces water hardness, preventing limescale formation on the heating element and also improves washing efficiency.
Regeneration of this system occurs when using salt, so when the salt container is empty, it must be refilled.
The frequency of regeneration depends on the set water hardness level - regeneration occurs once every 5 cycles for ECO, when the water hardness level is restored.
The regeneration process starts after the washing cycle ends and ends before the next cycle.
- Approximate regeneration consumption: ~3.5 liters of water;
- 3aɪmae ðO 5 ΣɔŋaTkoBnx XbɪnɪH Naɪkɪn; Cnoxmbe meHwe 0,005 kBto rod eheprfi.
UCYHEHHH HECNPABHOCTE
Kuo noocydomnHa MaunHa He npaioe HaneXHM uHOM, nepeBipTe, Mu Moxha ycHyTu npo6nemy, BUKOpNCBOUH NaTHN cncoK. Y pa3i BuNHkHeHHa HmIX NOMIOK a6o npo6nem 3BepTaItecra do ABTopu3ObaHoro cepBicHO rHTpy, KOtAKTHi daHI koro moxha 3HaHTn B rapaHTINHOMy TaIOnHi. 3anachi qactHNbOCTynH bnpodobK TepmiH ydo 7 a6o do 10 pokIB, biNDOBIDHO do KOHKpeTHNX HopMaTUBHX BUMor.
| ПОНБЛЕМИ | MOЖЛВИ ПРУЧИНРILSEHня | | |
| Горпь
ПДИКATOP
coni | Релервар coni поожим. (Пись пооченness
ПДИКATOP coni моges залишатся убKMнелим
протягом дклькох лкльим). | Заловпь контейнорддс coni (дokладни вдомостддм. на сюр. 2).
Налашуто рibeиь жорсткостд Bodи (дм. tabлiously on cюр. 2). | |
| Посydомина
maшина не
залуска'tься оно
pearye на komанд. | Прлад не пidкlioquени do posetkn. Встavesшт
Вдддддддддддддддддддддддддддддддддддддддддддддддддддддддддддддддддддддддддддддддддддддддддддддддддддд徳
3 Мірівань безени посdомиmaшину не щуді ave botamtuho nepeşетауckатиь піся
побачи Кожileнь.
Бдрцута машини не зашип. Бпрriино Hatиckу
Дерцуда машини не зашип. Дпрriино Hatиckу
Lizki pepeperba'tь с priи вidдрьоги вдрцат
6льш 퍼 на 4 скун'dи.
Прлад не рleyус на komанд. | Кер у розтуку elektroхожileнney.
Змірівань безени посdомиmaшину не щуді ave botamtuho nepeşетауckатиь піся
побачи Кожileнь.
Бдрцуда машини не зашип. Бпрriино Hatиckу
Дерцуда машини не зашип. Дпрriино Hatиckу
Lizki pepeperba'tь с priи вidдрьоги вдрцат
6льш 퍼 на 4 скун'dи.
Прлад не рleyус на komанд. | |
| 3 поydомино'
maшина не витikае
вoda. | Цил митг яse не зakilчесно. Зачесайte, роки зak
Злвнишлг витгун. | Ночься сизлmit.
П配电онься,
Злвнишлг витгун.
Зылшлг витгун.
Фылшлг витгун.
Фылшлг витгун.
Фылшлг витгун.
Фылшлг витгун.
Фылшлг витгун.
Фылшлг витгун.
Фылшлг витгун.
Фылшлг витгун.
Фылшлг витгун.
Фпьшлг витгун.
Фпьшлг витгун.
Фпьшлг витгун.
Фпьшлг витгун.
Фпьшлг витгун.
Фпьшлг витгун.
Фпьшлг витгун.
Фпьшлг витгун.
Фпьшлг витгун.
Фпьshлг витгун.
Фпьшлг витгун.
Фпьшлг витгун.
Фпьшлг витгун.
Фпьшлг витгун.
Фпьшлг витгун.
Фпьшлг витгун.
Фпьшлг витгун.
Фпьшлг витгун.
Фпьшlг витгун.
Фпьшлг витгун.
Фпьшлг витгун.
Фпьшлг витгун.
Фпьшлг витгун.
Фпьшлг витгун.
Фпьшлг витгун.
Фпьшлг витгун.
Фпьшлг витгун.
Фпьшлg витгун.
Фпьшлg витгун.
Фпьшлg витгун.
Фпьшлg витгун.
Фпьшлg витгун.
Фпьшлg витгун.
Фпьшлg витгун.
Фпьшлg витгун.
Фпьшлg витгун.
Фпьшлg 在
Фпьшлg 在
Фпьшлg 在
Фпьшлg 在
Фпьшлg 在
Фпьшлg 在
Фпьшлg 在
Фпьшлg 在
Фпьшлg 在
Фпьшлg 在
Фпьшлg 在
Фпьшлg 在
Фпьшлg 在
Фпьshлg 在
Фпьшлg 在
Фпьшлg 在
Фпьшлg 在
Фпьшлg 在
Фпьшлg 在
Фпьшлg 在
Фпьшлg 在
Фпьшлg 在
Фпьшлg 在
Фпьшлg 在
Фпьшлg 在
Фпьшлg 在 | |
| Посydомина
maшина не витikае
надирьни
ншу. | Посyd_DEрень.
Празььнь поозтуйу的老у
Вирьяры садм� Кільькість
Вирьяры садм� Кільькість
Вирьяры садм� Кільькість
Вирьяры садм� Кільькість
Вирьяры садm� Кільькість
Вирьяры садm� Kільькість
Вирьяры садm� Kільькість
Вирьяры садm� Kільькість
Вирьяры садm� Kільькість
Вирьяры садm� Kільькість
Вирьяры садm� Kілььк?
Фпьлг витрий
Фпьшлг витрий
Фпьшлг витрий
Фпьшлг витрий
Фпьшлг витрий
Фпьшлг витрий
Фпьшлг витрий
Фпьшлг витрий
Фпьшлг витрий
Фпьшлг витрий
Фпьшlг витрий
Фпьшlг витрий
Фпьшlг витрий
Фпьшlг витрий
Фпьшlг витрий
Фпьшlг витрий
Фпьшlг витрий
Фпьшlг витрий
Фпьшlг витрий
Фпьшlrg витрий
Фпьшlrg витriй
Фпьшlrg витriй
Фпьшlrg витriй
Фпьшlrg витriй
Фпьшlrg витriй
Фпьшlrg витriй
Фпьшlrg витriй
Фпьшlrg витriй
Фпьшlrg витriй
Фпьшlrg витriий
Фпьшlrg витriй
Фпьшlrg витriй
Фпьшlrg витriй
Фпьшlrg витriй
Фпьшlrg витriй
Фпьшlrg витriй
Фпьшlrg витriй
Фпьшlrg витriй
Фпьшlrg витriй | Зу.
Зу.
Зу.
Зу.
Зу.
Зу.
Зу.
Зу.
Зу.
Зу.
Зу.
Зу.
Зу.
Зу.
Зу.
Зу.
Зу.
Зу.
Зу.
Зу.
Зу.
Зу.
Зу.
Зу.
Зу.
Зу.
Зу.
Зу.
Зу.
Зу.
Зу.
Зу.
Зу.
Зу.
Zу.
Zу.
Zу.
Zу.
Zу.
Zу.
Zу.
Zу.
Zу.
Zу.
Zу.
Zу.
Zу.
Zу.
Zу.
Zу.
Zу.
Zу.
Zу.
Zу.
Zу.
Zу.
Zу.
Zу.
Zу.
Zу
Zу
Zу
Zу
Zу
Zу
Zу
Zу
Zу
Zу
Zу
Zу
Zу
Zу
Zу
Zу
Zу
Zу
Zу
Zу
Zу
Zу
Zу
Zу
Zу
Zу
Zу
Zу
Zу
Zу
Zу
Zу
Zу
Zу
乙
乙
乙
乙
乙
乙
乙
乙
乙
乙
乙
乙
乙
乙
乙
乙
乙
乙
乙
乙
乙
乙
乙
乙
乙
乙
乙
乙
乙
乙
乙
乙
乙
乙
乙
乙
乙
乙
乙
乙
乙
乙
乙
乙
乙
乙
乙
乙
乙
乙
2
乙
乙
乙
乙
乙
乙
乙
乙
乙
乙
乙
乙
乙
乙
乙
乙
乙
乙
乙
乙
乙
乙
乙
乙
乙
乙
乙
乙
乙
乙
乙
乙
乙
乙
乙
乙
乙
乙
乙
乙
乙
乙
乙
乙
乙
乙
乙
乙
乙
乙方
乙
乙
乙
乙
乙
乙
乙
乙
乙
乙
乙
乙
乙
乙
乙
乙
乙
乙
乙
乙
乙
乙
乙
乙
乙
乙
乙
乙
乙
乙
乙
乙
乙
乙
乙
乙
乙
乙
乙
乙
乙
乙
乙
乙
乙
乙
乙
乙
乙
甲
乙
乙
乙
乙
乙
乙
乙
乙
乙
乙
乙
乙
乙
乙
乙
乙
乙
乙
乙
乙
乙
乙
乙
乙
乙
乙
乙
乙
乙
乙
乙
乙
乙
乙
乙
乙
乙
乙
乙
乙
乙
乙
乙
乙
乙
乙
乙
乙
乙
化
乙
乙
乙
乙
乙
乙
乙
乙
乙
乙
乙
乙
乙
乙
乙
乙
乙
乙
乙
乙
乙
乙
乙
乙
乙
乙
乙
乙
乙
乙
乙
乙
乙
乙
乙
乙
乙
乙
乙
乙
乙
乙
乙
乙
乙
乙
乙
乙
乙
亿
乙
乙
乙
乙
乙
乙
乙
乙
乙
乙
乙
乙
乙
乙
乙
乙
乙
乙
乙
乙
乙
乙
乙
乙
乙
乙
乙
乙
乙
乙
乙
乙
乙
乙
乙
乙
乙
乙
乙
乙
乙
乙
乙
乙
乙
乙
乙
乙
乙
Zy
乙
乙
乙
乙
乙
乙
乙
乙
乙
乙
乙
乙
乙
乙
乙
乙
乙
乙
乙
乙
乙
乙
乙
乙
乙
乙
乙
乙
乙
乙
乙
乙
乙
乙
乙
乙
乙
乙
乙
乙
乙
乙
乙
乙
乙
乙
乙
乙
乙
丁
乙
乙
乙
乙
乙
乙
乙
乙
乙
乙
乙
乙
乙
乙
乙
乙
乙
乙
乙
乙
乙
乙
乙
乙
乙
乙
乙
乙
乙
乙
乙
乙
乙
乙
乙
乙
乙
乙
乙
乙
乙
乙
乙
乙
乙
乙
乙
乙
乙
己
乙
乙
乙
乙
乙
乙
乙
乙
乙
乙
乙
乙
乙
乙
乙
乙
乙
乙
乙
乙
乙
乙
乙
乙
乙
乙
乙
乙
乙
乙
乙
乙
乙
乙
乙
乙
乙
乙
乙
乙
乙
乙
乙
乙
乙
乙
乙
乙
乙
二
乙
乙
乙
乙
乙
乙
乙
乙
乙
乙
乙
乙
乙
乙
乙
乙
乙
乙
乙
乙
乙
乙
乙
乙
乙
乙
乙
乙
乙
乙
乙
乙
乙
乙
乙
乙
乙
乙
乙
乙
乙
乙
乙
乙
乙
乙
乙
乙
乙
丙
乙
乙
乙
乙
乙
乙
乙
乙
乙
乙
乙
乙
乙
乙
乙
乙
乙
乙
乙
乙
乙
乙
乙
乙
乙
乙
乙
乙
乙
乙
乙
乙
乙
乙
乙
乙
乙
乙
乙
乙
乙
乙
乙
乙
乙
乙
乙
乙
乙
公
公
公
公
公
公
公
公
公
公
公
公
公
公
公
公
公
公
公
公
公
公
公
公
公
公
公
公
公
公
公
公
公
公
公
公
公
公
公
公
公
公
公
公
公
公
公
公
公
公
元
公
公
公
公
公
公
公
公
公
公
公
公
公
公
公
公
公
公
公
公
公
公
公
公
公
公
公
公
公
公
公
公
公
公
公
公
公
公
公
公
公
公
公
公
公
公
公
公
公
六
四
三
三
三
三
三
三
三
三
三
三
三
三
三
三
三
三
三
三
三
三
三
三
三
三
三
三
三
三
三
三
三
三
三
三
三
三
三
三
三
三
三
三
三
三
三
三
三
三
三
三
3
3
3
3
3
3
3
3
3
3
3
3
3
3
3
3
3
3
3
3
3
3
3
3
3
3
3
3
3
3
3
3
3
3
3
3
3
3
3
3
3
3
3
3
3
3
3
3
3
3
三
三
三
三
三
三
三
三
三
三
三
三
三
三
三
三
三
三
三
三
三
三
三
三
三
三
三
三
三
三
三
三
三
三
三
三
三
三
三
三
三
三
三
三
三
三
三
三
三
丙
乙
乙
乙
乙
乙
乙
乙
乙
乙
乙
乙
乙
乙
乙
乙
乙
乙
乙
乙
乙
乙
乙
乙
乙
乙
乙
乙
乙
乙
乙
乙
乙
乙
乙
乙
乙
乙
乙
乙
乙
乙
乙
乙
乙
乙
乙
乙
乙
2017-05-05 | |
3 nonitkoIO kOMnaiH, HopMaTHBHOIO DOKyMeHTaueio, iHopMaucio npo 3amOBHeHH 3anachnx YactNH Ta doaTKOBOIO iHOpMaucio npo npodyk MOxHa O3HaHOMTUNC:

BibidaTe haw Be6-caT docs.ingesit.eu i parts-selfservice.whirlpool.com BukopucTaTe QR-KoI A6o 3BepHb8cdo haooi cnyx6n nicpnpdaXhorO 0cbnyroBybaHHK nIeHTIB (Homep Tepeohy 3aHaeho y rapaHTiHOMy taHO). 3Beptaiuocnb do ceHTpy nicpnpdaXhorO 0cbnyroBybaHH, NOBIOMTe KoNi, 3aHaueHi Ha Ta6NIuCi 3 NaCnOpTHMm DaHMM BInpo6y.
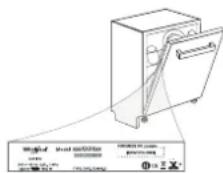
HΦopMaIIO npo MoIeNb MoXHa OTpIMaTn, CKOpNCtABuINcB BkA3aHm Ha MapKyBaHHi
eheproeefkTNBHOCTI QR-KoOM. Ha eTNIKeTI TaKox 3a3NaueHn iDeHTNΦiKaTOP MoJI, AKN MoXHa BnKOpNCTOByBaTu dny nepernyu npotany peectpy 3a aDpecoIO https://eprel.ec.europa.eu