CDX-GT517EE - Car stereo SONY - Free user manual and instructions
Find the device manual for free CDX-GT517EE SONY in PDF.
User questions about CDX-GT517EE SONY
0 question about this device. Answer the ones you know or ask your own.
Ask a new question about this device
Download the instructions for your Car stereo in PDF format for free! Find your manual CDX-GT517EE - SONY and take your electronic device back in hand. On this page are published all the documents necessary for the use of your device. CDX-GT517EE by SONY.
USER MANUAL CDX-GT517EE SONY
FM/MW/LW Compact Disc Player
Operating Instructions GB
For installation and connections, see the supplied installation/connections manual.
Warning if your car's ignition has no ACC position
Be sure to set the Auto Off function (page 11). The unit will shut off completely and automatically in the set time after the unit is turned off, which prevents battery drain. If you do not set the Auto Off function, press and hold OFF until the display disappears each time you turn the ignition off.
CLASS 1 LASER PRODUCT
This label is located on the bottom of the chassis.

Disposal of Old Electrical & Electronic Equipment (Applicable in the European Union and other European countries with separate collection systems)
This symbol on the product or on its
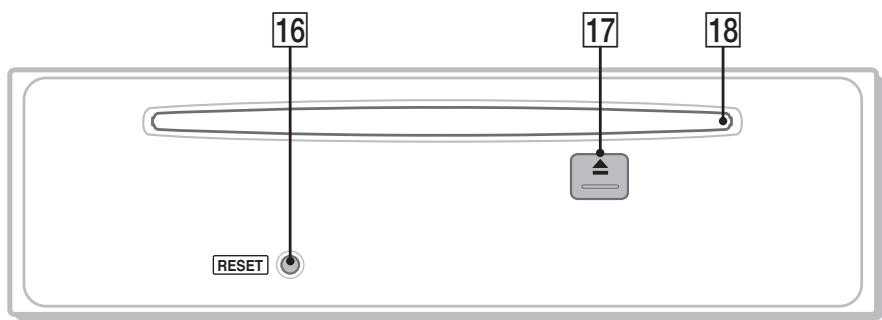
packaging indicates that this product shall not be treated as household waste. Instead it shall be handed over to the applicable collection point for the recycling of electrical and electronic equipment. By ensuring this product is disposed of correctly, you will help prevent potential negative consequences for the environment and human health, which could otherwise be caused by inappropriate waste handling of this product. The recycling of materials will help to conserve natural resources. For more detailed information about recycling of this product, please contact your local Civic Office, your household waste disposal service or the shop where you purchased the product.
Applicable accessory: Remote commander
SonicStage and its logo are trademarks of Sony Corporation.
"ATRAC" and its logo are trademarks of Sony Corporation.

Microsoft, Windows Media, and the Windows logo are trademarks or registered trademarks of Microsoft
Corporation in the United States and/or other countries.
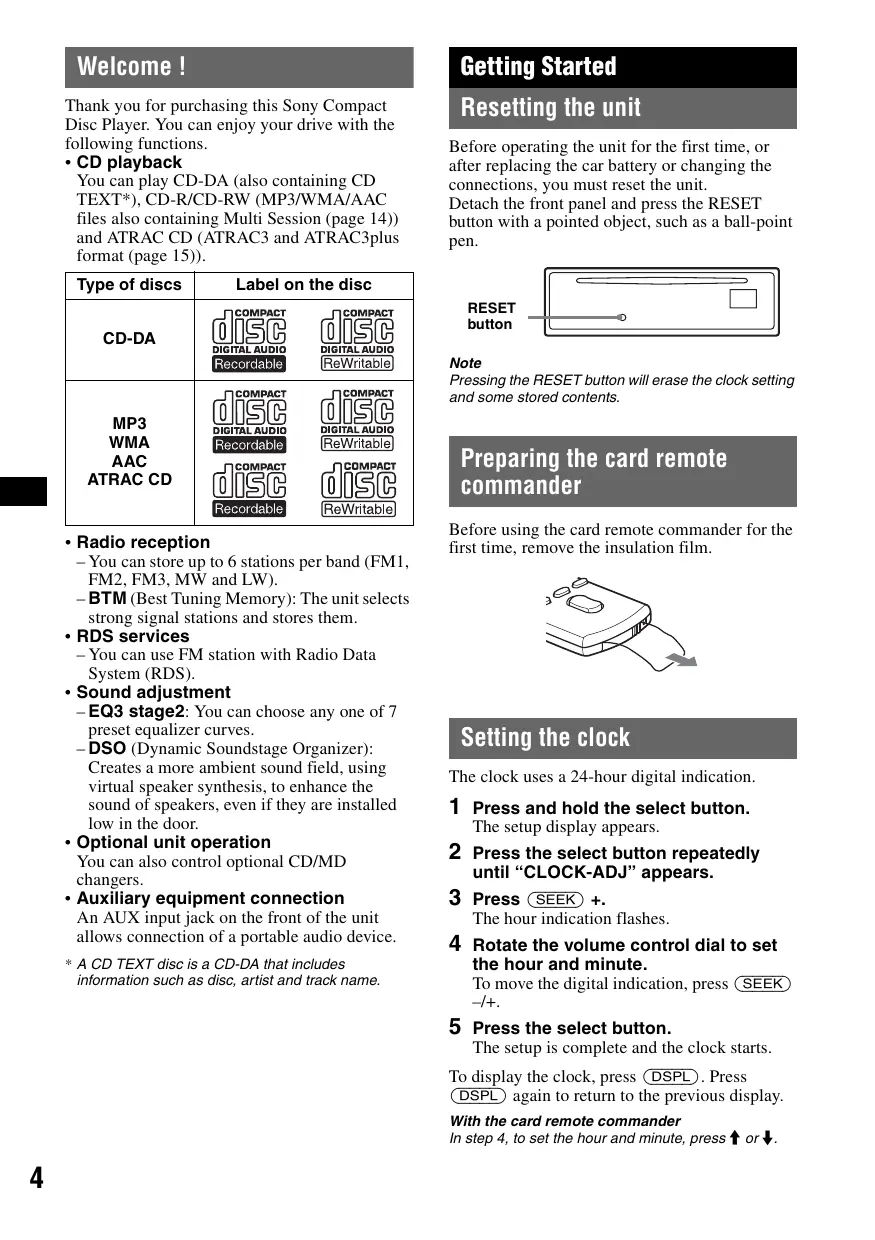
Welcome! 4
Getting Started
Resetting the unit. 4
Preparing the card remote commander 4
Setting the clock 4
Detaching the front panel 5
Attaching the front panel 5
Inserting the disc in the unit 5
Ejecting the disc 5
Location of controls and basic operations
Main unit. 6
Card remote commander RM-X151.6
CD
Display items 8
Repeat and shuffle play. 8
Radio
Storing and receiving stations 8
Storing automatically -BTM. 8
Storing manually. 8
Receiving the stored stations 8
Tuning automatically 8
RDS. 9
Overview. 9
Setting AF and TA 9
Selecting PTY. 10
Setting CT. 10
Other functions
Changing the sound settings. 11
Adjusting the sound characteristics
— BAL/FAD/SUB. 11
Customizing the equalizer curve -EQ3. 11
Adjusting setup items — SET 11
Using optional equipment. 12
Auxiliary audio equipment. 12
CD/MD changer. 12
RotarycommanderRM-X4S. 13
Additional Information
Precautions 14
Notes on discs 14
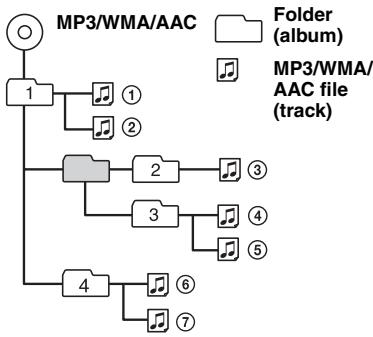
Playback order of MP3/WMA/
AAC files 15
About MP3 files. 15
About WMA files. 15
About AAC files 15
About ATRAC CD. 15
Maintenance 16
Removing the unit. 16
Specifications 17
Troubleshooting 18
Error displays/Messages. 19
Welcome!
Thank you for purchasing this Sony Compact Disc Player. You can enjoy your drive with the following functions.
- CD playback
You can play CD-DA (also containing CD TEXT*), CD-R/CD-RW (MP3/WMA/AAC files also containing Multi Session (page 14)) and ATRAC CD (ATRAC3 and ATRAC3plus format (page 15)).
| Type of discs | Label on the disc | |
| CD-DA | COMPACT DISC DIGITAL AUDIO Recordable | COMPACT DISC DIGITAL AUDIO ReWritable |
| MP3 | COMPACT DISC | COMPACT DISC |
| WMA | DIGITAL AUDIO Recordable | DIGITAL AUDIO ReWritable |
| AAC | COMPACT DISC | COMPACT DISC |
| ATRAC CD | Recordable | ReWritable |
-
Radio reception
-
You can store up to 6 stations per band (FM1, FM2, FM3, MW and LW).
- BTM (Best Tuning Memory): The unit selects strong signal stations and stores them.
RDS services
- You can use FM station with Radio Data System (RDS).
Sound adjustment
-EQ3 stage2: You can choose any one of 7 preset equalizer curves.
- DSO (Dynamic Soundstage Organizer): Creates a more ambient sound field, using virtual speaker synthesis, to enhance the sound of speakers, even if they are installed low in the door.
- Optional unit operation
You can also control optional CD/MD changers.
- Auxiliary equipment connection
An AUX input jack on the front of the unit allows connection of a portable audio device.
* A CD TEXT disc is a CD-DA that includes information such as disc, artist and track name.
Getting Started
Resetting the unit
Before operating the unit for the first time, or after replacing the car battery or changing the connections, you must reset the unit.
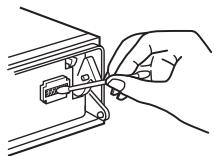
Detach the front panel and press the RESET button with a pointed object, such as a ball-point pen.
RESET button

Note
Pressing the RESET button will erase the clock setting and some stored contents.
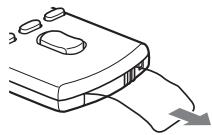
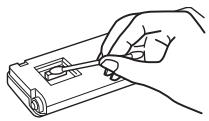
Preparing the card remote commander
Before using the card remote commander for the first time, remove the insulation film.
Setting the clock
The clock uses a 24-hour digital indication.
1 Press and hold the select button. The setup display appears.
2 Press the select button repeatedly until "CLOCK-ADJ" appears.
3 Press SEEK +. The hour indication flashes.
4 Rotate the volume control dial to set the hour and minute.
To move the digital indication, press (SEEK) - / +
5 Press the select button.
The setup is complete and the clock starts.
To display the clock, press DSPL. Press DSPL again to return to the previous display.
With the card remote commander
In step 4, to set the hour and minute, press or .
Tip
You can set the clock automatically with the RDS feature (page 10).
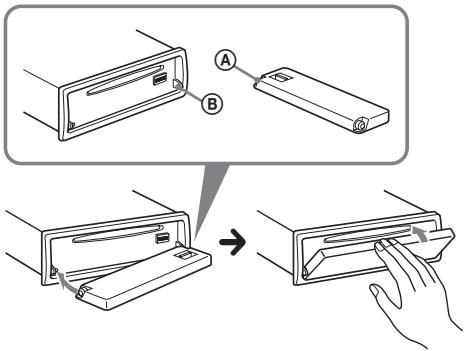
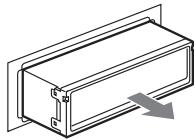
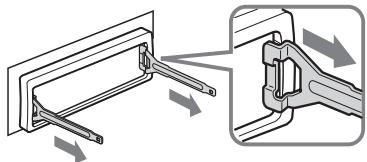
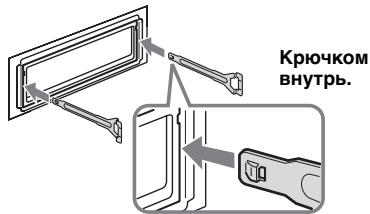
Detaching the front panel
You can detach the front panel of this unit to prevent theft.
Caution alarm
If you turn the ignition switch to the OFF position without detaching the front panel, the caution alarm will sound for a few seconds. The alarm will only sound if the built-in amplifier is used.
1 Press OFF.
The unit is turned off.
2 Press (OPEN).
The front panel is flipped down.
3 Slide the front panel to the right, then gently pull out the left end of the front panel.
Notes
- Do not drop or put excessive pressure on the front panel and display window.
- Do not subject the front panel to heat/high temperature or moisture. Avoid leaving it in a parked car or on a dashboard/rear tray.
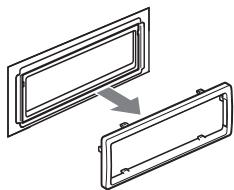
Attaching the front panel
Place the hole A of the front panel onto the spindle B on the unit, then lightly push the left side in.
Press SOURCE on the unit (or insert a disc) to operate the unit.
Note
Do not put anything on the inner surface of the front panel.
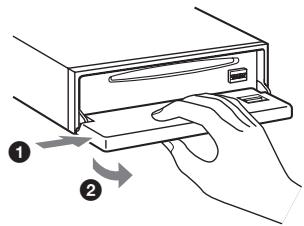
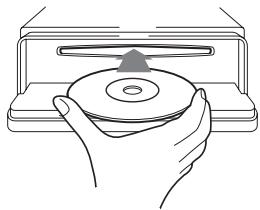
Inserting the disc in the unit
1 Press
2 Insert the disc (label side up).
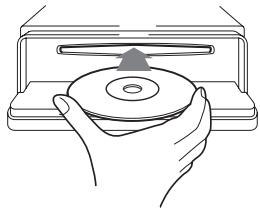
3 Close the front panel.
Playback starts automatically.
Ejecting the disc
1 Press
2 Press .
The disc is ejected.
3 Close the front panel.
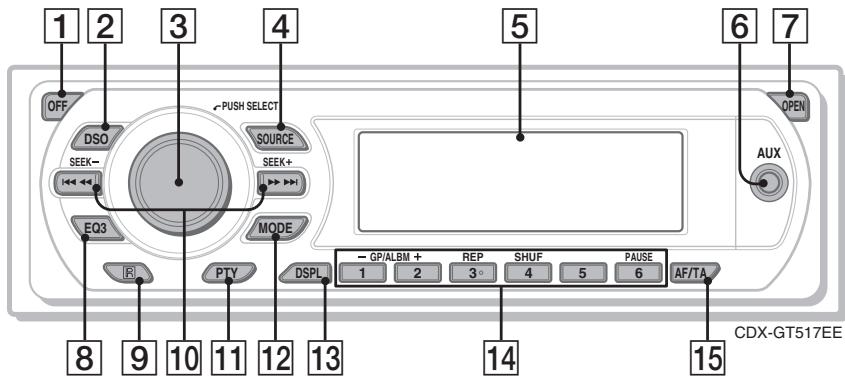
Main unit
Front panel removed
Card remote commander RM-X151
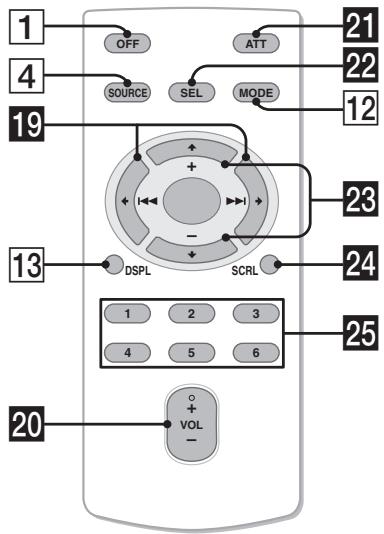
Refer to the pages listed for details. The corresponding buttons on the card remote commander control the same functions as those on the unit.
1 OFF button
To power off; stop the source.
2 DSO button 4
To select the DSO mode (1, 2, 3 or OFF). The larger the number, the more enhanced the effect.
3 Volume control dial/select button 11
To adjust volume (rotate); select setup items (press and rotate).
4 SOURCE button
To power on; change the source (Radio/CD/ MD*1/AUX).
Display window
6 AUX input jack 12
To connect a portable audio device.
7 OPEN button 5
EQ3 (equalizer) button 11
To select an equalizer type (XPLOD, VOCAL, EDGE, CRUISE, SPACE, GRAVITY, CUSTOM or OFF).
Receptor for the card remote commander
10 SEEK-/+buttons
CD:
To skip tracks (press); skip tracks continuously (press, then press again within about 1 second and hold); reverse/fast-forward a track (press and hold). Radio: To tune in stations automatically (press); find a station manually (press and hold).
11 PTY (Program Type) button 10
To select PTY in RDS.
12 MODE button 8, 12
To select the radio band (FM/MW/LW); select the unit*2.
13 DSPL (display) button 8,9
To change display items.
14 Number buttons
CD/MD*1:
1/2:GP3/ALBM4-/+
To skip albums (press); skip albums continuously (press and hold).*5
③: REP 8,13
④: SHUF 8, 13
(6): PAUSE*6
To pause playback. To cancel, press again.
Radio:
To receive stored stations (press); store stations (press and hold).
15 AF (Alternative Frequencies)/TA
(Traffic Announcement) button 9
To set AF and TA in RDS.
16 RESET button 4
17 (eject) button 5
To eject the disc.
18 Disc slot 5
To insert the disc.
The following buttons on the card remote commander have also different buttons/functions from the unit. Remove the insulation film before use (page 4).
19 (1 1) / (2 1) buttons
To control CD/radio, the same as (SEEK) - / + on the unit.
20 VOL (volume) +/- button
To adjust volume.
21 ATT (attenuate) button
To attenuate the sound. To cancel, press again.
22 SEL (select) button
The same as the select button on the unit.
23 (+) / (-) buttons
To control CD, the same as 12
(GP / ALBM - / + ) on the unit.
24 SCRL (scroll) button 8
To scroll the display item.
25 Number buttons
To receive stored stations (press); store stations (press and hold).
1 When an MD changer is connected.
2 When a CD/MD changer is connected.
3 When an ATRAC CD is played.
4 When an MP3/WMA/AAC is played.
5 If the changer is connected, the operation is different, see page 13.
6 When playing back on this unit.
Note
If the unit is turned off and the display disappears, it cannot be operated with the card remote commander unless SOURCE on the unit is pressed, or a disc is inserted to activate the unit first.
Tip
For details on how to replace the battery, see
"Replacing the lithium battery of the card remote commander" on page 16.
For details on selecting a CD/MD changer, see page 12.
Display items
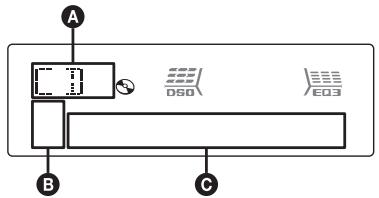
A Source
ATRAC/WMA/MP3/AAC indication
Track number/Elapsed playing time, Disc/ artist name, Album/group number*, Album/ group name, Track name, Text information, Clock
- Album/group number is displayed only when the album/group is changed.
To change display items ,press DSPL; scroll display items , press SCRL on the card remote commander or set "A.SCRL-ON" (page 12).
Tip
Displayed items will differ, depending on the disc type, recorded format and settings. For details on MP3/WMA/AAC, see page 15; ATRAC CD, see page 15.
Repeat and shuffle play
1 During playback, press (3) (REP) or (4) (SHUF) repeatedly until the desired setting appears.
| Select | To play |
| TRACK | track repeatedly. |
| ALBUM*1 | album repeatedly. |
| GROUP*2 | group repeatedly. |
| SHUF ALBUM*1 | album in random order. |
| SHUF GROUP*2 | group in random order. |
| SHUF DISC | disc in random order. |
1 When an MP3/WMA/AAC is played.
2 When an ATRAC CD is played.
To return to normal play mode, select " 一 OFF" or "SHUF OFF."
Radio
Storing and receiving stations
Caution
When tuning in stations while driving, use Best Tuning Memory (BTM) to prevent an accident.
Storing automatically — BTM
1 Press SOURCE repeatedly until "TUNER" appears.
To change the band, press MODE repeatedly. You can select from FM1, FM2, FM3*, MW or LW.
2 Press and hold the select button.
The setup display appears.
3 Press the select button repeatedly until "BTM" appears.
4 Press (SEEK) +.
The unit stores stations in order of frequency on the number buttons.
A beep sounds when the setting is stored.
- FM3 tuning range is 65 to 74 MHz (at 30 kHz step).
Storing manually
1 While receiving the station that you want to store, press and hold a number button (① to ⑥) until "MEM" appears.
The number button indication appears in the display.
Note
If you try to store another station on the same number button, the previously stored station will be replaced.
Tip
When a RDS station is stored, the AF/TA setting is also stored (page 9).
Receiving the stored stations
1 Select the band, then press a number button (① to ⑥).
Tuning automatically
1 Select the band, then press (SEEK) -/+ to search for the station.
Scanning stops when the unit receives a station. Repeat this procedure until the desired station is received.
Tip
If you know the frequency of the station you want to listen to, press and hold (SEEK) -/+ to locate the approximate frequency, then press (SEEK) -/+ repeatedly to fine adjust to the desired frequency (manual tuning).
RDS
Overview
FM stations with Radio Data System (RDS) service send inaudible digital information along with the regular radio program signal.
Display items
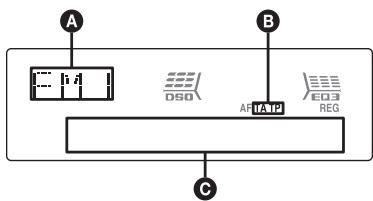
A Radio band, Function
TA/TP*1
Frequency*2 (Program service name), Preset number, Clock, RDS data
1 "TA" flashes during traffic information. "TP" lights up while such a station is received.
2 While receiving the RDS station, “*” is displayed on the left of the frequency indication.
To change display items , press DSPL.
RDS services
This unit automatically provides RDS services as follows:
AF (Alternative Frequencies)
Selects and retunes the station with the strongest signal in a network. By using this function, you can continuously listen to the same program during a long-distance drive without having to retune the same station manually.
TA (Traffic Announcement)/TP (Traffic Program)
Provides current traffic information/programs. Any information/program received, will interrupt the currently selected source.
PTY (Program Types)
Displays the currently received program type. Also searches your selected program type.
CT (Clock Time)
The CT data from the RDS transmission sets the clock.
Notes
- Depending on the country/region, not all RDS functions may be available.
- RDS will not work if the signal strength is too weak, or if the station you are tuned to is not transmitting RDS data.
Setting AF and TA
1 Press / TA repeatedly until the desired setting appears.
| Select | To |
| AF-ON | activate AF and deactivate TA. |
| TA-ON | activate TA and deactivate AF. |
| AF, TA-ON | activate both AF and TA. |
| AF, TA-OFF | deactivate both AF and TA. |
Storing RDS stations with the AF and TA setting
You can preset RDS stations along with the AF/ TA setting. If you use the BTM function, only RDS stations are stored with the same AF/TA setting.
If you preset manually, you can preset both RDS and non-RDS stations with the AF/TA setting for each.
1 Set AF/TA, then store the station with BTM or manually.
Presetting the volume of traffic announcements
You can preset the volume level of the traffic announcements so as to not miss hearing them.
1 Rotate the volume control dial to adjust the volume level.
2 Press and hold ( / TA) until "TA" appears.
Receiving emergency announcements
With AF or TA on, the emergency announcements will automatically interrupt the currently selected source.
Staying with one regional program — REG
When the AF function is on: this unit's factory setting restricts reception to a specific region, so you will not be switched to another regional station with a stronger frequency.
If you leave this regional program's reception area, set "REG-OFF" in setup during FM reception (page 12).
Note
This function does not work in the UK and in some other areas.
Local Link function (UK only)
This function enables you to select other local stations in the area, even if they are not stored on your number buttons.
1 During FM reception, press a number button (① to (6)) on which a local station is stored.
2 Within 5 seconds, press again a number button of the local station.
Repeat this procedure until the local station is received.
Selecting PTY
1 Press PTY during FM reception.
pty
DSD
E03
NEWS
The current program type name appears if the station is transmitting PTY data.
2 Press repeatedly until the desired program type appears.
3 Press (SEEK) -/+
The unit starts to search for a station broadcasting the selected program type.
Type of programs
NEWS (News), AFFAIRS (Current Affairs), INFO (Information), SPORT (Sports), EDUCATE (Education), DRAMA (Drama), CULTURE (Culture), SCIENCE (Science), VARIORED (Varied), POP M (Popular Music), ROCK M (Rock Music), EASY M (Easy Listening), LIGHT M (Light Classical), CLASSICS (Classical), OTHER M (Other Music Type), WEATHER (Weather), FINANCE (Finance), CHILDREN (Children's Programs), SOCIAL A (Social Affairs), RELIGION (Religion), PHONE IN (Phone In), TRAVEL (Travel), LEISURE (Leisure), JAZZ (Jazz Music), COUNTRY (Country Music), NATION M (National Music), OLDIES (Oldies Music), FOLK M (Folk Music), DOCUMENT (Documentary)
Note
You cannot use this function in countries/regions where no PTY data is available.
Setting CT
1 Set "CT-ON" in setup (page 11).
Notes
- The CT function may not work even though an RDS station is being received.
- There might be a difference between the time set by the CT function and the actual time.
Adjusting the sound characteristics — BAL/FAD/SUB
You can adjust the balance, fader, and subwoofer volume.
1 Press the select button repeatedly until "BAL," "FAD" or "SUB" appears.
The item changes as follows:
$$ \begin{array}{l} \text {L O W} ^ { 1} \rightarrow \text {M I D} ^ { 1} \rightarrow \text {H I} ^ { 1} \rightarrow \ \text {B A L} (\text {l e f t - r i g h t}) \rightarrow \text {F A D} (\text {f r o n t - r e a r}) \rightarrow \ \text {S U B} (\text {s u b w o o f e r v o l u m e}) ^ { 2} \rightarrow \text {A U X} ^ {* 3} \ \end{array} $$
1 When EQ3 is activated (page 11).
2 When the audio output is set to "SUB" (page 11).
"ATT" is displayed at the lowest setting, and can be adjusted up to 20 steps.
*3 When AUX source is activated (page 12).
2 Rotate the volume control dial to adjust the selected item.
After 3 seconds, the setting is complete and the display returns to normal play/reception mode.
With the card remote commander
In step 2, to adjust the selected item, press , , or .
Customizing the equalizer curve - EQ3
"CUSTOM" of EQ3 allows you to make your own equalizer settings.
1 Select a source, then press EQ3 repeatedly to select "CUSTOM."
2 Press the select button repeatedly until "LOW," "MID" or "HI" appears.
3 Rotate the volume control dial to adjust the selected item.
The volume level is adjustable in 1 dB steps, from -10dB to +10dB .

Repeat steps 2 and 3 to adjust the equalizer curve.
To restore the factory-set equalizer curve, press and hold the select button before the setting is complete.
After 3 seconds, the setting is complete and the display returns to normal play/reception mode.
Tip Other equalizer types are also adjustable.
With the card remote commander In step 3, to adjust the selected item, press ↑, → or ↓.
Adjusting setup items — SET
1 Press and hold the select button.
2 Press the select button repeatedly until the desired item appears.
3 Rotate the volume control dial to select the setting (example "ON" or "OFF").
4 Press and hold the select button.
The setup display appears.
The setup is complete and the display returns to normal play/reception mode.
Note
Displayed items will differ, depending on the source and setting.
With the card remote commander
In step 3, to select the setting, press or .
The following items can be set (follow the page reference for details):
"·" indicates the default settings.
CLOCK-ADJ (Clock Adjust) (page 4)
CT (Clock Time)
To set "CT-ON" or "CT-OFF" () (page 9, 10).
BEEP
To set "BEEP-ON" () or "BEEP-OFF."
AUX-A*1 (AUX Audio)
To turn the AUX source display "AUX-A-ON"
() or "AUX-A-OFF" (page 12).
A.OFF (Auto Off)
To shut off automatically after a desired time when the unit is turned off: "A.OFF-NO" ()
"A.OFF-30S (Seconds)," "A.OFF-30M
(Minutes) or "A.OFF-60M (Minutes)."
SUB/REAR\*1
To switch the audio output.
- "SUB-OUT" () : to output to a subwoofer.
- "REAR-OUT": to output to a power amplifier.
DEMO\*1 (Demonstration)
To set "DEMO-ON" () or "DEMO-OFF."
DIM (Dimmer)
To change the brightness of the display.
- "DIM-AT" () : to dim the display automatically when you turn lights on.
- "DIM-ON": to dim the display.
- "DIM-OFF": to deactivate the dimmer.
ILM (Illumination)
To change the illumination color: "ILM-1" (●) or "ILM-2."
M.DSPL (Motion Display)
To select the Motion Display mode.
- "M.DSPL-SA" () : to show moving patterns and spectrum analyzer.
- "M.DSPL-ON": to show moving patterns.
- "M.DSPL-OFF": to deactivate the Motion Display.
A.SCRL (Auto Scroll)
To scroll long displayed item automatically when the disc/album/group/track is changed.
-A.SCRL-ON" () : to scroll.
-A.SCRL-OFF": to not scroll.
- "LOCAL-OFF" () : to tune normal reception.
- "LOCAL-ON": to only tune into stations with stronger signals.
MONO (Monaural mode)*2
To improve poor FM reception, select monaural reception mode.
- "MONO-OFF" () : to hear stereo broadcast in stereo.
-MONO-ON': to hear stereo broadcast in monaural.
REG^*2 (Regional)
To set "REG-ON" or "REG-OFF" (●) (page 9).
LPF^*3 (Low Pass Filter)
To select the subwoofer cut-off frequency: "LPF OFF" () , "LPF125Hz" or "LPF 78Hz."
BTM (page 8)
1 When the unit is turned off.
2 When FM is received.
*3 When the audio output is set to "SUB."
Using optional equipment
Auxiliary audio equipment
By connecting an optional portable audio device to the AUX input jack (stereo mini jack) on the unit and then simply selecting the source, you can listen on your car speakers. The volume level is adjustable for any difference between the unit and the portable audio device. Follow the procedure below:
Connecting the portable audio device
1 Turn off the portable audio device.
2 Turn down the volume on the unit.
3 Connect to the unit.
* Be sure to use a straight type plug.
Adjust the volume level
Be sure to adjust the volume for each connected audio device before playback.
1 Turn down the volume on the unit.
2 Press SOURCE repeatedly until "AUX" appears.
"AUX FRONT IN" appears.
3 Start playback of the portable audio device at a moderate volume.
4 Set your usual listening volume on the unit.
5 Press the select button repeatedly until "AUX" appears, and rotate the volume control dial to adjust the input level (-8dB to +18dB)
CD/MD changer
Selecting the changer
1 Press SOURCE repeatedly until "CD" or "MD" appears.
2 Press MODE repeatedly until the desired changer appears.

Playback starts.
Skipping albums and discs
1 During playback, press ①/② (GP/ALBM -/+).
| To skip | Press ①/② (GP/ALBM -/+ ) |
| album | and release (hold for a moment). |
| album continuously | within 2 seconds of first releasing. |
| discs | repeatedly. |
| discs continuously | then, press again within 2 seconds and hold. |
Repeat and shuffle play
1 During playback, press (3) (REP) or (4) (SHUF) repeatedly until the desired setting appears.
| Select | To play |
| ← DISC*1 | disc repeatedly. |
| SHUF | tracks in the changer in random order. |
| CHANGER*1 | |
| SHUF ALL*2 | tracks in all units in random order. |
1 When one or more CD/MD changers are connected.
2 When one or more CD changers, or two or more MD changers are connected.
To return to normal play mode, select " OFF" or "SHUF OFF."
Tip
"SHUF ALL" will not shuffle tracks between CD units and MD changers.
Rotary commander RM-X4S
Attaching the label
Attach the indication label depending on how you mount the rotary commander.
Location of controls
The corresponding buttons on the rotary commander control the same functions as those on this unit.
The following controls on the rotary commander require a different operation from the unit.
- PRESET/DISC control
The same as (1) / (2) (GP/ALBM - / + ) on the unit (push in and rotate).
VOL (volume) control
The same as the volume control dial on the unit (rotate).
- SEEK/AMS control
The same as (SEEK) - / + on the unit (rotate, or rotate and hold).
Changing the operative direction
The operative direction of the controls is factory-set as shown below.

If you need to mount the rotary commander on the right hand side of the steering column, you can reverse the operative direction.
1 While pushing the VOL control, press and hold (SEL).

Additional Information
Precautions
- If your car has been parked in direct sunlight, allow the unit to cool off before operating it.
- Power antenna (aerial) will extend automatically while the unit is operating.
Moisture condensation
On a rainy day or in a very damp area, moisture condensation may occur inside the lenses and display of the unit. Should this occur, the unit will not operate properly. In such a case, remove the disc and wait for about an hour until the moisture has evaporated.
To maintain high sound quality
Be careful not to splash juice or other soft drinks onto the unit or discs.
Notes on discs
- To keep a disc clean, do not touch its surface. Handle the disc by its edge.
- Keep your discs in their cases or disc magazines when not in use.
- Do not subject discs to heat/high temperature. Avoid leaving them in a parked car or on a dashboard/rear tray.
- Do not attach labels, or use discs with sticky ink/ residue. Such discs may stop spinning when used, causing a malfunction, or may ruin the disc.


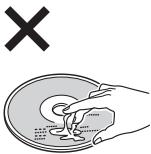
- Do not use any discs with labels or stickers attached.
The following malfunctions may result from using such discs:
- Inability to eject a disc (due to a label or sticker peeling off and jamming the eject mechanism).
- Inability to read audio data correctly (e.g., playback skipping, or no playback) due to heat shrinking of a sticker or label causing a disc to warp.
- Discs with non-standard shapes (e.g., heart, square, star) cannot be played on this unit.
Attempting to do so may damage the unit. Do not use such discs.
- You cannot play 8cm (3^1 / 4 in) CDs.
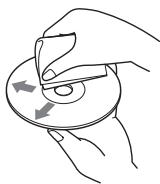
- Before playing, clean the discs with a commercially available cleaning cloth. Wipe each disc from the center out. Do not use solvents such as benzine, thinner, commercially available cleaners, or antistatic spray intended for analog discs.
Notes on CD-R/CD-RW discs
- Some CD-Rs/CD-RWs (depending on the equipment used for its recording or the condition of the disc) may not play on this unit.
- You cannot play a CD-R/a CD-RW that is not finalized.
-
The unit is compatible with the ISO 9660 level 1/level 2 format, Joliet/Romeo in the expansion format, and Multi Session.
The maximum number of: -
folders (albums): 150 (including root and empty folders).
- files (tracks) and folders contained in a disc: 300 (if a folder/file names contain many characters, this number may become less than 300).
displayable characters for a folder/file name is 32 (Joliet), or 64 (Romeo). - When the disc is recorded in Multi Session, only the first track of the first session format is recognized and played (any other format is skipped). The priority of the format is CD-DA, ATRAC CD and MP3/WMA/AAC.
- When the first track is a CD-DA, only CD-DA of the first session is played.
- When the first track is not a CD-DA, an ATRAC CD or MP3/WMA/AAC session is played. If the disc has no data in any of these formats, "NO MUSIC" is displayed.
Music discs encoded with copyright protection technologies
This product is designed to play back discs that conform to the Compact Disc (CD) standard. Recently, various music discs encoded with copyright protection technologies are marketed by some record companies. Please be aware that among those discs, there are some that do not conform to the CD standard and may not be playable by this product.
Note on DualDiscs
A DualDisc is a two sided disc product which mates DVD recorded material on one side with digital audio material on the other side. However, since the audio material side does not conform to the Compact Disc (CD) standard, playback on this product is not guaranteed.
Playback order of MP3/WMA/AAC files
About MP3 files
- MP3, which stands for MPEG-1 Audio Layer-3, is a music file compression format standard. It compresses audio CD data to approximately 1/10 of its original size.
- ID3 tag versions 1.0, 1.1, 2.2, 2.3 and 2.4 apply to MP3 only. ID3 tag is 15/30 characters (1.0 and 1.1), or 63/126 characters (2.2, 2.3 and 2.4).
- When naming an MP3 file, be sure to add the file extension ".mp3" to the file name.
- During playback or fast-forward/reverse of a VBR (variable bit rate) MP3 file, elapsed playing time may not display accurately.
About WMA files
- WMA, which stands for Windows Media Audio, is a music file compression format standard. It compresses audio CD data to approximately 1/22^* of its original size.
WMA tag is 63 characters. - When naming a WMA file, be sure to add the file extension“.wma” to the file name.
-
During playback or fast-forward/reverse of a VBR (variable bit rate) WMA file, elapsed playing time may not display accurately.
-
only for 64 kbps
Note on WMA
Playback of the following WMA files is not supported.
- lossless compression
copyright-protected
About AAC files
- AAC, which stands for Advanced Audio Coding, is a music file compression format standard. It compresses audio CD data to approximately 1/11^* of its original size.
- AAC tag is 126 characters.
- When naming an AAC file, be sure to add the file extension ".m4a" to the file name.
-
During playback or fast-forward/reverse of a VBR (variable bit rate) AAC file, elapsed playing time may not display accurately.
-
only for 128 kbps
Note on AAC
Playback of a copyright-protected file is not supported.
About ATRAC CD
ATRAC3plus format
ATRAC3, which stands for Adaptive Transform Acoustic Coding3, is audio compression technology. It compresses audio CD data to approximately 1/10 of its original size.
ATRAC3plus, which is an extended format of ATRAC3, compresses the audio CD data to approximately 1/20 of its original size. The unit accepts both ATRAC3 and ATRAC3plus format.
ATRAC CD
ATRAC CD is recorded audio CD data which is compressed to ATRAC3 or ATRAC3plus format using authorized software, such as SonicStage 2.0 or later, or SonicStage Simple Burner.
The maximum number of: -folders (groups):255 files tracks)999
- The characters for a folder/file name and text information written by SonicStage are displayed.
For details on ATRAC CD, see the SonicStage or SonicStage Simple Burner manual.
Note
Be sure to create the ATRAC CD using authorized software, such as SonicStage 2.0 or later, or SonicStage Simple Burner 1.0 or 1.1.
If you have any questions or problems concerning your unit that are not covered in this manual, consult your nearest Sony dealer.
Replacing the lithium battery of the card remote commander
Under normal conditions, the battery will last approximately 1 year. (The service life may be shorter, depending on the conditions of use.) When the battery becomes weak, the range of the card remote commander becomes shorter. Replace the battery with a new CR2025 lithium battery. Use of any other battery may present a risk of fire or explosion.
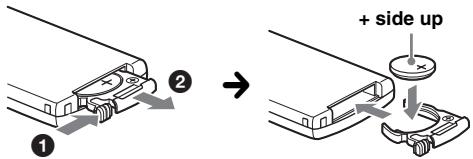
Notes on the lithium battery
- Keep the lithium battery out of the reach of children. Should the battery be swallowed, immediately consult a doctor.
- Wipe the battery with a dry cloth to assure a good contact.
- Be sure to observe the correct polarity when installing the battery.
- Do not hold the battery with metallic tweezers, otherwise a short-circuit may occur.
WARNING
Battery may explode if mistreated.
Do not recharge, disassemble, or dispose of in fire.
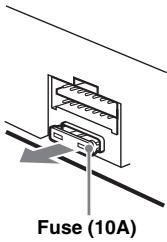
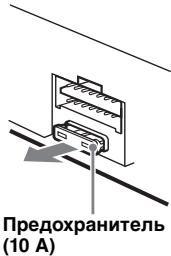
Fuse replacement
When replacing the fuse, be sure to use one matching the amperage rating stated on the original fuse. If the fuse blows, check the power connection and replace the fuse. If the fuse blows again after replacement, there may be an internal malfunction. In such a case, consult your nearest Sony dealer.
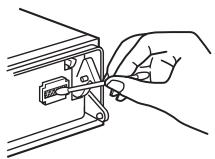
Cleaning the connectors
The unit may not function properly if the connectors between the unit and the front panel are not clean. In order to prevent this, detach the front panel (page 5) and clean the connectors with a cotton swab. Do not apply too much force. Otherwise, the connectors may be damaged.
Main unit

Back of the front panel
Notes
- For safety, turn off the ignition before cleaning the connectors, and remove the key from the ignition switch.
- Never touch the connectors directly with your fingers or with any metal device.
Removing the unit
1 Remove the protection collar.
Detach the front panel (page 5).
Engage the release keys together with the protection collar.
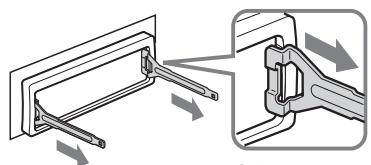
Orient the release keys as shown.
Pull out the release keys to remove the protection collar.

2 Remove the unit.
Insert both release keys simultaneously until they click.
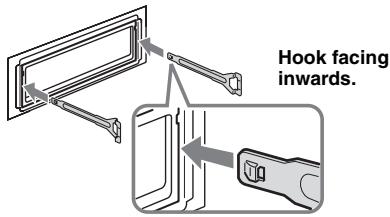
Pull the release keys to unseat the unit.
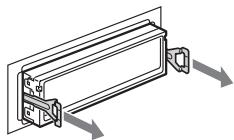
Slide the unit out of the mounting.
Specifications
CD Player section
Signal-to-noise ratio: 120 dB
Frequency response: 10 - 20,000Hz
Wow and flutter: Below measurable limit
Tuner section
FM
Tuning range:
FM1/FM2: 87.5 - 108.0 MHz (at 50 kHz step)
FM3: 65 - 74 MHz (at 30 kHz step)
Antenna (aerial) terminal:
External antenna (aerial) connector
Intermediate frequency: 10.7MHz / 450kHz
Usable sensitivity: 9 dBf
Selectivity: 75dB at 400kHz
Signal-to-noise ratio: 67 dB (stereo), 69 dB (mono)
Harmonic distortion at 1 kHz: 0.5% (stereo), 0.3% (mono)
Separation: 35dB at 1kHz
Frequency response: 30 - 15,000Hz
MW/LW
Tuning range:
MW: 531 - 1,602 kHz
LW: 153 - 279kHz
Antenna (aerial) terminal:
External antenna (aerial) connector
Intermediate frequency: 10.7MHz / 450kHz
Sensitivity: MW: 30~ V , LW: 40~ V
Power amplifier section
Outputs: Speaker outputs (sure seal connectors)
Speaker impedance: 4-8 ohms
Maximum power output: 50W× 4 (at 4 ohms)
General
Outputs:
Audio outputs terminal (front, sub/rear switchable)
Power antenna (aerial) relay control terminal
Power amplifier control terminal
Inputs:
Telephone ATT control terminal
Illumination control terminal
BUS control input terminal
BUS audio input terminal
Remote controller input terminal
Antenna (aerial) input terminal
Mid: ± 10 dB at 1kHz (XPLOD)
High: ± 10 dB at 10kHz (XPLOD)
Power requirements: 12 V DC car battery
(negative ground (earth))
Dimensions: Approx. 178 × 50 × 180 ~mm
(7^1 / 8× 2× 7^1 / 8 in) (w / h / d)
Mounting dimensions: Approx. 182 × 53 × 162 ~mm
(7^1 / 4× 2^1 / 8× 6^1 / 2in)(w / h / d)
Mass: Approx. 1.2kg (2 lb 11 oz)
Supplied accessories:
Card remote commander: RM-X151
Parts for installation and connections (1 set)
Optional accessories/equipment:
Rotary commander: RM-X4S
BUS cable (supplied with an RCA pin cord):
CD changer (10 discs): CDX-757MX
CD changer (6 discs): CDX-T70MX
Source selector:XA-C40
AUX-IN selector:XA-300
Interface adaptor for iPod:XA-110IP
Your dealer may not handle some of the above listed accessories. Please ask the dealer for detailed information.
US and foreign patents licensed from Dolby Laboratories.
MPEG Layer-3 audio coding technology and patents licensed from Fraunhofer IIS and Thomson.
Note
This unit cannot be connected to a digital preamplifier or an equalizer which is Sony BUS system compatible.
Design and specifications are subject to change without notice.
continue to next page

- Halogenated flame retardants are not used in the certain printed wiring boards.
- Halogenated flame retardants are not used in cabinets.
Cushions made from paper.
VOC (Volatile Organic Compound)-free vegetable oil based ink is used for printing the carton.
Troubleshooting
The following checklist will help you remedy problems you may encounter with your unit.
Before going through the checklist below, check the connection and operating procedures.
General
No power is being supplied to the unit.
- Check the connection. If everything is in order, check the fuse.
- If the unit is turned off and the display disappears, it cannot be operated with the remote commander.
Turn on the unit.
The power antenna (aerial) does not extend.
The power antenna (aerial) does not have a relay box.
No sound.
The volume is too low.
- The ATT function is activated, or the Telephone ATT function (when the interface cable of a car telephone is connected to the ATT lead) is activated.
- The position of the fader control "FAD" is not set for a 2-speaker system.
- The CD changer is incompatible with the disc (MP3/WMA/AAC/ATRAC CD).
Play back with this unit.
No beep sound.
- The beep sound is canceled (page 11).
- An optional power amplifier is connected and you are not using the built-in amplifier.
The contents of the memory have been erased.
- The RESET button has been pressed.
Store again into the memory. - The power supply lead or battery has been disconnected.
- The power supply lead is not connected properly.
Stored stations and correct time are erased. The fuse has blown.
Makes noise when the position of the ignition is switched.
The leads are not matched correctly with the car's accessory power connector.
The display disappears from/does not appear in the display window.
- The dimmer is set "DIM-ON" (page 11).
- The display disappears if you press and hold OFF.
Press and hold on the unit until the display appears.
- The connectors are dirty (page 16).
The Auto Off function does not operate.
The unit is turned on. The Auto Off function activates after turning off the unit.
Turn off the unit.
Card remote commander operation is not possible.
Make sure the insulation film has been removed (page 4).
DSO does not function.
Depending on the type of car interior or type of music, DSO may not have a desirable effect.
CD/MD playback
The disc cannot be loaded.
- Another disc is already loaded.
- The disc has been forcibly inserted upside down or in the wrong way.
The disc does not playback.
Defective or dirty disc.
- The CD-Rs/CD-RWs are not for audio use (page 14).
- The disc format and file version are incompatible with this unit (For details, refer to page 4 and 14).
MP3/WMA/AAC files take longer to play back than others.
The following discs take a longer time to start playback.
- a disc recorded with a complicated tree structure.
- a disc recorded in Multi Session.
- a disc to which data can be added.
The ATRAC CD cannot play.
- The disc is not created by authorized software, such as SonicStage or SonicStage Simple Burner.
- Tracks that are not included in the group cannot be played.
The display items do not scroll.
- For discs with very many characters, those may not scroll.
"A.SCRL" is set to "OFF".
Set "A.SCRL-ON" (page 12) or press on the card remote commander.
The sound skips.
- Installation is not correct.
Install the unit at an angle of less than 45^ in a sturdy part of the car.
Defective or dirty disc.
The operation buttons do not function.
The disc will not eject.
Press the RESET button (page 4).
Radio reception
The stations cannot be received.
The sound is hampered by noises.
- Connect a power antenna (aerial) control lead (blue) or accessory power supply lead (red) to the power supply lead of a car's antenna (aerial) booster (only when your car has built-in FM/MW/LW antenna (aerial) in the rear/side glass).
- Check the connection of the car antenna (aerial).
- The auto antenna (aerial) will not go up.
Check the connection of the power antenna (aerial) control lead.
- Check the frequency.
- When the DSO mode is on, the sound is sometimes hampered by noises.
Set the DSO mode to "OFF" (page 6).
Preset tuning is not possible.
- Store the correct frequency in the memory.
The broadcast signal is too weak.
Automatic tuning is not possible.
- Setting of the local seek mode is not correct.
Tuning stops too frequently: Set "LOCAL-ON" (page 12).
Tuning does not stop at a station: Set "MONO-ON" (page 12).
The broadcast signal is too weak.
Perform manual tuning.
During FM reception, the "ST" indication flashes.
- Tune in the frequency accurately.
The broadcast signal is too weak.
Set "MONO-ON" (page 12).
An FM program broadcast in stereo is heard in monaural.
The unit is in monaural reception mode.
Set "MONO-OFF" (page 12).
RDS
The SEEK starts after a few seconds of listening.
The station is non-TP or has weak signal.
Deactivate TA (page 9).
No traffic announcements.
- Activate TA (page 9).
- The station does not broadcast any traffic announcements despite being TP.
Tune in another station.
PTY displays "----"
- The current station is not an RDS station.
- RDS data has not been received.
- The station does not specify the program type.
Error displays/Messages
BLANK*1
Tracks have not been recorded on the MD.*2
Play an MD with recorded tracks.
ERROR\*1
- The disc is dirty or inserted upside down.*2
Clean or insert the disc correctly. - A blank disc has been inserted.
- The disc cannot play due to a problem.
Insert another disc.
FAILURE
The connection of speakers/amplifiers is incorrect.
See the installation guide manual of this model to check the connection.
LOAD
The changer is loading the disc.
Wait until loading is complete.
L. SEEK +/-
The local seek mode is on during automatic tuning.
NO AF
There is no alternative frequency for the current station.
Press (SEEK) - / + while the program service name is flashing. The unit starts searching for another frequency with the same PI (Program Identification) data ("PI SEEK" appears).
NO DISC
The disc is not inserted in the CD/MD changer.
Insert discs in the changer.
NO INFO
Text information is not written in the MP3/WMA/ AAC files or ATRAC CD.
NO MAG
The disc magazine is not inserted in the CD changer.
Insert the magazine in the changer.
NO MUSIC
The disc is not a music file.
Insert a music CD in this unit or MP3 playable changer.
NO NAME
A disc/album/group/track name is not written in the track.
NO TP
The unit will continue searching for available TP stations.
NOT READ
The disc information has not been read by the unit.
Load the disc, then select it on the list.
NOTREADY
The lid of the MD changer is open or the MDs are not inserted properly.
Close the lid or insert the MDs properly.
continue to next page
OFFSET
There may be an internal malfunction.
Check the connection. If the error indication remains on in the display, consult your nearest Sony dealer.
READ
The unit is reading all track and group/album information on the disc.
Wait until reading is complete and playback starts automatically. Depending on the disc structure, it may take more than a minute.
RESET
The CD unit and CD/MD changer cannot be operated due to a problem.
Press the RESET button (page 4).
“i_i_i_i_i_”or“-1-1-1-!”
During reverse or fast-forward, you have reached the beginning or the end of the disc and you cannot go any further.
“
The character cannot be displayed with the unit.
1 If an error occurs during playback of a CD or MD, the disc number of the CD or MD does not appear in the display.
2 The disc number of the disc causing the error appears in the display.
If these solutions do not help improve the situation, consult your nearest Sony dealer.
If you take the unit to be repaired because of CD playback trouble, bring the disc that was used at the time the problem began.
I3roTOBHTeJIb: CoHn KopnpoeiHN
CLASS 1 LASER PRODUCT
3Ta 3TNKeTka HaxoJntcra Ha HnKHei CTopoHe KopIyca.

Ytln3aun 3Jektpnueckoro n 3JektpoHHoro OobopyoBaHna (DnpeKtNa npImeHneTcB CtpaHax Ebpocio3a n dpynx Ebponecknx CtpaHax, rde DeIeCTByOT CNCTembl pa3dJIbHO c6opora OTXoOB)
Data n3rTOBJIeHn yCTpOJCTBa
Tot je HOMep, TIO n cepHnHb HOMep yCTPOcTBA, yka3aHbHa hAkaJIeKe CO IIITPNX-KoJOM Ha kapTOHHO yIaKOBKE.
YTObIy3HaTbI DaTy H3TOTOBJIeHn, CM. CHMBOJIb
“P/D: Ha NaKJIeKe Co ⅢTpHX-KoJOM Ha KaPTOHNo yIaKOBKe.
P/D:XXXXXXX 1 2
1.MecuH3ROTOBJIeHHN
2. Гол ИЗГ罗TOBJeHЯ
A-0,B-1,C-2,D-3,E-4,F-5,G-6,H-7,I-8,J-9
SonicStage I ee JIOTHII YBJIHOCTc TOBAPbIMN 3HaKaAMN KOpIopauIN Sony. "ATRAC" I ee JIOTHII YBJIHOCTc TOBAPbIMN 3HaKaAMN KOpIopauIN Sony.

Microsoft,Windows Media IJorOTnI Windows JBJIaIOTcTOBaPbIMN 3HaKaMn HJIN
3apeHCTpnpOBaHHbIMN TOBapHBIMN 3HaKaAMn KOpIopauuMn Microsoft B CIIIA n IpyrHex cTpaHax.
Poi3IpaBJIaem c IIOkyIkoI! 4
HauaJopaboTbI
C6poc IIapametpoB yctpoiCTBa 4
IoiIOTOBka IIyIbTa IINCTaHIOHOHOrO yIpaJIeHn. 4
YcTaHOBka YacOB 4
ChTHe IepeJHHeIaHeJIu 5 UcTaHOBka IepeJHHeIaHeJIu. 5
UcTaHOBKaIINCKaBycTPOHCTBO 5
I3BJIeHHe IINcKa 5
PacnoJoxeHne opraHOb ynpaBJIeHnI OCHOBHbIe onepaun
OchOBHoe yctpoHCTBO. 6
IyJIbT nHCTaHnHOHHOrO yIpaBJIeHHa
RM-X151. 6
KomnaKT-dnck
HnKaIIHa HaIINJIeee. 8
Повторгов ВоспожиЗБЕДЕННИ
BOcIIPOH3BVeIeHHe B CJIyuaHHOIIOJIeIOBaTeJIbHOCTN. 8
PapnoonpneMnK
CoxpaHHe H II pIeM paIIOCTaIIH.. 9
ABTOMaTHueckoe coXpaHene
- BTM (ΠamrTb OIIThMaJIbHOH
HaCtpoiKN) 9
CoxpaHeHHe BpyHyIO 9
IpiHem paHIOCTaHIIH, COxpaHeHHbIX B IIaMAYTH. 9
ABTomatHuecka HacTpoKa 9
RDS 9
O63op. 9
HacTpoKa IapamEtPoB yCTaHOBKN - SET 12
IcnoJIb3OBAHHe IIOJIHHTeJIbHO O6OpyIOBaHn. 13
BcIOMoTaTeJIbHoe ayIHOO6OpuIOBaHHe 13
IIpoHrpbIbATEJIb KOMIIaKT-/MHHN-ⅡHCKOB. 14
IIOBOPOTbI JINCTaHIIHOHHbI IIEpeKJIIOuAteJIb RM-X4S. 15
DOnOpHnTeJIbHaN HnΦopMaζη
MepbI IpeIOcTOPOXHOCTH 16
PnHMeuHaHH OTHOCHTeJIbHO HNCKOB... 16
IopraOK BocpoH3BcEHeHHaJIOB MP3/WMA/AAC. 17
O paimax MP3. 17
O paimax WMA 17
OfaiJax AAC. 17
OKomnaKT-Днскax ATRAC CD. 18
YxOJ 3a yCTPOINCTBOM 18
I3BJIeueHHe ycTpoHcTBa. 19
TexHHueckHe xapaKTepeHCTHKn. 19
Поньн устаянно HeHcIIpaBHOCTeI .20
HnIkaa/oo6eHna 06 oHH6kax 22
P03dpablaem c nokynko!
He ctabbTe HnHero Ha BHyTpEHHIO NOBepxHOCTb nepeDne nnHnn.
YCTaHOBka DNCKa B YCTpO'CTBO
1 Haxmnte KhoNky (OPEN).
2 BCTaBbTe Dnck (MeTKoB BBepx).
3 3aKpoITe nepeDnHIO nAHeJIb.
BocpoN3BeJeHHe NaHHeTcABTOMaTHUeCKN.
ИЗВLEЧЕНИЕ ДИСКА
1 Haxmnte KhONky (OPEN).
2 HaxmTe KhONKy
ДиСКБуДЕТИЗВЛЕЧЕ.
3 3aKpoIe IpeepHIO IO naHeJIb.
OchOBHoe yctpOuCTBO

ChetaepeHnaHelb

1 HaXmMaTe KHONKy (AF/TA), NOKa Ha DnCpJIee He NOBNTcH HxKhBi napamETp.
| Выбор | Чтобу |
| AF-ON | ВКЛЮЧЕНЕ AF и OTKЛЮЧЕНЕ TA. |
| TA-ON | ВКЛЮЧЕНЕ TA и OTKЛЮCHЕНЕ AF. |
| AF,TA-ON | ВКЛЮЧЕНЕ kaK AF,taKи TA. |
| AF,TA-OFF | OTKЛЮЧЕНЕ kaK AF,taKи TA. |
CoxpaHeHne cTaHcI RDS c npaMeTpamn AF n TA
MoxHo BbIIOJIHNITb IIpeBapHTeJIbHyIO
haCTpoKy cTaNiIN RDS c IapaMeTpAmH
AF/TA.IPi NcIOJIb3OBAHHn OyHKiIN BTM
coXpaHHO7cTOJIbKO cTaHIIIN RDS cTeMn
JKe IpaMeTpAmH AF/TA.
PiN BbIIOJIHeHHn IpeBapHTeJIbHO
hAcSTpoKn BpyUHYIO MOxHO CoXpaHHTb KaK
cTaHIIIN RDS, TaK n cTaHIIIN 6e3 RDS c
IHDbHIIyaJIbHbIMn IpaMeTpAmH AF/TA.
1 3aJaIte AF/TA, 3aTe m coXpaHITe cTaHIO C IIMOIIbIO BTM HJI IN BpyHyIO.
IpeBapnteJbHaY yCTaHOBka yPoBnI rPOMKoCTn COOSeHn O TeKuIe CNtYaauNn Ha Doporax
Moxho IpeBapHTeJbHO yCTaHOBHTb
ypOBeHb rPOMKocTH COOJIeHH O TeKUIIeH
CHTyauHH Ha IOpORax, YTObI He IIPOIIyCTHTb
MOMeHT, KOrDa OHN IIpePaIOTc.
1ПоворачнbaiteperуЛЯТOPгомКOCTH,TOбиHaCTpOHTbуPOBEHbгPOMKOCTH.
2 HaKMHTe HyIepXHBAaTe HaKaToi KHOIIky / TA ,IOKA He IIOABITcN HHINKAAIIHA "TA".
PpneM coo6eHn o6 abapuHbIX cnTuaunx
PnB BKJIIOUeHNN AF HJN TA COO6IeHnO6 aBapHHbIX CNTyaIINX 6yDyT aBTOMaTHueCKN IIpepbIBaTB TeKyuIee BeIIaHHe.
PpocJyUWBaHne OJHOI perNoHaJIbHOI npOrpaMMbl-REG
KorIaФyHKIIHr AF BkJIIOueHa:B COOTBeTCTBnC 3aBOJCKIMn HAcTPOKaMn DAHHORO ycTPOHCTBa IIpHEm BO3MOKeH TOJIbKO B OIIpeJEJIeHOM peRHOHe, IIO3TOMY OHO He 6yIeT IIpeKJIIOUeHo Ha IpyrYIO perHOHaJIbHyO cTAHINo C 6OJIeee CNJIbHOJ YAcTOTOn.
IIpnBbIe3e 3a IIpeJIeIbI O6JIaCTH IIpHEMa OIIpeJIeJIeHHo peHHOHaJIbHOI IIpOgPaMMbI ycTaHOBHTe IapAmTeP“REG-OFF” B MeHIO HAcTpoJKN BO BpEmI IIpHEMa FMpaIHOCTaHcHH (ctp.13).
PpmeaHne
3TaФункиЯ He paBoTaeВ BeNko6pTuHaHnI n HEKOTOpbIx dpynx perNoHax.
ФункцЯ MeCTHOI npUB3KN (ToIbkoДЯ BeIINKo6pntaHn)
念 Ta yHKIIH IIO3BOJIeT HAcTpaHBaTcHa BOJHy IpyrHX MeCTbIX CTaHIIN B DaHHOM paHOHe,JaKe ecJIH OHn HE 3aHeceHbI B IIaMHTb IIpHemHnKa IIOHOMepHBIMKHOIIKAMH.
1 Bo BpemI IIpHemaB IHaIIa3OHe FM HaxMMTe HOMepHyIO KHOIIKy (① - ⑥) JIA KOToPOI 3aIIporpaMMIpOBaHa MeCTHa CTaIHJIa.
2 He 6oJIee Yem Yepe3 5 cekyH, eIe pa3 HauKMHTe HOMepHyIO KHOIIky MeCTHOI CTaHIHN.
Повторяп Te npоцуpy, пoka He 6удт haндаHa MeCTHа paДиocТанцИ.
Bb16op PTY
1 HaxMMTe KhoNky (PTY) BO BpeMa npHema B dnaNa3OHe FM.

EcJIN cTaHIIa IIpeJaET aAHHbIe PTY, IIOBJIaETcHa3BaHHe TnIIa TeKyuIIe IIpOrpaMMbI.
2 Haxmaite KhoNky (PTY), noka He NOBHTCA HyXhBi TnnporpaMMbl.
3 Haxmnte KhoNky SEEK-/+. YcTpoIcTBo HaunHaet IIOnc cTaHnH, IpeJaIOuIe IIporpaMMy BbIbpaHHoro TIIa.
Tin nporpamM
NEWS (HOBOCTH), AFFAIRS (TeKUIIHe co6bIITn), INFO (HNFOpMaIIH), SPORT (CIOPT), EDUCATE (O6pa3OBaHne), DRAMA (paJINOCIEKTAkJI), CULTURE (KUYLTpya), SCIENCE (Hayka), VARIORED (HHTeRbBIO, IYrBbI N KOMeIIN), POP M (IIOJIyIrpHaMy3bIka), ROCK M (POK-My3bIka), EASY M (JIeTKaMy3bIka), LIGHT M (JIeTKaMy KIAaccNka), CLASSICS (KJIaccNka), OTHER M (IpoUHe TIIbIM My3bIK), WEATHER (IIOrOla), FINANCE (ΦHHaHcbl), CHILDREN (JeTCKHe IIporpAmMbI), SOCIAL A (o6IIeCTBHNaJgK3HB), RELIGION (peJIITn), PHONE IN (3BOHKN B IIpMOn ədHp), TRAVEL (IyTeIIeCTBnH), LEISURE (IoCyr), JAZZ (ДжЗаOBaMy3bIka), COUNTRY (My3bIka "KaHTprH"), NATION M (HaiIOHaJIbHaN My3bIka), OLDIES (cTapbIe IIJIRepeB), FOLK M (HapOJNaMy3bIka), DOCUMENT (DOKymeHTaJIbHbIe peInopTaXH)
PpmeaHne
3Ty dyHKUINO HeB03MOJHO HcNToIb3ObaTb B HEKOTOpbIX cTaPahx/perNoHax, rIe He nepepaOTca DaHbIE PTY.
YctaHOBka CT
1 YctaHOBHTe "CT-ON" B MeHIO HactpOuKn (Ctp. 13).
PpmeuHn
Функця CT moKET He pa6oTaby, daXe ecnn PpHnHaMaTcR cTaHUNa, nepeaoua daHbIe RDS.
B3OMOKHO pACOXJDeHWE MEJxNy BpEMeHEm, YcTaHOJIENbIM C nOMOJIbO fYHKmI NT, H peaJIbHbIM pEMeHEm.
HactpoJaXapaKTepeNCTnK3ByKa —BAL/FAD/SUB
Moxho OtperyIHpOBaTb 6aJaHc KaHaJIOB,
feiIep H yPoBeHb rPOMKoCTn caOByepea.
1 HaxkMaTe KhoNky BbIbOpa, Noka He NOBHTcR INHdNkaCua "BAL", "FAD" IJIN "SUB".
INHnKaIHH6yJeT MeHrTbCra CJIeNHyIOHMM 06pa3OM:
LOW (HN3KNE)*1
MID (CPEДНЕ) ^1 HI (BbICOKNE) ^1
BAL (6aJIaHc JIeBOrO-IIpaBOrO KaHaJIOB)
→FAD (6aJIaHc IepeIHHx-3aIHHx rPOMKOROBOPHTeJIeI) →
SUB (ypoBeHb rpoMkoCTn ca6Bypepa)*2 AUX*3
1 Kɔrda actnbunpoBaHa ΦyHKnna
экваланзета EQ3 (ctp. 12).
2 Korda對於aydnoBbIXOda yctaHOBJIeHOn 3haueHne "SUB" (ctp.13). "ATT" otobpaKaTeCn npu cAmo Hn3KOJ yctaHOBKe. Ee MoKHo hAcTpaNbATb B dnaIa3OHe do 20 wArOB.
*3 Korga akTbBn3npoBaH nCTOHyK AUX (cTp. 13).
2 NObepHnTe peryJrTOp rPOMKoCTn, YTO6bI HAcTpOHTb BbIbpaHHbI npaMeTp.
Yepe3 3ceKyHbI IIO OKOHaHHN HAcTPOHKINCHJIeB O3BpAIIaeTcB O6bYHbI peKHM BOCIIPOH3BeIeHH/ IIpHeMa.
PnHcnoIb3OBAHHN PylbTa DnCTaHNoHHOro ynpabLeHHN
Ytobi HAcTpoNTb BbIbpaHHbI npaMeTp B Ware 2, HaxMnTE KHOJIky ↑→HIN
HactpoIka KpNBoi 3KBaJai3epa - EQ3
MeHHO "CUSTOM", IOBJIHOIIeecr IIpr HauKaTHN KHOIIKN EQ3,IO3BOJIaER TACPoNTb CO6CTBeHHbIe yCTaHOBKn əKBAJIaJI3epa.
1 BbI6epNTe NCTOCHNK, 3aTeM HaXMnTe KHOJKy EQ3ДЯ BbI6opa "CUSTOM".
2 Haxnmaite KhoNky Bbl6opa, noka He NOBNTcH INDnKaun "LOW", "MID" nn "HI".
3 NObepHnTe peryJrTOp rPOMKoCTn, YTO6bI HAcTpOHTb BbIbpaHHbI npaMeTp.
YpOBeHb rPOMKOCTn HAcTpaHbaeTcB IHaIa3OHe OT-10 nB Do+10 nB c IlaROM 1 nB.
LOW
- ⅢdⅡ
PnHcNoIb3OBAHHN PyNbTa DnCTaHcNoHOrO ynpabLeHHN
YTo6bI HAcTPOINTb BbIbpaHHbI npaMeTp B Ware 3, HaxMnTE KOnIKy ↑→ INH ↓
Hactpoika napametpoB yctahOBKN SET
1 HaXMMTe u ydepxuBaIte KHOKNy Bbl6opa.
OTo6pa3ntcIHcnJIeYyCTaHOBOK.
2 HaximaiTe KhoNky BbIbopa, noka He NOBHTcH yHXhbl npaMeTp.
3 Поворачивашиperуларot rpoMkoCTn,чTo6bl Bbl6paTb napametp (Hanpimep,“ON”ил "OFF").
4 HaxmTe u ydepXnBaIte KHOkky Bbl6opa.
YcTaHOBka 3aBePIIeHa, INHCJIJIeI BO3BPaIIaETCB I O6bIuHbI pexHM BOCIIpON3BeJeHn/IIpHeMa.
PpmeaHne
Дя pa3bix nCTOCHNKOB n npaMeTPOB, BO3MOXHO, OTO6paKaJaemble 3nEmeHTbI 6yUT OTInuTaBCr.
PnncnoB3OBAHnn PnybTa DnctaHNoHHoYnpaBNeHH
YtO6bI BbI6paTb npaMeTp B WAre 3, HaxMMTe KHOIIky INN
MOxHo yCTaHOBHTcJIeIyOUIne IapAmeTpbl (IOIIIOJIHHTeJIbHbIE CBeJeHnma. Ha yKa3aHHoN CTpaHnIe pyKOBOcTBA): *yKa3bIBaET 3HaueHnI IO yMOJIaHHIO.
CLOCK-ADJ (YcTaHOBKa yacOB) (ctp. 4)
CT (BpemHa yacax) UcTaHObKa 3HaueHnra "CT-ON" HIN "CT-OFF" () (ctp.10,11).
A.OFF (ABTOMaTHUeCKOE BbIKJIIOueHne) IJIa ABToMaTHUeCKORe BbIKJIIOUeHnRApe3 ONPeJIeHNbI IIPOMeKyTOK BpEmHe, KOrJa ycTroPoCTBO BbIKJIIOuHTcR:"A.OFF- NO" () "A.OFF-30S (CeKyHbI), "A.OFF- 30M (MmHytBi)" IIIN "A.OFF-60M (MmHytBi)".
SUB/REAR*1 IcnoJIb3yETcIJIa IIpeKeJIIOUeHnayuIOBbIXOJa.
"SUB-OUT" () :Дя Вьюда на ca6Bypep.
-“REAR-OUT”:ДЛЯ BBIBOДа Ha yCnJIHTeJIb MOIIHOCTHI.
DEMO*1(IeMoHcTpaIIH)
IcIOJIb3yETcraIIyycTaHOBKn 3HaueHnIa“DEMO-ON” () IIN“DEMO-OFF”.
ByIbTe octOpokhbl H He IpoJIbHaIte cOK HJIn JpyTHe HaIIHTKN Ha ycToPOnCTBO HJIn DNcKn.
He HcnoJIb3yIte JnCKN cApJIbIKamn Hn KaJIeIKamn.
Bpe3yIbTaTe HcIOJIb3OBAHnHa TaKHX INCKOB MOrYT Bo3HNKHyTb CJIeJyIOIIHe HeIOJIaIKN.
-HeB03MOXHOCTb H3BJIeueHnna JINCKa (TaK KaOK OTKJIeHJcRApJIbIK HJIIn HaKJIeHka, YTO pIINBEIO K 3aTOpy B MExaHn3Me H3BJIeueHnna JINCKa).
-HeBO3MOXHOCTbIpaBHLbHOrOyTeHnAynIOHaHHbIX(HapnpMeP,cakKnPiBBOcIIpOHN3BeJeHnHINJNTOCTCBHEBOcIIpON3BeJeHnHIN3-3aTOrO,TOYApJIbIKNJINHaKJIeKaJeOpMPOBaHcBOTeJIla,YTOIIpNBEOKIIpeKocuDncka.
-Динсн HectaHДapTHOД ФОмБI (HaIIpHmep, BФОмe cepДиа, KBAДрАТа, 3Be3Ди) HeJIb3BBOcINpOuN3BODIHTb Ha ΘtOM yCTpoIYCTBE. BIpOTBHOM CJIyAe ΘTO MOKET IIpHBecTH KIOBpeXJdEHnU yCTpoIYCTBa. He IIOJIb3yIteCtBaKHMn JINCKaMn.
HeJIb3a BOCIIPOH3BOJNTb KOMIaKT-ⅡHCKN IIHaMeTpOM 8 cm.
-Перд Воспpon3БeДнЕм
прOTРte KOMДАКТ-ДИСК
нМЕОПЕССВ В ПОДАж
ЧИСТЯПЕТКАБLO.
Pn HeIpaBbHbHom 6paIeHH
6aTapeKa MoKeT B3OpBaTbC.
He Ipe3apKatb, He pa3bnpaTb, He
IOJHOcHTb K OTHIO.
3aMeHa
PpeoXpaHnTeJIa
Ipn3aMeHe
IpeIOxpanHTeJIe
O63aTeJbHO HcIOJIb3yHTe
TOJIbKO Te, KOTOpBJe
COOTBETCTBYOT CnIE TOKA,
Yka3aHHoH Ha N3HaJaJIbHO
yCTaHOBJeHHOM
IpeIOxpaHHTeJIe. EcJIi
IpeperopeJIpeIOxpaHHTeJI
IpoBepBe IIOJKIIUoyHeHne
IHTaHnI 3aMeHnTe IpeIOxpaHnTe.Ib.EcJI INocJIe 3aMeHbI IpeIOxpaHnTeJb CHOBA IpeIopeJ,3TO MOKeTc03HaUaTb HEnICPABHOCTyCtPOCTBa. B 3OTomClyuae 6oPaTHTeCB K 6JIHKaIIeMy DJIePy Sony.
YnCTka KOHTaKTOB
Bo3MoJHo, yctPoIcTbO He 6yIeT pa6oTaTb HaJIeXaIIMM O6pa3OM H3-3a 3aIrp3HeHnKoHTaKTOB, cIyXaIINx IJIa CoEiHHeHnIpeJHne IIaHEn C yctPoIcTBOM. Bo H36eXaHHe NTO rTO CoEiHNITe IIpeJHIOIaHHeB (ctp.5) II IpOTpIte KOHTaKtBb BaTHbIM TaIIIOHOM. He IIpHKJIaIbIBaIte H3JIINIHnxycJIH.N B IIpoTHBHom cIJyae MoXHO IIOBpeJHb KOHTaKtB1.
OCHOBHOe yCTPOUCTBO
Obotha ctopoha nepedne nanei
PpmeuHn
B 乙ENJX 630NAHOCHTN NpeD NCTKOH KOHTAKTOB BbIKIOUHTe 3aKINaHne N BbIHbTe KIOU H3 3aMKa 3aKINAHNA.
Hnkorga He npkaacatecb K KOhtaTam naIbuaMn nn MetanllueckmnnpeMetamn.
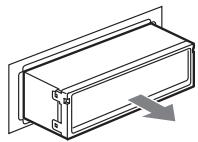
I3BJIeUHHe yCTpoiCTBa
1 CHINMITE 3aunTHyMoMaHxety.
1 CHHmHTe IpeepHIOI NaHeJIb (ctp. 5).
2 TTO6bI CHrTb 3aIIHTbIe MaHKeTbI, HcIOJIb3yIte KJIIOUH JIJI DeMOHTaJa.
YCTAHOBNTe KJIOCh nIy
dEMOHTaJa,KaK NOKa3aHO
Ha pncyHe.
3 IOTaHnTE Ha ce6a KJIIOu NIIJI DeMOHTaKa, YTO6bI CHrTb 3aIITHyIO MaHKeTy.
2 N3BNeKInTe yCtpoiCTBO.
BCTaBbTe OJHOBpeMeHNO 6o6 KaJIIOuA JIJa IeMOHTaKa Jo IIeJIyKa.
IOTYHHTe KJIIOUH JIIJ IEMOHToXa, YTO6bI H3BJIeYb yCTpOHTBO.
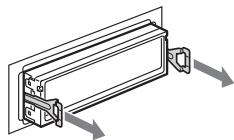
3 BbIiBnHbTe yCTpoIcTBO H3 MOHTaXHOI nHaHeJIi.
TexHmueckne XapaKTePnCTMKN
PonrpBbateJIb KOMnakT-DnCKOB
OTHOHHe "cHrHaJI-Imy": 120 JB
Дианэзов ВОБСПОЗИВОДМБИХЧАТOT: 10-2000 Гι
Hn3KoYactOToTHa H bIcOKoYactOToTHa DeToHaJIH: HIXe yPoBHI o6hApUxKeHH
Touhep
FM
Дианэзн Настонун:
FM1/FM2:87,5-108,0 MΓι (Ⅲαr 50 κΓι)
FM3: 65 - 74 MΓι (Παr 30 κΓι)
AnteHHoe rHe3Ia:
pa3bem BHeIIHc aHTeHHbI
Ipomexytohna yactota: 10.7 MΓι/450 κΓι
HcnoJb3yemaYyBCTBHTeJbHocTe:9Db
H3bHpateIbHocTb:75nB npn 400 K
OthouHHe "ChrHaJI-IIIyM": 67 Ib (ctrepeo), 69 Ib (MOHO)
Ko3ΦfHnHHeT rapMoHHueckHx NcKaJxHn H np1 KΓι:0,5% (ctepeO), 0,3% (MOHO)
Pa3dJeIeHHe: 35 nB npn 1 K
HnHa30H BocnpoH3BODHMbIX TaCToT: 30-15000 T
npoDOnKEnHeHa cNe dyUoSei CtpaHnue
MW/LW
Дианэзннachtpoин:
MW: 531 - 1602 kT
LW: 153 - 279 kTt
AHTeHHoe rHe3Ia:
pa3bem BHeIIHEn aHTeHHBi
Ipomexytohna yactota: 10,7 M /450
YBCTBHTeJIbHocTb: MW: 30 MKB, LW: 40 MKB
YcHnIteJIb MoUHOCTN
BbIXOJIb: BbIXOJIbI rPOMKOrOBoPnTeJIeI (c coeINHInTeJIbHbIMnΦHKCaTOpaM
HIOJHOe cOPOTHBJIeHHe rPOMKOrOBOpHTJIH: 4-8 OM
MaKCHMaJIbHЯ BbIXOJHa MoIHHoCTb:
50BT× 4( H4OM)
OmbaHnHOpMaun
BbIxoIbI:
TePMHHaJI ayINHObIXOIOB (BO3MOXHOCTb IpeKJIIOUOeHnM MeJxIy IpeJIHNMI, HN3KOaCTOTHBIMI/3aIHNMI)
TePMHHaJI peJIeHnOу YIpaJIeHnAHTEHNOc 3JIeKTHpueCKHM IIpHBODOM
TePMHHaJI yIpabJIeHnY cHJInTEJIeM MoIIHOCTN
BxOJIb:
TepMHHaJI yIpaBJIeHnI ΦyHKIIneI Telephone ATT
TePMHNAJI yIpaBJIeHNI POJCBETKOH BXOJHOI TePMHNAJI pa3JeMa yIpaBJIeHNI TePMHNAJI ayDJIOXBODa KaHaJa
BXOJHOI TepMHHaJI IyJIbTa JNCTaHtIOHOHOr OYIIpaBJIeHnI
BXOJHOI TePmHnHaJI aHTeHHbI BXOJHOI rHe3IO AUX (MmHn-CTepeopa3bEm)
Pery.IaTOpbI Tem6pa:
Hn3KHe: ± 10 nB npn 60 T (XPLOD)
cpeHHe: ± 10 nB npn 1 _ (XPLOD)
BbICOKHe: ± 10 nE npH 10k_II (XPLOD)
Tpe6obHnK HcToUHHky IHTaHHa:
aBTOMO6HbHbI aKcMyJITop 12 BIOCT.
TOKa (cOTpHIIaTeJIbHbIM 3a3eMJIeHHeM)
PazmepbI: np6JI. 178 × 50 × 180 MM (III/B/Γ)
IIOPOPTbI JINCTAHIINHII IpeKJIIOUaTeJIb: RM-X4S
Ka6eJIbBUS(IipHJIaTaAetcK Ka6eJIIO c pa3BeMaMH RCA):RC-61(1M),RC-62(2M)
IIPOHrPbIbATEJIb KOMIIaKr-ⅡNcKOB (10 IINcKOB) CDX-757MX
IIPOHrPbIBaTeJIb KOMIIaKT-ⅡNcKOB (6 IIINcKOB): CDX-T70MX
ceJIeKTop HcToUHnKa:XA-C40
IpekeJIIOuAteJIb AUX-IN:XA-300
HnTepcBnB aIaIeP iPod:XA-110IP
BaII TOPOBbI IpeIcTaBHTeJIb MoKet He
HMeTb B HaJIINH INeKOToPbIe H3
IpiHaJIeXHcOteIe, IpeYeICHeHHbIX BbHIe.
O6paTIteB K IIJIepy IIJIIOJIyuEHHa
IOJpO6HOH INHΦopMaUHN.
IaTeHTbI CIIIA HpyrHx cTpaH IIO JInueH3HH KOMIIaHIN Dolby Laboratories.
JIHHeH3nHaTexHOJIOrHIO 3ByKOBOI KOINPOBKn MPEG Layer-3 II NaTeHTbI IIOJUeHa oFraunhofer IIS n Thomson.
PpmeuHne
3To yctpoIcTBo HnIb3a IqKnIIOuBaT K UINΦpOBOMy IpeDyCnITeIIO Nn 3KBAanai3epy, COBMeCTIMOMy C cnTeMoI Sony BUS.
KoHCTpykUIN XapaKTepnCTNK MOrTy N3MeHrTbc8e3 npedBapntelbHOrO yBeDOMHeHH.

B HeKOTOpbIx neaTbIx nIpatax ranloReHnpoBaHbIe ORHe3aunTHbIe COCTaBbl HeNCN0Nb3yOITcA.
-ДяКорпсов raIoreHINPOBaHbIe ORHe3aUHTbIe COCTaBbI He IcNIOJIb3yIOTCR.
B KaueCTBe ynaKoBOUHbIX npOKnlaDOK nCOnb3yETc8 Myara.
Длп чати на Kapтоне InconpoIb3уOTcR paKcN ha OCHOBE paCTIteNbIbIX MaceI, He copeJgKaIeNeTyUHx opraHueCekNcoeIInHeN (VOC).
Ha yctpoiCTBO He noaetcIHTaHne.
-ПюовьтЕ ПОДКЛЮЧЕп.ЕсЛВ Се-coeДИЗЕпьББЛПОЛHEHы ПЯВиЛьHo,ПюовьтЕпяДОХРАнТЕЛь.
Ecln yctpoCTBO BbKJIIOueHO IIINcIIeI Norac, ToyctpoCTBOM HeB03MOxHO 6yET ynpABLTbC IIOMOIbIO IyIbTa IINCTaIHINOHORO YnpABLeHNN. BkQOnHTe yctpoCTBO.
ANTeHHa C3NeKtpnueckm PpNUBODom He BblBnIraeTcR.
B aHTeHHe c 3JIeKTPHueCKHM IIpHBOIOM OTCyTCTByeT peJe.
Het 3Byka.
- YpOBeHb rPOMKoCTH CJINIIKOM HN3KNI.
BkIIOUeHaФyKIIINA ATT IIJI Telephone ATT (PnI IOKIIIOUeHHN IHTepΦeCHOrO Ka6eJIa ABTOMOIBHLBOrO TeJcΦoHa K IPOBOy ATT).
PeryJyTOp fpeIepa“FAD”He yCTaHOBJIeH JIIa cnCTeMbI c 2 rPOMKOrOBOpHTeJIaMn.
-ПюИгрьИВаTeЛь КOMПАКТ-ДИСКOB He COBМecTHM cДИСКОМ (MP3/WMA/AAC/ATRAC CD).
→CJIeIyET BbIIOJIHHTB BOCIIpOH3BeIeHHe Ha əTOM yCTPOHCTBE.
He cIbIweH 3ByKOBoCnHaJ.
-Функия 3ByKOBOrO cHrHaJIa OTKJIIOyeHa (cTp.13).
-ПОДКЛIOUECHENДОПЛHINTeЛьнБИУСHЛNTeJIb MOIIHOCTHI, a BCTPoeHHBи He HICNIOJIb3yETcY.
YdaenbdaHHbIeN3namrtn.
-БылajaHaЖаТa KHOДКa RESET.
→3aHecHTe IaHHbIe B IIaMraTb eIIe pa3.
- OToCoeIHHJIcIpyoBOJ IIHTaHHN HJIH H3BJIeueHa 6aTapeIka.
-Плloxo ПОДсоeINHEn IpoBOJ IHTaHH.
I3 namrtn ydaJIeHbI 3aIporpamMnpoBaHHbIpepaIOCTaHcIMN yCTaHOBka BpeMeHN.
Ipeperopel npedoxpanHTeJIb.
CJIbIeH Wym npn nepeKJIoueHm NIOJoxHeH BbIKJIOUaTeJI 3axnraHn.
\PiIOB0Ja HIEPRAIBHb IOIOCoEINHeHb Kpa3BeMy 3JIeKToPiHTaHHB BCIIOMOraTeJIbHOrO 6OBpyOBAHnAB ABTOMO6HJIa.
PpOana/He oTo6paXaetcHnDnKaunB OOKoUke nucnIe.
-ДлЯ ДИМмеру установлеси ЗнayчЕнг "DIMON" (cтp.13).
-ⅡHcJIJIeIeOTKJIIOHTcIeCJIINHaJkaTb H yIepKJBaTb KHOIIKy (OFF).
→HajmTe KHOIky OFF) eIe pa3 n yIepKHBaIte ee HkaToH, Ioka IIChIIe He BKJIOHTc.
- KoHTaKTbI 3aIrp83HeHbI (Ctp. 19).
ФункцаabTOOTKJIIOUeHHe pa6OtaeT.
YCTPOHTBO BKJIOUHO. ΦYHKIIIAABTOOTKJIIOOHeHnAKTHBN3HpyETcIIOCJIeBbIKIIOUeHHYCTPOHTBA.
→BbIKJIOUHTe ycTpoIcTBO.
BbIOpHHeHne OIepaunC nOMoUbNo npIbTa DnCTaHcNHO UnpaBHeH NHeBO3MOXHO.
IIpoBepbTe, cHraTa IIN H3OJIaIIOHHaI IIeHka (cTp. 4).
Функци DA SO He pa6oTaE.
B 3aBHCIMOCTH OT INHTepbepa ABTOMO6HJI HIN IIPOCJIYIIINBAEMO MY3bIKH ΦyHKIIIN DSO MOKeT He o6ecIeYHTb HJXHbI ΦΦeKT.
Bocnpoun3BeDHe NcMnakT-/MnHn- DnCKa
He ydaetcBCTaBntb DnCK.
- Yke BCTaBJIeH npyToK KOMIIaKT-Ⅱnck.
- KomIIaKT-ДИСВСВТБАЛЕн CУСHЛЕМ, He TOI CTOPHOH ИЛПНЕПаВИЛБИЗ.
KOMnakT-ndck He BOCPON3BOUHTCA.
-ДинсЗа rgрзHeH HIN IOBpeKdEh.
-Динск CD-R/CD-RW He IIpeIHa3HauHeBb IJIЯ BOCIIpoH3BeIeHnI 3ByKa (cTp.16).
ΦOpMaT IINCKA H BepCnHa ΦaJIHa HecOBMeCTHMbI C DaHHbIM ycTpoHcTBOM (JJIIIOJIyueHnI IOIOJIHNTEJIbHOH INHΦopMaIHn CM. cTp. 4 H 16).
Длв ВсрпонЗБеDHЯФалOB MP3/WMA/ AAC Tpe6byetc60JIbWe BpemeHn,чem ДлгдугнхФалOB.
MoKetIOTpe6OBaTbC6OJIbIe BpeMeHn Do NaHaJaBocPOn3BeHeNcJIeYIOJIINxJINCKOB: -IHKC, 3aIIncAHHH C HcIIIOJI3OBAHmE CJOXHO pa3BETBHeHHO cTpyKtpyb IanOK;
-ДиСК,ЗаПпсаннБь ВфОрмATE Multi Session;
- INCK, Ha KOTOpbIM MOXHO IO6aJIaTb DaHHbIe.
KOMIaKT-DnCK ATRAC CD He BOCnPOn3BODnTcR.
ДиСК 3aIINcaH c IOMOIIbIbIpyorpaMMHOrO
obecIeueHn, OTJIYHOrO OTIOJdEprKJBaEmoR,
HapHmep SonicStage HIN SonicStage Simple
Burner.
- KomIIIO3HIIHH, KOtOpBIE He BXOJIaT B IpyIINbI, HEBO3MOXHO BOCIPHO3BecTH.
He ocyuectbnaetc npokpyka Hndnkaun Ha dncnnee.
HΦOPommaB Bnue 6eYiueS CTPOK MNOKeT He OTObpaKaTcBJII NCKOB, CoJIpeKaiHx CJIIHOM 6OJIbIIOE KOJIyecCTBO CHMBOJIOB.
-Длг“A.SCRL"установлесионз nause�енe“OFF”.
YctaHOBHTe 3HaueHHe "A.SCRL-ON" (cTp.13) HJIi HaKMHTe KHOIky SCRL Ha IIyIbTe IINCTaIHIOHHORO yIpabJIeHnJ.
ImeIOT MeCTO npoBaJIbI 3Byka.
- HenpaBnJIbHa yCTaHOBka.
→YCTAHABJIHBAIHTE yCTPOICTBO IIOJ YFJIOM,HE IIpeBbIIaIOIIHM 45°, B HE IIIOJBepKeHHOM BnOpaIIIN MceTe.
-Динс 3aIpr83HeH nII INOBpeKJIeH.
He pa6oTaIOT KhONKn ynpBJIeHnA. DnCK He n3BJIeKaeTcR.
HajmTe KhoIky RESET (ctp.4).
npoOJXeHHe Na cIeDyUoSei cTpaHnCe
PpnepaonoctaHcN
He ydaetc npnHrTaNoctaHun.
3Byk conpoBOXdaetcH nomexamn.
ПоДсоeДИHHTe ПОВOD ПИТаHЯ aHTeHbI c 3JIeKTpUcEckHM ПИНБДOM (СИн) ИЛ ПОВOD IITaHЯ uTpoIcTBa (Крссны) K ПОВODY IITaHЯ uChIteJЯ aHTeHbI aBTOMObHЯ (ecЛи Ha 3aДHem/6OKOBOM tCKeI HeMeeTcB aCTPoEHHa aHTeHHa dHaIIaIa3OHa FM/MW/LW).
-Пюверъп IOДСоЕДИЗЕНЕ aBТOMОБЛьнOH aHTeHHbl.
-HeBbIDBnIaTeaABTOMo6HJIbHa aHTeHHa.
→ПОВЕРБTe ПОДСоeДИнEHNE ПЮВОДА ПИТАнHЯ aHTeHHbI c 3JIeKTPHueCKHM ПИНБОДМ.
-ПоберытучсToTу.
KoTgBaBKnIOueH peXHM DSO,3ByK HHOrga coIPOBOXJaETcH IOMExAMH.
YctaHOBHTe IIJI pexHMa DSO 3HaueHHe "OFF" (cTp. 6).
He ydaetcBbInonHnItb npedBapntelbHyIO hAcTpoKy.
- CoxpaHnTe B I NaMaTn IpaBnIbHyIO YacToTy.
- IpejaBaembI paHocnHaJI cJIINIKOM cJa6.
He ydaetcBbINONHHTb aBTOMaTnueckyio HacTPOkY.
- HeIIpABHbIbHaYyCTaHOBKa peXHMa MeCTHOrO IOHcKa.
HactpoKa IIpepbIbAeTc CJIINKOM Yacto: YctaHOBHTe Iapametp "LOCAL-ON" (ctp. 13).
→Приhaltroponkeiproponyckaetca staniiu: Yctaonbte npapameTp“MONO-ON" (ctp.13).
- IpeepaBaeMbpaHnOCHHaJI cJINIKOM cJa6.
→BbIIOJIHHTe HAcTpoHky BpyHyIO.
Ppi npneMe FM-paioctaun Mnaet HnDnkauna "ST".
- BbIIOJIHNTe ToUHyIO HAcTpoIKy YaCTOByI.
-ПеретаамьшpaДиСгнHaJIсЛИКOMсla6.
YctaHOBHTe IapamEtP“MONO-ON" (cTp.13).
CteopnporpaMMbI B dHana3oHe FM npHHMaHOCTKaK MOHOFOHNueCKne.
YcTpoHCTBO HaxOHTCBypeKHMe MOHOHHeCKORIOpHEMa paJHoCTaHIN.
YcTaHOBHTe IapaMeTp "MONO-OFF" (cTp. 13).
RDS
Pocne HeckoIbKnx CekyH npocnyuBaHn BkIouaetc yHKun SEEK.
CtaHnIa He IpePeIaet DaHbIe TP HIN IpePeIaET CJIIHKOM cJIa6bI CNrHaJI.
OTKJIIOUHTeTA (cTp.10).
Dopoxhble coo6eHnHe nepeaIOTc.
BKJIIOUHTe cyHKnHIO TA (cTp. 10).
- CtaHnIHe TpAHCJIHyPeT IOpOJXbIX COO6UeHHN, XOTa H OTHOCHTcK TtHiY TP.
→HactpoItebcHaIpyTuOCTaHnIO.
PnBVKJIOUeHmΦyHKuMnPTYoTO6paXaETc HNDAKauN“-
-Пиннmaemая санця HeпepeДaeТ дHHbIe RDS.
-ДанныеRDS He npHHMaIOTcA.
- CtaHnH He yKa3bIbAe TTH IIpoIpaMMbl.