The Oracle BES980 - Coffee machine BREVILLE - Free user manual and instructions
Find the device manual for free The Oracle BES980 BREVILLE in PDF.
User questions about The Oracle BES980 BREVILLE
0 question about this device. Answer the ones you know or ask your own.
Ask a new question about this device
Download the instructions for your Coffee machine in PDF format for free! Find your manual The Oracle BES980 - BREVILLE and take your electronic device back in hand. On this page are published all the documents necessary for the use of your device. The Oracle BES980 by BREVILLE.
USER MANUAL The Oracle BES980 BREVILLE
natural_image
Exterior view of a Breville brand espresso machine (no visible text or symbols on the device body)EN
INSTRUCTION BOOK
FR-CA
MANUEL D'INSTRUCTIONS
ES-MX
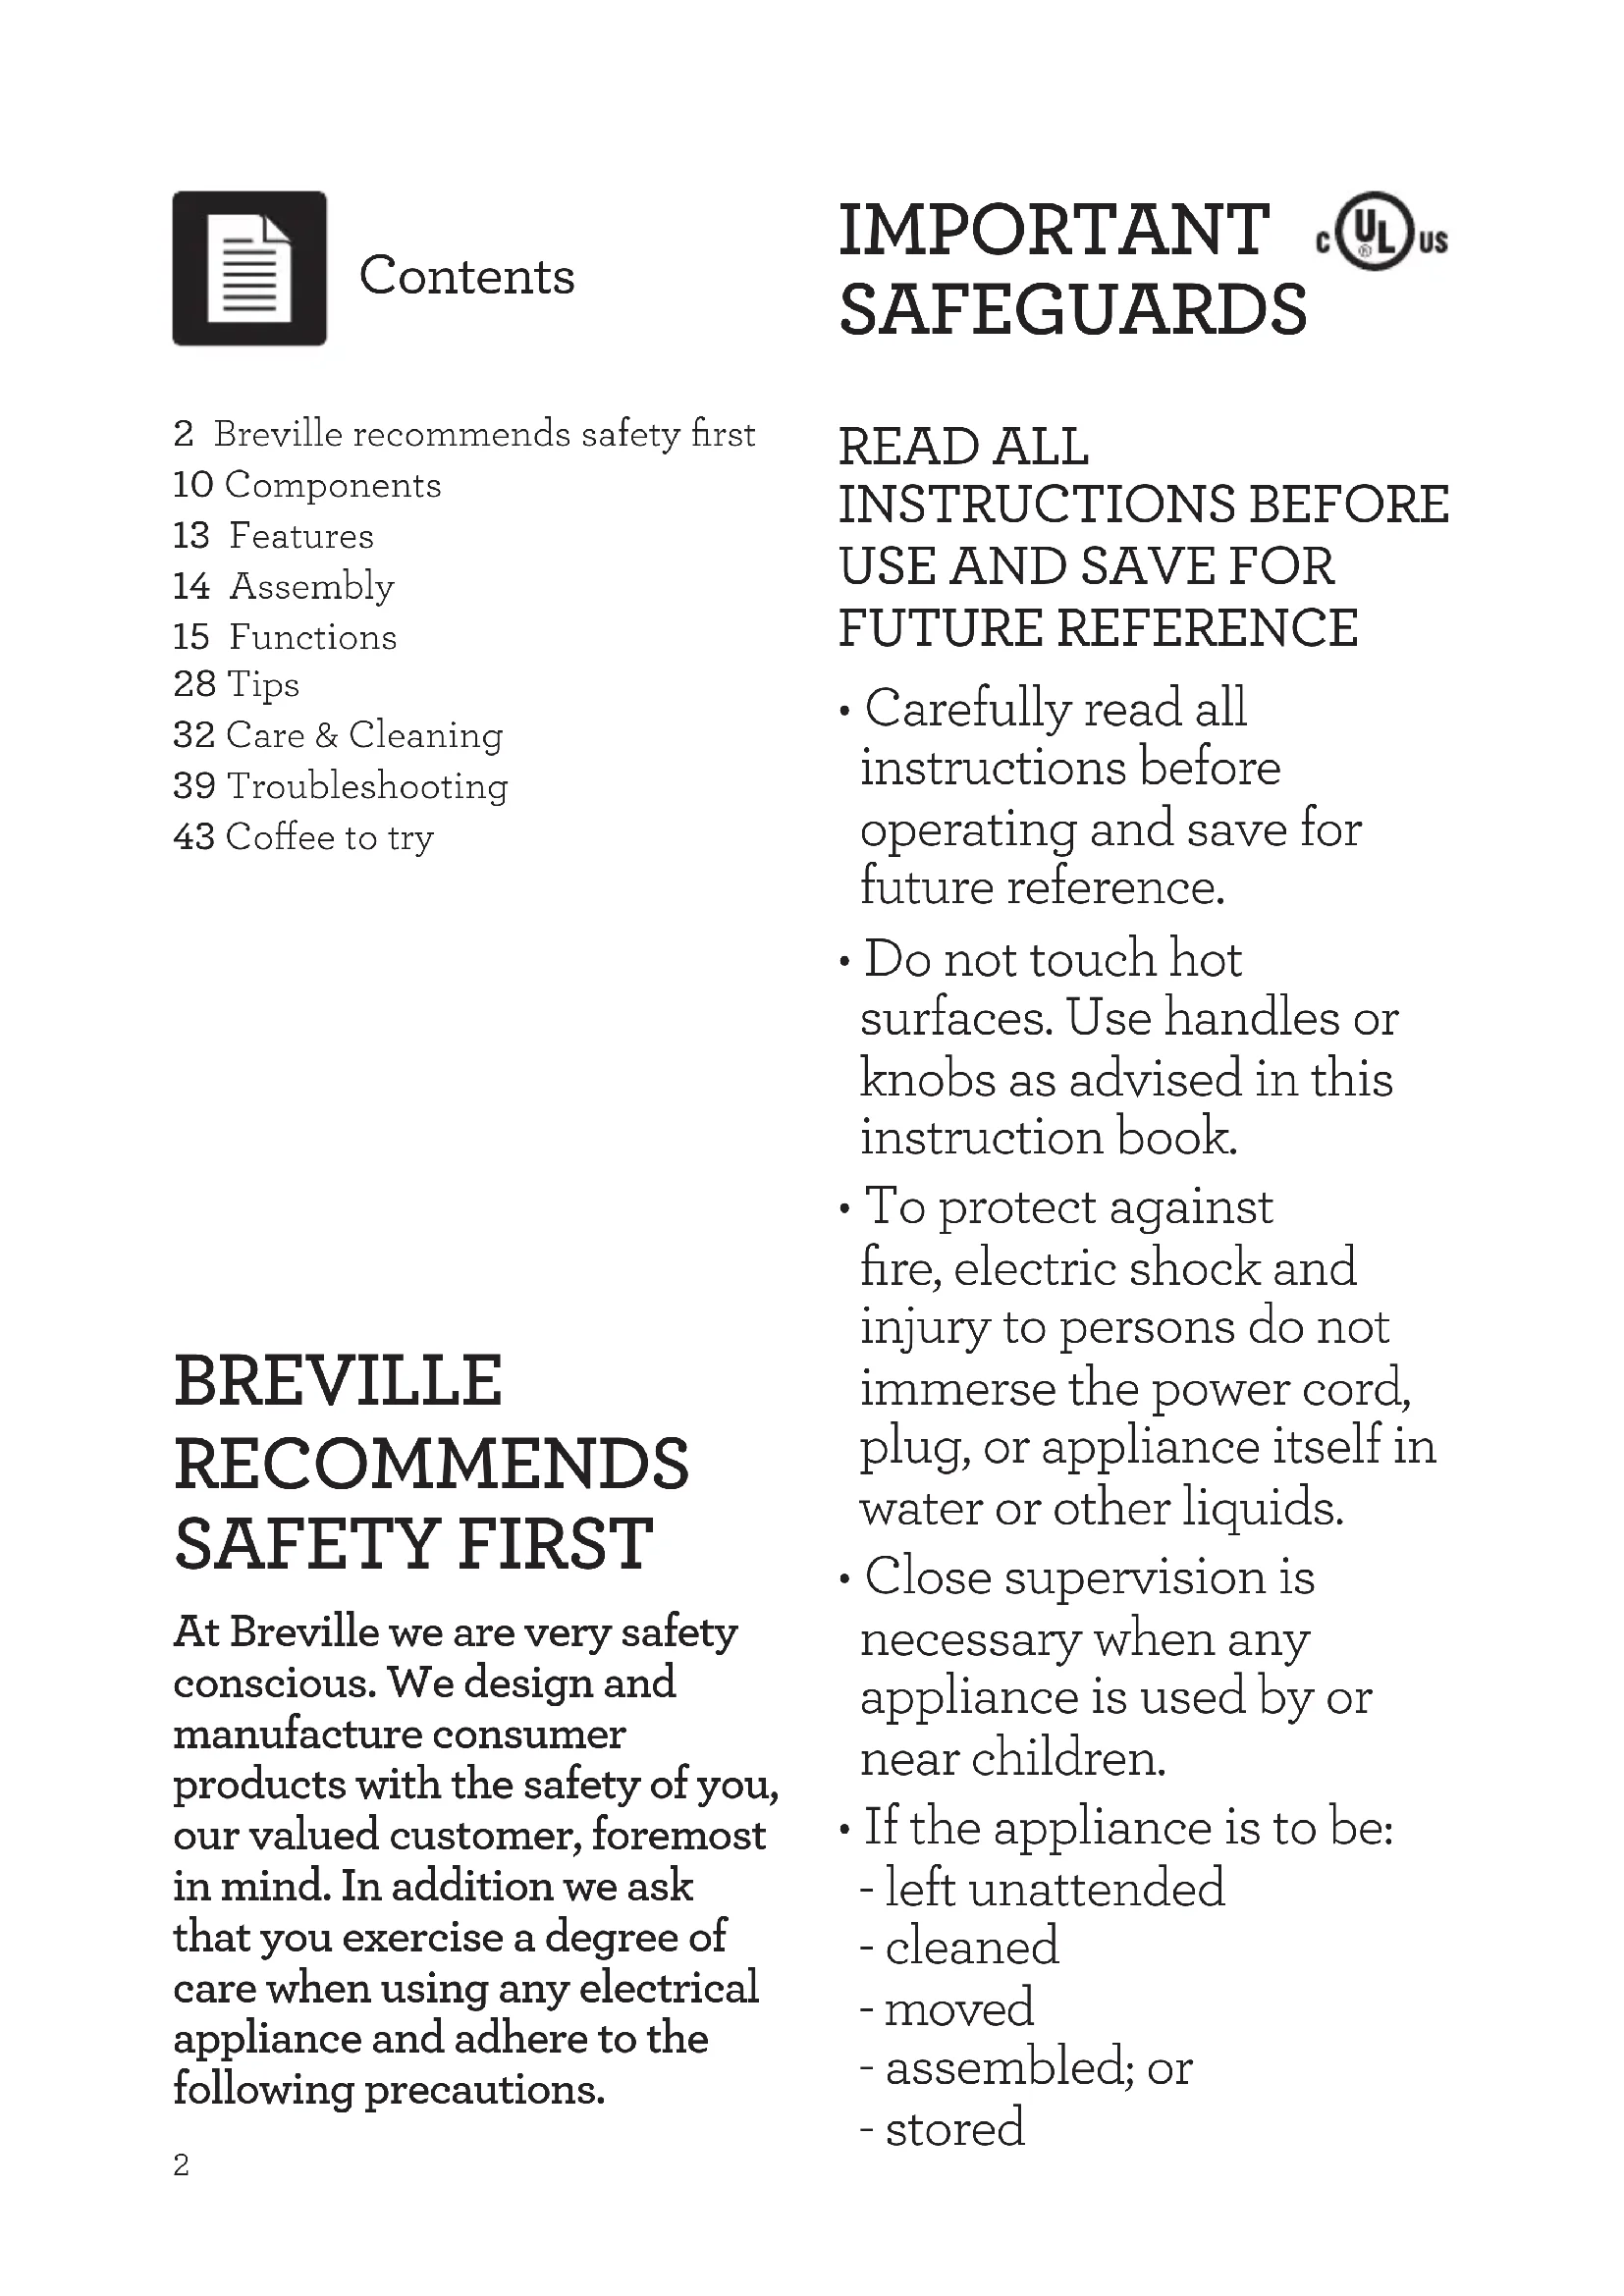
2 Breville recommends safety first
10 Components
13 Features
14 Assembly
15 Functions
28 Tips
32 Care & Cleaning
39 Troubleshooting
43 Coffee to try
BREVILLE RECOMMENDS SAFETY FIRST
At Breville we are very safety conscious. We design and manufacture consumer products with the safety of you, our valued customer, foremost in mind. In addition we ask that you exercise a degree of care when using any electrical appliance and adhere to the following precautions.
IMPORTANT SAFEGUARDS c UL us
READ ALL INSTRUCTIONS BEFORE USE AND SAVE FOR FUTURE REFERENCE
- Carefully read all instructions before operating and save for future reference.
- Do not touch hot surfaces. Use handles or knobs as advised in this instruction book.
• To protect against fire, electric shock and injury to persons do not immerse the power cord, plug, or appliance itself in water or other liquids.
- Close supervision is necessary when any appliance is used by or near children.
- If the appliance is to be: - left unattended - cleaned - moved - assembled; or - stored
• Always switch off the appliance by pressing the POWER button to off and unplug from the power outlet.
- Unplug from outlet when not in use and before cleaning. Allow to cool before putting on or taking off parts and before cleaning the appliance.
- It is recommended to regularly inspect the appliance and power cord. Do not use the appliance if there is damage to the power cord or plug, or after the appliance malfunctions or has been damaged in any way. Immediately stop use and call Breville Consumer Support.
- The use of accessory attachments not recommended by Breville may result in fire, electric shock or injury to persons.
- Do not let the power cord hang over the edge of a
table or counter-top, or touch hot surfaces.
- Do not place the appliance near the edge of a table or counter-top. Ensure the surface is level, clean and free of water and other substances.
- Do not place the appliance on or near a hot gas or electric burner. Do not place it in, or allow it to come in contact with a heated oven.
• This appliance is recommended for household use only. Do not use this appliance for anything other than its intended use. Do not use outdoors. Do not use in moving vehicles or boats.
NOTICE TO CUSTOMERS REGARDING MEMORY STORAGE
Please note that in order to better serve our customers, internal memory storage has been imbedded into your appliance. This memory storage consists of a small chip to collect certain information about your appliance including the frequency of use of the appliance and the manner in which your appliance is being used. In the event your appliance is returned for service, the information collected from the chip enables us to quickly and efficiently service your appliance. The information collected also serves as a valuable resource in developing future appliances to better serve the needs of our consumers. The chip does not collect any information regarding the individuals who use the product or the household where the product is used. If you have any questions regarding the memory storage chip please contact us at privacy@breville.com
SPECIFIC INSTRUCTIONS FOR BES980XL
- It is recommended to plug the espresso machine into a properly grounded and dedicated circuit, separate from other electrical appliances.
- Avoid contact with moving parts.
- Check bean hopper for presence of foreign objects before using.
- Use only cold water in the water tank. Do not use any other liquids. Do not use highly filtered, demineralized or distilled water as this may affect
the taste of the coffee and how the espresso machine operates.
- Ensure the portafilter is firmly inserted and secured into the group head before starting an extraction. Never remove the portafilter during the extraction process.
- Use caution after milk texturing as the auto purge function will purge hot steam when the steam wand is lowered.
- Caution must be used during descaling as hot steam may be released. Before descaling, turn off the machine, allow to cool for at least 1 hour and ensure the drip tray is empty and fully inserted. For instructions, refer to 'Descale (dESc)', page 34.

WARNING
To avoid the risk of injury, do not open the brew chamber during the brew process.
- Do not attempt to open or service the espresso machine.
- For any maintenance other than cleaning, call Breville Consumer Support or visit a Breville Authorized Servicer.
SHORT CORD INSTRUCTIONS
Your Breville appliance is fitted with a short power cord to reduce personal injury or property damage resulting from pulling, tripping or becoming entangled with a longer cord. Longer detachable power cords or extension cords are available and may be used if care is exercised.
If an extension cord is used, (1) the marked electrical rating of the cord set or extension cord should be at least as great as the electrical rating of the appliance, (2) the cord should be arranged so that it will not drape over the counter-top or table where it can be pulled on by children or tripped over unintentionally and (3) the extension cord must include a 3-prong grounding plug.
BREVILLE ASSIST® PLUG
Your Breville appliance comes with a unique Assist™ Plug, conveniently designed with a finger hole to ease removal from the power outlet.
CSA DUTY CYCLE MARKING
The Canadian Standards Authority requires any appliances capable of drawing over 1500W to be marked with a ‘duty cycle’ in minutes. For the BES980XL, this ‘duty cycle’ represents the maximum time for which the appliance will draw over 1500W during any 2 hour period of use. It does not indicate the appliance is unsafe for continuous use or is required to be switched off at certain intervals during normal use.
SPECIFIC
INSTRUCTIONS FOR WATER FILTER
- Filter cartridge should be kept out of reach of children.
- Store filter cartridges in a dry place in the original packaging.
- Protect cartridges from heat and direct sunlight.
- Do not use damaged filter cartridges.
- Do not open filter cartridges.
- If you are absent for a prolonged period of time, empty the water tank and replace the cartridge.
FOR HOUSEHOLD USE ONLY SAVE THESE INSTRUCTIONS
WARNING
- INGESTION HAZARD: This product contains a button cell or coin battery.
- DEATH or serious injury can occur if ingested.
- A swallowed button cell or coin battery can cause Internal Chemical Burns in as little as 2 hours.
- KEEP new and used batteries OUT OF REACH of CHILDREN.
- Seek immediate medical attention if a battery is suspected to be swallowed or inserted inside any part of the body.

text_image
Warning symbol with exclamation mark inside triangle and plus sign below, indicating caution or error warningThe battery included in this product is not user replaceable. Consumer shall never attempt to replace the battery. Compatible battery type is: CR2450. Nominal battery voltage is: +3.0V.
- The logo on the product marking warns that this product contains a coin battery.
- Non-rechargeable batteries are not to be recharged.
- If you suspect someone or a child has ingested a coin battery, immediately call a local poison control center for treatment information.
- Even used batteries may cause severe injury or death.
- For service centers: If you ever need to service the coin battery in the product, remove and immediately recycle or dispose of used batteries according to local regulations and keep away from children. DO NOT dispose of batteries in household trash or incinerate.
- DO NOT force discharge, recharge, disassemble, heat above 158 °F (70 °C) or incinerate. Doing so may result in injury due to venting, leakage or explosion resulting in chemical burns.

Notes

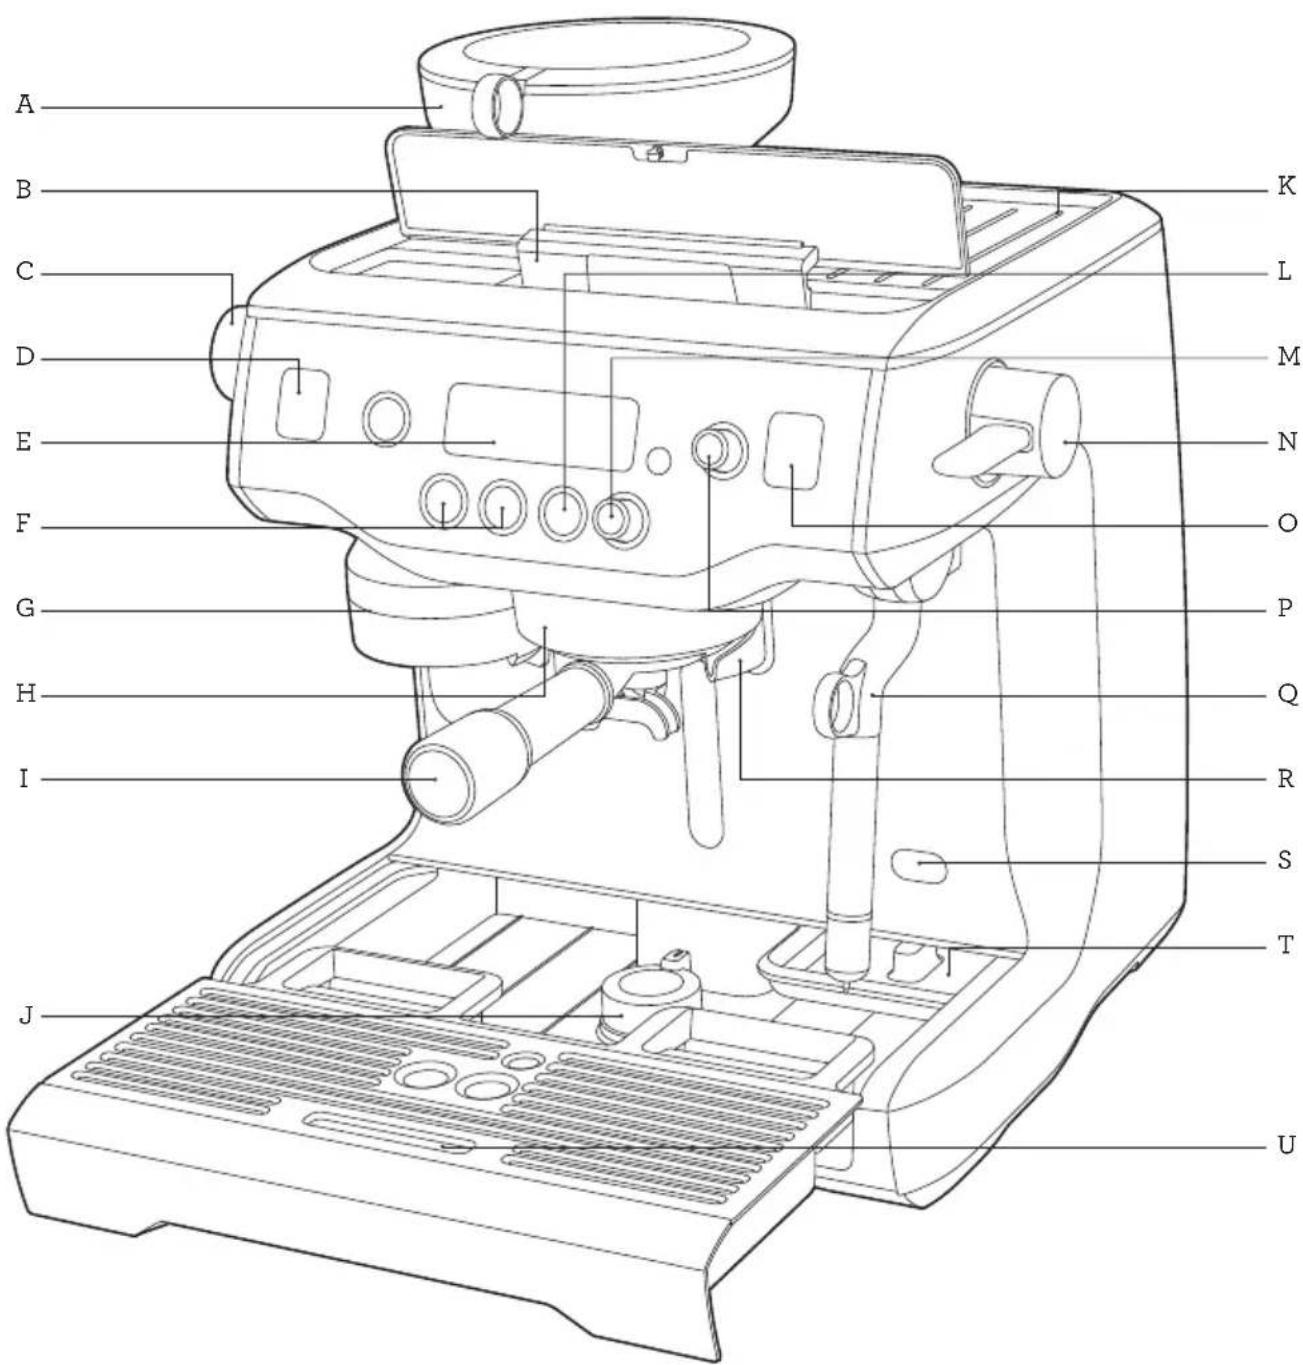
Components
A. Integrated conical burr grinder With removable 12 lb bean hopper.
B. Top-fill 84 fl.oz (2.5L) removable water tank
With integrated water filter and backlit level indicator.
C. Grind Size dial
Select the desired espresso grind size to suit your coffee beans.
D. Grind LCD
Displays current grind settings.
E. Main LCD
Displays current settings and simplifies programming.
F. 1 CUP & 2 CUP buttons
With preset shot durations, manual override or reprogrammable durations/volumes.
G. Grind outlet
With auto grind, dose & tamp function.
H. Heated 58mm group head with embedded element
I. 58mm full stainless steel portafilter
J. Drop down swivel foot
Lifts the machine upwards for
easy maneuverability.
K. Heated cup warming tray
L. HOT WATER button
Press to start and stop the flow of hot water from the hot water outlet.
M. AMERICANO dial
With preset and customizable settings.
N. Steam lever
With one touch auto milk texturing (down position) and manual milk texturing (up position).
O. Steam LCD
Displays current milk temperature and texture settings.
P. SELECT dial
Select the desired milk temperature & texture. Also use this dial in conjunction with the MENU button to set the programmable functions.
Q. Cool touch steam wand
With integrated temperature sensor.
R. Dedicated hot water outlet Delivers hot water for Americanos and pre-heating cups.
S. Descale access point
T. Tool storage tray
Houses accessories when not in use.
U. Removable drip tray
text_image
A B C D E F G H I J K L M N O P Q R S T URating Information
120 V\~ 60 HZ 1800 W

text_image
A B C D F G H I J K M L NACCESSORIES
A. Stainless steel milk jug
B. 2 cup filter basket
C. 1 cup filter basket
D. Water filter holder with filter
E. Cleaning disc
F. The Knock Box™ 10
G. Burr brush
H. Grind outlet brush & tamp removal magnet
I. Cleaning tool for steam wand tip
J. Allen key
K. Steam wand cleaning powder
L. Water hardness test strip
M. Espresso cleaning tablets
N. Descaling Powder Sachet

Features
HANDS FREE AUTOMATIC GRIND, DOSE & TAMP
Automatically grinds, doses and tamps the required amount of coffee, mess free.
GRIND SIZE DIAL
Adjustable grind settings from fine to coarse for optimal espresso extraction.
PRECISION CONICAL BURRS
Maximize ground coffee surface area for a full espresso flavor.
AUTOMATIC HANDS FREE MILK TEXTURING
Automatically textures milk to the selected temperature and style from silky smooth latté to creamy cappuccino. Automatic purge removes residual milk from the steam wand when returned to the downward position.
Dedicated stainless steel espresso and steam boilers for simultaneous milk texturing and espresso extraction.
PRECISION CONTROL
Electronic PID Temperature Control
Electronic temperature control delivers precise water temperature for optimum espresso flavor. Programmable.
Actively Heated Group Head
Commercial size 58mm group head with embedded element for thermal stability during extraction.
Regulated Extraction Pressure
Over pressure valve (OPV) limits maximum pressure for optimal espresso flavor.
Low Pressure Pre-Infusion
Gradually increases water pressure to gently expand grinds for an even extraction. Programmable.
Dual Pumps
Dedicated espresso and steam boiler pumps.
Programmable Shot Temperature
Adjust water temperature to achieve optimal espresso flavor depending on coffee origin and degree of roast.
ADDITIONAL FEATURES
One Touch Americano
Delivers hot water directly into the cup after espresso extraction. Preset and customizable settings.
Shot Clock
Displays duration of the espresso shot being extracted.
Auto Start
Switches machine on at a specified time.
Auto Off
Switches machine off after a specified time from 10mins to 8 hours.

Assembly
BEFORE FIRST USE
Machine Preparation
Remove and discard all labels and packaging materials attached to your espresso machine. Ensure you have removed all parts and accessories before discarding the packaging. Remove the plastic bag containing the water filter and water filter holder. Clean parts and accessories (water tank, portafilter, filter basket, jug) using warm water and a gentle dish washing liquid. Rinse well then dry thoroughly.

TIP
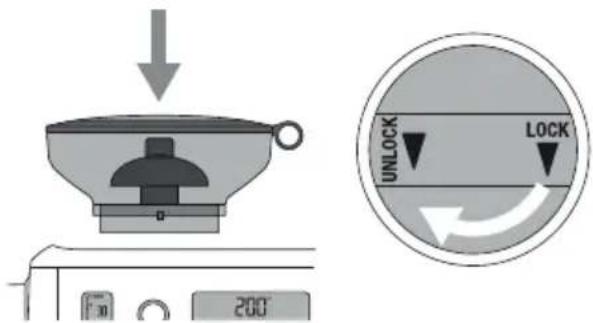
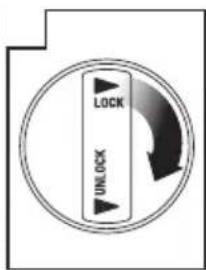
To easily maneuver your machine, use the drop down swivel foot located under the drip tray. When turned to UNLOCK, the swivel foot drops down & lifts the machine upwards, making it easier to access the removable water tank or reposition the machine to another location.
INSTALLING THE WATER FILTER
- Remove the water filter and water filter holder from the plastic bag.
- Soak the filter in cold water for 5 minutes.
- Wash the filter holder with cold water.
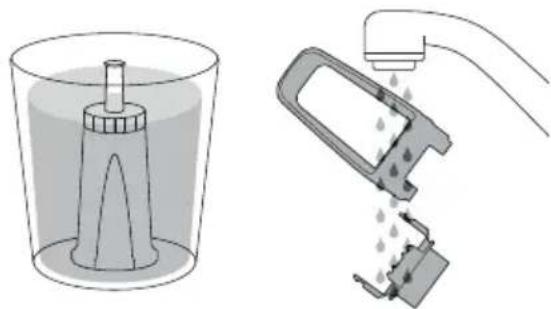
natural_image
Illustration of a spray bottle and a cleaning tool with liquid droplets (no text or symbols)- Set the reminder for next month of replacement. We recommend to replace the filter after 3 months.
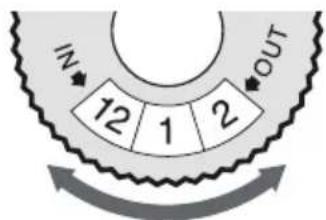
text_image
IN 12 1 2 OUT- Insert the filter into the two parts of the filter holder.
- To install the assembled filter holder into the water tank, align the base of the filter holder with the adapter inside the water tank. Push down to lock into place.
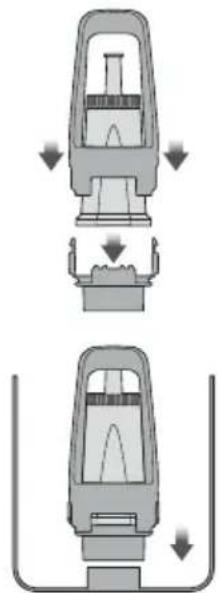
natural_image
Diagram showing two mechanical components with downward arrows indicating motion or force (no text or symbols)- Fill the water tank with cold water before sliding back into position at the back of the machine and locking into place.

NOTE
Replacing the water filter after three months or 10.6 USgal / 40L will reduce the need to descale the machine. Filters can be purchased at Breville webpage.

NOTE
DO NOT use highly filtered, demineralised or distilled water in this machine. This may affect the taste of the coffee.

Functions
FIRST USE
- Ensure tank is filled with cold water. You can do this by either opening the top-fill water tank lid (push to open), or by removing the water tank at the back of the machine.
- Press POWER button to turn machine on.
- The main LCD will display 'Hrd3', prompting you to set the water hardness level. Programming this will determine the regularity of the 'CHANGE FILTER' alert which indicates when the water filter in the water tank needs to be replaced.
Setting Water Hardness
- Remove the supplied water hardness test strip from the wrapper.
- Dip the test strip into a sample of the water you have filled the tank with. Wait for one minute. The water hardness setting is indicated by the number of red squares displayed on the test strip eg. 3 red squares indicates a water hardness setting of 3.
- Rotate SELECT dial to the required setting from 'Hrd1' (softest water) to 'Hrd5' (hardest water). Press SELECT dial to set. Machine will beep once to confirm selection.
- A pumping/vibrating sound will be heard indicating empty boilers are being filled with water for the first time. The main LCD will display the current boiler temperature and flash 'HEATING'.
- After approximately 10 minutes, the machine will reach the default operating temperature (200°F/93°C) and all 6 buttons will illuminate. The machine is now in STANDBY mode, ready for the next step, 'Flushing The Machine'.
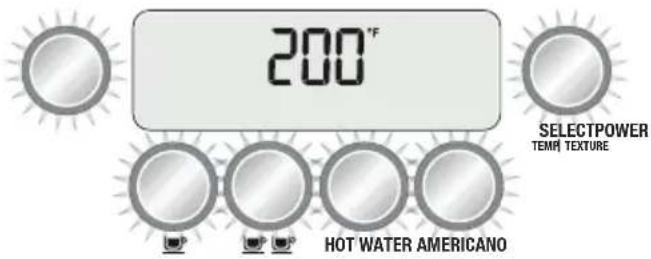
text_image
200°F SELECTPOWER TEMP TEXTURE HOT WATER AMERICANOFLUSHING THE MACHINE
- When the machine has reached STANDBY mode:
- Press 2 CUP button to run water through the group head for 30 seconds.
- Press HOT WATER button to run water through the hot water outlet. After 30 seconds, press HOT WATER button again to stop the flow of water.
- Lift steam lever to the MANUAL position to release steam through the steam wand. After 30 seconds, lower the steam lever to the center OFF position.
- Repeat steps 1-3 twice.
- Re-fill water tank and empty drip tray, if required.
MANUAL WILL FLASH ON LCD
The machine will not reach operating temperature (STANDBY mode) if the steam lever is in the MANUAL position. The steam LCD will display 'MANUAL'. Lower the steam lever to the center OFF position.
Steam operation is ready when the SELECT dial illuminates.

NOTE
You will not be able to select the 1 CUP, 2 CUP or AMERICANO functions; or access the cleaning cycle in the menu options until the machine has reached operating temperature (STANDBY mode). The machine will beep 3 times if one of these functions is selected.
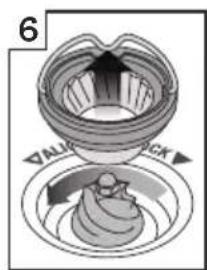
GRINDING OPERATION

NOTE
This machine is designed only for whole roasted coffee beans. Avoid grinding unroasted green and under-roasted coffee beans. These are dense and not brittle enough to run through a burr grinder. This will damage or break burr grinders and even pose a safety risk.
Insert bean hopper into position on-top of the machine. Turn knob to lock into place. Fill hopper with fresh beans.

TIP
We recommend quality 100% Arabica beans with a 'Roasted On' date stamped on the bag, not a 'Best Before' or 'Use By' date. Coffee beans are best consumed between 5-20 days after the 'Roasted On' date. Stale coffee may pour too quickly from the portafilter spouts and taste bitter and watery.
text_image
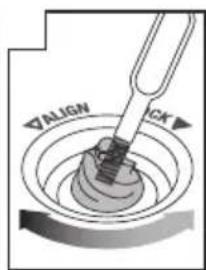
Diagram showing a kitchen appliance with a downward arrow and a circular control panel labeled 'UNLOCK' and 'LOCK'.SELECTING GRIND SIZE
There are 45 espresso grind size settings (No.1 – finest, No. 45 – coarsest) to enable you to select the right grind size for your coffee beans and achieve the perfect espresso extraction.
To select grind size, rotate the grind size dial counter-clockwise to increase grind coarseness or clockwise to increase grind fineness.
We recommend you start at No. 30 and adjust as required to control espresso flow rate.
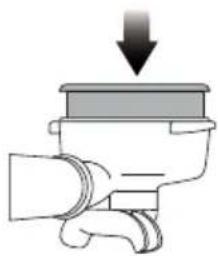
SELECT YOUR FILTER BASKET
Insert the correct Filter Basket into the Portafilter for the number of coffees or strength you are making.
natural_image
Illustration of a hand gripping a mechanical component with a downward arrow indicating force or motion (no text or symbols)Use the 1 Cup Filter Basket for making a single cup or a weaker tasting espresso. Use the 2 Cup Filter Basket for making 2 cups or a stronger tasting espresso, usually for mugs or larger cups.
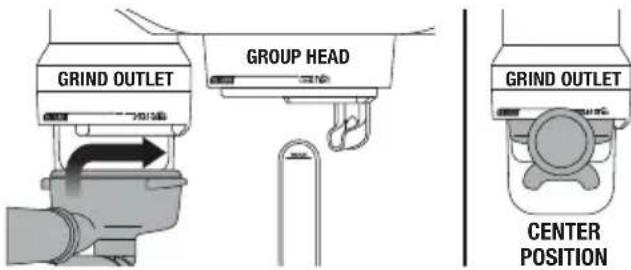
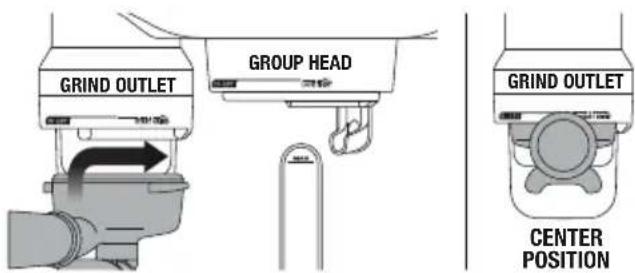
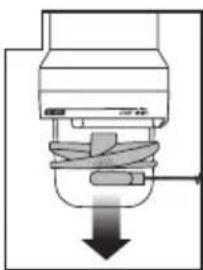
AUTO GRIND DOSE & TAMP
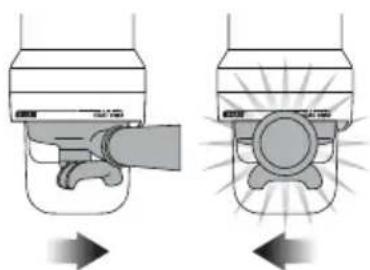
Align portafilter handle with the INSERT position on the grind outlet. Lift to insert portafilter into the grind outlet and rotate to the center position.
text_image
GRIND OUTLET GROUP HEAD GRIND OUTLET CENTER POSITIONTo start the auto grind, dose & tamp function, rotate the portafilter to the right then gently guide back to the center position. Grinding will commence.
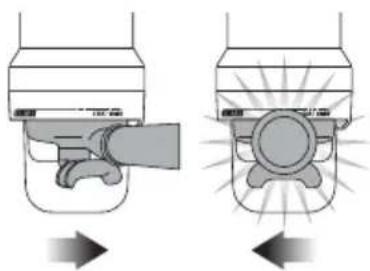
natural_image
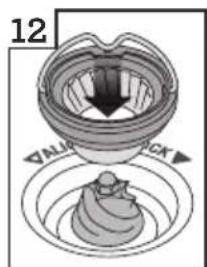
Diagram showing two mechanical components with arrows indicating motion, no text or symbols presentWhen the auto grind, dose & tamp function is complete, rotate the portafilter handle to the INSERT position and lower to remove.
ESPRESSO EXTRACTION
Align portafilter handle with the INSERT position on the group head. Lift to insert portafilter into the group head and rotate towards the LOCK TIGHT position until resistance is felt.
EXTRACTION GUIDE
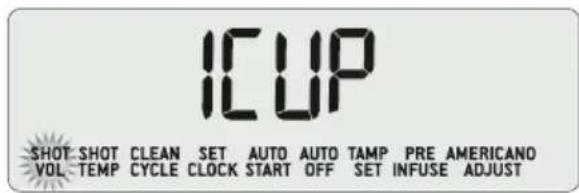
The 1 CUP button and 2 CUP button use duration to control espresso volume. The duration times are preset, but can be reprogrammed (refer to 'Programming Shot Volume/Duration', page 18). Alternatively, access the Advanced Features if you wish to use volumetric controls instead of duration to determine espresso volume (refer to 'Flow Measurement Method (VoL)', page 24).
1 CUP BUTTON
Press 1 CUP button once to extract a single shot of espresso at the preset duration (25 seconds). The extraction will start using the low pressure pre-infusion.

natural_image
Silhouette of a hand pointing at a circular button with radiating lines, next to a small camera icon (no text or symbols)The machine will stop after 1 CUP duration has been extracted and will return to STANDBY mode.
2 CUP BUTTON

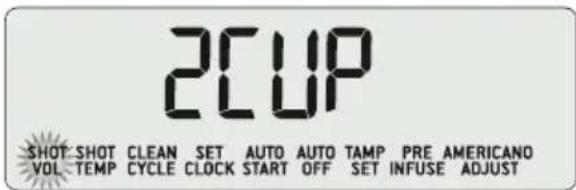
Press 2 CUP button once to extract a double shot of espresso at the preset duration (30 seconds). The extraction will start using the low pressure pre-infusion.

natural_image
Silhouette of a hand touching a circular button with radiating lines, symbolizing action or notification (no text present)The machine will stop after 2 CUP duration has been extracted and will return to STANDBY mode.
MANUAL OVERRIDE
Press and hold either 1 CUP or 2 CUP button to commence pre-infusion. When the required pre-infusion duration is met, release button to begin full pump pressure.
Press button again to stop pour when required duration has been achieved.
TEXTURING MILK
The SELECT dial is used to select milk temperature and texture. Press the dial to toggle between milk temperature & texture. The flashing value (either temperature or texture triangle) can be changed by rotating the dial.
ADJUSTING MILK TEMPERATURE
Press the SELECT dial until the milk temperature flashes. Rotate dial to increase or decrease milk temperature. The selected temperature will be displayed on the steam LCD. The ideal temperature for milk is between 131^ F - 150^ F ( 55^ C - 65^ C) as indicated by the smiley face icon.

text_image
SELECTSELECT SELECT TEMP| TEXTURETEMP | TEXTURETEMP | STEMAM CAPP 140 °F LATTEADJUSTING MILK TEXTURE
Press the SELECT dial until the milk texture triangle flashes. Rotate dial towards 'CAPP' for more texture or 'LATTE' for less texture. The selected texture will be displayed on the steam LCD.

text_image
SELECTSELECT SELECT TEMP | TEXTURETEMP TEXTURETEMP STEAM CAPP 140°F LATTEDifferent brands and types of milk and milk alternatives will texture differently. You may need to adjust the texture level accordingly.

NOTE
Prior to texturing milk, always purge steam wand by momentarily pressing down the steam lever.
AUTO MILK TEXTURING
Start with fresh cold milk. Fill milk jug to below the spout position. Lift steam wand and insert into milk jug. Lower steam wand, ensuring it is fully down. The milk jug should rest on the drip tray and milk should cover the steam wand seal.
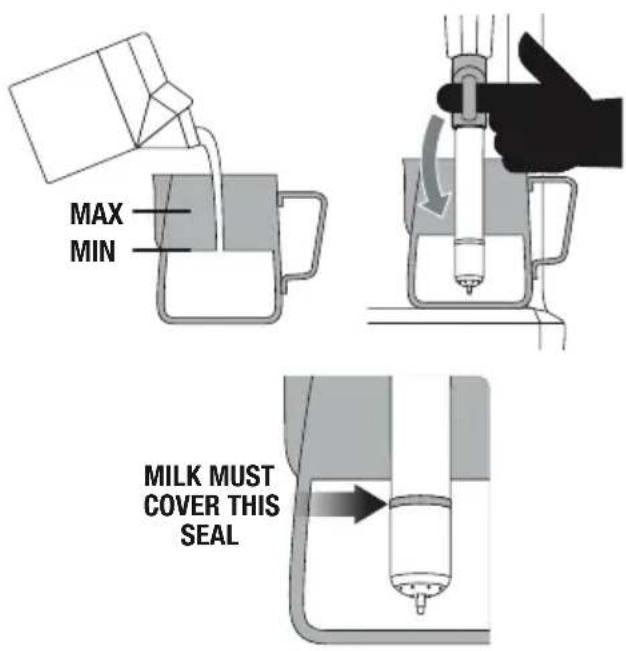
text_image
MAX MIN MILK MUST COVER THIS SEALTo start, press down and release steam lever. The LCD will display the temperature of the milk as it heats. Milk texturing will stop automatically when the selected milk temperature is reached. Lift steam wand to remove milk jug. Wipe the wand & tip with a damp cloth. Lower steam wand to the down position and the wand will automatically purge.
MANUAL MILK TEXTURING
Auto milk texturing and auto shut-off are disabled during manual milk texturing mode.
Insert steam wand into milk jug. Lift steam lever to activate manual steam mode. Once the desired milk texture and temperature are achieved, lower the steam lever to the center OFF position. Wipe the wand & tip with a damp cloth. Lower steam wand to the down position and the wand will automatically purge.

CAUTION: BURN HAZARD
Pressurized steam can still be released, even after machine has been switched off.
Children must always be supervised.
PRESET AMERICANO
There are 3 preset Americano settings – small, medium and large. To use one of these settings:
- Insert the 2 Cup Filter Basket into the Porta-filter.
- Fill the portafilter using the auto grind, dose & tamp function.
- Insert the portafilter into the group head.
- Position your cup so the portafilter spouts and hot water outlet are directed inside the cup.

natural_image
Line drawing of a coffee maker with a mug and stand, no text or symbols present- Rotate the AMERICANO dial to the desired cup size.
| PRESET | AMOUNT |
| CUP SIZE | BREWED |
| Small Approx. 6oz | |
| Medium Approx. 8oz | |
| Large Approx. 12oz | |
The brewed amounts are approximate only. Actual amounts may vary due to the coffee bean roast, blend and freshness as well as the selected grind size. These factors affect extraction rate and shot volume.
- To start extraction, press the AMERICANO dial. Espresso will extract from the portafilter spouts, followed by hot water from the hot water outlet.

NOTE
To override the setting during operation, press the AMERICANO dial. Pressing the AMERICANO dial during the espresso extraction will stop the flow of espresso and start the flow of hot water. Pressing the AMERICANO dial during the hot water delivery will stop the flow of hot water.

TIP
If the preset Americano settings do not suit your cup size or strength preferences, there are 6 custom Americano settings for you to program. Once programmed, your custom setting will appear after the 3 preset settings. Refer to 'Americano Adjust - Programming Custom Settings', page 21.
MANUAL AMERICANO
This allows you total control over the Americano process: pre-infusion duration, espresso volume & hot water volume. During manual Americano mode, the LCD will show a moving cup icon.
Press and hold AMERICANO dial to activate pre-infusion. Release AMERICANO dial to commence espresso pour.
Press the AMERICANO dial to stop espresso pour and commence hot water pour.
Press the AMERICANO dial again to stop the pour of hot water.

TIP
You can conduct a manual Americano extraction each time, or program this as a custom setting. Once programmed, your custom setting will appear after the 3 preset settings. Refer to 'Americano Adjust - Programming Custom Settings', page 21.
HOT WATER
The HOT WATER button can be used to preheat cups or add hot water manually.
To stop and start the pour of hot water, press the HOT WATER button.
To ensure water is dispensed at the correct temperature, hot water will cease to dispense after approx. 90 seconds. Depending on the size of your cup, you may need to press the HOT WATER button a second time.

text_image
HOT WATER
NOTE
You cannot run hot water and extract espresso at the same time.
PROGRAMMABLE FUNCTIONS
To enter program mode, press the MENU button. Rotate SELECT dial to the desired function.
Program mode allows you to program:
- Shot Volume
- Shot Temperature
- Clean Cycle
- Set Clock
- Auto Start
• Auto Off - Tamp Set
- Pre-Infusion
• Americano Adjust
To exit program mode, press MENU button.
text_image
ICUP SHOT SHOT CLEAN SET AUTO AUTO TAMP PRE AMERICANO VOL TEMP CYCLE CLOCK START OFF SET INFUSE ADJUST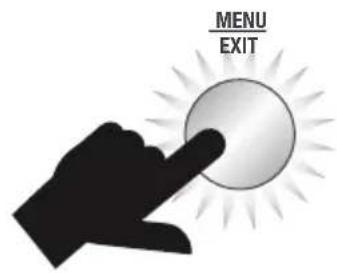
text_image
MENU EXIT
NOTE
The MENU button is disabled when the machine is in coffee making mode or dispensing hot water.
PROGRAMMING SHOT VOLUME/DURATION
Fill the portafilter using the auto grind, dose & tamp function. Insert the portafilter into the group head.
While 'SHOT VOL' is displayed on the LCD, rotate the SELECT dial to '1 CUP' to reprogram the 1 CUP button, or '2 CUP' to reprogram the 2 CUP button. Press the SELECT dial to start espresso extraction. When required espresso volume/duration has been extracted, press SELECT dial to stop extraction. Machine will beep once to confirm the new volume/duration.
text_image
2CUP SHOT SHOT CLEAN SET AUTO AUTO TAMP PRE AMERICANO VOL TEMP CYCLE CLOCK START OFF SET INFUSE ADJUST
text_image
SELECTSELECT TEMP | TEXTURETEMP TEXTURETEMP TEXTURE
NOTE
The 1 CUP & 2 CUP buttons use duration to control espresso volume. Access the Advanced Features if you wish to use volumetric controls instead of duration to determine espresso volume. Refer to 'Flow Measurement Method (VoL)', page 24).
SHOT TEMPERATURE
While 'SHOT TEMP' is displayed on the LCD, press the SELECT dial. The current temperature will flash. Turn the SELECT dial to required temperature then press SELECT dial to set. Machine will beep once to confirm new temperature.
text_image
200°F SHOT SHOT CLEAN SET AUTO AUTO TAMP PRE AMERICANO VOL TEMP CYCLE CLOCK START OFF SET INFUSE ADJUST SELECTSELECTSELECT TEMP | TEXTURETEMP TEXTURETEMP TEXTURECLEANING CYCLE
The cleaning cycle cleans the shower screen and back-flushes the group head. Select this feature when the LCD displays 'CLEAN ME!' Refer to 'Cleaning Cycle', page 30.
PUSH
SHOT SHOT CLEAN SET AUTO AUTO TAMP PRE AMERICANO VOL TEMP CYCLE CLOCK START OFF SET INFUSE ADJUST

text_image
SELECTSELECTSELECTSELECTSELECTSELECT TEMP|TEXTURETEMP TEXTURETEMP TEXTURE
SET CLOCK
Setting the clock is optional. While 'SET CLOCK' is displayed on the LCD, press the SELECT dial. The current time will flash or default to 12.00AM if the time has not been set. Turn the SELECT dial to the left or right to adjust time. Turning the SELECT dial faster or slower will change the rate of adjustment. When required time has been reached, press the SELECT dial to set. Machine will beep once to confirm the clock has been set.
12:00 AM
SHOT SHOT CLEAN SET AUTO AUTO TAMP PRE AMERICANO VOL TEMP CYCLE CLOCK START OFF SET INFUSE ADJUST

natural_image
Silhouette of a hand pointing at a circular button with radiating lines, labeled 'SELECTSELECTSELECT' below (no additional text or symbols)SELECTSELECTSELECT TEMP|TEXTURETEMP TEXTURETEMP TEXTURE
AUTO START
Auto Start is optional. It allows you to program the specific time when the machine will automatically turn on. By programming your machine, you will not have to wait for it to pre-heat.

NOTE
The clock must be set before the Auto Start time can be programmed. If you try to turn Auto Start on without first setting the clock, the machine will beep 3 times.
While 'AUTO START' is displayed on the LCD, press the SELECT dial. Turn the SELECT dial to on (On) or off (oFF).
Press SELECT dial to set.
text_image
12:00 AM SHOT SHOT CLEAN SET AUTO AUTO TAMP PRE AMERICANO VOL TEMP CYCLE CLOCK START OFF SET INFUSE ADJUST SELECTSELECTSELECT TEMP | TEXTURETEMP TEXTURETEMP TEXTURE SELECTSELECTSELECT TEMP | TEXTURETEMP TEXTURETEMP 100 SHOT SHOT CLEAN SET AUTO AUTO TAMP PRE AMERICANO VOL TEMP CYCLE CLOCK START OFF SET INFUSE ADJUST SELECTSELECTSELECT TEMP | TEXTURETEMP TEXTURETEMP TEXTURE SELECTSELECTSELECT TEMP | TEXTURETEMP TEXTURETEMP TEXTURTurn the SELECT dial to the left or right to select the desired Auto Start time. Turning the SELECT dial faster or slower will change the rate of adjustment. When required time has been reached, press the SELECT dial to set. A small clock icon will be displayed on the LCD when the Auto Start function has been programmed.
text_image
8:00 AM SHOT SHOT CLEAN SET AUTO AUTO TAMP PRE AMERICANO VOL TEMP CYCLE CLOCK START OFF SET INFUSE ADJUSTAUTO OFF
This function sets how long the machine will stay turned on before it automatically turns off. It can be set for 10mins, 30mins, 1hr, 2hrs, 3hrs, 4hrs, 5hrs, 6hrs, 7hrs or 8hrs until Auto Off activates.
While 'AUTO OFF' is displayed on the LCD, press the SELECT dial. Turn the SELECT dial to the desired time then press SELECT dial to set. Machine will beep once to confirm selection.
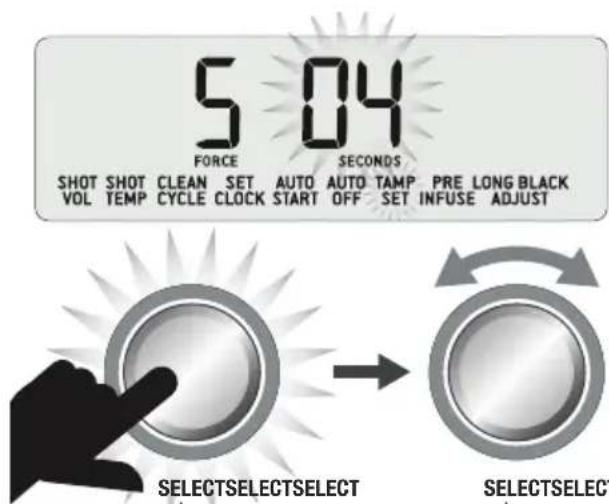
TAMP SET
This function is for advanced use only.
Adjusting tamp parameters allows for fine tuning of coffee tamping force & polishing duration. While 'TAMP SET' is displayed on the LCD, press the SELECT dial. The tamp force setting will flash. Turn SELECT dial to setting 1-9.
Press SELECT dial to set and the current polishing time will flash. Turn SELECT dial to select 2–10 seconds. Press SELECT dial to set. Machine will beep once to confirm settings.
text_image
504 FORCE SECONDS SHOT SHOT CLEAN SET AUTO AUTO PRE LONG BLACK VOL TEMP CYCLE CLOCK START OFF TAMP INFUSE ADJUST SELECTSELECTSELECT SELECTSELECTTEMP| TEXTURETEMP TEXTURETEMP TEXTURE
SELECTSELECTSELECT
4. Pre.
TEMP | TEXTURETEMP TEXTURETEMP TEXTURE
PRE-INFUSION
This function is for advanced use only.
Low pressure pre-infusion allows you to control the pressure & duration of the pre-infusion phase of the espresso extraction. While 'PRE INFUSE' is displayed on the LCD, press the SELECT dial. The pump power setting will flash. Turn SELECT dial to increase or decrease the pre-infusion pressure. Press SELECT dial to set and pre-infusion duration will flash. Turn SELECT dial to adjust seconds. Press SELECT dial to set. Machine will beep once to confirm settings.
AMERICANO ADJUST - PROGRAMMING CUSTOM SETTINGS
There are 6 custom Americano settings for you to program to suit your cup size and strength preferences. To program your custom setting:
- Fill the portafilter using the auto grind, dose & tamp function.
- Insert the portafilter into the group head.
- Position your cup so the portafilter spouts and hot water outlet are directed inside the cup.
Press the MENU button. Rotate the SELECT dial to 'AMERICANO ADJUST' then press the SELECT dial.
SET 1
SHOT SHOT CLEAN SET AUTO AUTO TAMP PRE AMERICANO VOL TEMP CYCLE CLOCK START OFF SET INFUSE ADJUST
- Rotate SELECT dial to the custom setting you'd like to program - 'Set 1' to 'Set 6'. Settings that have already been programmed will display a cup icon.
SET 1
AMERICANO ADJUST
NOT PROGRAMMED
SET 1

AMERICANO ADJUST
PROGRAMMED
- To start programming, press the SELECT dial. The LCD will show a moving cup icon and espresso will extract from the portafilter spouts. When required amount has been extracted, press the SELECT dial to stop the flow of espresso and start the flow of hot water. When required amount of water has poured, press the SELECT dial to stop the flow of hot water. The LCD will show a cup icon and the machine will beep to confirm your custom Americano setting has been programmed.
5E+2

AMERICANO ADJUST
PROGRAMMED
- To use your custom Americano setting, rotate the AMERICANO dial. Your programmed custom Americano setting will appear after the preset small, medium and large settings. Press the AMERICANO dial and your programmed Americano setting will dispense.

NOTE
Custom Americano settings can be reprogrammed by following steps 1-6.
ADVANCED FEATURES
These features should only be accessed by experienced users.
To access Advanced Features, with the machine turned off, press and hold the 1 CUP button, then press and hold the POWER button together for 3 seconds. Rotate the SELECT dial to the desired feature. Press SELECT dial to access feature settings.
Press the MENU button at any time to exit Advanced Features.

text_image
POWER
NOTE
The machine will exit Advanced Features if there is no user input for 30 seconds or the POWER button or MENU button is pressed.
Reset Default Settings (rSEt)
Use this function to reset all programmable values back to the default settings. The machine has the following default settings:
- Shot Temperature: 200°F (93°C)
- Low Pressure Pre-infusion: PP60, PT07 seconds
- Milk Temperature: 150^ F ( 65^ C)
- Auto Start: OFF (8:00AM)
- Auto Off: 1 Hour
- Clock: 12:00AM
- 1 CUP Button Shot Duration: 25 seconds
- 2 CUP Button Shot Duration: 30 seconds
While 'rSEt' is displayed on the LCD, press the SELECT dial to reset all settings to factory defaults.

'Hrd3' will flash on screen. Machine is now in Water Hardness mode. See 'Water Hardness (Hrd3)' to set.
Descale (dESc)
Select this feature to access the step by step descale procedure on the LCD. Refer to page 34 for the accompanying instructions.
Water Hardness (Hrd3)
Determine water hardness with the supplied water hardness test strip. Refer to 'Setting Water Hardness', page 13.
Rotate SELECT dial to the required setting from 'Hrd1' (softest water) to 'Hrd5' (hardest water). Press SEL

NOTE
The machine will exit Advanced Features if there is no user input for 30 seconds or the POWER button or MENU button is pressed.
ECT dial to set. Machine will beep once to confirm selection.
Setting water hardness will determine the regularity of the 'CHANGE FILTER' alert which indicates when the water filter in the water tank needs to be replaced.
Units (SEt)
Set units to metric or imperial. Rotate SELECT dial to the desired unit. Press SELECT dial to set. Machine will beep once to confirm selection.
LCD Backlight (Lcd)
Adjust the LCD brightness/contrast. Rotate SELECT dial to the desired brightness. Press SELECT dial to set. Machine will beep once to confirm selection.
Spotlights (SPOt)
Adjust the brightness of the LEDS lighting the drip tray area. Rotate SELECT dial to the desired brightness. Press SELECT dial to set. Machine will beep once to confirm selection.
Steam Temperature (StEA)
Adjust the steam boiler temperature, which in turn controls steam pressure. Rotate SELECT dial to the desired temperature. The default is 266^ F ( 130^ C). Press SELECT dial to set. Machine will beep once to confirm selection.
Air Pump Delay (Air)
This function is for advanced use only. Delay the operation of the air pump during automatic milk texturing. Rotate SELECT dial to the desired delay time. The default setting is 02 seconds. Press SELECT dial to set. The default temperature which the air pump turns off will be displayed. Rotate SELECT dial to the desired temperature. Press SELECT dial to set. Machine will beep once to confirm selection.
Sound (Snd)
Adjust the audible alerts. Rotate SELECT dial to the desired setting. Select between off (OFF), low (Lo) or high (Hi). Press SELECT dial to set. Depending on the selected setting, the machine may beep once to confirm selection.
Fan Control (FAn)
Adjust the speed of the internal cooling fan. Rotate SELECT dial to the desired fan speed. Select between Silent (SILt), Standard (StNd) or cool (CooL). Press SELECT dial to set. Machine will beep once to confirm selection.
Disable Clean Me! Alert (Cln)
Disables the 'CLEAN ME!' alert. Rotate SELECT dial to on (On) or off (OFF). The default setting is on. Press SELECT dial to set. Machine will beep once to confirm selection.
12H or 24H Clock (CLoC)
Display time in 12h or 24h format. Rotate SELECT dial to the desired unit. Press SELECT dial to set. Machine will beep once to confirm selection.
Flow Measurement Method (VoL)
Select between volume based (FLo) or time based (SEc) method for espresso dose measurement. Rotate SELECT dial to the desired method. Press SELECT dial to set. Machine will beep once to confirm selection.
ALERTS
MANUAL will flash on steam LCD
The machine will not reach operating temperature (STANDBY mode) if the steam lever is in the MANUAL position. The steam LCD will display 'MANUAL'. Lower the steam lever to the center OFF position.
Steam operation is ready when the SELECT dial illuminates.
Fill Tank
The machine will detect a low water level. The LCD will display 'FILL TANK'.

text_image
FILL TANK 200°FFill tank with cold fresh water. The machine will not be able to make coffee or hot water while the tank is empty.
Clean Me!
Indicates when 200 extractions have been carried out since the last cleaning cycle.
The cleaning cycle cleans the shower screen and back-flushes the group head. For information on how to clean the machine, refer to `Cleaning Cycle', page 30.

text_image
CLEAN ME! 200°FHeating
Indicates when the machine is heating up or if the temperature drops excessively during use.
Lock Hopper
Indicates if the bean hopper has not been properly inserted and locked into position. The auto grind, dose & tamp function cannot be used during this time and 3 beeps will sound if user attempts to activate.
Overheat Please Wait
Indicates if the grinder is used excessively and needs time to cool. The auto grind, dose & tamp function cannot be used during this time and 3 beeps will sound if user attempts to activate.
Change Filter
Indicates when the water filter in the water tank needs to be replaced. For information on changing the filter, refer to 'Replacing The Water Filter', page 31.
The regularity of this alert is determined by the water hardness setting (Hrd1-Hrd5) selected. For information, refer to 'Setting Water Hardness', page 13 and 'Water Hardness (Hrd3)', page 23.
TRANSPORTING AND STORING
We recommend draining both boilers completely before transporting the machine or storing for an extended period of time. Refer to the Descale section for the step by step instructions.
This procedure is also intended as an anti-freeze measure in the event the machine is exposed to extreme cold temperatures.

Tips
PRE-HEATING
Heating your cup or glass
A warm cup will help maintain the coffee's optimal temperature. Pre-heat your cup by rinsing with hot water from the hot water outlet and place on the cup warming tray.
Heating the portafilter and filter basket
A cold portafilter and filter basket can reduce the extraction temperature enough to significantly affect the quality of your espresso. Always ensure the portafilter and filter basket are pre-heated with hot water from the hot water outlet before initial use.

NOTE
Always wipe the filter basket and portafilter dry before dosing with ground coffee as moisture can encourage 'channeling' where water bypasses the ground coffee during extraction.
THE GRIND
When grinding coffee beans for espresso, the grind size should be fine but not too fine. The grind size will affect the rate at which the water flows through the ground coffee in the filter basket and the taste of the espresso.

NOTE
When switching between the 1 Cup & 2 Cup Filter Baskets, you may need to adjust the Grind Size to fine tune your extraction.
If the grind is too fine (looks like powder and feels like flour when rubbed between fingers), the water will not flow through the coffee even when under pressure. The resulting espresso will be OVER-EXTRACTED, dark in color and bitter in flavor.
If the grind is too coarse the water will flow through the ground coffee in the filter basket too quickly. The resulting espresso will be UNDER-EXTRACTED, lacking in color and flavor.
AUTOMATIC GRINDING, DOSING & TAMPING
- Ensure hopper is filled with fresh coffee beans. We recommend quality 100% Arabica beans with a 'Roasted On' date stamped on the bag, not a 'Best Before' or 'Use By' date. Coffee beans are best consumed between 5-20 days after the 'Roasted On' date. Stale coffee may pour too quickly from the portafilter spouts and taste bitter and watery. Never put pre-ground coffee in the hopper.
- Align portafilter handle with the INSERT position on the grind outlet. Lift to insert portafilter into the grind outlet and rotate to the center position.
text_image
GRIND OUTLET GROUP HEAD GRIND OUTLET CENTER POSITION- To start the auto grind, dose & tamp function, rotate the portafilter to the right then gently guide back to the center position. Grinding will commence.
natural_image
Diagram showing two mechanical components with arrows indicating motion, no text or symbols present- When the auto grind, dose & tamp function is complete, rotate the portafilter handle to the INSERT position and lower to remove.
- Wipe any excess coffee from the rim of the filter basket to ensure a proper seal in the group head is achieved.
- To adjust the tamping height, use the Allen key provided. Pull the tamping fan down from the grind outlet, and then pull down on the fan coupling inside the grind outlet to remove it. Adjust the length of the coupling by loosening the fastener with the Allen key and rotating the coupling to the desired length.
PURGING THE GROUP HEAD
Before placing the portafilter into the group head, run a short flow of water through the group head by pressing the 1 CUP button. Allow water to flow for 5 seconds, then press the 1 CUP button again to stop the flow of water. This will purge any ground coffee residue from the group head and stabilize the water temperature prior to extraction.
INSERTING THE PORTAFILTER
Align portafilter handle with the INSERT position on the group head. Lift to insert portafilter into the group head and rotate towards the LOCK TIGHT position until resistance is felt.
EXTRACTING ESPRESSO
- Place pre-warmed cup(s) beneath the portafilter spouts and press the 1 CUP or 2 CUP button.
- As a guide, the espresso will start to flow after 8-12 seconds (this includes pre-infusion time) and should be the consistency of warm dripping honey.
- If the espresso starts to flow before 7 seconds, the grind is too coarse. This is an UNDER-EXTRACTED shot. Adjust the grind size slightly finer.
- If the espresso starts to drip or flow after 12 seconds, then the grind is too fine. This is an OVER-EXTRACTED shot. Adjust the grind size slightly coarser.
A great espresso is about achieving the perfect balance between sweetness, acidity and bitterness.
The flavor of your coffee will depend on many factors, such as the type of coffee beans, degree of roast, freshness, coarseness or fineness of the grind.
Experiment by adjusting these factors just one at a time to achieve the taste of your preference.
EXTRACTION GUIDE
| EXTRACTION TYPES | GRIND | SHOT DURATION |
| OVER-EXTRACTED (bitter·astringent) | Too Fine | Over 35secs |
| BALANCED Optimum | Between 25-30secs | |
| UNDER-EXTRACTED (underdeveloped·sour) | Too Coarse | Less than 20secs |

HINTS & TIPS
If machine is run continuously for 30 minutes, allow machine to cool for 3 minutes before each use.
TEXTURING MILK
The machine allows you to texture milk both automatically and manually.
Automatic Hands-Free Milk Texturing:
- Set Milk Temperature: Press the SELECT dial to toggle to the milk temperature function, as indicated by the flashing milk temperature. Rotate SELECT dial to the desired milk temperature, then press the dial to select.
- Set Milk Texture: Press the SELECT dial to toggle to the milk texture function, as indicated by the flashing milk texture triangle. Rotate SELECT dial towards 'CAPP' for more texture or 'LATTE' for less texture, then press the dial to select.
• Always start with fresh cold milk. - Fill milk jug to below the spout position. At a minimum, there should be enough milk to cover the steam wand seal.
- To remove any condensed water from the system, ensure the steam wand is in the down position over the drip tray then momentarily lift the steam lever.
- Lift steam wand & insert into milk jug. Lower steam wand, ensuring it is fully down. The milk jug should rest on the drip tray.
- Press down & release steam lever to start automatic milk texturing.
- Steam LCD will display the temperature of the milk as it heats.
- Milk texturing will automatically stop when the selected temperature is reached.
- Lift & remove steam wand from the milk jug.
- Wipe the wand & tip with a damp cloth. Lower steam wand to the down position and the wand will automatically purge.

HINTS & TIPS
For optimum milk texturing performance it is critical that the holes around the steam tip are clear. Even partially blocked holes may affect the ability of the steam wand to produce sufficient foam.
Always wipe the wand and tip with a damp cloth BEFORE returning the wand to the down position. Wiping the wand will remove the majority of milk and allow the automatic purge feature to more effectively remove any residual milk.
- Tap the jug on the counter-top to collapse any bubbles.
- Swirl the jug to polish and re-integrate the texture.
- Pour milk directly into the espresso.
- The key is to work quickly, before the milk begins to separate.
MANUAL MILK TEXTURING
Auto milk texturing and auto shut-off are disabled during manual milk texturing mode.
• Always start with fresh cold milk.
- Fill milk jug to below the spout position.
- To remove any condensed water from the system, ensure the steam wand is in the down position over the drip tray then momentarily lift the steam lever.
- Insert the steam tip 14 - 34" (1-2cm) below the surface of the milk close to the right hand side of the jug at the 3 o'clock position.
- Lift the steam lever to start the flow of steam.
- Keep the tip just under the surface of the milk until the milk is spinning clockwise, producing a vortex (whirlpool effect).
- With the milk spinning, slowly lower the jug. This will bring the steam tip to the surface of the milk & start to introduce air into the milk. You may have to gently break the surface of the milk with the tip to get the milk spinning fast enough.
- Keep the tip at or slightly below the surface, continuing to maintain the vortex. Texture the milk until sufficient volume is obtained.
- Lift the handle of the jug to lower the tip beneath the surface, but keep the vortex of milk spinning. Use the steam LCD to monitor the milk temperature. We recommend 130^ - 150^ (55°C–65°C).
- Move the steam lever to the center OFF position BEFORE lowering the jug and taking the tip out of the milk.
- Wipe the wand & tip with a damp cloth. Lower steam wand to the down position and the wand will automatically purge.
- Tap the jug on the counter-top to collapse any bubbles.
- Swirl the jug to polish and re-integrate the texture.
- Pour milk directly into the espresso.
- The key is to work quickly, before the milk begins to separate.
COFFEE BEAN HINTS & TIPS
- Fresh, quality coffee beans will give you the best possible extraction.
- We recommend quality 100% Arabica beans with a ‘Roasted On’ date stamped on the bag, not a ‘Best Before’ or ‘Use By’ date.
- Coffee beans are best consumed between 5-20 days after the ‘Roasted On’ date. Ideally only grind directly before the extraction to maximize flavor.
- Buy coffee beans in small batches to reduce the storage time.
- Store coffee beans in a cool, dark and dry container. Vacuum seal if possible.

Care & Cleaning
CLEANING CYCLE
- CLEAN ME! will be displayed on the LCD to indicate when a cleaning cycle is required (approx. 200 shots). The cleaning cycle cleans the shower screen and back-flushes the group head.
CLEAN ME!
200°F
- Insert the supplied grey silicone cleaning disc, followed by 1 cleaning tablet into the filter basket.
- Lock the portafilter into the group head.
- Ensure the water tank is filled with cold water and the drip tray is empty.
- Press the MENU button and rotate SELECT dial until 'CLEAN CYCLE' and 'PUSH' are displayed on the LCD.
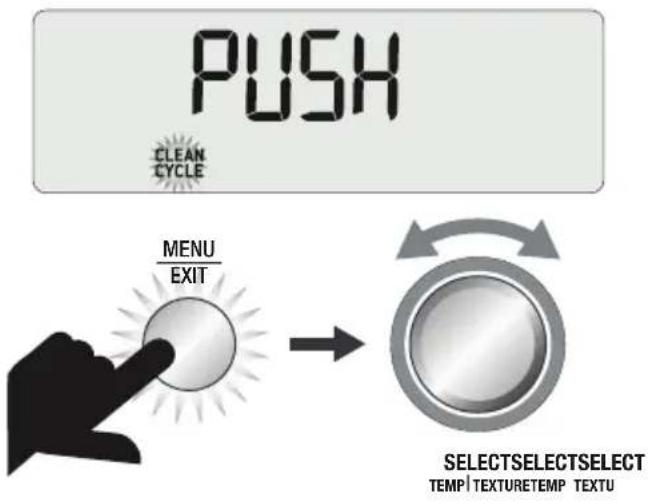
text_image
PUSH CLEAN CYCLE MENU EXIT SELECTSELECTSELECT TEMP | TEXTURE | TEMP | TEXTU- Press the SELECT dial to start the cleaning cycle.
• The LCD will display a countdown timer showing remaining time for the cleaning cycle in seconds.
370
CLEAN CYCLE
- When the cleaning cycle has finished, remove the portafilter and ensure the tablet has completely dissolved. If the tablet has not dissolved, repeat these steps, without inserting a new tablet.
- Rinse the filter basket and portafilter thoroughly before use.
- Extract an espresso to "season" the machine and purge the system of any remaining cleaner.
REPLACING THE WATER FILTER
The provided water filter helps prevent scale build-up in and on many of the inner functioning components. Replacing the water filter after three months or 10.6 USgal / 40L will reduce the need to descale the machine.
The limitation of 10.6 USgal / 40L is based on water hardness level 4. If you are in level 2 area, you can increase this to 16 USgal / 60L.

NOTE
To purchase water filters visit Breville webpage.

WARNING
Do not immerse power cord, power plug or appliance in water or any other liquid. The water tank should never be removed or completely emptied during descaling.
CLEANING CONICAL BURRS
Regular cleaning helps the burrs achieve consistent grinding results which is especially important when grinding for espresso.
text_image
12345 UNLOCK LOCKUnlock hopper
natural_image
Illustration of a container with scattered seeds or beans, no text or symbols presentRemove beans Ru Replace&ldd empty Unlock & remove hopper
text_image
LOCK UNLOCK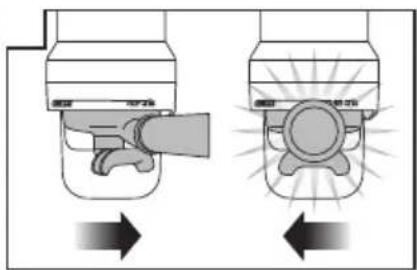
natural_image
Diagram showing two mechanical components with arrows indicating motion or force direction (no text or symbols)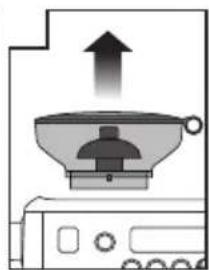
natural_image
Simple line drawing of a toaster oven with an upward arrow indicating heating or ventilation (no text or symbols)hopper
text_image
6 VAUR CKRemove upper burr
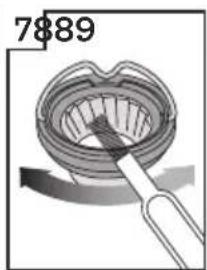
natural_image
Diagram of a mechanical component with a brush applying material, no visible text or symbolsClean upper burr with burr brush
text_image
ALIGN LOCKClean lower burr with burr brush
natural_image
Diagram of a mechanical device with internal components and a downward arrow indicating motion (no text or symbols)Remove tamping fan with tamp removal magnet
text_image
10Clean grind outlet with grind outlet brush

text_image
11Replace tamping fan by hand
text_image
12 VALA CHKPush upper burr firmly into position
text_image
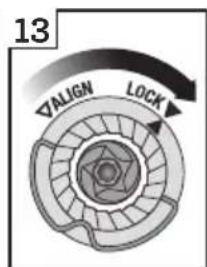
13 ALIGN LOCKLock upper burr
text_image
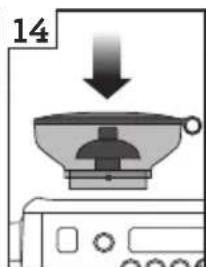
14Insert hopper
text_image
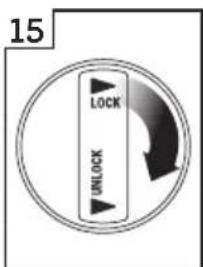
15 LOCK UNLOCKLock hopper
text_image
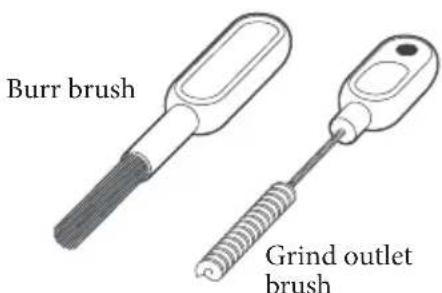
Burr brush Grind outlet brushTamp removal magnet
CLEANING THE STEAM WAND

IMPORTANT
After every use, thoroughly wipe the steam wand and tip with a damp cloth & purge immediately. Failure to clean the steam wand may affect the milk texturing performance.
- If any of the holes in the tip of the steam wand become blocked, ensure the steam lever is in the center OFF position and unblock using the steam tip cleaning tool. Even partially blocked holes may affect the ability of the steam wand to produce sufficient foam volume.
- If steam wand remains blocked, remove the tip and soak together with steam wand using the provided steam wand cleaning powder (instructions below). Screw tip back onto the steam wand after rinsing.
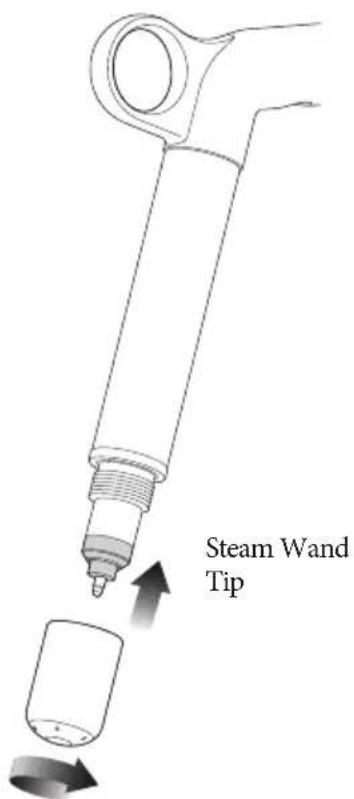
text_image
Steam Wand Tip- The steam wand can be left immersed in the milk jug filled with water when not in use to reduce the risk of blockages.
Steam Wand Cleaning Powder
- Add 1 packet into an empty milk jug.
- Add 1 cup (8oz/240ml) hot water into milk jug.
- Remove steam tip and place with steam wand into jug.
- Leave to soak for 20 minutes.
- Clean, rinse and replace steam tip. Place wand back into the jug and activate steam for 10 seconds.
- Allow to soak for 5 minutes.
- Activate steam several times to purge the steam wand, then rinse the wand thoroughly.
- Wipe the steam wand dry with a clean cloth.
- Discard solution & rinse jug thoroughly.

NOTE
Please ensure the steam wand tip is tightly fastened after cleaning to avoid temp sensing error.
CLEANING THE FILTER BASKET AND PORTAFILTER
- The filter basket and portafilter should be rinsed under hot water after each coffee making session to remove all residual coffee oils.
- If the holes in the filter basket become blocked, dissolve a cleaning tablet in hot water and soak filter basket and portafilter in solution for approx. 20 minutes. Rinse thoroughly.
CLEAR WATER BACKFLUSH
• After each coffee making session we recommend doing a clear water backflush before you turn off the machine. Empty drip tray. Insert the cleaning disc into the filter basket then insert the portafilter into the group head. Press the 2 CUP button and allow pressure to build for 20secs, then press to stop & release pressure. Repeat this 5 times to purge any fine coffee grounds and residual coffee oils from the brew water paths.
• The group head interior and shower screen should be wiped with a damp cloth to remove any ground coffee particles.
- Periodically, run hot water through the group head with the filter basket and portafilter in place, but without ground coffee. This will remove any residual ground coffee particles from the shower screen.
CLEANING THE DRIP TRAY & STORAGE TRAY
- The drip tray should be removed, emptied and cleaned after each use or when the drip tray indicator is visibly floating.
- Remove grill from the drip tray. Wash the drip tray in warm soapy water. The drip tray full indicator can also be removed from the drip tray.
- The storage tray can be removed and cleaned with a soft, damp cloth (do not use abrasive cleansers, pads or cloths which can scratch the surface).
CLEANING THE OUTER HOUSING & CUP WARMING TRAY
- The outer housing and cup warming tray can be cleaned with a soft, damp cloth. Polish with a soft, dry cloth. Do not use abrasive cleansers, pads or cloths which can scratch the surface.

NOTE
Do not clean any of the parts or accessories in the dishwasher.
DESCALE (DESC)
Use this function to access descale procedures when a descale alert is displayed on the LCD. Even if you used the provided water filter, we recommend you to descale if there is scale build-up in the water tank.

text_image
SERVICE dEScPlease ensure you allow approximately 1.5 hour to complete the entire descale process and follow the step by step instructions. If you've just finished using your machine, please ensure to turn the machine off and allow to cool for at least 1 hour before starting your descale process.
- Prepare for Descale
a) Empty the drip tray and insert into position.
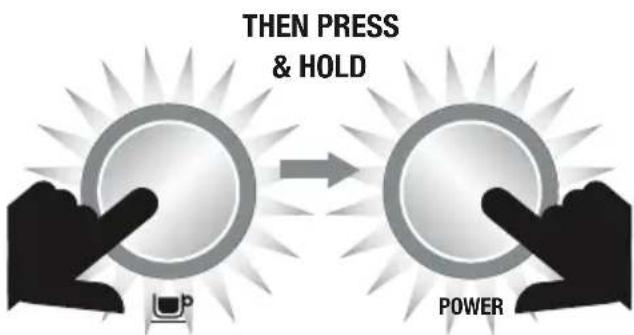
b) With the machine off, press and hold the 1 CUP button, then press and hold the POWER button together for 3 seconds. rSEt will appear on the LCD.
text_image
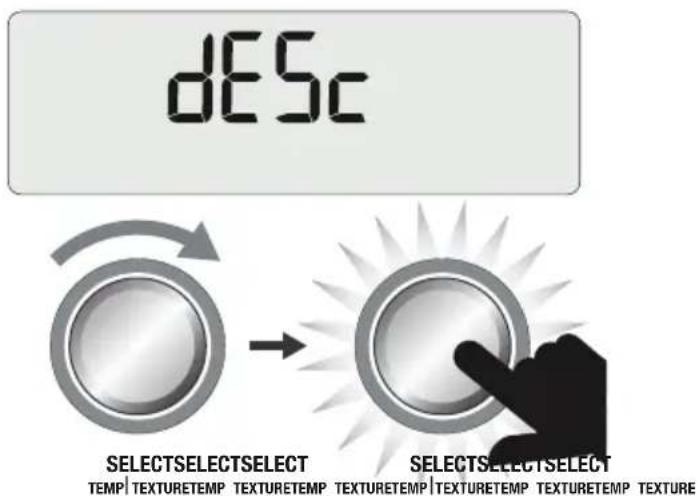
THEN PRESS & HOLD POWERc) Rotate SELECT dial until 'dESc" appears on LCD and press the dial to confirm.
text_image
dESC SELECTSELECTSELECT TEMP | TEXTURETEMP | TEXTURETEMP | TEXTURETEMP | TEXTURETEMP | TEXTURE SELECTSELECTSELECT SELECTSELECTSELECT2. Empty Boilers
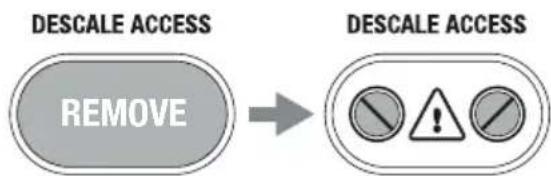
a) Remove the grey silicone cover on the lower front panel marked DESCALE ACCESS.
flowchart
graph LR
    A["REMOVE"] --> B["DESCALE ACCESS"]
    B --> C["DESCALE ACCESS"]
b) Place a cloth over the drip tray to prevent steam escaping.
natural_image
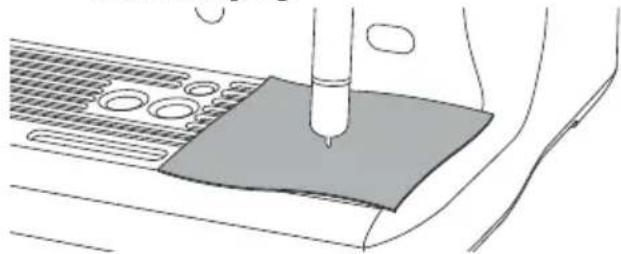
Illustration of a pipette dispensing liquid onto a surface with circular indentations (no text or symbols)c) Use a flat head screw driver to rotate the right valve counter-clockwise SLOWLY until fully open. As the valve opens, steam may be released.

NOTE
If there's no water released into the drip tray, press and hold the 1 CUP button for 3 seconds. This will release water from the boiler.
When the water is completely empty, close the valve by rotating screws clock-wise until seated. Do not overtighten screws to avoid damages to the valves.
DESCALE ACCESS
text_image
Safety warning symbol and soldering tip diagram showing hazard, warning sign, and drop-down instructionsd) Repeat the above process on the left valve.
e) Empty the drip tray, use caution as the drip tray may be hot.
f) Empty water tank, remove water filter.
g) Place descale solution into water tank, fill with cold water to MAX line,
(if an alternative cleaning solution is used, please follow the manufacturer's instructions accordingly). Lock water tank back into position at the back of the machine.

NOTE
If water tank has not been removed, replaced or is empty, "FILL TANK" will appear on the LCD.
3. Begin Descale
a) Press 1 Cup button and the LCD screen will show countdown time (20 minutes).

During this time, the machine will fill boilers with descale solution and heat to temperature. There may be some water flow through the group head during this time. Allow the countdown timer to reach 0 as this allows solution sufficient time to dissolve scale build up. However you can proceed to the next step at any time by pressing the 1 Cup button.
b) Place a cloth over the drip tray to stop steam escaping.
c) Empty boilers by repeating steps 2c and 2d.
d) Empty drip tray and insert back to place.
e) Empty water tank then rinse and fill with clean water to the MAX line. Lock water tank back into position.
4. Flush Boilers
a) Press 1 Cup button and the LCD screen will show countdown time (20 minutes).
20
During this time, the machine will fill boilers with fresh clean water and heat to temperature. You can proceed to the next step at any time by pressing the 1 Cup button.
b) Place a cloth over the drip tray to stop steam escaping.
c) Empty boilers by repeating steps 2c and 2d.
d) Empty drip tray and insert back to place.
e) Empty water tank then rinse and fill with clean water to the MAX line. Lock water tank back into position.
5. Repeat Step 4 Flush Boilers
We recommend flushing boilers again to ensure any residual descale solution is released from the boilers.
Press POWER button to escape the Descale mode. The descale process is now complete and ready to use.

Troubleshooting
PROBLEM EASY SOLUTION WHAT TO DO
| Motor starts but no ground coffee coming from grind outlet | No coffee beans in bean hopper.Grinder/bean hopper is blocked.Coffee bean may have become stuck in hopper. | Fill bean hopper with fresh coffee beans.Remove bean hopper. Inspect bean hopper & grinding burrs for blockage. Replace parts and try again. |
| Motor starts but operates with a loud ‘racket’ noise | Grinder is blocked with foreign item or chute is blocked.Moisture clogging grinder. | Remove bean hopper, inspect burrs & remove any foreign body.Clean the burrs and grind outlet, see page 32.Leave burrs to dry thoroughly before re-assembling. It is possible to use a hair dryer to blow air into the burr area to quicken the drying process. |
| Unable to lock bean hopper into position | Coffee beans obstructing bean hopper locking device. | Remove bean hopper. Clear coffee beans from top of burrs.Re-lock bean hopper into position. |
| Portafilter overfills | Tamping fan was removed for cleaning and not replaced. | Check that the tamping fan is in position and mounted correctly to the drive shaft, see page 32. |
| Emergency stop? | Rotate the portafilter to the left to stop the auto grind, dose & tamp function.Unplug power cord from power outlet. | |
| There is an alert on the LCD eg. 'OVERHEAT PLEASE WAIT', 'HEATING' etc. | See page 25 for list of alerts.If problem persists, contact Breville Consumer Support. | |
| Grinder running continuously | No beans in hopper. | Fill hopper with beans.Rotate the portafilter to the left to stop the auto grind, dose & tamp function. |
| Tamping fan has been removed. | Check that the tamping fan is in position and mounted correctly to the drive shaft, see page 32. |
PROBLEM EASY SOLUTION WHAT TO DO
| Espresso runs outaround the edgeof the portafilter | • Portafilternot insertedin the grouphead correctly. | • Ensure portafilter is rotated to the right until thehandle is past the center and is securely locked inplace. Rotating past the center will not damage thesilicone seal. |
| and/or | • There are coffeegrounds around thefilter basket rim. | • Clean excess coffee from the rim of the filterbasket after grinding to ensure a proper sealin group head. |
| Portafilter comes outof the group headduring an extraction | • Filter basket rim iswet or underside ofportafilter lugs arewet. Wet surfacesreduce the frictionrequired to holdthe portafilter inplace whilst underpressure duringan extraction. | • Always ensure filter basket and portafilter are driedthoroughly before filling with coffee, tamping andinserting into the group head. |
| Issues with theAuto Start feature | • Clock not set orclock is set withincorrect time. | • Check that the clock and Auto Start time havebeen programmed correctly. The LCD willdisplay a clock icon when the Auto Start timeis programmed. |
| ERR error messageon LCD | • A fault has occurredand machinecannot operate. | • Contact Breville Consumer Support. |
| Pumps continueto operate / Steamis very wet / Hotwater outlet leaks | • Using highlyfiltered,demineralizedor distilled waterwhich is affectinghow the machineis designedto function. | • We recommend usingcold, filtered water. We do not recommendusing water with no/low mineral content suchas highly filtered, demineralized or distilledwater. If the problem persists, contact BrevilleConsumer Support. |
PROBLEM EASY SOLUTION WHAT TO DO
| Water does not flow from the group head | Machine has not reached operating temperature. | Allow time for the machine to reach operating temperature. The POWER button will stop flashing when machine is ready. |
| Wartertank is empty. | Fill tank. Prime the system by:1) Pressing 2 CUP button to run water through the group head for 30 seconds.2) Pressing HOT WATER button to run water through the hot water outlet for 30 seconds. | |
| Water tanknot fully inserted & locked. | Push water tank in fully and lock latch closed. | |
| FILL TANK on LCD but water tank is full | Water tanknot fully inserted & locked. | Push water tank in fully and lock latch closed. |
| No hot water | Wartertank is empty. | Fill water tank. |
| No steam | Steamwand is blocked. | Refer to 'Cleaning the Steam Wand', page 33. |
| The machine is 'On' but ceases to operate | Turn machine off. Wait for 60 minutes and turn machine back on.If problem persists, call Breville Consumer Support. | |
| Steam pouring out of group head | Turn machine off. Wait for 60 minutes and turn machine back on.If problem persists, call Breville Consumer Support. | |
| Espresso only drips from the portafilter spouts, restricted flow | Coffee is ground too finely. | Adjust the grind size to a higher number to make the grind size slightly coarser. |
| Espresso flows out too quickly | The coffee is ground too coarsely.Coffee beans are stale. | Adjust the grind size to a lower number to make the grind size slightly finer.Use freshly roasted coffee beans with a 'Roasted On' date and consume between 5-20 days after that date. |
PROBLEM EASY SOLUTION WHAT TO DO
| Coffee not hot enough | Cups not pre-heated. | Rinse cups under hot water outlet and place on cup warming tray. |
| Milk not hot enough (if making a cappuccino or latté etc). | Increase the milk temperature. Refer to 'Adjusting Milk Temperature', page 15. | |
| No crema | Coffee beans are stale. | Use freshly roasted coffee beans with a 'Roasted On' date and consume between 5-20 days after that date. |
| Not enough milk texture | Steam wand is blocked. | Refer to 'Cleaning the Steam Wand', page 33. |
| Different brands and types of milk and milk alternatives will texture differently. You may need to adjust the texture level accordingly. Refer to 'Adjusting Milk Texture', page 15. | ||
| Too much coffee extracted | Coffee is ground too coarsely.Shot duration/volume needs to be reprogrammed. | Adjust the grind size to a lower number to make the grind size slightly finer.Reprogram the shot duration/volume. Refer to 'Programming Shot Volume/Duration', page 18. |
| Not enough coffee extracted | Coffee is ground too finely.Shot duration/volume needs to be reprogrammed. | Adjust the grind size to a higher number to make the grind size slightly coarser.Reprogram the shot duration/volume. Refer to 'Programming Shot Volume/Duration', page 18. |
| Amount of coffee extracted has changed, but all settings are the same. | As coffee beans age, the extraction rate changes and can affect the shot volume. | Adjust the grind size to a lower number to make the grind size slightly finer.Reprogram the shot duration/volume. Refer to 'Programming Shot Volume/Duration', page 18.Use freshly roasted coffee beans with a 'Roasted On' date and consume between 5-20 days after that date. |

Coffees to try
CAPPUCCINO
A single shot of espresso with textured milk, garnished with drinking chocolate.

natural_image
Black and white photo of a coffee cup on a saucer with a spoon, no text or symbols visible.ESPRESSO
Intense and aromatic, it is also known as a short black and is served in a small cup or glass.

natural_image
Black and white photo of a coffee cup on a saucer with a spoon, no text or symbols visible.LATTÉ
A latté consists of a single espresso with textured milk and approx. 10mm of foam.

natural_image
Black and white photo of a glass of coffee with a heart-shaped top, accompanied by a spoon on a saucer (no text or symbols visible)MACCHIATO
Traditionally served short, the macchiato is also poured as a long black with a dash of milk or a dollop of textured milk.

natural_image
Black and white photo of a glass cup on a saucer with a spoon, no text or symbols visible.AMERICANO
A shot of espresso (single or double) with hot water. Also known as a long black.

natural_image
Black and white photo of a coffee cup on a saucer with a spoon, no text or symbols visible.RISTRETTO
A ristretto is an extremely short espresso of approximately 15ml, distinguished by its intense flavor and aftertaste.

natural_image
Black and white photo of a coffee cup on a saucer with a spoon, no text or symbols visible.
Notes
the Oracle®

natural_image
Exterior view of a Breville brand espresso machine (no visible text or symbols on the device body)FR-CA MANUEL D'INSTRUCTIONS
Breville®

Contents
FICHE ASSISTMC DE BREVILLE
text_image
A B C D E F G H I J K L M N O P Q R S T Utext_image
A B C D F G H I J K M L NACCESSOIRES
natural_image
Illustration of a funnel pouring liquid into a container and a mechanical device (no text or symbols)text_image
IN 12 1 2 OUTnatural_image
Diagram showing two mechanical components with downward arrows indicating motion or force direction (no text or symbols)text_image
Diagram showing a kitchen appliance with a downward arrow and a circular control panel labeled 'LOCK' indicating clockwise rotation.SÉLECTION DE LA GROSSEUR DE MOUTURE
natural_image
Diagram of a mechanical component with a downward arrow indicating force or direction (no text or symbols)text_image
Diagram illustrating a mechanical or electrical component with directional arrows and labeled parts, likely illustrating a process or assembly.natural_image
Silhouette of a hand pointing at a circular light bulb with radiating lines, next to a camera (no text or symbols)natural_image
Silhouette of a hand pressing a circular button with two USB drive icons below (no text or symbols)text_image
MAX MIN MILK MUST COVER THIS SEALMOUSSAGE MANUEL DU LAIT
natural_image
Line drawing of a coffee maker with a mug and stand, no text or symbols presenttext_image
HOT WATER
NOTE
natural_image
Hand cursor clicking a circular button with radiating lines, no text or symbols visibleTEMP|TEXTURETEMP TEXTURETEMP TEXTURE
RÉGLAGE DE L'HEURE
natural_image
Diagram showing two mechanical components with arrows indicating motion or force direction (no text or symbols)MOUSSAGE MANUEL DU LAIT
natural_image
Diagram of a mechanical component with directional arrows indicating movement or force (no text or symbols)natural_image
Top-down view of a car with visible exhaust lines and number 3 (no text or symbols on the car itself)natural_image
Diagram of a car interior with directional arrows indicating movement or force (no text or symbols)natural_image
Diagram of a car spraying water with a showerhead above it, no text or symbols presentnatural_image
Diagram of a toaster oven with a door and front panel, showing airflow direction (no text or symbols)natural_image
Simple line drawing of a paintbrush, clip, and paper with three vertical stripes (no text or symbols)natural_image
Illustration of a conveyor belt filled with small cylindrical objects, emitting particles (no text or symbols)Retirer les grains
text_image
LOCK UNLOCKnatural_image
Diagram showing two mechanical components with arrows indicating motion or force direction (no text or symbols)natural_image
Simple line drawing of a toaster oven with an upward arrow indicating heating or cooking process (no text or symbols)text_image
6 VALA CKnatural_image
Diagram of a brush applying paint to a circular object with a handle, no text or symbols presenttext_image
10 ← → ←natural_image
Illustration of a pipette dispensing liquid onto a surface with circular indentations, no text or symbols presenttext_image
DESCALE ACCESSPROBLÈME CAUSES POSSIBLES QUE FAIRE?
PROBLÈME CAUSES POSSIBLES QUE FAIRE?
PROBLÈME CAUSES POSSIBLES QUE FAIRE?
PROBLÈME CAUSES POSSIBLES QUE FAIRE?
natural_image
Black and white photo of a coffee cup on a saucer with a spoon, no text or symbols visible.ESPRESSO
natural_image
Black and white photo of a coffee cup on saucer with a spoon, no text or symbols visibleLATTÉ
natural_image
Black and white photo of a glass of coffee with a spoon on a saucer (no text or symbols visible)MACCHIATO
natural_image
Black and white photo of a glass cup on a saucer with a spoon, no text or symbols visible.AMERICANO
natural_image
Black and white photo of a coffee cup on a saucer with a spoon, no text or symbols visible.RISTRETTO
natural_image
Black and white photo of a teacup with saucer and spoon (no text or symbols)
Remarques
the Oracle®
natural_image
Exterior view of a Breville brand espresso machine (no visible text or symbols on the device body)ES-MX MANUAL DE INSTRUCCIONES
Breville®

Contenido
text_image
A B C D E F G H I J K L M N O P Q R S T UDatos técnicos
120 V\~ 60 HZ 1 800 W
text_image
A B C D F G H I J K M L NACCESORIOS
natural_image
Illustration of a beaker with a conical tube and a spray bottle pouring liquid into a container (no text or symbols)text_image
IN 12 1 2 OUTnatural_image
Diagram showing two mechanical components with downward arrows indicating motion or force (no text or symbols)text_image
Diagram showing a kitchen appliance with a downward arrow and a circular control dial labeled 'UNLOCK' and 'LOCK'.natural_image
Diagram of a hand holding a mechanical component with a downward arrow indicating force or direction (no text or symbols)natural_image
Diagram showing two mechanical components with arrows indicating motion, no text or symbols presentnatural_image
Silhouette of a hand pressing a circular button with radiating lines, next to a camera (no text or symbols)natural_image
Silhouette of a hand pressing a circular button with radiating lines, next to two small icons labeled 'p' and 'p' (no text or symbols on the button itself)natural_image
Technical line drawing of a coffee maker with a mug and stand (no text or symbols)text_image
HOT WATER
NOTA
Descalcificar (dESc)
Heating (Calentando)
natural_image
Diagram showing two mechanical components with arrows indicating motion, no text or symbols presenttext_image
PUSH CLEAN CYCLE
flowchart
graph LR
    A["MENU EXIT"] --> B["SELECT SELECT"]
    style A fill:#f9f,stroke:#333
    style B fill:#bbf,stroke:#333
natural_image
Diagram of a car seatbelt with directional arrows indicating movement (no text or symbols)natural_image
Simple line drawing of a car with headlights on, no text or symbols presentnatural_image
Diagram of a car seat with directional arrows indicating movement or force (no text or symbols)natural_image
Simple line drawing of a showerhead spraying water into a container (no text or symbols)natural_image
Diagram showing a door with a right-handled arrow indicating direction, no text or symbols presentnatural_image
Simple line drawing of a document with a clip, a pen, and a paper (no text or symbols)natural_image
Illustration of a conveyor belt filled with small round objects, emitting particles (no text or symbols)Retire los granos.

text_image
LOCK UNLOCKnatural_image
Diagram showing two mechanical components with arrows indicating motion or force direction (no text or symbols)natural_image
Simple line drawing of a toaster oven with an upward arrow indicating airflow or heat (no text or symbols)natural_image
Diagram of a mechanical component with a brush applying material, no visible text or symbolsnatural_image
Cross-sectional diagram of a mechanical device with internal components and a downward arrow indicating motion (no text or symbols)natural_image
Diagram of a mechanical device with an upward arrow indicating motion or force (no text or symbols present)text_image
12 VALU RCKtext_image
SERVICE DEScflowchart
graph LR
    A["REMOVE"] --> B["DESCALE ACCESS"]
    B --> C["DESCALE ACCESS"]
natural_image
Diagram of a pipette dispensing liquid onto a surface with grid patterns (no text or symbols)text_image
DESCALE ACCESSnatural_image
Black and white photo of a coffee cup on a saucer with a spoon, no text or symbols visible.ESPRESSO
natural_image
Black and white photo of a coffee cup on a saucer with a spoon (no text or symbols visible)LATTE
natural_image
Black and white photo of a glass of coffee with a spoon on a saucer (no text or symbols visible)MACCHIATO
natural_image
Black and white photo of a glass cup on a saucer with a spoon, no text or symbols visible.AMERICANO
natural_image
Black and white photo of a coffee cup on a saucer with a spoon, no text or symbols visible.RISTRETTO
natural_image
Black and white photo of a coffee cup on a saucer with a spoon, no text or symbols visible.
Notas

Notas
Breville Service Center
USA Mail: Breville USA
19400 S. Western Ave, Torrance CA
90501-1119
Phone: 1-866-273-8455
1-866-BREVILLE
Web: breville.com/us/support
Canada Mail: Breville Canada
300 Town Centre Blvd,
Suite 201, Markham,
Ontario, L3R 5Z6, Canada
Phone: 1-855-683-3535
Web: breville.ca/support
Master Every Moment*
Breville is a registered trademark of Breville Pty. Ltd. A.B.N. 98 000 092 928.
Copyright Breville Pty. Ltd. 2024.
- Due to continued product improvement, the products illustrated/photographed in this brochure may vary slightly from the actual product.