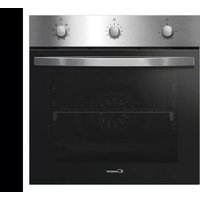
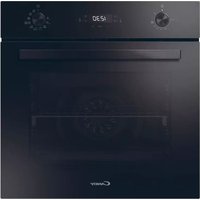
MEF340VTX - Built-in oven CANDY - Free user manual and instructions
Find the device manual for free MEF340VTX CANDY in PDF.
| Product type | Built-in oven |
| Brand | Candy |
| Model | MEF340VTX |
| Power supply | 220-240 V ~, 50/60 Hz |
| Maximum power | 2400 W |
| Cooking modes | 14 modes: Baking, Roasting, True Convection, Convection Roasting, Double Grill, Grill, Convection Grill, Convection Bottom Heat, Pizza, Defrost, Dehydration, Top Heat, Sabbath, Cleaning |
| Special functions | Fast preheat, Timer, Timed cooking, Temperature probe (optional), Demo mode, Sabbath mode |
| Control type | Electronic with display and touch keys |
| Interior lighting | Bulb with automatic shut-off after 3 minutes |
| Cleaning | Turboclean assisted cleaning (250°C) with catalytic panels |
| Door | Removable, internal glass panels removable for cleaning |
| Supplied accessories | Removable racks, temperature probe (depending on model) |
| Number of shelf levels | 4 levels |
| Installation type | Built-in |
| Safety | Mandatory supervision for children under 8, automatic shut-off at end of cooking |
| Dimensions (W x H x D) | Not specified in the manual |
| Weight | Not specified |
Frequently Asked Questions - MEF340VTX CANDY
User questions about MEF340VTX CANDY
0 question about this device. Answer the ones you know or ask your own.
Ask a new question about this device
Download the instructions for your Built-in oven in PDF format for free! Find your manual MEF340VTX - CANDY and take your electronic device back in hand. On this page are published all the documents necessary for the use of your device. MEF340VTX by CANDY.
USER MANUAL MEF340VTX CANDY
1 - Safety Instructions 2
2-Product Features 3
3-Installation of the Oven 4
Electricals 4
Respect for the environment 4
Connection to the electrical power mains 10
The first time you use the oven 11
Removable Guides (if present) 11
4- Instructions for Use 11
5-Control panel 12
Keypad 12
Error codes 13
Beeps 13
Default Settings 13
F Failure Number Codes 13
Preheat and Fast Preheat 13
Timer 13
6-General Oven Information 13
7-General Oven Tips 14
Preheating the Oven 14
Operational Suggestions 14
Utensils 14
Oven Condensation and Temperature 14
High Altitude Baking 14
Instructions for initial switch-on 15
8-Getting Started 15
9-User Settings 16
Language 16
Temperature & Weight 16
Time 16
Date 17
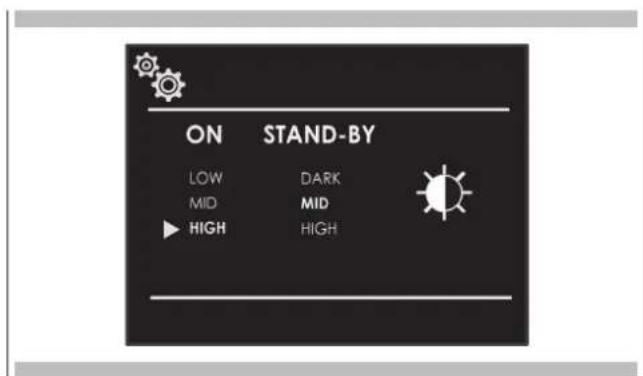
Brightness 17
Volume 17
10-System Setting 18
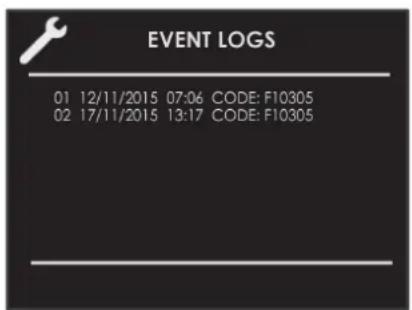
Event Log 18
Demo 18
11-Starting your Oven 19
Switching the oven on and offf 19
Selecting the cooking mode 19
Changing the cooking mode 19
Changing temperature 19
TABLE OF CONTENTS PAGE
12-Cooking Mode Tables 20
Pre-heating phase 22
Fast Preheat 22
Eco 22
Using Oven Lights 22
13-Time Oven Mode Operation 23
Cook Time 23
Stop Time 23
14- Setting the Meat Probe (if present) 24
15- Understanding the Various Oven Modes 26
Roast Tips and Techniques 26
General Guidelines 26
True Convection Tips and Techniques 26
Convection Roast Tips and Techniques 27
Convection Broil Tips and Techniques 27
Broil Tips and Techniques 27
Dehydrate Tips and Techniques 27
Dehydrate Chart 28
16- Recipes 29
17 - Sabbath Mode Instructions (on some models) 31
18-Oven Care and Cleaning 32
Clean 32
Removing the door 32
Removing the slide oven door 33
How to remove the inner glass of the "FULL 22
GLASS" panoramic door 55
Replacement of the oven light 34
19-Solving Baking Problems 35
20-Solving Operational Problems 36
21 - Assistance or Service 37
Service Data Record 37

IMPORTANT
The oven's data plate is accessible even with the oven fully installed. The plate is visible simply by opening the door. Always quote the details from it to identify the appliance when ordering spare parts.
- Do not disassemble any parts prior to having disconnected the oven from the mains.
- Do not use the appliance if any part is broken (for example a glass). Disconnect it from the mains and call service.
- Before using the oven, it is recommended to make it operate at noload at the maximum temperature for an hour to eliminate the insulating material odour.
-
In all models, leave the door closed when the grill is used.
-
The cooling fan may remain in operation so long as the oven is hot, even after it has been switched off.
- During the use the appliance becomes very hot; don't touch the heating elements inside the oven.
- Parents and adults should pay particular attention when using the product in presence of children.
- Children should be overseen so as to ensure that they don't play with the equipment.
- Keep children under age 8 away, unless constantly supervised.
- This appliance is not intended for use by persons (including children over age 8) with reduced physical sensory or mental capabilities, or lack of experience and knowledge, unless they have been given supervision or instruction concerning use of the appliance by a person responsible for their safety.
Children may not perform cleaning and maintenance unsupervised. - In order to avoid damage to the oven enamel coat, do not cover the oven muffle sole with any item (e.g. aluminum foil, pans and the likes).
- Do not use harsh abrasive cleaners or sharp metal scrapers to clean the oven door glass since they can scratch the surface, which may result in shattering of the glass.
- Abrasive detergents and steam cleaning equipment should not be used for cleaning.
- The appliance must not be installedbehind a decorative door in order to avoid overheating.
- WARNING: Ensure that the appliance is switched off before replacing the lamp to avoid the possibility of electric shock.
- The oven is cool and power to the oven has been turned off before removing the door. Failure to do so could result in electrical shock or burns.
- Use only the meat probe supplied with the appliance.

IMPORTANT
If the oven is installed in an ambient temperature below 37 ^ F (3 °C), F*0117 may appear; when a higher ambient temperature is reached, the error will no longer appear.
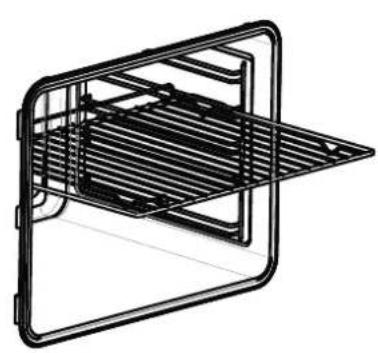
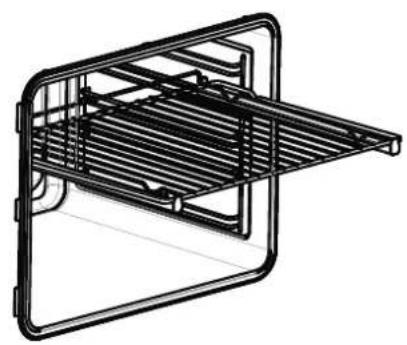
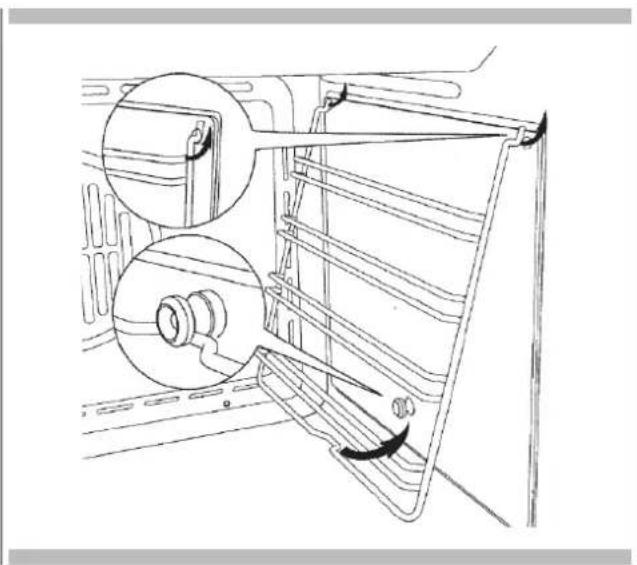
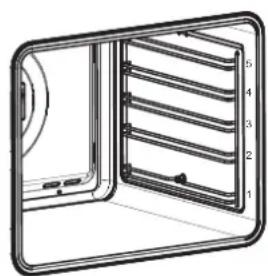
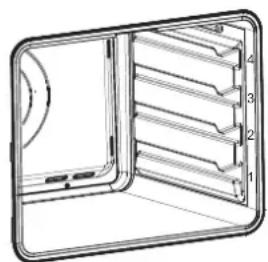
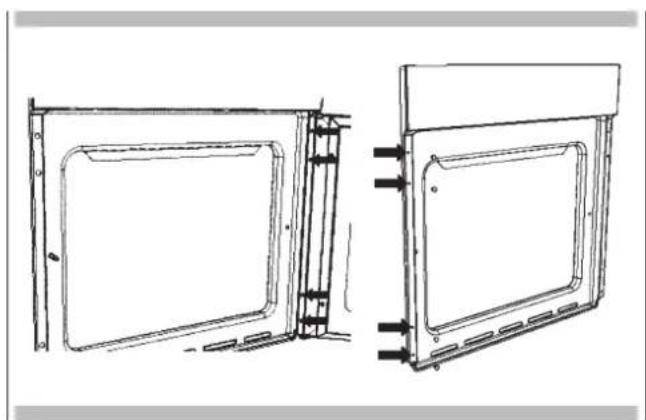
Refer to the figures below for the correct placement of the grills
EMBOSSED GUIDES
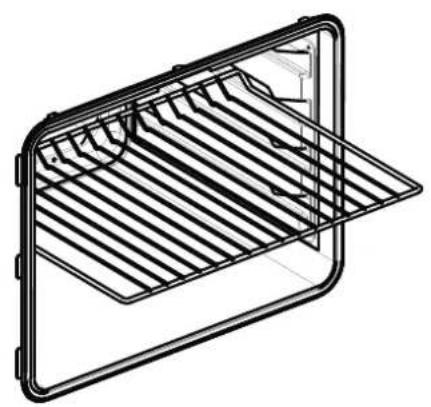
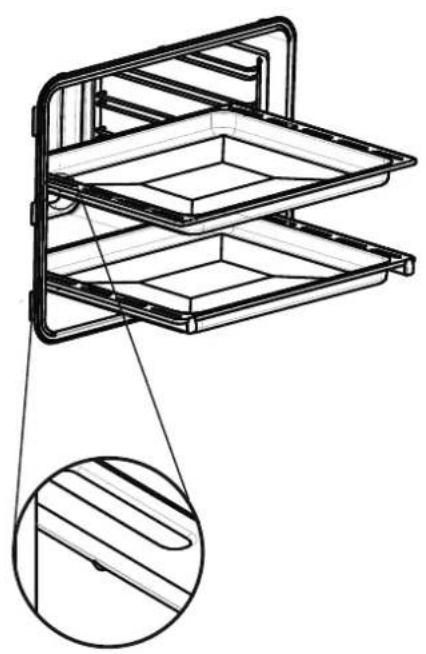
REMOVABLEGUIDES
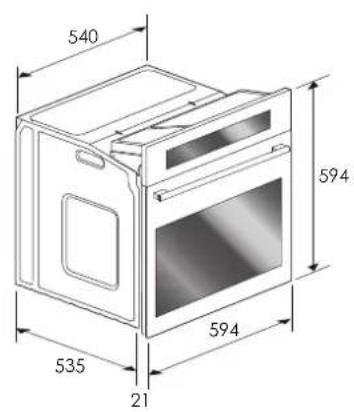
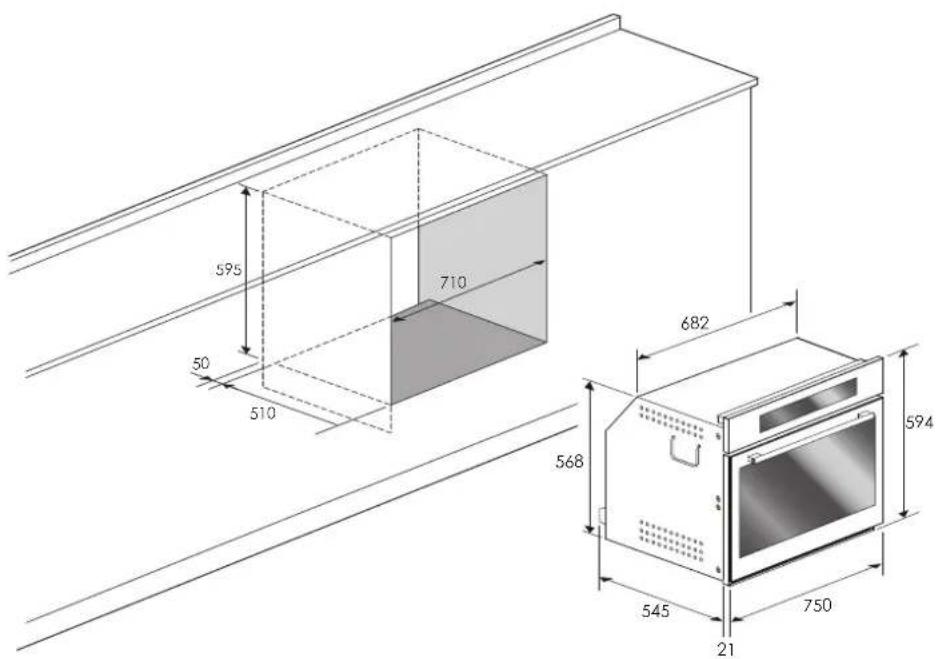
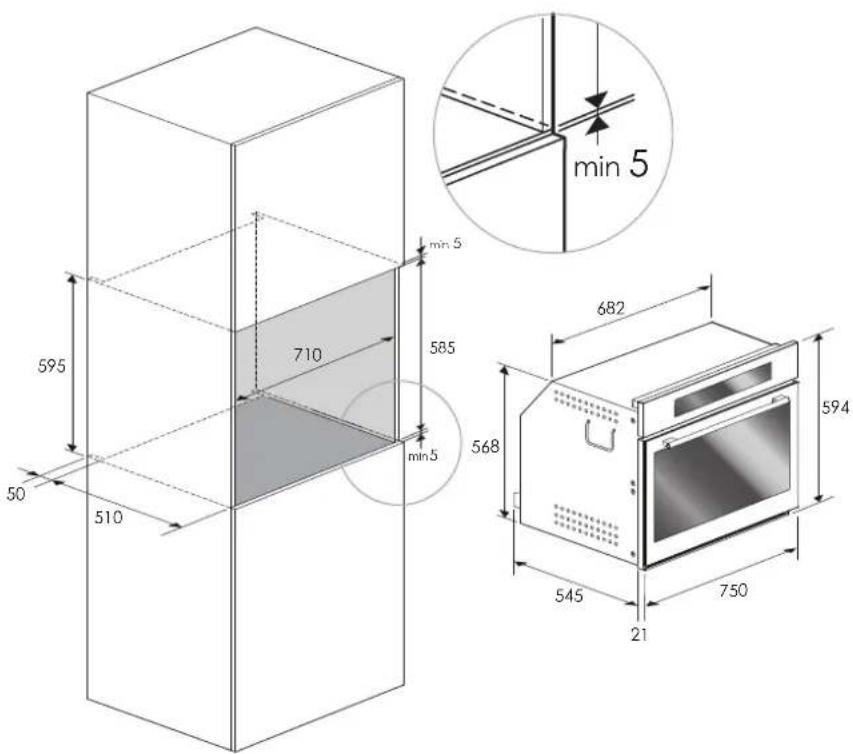
To install the oven into the kitchen a cutout should be made in accordance with the dimensions shown in the Cutout & Dimensions figure.
The apparatus is to be fastened to the top by means of the two screws provided in the kit through the holes made on the oven uprights.
The cabinet in which the apparatus is installed shall be open on the back side to ensure a sufficient air circulation and prevent overheating.

WARNING
As the apparatus is to be fitted in your kitchen furniture, make sure that all surfaces in contact with the oven can resist a temperature of approx 90^ .
Electricals
Maximum absorbed power: (see data plate).
Supply voltage: (see data plate).
NOTE: This appliance is in compliance with following European directives: 2006/95/CE (LVD), 2004/108/CE (EMC), 2011/65/CE (RoHS), 2012/19/UE (WEEE), 2002/40/CE.
Respect for the environment
The documentation for this appliance is printed on paper bleached without chlorine or recycled paper to contribute to protecting the environment. The packaging was designed to prevent damage to the environment; they are ecological products that can be recovered or recycled.
Recycling the packing saves raw materials and reduces the volume of industrial and domestic waste.

THE PACKING MATERIAL is 100% recyclable and marked with the recycling symbol. Dispos of in conformity with local law. The packing material (plastic bags, polystyrene parts, etc.) must be kept out of the reach of children because it is potentially dangerous. THIS APPLIANCE is marked in conformity with European Directive 2012/96/UE, Waste Electrical and Electronic Equipment (WEEE). By making sure that this product is disposed of correctly, the user contributes to preventing potential negative consequences for the environment and health.
THE SYMBOL on the product or accompanying documentation indicates that this product must not be treated as domestic waste but must be delivered to a suitable collection point for the recycling of electrical and electronic equipment.


MOD.45
Dimensions are in millimeters
MOD.60
Dimensions are in millimeters
MOD.75
Dimensions are in millimeters
MOD.90x48
Dimensions are in millimeters
MOD.90x60
Dimensions are in millimeters
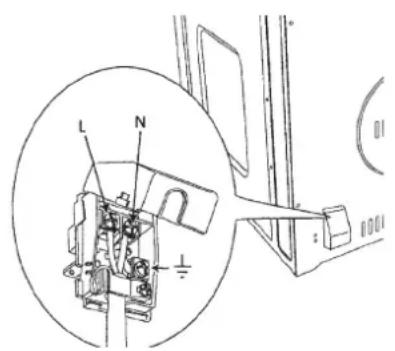
Connection to the electrical power mains

WARNING
This apparatus must be earthed.
The oven is only for domestic use.
The feed voltage and the absorbed power are as indicated on the data plate attached to the left-hand side upright, which can be seen when the oven door is open.
Connecting must be carried out by qualified personnel and in accordance with the regulations currently in force.
The manufacturer can not be held responsible for any damages to persons or objects caused by failure to observe these instructions.
If the supply cord is damaged, it must be replaced by the manufacturer, its service agent or similarly qualified persons in order to avoid a hazard.
The oven must be connected to the mains through a multipole circuit breaker with a contact-to-contact gap of at least 3 mm, making sure that the earth wire is not disconnected. For connecting use a flexible cable remembering to make it long enough to allow the oven to be removed from its housing unit when maintenance work is required.
Such a device must be fitted to the power supply in compliance with the regulations
governing electrical installations.
The socket or switch must be easily reachable with the oven fully installed.
| CABLE TYPES AND MINIMAL DIAMETERS | |
| SASO | |
| H05RR-F 3x1,5 mm² H05RR-F | 3x2,5 mm² |
| H05VV-F 3x1,5 mm² H05VV-F | 3x2,5 mm² |
| H05RN-F 3x1,5 mm² H05RN-F | 3x2,5 mm² |
| H05V2V2-F 3x1,5 mm² H05V2V2-F | 3x2,5 mm² |
The first time you use the oven
Clean the oven thoroughly with soapy water and rinse well.
Operate the oven for about 30 minutes at maximum temperature to burn off all traces of grease which might otherwise create unpleasant smells when cooking.

WARNING
Never use aluminum foil to cover the oven racks or to line the oven. It can cause damage to the oven liner if heat is trapped under the foil.

WARNING
Make sure you do not force it to avoid damage to the enamel.
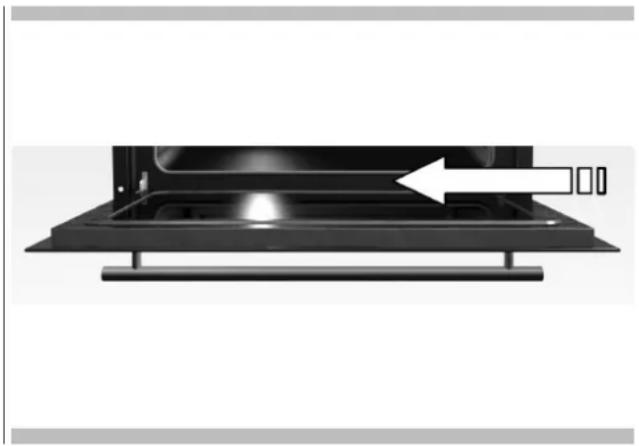
Removable Guides (if present)
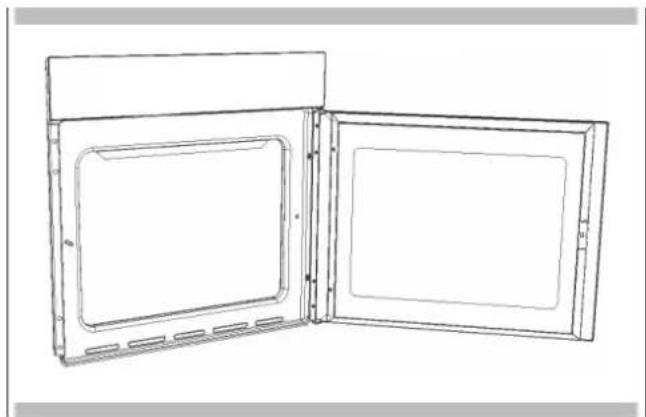
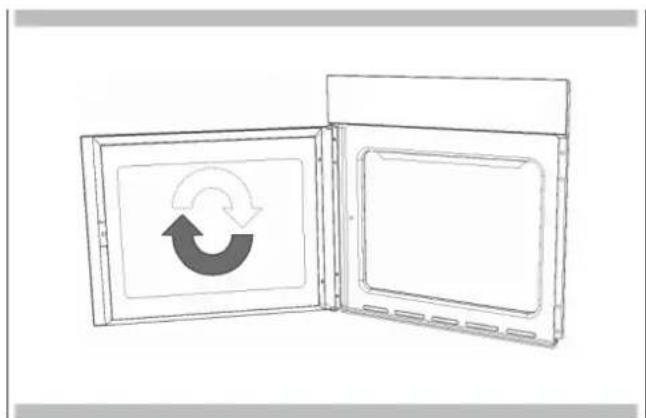
To remove the lateral frames from smooth-walled ovens, proceed as shown in the figure.
EN 5 - Control panel
Your appliance could vary slightly compared to the illustrations below.
A - Keypad
B - Display screen
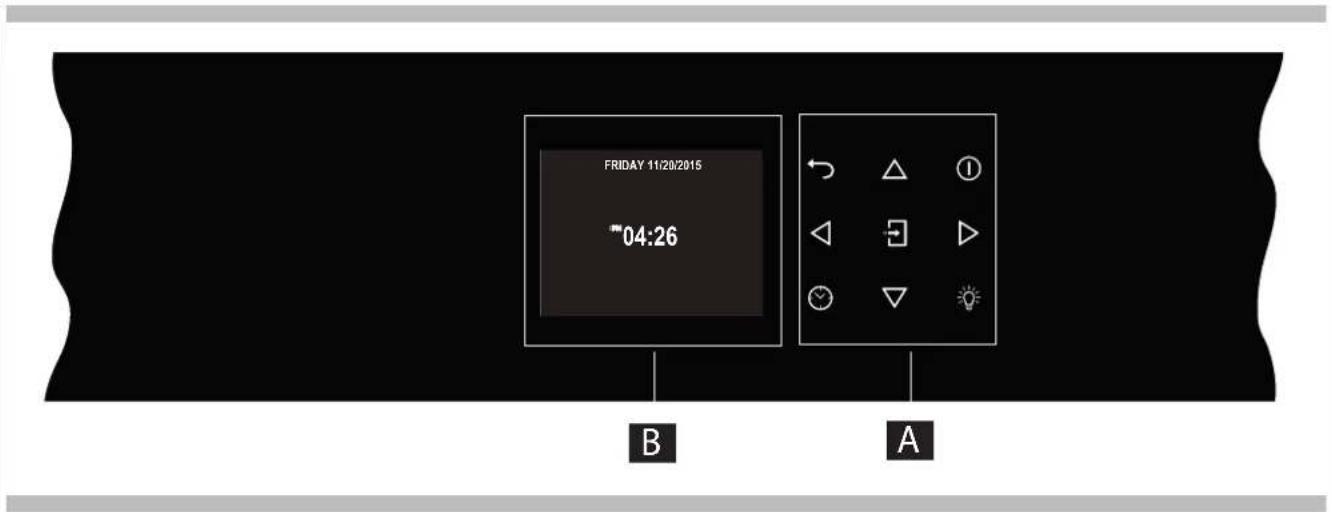
Keypad
To operate the key, press gently. The keypad will not work if more than one key is pressed at the same time.
| △△△ | Movement arrows |
| ← | Return to previous display page. Keep pressed to return to Home page |
| ① | Switches the oven on and off. |
| → | Confirms the settings and starts cooking operations. When pressed during a cooking operation, the function is placed in pause. Press again to restart. |
| × | To set the timer. Enter the functions menu during cooking. |
| Switches the inner oven light on and off. |
Before using your oven for the first time remove all packing and foreign materials from the oven(s). Any material of this sort left inside may melt or burn when the appliance is used.
Error codes
This code appears in the event of the electronic control indicating a fault. When the error appears, the current function is blocked. If the type of error is related to a safety function, the oven becomes unusable and every time a start attempt is made, the same error appears (in which case call in the after-sales service), while if the error relates to a minor fault, after being restarted the oven can be used for the functions that do not involve the faulty part (e.g., a heating element).
Beeps
Confirms that the command has been received after a key has been pressed.
It also indicates that a time function has been completed (e.g. Timer or Timed Cooking). During the execution of a recipe, an acoustic signal warns the user that the oven is waiting for operation by the user (e.g., insert the dish or turn it over).
Beeps also signal an oven fault.
Default Settings
The cooking modes automatically select a suitable temperature when the cooking mode is selected, these can be changed when a different one is needed.
F Failure Number Codes
These codes are displayed when the electronic control detects a problem in the oven or in the electronics.
The error code is recorded in the Error Log in the Setup menu. This error can be communicated to the service technician so he/she can understand the possible cause of the problem in advance.
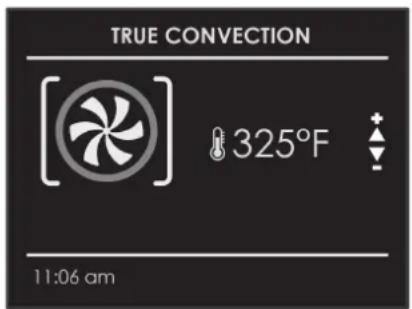
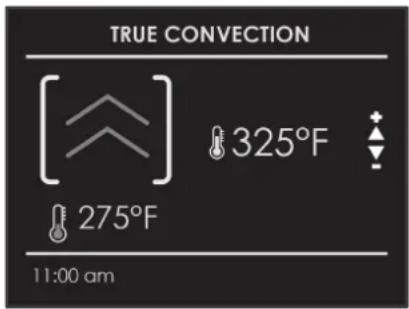
Preheat and Fast Preheat
Whenever a cooking mode is set and the oven is heating, the preheating starts, during this period, the instantaneous temperature is displayed together with the thermometer icon.
As soon as the 100% is reached, the control sounds an "end of preheat" tone and the current temperature value disappears.
When it's necessary to heat up the oven rapidly, a Fast Preheat mode is available: it uses the heating elements and the convection fan in a special way, in order to reduce the heating time as long as possible.
After having set one of the cooking functions for which the fast preheat is available and set the desired temperature value touch the key, after entering the functions menu, select the icon by means of the keys confirm by means of the key.
As soon as the set-point temperature is reached, the control sounds a and both "Fast Preheat Icon" and "current temperature" disappear. The oven switches automatically to the desired cooking mode that was previously set: put the food inside now.
Timer

WARNING
The timer on your oven does not turn the appliance on or off, its only purpose is to alert you through the buzzer. When you want to turn off the oven automatically, use the end-of-cooking or delayed cooking function.
NOTE Pressing the OFF button does not reset or stop the timer.
- Press the button and set the desired time using the arrows and confirm with the button. To switch the selection between hours and minutes use the arrows
- The time can be set from 1 minute to 12 hours and 59 minutes and, when set, the remaining time is always visible in the bottom status bar until the time expires or is reset.
- To change or cancel the time set, you must reset the timer by pressing and holding the button for a few seconds.
- Timer format is usually HR:MIN, switching into MIN:SEC during the last minute.
- When the time expires, the display shows 00:00 and the buzzer will sound for one minute or until the button is pressed.
Preheating the Oven
- Preheat the oven when using the Bake, Convection Bake and Convection Roast modes.
- Use Fast Preheat mode when a shorter time is desired to preheat the oven.
- Selecting a higher temperature does not shorten the preheat time.
- Preheating is necessary for good results when baking cakes, cookies, pastry and breads.
- Preheating will help to sear roasts and seal in meat juices.
- Place oven racks in their proper position before preheating.
- During preheating, the selected cooking temperature is always displayed.
- A beep will confirm that the oven is preheated and the "detected temperature" will turn off.
Operational Suggestions
- Do not set pans on the open oven door.
- Use the interior oven lights to view the food through the oven door window rather than opening the door frequently.
Utensils
- Glass baking dishes absorb heat. Reduce oven temperature 25^ ( 15^ ) when baking in glass.
- Use pans that give the desired browning. The type of finish on the pan will help determine the amount of browning that will occur.
- Shiny, smooth metal or light non-stick / anodized pans reflect heat, resulting in lighter, more delicate browning. Cakes and cookies require this type of utensil.
- Dark, rough or dull pans will absorb heat resulting in a browner, crisper crust. Use this type for pies.
- For brown, crisp crusts, use dark non-stick / anodized or dark, dull metal utensils or glass bake ware. Insulated baking pans may increase the length of cooking time.
- Do not cook with the empty broiler pan in the oven, as this could change cooking performance.
- Store the broil pan outside of the oven.
Oven Condensation and Temperature
- It is normal for a certain amount of moisture to evaporate from the food during any cooking process. The amount depends on the moisture content of the food. The moisture may condense on any surface cooler than the inside of the oven, such as the control panel.
- Your new oven has an electronic temperature sensor that allows maintaining an accurate temperature. Your previous oven may have had a mechanical thermostat that drifted gradually over time to a higher temperature. It is normal that you may need to adjust your favorite recipes when cooking in a new oven.
High Altitude Baking
- When cooking at high altitude, recipes and cooking time will vary from the standard.
Instructions for initial switch-on
Once the oven has been connected to the power supply for the first time, the control automatically prepares for setting a number of user settings, which remain stored in case of any subsequent switch-on.
Language
- Temperature & Weight
Time
- Date
Refer to the USER SETTING paragraph for setting instructions.
After making the user settings, the control moves automatically to the "Standby" display page.
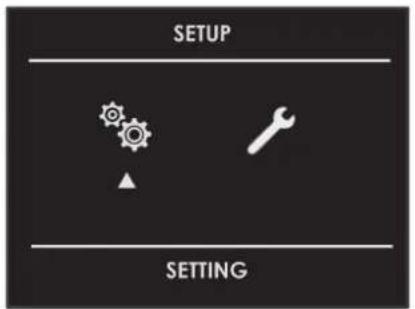
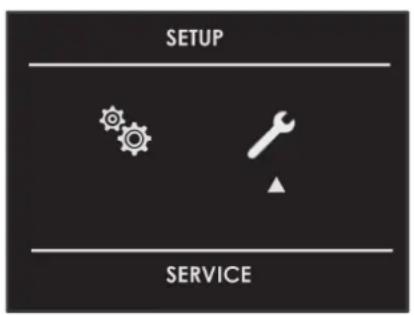
With the oven on, select the icon and confirm with the key to enter the SETTINGS menu. This menu permits personalizing the settings of your oven. To make access, no active cooking or any set time functions must be in progress.
NOTE The Setting menu can never be set if any time function is already set: first delete all the active time functions.
- Press the keys to select the sub menu and confirm by means of the key.
- Use this menu to change the following settings: Press the keys b) to select the setting or change a sub menu from among the six available ones and confirm by means of the key.

Language
Press the arrow key to select a language from among those available, and confirm with the key.

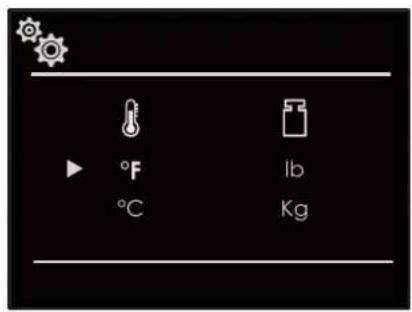
Temperature & Weight
Press the arrow key and select one of the two temperature options "oC/oF" or weight options Kg/ib and confirm with the key.
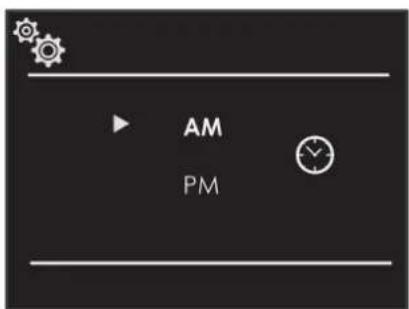
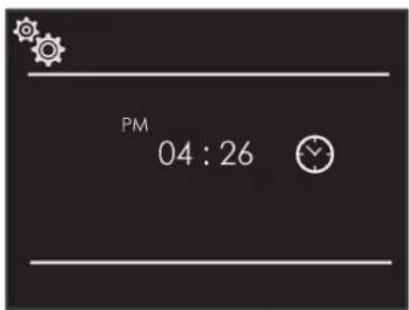
Time
Press the arrow key select the time format between the options "12h AM/PM or 24h" and confirm with the key. Subsequently, set the time using the arrows and confirm with the key.

Date
Press the arrow key select the date format from among the options "D.M.Y. - Y.M.D. - M.D.Y." and confirm with the key. Subsequently set the value using the arrows and confirm with the key.

Volume
Press the arrow key select the required degree of luminosity and confirm with the key

Brightness
Press the arrow key choose which luminosity setting to change between ON or STANDBY, then by means of the arrows select the required degree of luminosity and confirm with the key.
With the oven on, select the icon and confirm with the key enter the SETTINGS menu. This menu permits setting a number of parameters or special functions. It also permits accessing the error events list.
- Press the keys to select the sub menu and confirm with the key.
- Use this menu to change the following settings: Press the keys select the item to be set or to be displayed from among the three available ones and confirm with the key.
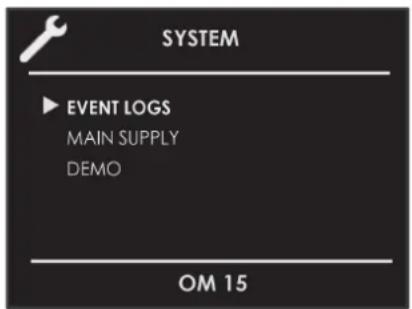
Event Log
The menu permits checking any recorded errors. These codes can be notified to the after-sales service.
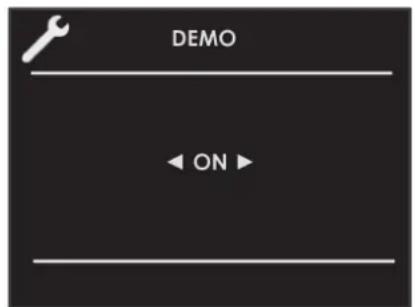
Demo
The purpose of this function is to set the DEMO mode, which makes the oven useless for cooking but automatically performs a demonstration of functions.
- Press the keys to select the item ON.
- Confirm with the key.
- Press the ① key.
After about 30 seconds, the oven starts to operate in this mode. To temporarily stop the DEMO function, simply keep any key pressed for a few seconds until the oven switches to standby. To start it again, press the Key.
To disable the function, enter the DEMO display page and set OFF. Confirm using the key.
NOTE Once set, the function remains enabled even if the oven is disconnected from the power mains.
Switching the oven on and off

IMPORTANT
The key does not stop the function.
- After switching off the oven, the cooling fan could continue to operate until the inner parts of the oven have cooled down.
Press ① to switch the oven on and press again to switch it off. The oven returns to standby mode.
Selecting the cooking mode

IMPORTANT
- Do not leave the door open for a long time during cooking.
- The door must be kept closed during the BROIL functions.
- Position the grill or grills on an appropriate level.
Functions
BAKE
ROAST
TRUE CONVEC.
CONVEC.ROAST
| ECO |
ECO BAKING
| [...] |
DOUBLE GRILL
| [...] |
GRILL
| * |
CONVEC. GRILL
| * |
CONVEC. DOWN BAKE
| PIZZA |
PIZZA
DEFROST
DEHYDRATE
Functions


UP BAKE
SABBATH
On some models
CLEAN
On some models
- Select the icon and press the key Select the appropriate cooking mode according to the food to be cooked using the arrows and confirm with the key.
- On this display page, it is still possible to change the cooking mode by using the keys.
- If the proposed temperature is correct, confirm with the key to start cooking, otherwise, if the key is not pressed within 10 seconds, the oven switches to automatic mode and the cooking mode icon becomes animated.
Changing the cooking mode
- During untimed cooking, a cooking pause can be set by pressing the key. All the settings of the suspended cooking operation remain stored and can be reactivated by pressing the same key again.
- To change the cooking mode while the oven is working, press the key and then the key. At this point, another cooking mode can be selected from among those available in the group by means of the arrows
Changing temperature

IMPORTANT
In all the cooking modes where the temperature is fixed, this is not shown on the screen.
- At the end of a function, the display screen shows the residual compartment heat temperature from the standby page.
- From the cooking mode preview display page, the temperature can be changed by means of the arrows subsequently confirming by means of the key.
- Once cooking has started, the temperature can in any case be changed, at any time, by means of the arrows .
| OVEN 45 cm | |||||
| COOKING MODE ICON FAST PREHEAT MEAT PROBE TEMPERATURE | Min. Preset Max. | ||||
| DEFROST 40°C 50°C 60°C | |||||
| BAKE | 50°C 50°C 200°C | ||||
| ROAST | 50°C 190°C 230°C | ||||
| ECO BAKING | 50°C 165°C 230°C | ||||
| TRUE CONVECTION | 50°C 165°C 230°C | ||||
| PIZZA | 50°C 230°C 230°C | ||||
| CONVECTION ROAST | 50°C 165°C 230°C | ||||
| CONVECTION GRILL | 50°C 165°C 230°C | ||||
| CONVECTION DOWN BAKE | 50°C 165°C 200°C | ||||
| GRILL | 50°C 230°C 230°C | ||||
| DOUBLE GRILL | 50°C 230°C 230°C | ||||
| UP BAKE | 50°C 180°C 230°C | ||||
| SABBATH (if present) | 60°C | ||||
| OVEN 60 cm-OVEN 75 cm-OVEN 90x48 cm-OVEN 90X90 cm | |||||
| COOKING MODE ICON FAST PREHEAT MEAT PROBE TEMPERATURE | Min. Preset Max. | ||||
| DEFROST 40°C 50°C 60°C | |||||
| BAKE | 50°C 50°C 250°C | ||||
| ROAST | 50°C 190°C 250°C | ||||
| ECO BAKING | 50°C 165°C 250°C | ||||
| TRUE CONVECTION | 50°C 165°C 250°C | ||||
| PIZZA | PIZZA | 50°C 230°C 250°C | |||
| CONVECTION ROAST | 50°C 165°C 250°C | ||||
| CONVECTION GRILL | 50°C 165°C 250°C | ||||
| CONVECTION DOWN BAKE | 50°C 165°C 250°C | ||||
| GRILL | 50°C 230°C 250°C | ||||
| DOUBLE GRILL | 50°C 230°C 250°C | ||||
| UP BAKE | 50°C 180°C 250°C | ||||
| SABBATH (if present) | SAB 111 | 60°C | |||
| CLEAN | CLEAN | 250°C | |||
Pre-heating phase
While the oven is in pre-heating phase, the instantaneous temperature is displayed underneath the cooking mode icon.
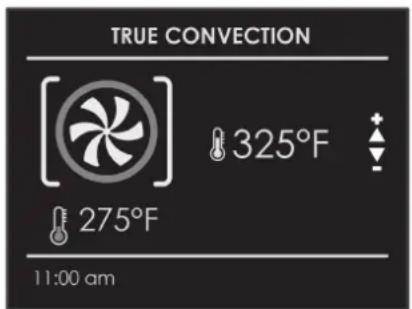
Just as soon as the set temperature is reached, an acoustic signal is heard and the instantaneous temperature indication disappears.
Fast Preheat
The FAST PREHEAT function permits reaching the desired temperature quicker compared to standard preheating. The function can be enabled for all the cooking modes in the BAKE (except the Sabbath and ECO), CONVECT and PIZZA groups.
To select FAST PREHEAT:
- Select the cooking mode as previously indicated and press the key to display the cooking mode preview display page.
- Press the key.
Select the icon by means of the arrows and confirm with the key The symbol appears in the lower part of the screen.
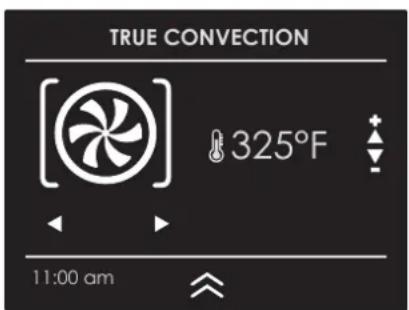
- Press the key again to run the function.
The display page shows the icon of the active functions until the set temperature has been reached. Afterwards, the function switches to automatic in the selected cooking mode.
Eco
This mode is intended to save energy.
Ideal for frozen or precooked food, and small portions-meals.
The preheat time is very short and cooking tends
to be slower. It is not recommended for heavy loads e.g. large portions or big meal preparation.
Using Oven Lights
A single light key activates the lights.
Touch to turn lights on or off
Oven lights turn on automatically when the door is opened.
When an oven is in use, oven lights turn on automatically when a mode is started.
Oven lights will turn off automatically when the oven mode is cancelled.
NOTE: Once switched on, the lights go off automatically after 3 minutes. To switch them back on, press the key or open the door.
Be sure that the time-of-day clock is displaying the correct time.
The timed mode turns off the oven at the end of the cook time.

CAUTION
Never leave food in the oven for more than one hour before and after cooking. This could deteriorate the properties of the food itself.
NOTE The time functions cannot be used if the meat probe is on. The maximum cooking time that can be set is 12 h.
Cook Time
Use the "Cook Time" function to operate the oven for a determinate period of time. The oven starts immediately and switches off automatically once the time has expired.
To Set a Timed Mode
- Select the cooking mode and temperature.
- There are two ways to set the function.
a) Select to set the duration and press
b) Select to set the stop time and press
- After selecting one of the two above options, set the time by means of the arrows and confirm with the key.
-
After pressing the key, cooking starts and the time cooking information is shown on the display page.
-
Cooking mode
- Temperature
- Cooking time
End of cooking time
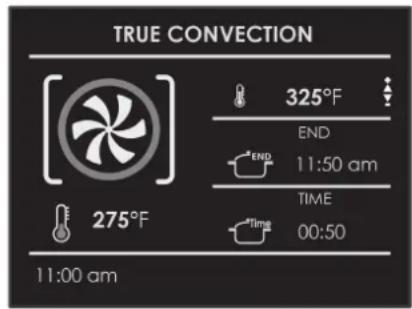
5 After cooking, the oven switches off and an acoustic signal warns that cooking has terminated.
To change the cooking time when the oven is already operating, simply press the key and enter the new cooking time before pressing the key again.
Stop Time
Use the "Stop Time" function to delay the start of timed cooking. Enter the cooking stop time and the oven will automatically calculate the start time. The oven switches on and off automatically.
To Delay the Start of a Timed Mode
1 First of all set the required timed cooking as indicated in the "COOK TIME" paragraph.
2 Select to set the stop time and press.
3 Set the cooking stop time by means the arrows and confirm by means of the key.
4 After pressing the key, the function positions in standby and the postponed cooking details are shown on the screen.
- Cooking mode
- Temperature
- Cooking stop time
- Cooking start time
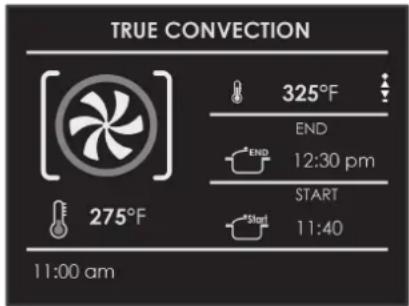
After cooking, the oven switches off and an acoustic signal warns that cooking has terminated.
To change the cooking time and stop time when the oven is already operating, simply press the key and enter the new cooking time or cooking stop time and press the key again.
EN 14 - Setting the Meat Probe (if present)
When roasts, steaks or poultry are being cooked, this is the best way to tell when the food is correctly cooked.
This oven is optionally provided with the meat probe feature to sense the temperature inside meat and stop cooking as soon as the set value is reached.
When the probe is used, the oven automatically checks the cooking time.
NOTE: the food probe is an accessory available only in some versions of the product.
Tenderness, aroma and flavour are the result of precise, functional control.
The food probe is a thermometer which, when inserted into the food, makes it possible to check the internal temperature and use it to establish the end of cooking.
For example, meat may look like it is cooked on the outside, but still be pink on the inside!
The temperature reached by food during cooking is closely linked to problems relating to health and hygiene. Bacteria can be contained in every kind of meat, poultry and fish, as well as raw eggs.
Certain types of bacteria make food go off, while others, such as Salmonella, Campylobacter jejuni, Listeria monocytogenes, Escherichia coli and Staphylococcus aureus can be seriously harmful to human health. Bacteria multiply very quickly above a temperature of 4.4^ up to 60^ . Mince is particularly at risk from this point of view.
To prevent bacteria from multiplying, it is necessary to take the following measures:
- Do not defrost food at room temperature, always in the fridge or in the oven using the specific function. In the latter case, cook the food immediately afterwards.
- Stuff chicken just before eating it. Never buy pre-packed ready-stuffed chicken and only buy ready-cooked stuffed chicken when you intend to eat it within 2 hours.
- Marinate food in the fridge, not at room temperature.
- Use a food probe to check the temperature of meat, fish and poultry if they are more than 5cm thick, to ensure that the minimum cooking temperatures are reached.
- The greatest hazards are posed by poorly cooked chicken, particularly at risk from Salmonella.
- Avoid interrupting the cooking process, i.e., partially cooking food, storing it and completing the cooking process later. This sequence encourages the growth of bacteria due to the "warm" temperatures reached inside the food.
- Roast meat and poultry in the oven at temperatures of at least 165^ .
NB: Use only the meat probe supplied with the appliance.
In any case, we recommend that you consult the following table taken from the National Food Safety Database (USA).
| Food Minimum internal temperature | |
| Mince | |
| Hamburger 71°C | |
| Beef, veal, lamb, pork 74°C | |
| Chicken, turkey 74°C | |
| Beef, veal, lamb | |
| Roasts and steaks: | |
| Rare | The cooking temperature for rare meat is not indicated by the NFSD as it is unsafe for health reasons |
| Medium-rare 63°C | |
| Medium 71°C | |
| Well done 77°C | |
| Pork | |
| Chops, roasts, ribs: | |
| Medium 71°C | |
| Well done 77°C | |
| Fresh ham 71°C | |
| Fresh sausages 71°C | |
| Poultry | |
| Whole chicken or chicken pieces 82°C | |
| Duck 82°C | |
| Whole turkey (not stuffed) | 82°C |
| Turkey breast | 77°C |

WARNING
- To avoid burns, use a kitchen glove to fit and remove the meat probe when the oven is hot.
- Always remove the probe using the grip. If it is removed by pulling the cable, it could suffer damage.
- Make sure the food is completely de-frozen when the probe is fitted. Otherwise it could suffer damage.
NOTE: The meat probe is not enabled for all functions (meat probe function not available also for Recipes). If it is fitted during one of these functions, a probe removal message appears on the screen.
If the meat probe is accidentally removed during operation, a warning message appears on the screen.
The temperature of the probe can be set between 104^ and 212^ (40^ - 100^) .
The oven stores the last temperature set by the user.
Insert the tip of the probe in the central and thickest part of the meat.
Make sure the probe is not in contact with the fat, bone, oven parts or dishes.
The meat probe is automatically recognised when it is inserted and the icon appears on the screen.
When a cooking mode is started with the probe inserted, the display page for setting the function appears automatically.
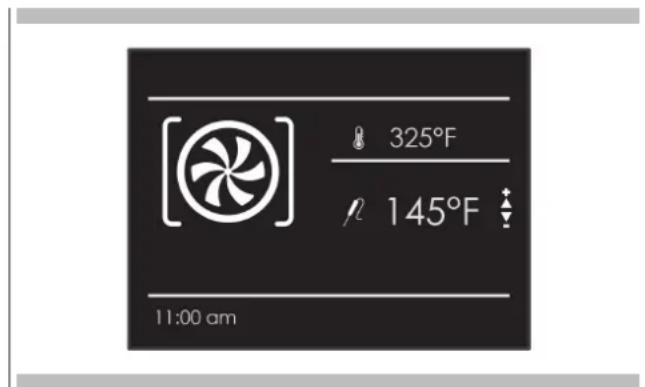
- Set the required probe temperature by means of the arrows and confirm with the key.
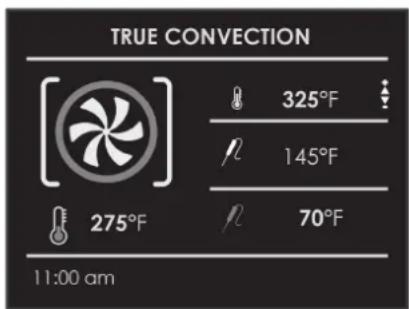
-
After pressing the key, cooking starts and all probe cooking details appear on the screen.
-
Cooking mode
- Oven temperature
- Set probe temperature
- Instantaneous probe temperature
Once the set probe temperature is reached, the oven switches off and an acoustic signal warns that cooking has terminated.
NOTE: After cooking has started, the oven temperature can in any case be changed at any time by means of the arrows .
To change the probe temperature, press the key and then the key and finally, the key again.
Roast Tips and Techniques
Roasting is cooking with heated air. Both upper and lower elements in the oven are used to heat the air but no fan is used to circulate the heat.
Follow the recipe or convenience food directions for baking temperature, time and rack position. Baking time will vary with the temperature of ingredients and the size, shape and finish of the baking utensil.
General Guidelines
- For best results, bake food on a single rack with at least 1'' - 1 12'' (2,5-3cm) space between utensils and oven walls.
- Use one rack when selecting the bake mode.
- Check for doneness at the minimum time.
- Use metal bake ware (with or without a non stick finish), heatproof glass, glass-ceramic, pottery or other utensils suitable for the oven.
- When using heatproof glass, reduce temperature by 25^ (15^) from recommended temperature.
- Use baking sheets with or without sides or jelly roll pans.
- Dark metal pans or nonstick coatings will cook faster with more browning. Insulated bake ware will slightly lengthen the cooking time for most foods.
- Do not use aluminum foil or disposable aluminum trays to line any part of the oven. Foil is an excellent heat insulator and heat will be trapped beneath it. This will alter the cooking performance and can damage the finish of the oven.
- Avoid using the opened door as a shelf to place pans.
- Tips for Solving Baking Problems are found on Page 35.
True Convection Tips and Techniques
- Reduce recipe baking temperatures by 25^ (15^) .
- For best results, foods should be cooked uncovered, in low-sided pans to take advantage of the forced air circulation. Use shiny aluminum pans for best results unless otherwise specified.
- Heatproof glass or ceramic can be used. Reduce temperature by another 25^ (15^) when using heatproof glass dishes for a total reduction of 50^ (30^) .
- Dark metal pans may be used. Note that food may brown faster when using dark metal bake ware.
- The number of racks used is determined by the height of the food to be cooked.
- Baked items, for the most part, cook extremely well in convection. Don't try to convert recipes such as custards, quiches, pumpkin pie, or cheeses, which do not benefit from the convection-heating process. Use the regular Bake mode for these foods.
-
Multiple rack cooking for oven meals is done on rack positions 1, 2, 3, and 4. All four racks can be used for cookies, biscuits and appetizers.
-
2 Rack baking: Use positions 1 and 3.
-
When baking four cake layers at the same time, stagger pans so that one pan is not directly above another. For best results, place cakes on front of upper rack and back of lower rack (See graphic at right). Allow 1'' - 1 12'' (2,5 - 3cm). air space around pans.
-
Converting your own recipe can be easy. Choose a recipe that will work well in convection.
- Reduce the temperature and cooking time if necessary. It may take some trial and error to achieve a perfect result. Keep track of your technique for the next time you want to prepare the recipe using convection.
- Tips for Solving Baking Problems are found on Page35.
Foods recommended for Convection Bake mode:
Appetizers Biscuits Coffee Cakes
Cookies (2 to 4 racks) Yeast Breads
Cream Puffs
Popovers
Casseroles and One-Dish Entreés
Oven Meals (rack positions 1, 2, 3)
Air Leavened Foods (Souflés, Meringue, Meringue- Topped
Desserts, Angel Food Cakes, Chiffon Cakes)
RACK POSITION
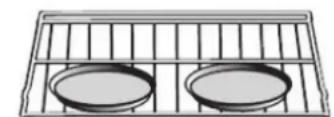
Rack 3
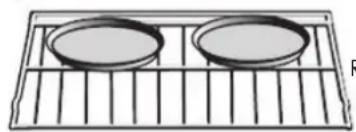
Rack 1
Quick and easy recipe tips
Converting from standard BAKE to CONVECTION BAKE:
- Reduce the temperature by 25^ F ( 15^ C ).
- Use the same baking time as Bake mode if under 10 to 15 minutes.
- Foods with a baking time of less than 30 minutes should be checked for doneness 5 minutes earlier than in standard bake recipes.
If food is baked for more than 40 to 45 minutes, bake time should be reduced by 25% .
Convection Roast Tips and Techniques
- Do not preheat for Convection Roast.
- Roast in a low-sided, uncovered pan.
- When roasting whole chickens or turkey, tuck wings behind back and loosely tie legs with kitchen string.
- Use the 2-piece broil pan for roasting uncovered.
- Use the probe or a meat thermometer to determine the internal doneness on "END" temperature.
- Double-check the internal temperature of meat or poultry by inserting meat thermometer into another position.
- Large birds may also need to be covered with foil (and pan roasted) during a portion of the roasting time to prevent overbrowning.
Quick and easy recipe tips
Converting from standard BAKE to CONVECTION ROAST:
- Temperature does not have to be lowered.
- Roasts, large cuts of meat and poultry generally take 10-20% less cooking time. Check doneness early.
- Casseroles or pot roasts that are baked covered in CONVECTION ROAST will cook in about the same amount of time.
- The minimum safe temperature for stuffing in poultry is 165^ (75^) .
After removing the item from the oven, cover loosely with foil for 10 to 15 minutes before carving if necessary to increase the final foodstuff temperature by 5^ to 10^ (3^ to 6^)
Cooking times are indicative and also depend on the thickness and the starting temperature of the meat before cooking.
Convection Broil Tips and Techniques
- Place rack in the required position needed before turning on the oven.
- Use Convection Broil mode with the oven door closed.
- Do not preheat oven.
- Use the 2-piece broil pan.
- Turn meats once halfway through the cooking time (see convection broil chart).
Broiling and convection broiling times are approximate and may vary slightly.
Cooking times are indicative and also depend on the thickness and the starting temperature of the meat before cooking.
Broil Tips and Techniques
- Place rack in the required position needed before turning on the oven.
- Use Broil mode with the oven door closed.
- Preheat oven for 5 minutes before use.
- Use the 2-piece broil pan.
- Turn meats once halfway through the cooking time (see convection broil chart).
Broiling and convection broiling times are approximate and may vary slightly.
Cooking times are indicative and also depend on the thickness and the starting temperature of the meat before cooking.
Dehydrate Tips and Techniques
- Dehydrating can be done using the Dehydrate mode. A lower temperature is used and the circulating heated air slowly removes the moisture for food preservation.
- The Dehydrate mode temperature is pre-programmed at 140^ (60^) .
- The Dehydrate mode temperatures available are 120^ (50^) to 160^ (70^) .
- Multiple racks can be used simultaneously.
- Some foods require as much as 14-15 hours of time to fully dehydrate.
- Consult a food preservation book for specific times and the handling of various foods.
- This mode is suitable for a variety of fruits, vegetables, herbs and meat strips.
- Drying screens can be purchased at specialty kitchen shops.
- By using paper towels, some food moisture can be absorbed before dehydrating begins (such as with sliced tomatoes or sliced peaches).
Dehydrate Chart
| FOOD PREPARATION APPROXIMATE | DRYING TIME* (hrs) | TEST FOR DONENESS | |
| FRUIT | |||
| Apples | Dipped in 1/4 cup lemon juice and 2 cups water, 1/4 slices | 11 - 15 Slightly pliable | |
| Bananas | Dipped in 1/4 cup lemon juice and 2 cups water, 1/4 slices | 11 - 15 Slightly pliable | |
| Cherries | Wash and towel dry. For fresh cherries, remove pits | 10 - 15 Pliable, leathery, chewy | |
| Oranges Peels and slices | 1/4 slices of orange; orange part of skin thinly peeled from oranges | Peels: 2 - 4 Slices: 12 - 16 | Orange peel: dry and brittle Orange slices: skins are dry and brittle, fruit is slightly moist |
| Pineapple rings | Towel dried | Canned: 9 - 13 Fresh: 8 - 12 | Soft and pliable |
| Strawberries | Wash and towel dry. Sliced 1/2" thick, skin (outside) down on rack | 12 - 17 Dry, brittle | |
| VEGETABLE | |||
| Peppers | Wash and towel dry. Remove membrane of pepper, coarsely chopped about 1" pieces | 16 - 20 | Leathery with no moisture inside |
| Mushrooms | Wash and towel dry. Cut of stem end. Cut into 1/8" slices | 7 - 12 Tough and leathery, dry | |
| Tomatoes | Wash and towel dry. Cut this slices, 1/8" thick, dry well | 16 - 23 Dry, brick red color | |
| HERBS | |||
| Oregano, sage parsley and thyme, and fennel | Rinse and dry with paper towel | Dry at 120°F (60°C) | 3 - 5 Crisp and brittle |
| Basil | Use basil leaves 3 to 4 inches from top. Spray with water, shake off moisture and pat dry | Dry at 120°F (60°C) | 3 - 5 Crisp and brittle |
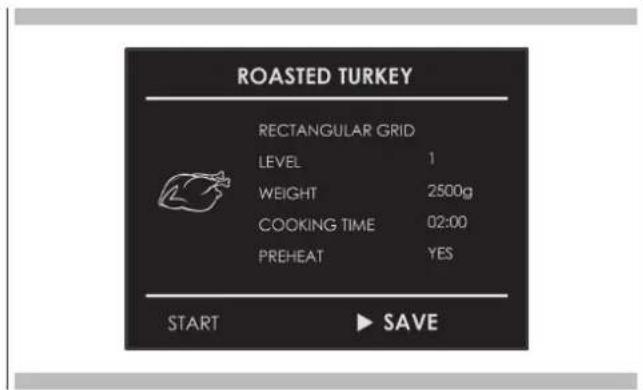
The Recipe function of your oven gives you the chance to cook food without having to set the oven manually every time. By selecting a "SET" recipe, the cooking mode, the temperature and the time are automatically set according to the recipe selected from the menu.
| Recipe List Type of Food Food condition Recipes List Information displayed | ||||
| PRESET OR PERSONAL | FRESH | BREAD PIZZA FIRST | TYPE OF ACCESSORY LEVEL POSITION FOOD WEIGHT COOKING TIME PREHEAT REQUIRED (YES/NO) | |
| FROZEN | ||||
| WHOLE | MEAT | |||
| IN PEICES | ||||
| WHOLE | POULTRY | |||
| IN PEICES | ||||
| WHOLE | FISH | |||
| IN PEICES | ||||
| - | VEGETABLES | |||
| - | ||||
| - | PIES | |||
| - | ||||
Select an already-set recipe:
- Switch the oven, select the icon and press the button.
- Using the arrows select the list between "PRESET" or "PERSONAL" and confirm by means of the key.
- Choose the type of food to be cooked using the arrows and the arrows and confirm by means of the key.
- Using the arrows choose between "FRESH" or "FROZEN" or in other cases between "WHOLE" or "IN PEICES" and confirm with the key.
- Select the required recipe by means of the arrows and confirm using the key.
- When the recipe is selected, the following display page appears on the screen:
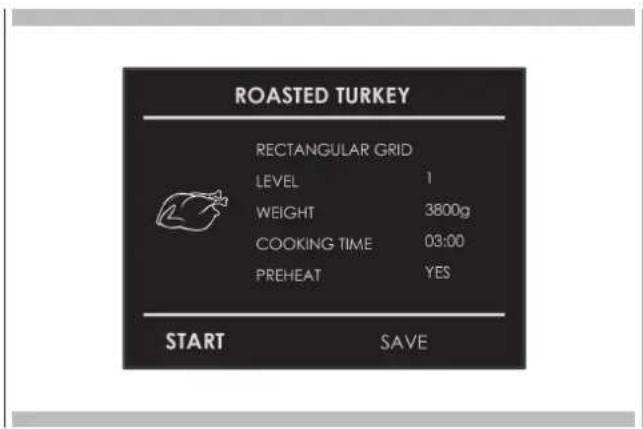
- To start the recipe, confirm with the key. During a recipe, a number of acoustic and visual messages will ask you to perform the following operations. Simply follow the instructions on the screen.
- Upon termination, the oven switches off and an acoustic and visual signal warns that the recipe has terminated.
Saving a personalized recipe:
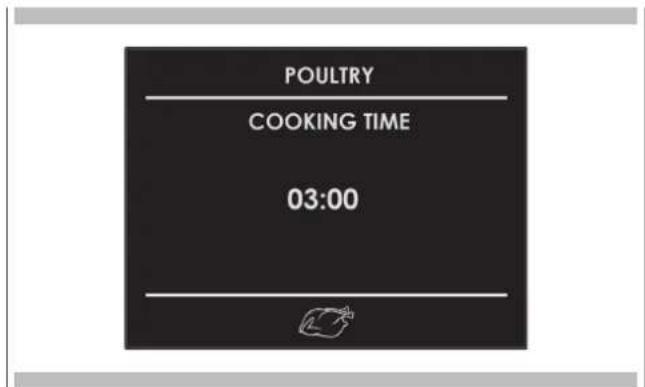
Once a recipe has been selected, the "Time" and "Weight" setting can be changed and the recipe can be saved among the "PERSONAL" ones.
- Once a recipe has been selected, press the key and confirm by means of the key.
- To change the weight, enter the desired weight by means of the arrows and confirm by means of the key.
- The oven switches automatically to the cooking time. To change this time, use the arrows and confirm again by means of the key.
- At this point, the recipe can be saved in the list of "PERSONAL" recipes by selecting "SAVE" and confirming by means of the key.
NOTE If the time and weight values are changed and not saved straight away, at the end of the recipe, a message appears which asks whether you want to save it.
5. To start the recipe press the key.
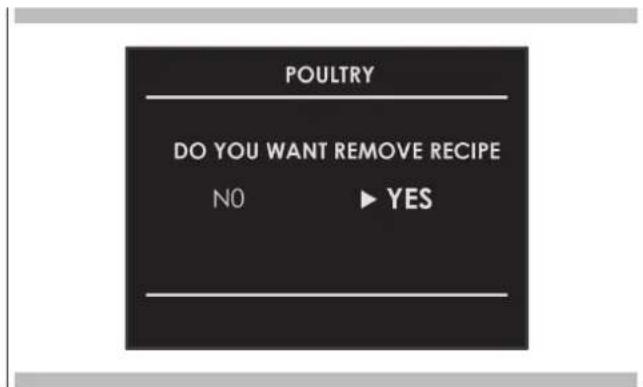
Cancelling a Personalized recipe:
- To eliminate a recipe from the list of personalized recipes, select the recipe.
- Press the key and select the choice and confirm with the key.
The Sabbath Mode function of your oven complied with Jewish laws. This function allows the oven to perform only the static function.
When the Sabbath function is selected, the following functions are disabled:
- Oven lights
- All the keys except ON/OFF
- Meat Probe Function
- Timed cooking function
- Timer function
- The icon on the display screen is steady and not animated as in the case of traditional cooking modes.
- Display screen and key acoustic warnings.
To set the Sabbath Mode function, switch on the oven and select the icon and press the key Select the Sabbath function by means of the arrows and confirm twice with the key
The function starts by showing the icon on the display screen.
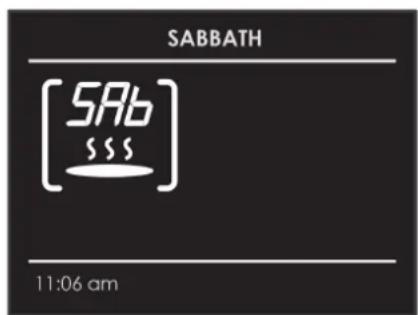
NOTE The function lasts at most 72 hours.
The temperature is not adjustable but fixed at 140^
(60^) The function can be disabled at any time by pressing the OFF key.
Abrasive detergents and steam cleaning equipment should not be used for cleaning.

WARNING
Do not use harsh abrasive cleaners or sharp metal scrapers to clean the oven door glass since they can scratch the surface, which may result in shattering of the glass.
Clean
Assisted cleaning
High temperature cycle (250^) , combined with self-cleaning panels for gentle, non-invasive cleaning of the cooking chamber.
Correct operation is combined with the use of the lateral panels and catalytic fan cover: the oven is treated with special enamel with a micro-porous structure, which breaks down the fat projected thanks to a catalytic oxidisation process which transforms residues into gaseous products.
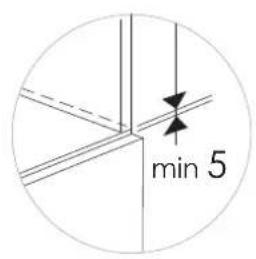
The turbo clean function is only activated when no cooking function has been selected, so: switch on the oven and touch the symbol as shown in the figure for five seconds.

WARNING
The cleaning process takes place at a temperature of 250^ and lasts one hour. Do not use it for cooking food!!
The oven light is activated and can be switched off and on again at any time.
All the self-cleaning panels will perform effectively for thirty cleaning processes, after this limit the panels must be replaced. The panels should be cleaned exclusively with tap water and replacements can be ordered from your specialised dealer.
Removing the door

WARNING
Make sure that:
- The oven is cool and power to the oven has been turned off before removing the door. Failure to do so could result in electrical shock or burns.
- The oven door is heavy and fragile. Use both hands to remove the oven door. The door front is glass. Handle carefully to avoid breakage.
- Grasp only the sides of the oven door. Do not grasp the handle as it may swing in your hand and cause damage or injury.
- Failure to grasp the oven door firmly and properly could result in personal injury or product damage.
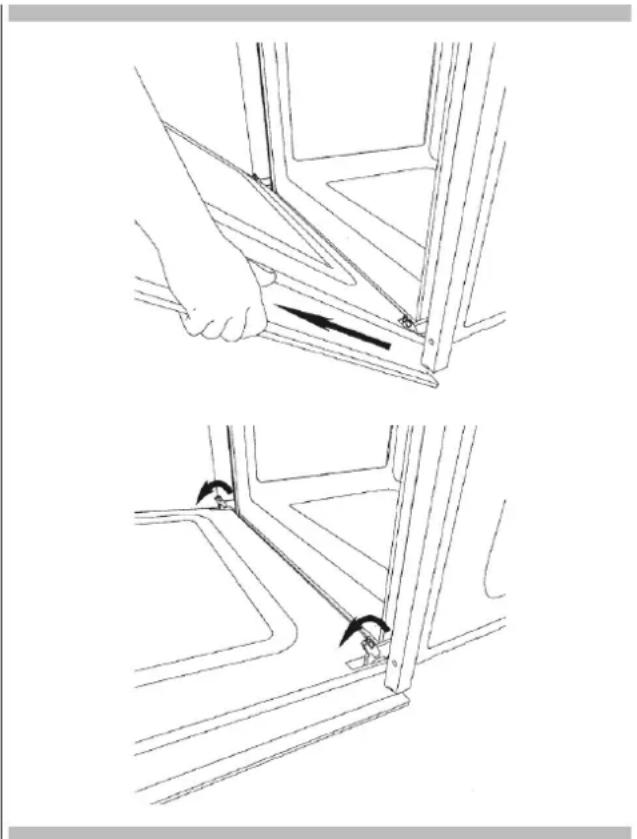
Removing the standard oven door
The oven door can be removed quickly and easily. To do so, proceed as follows:
- Open the door fully.
- Lift the two levers shown below.
- Close the door as far as the first stop (caused by the raised levers).
- Lift the door upwards and outwards to remove it from its mountings.
To replace fit the door, fit the hinges in their mountings and lower the two levers
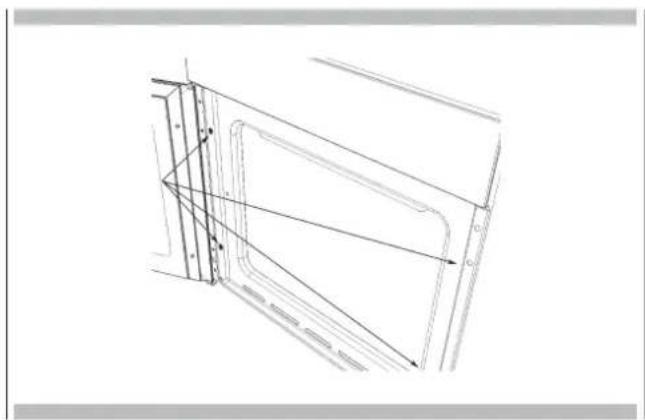
Removing the slide oven door
- Decide whether you want the door to open to the left or right before positioning the appliance in the oven recess.
- Fully open the door.
- Remove the four fixing screws from the door hinge.
- Remove the four plastic caps from the opposite side and unscrew the locking pin.
- Turn the door 180^ .
- Secure the door in its new position using the 4 screws removed previously.
NOTE: Make sure that the oven door is perfectly parallel with the front panel. If it is not, adjust it by means of the screws you have just inserted.
7. Fix the oven in the oven recess using the 4 screws and the plastic spacers provided.
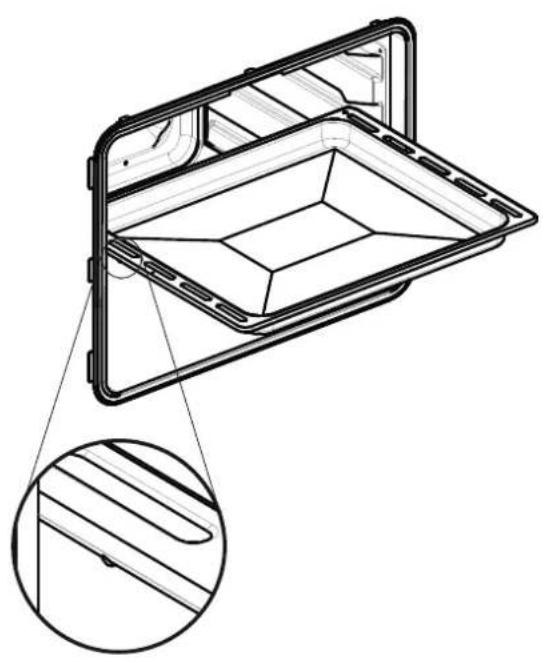
How to remove the inner glass of the "FULL GLASS" panoramic door
- Wear protective gloves.
- Place the door on a flat horizontal surface face down on a soft cloth to avoid scratching the visible part.
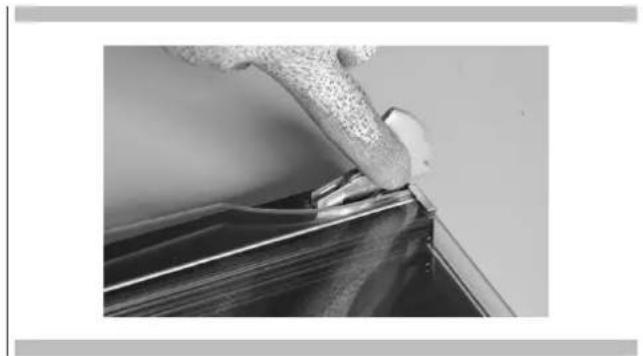
- Simultaneously press the keys of the two side covers, removing the upper strip.
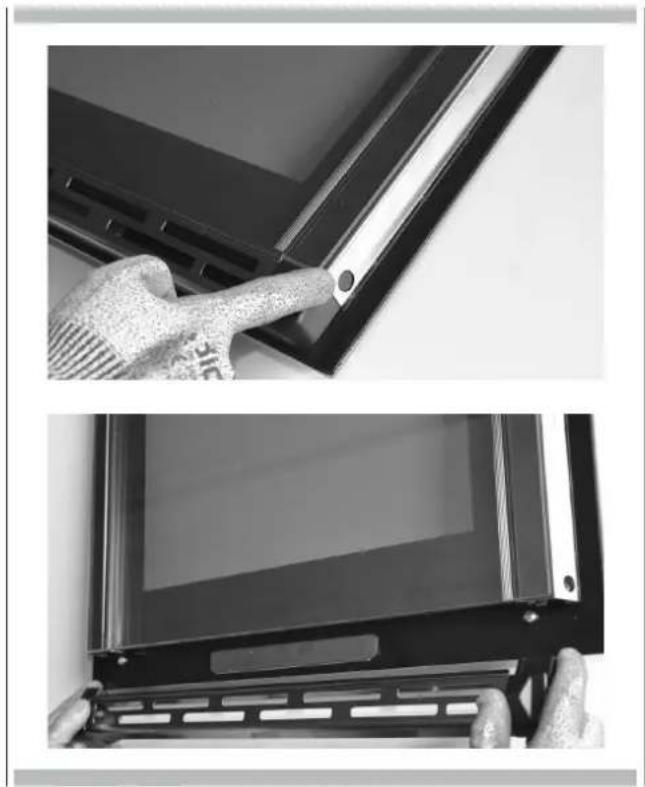
- Slide out the internal glass as shown below. Remove the second and third panes of glass (middle panes) for cleaning sliding out the rubber strip.
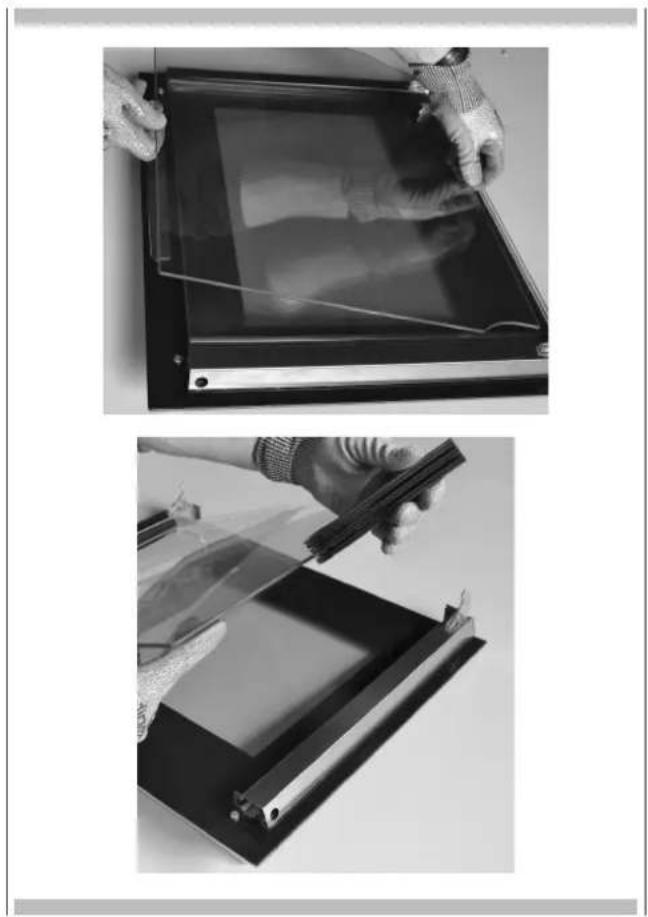
- Replace the middle panes after cleaning in reverse order, checking that they are oriented so the words INTERNAL SIDE are properly legible.
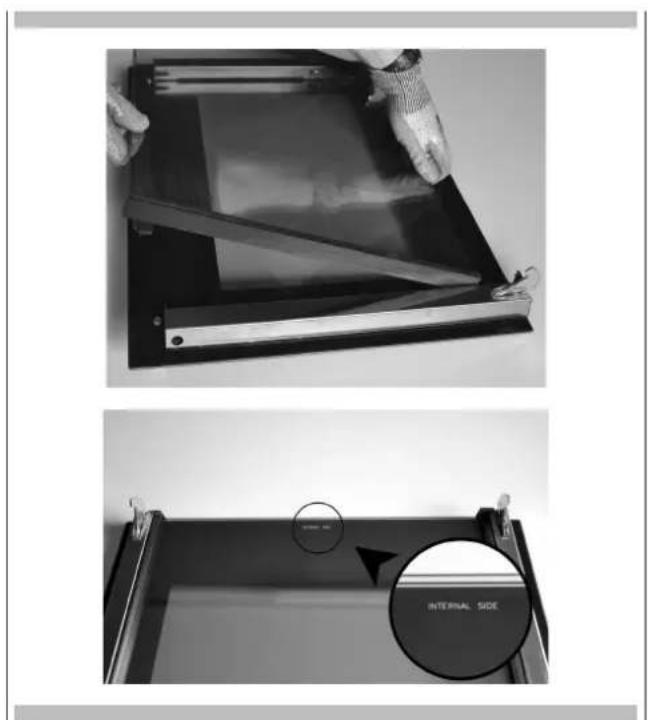
NOTE: a slight gap between the middle panes and the side supports is normal because it allows for the heat expansion of the glass.
6. Place the pack of three glass panes between the two uprights and replace the top strip.
Replacement of the oven light

WARNING
Make sure that:
- The oven and lights are cool and power to the oven has been turned off before replacing the light bulb(s). Failure to do so could result in electrical shock or burns.
- The lenses must be in place when using the oven.
- The lenses serve to protect the light bulb from breaking.
- The lenses are made of glass. Handle carefully to avoid breakage. Broken glass could cause an injury.
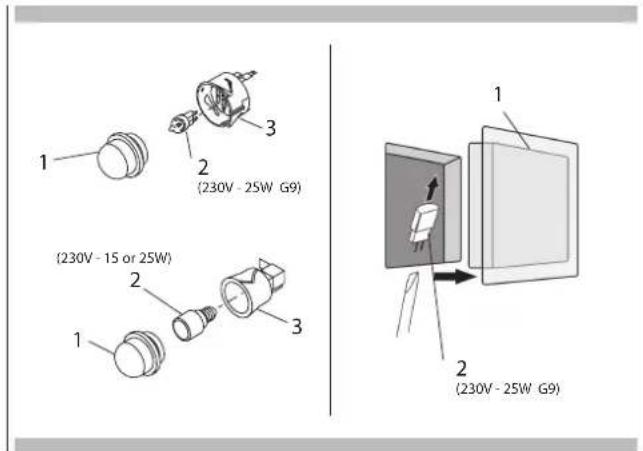
1 Turn off power at the main power supply (fuse or breaker box).
2 Remove the lens (1).
3 Remove the light bulb (2) from its socket (3).
4 Replace the bulb (2) with a new one. Avoid touching the bulb with fingers, as oils from hands can damage the bulb when it becomes hot.
5 Use one with the same Volt and Watt (see figure).
6 Screw the lens (1) back on.
7 Turn power back on at the main power supply (fuse or breaker box).
With either Bake or Convection Bake, poor results can occur for many reasons other than a malfunction of the oven. Check the chart below for causes of the most common problems. Since the size, shape and material of baking utensils directly affect the baking results, the best solution may be to replace old baking utensils that have darkened and warped with age and use.
| Baking Problem Cause | |
| Food browns unevenly - Oven not preheated | - Aluminum foil on oven rack or oven bottom - Baking utensil too large for recipe - Pans touching each other or oven walls |
| Food too brown on bottom - Oven not preheated | - Using glass, dull or darkened metal pans - Incorrect rack position - Pans touching each other or oven walls |
| Food is dry or has shrunk excessively - Oven temperature too low | - Oven not preheated - Oven door opened frequently - Tightly sealed with aluminum foil - Pan size too small |
| Food is baking or roasting too slowly - Oven temperature too low | - Oven not preheated - Oven door opened frequently - Tightly sealed with aluminum foil - Pan size too small |
| Pie crusts do not brown on bottom or have soggy crust - Baking time not long enough | - Using shiny steel pans - Incorrect rack position - Oven temperature is too low |
| Cakes pale, flat and may not be done inside - Oven temperature too low | - Incorrect baking time - Cake tested too soon - Oven door opened too often - Pan size may be too large |
| Cakes high in middle with crack on top - Baking temperature too high | - Baking time too long - Pans touching each other or oven walls - Incorrect rack position - Pan size too small |
| Pie crust edges too brown - Oven temperature too high | - Edges of crust too thin |
Before contacting service, check the following to avoid unnecessary service charges.
| Oven Problem Problem Solving Steps | |
| Other F__Error appears in the display window. | Remove power and turn it back on again after a few seconds. If condition persists, note the code number (in the EVENT LOG list) and contact service. |
| The oven display stays OFF Turn off power at the main power supply (fuse or breaker box). Turn breaker back on. If condition persists, call an authorized service. | |
| Cooling fan continues to run after oven is turned off | The fan turns off automatically when the electronic components have cooled sufficiently. |
| Oven is not heating Check the circuit breaker or fuse box to your house. Make sure there is proper electrical power to the oven. Make sure the oven temperature has been selected. | |
| Oven is not cooking evenly Refer to cooking charts for recommended rack position. Always reduce recipe temperature by 25°F (15°C) when baking with Convection Bake mode. | |
| Oven light is not working properly | Replace or reinsert the light bulb if loose or defective. See Page 34. Avoid touching the bulb glass with bare fingers as finger oil may cause bulbs to burn out prematurely. |
| Oven light stays on Check for obstruction in oven door. Check to see if hinge is bent or door switch broken. | |
| Clock and timer are not working properly | Make sure there is proper electrical power to the oven. See the Clock sections on Page 16. |
| Excessive moisture When using Bake mode, preheat the oven first. Convection Bake and Convection Roast will eliminate any moisture in oven (this is one of the advantages of convection). | |
| Porcelain chips When oven racks are removed and replaced, always tilt racks upward and do not force them to avoid chipping the porcelain. | |
Before contacting service, please check "Troubleshooting." It may save you the cost of a service call.
If you still need help, follow the instructions below. When calling, please know the purchase date and the complete model and serial number of your appliance. This information will help us to better respond to your request.
Service Data Record
For authorized service or parts information see paragraph "WARRANTY for Home Appliances".
For authorized service or parts information see paragraph "WARRANTY for Home Appliances".
For serial tag location see Page 2. Now is a good time to write this information in the space provided below.
Keep your invoice for warranty validation.
Service Data Record
Model Number
Serial Number
Date of Installation or Occupancy
TABLE DES MATIERES PAGE
Hapjes, Biscuits, Cakes
Koekjes (2 to 4rekken) Gistbrood
Slagroomsoesjes
Muffins