
GWS 9100 P Professional - Coffee grinder BOSCH - Free user manual and instructions
Find the device manual for free GWS 9100 P Professional BOSCH in PDF.

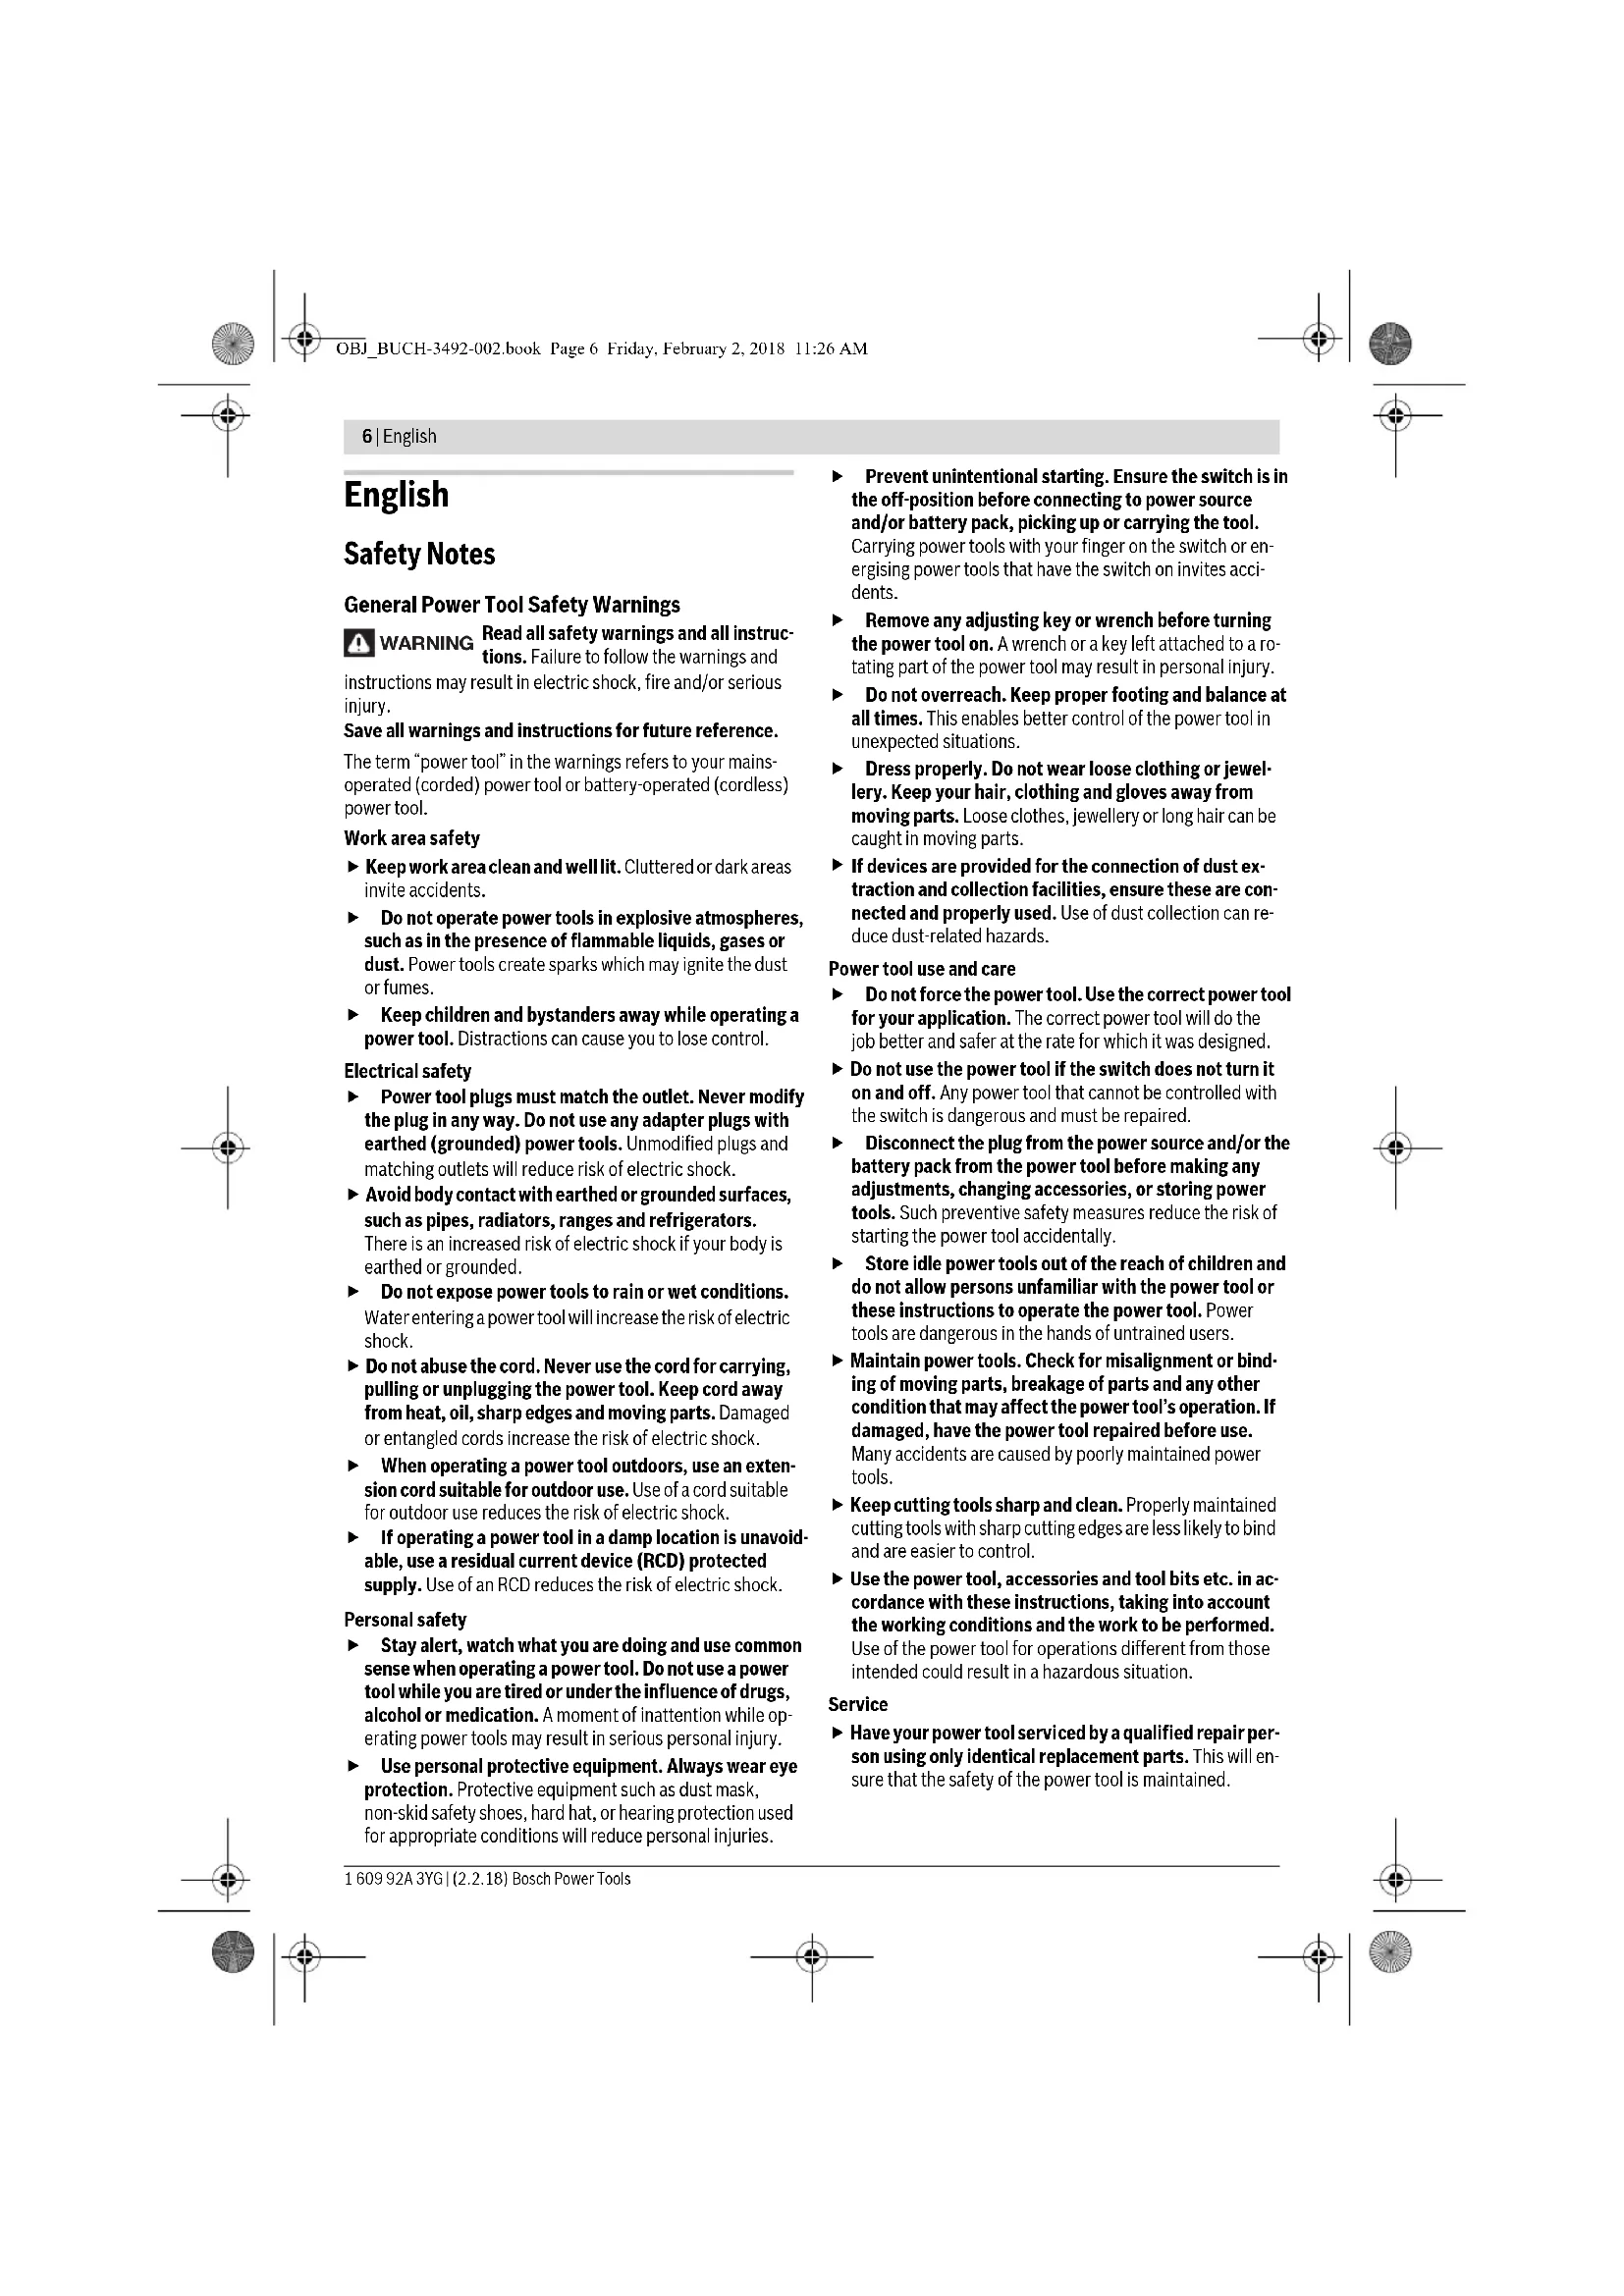


| Product type | Angle grinder |
| Brand | Bosch |
| Model | GWS 9100 P Professional |
| Nominal absorbed power | 900 W |
| Useful output power | 450 W |
| Rated speed | 11,000 rpm |
| Max. wheel diameter | 100 mm |
| Spindle thread | M 10 |
| Max. spindle thread length | 22 mm |
| Weight (with anti-vibration handle) | 2.0 kg |
| Weight (with standard handle) | 1.9 kg |
| Protection class | II (double insulation) |
| Power supply | 230 V ~ 50/60 Hz |
| Main functions | Grinding, cutting, sanding, brushing |
| Maintenance and cleaning | Regularly clean ventilation slots; use a dust extraction device if necessary |
| Safety | Spindle lock, safety switch, protective guard, insulated additional handle |
| Spare parts and repairability | Repair by a qualified Bosch repairer; spare parts available at www.bosch-pt.com |
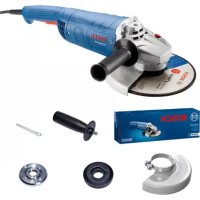
| Included accessories | Protective guard, additional handle, combination wrench |
| Intended use | For cutting, grinding and brushing metals and stones without water |
Frequently Asked Questions - GWS 9100 P Professional BOSCH
User questions about GWS 9100 P Professional BOSCH
0 question about this device. Answer the ones you know or ask your own.
Ask a new question about this device
Download the instructions for your Coffee grinder in PDF format for free! Find your manual GWS 9100 P Professional - BOSCH and take your electronic device back in hand. On this page are published all the documents necessary for the use of your device. GWS 9100 P Professional by BOSCH.
USER MANUAL GWS 9100 P Professional BOSCH
Robert Bosch Power Tools GmbH
70538 Stuttgart
GERMANY
www.bosch-pt.com
160992A3YG(2018.02)0/85

160992A3YG
GWS Professional
HEAVY
DUTY
9-100P|9-115P|9-125P

BOSCH
en Original instructions
fr Notice originale
pt Manual original
Original instruction manual
Original instruction manual
Original instructions

English. Page 6
French. Page 15
Portuguese. Page 23
Chinese. Page 31
Chinese. Page 37
3

Bosch Power Tools 1609 92A 3YG (2.2.18)




4
6|English
English
Safety Notes
General Power Tool Safety Warnings

Read all safety warnings and all instructions. Failure to follow the warnings and
instructions may result in electric shock, fire and/or serious injury.
Save all warnings and instructions for future reference.
The term "power tool" in the warnings refers to your mains-operated (corded) power tool or battery-operated (cordless) power tool.
Work area safety
- Keep work area clean and well lit. Cluttered or dark areas invite accidents. Do not operate power tools in explosive atmospheres, such as in the presence of flammable liquids, gases or dust. Power tools create sparks which may ignite the dust or fumes.
- Keep children and bystanders away while operating a power tool. Distractions can cause you to lose control.
Electrical safety
Power tool plugs must match the outlet. Never modify the plug in any way. Do not use any adapter plugs with earthed (grounded) power tools. Unmodified plugs and matching outlets will reduce risk of electric shock. Avoid body contact with earthed or grounded surfaces, such as pipes, radiators, ranges and refrigerators. There is an increased risk of electric shock if your body is earthed or grounded. Do not expose power tools to rain or wet conditions. Water entering a power tool will increase the risk of electric shock. Do not abuse the cord. Never use the cord for carrying, pulling or unplugging the power tool. Keep cord away from heat, oil, sharp edges and moving parts. Damaged or entangled cords increase the risk of electric shock. When operating a power tool outdoors, use an extension cord suitable for outdoor use. Use of a cord suitable for outdoor use reduces the risk of electric shock. If operating a power tool in a damp location is unavoidable, use a residual current device (RCD) protected supply. Use of an RCD reduces the risk of electric shock.
Personal safety
Stay alert, watch what you are doing and use common sense when operating a power tool. Do not use a power tool while you are tired or under the influence of drugs, alcohol or medication. A moment of inattention while operating power tools may result in serious personal injury. Use personal protective equipment. Always wear eye protection. Protective equipment such as dust mask, non-skid safety shoes, hard hat, or hearing protection used for appropriate conditions will reduce personal injuries.
Prevent unintentional starting. Ensure the switch is in the off-position before connecting to power source and/or battery pack, picking up or carrying the tool. Carrying power tools with your finger on the switch or energising power tools that have the switch on invites accidents. Remove any adjusting key or wrench before turning the power tool on. A wrench or a key left attached to a rotating part of the power tool may result in personal injury. Do not overreach. Keep proper footing and balance at all times. This enables better control of the power tool in unexpected situations. Dress properly. Do not wear loose clothing or jewellery. Keep your hair, clothing and gloves away from moving parts. Loose clothes, jewellery or long hair can be caught in moving parts. If devices are provided for the connection of dust extraction and collection facilities, ensure these are connected and properly used. Use of dust collection can reduce dust-related hazards.
Power tool use and care
Do not force the power tool. Use the correct power tool for your application. The correct power tool will do the job better and safer at the rate for which it was designed. Do not use the power tool if the switch does not turn it on and off. Any power tool that cannot be controlled with the switch is dangerous and must be repaired. Disconnect the plug from the power source and/or the battery pack from the power tool before making any adjustments, changing accessories, or storing power tools. Such preventive safety measures reduce the risk of starting the power tool accidentally. Store idle power tools out of the reach of children and do not allow persons unfamiliar with the power tool or these instructions to operate the power tool. Power tools are dangerous in the hands of untrained users. Maintain power tools. Check for misalignment or binding of moving parts, breakage of parts and any other condition that may affect the power tool's operation. If damaged, have the power tool repaired before use. Many accidents are caused by poorly maintained power tools. Keep cutting tools sharp and clean. Properly maintained cutting tools with sharp cutting edges are less likely to bind and are easier to control. Use the power tool, accessories and tool bits etc. in accordance with these instructions, taking into account the working conditions and the work to be performed. Use of the power tool for operations different from those intended could result in a hazardous situation.
Service
Have your power tool serviced by a qualified repair person using only identical replacement parts. This will ensure that the safety of the power tool is maintained.
Safety Warnings for Angle Grinder
Safety Warnings common for Grinding, Sanding, Wire Brushing or Abrasive Cutting Off Operations
This power tool is intended to function as a grinder, sander, wire brush or cut-off tool. Read all safety warnings, instructions, illustrations and specifications provided with this power tool. Failure to follow all instructions listed below may result in electric shock, fire and/or serious injury. Operations such as polishing are not recommended to be performed with this power tool. Operations for which the power tool was not designed may create a hazard and cause personal injury. Do not use accessories which are not specifically designed and recommended by the tool manufacturer. Just because the accessory can be attached to your power tool, it does not assure safe operation. The rated speed of the accessory must be at least equal to the maximum speed marked on the power tool. Accessories running faster than their rated speed can break and fly apart. The outside diameter and the thickness of your accessory must be within the capacity rating of your power tool. Incorrectly sized accessories cannot be adequately guarded or controlled. Threaded mounting of accessories must match the grinder spindle thread. For accessories mounted by flanges, the arbour hole of the accessory must fit the locating diameter of the flange. Accessories that do not match the mounting hardware of the power tool will run out of balance, vibrate excessively and may cause loss of control. Do not use a damaged accessory. Before each use inspect the accessory such as abrasive wheels for chips and cracks, backing pad for cracks, tear or excess wear, wire brush for loose or cracked wires. If power tool or accessory is dropped, inspect for damage or install an undamaged accessory. After inspecting and installing an accessory, position yourself and bystanders away from the plane of the rotating accessory and run the power tool at maximum no-load speed for one minute. Damaged accessories will normally break apart during this test time. Wear personal protective equipment. Depending on application, use face shield, safety goggles or safety glasses. As appropriate, wear dust mask, hearing protectors, gloves and workshop apron capable of stopping small abrasive or workpiece fragments. The eye protection must be capable of stopping flying debris generated by various operations. The dust mask or respirator must be capable of filtrating particles generated by your operation. Prolonged exposure to high intensity noise may cause hearing loss. Keep bystanders a safe distance away from work area. Anyone entering the work area must wear personal protective equipment. Fragments of workpiece or of a
broken accessory may fly away and cause injury beyond immediate area of operation.
Hold the power tool by insulated gripping surfaces only, when performing an operation where the cutting accessory may contact hidden wiring or its own cord. Cutting accessory contacting a "live" wire may make exposed metal parts of the power tool "live" and could give the operator an electric shock. Position the cord clear of the spinning accessory. If you lose control, the cord may be cut or snagged and your hand or arm may be pulled into the spinning accessory. Never lay the power tool down until the accessory has come to a complete stop. The spinning accessory may grab the surface and pull the power tool out of your control. Do not run the power tool while carrying it at your side. Accidental contact with the spinning accessory could snag your clothing, pulling the accessory into your body. Regularly clean the power tool's air vents. The motor's fan will draw the dust inside the housing and excessive accumulation of powdered metal may cause electrical hazards. Do not operate the power tool near flammable materials. Sparks could ignite these materials. Do not use accessories that require liquid coolants. Using water or other liquid coolants may result in electrocution or shock.
Kickback and related warnings
- Kickback is a sudden reaction to a pinched or snagged rotating wheel, backing pad, brush or any other accessory. Pinching or snagging causes rapid stalling of the rotating accessory which in turn causes the uncontrolled power tool to be forced in the direction opposite of the accessory's rotation at the point of the binding. For example, if an abrasive wheel is snagged or pinched by the workpiece, the edge of the wheel that is entering into the pinch point can dig into the surface of the material causing the wheel to climb out or kick out. The wheel may either jump toward or away from the operator, depending on direction of the wheel's movement at the point of pinching. Abrasive wheels may also break under these conditions. Kickback is the result of power tool misuse and/or incorrect operating procedures or conditions and can be avoided by taking proper precautions as given below.
- Maintain a firm grip on the power tool and position your body and arm to allow you to resist kickback forces. Always use auxiliary handle, if provided, for maximum control over kickback or torque reaction during start-up. The operator can control torque reactions or kickback forces, if proper precautions are taken.
- Never place your hand near the rotating accessory. Accessory may kickback over your hand. Do not position your body in the area where power tool will move if kickback occurs. Kickback will propel the tool in direction opposite to the wheel's movement at the point of snagging.
Use special care when working corners, sharp edges, etc. Avoid bouncing and snagging the accessory. Corners, sharp edges, or bouncing have a tendency to snag the rotating accessory and cause loss of control or kickback. Do not attach a saw chain woodcarving blade or toothed saw blade. Such blades create frequent kickback and loss of control.
Safety warnings specific for Grinding and Abrasive Cutting-Off operations
Use only wheel types that are recommended for your power tool and the specific guard designed for the selected wheel. Wheels for which the power tool was not designed cannot be adequately guarded and are unsafe. The grinding surface of centre depressed wheels must be mounted below the plane of the guard lip. An improperly mounted wheel that projects through the plane of the guard lip cannot be adequately protected. The guard must be securely attached to the power tool and positioned for maximum safety, so the least amount of wheel is exposed towards the operator. The guard helps to protect operator from broken wheel fragments, accidental contact with wheel and sparks that could ignite clothing. Wheels must be used only for recommended applications. For example: do not grind with the side of cut-off wheel. Abrasive cut-off wheels are intended for peripheral grinding; side forces applied to these wheels may cause them to shatter. Always use undamaged wheel flanges that are of correct size and shape for your selected wheel. Proper wheel flanges support the wheel thus reducing the possibility of wheel breakage. Flanges for cut-off wheels may be different from grinding wheel flanges. Do not use worn down wheels from larger power tools. Wheel intended for larger power tool is not suitable for the higher speed of a smaller tool and may burst.
Additional safety warnings specific for abrasive cutting off operations
Do not "jam" the cut-off wheel or apply excessive pressure. Do not attempt to make an excessive depth of cut. Overstressing the wheel increases the loading and susceptibility to twisting or binding of the wheel in the cut and the possibility of kickback or wheel breakage. Do not position your body in line with and behind the rotating wheel. When the wheel, at the point of operation, is moving away from your body, the possible kickback may propel the spinning wheel and the power tool directly at you. When wheel is binding or when interrupting a cut for any reason, switch off the power tool and hold the power tool motionless until the wheel comes to a complete stop. Never attempt to remove the cut-off wheel from the cut while the wheel is in motion otherwise kickback may occur. Investigate and take corrective action to eliminate the cause of wheel binding.
Do not restart the cutting operation in the workpiece. Let the wheel reach full speed and carefully re-enter the cut. The wheel may bind, walk up or kickback if the power tool is restarted in the workpiece. Support panels or any oversized workpiece to minimize the risk of wheel pinching and kickback. Large workpieces tend to sag under their own weight. Supports must be placed under the workpiece near the line of cut and near the edge of the workpiece on both sides of the wheel. Use extra caution when making a "pocket cut" into existing walls or other blind areas. The protruding wheel may cut gas or water pipes, electrical wiring or objects that can cause kickback.
Safety warnings specific for sanding operations
Do not use excessively oversized sanding disc paper. Follow manufacturers recommendations, when selecting sanding paper. Larger sanding paper extending beyond the sanding pad presents a laceration hazard and may cause snagging, tearing of the disc, or kickback.
Safety warnings specific for wire brushing operations
Be aware that wire bristles are thrown by the brush even during ordinary operation. Do not overstress the wires by applying excessive load to the brush. The wire bristles can easily penetrate light clothing and/or skin. If the use of a guard is recommended for wire brushing, do not allow any interference of the wire wheel or brush with the guard. Wire wheel or brush may expand in diameter due to work load and centrifugal forces.
Additional safety warnings
Wear safety goggles.
Use suitable detectors to determine if utility lines are hidden in the work area or call the local utility company for assistance. Contact with electric lines can lead to fire and electric shock. Damaging a gas line can lead to explosion. Penetrating a water line causes property damage or may cause an electric shock. Release the On/Off switch and set it to the off position when the power supply is interrupted, e.g., in case of a power failure or when the mains plug is pulled. This prevents uncontrolled restarting. Do not touch grinding and cutting discs before they have cooled down. The discs can become very hot while working. Secure the workpiece. A workpiece clamped with clamping devices or in a vice is held more secure than by hand.
Products sold in GB only: Your product is fitted with an BS 1363/A approved electric plug with internal fuse (ASTA approved to BS 1362).
If the plug is not suitable for your socket outlets, it should be cut off and an appropriate plug fitted in its place by an authorised customer service agent. The replacement plug should have the same fuse rating as the original plug.
The severed plug must be disposed of to avoid a possible shock hazard and should never be inserted into a mains socket elsewhere.
Product Description and Specifications

Read all safety warnings and all instructions. Failure to follow the warnings and instructions may result in electric shock, fire and/or serious injury.
Intended Use
The machine is intended for cutting, roughing and brushing of metal and stone materials without the use of water. For cutting with bonded abrasives, a special cutting guard (accessory) must be used.
When cutting in stone, provide for sufficient dust extraction. With approved sanding tools, the machine can be used for sanding with sanding discs.
Product Features
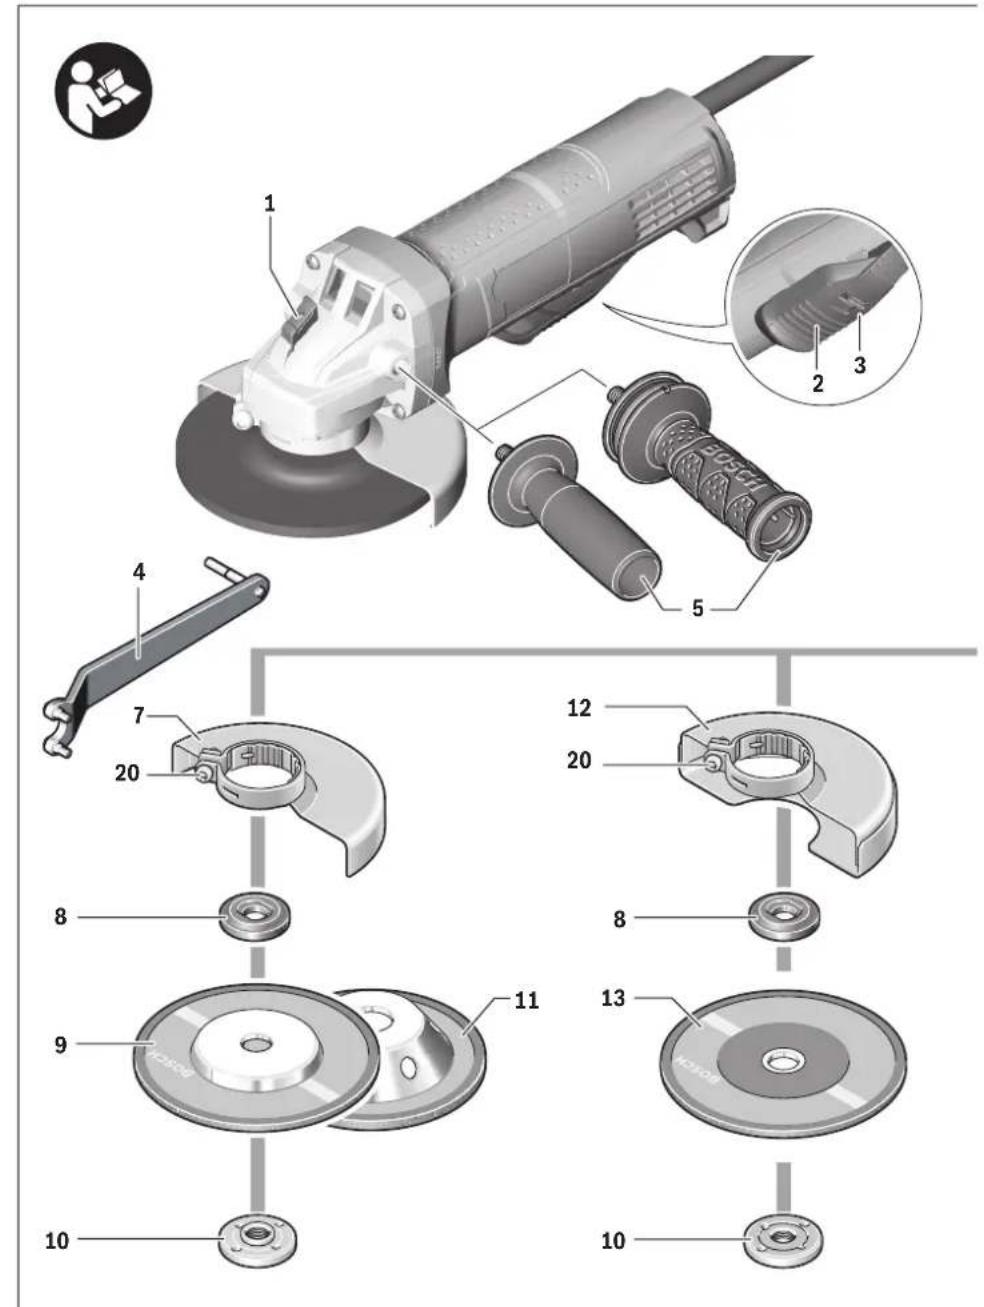
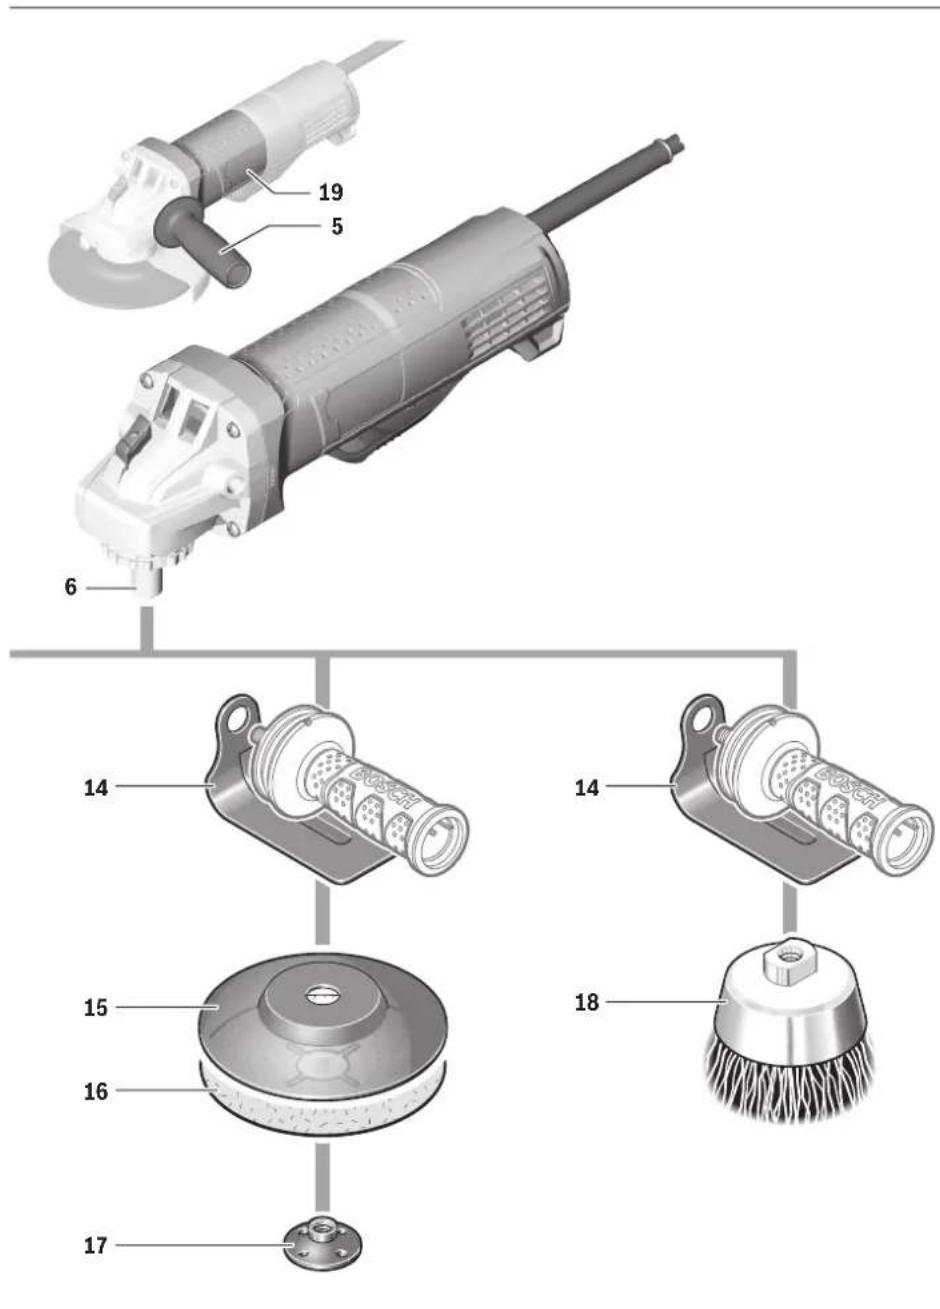
The numbering of the product features refers to the illustration of the machine on the graphics page.
1 Spindle lock button
2 On/Off switch
3 Lock-off button for On/Off switch
4 Combination spanner for M 10/M 14 grinder spindle
5 Auxiliary handle (insulated gripping surface)
6 Grinder spindle
7 Protection guard for grinding
8 Mounting flange
9 Grinding wheel
10 Clamping nut
11 Carbide grinding head
12 Protection guard for cutting*
13 Cutting disc
14 Hand guard
15 Rubber sanding plate
16 Sanding sheet
17 Round nut
18 Cup brush
19 Handle (insulated gripping surface)
20 Locking screw for protection guard
*Accessories shown or described are not part of the standard delivery scope of the product. A complete overview of accessories can be found in our accessories program.
Technical Data
| Angle Grinder | GWS 9-100 P | GWS 9-115 P | GWS 9-125 P |
| Article number | 3601 C96 5..3601 C96 5..3601 C96 5.. | ||
| Rated power input | W | 9 | 0 |
| Output power | W | 4 | 5 |
| Rated speed | min-1 | 11000 | 11000 |
| Grinding disc diameter, max. | mm 100 | 115 | 125 |
| Thread of grinder spindle | M 10 M 14 M 14 | ||
| Thread length (max.) of grinder spindle | mm 22 | 22 | 22 |
| Weight according to EPTA-Procedure 01:2014 | |||
| with vibration-damping auxiliary handle | kg | 2.0 | 2.0 |
| with standard-auxiliary handle | kg | 1.9 | 1.9 |
| Protection class | /II /II /II /II | ||
| The values given are valid for a nominal voltage [U] of 230 V. For different voltages and models for specific countries, these values can vary. | |||
900 900
450450
Assembly
Mounting the Protective Devices
Before any work on the machine itself, pull the mains plug.
Note: After breakage of the grinding disc during operation or damage to the holding fixtures on the protection guard/power tool, the machine must promptly be sent to an after-sales service agent for maintenance. For addresses, see section "After-sales Service and Application Service".
Protection Guard for Grinding
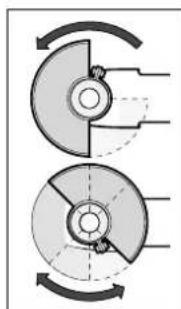
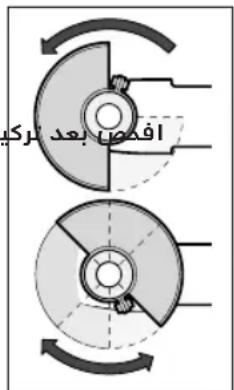
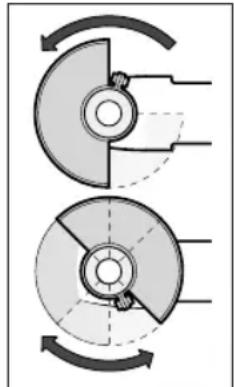
Place the protection guard 7 on the spindle collar. Adapt the position of the protection guard 7 to the requirements of the work step. Lock protection guard 7 by tightening locking screw 20 with combination spanner 4.
Adjust the protection guard 7 in such a manner that sparking is prevented in the direction of the operator.
Note: The encoding keys on the protection guard 7 ensure that only a protection guard that fits the machine type can be mounted.
Protection Guard for Cutting
For cutting with bonded abrasives, always use the protection guard for cutting 12. Provide for sufficient dust extraction when cutting stone.
The protection guard for cutting 12 is mounted in the same manner as the protection guard for grinding 7.
Auxiliary Handle
Operate your machine only with the auxiliary handle 5.
Screw the auxiliary handle 5 on the right or left of the machine head depending on the working method.
Hand Guard
For operations with the rubber sanding plate 15 or with the cup brush/wheel brush/flap disc, always mount the hand guard 14.
The hand guard 14 is fastened with the auxiliary handle 5.
Mounting the Grinding Tools
Before any work on the machine itself, pull the mains plug. Do not touch grinding and cutting discs before they have cooled down. The discs can become very hot while working.
Clean the grinder spindle 6 and all parts to be mounted. For clamping and loosening the grinding tools, lock the grinder spindle with the spindle lock button 1. Actuate the spindle lock button only when the grinder spindle is at a standstill. Otherwise, the machine may become damaged.
Grinding/Cutting Disc
Pay attention to the dimensions of the grinding tools. The mounting hole diameter must fit the mounting flange without play. Do not use reducers or adapters.
When using diamond cutting discs, pay attention that the direction-of-rotation arrow on the diamond cutting disc and the direction of rotation of the machine (see direction-of-rotation arrow on the machine head) agree.
See graphics page for the mounting sequence.
To fasten the grinding/cutting disc, screw on the clamping nut 10 and tighten it with the combination spanner 4.
After mounting the grinding tool and before switching on, check that the grinding tool is correctly mounted and that it can turn freely. Make sure that the grinding tool does not graze against the protection guard or other parts.
Flap Disc
For operations with the flap disc, always mount the hand guard 14.
Rubber Sanding Plate
For operations with the rubber sanding plate 15, always mount the hand guard 14.
See graphics page for the mounting sequence.
Screw on round nut 17 and tighten it with the combination spanner 4.
Cup Brush/Disc Brush
For operations with the cup brush/wheel brush, always mount the hand guard 14.
See graphics page for the mounting sequence.
The cup brush/disc brush must be able to be screwed onto the grinder spindle until it rests firmly against the grinder spindle flange at the end of the grinder spindle threads. Tighten the cup brush/disc brush with an open-end spanner.
Approved Grinding Tools
All grinding tools mentioned in these operating instructions can be used.
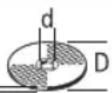
The permissible speed [min^-1] or the circumferential speed [m/s] of the grinding tools used must at least match the values given in the table.
Therefore, observe the permissible rotational/circumferential speed on the label of the grinding tool.
| max. [mm] D b d [min] | [mm] | 13 | [m/s] | ||
| b D | 100 | 6 | 22 | 11000 | 80 |
| 115 | 7 | 22 | 11000 | 80 | |
| 125 | 7 | 22 | 11000 | 80 | |
| D | 100 | - | - | 11000 | 80 |
| 115 | - | - | 11000 | 80 | |
| 125 | - | - | 11000 | 80 | |
| b D | 70 | 30 | M 10 | 11000 | 45 |
| 70 | 30 | M 14 | 11000 | 45 | |
Rotating the Machine Head
Before any work on the machine itself, pull the mains plug.
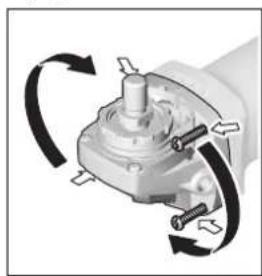
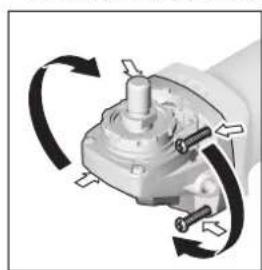
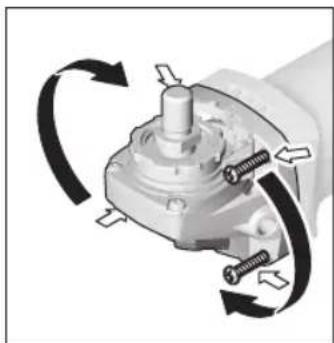
The machine head can be rotated with respect to the machine housing in 90° steps. In this manner, the On/Off switch can be brought into a more convenient position for special working situations, e.g. for left-handed persons. Completely unscrew the four screws. Rotate the
machine head carefully, without removing it from the housing, to the new position. Screw in and tighten the four screws again.
Dust/Chip Extraction
Dust from materials such as lead-containing coatings, some wood types, minerals and metal can be harmful to one's health. Touching or breathing-in the dust can cause allergic reactions and/or lead to respiratory infections of the user or bystanders.
Certain dust, such as oak or beech dust, is considered carcinogenic, especially in connection with wood-treatment additives (chromate, wood preservative). Materials containing asbestos may only be worked by specialists.
- As far as possible, use a dust extraction system suitable for the material.
- Provide for good ventilation of the working place.
- It is recommended to wear a P2 filter-class respirator.
Observe the relevant regulations in your country for the materials to be worked.
Prevent dust accumulation at the workplace. Dust can easily ignite.
Operation
Starting Operation
Observe correct mains voltage! The voltage of the power source must agree with the voltage specified on the nameplate of the machine. Power tools marked with 230 V can also be operated with 220 V. - Products sold in AUS and NZ only: Use a residual current device (RCD) with a rated residual current of 30 mA or less. Hold power tool by insulated gripping surfaces 19 and auxiliary handle 5 only. The accessory may contact hidden wiring or its own cord. Accessory contacting a "live" wire may make exposed metal parts of the power tool "live" and shock the operator.
When operating the machine with power from mobile generators that do not have sufficient reserve capacity or are not equipped with suitable voltage control with starting current
amplification, loss of performance or untypical behavior can occur upon switching on.
Please observe the suitability of the power generator being used, particularly with regard to the mains voltage and frequency.
Switching On and Off
To save energy, only switch the power tool on when using it. To start the machine, first slide the lock-off button 3 to the rear and then push the On/Off switch 2 and keep it pressed. To switch off the machine, release the On/Off switch 2.
Check grinding tools before using. The grinding tool must be mounted properly and be able to move freely. Carry out a test run for at least one minute with no load. Do not use damaged, out-of-centre or vibrating grinding tools. Damaged grinding tools can burst and cause injuries.
Working Advice
Before any work on the machine itself, pull the mains plug. Exercise caution when cutting slots in structural walls; see Section "Information on Structures". - Clamp the workpiece if it does not remain stationary due to its own weight. Do not strain the machine so heavily that it comes to a standstill. After heavily straining the power tool, continue to run it at no-load for several minutes to cool down the accessory. Do not touch grinding and cutting discs before they have cooled down. The discs can become very hot while working. Do not use the power tool with a cut-off stand.
Rough Grinding
Never use a cutting disc for roughing.
The best roughing results are achieved when setting the machine at an angle of 30° to 40°. Move the machine back and forth with moderate pressure. In this manner, the workpiece will not become too hot, does not discolour and no grooves are formed.
Flap Disc
With the flap disc (accessory), curved surfaces and profiles can be worked.
Flap discs have a considerably higher service life, lower noise levels and lower sanding temperatures than conventional sanding sheets.
Cutting Metal
For cutting with bonded abrasives, always use the protection guard for cutting 12.
When cutting, work with moderate feed, adapted to the material being cut. Do not exert pressure onto the cutting disc, tilt or oscillate the machine.
Do not reduce the speed of running down cutting discs by applying sideward pressure.
12 | English
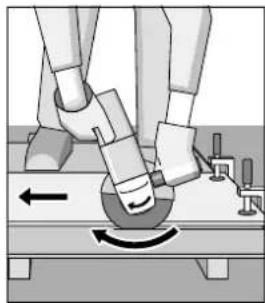
The machine must always work in an upgrinding motion. Otherwise, the danger exists of it being pushed uncontrolled out of the cut.
When cutting profiles and square bar, it is best to start at the smallest cross section.
Cutting Stone
- Provide for sufficient dust extraction when cutting stone. Wear a dust respirator.
The machine may be used only for dry cutting/grinding.
For cutting stone, it is best to use a diamond cutting disc. For cutting especially hard material, e.g., concrete with high pebble content, the diamond cutting disc can overheat and become damaged as a result. This is clearly indicated by circular sparking, rotating with the diamond cutting disc. In this case, interrupt the cutting process and allow the diamond cutting disc to cool by running the machine for a short time at maximum speed with no load.
Noticeably decreasing work progress and circular sparking are indications of a diamond cutting disc that has become dull. Briefly cutting into abrasive material (e.g. lime-sand brick) can resharpen the disc again.
Information on Structures
Slots in structural walls are subject to the Standard DIN 1053 Part 1, or country-specific regulations.
These regulations are to be observed under all circumstances. Before beginning work, consult the responsible structural engineer, architect or the construction supervisor.
Maintenance and Service
Maintenance and Cleaning
Before any work on the machine itself, pull the mains plug. For safe and proper working, always keep the machine and ventilation slots clean. In extreme conditions, always use dust extraction as far as possible. Blow out ventilation slots frequently and install a portable residual current device (PRCD). When working metals, conductive dust can settle in the interior of the power tool. The total insulation of the power tool can be impaired.
Please store and handle the accessory(-ies) carefully.
If the replacement of the supply cord is necessary, this has to be done by Bosch or an authorized Bosch service agent in order to avoid a safety hazard.
After-sales Service and Application Service
Our after-sales service responds to your questions concerning maintenance and repair of your product as well as spare parts. Exploded views and information on spare parts can also be found under:
www.bosch-pt.com
Bosch's application service team will gladly answer questions concerning our products and their accessories.
In all correspondence and spare parts orders, please always include the 10-digit article number given on the nameplate of the product.
Cambodia
Robert Bosch (Cambodia) Co., Ltd
Unit 8BC, GT Tower, 08th Floor, Street 169
Czechoslovakia Blvd, Sangkat Veal Vong
Khan 7 Makara, Phnom Penh
VAT TIN: 100 169 511
Tel.: +855 23 900 685
Tel.: +855 23 900 660
www.bosch.com.kh
People's Republic of China
China Mainland
Bosch Power Tools (China) Co., Ltd.
567, Bin Kang Road
Bin Jiang District 310052
Hangzhou, P.R.China
Tel.: 4008268484
Fax: (0571) 87774502
E-Mail: contact.ptcn@cn.bosch.com
www.bosch-pt.com.cn
HK and Macau Special Administrative Regions
Robert Bosch Co. Ltd
21st Floor, 625 King's Road
North Point, Hong Kong
Customer Service Hotline: +852 2101 0235
Fax:+85225909762
E-Mail: info@hk.bosch.com
www.bosch-pt.com.hk
India
Bosch Service Center
69, Habibullah Road, (Next to PSBB School), T. Nagar
Chennai-600077
Phone: (044) 64561816
Bosch Service Center Rishyamook
85A, Panchkuin Road
New Delhi-110001
Phone: (011) 43166190
Bosch Service Center
- Crystal Bldg., Dr. Annie Besant Road, Worli
Mumbai-400018
Phone: (022) 39569936 / (022) 39569959 /
(022)39569967/(022)24952071
Indonesia
PT Robert Bosch
Palma Tower 10th Floor
Jalan RA Kartini II-S Kaveling 6
Pondok Pinang, Kebayoran Lama
Robert Bosch Middle East FZE - Pakistan Liaison Office
2nd Floor Plaza # 10, CCA Block, DHA Phase 5
Lahore, 54810
Phone: +92(303)4444311
Email: Faisal.Khan@bosch.com
Philippines
Robert Bosch, Inc.
28th Floor Fort Legend Towers,
3rd Avenue corner 31st Street.
Fort Bonifacio, Global City,
1634 Taguig City
Tel.: (632) 8703871
Fax: (632) 8703870
www.bosch-pt.com.ph
Singapore
Powerwell Service Centre Ptd Ltd
Bosch Authorised Service Centre (Power Tools)
4012 Ang Mo Kio Ave 10, #01-02 TECHplace
Singapore 569628
Tel.: 64521770
Fax:64521760
E-Mail: ask@powerwellsc.com
www.powerwellsc.com
www.bosch-pt.com.sg
Thailand
Robert Bosch Ltd.
Liberty Square Building
No. 287, 11th Floor
Silom Road, Bangrak
Bangkok 10500
Tel.: 02 6393111
Fax: 02 2384783
Robert Bosch Ltd., P.O. Box 2054
Bangkok 10501
www.bosch.co.th
Bosch Service - Training Centre
La Salle Tower Ground Floor Unit No. 2
10/11 La Salle Moo 16
Srinakharin Road
Bangkaew, Bang Plee
Samutprakarn 10540
Tel.: 02 7587555
Fax: 027587525
Vietnam
Branch of Bosch Vietnam Co., Ltd in HCMC
Floor 10, 194 Golden Building
473 Dien Bien Phu Street
Ward 25, Binh Thanh District, Ho Chi Minh City
Tel.: (08) 6258 3690
Fax: (08) 62583692
Hotline: (08) 6250 8555
www.bosch-pt.com.vn
Armenia, Azerbaijan, Georgia, Kyrgyzstan, Mongolia, Tajikistan, Turkmenistan, Uzbekistan
TOO "Robert Bosch" Power Tools, After Sales Service
Rayimbek Ave., 169/1
050050, Almaty, Kazakhstan
Service Email: service.pt.ka@bosch.com
Official Website: www.bosch.com, www.bosch-pt.com
Bahrain
Hatem Al Juffali Technical Equipment Establishment.
Kingdom of Bahrain, Setra Highway, Al Aker Area
Phone: +966126971777-311
Fax: +97317704257
Email: h.berjas@eajb.com.sa
Egypt
Unimar
20 Markaz kadmat
Eltagmoa EL Aoul - New Cairo
Phone: +20 2224 76091-95
Phone: +20222478072-73
Fax: +20222478075
Email: adelzaki@unimaregypt.com
Iran
Robert Bosch Iran
3rd Floor, No 3, Maadiran Building
Aftab St., Khodami St., Vanak Sq.
Tehran 1994834571
Phone: +9821-86092057
Iraq
Sahba Technology Group
Al Muthana airport road
Baghdad
Phone: +9647901906953
Phone Dubai: +97143973851
Email: bosch@sahbatechnology.com

Jordan
Roots Arabia-Jordan
Nasser Bin Jameel street, Building 37 Al Rabiah
11194 Amman
Phone: +962 6 5545778
Email: bosch@rootsjordan.com
Kuwait
Al Qurain Automotive Trading Company
Shuwaikh Industrial Area, Block 1, Plot 16, Street 3rd
P.O.Box 164-Safat 13002
Phone: 24810844
Fax: 24810879
E-mail: josephkr@aaalmutawa.com
Lebanon
Tehini Hana & Co. S.A.R.L.
P.O. Box 90-449
Jdeideh
Dora-Beirut
Phone: +961 1 255 211
Email: service-pt@tehini-hana.com
Libya
El Naser for Workshop Tools
Swanee Road, Alfalah Area
Tripoli
Phone: +218 21 481 1184
Oman
Malatan Trading & Contracting LLC
P.O. Box 131
Ruw, 112 Sultanate of Oman
Phone: +968 9988 6794
Email: malatanpowertools@malatan.net
Qatar
International Construction Solutions W L L
P.O.Box 51Doha
Phone:+974 40065458
Fax:+97444538585
Email: csd@icsdoha.com
Saudi Arabia
Juffali Technical Equipment Co. (JTECO)
Kilo 14, Madinah Road, Al Bawadi District
Jeddah 21431
Phone:+96626672222Ext.1528
Fax:+96626676308
Email:roland@eajb.com.sa
Syria
Dallal Establishment for Power Tools
P.O. Box 1030
Aleppo
Phone: +963212116083
Email: rita.dallal@hotmail.com
United Arab Emirates
Central Motors & Equipment LLC, P.O. Box 1984
Al-Wahda Street - Old Sana Building
Sharjah
Phone: +97165932777
Fax: +97165332269
Email: powertools@centralmotors.ae
Yemen
Abualrejal Trading Corporation
Sana'a Zubiery St. Front to new Parliament Building
Phone: +967-1-202010
Fax: +967-1-279029
Email: tech-tools@abualrejal.com
Ethiopia
Forever plc
Kebele 2, 754 BP 4806
Addis Ababa
Phone: +251 111 560 600
Email: foreverplc@ethionet.et
Ghana
C. WOERMANN LTD.
Nsawam Road/Avenor Junction, P.O. Box 1779
Accra
Phone: +233 302 225 141
Kenya
Robert Bosch East Africa Ltd
Mpaka Road P.O.Box 856
00606 Nairobi
Nigeria
Robert Bosch Nigeria Ltd.
52-54 Isaac John Street P.O. Box
GRA Ikeja-Lagos
Republic of South Africa
Customer service
Hotline: (011) 6519600
Gauteng - BSC Service Centre
35 Roper Street, New Centre
Johannesburg
Tel.: (011) 4939375
Fax: (011) 4930126
E-Mail: bsctools@icon.co.za
KZN - BSC Service Centre
Unit E, Almar Centre
143 Crompton Street
Pinetown
Tel.: (031) 7012120
Fax: (031) 7012446
E-Mail: bsc.dur@za.bosch.com
Western Cape - BSC Service Centre
Democracy Way, Prosperity Park
Milnerton
Tel.: (021) 5512577
Fax: (021) 5513223
E-Mail: bsc@zsd.co.za
Syria
Français | 15
Bosch Headquarters
Midrand, Gauteng
Tel.: (011) 6519600
Fax: (011) 6519880
E-Mail: rbsa-hq.pts@za.bosch.com
Tanzania
Diesel & Autoelectric Service Ltd.
117 Nyerere Rd., P.O. Box 70839
Vingunguti 12109, Dar Es Salaam
Phone: +255 222 861 793/794
Australia, New Zealand and Pacific Islands
Robert Bosch Australia Pty. Ltd.
Power Tools
Locked Bag 66
Clayton South VIC 3169
Customer Contact Center
Inside Australia:
Phone: (01300) 307044
Fax: (01300) 307045
Inside New Zealand:
Phone: (0800) 543353
Fax: (0800) 428570
Outside AU and NZ:
Phone: +61 3 95415555
www.bosch-pt.com.au
www.bosch-pt.co.nz
Disposal
The machine, accessories and packaging should be sorted for environmental-friendly recycling.

Do not dispose of power tools into household waste!
Subject to change without notice.
French
Robert Bosch Morocco SARL
- Rue Lieutenant Mahmoud Mohamed
20300 Casablanca
E-Mail: sav.outillage@ma.bosch.com
Tunisia
Robert Bosch Tunisia SARL
Angle grinder GWS 9-100 P GWS 9-115 P GWS 9-125 P
12 7
1wneovnwnnnnnae 5
5 5
nntaunna
15 14
nraia 14 nnnnnnnaa 5
nannnnnnnnnnnn
A aannnnn
ywnnnaaunnnn 6ua=nnauuun 1 nauanunuaonnuuynnnwn
y

| [mm] | [mm] | [mm] / [mm] | |||
| D | b | d | [mm/ mm] | ||
| b | 100 | 6 | 22 | 11000 | 80 |
| 115 | 7 | 22 | 11000 | 80 | |
| 125 | 7 | 22 | 11000 | 80 | |
| D | 100 | - | - | 11000 | 80 |
| 115 | - | - | 11000 | 80 | |
| 125 | - | - | 11000 | 80 | |
| b | 70 | 30 | M 10 | 11000 | 45 |
| 70 | 30 | M 14 | 11000 | 45 | |




Wear protective goggles.
Safety Warning for Angle Grinder
Common safety warnings for grinding, sanding, wire brushing, or cutting-off operations
This power tool is intended to function as a grinder, sander, wire brush, or cut-off tool. Read all safety warnings, instructions, illustrations, and specifications provided with this power tool. Failure to follow the instructions listed below may result in electric shock, fire, and/or serious injury. This power tool is not intended for polishing. Operating in a manner not intended for this power tool may create a hazard and cause personal injury. Do not use accessories not specifically designed and recommended by the tool manufacturer. Just because an accessory can be attached to your power tool, it does not assure safe operation. The rated speed of the accessory must be at least equal to the maximum speed marked on the power tool. Accessories running faster than their rated speed can fly apart. The outside diameter and thickness of your accessory must be within the rated capacity of your power tool. Incorrectly sized accessories cannot be adequately guarded or controlled. The threaded mounting of accessories must match the thread of the grinder spindle. For accessories mounted by flanges, the arbor hole of the accessory must fit the locating diameter of the flange.
The accessory must fit snugly onto the spindle of the tool. Accessories that do not fit properly on the tool's arbor will run out of balance, vibrate excessively, and may cause loss of control. Do not use damaged accessories. Before each use, inspect accessories such as abrasive wheels for chips and cracks, backing pads for tears or excessive wear, and wire brushes for loose or broken wires. If the power tool or accessory is dropped, inspect for damage or install an undamaged accessory. After inspecting and installing an accessory, position yourself and bystanders away from the plane of the rotating accessory and run the power tool at maximum no-load speed for one minute. Damaged accessories will normally break apart during this test. Wear personal protective equipment. Depending on the application, use face shield, safety goggles, or safety glasses. As appropriate, wear a dust mask, hearing protectors, gloves, and workshop apron capable of stopping small abrasive or workpiece fragments. Eye protection must be capable of stopping flying debris generated by various operations. The dust mask or respirator must be capable of filtering particles generated by your operation. Prolonged exposure to high-intensity noise may cause hearing loss. Keep bystanders at a safe distance away from the work area. Anyone entering the work area must wear personal protective equipment. Fragments of workpiece or of a broken accessory may fly away and cause injury beyond the immediate area of operation. Hold the power tool by insulated gripping surfaces only, when performing an operation where the cutting accessory may contact hidden wiring or its own cord. Cutting accessory contacting a "live" wire may make exposed metal parts of the power tool "live" and shock the operator. Keep the cord away from the rotating accessory. If you lose control, the cord may be cut or snagged and your hand or arm may be pulled into the spinning accessory. Never lay the power tool down until the accessory has come to a complete stop. The spinning accessory may grab the surface and pull the power tool out of your control.
62|Vietnamese
Do not operate the power tool while carrying it at your side. Accidental contact with the spinning accessory could snag your clothing, pulling the accessory into your body. Regularly clean the power tool's ventilation slots. The motor's fan will draw dust inside the housing and excessive accumulation of metal dust may cause electrical hazards. Do not operate the power tool near flammable materials. Sparks could ignite these materials. Do not use accessories that require liquid coolants. Using water or other liquid coolants may result in electrocution or electric shock.
Additional safety warnings

Wear safety glasses.
Use suitable detection equipment to determine if there are any underground utility lines in the work area, or contact the local utility company for assistance. Do not touch live electrical wires as this can cause fire and electric shock. Damaging gas lines when digging can cause explosion. Puncturing water lines can damage property or create a risk of electric shock. The On/Off switch must be turned off and the tool moved to a new position only when the power supply is disconnected, for example, during a power outage or when the plug is pulled out. This prevents the tool from starting unexpectedly. Do not touch the grinding disc or cutting disc until they have cooled down. The disc can become very hot during operation. Clamp the workpiece securely. A workpiece clamped with a clamping device or vise is more secure than holding it by hand.
Wire Brush / Cup Brush
Always attach the guard 14 when using a wire brush or cup brush.
See the figure page for assembly steps.
The wire brush or cup brush must be screwed fully onto the spindle thread until it sits firmly against the spindle flange. Tighten the wire brush or cup brush with a two-hole wrench.
Approved Grinding Tools
All grinding tools mentioned in the instruction pages can be used.
The permissible speed [rpm] or the peripheral speed [m/s] of the grinding tool must be at least equal to the values given in the table. Therefore, pay attention to the speed/peripheral speed limit marked on the grinding tool's label.
| tõi da. [mm] | [mm] | [met/ giày] | ||||
| D | b | d | [v/p] | |||
| b | 100 | 6 | 22 | 11000 | 80 | |
| 115 | 7 | 22 | 11000 | 80 | ||
| 125 | 7 | 22 | 11000 | 80 | ||
| D | 100 | - | - | 11000 | 80 | |
| 115 | - | - | 11000 | 80 | ||
| 125 | - | - | 11000 | 80 | ||
| b | 70 | 30 | M | 10 | 11000 | 45 |
| 70 | 30 | M | 14 | 11000 | 45 | |
Rotating the Tool Head
Before performing any work on the machine, pull the power plug out of the outlet.
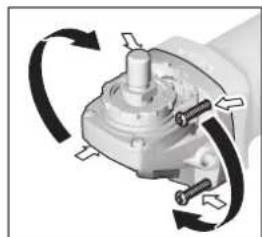
Using the machine housing as a reference, the tool head can be rotated to the right or left in 90° increments. This way, the On/Off switch can be moved to a more convenient position for specific situations,
for example, for left-handed users.
Remove all four screws. Carefully rotate the tool head to the new position without letting it fall off the housing. Insert the screws and tighten all four screws again.
Dust Extraction
Dust from materials coated with lead-based paint, some types of wood, minerals, and metals can be hazardous to health. Contact with or inhalation of this dust can cause allergic reactions and/or respiratory infections.
Some specific types of dust, such as oak or beech dust, are considered carcinogenic, especially when associated with wood treatment additives (chromate, wood preservatives).
66 | Vietnamese
Chromate, wood preservatives). Dust extraction should be used for professional processing of materials containing asbestos.
Keep as far away as possible, use a suitable extraction system for the material type. - Ensure good ventilation in the work area. - It is recommended to wear a respirator with P2 filter.
Unit 8BC, GT Tower, 8th Floor,
169 Street, Tiep Khac Blvd, Sangkat Veal Vong,
Khan 7 Makara, Phnom Penh
VAT TIN: 100 169 511
Tel.: +855 23 900 685
Tel.: +855 23 900 660
www.bosch.com.kh
Disposal
Machines, accessories, and packaging should be sorted for environmentally friendly recycling.

Do not dispose of power tools in household waste!
Subject to change without notice.
wgc 2014
+21671427496/879:cJl
+21671428621:UuS
sav.outillage@tn.bosch.com:gjgJL
aJdJI aJdJI JloJX
Central Motors & Equipment LLC
1984:JU
LlU 00-0gEJw
aJlU
+97165932777:
+97165332269:UuS

Roots Arabia-Jordan
+96265545778:
bosch@rootsjordan.com
Malatan Trading & Contracting LLC
+968 99886794:
malatanpowertools@malatan.net
International Construction Solutions W L L
+97440065458:
+974 4453 8585
__SUPPIMER__
__SUPPIMER__
.


[pa]
[100]
[duj/uo] [daes]
80 11000
80 11000
80 11000
d
22
22
22
0
6
<100
-5
A. | Δj | and j [0,1]
4
__SUPPIMER__
Speed [m/s] and rotational speed [min-1] are given in the diagram. The values are valid for the specified operating conditions.
| [mm] | max [mm] | ||||
| -1[m/s] | Dbd[min] | ||||
| 80 | 11000 | 22 | 6 | 100 | |
| 80 | 11000 | 22 | 7 | 115 | |
| 80 | 11000 | 22 | 7 | 125 | |
| 80 | 11000 | - | - | 100 | |
| 80 | 11000 | - | - | 115 | |
| 80 | 11000 | - | - | 125 | |
| 45 | 11000 | M 10 | 30 | 70 | |
| 45 | 11000 | M 14 | 30 | 70 | |
__SUPPIMER__
EPTA-Procedure 01:2014 |J|J|J|J|J|
II/ II/ 1
1
7 12 12




Bosch Power Tools 1609 92A 3YG (2.2.18)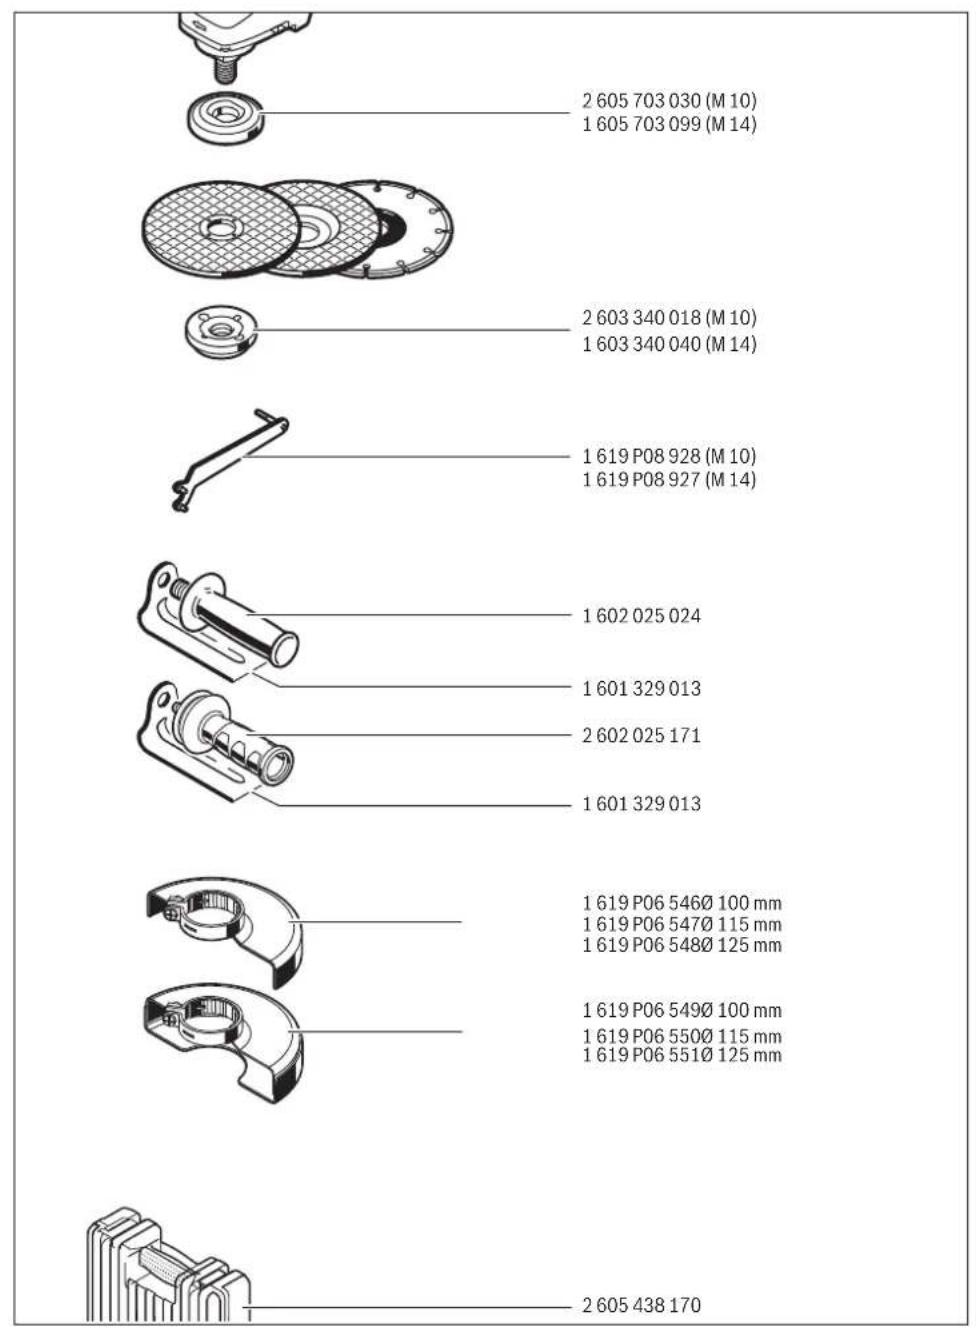




- ENGLISH
- SAFETY NOTES
- GENERAL POWER TOOL SAFETY WARNINGS
- WORK AREA SAFETY
- ELECTRICAL SAFETY
- PERSONAL SAFETY
- POWER TOOL USE AND CARE
- SERVICE
- SAFETY WARNINGS FOR ANGLE GRINDER
- KICKBACK AND RELATED WARNINGS
- SAFETY WARNINGS SPECIFIC FOR GRINDING AND ABRASIVE CUTTING-OFF OPERATIONS
- ADDITIONAL SAFETY WARNINGS SPECIFIC FOR ABRASIVE CUTTING OFF OPERATIONS
- SAFETY WARNINGS SPECIFIC FOR SANDING OPERATIONS
- SAFETY WARNINGS SPECIFIC FOR WIRE BRUSHING OPERATIONS
- ADDITIONAL SAFETY WARNINGS
- PRODUCT DESCRIPTION AND SPECIFICATIONS
- INTENDED USE
- PRODUCT FEATURES
- ASSEMBLY
- MOUNTING THE PROTECTIVE DEVICES
- PROTECTION GUARD FOR GRINDING
- PROTECTION GUARD FOR CUTTING
- AUXILIARY HANDLE
- HAND GUARD
- MOUNTING THE GRINDING TOOLS
- GRINDING/CUTTING DISC
- FLAP DISC
- RUBBER SANDING PLATE
- CUP BRUSH/DISC BRUSH
- APPROVED GRINDING TOOLS
- ROTATING THE MACHINE HEAD
- DUST/CHIP EXTRACTION
- OPERATION
- STARTING OPERATION
- SWITCHING ON AND OFF
- WORKING ADVICE
- ROUGH GRINDING
- CUTTING METAL
- CUTTING STONE
- INFORMATION ON STRUCTURES
- MAINTENANCE AND SERVICE
- MAINTENANCE AND CLEANING
- AFTER-SALES SERVICE AND APPLICATION SERVICE
- WWW.BOSCH-PT.COM
- CAMBODIA
- PEOPLE'S REPUBLIC OF CHINA
- CHINA MAINLAND
- HK AND MACAU SPECIAL ADMINISTRATIVE REGIONS
- INDIA
- INDONESIA
- PHILIPPINES
- SINGAPORE
- THAILAND
- VIETNAM
- ARMENIA, AZERBAIJAN, GEORGIA, KYRGYZSTAN, MONGOLIA, TAJIKISTAN, TURKMENISTAN, UZBEKISTAN
- BAHRAIN
- EGYPT
- IRAN
- IRAQ
- JORDAN
- KUWAIT
- LEBANON
- LIBYA
- OMAN
- QATAR
- SAUDI ARABIA
- SYRIA
- UNITED ARAB EMIRATES
- YEMEN
- ETHIOPIA
- GHANA
- KENYA
- NIGERIA
- REPUBLIC OF SOUTH AFRICA
- GAUTENG - BSC SERVICE CENTRE
- KZN - BSC SERVICE CENTRE
- WESTERN CAPE - BSC SERVICE CENTRE
- BOSCH HEADQUARTERS
- TANZANIA
- AUSTRALIA, NEW ZEALAND AND PACIFIC ISLANDS
- DISPOSAL
- FRENCH
- TUNISIA
- NNTAUNNA
- NANNNNNNNNNNNN
- Y
- SAFETY WARNING FOR ANGLE GRINDER
- VIETNAMESE
- WIRE BRUSH / CUP BRUSH
- ROTATING THE TOOL HEAD
- DUST EXTRACTION
- AJDJI AJDJI JLOJX
Brand : BOSCH
Model : GWS 9100 P Professional
Category : Coffee grinder