
IR140 - Radio DENVER - Free user manual and instructions
Find the device manual for free IR140 DENVER in PDF.
| Product type | Internet Radio |
| Brand | Denver |
| Model | IR-140 |
| Dimensions (L x D x H) | 185 x 100 x 114 mm |
| Power supply | 5 V ⎓ 1 A (via mains adapter 100-240 V~ 50/60 Hz) |
| Built-in battery | Lithium-ion 3.7 V 2000 mAh |
| Display | 2.4-inch colour TFT |
| Wireless connectivity | WiFi IEEE 802.11b/g/n (2.412-2.484 GHz), Bluetooth V4.2 BR/EDR |
| Bluetooth range | 10 m (line of sight) |
| WiFi security protocol | WEP / WPA / WPA2 |
| Audio outputs | 3.5 mm headphone jack, 3.5 mm line out |
| Main functions | Internet radio, Bluetooth streaming, UPnP/DLNA, alarm, station presets |
| Alarm / Wake-up | Yes, with source selection and snooze |
| Presets | 4 direct buttons + favourites list |
| Operating temperature | 0 to 40 °C |
| Box contents | Radio, USB cable with mains adapter, user manual |
| Power consumption (no charging) | ≤ 0.1 W |
| Maintenance and cleaning | Clean with a soft dry cloth. Do not use abrasive products. |
| Safety | Read the safety instructions carefully. Do not open, avoid water and heat. |
Frequently Asked Questions - IR140 DENVER
User questions about IR140 DENVER
0 question about this device. Answer the ones you know or ask your own.
Ask a new question about this device
Download the instructions for your Radio in PDF format for free! Find your manual IR140 - DENVER and take your electronic device back in hand. On this page are published all the documents necessary for the use of your device. IR140 by DENVER.
USER MANUAL IR140 DENVER
Please read the safety instructions carefully before using the product for the first time and keep the instructions for future reference.
- This product is not a toy. Keep it out of reach of children.
- Keep product out of the reach of children and pets to avoid chewing and swallowing.
- Product operating and storage temperature is from 0 degree Celsius to 40 degree Celsius. Under and over this temperature might affect the function.
- Never open the product. Touching the inside electrics can cause electric shock. Repairs or service should only be performed by qualified personnel.
- Do not expose to heat, water, moisture, direct sunlight!
- Please protect your ears against loud volume. Loud volume can damage your ears and risk in hearing loss.
- Bluetooth wireless technology operates within a range of about 10m (30 feet). The maximum communication distance may vary depending on the presence of obstacles (people, metal objects, walls, etc.) or the electromagnetic environment.
- Microwaves emitting from a Bluetooth device may affect the operation of electronic medical devices.
- The unit is not waterproof. If water or foreign objects enter the unit, it may result in fire or electric shock. If water or a foreign object enters the unit, stop use immediately.
- Only charge with supplied Adaptor. The direct plug-in adapter is used as disconnect device, the disconnect device shall remain readily operable. So, make sure there is space around the power outlet for easy access.
- Do not use non original accessories together with the product as this can make the product functionality abnormal.
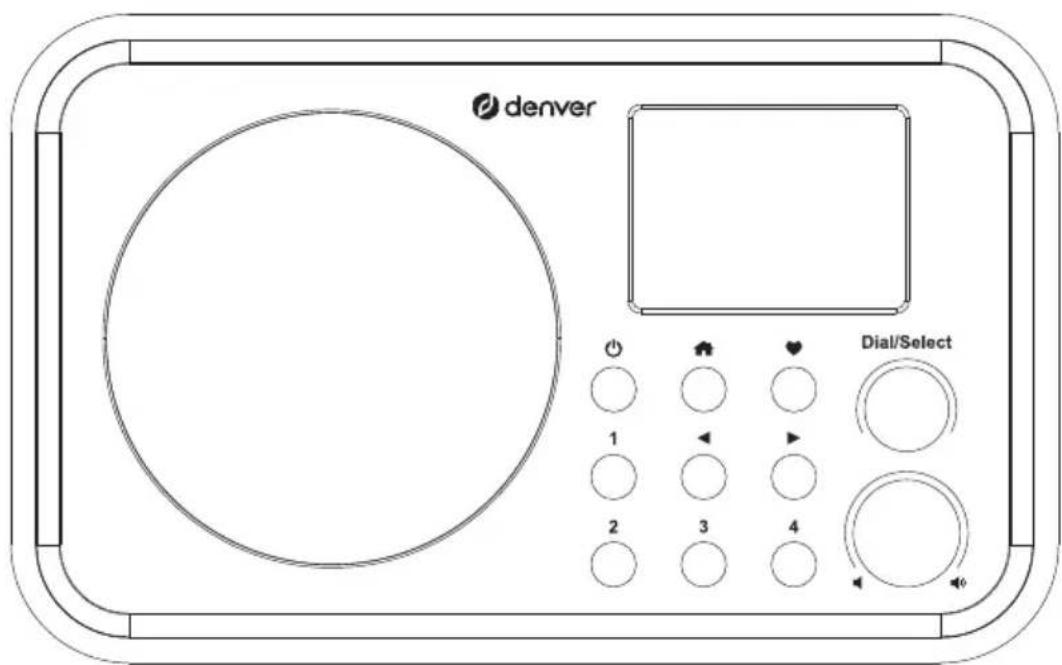
Location of the controls
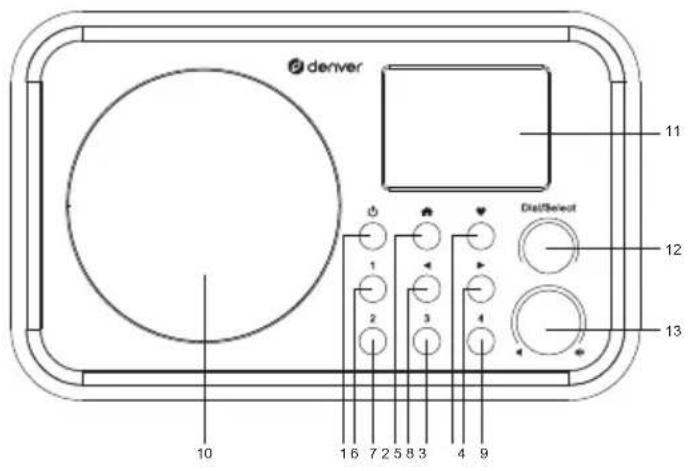
- ①
Press and hold this to turn on/off the radio.
Press this button shortly to activate the radio / turn it to standby. (Standby is only enabled when the radio is connected to the mains. This option will be disabled when the internal battery is used.)
2.
Press this button to enter the main menu / return to the main screen.
3.
Press and hold this button to preset a particular station.
Press this button to recall the favorite list.
4.
Right cursor/enter the edit menu under the Favorite list / view the big clock, radio and info under the main screen.
5.
Back to previous menu/left cursor
6-9. Preset button 1-4
For presetting the top four favorite stations
Press and hold to preset the station
Press this button briefly to recall the station
-
Speaker
-
TFT color screen 2.4"
-
Dial / Select knob
Rotate this knob to scroll up/down in the menu. Push this knob to confirm/select menu options. Push this knob to pause/resume playback of the radio channel.
13.
Rotate this knob to adjust the volume level.
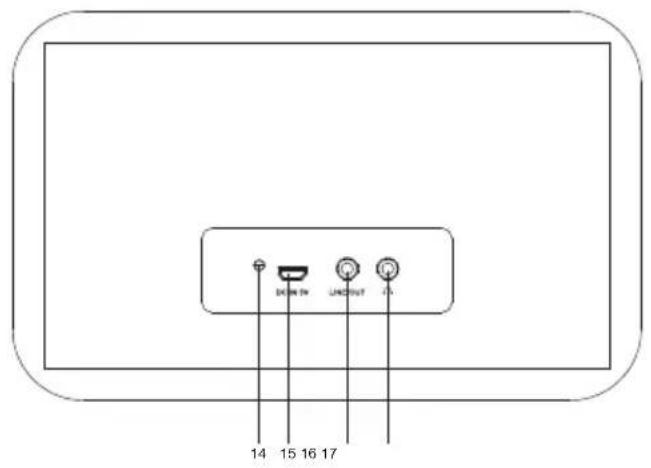
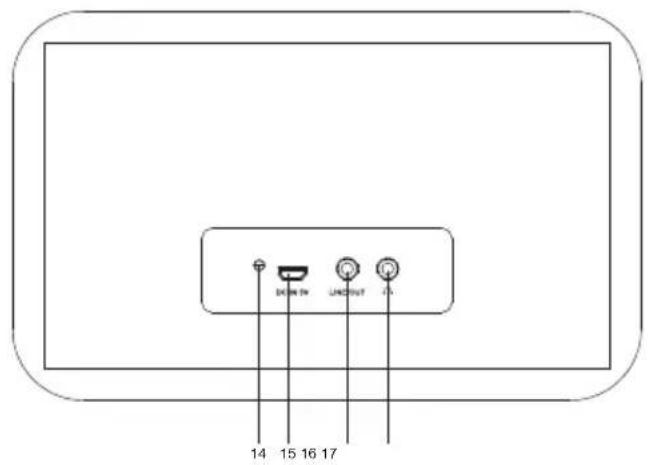
- LED indicator for battery charging status
- DC IN Jack
- Line output jack 3.5 mm
- Earphone jack 3.5mm
How to input password for your wireless network
Use the [Dial/Select] knob to scroll through the characters, highlight it and press the [ ] button to confirm and enter the next character. When the last character of the password is reached, press the [Dial/Select] knob to confirm and complete the entry.
Note: The password is case sensitive.
Getting started
The radio is powered by the built-in lithium battery. A USB cable and power adapter are supplied in the product package.
Press and hold the [ button to turn on the radio.
Press and hold the same button to turn off the radio.
The standby mode is enabled only when the mains is connected. So, to be able to make use of the alarm clock function, the mains should be connected.
Connect the mains to the radio, and press and hold the [ ] button to turn it on. Pressing the [ ] button again will put the radio into standby.
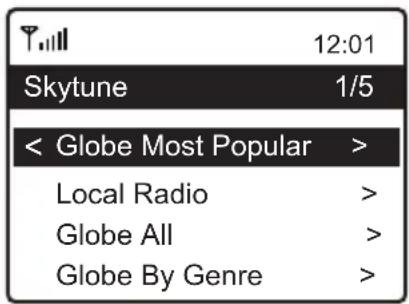
In the main menu, select Internet Radio; the following options will be displayed:
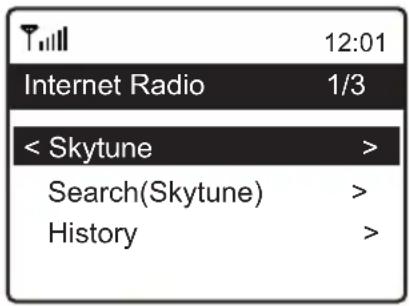
Skytune
Select Skytune to start enjoying thousands of radio stations all over the world. You can filter your search by region, music genre and talks.
You can use Local Radio for quick access to the stations that are available in your local area through your internet connection.
Music streaming
- You can start streaming music, once the UPnP/DLNA compatible server is configured to share media files with your radio.
- In the main menu, select Media Centre, and select UPnP.
- It may take a few seconds for the radio to complete the scan for available UPnP servers. If no UPnP servers are found, the screen will display Empty List.
- After completing a successful scan, select your UPnP server.
- The screen will display the media categories available from the UPnP server, e.g. "Music", "Playlists" etc.
- Select the media files that you wish to play.
You can set the mode of playback under Configuration >Playback setup.
Bluetooth playback
- Push the Menu button to display the selection menu for the different operating modes.
- Use the up/down button to select the operating mode Bluetooth and push the Dial/Select knob.
- Switch on the Bluetooth device to which you want to connect the radio, and activate the pairing mode on that device. The device scans for Bluetooth devices in the reception range.
- When the radio is found, the name IR-140-XXXX is displayed on your Bluetooth device (XXXX is the identification code of your radio).
- Select the radio on your Bluetooth device.
- Start playback on your Bluetooth device.
- Playback now takes place through the radio.
Setting the alarm
Important!
In order to use the alarm clock function, the radio should be connected to the mains, in order to have the standby mode enabled. When the radio is turned on, press the [ ] button to put the radio into standby. Standby is disabled when the radio is using the internal battery.
- Select Alarm from the main menu.
- Select either Alarm 1 or Alarm 2, select Turn on to activate the alarm.
- Follow the instructions of the alarm wizard to set the alarm.
- The wizard will guide you through the following settings:
Time - Set the time for the alarm
Sound - You can select Wake to Tone, My Favoriteas the alarm source.
Repeat - You can schedule the alarm as desired -Every day, Once or multiple days.
Alarm Volume - Adjust the volume of the alarm as desired by rotating the [Dial/Select] knob.
Alarm duration - Set the duration of the alarm from the preset options ranging from 30 to 180 minutes. The radio will be turned to standby when the selected duration has elapsed.
- After the above settings are completed, press the button [ ] to exit the menu and to ensure that the alarm is turned on. When the alarm is active, the alarm icon appears on the display.
Stopping the alarm / activating the snooze function
When the alarm sounds, press the [ button to stop the alarm or press the [Dial/Select] knob to activate the snooze function.
When the Snooze function is activated, the alarm is muted, and sounds again after 9 minutes. You can repeat the process multiple times.
To stop the snooze function, press the [ button.
Technical Specification
| Model | IR-140 |
| Power input | 5V ≈ 1A |
| Power voltage | 100-240V~50/60Hz |
| Wireless Network | IEEE802.11b/g/n |
| Wireless network frequency | 2.412 - 2.484 GHZ |
| Wireless transmission power | Rated transmission power 14 dBm (72.2 Mbps); 20 dBm (11b mode) |
| Security Protocol | WEP/WPA/WPA2 |
| Bluetooth version | V4.2 BR/EDR compliant |
| Bluetooth frequency | 2.400-2.485 GHz |
| Bluetooth range | 10 meters (line of sight) |
| Built-in Lithium-ion battery | 3.7V 2000 mAh |
| Audio output | Stereo earphone jack 3.5 mm Stereo audio out |
| Dimensions of the unit | 185 x 100 x 114 mm (L x D x H) |
Remark: Specification may vary without notice
In the box
- Internet radio
- USB cable with power adapter
- User manual
| Manufacturer's name or trade mark, commercial registration number and address | Shenzhen Fushigang Technology Co., Ltd 91440300699086484H Southeast 9/F, Southeast 7/F, Building 1 Baotang High-tech Park, Tangwei Community, Fenghuang Street Guangming District 518106 Shenzhen, Guangdong Province PEOPLE'S REPUBLIC OF CHINA |
| Model identifier | AS0601A-0501000EUU |
| Input voltage | 100-240V |
| Input AC frequency | 50/60Hz |
| Output voltage | 5V |
| Output current | 1A |
| Output power | 5W |
| Average active efficiency | ≥ 73.62% |
| Efficiency at low load (10%) | NA |
| No-load power consumption | ≤ 0.1W |
WEEE and recycling

European legislation does not allow the disposal of old or defective electric or electronic devices with household waste. Dispos of your product by returning it to a municipal collection point for recycling. This system is financed by the industry and ensures environmentally responsible disposal and the recycling of valuable raw materials.
Please notice - All products are subject to change without any notice. We take reservations for errors and omissions in the manual.
ALL RIGHTS RESERVED, COPYRIGHT DENVER A/S

denver
www.denver.eu

Electric and electronic equipment and included batteries contains materials, components and substances that can be hazardous to your health and the environment, if the waste material (discarded electric and electronic equipment and batteries) is not handled correctly.
Electric and electronic equipment and batteries is marked with the crossed out trash can symbol, seen above. This symbol signifies that electric and electronic equipment and batteries should not be disposed of with other household waste, but should be disposed of separately.
As the end user it is important that you submit your used batteries to the appropriate and designated facility. In this manner you make sure that the batteries are recycled in accordance with legislature and will not harm the environment.
All cities have established collection points, where electric and electronic equipment and batteries can either be submitted free of charge at recycling stations and other collection sites, or be collected from the households. Additional information is available at the technical department of your city.
Hereby, Denver A/S declares that the radio equipment type IR-140 is in compliance with Directive 2014/53/EU. The full text of the EU declaration of conformity is available at the following internet address:
www.denver.eu and then click the search ICON on topline of website. Write model number: IR-140. Now enter product page, and RED directive is found under downloads/other downloads.
Operating Frequency Range: 2.412-2.484 GHz
Max Output Power: 30W / 3W RMS
DENVER A/S
Omega 5A, Soeften
DK-8382 Hinnerup
Denmark
www.facebook.com/denver.eu
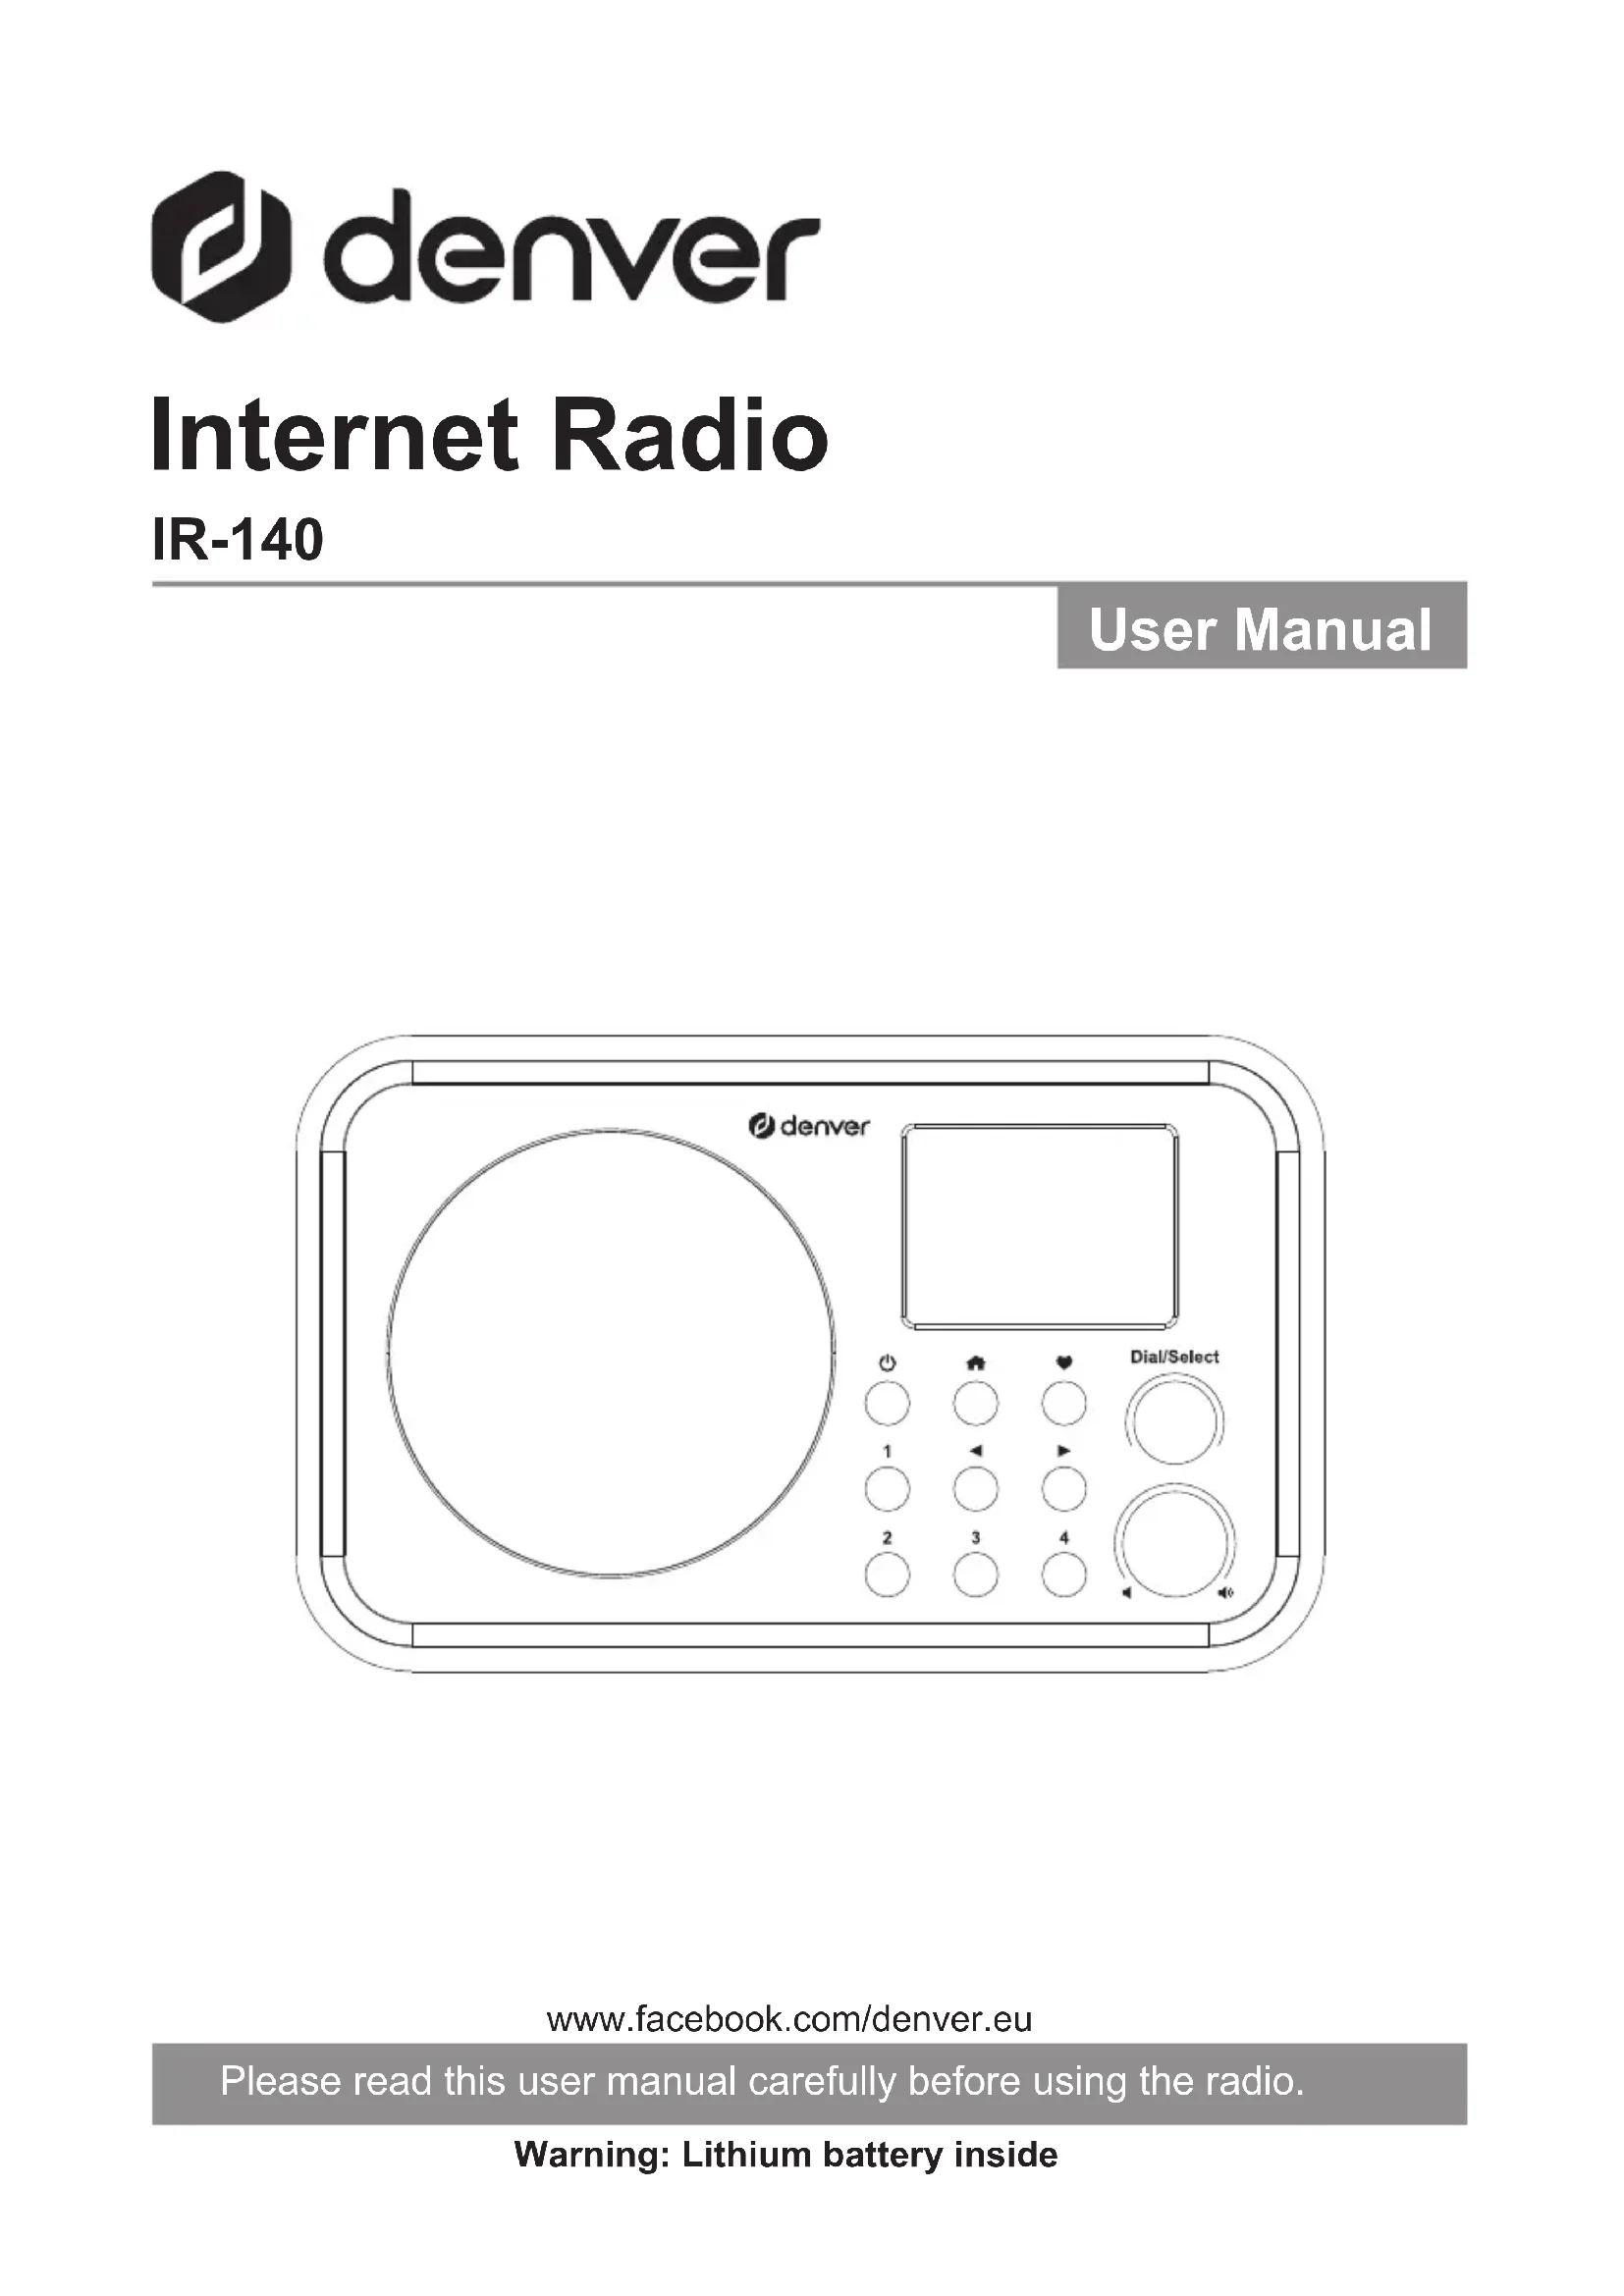
Internetradio
IR-140
Bedienungsanleitung
Sicherheitshinweise
Location of the controls
- ⑥


Brand : DENVER
Model : IR140
Category : Radio