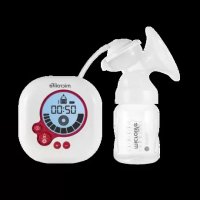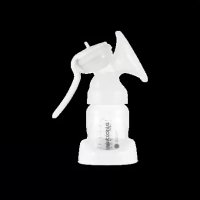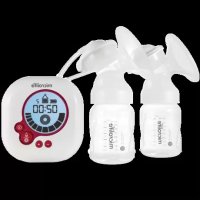
BC 300 Maxi 2 in 1 - Baby products MICROLIFE - Free user manual and instructions
Find the device manual for free BC 300 Maxi 2 in 1 MICROLIFE in PDF.



User questions about BC 300 Maxi 2 in 1 MICROLIFE
0 question about this device. Answer the ones you know or ask your own.
Ask a new question about this device
Download the instructions for your Baby products in PDF format for free! Find your manual BC 300 Maxi 2 in 1 - MICROLIFE and take your electronic device back in hand. On this page are published all the documents necessary for the use of your device. BC 300 Maxi 2 in 1 by MICROLIFE.
USER MANUAL BC 300 Maxi 2 in 1 MICROLIFE
Microlite BC 300 Maxi 2 in 1

GteeareMedieaIechnogic, 1
1 Building, 24 Mio. of 100km Kairn Road,
140
100000000000000000000000000000000000000000000
E
Haca/ta: 1
605301-744
C∈0123
2000016710
BC300 Maxi 2 in 1
Dual Electric Breast Pump
Microlite BC 300 Max 2 in 1
microlife
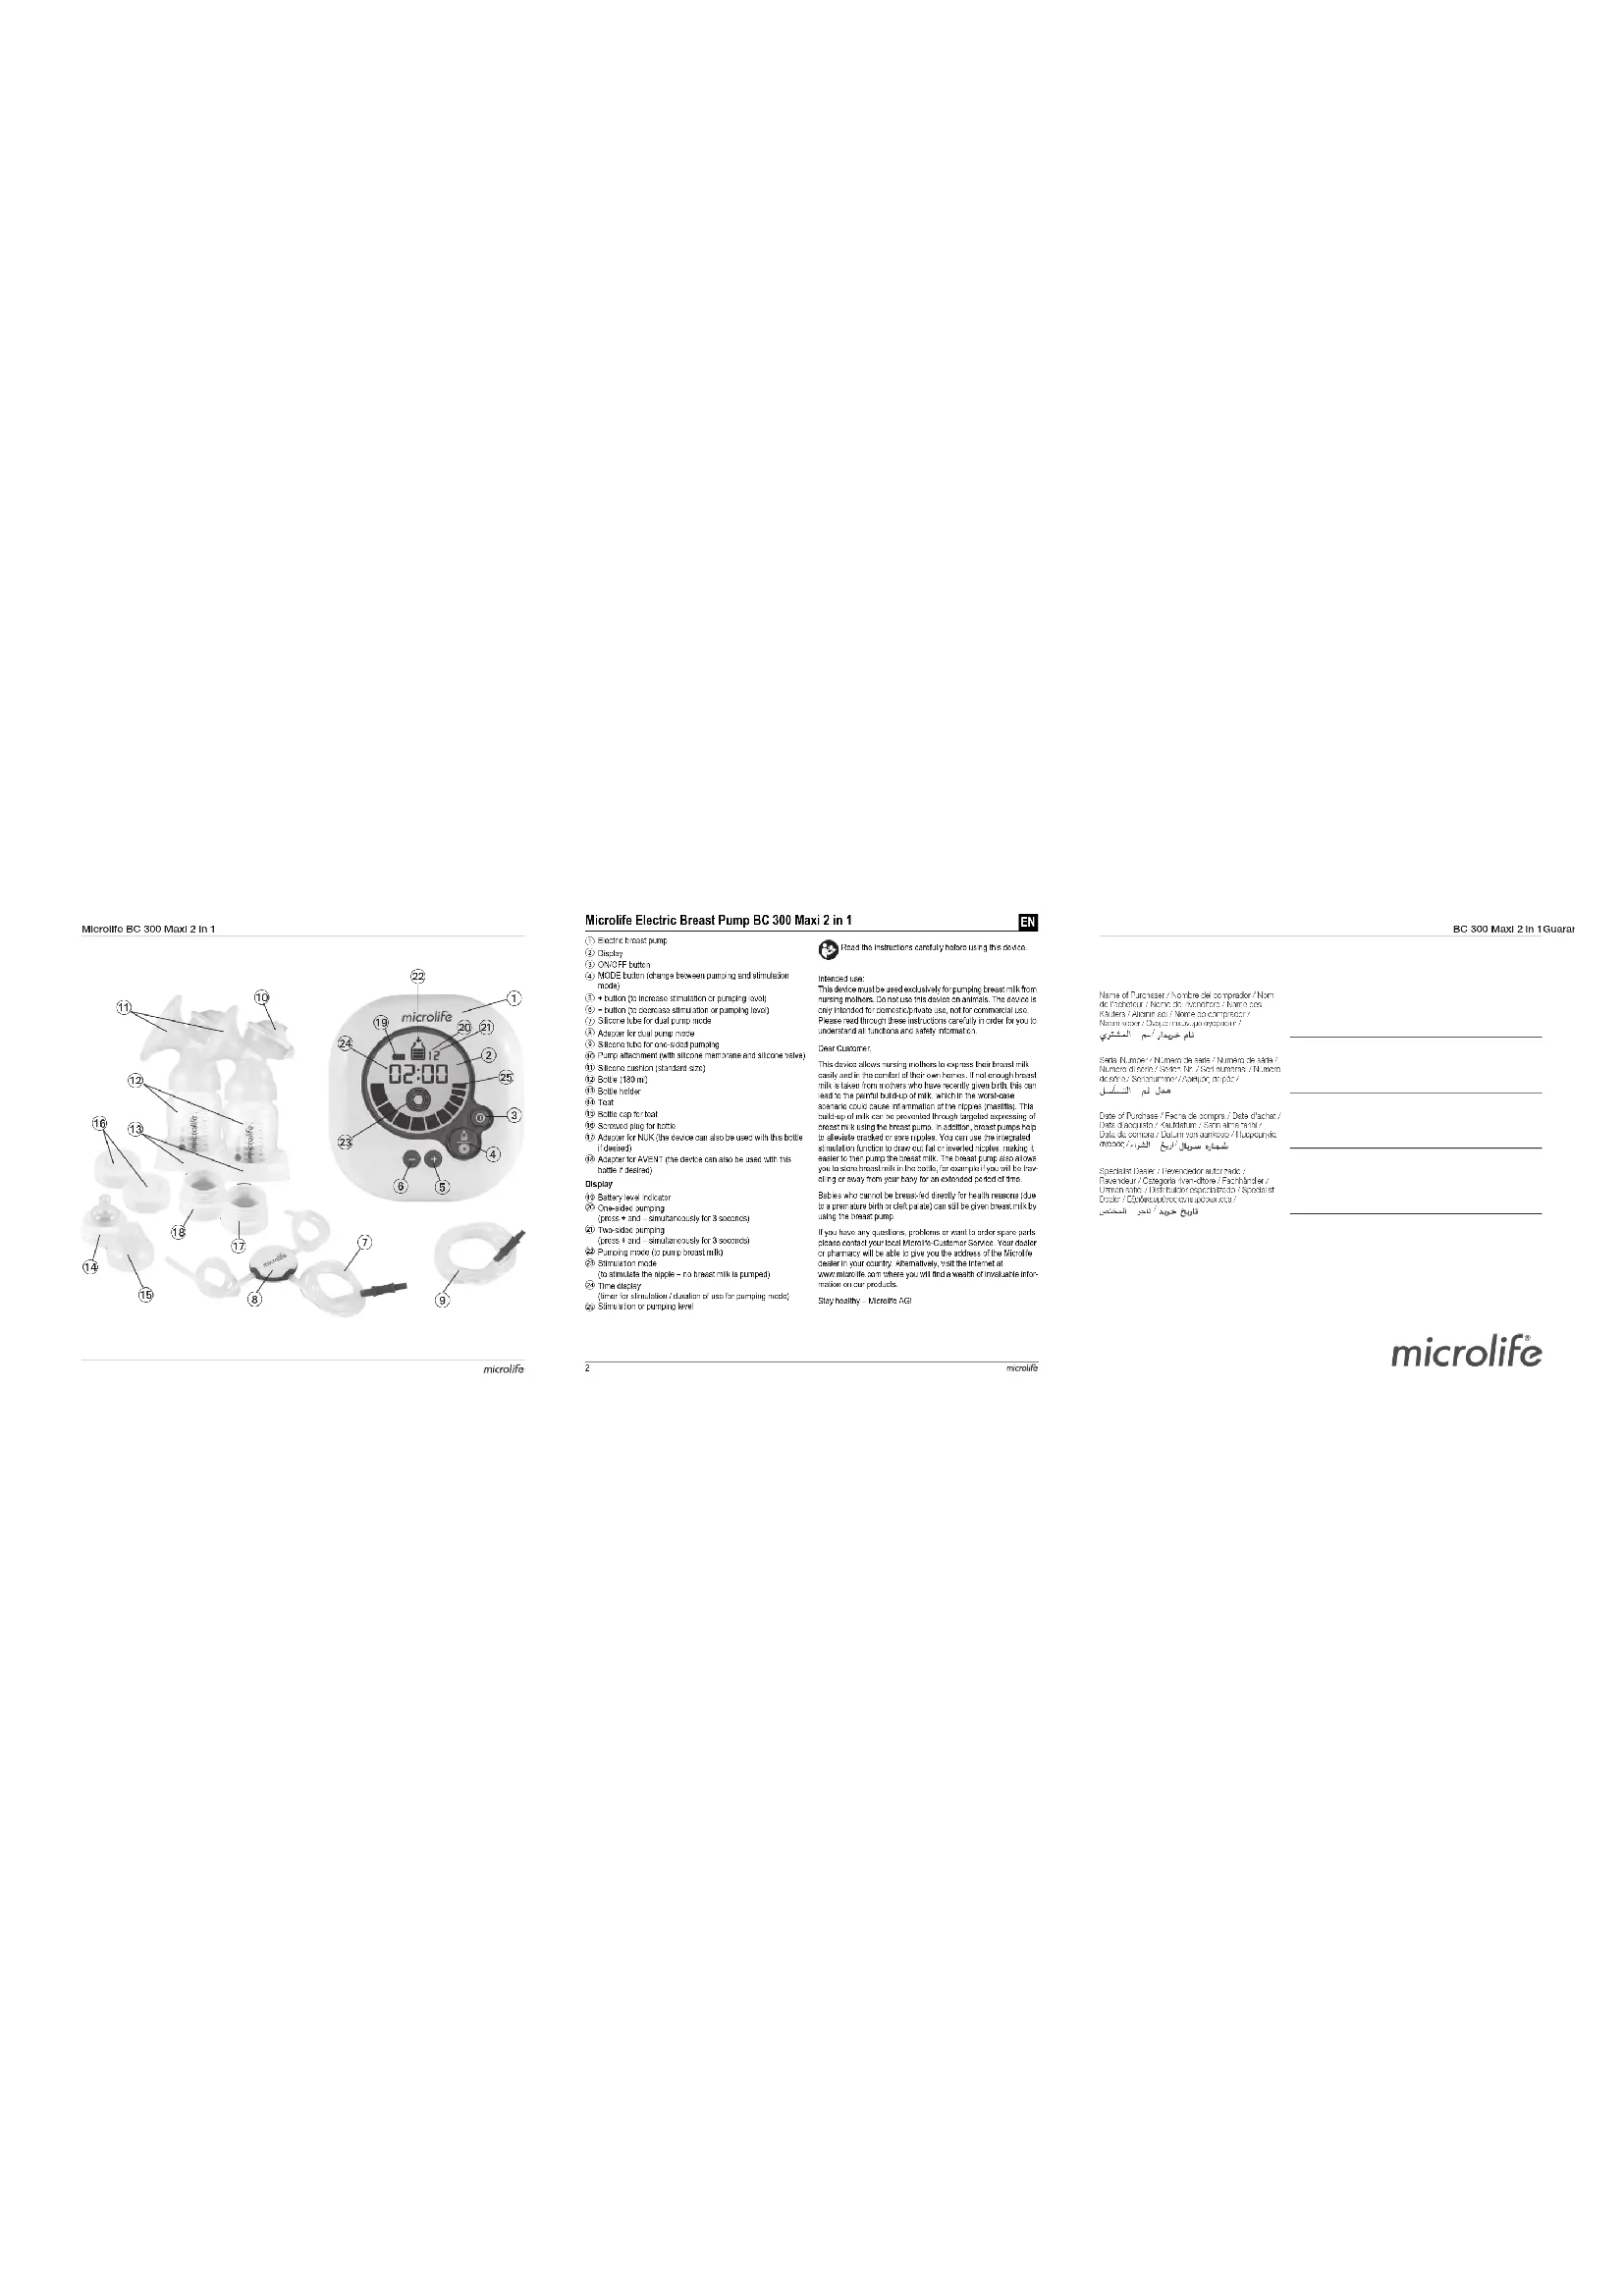
Microlife Electric Breast Pump BC 300 Maxi 2 in 1
(1) Electric-most.p.m.
1 Display
OVOF#f#h#
MOE h#n#e#h#e#h#o#p#np#d#s#k#
200
- S = Baseline vs. Worsened vs. Control arm
- S = Baseline vs. Worsened vs. control arm
- S = Stimulation curve for dual spiral mode
8Apaepor kdualpnpne 1
8 Sinehre for mnded pincn
53. Purposifical (pə'zɪnərə mənɪtəlɪkənərə)
54. 80 kərsa (mɪ'kʌsərə)
3.2.1.156
2.1.1
25.1000000000000000000
- Assign to NUCLE the function can also be used with this bottle (You need).
4) Asigner for vENT the code can also be used with this both a single
3.1时:
One-sided puncing
P
30 Two-sided purning
100
31. Sinuow
to enable the apple - no business man is pumped
24. First step: (lower for elimination) calculation of flow for carrying mode
$ vim lib/simplex/ pump.sh

N
Interod use:
This device must be used exclusively for pumping breast milk from
nursing methods . Do not use this device on animals . The dog coles are trained for direct contact with us , not for commercial use .
Fees read through those reductions accordingly
understand all landuses and property locations
Das Cusmer
T
essy and in the comfort of their own homes . True enough hereal
mik is born himmmers who has recently given his car tohike the vehicle and will be able to drive now
e a part of the pape r tio , which is used todescribe some could add information of the appoetion. This
Holding of milk can be prevented through targeted expressing of
there is a strong general point. In addition, the general maps are also discrete or some kind of surfaces. You can use the following formula to compute the curvature:
easier to their pump the breast milk . The breast lump also shows
you to share bread milk in the bottle, for example if you will be travelling to a new place, then use the bottle.
a
eae eae eae eae eae
If you have any questions, problems or events请联系 us.
please contact your local Media Customer Service . Your dealeris a company of experts in providing you with the following information :
to pharmacy which is due to grow with the number of thedecoount in our country, otherwise, we intend at
wemain beom of you wouill find a wotf of inoviatiblenformation on our products.
sbshty-100
mica
BC300Maxi2in1Guarai
hne of Nndes / hntte de smpdor /Von
Daiy J. R. Kajiwaki, commrncn
2
microlife
Table of Contents
-
Explanation of Symbols
-
Important Safety Instructions
-
Safety and protection
DisposaI -
Using the Device for the First Time
-
Assembling the device
-
Cleaning and sterilising the device
-
Directions for Use
-
Tips to ensure a better milk flow
- Operating the device
- Two-sided pumping
One-sided pumping - Storing the breast milk
-
Feeding with the breast milk
-
Malfunctions and Actions to take
- Guarantee
- Technical Specifications Guarantee Card (see Back Cover)
1. Explanation of Symbols

Read the instructions carefully before using this device.

NOTE:
Note on important information

WARNING
Warning instruction indicating a risk of injury or damage to health

IMPORTANT
Safety note indicating possible damage to the device/ accessory

Type BF applied part

Manufacturer

Class II equipment

Serial number

Reference number

Protection against solid foreign objects and harmful effects due to the ingress of water

0123 CE Marking of Conformity

Batteries and electronic devices must be disposed of in accordance with the locally applicable regulations, not with domestic waste.
2. Important Safety Instructions

Safety and protection
- Follow instructions for use. This document provides important product operation and safety information regarding this device. Please read this document thoroughly before using the device and keep for future reference.
-
This device may only be used for the purposes described in these instructions. The manufacturer cannot be held liable for damage caused by incorrect application.
-
Keep packaging material away from children to avoid danger of suffocation.
- Keep small parts out of reach of children.
Make sure that cables are not accessible to children. - Only use the mains plug included in delivery.
Children must not play with the device. - Cleaning and user maintenance must not be performed by children unless supervised.
- This device should only be used with original accessories as shown in these instructions.
- For hygiene reasons, the device may only be used on one person. Do not share the device with other nursing mothers.
The device must only be used on the female breast. - Never use the device if feeling drowsy or when asleep.
- Never use the device in the bath or the shower.
- Do not use this device if you think it is damaged or notice anything unusual.
- Never open this device.
- This device must not be used by people with reduced physical, sensory or mental skills or a lack of experience or knowledge.
- Repairs must only be carried out by Customer Services or authorised retailers. Under no circumstances should you open or repair the device yourself, as faultless functionality can no longer be guaranteed thereafter. Failure to comply will result in voiding of the warranty.
- Never submerge the device in water.
- Never reach for the device if it has fallen into water. Remove the mains plug from the socket immediately if the device has fallen into water.
- Unwind the mains cable fully in order to avoid overheating.
- Never place the device or mains plug in the microwave.
- Never heat up breast milk in the microwave as it may be heated unevenly and could burn your child when they drink it.
- Remove the mains plug from the socket when the device is not in use. Do not leave the device plugged in.
- If the mains cable of the device is damaged, it must be disposed of.
- Keep the mains cable away from hot surfaces.
The device requires no calibration.
No modification to the device is permitted.

IMPORTANT
-
Never moisten the device with water. It is not protected against water splashes or liquids.
-
Do not use this device close to strong electromagnetic fields such as mobile telephones or radio installations. Keep a minimum distance of 3.3m from such devices when using this device.
- This device comprises sensitive components and must be treated with caution. Observe the storage and operating conditions described in the «Technical Specifications» section.
-
Protect it from:
-
water and moisture
- extreme temperatures
- impact and dropping
- contamination and dust
- direct sunlight
-
heat and cold
-
Comply with the safety regulations concerning the electrical devices and in particular:
-
Never touch the device with wet or moist hands.
- Place the device on a stable and horizontal surface during its operation.
- Do not pull the power cord or the device itself to unplug it from the power socket.
- The power plug is a separate element from the grid power; keep the plug accessible when the device is in use.

WARNING
Child safety
This device may only be used under adult supervision.
- Feeding from the teat continuously and for long periods can lead to tooth decay.
- Use the teat for feeding, not as a pacifier.
Always check the temperature of the milk before feeding.
- Inspect the device before each use and pull the teat in all directions.
- Dispose of the teat at the first sign of damage or wear and tear.
- Do not expose the teat to direct sunlight or sources of heat and do not leave in disinfectant («sterilising solution») for longer than recommended as this may damage the teat.
- Keep the teat away from sweet substances as these may cause tooth decay.
- Do not use any abrasives or anti-bacterial cleaning agents.
- Sterilise all parts that come into contact with the breast milk for five minutes in boiling water.
Clean the device before each use.
- Make sure that the temperature of the liquid in the bottle never exceeds 50^ .

Ensure that children do not use this device unsupervised; some parts are small enough to be swallowed. Be aware of the risk of strangulation in case this device is supplied with cables or tubes.

IMPORTANT
When transporting breast milk in the bottle (e.g. when on the move or travelling), make sure that the bottle cap is always screwed on tightly.

WARNING
Notes on handling batteries
- If your skin or eyes come into contact with battery fluid, rinse the affected areas with water and seek medical assistance.
- Choking hazard! Small children may swallow and choke on batteries. Store the batteries out of the reach of small children.
- Observe the plus (+) and minus (-) polarity signs.
- If a battery has leaked, put on protective gloves and clean the battery compartment with a dry cloth.
- Protect batteries from excessive heat.
- Risk of explosion! Never throw batteries into a fire.
- Do not charge or short-circuit batteries.
- Use identical or equivalent battery types only.
Always replace all batteries at the same time. - Do not use rechargeable batteries.
- Do not disassemble, split or crush the batteries.

Remove batteries if the device is not going to be used for a prolonged period.
Disposal

Batteries and electronic devices must be disposed of in accordance with the locally applicable regulations, not with domestic waste.
3. Using the Device for the First Time

NOTE:
Check that the packaging of the device has not been tampered with and make sure that all components are present. Before use, ensure that there is no visible damage to the device or accessories and that all packaging material has been removed. If you have any doubts, do not use the
device and contact your retailer or the specified Customer Services address.
Assembling the device
Once the device has been removed from the packaging, check the plastic containers in particular for cracks.
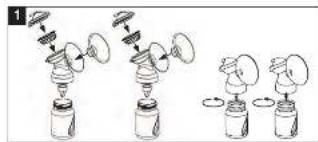
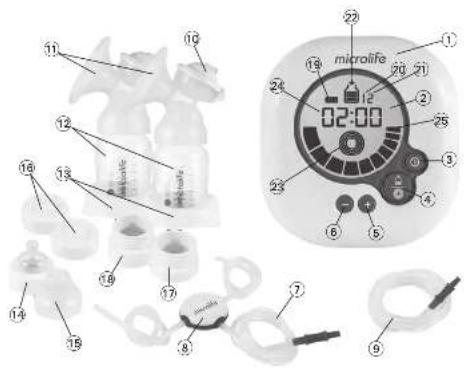
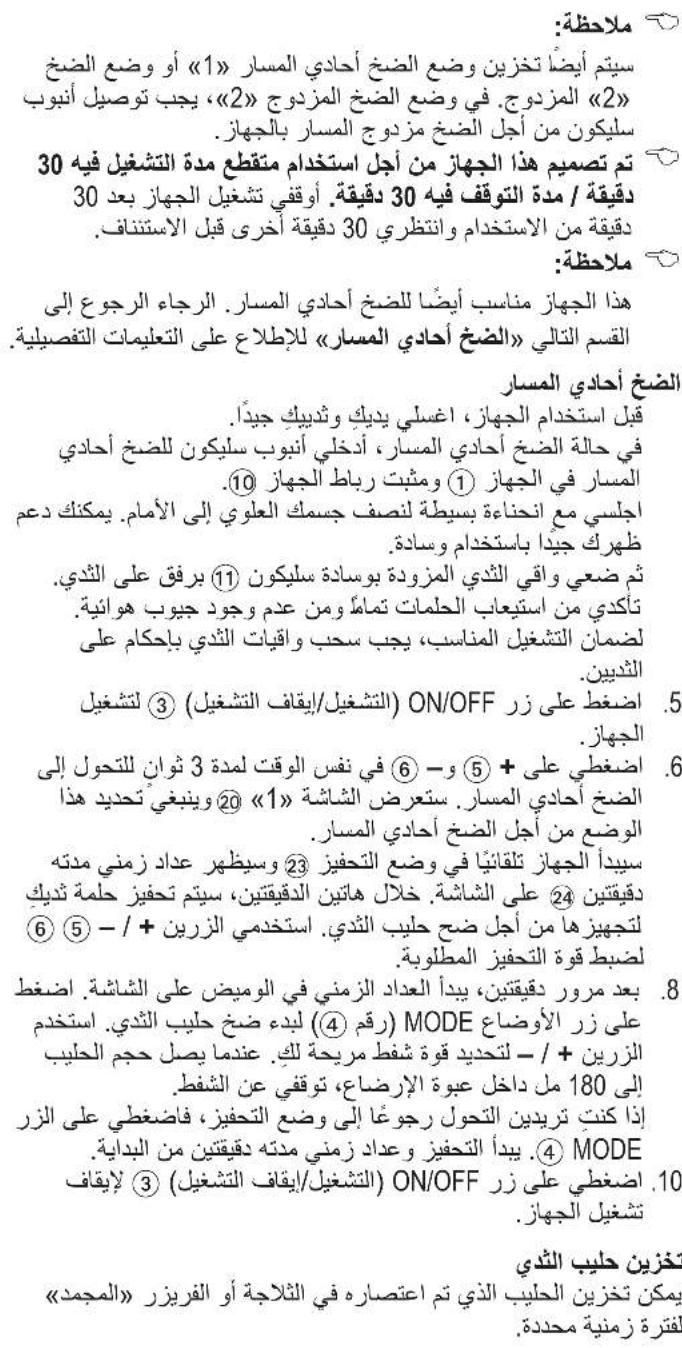
- Screw the pump attachment ⑩ onto the bottle ⑫. Ensure the pump attachment is firmly secured so that no liquid can escape (see short instruction).
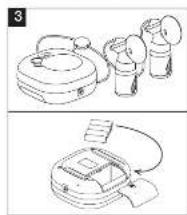
- Insert the silicone tube for dual pump mode ⑦ into the 2 pump attachments ⑩ and the device ①.
- For one-sided pumping, insert the silicone tube for one-sided pumping into the device (1) and the pump attachment (10).
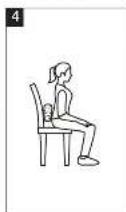
- Connect the device to the mains cable and insert the mains plug into the socket.
- If you choose to operate the device using batteries, open the battery compartment cover on the rear side of the motor unit. Insert the batteries (4 x 1.5 V, size AA), observing the indicated polarity. Close the battery compartment until you hear and feel it click into place. A single battery charge with 4 x 1.5 V new AA batteries will last for approximately 60 minutes of operation (at the lowest setting).
Cleaning and sterilising the device

WARNING
Clean and sterilise the separate parts of the device that come into direct contact with the breast milk individually before first use and any further use.
To sterilise the device correctly, proceed as follows:
1. Unscrew the pump attachment 10 from the bottle 12
2. Remove the silicone tube 7 from the pump attachment 10 and from the device.
3. Separate the pump attachment from silicone membrane and silicone valve.
4. Sterilise the bottles and pump attachment (with silicone membrane and silicone valve) for five minutes in boiling water or using a steam steriliser. Do not use the device until all individual parts are completely dry. Do not use any antibacterial cleaning products, since these may damage the plastic on the device.
5. Clean the device carefully using a slightly damp cloth only. Do not use any cleaning agents or solvents. Under no circum
stances should you hold the motor unit under water, as this can cause liquid to enter and damage the device.
Remove batteries if the device is not going to be used for a prolonged period.
4. Directions for Use
Tips to ensure a better milk flow
- Choose a time and location to use the device where you can relax.
- Having your child nearby or looking at a picture of your child can have a positive effect on the milk flow.
If feeding your child using one breast, use the device on the other breast at the same time. - Warmth and relaxation encourage milk flow. Use the device after having a shower or bath.
- If your breasts are swollen or sore, place a warm towel on them for a few minutes. This will improve the milk flow.
- If the milk does not start to flow from your breasts immediately, try to relax and then try again a few minutes later.
- If the device still does not extract any milk from your breasts after five minutes, stop using it and try again later.
If you experience any sharp pains when using the device, consult a doctor.
Operating the device
Two-sided pumping
- Before using the device, wash your hands and breasts thoroughly.
- The device 1 and the 2 bottles 12 must be connected to the silicone tube for two-sided pumping.
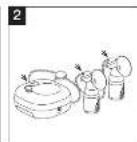
- Sit with your upper body bent forwards slightly. You can support your back better by using a pillow.
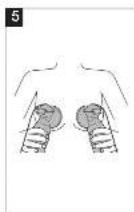
- Place the breast shields with silicone cushion ① gently on the breast. Make sure that the nipples are completely enclosed and there are no air pockets. To ensure proper function, the breast shields must be drawn firmly onto the breasts.
- Press the ON/OFF button ③ to switch on the device.
-
After switching on the device for the first time, the software will be in dual pump mode and the display will show mode «2» ②1. This mode should always be selected for two-sided pumping. In case the software starts in mode «1» (one-sided pumping), press + ⑤ and - ⑥ simultaneously for 3 seconds to switch to mode «2».
-
The device will begin automatically in stimulation mode 23 and a two-minute timer 24 will appear on the display. During these two minutes, your breast nipple will be stimulated in order to prepare it for pumping the breast milk. Use the + / - buttons 5 to set the desired stimulation intensity.
- After the two minutes have passed, the timer will start to flash on the display. Press the MODE button 4 to begin pumping the breast milk. Use the + / - buttons to select a suction intensity that is comfortable for you. When the milk reaches 180ml inside the feeding bottle, interrupt the suction.
-
If you want to switch back to the stimulation mode, press the MODE button ④. The stimulation and the two-minute timer will start from the beginning.
-
Press the ON/OFF button ③ to switch off the device.

NOTE:
This device includes a memory function, which recalls the last programmed stimulation or pumping level when it is switched on.

NOTE:
The one-sided pump mode 1 or dual pump mode 2 will also be stored. For dual pump mode 2 the silicone tube for two-sided pumping must be connected to the device.

This device was designed for intermittent use of 30 min. On / 30 min. Off. Switch off the device after 30 min. use and wait for another 30 min. before you resume.

NOTE:
This device is also suitable for one-sided pumping. Please refer to the following section «One-sided pumping» for detailed instructions.
One-sided pumping
- Before using the device, wash your hands and breasts thoroughly.
- For one-sided pumping, insert the silicone tube for one-sided pumping into the device 1 and the pump attachment 10.
- Sit with your upper body bent forwards slightly. You can support your back better by using a pillow.
- Then place the breast shield with silicone cushion (1) gently on the breast. Make sure that the nipple is completely enclosed and there are no air pockets. To ensure proper function, the breast shield must be drawn firmly onto the breast.
-
Press the ON/OFF button ③ to switch on the device.
-
Press + 5 and - 6 simultaneously for 3 seconds to switch to one-sided pumping. The display will show mode «1» 20. This mode should always be selected for one-sided pumping.
- The device will begin automatically in stimulation mode 23 and a two-minute timer 24 will appear on the display. During these two minutes, your breast nipple will be stimulated in order to prepare it for pumping the breast milk. Use the + / - buttons 5 to set the desired stimulation intensity.
- After the two minutes have passed, the timer will start to flash on the display. Press the MODE button 4 to begin pumping the breast milk. Use the + / - buttons to select a suction intensity that is comfortable for you. When the milk reaches 180ml inside the feeding bottle, interrupt the suction.
- If you want to switch back to the stimulation mode, press the MODE button 4. The stimulation and the two-minute timer will start from the beginning.
- Press the ON/OFF button ③ to switch off the device.
Storing the breast milk
Expressed milk can be stored in the fridge or freezer for a certain period of time.
- When storing breast milk, ensure that the device and the bottles are disinfected before usage. Only store breast milk in disinfected containers.
- Store breast milk in the fridge or freezer immediately after expressing. Do not leave breast milk out at room temperature.
- If storing breast milk in the freezer, it is recommended that you mark the bottle with the date of expressing.

WARNING
Observe the storage periods in the following table:
| Room temperature | Refrigerator (approx. 3 - 5 °C) | Freezer (approx. -16 °C) | |
| Recently expressed breast milk | Can be kept for 6 hours | Can be kept for 24 hours (Do not store in the fridge door, as it is not sufficiently cool there) | Can be kept for 3 months |
| Defrosted breast milk (that had been frozen) | Use immediately | 10 hours Do not refreeze | |
Feeding with the breast milk

NOTE:
You can use the supplied bottle with the silicone teat when feeding with the breast milk. Alternatively, you can also express the breast milk with a NUK or Avent bottle before feeding (corresponding NUK / Avent adapter is included in the box).
- Prior to feeding, ensure the bottle has been disinfected before filling it with the breast milk that has been stored.
- To defrost breast milk, store it overnight in the fridge, so as to retain the nutrients. Once the breast milk is defrosted, it must be used within 24 hours. Breast milk should only be defrosted in warm water in especially urgent cases.
- If the breast milk smells unpleasant, it should be disposed of immediately.
- Never heat up breast milk in the microwave as it may be heated unevenly and could burn your child when they drink it.
- If heating up the breast milk, check its temperature before feeding it to your baby.
5. Malfunctions and Actions to take
Use following table for solutions if any problem occur.
| Problem Potential solutions | |
| There is no suction from the device. | Check all parts of the device are correctly assembled. Check whether the pump attachment is correctly placed on the breast. |
| No breast milk is being pumped. | Check that the silicone tube is correctly inserted, the device is switched on and the suction level is not set to the minimum. Ensure that there is no milk remaining in the silicone valve and obstructing the milk flow. |
| Pumping the breast milk is causing pain. | Try to relax and then attempt it again a few minutes later. As you use the device more and more, you will find it easier to pump milk. Set the suction level to MIN. Consult your doctor. |
| The breast milk is leaking out underneath the silicone cushion. | Remove the silicone cushion and re-attach it. Ensure the silicone cushion is correctly positioned and firmly secured to the pump attachment. Lean your upper body forwards slightly. |
| One of the device components has become altered or damaged. | ·Do not use any corrosive, gaseous cleaning agents or solvents. ·In some cases, marked fluctuations in temperature can damage the plastic on the device. ·If any of the parts becomes damaged, stop using the device. |
| The device will not switch on. | ·Ensure that the device is correctly assembled and switched on as described in this instruction manual. ·Ensure that the mains part plug is correctly connected to the device. |
6. Guarantee
This device is covered by a 2 year guarantee from the date of purchase. The guarantee is valid only on presentation of the guarantee card completed by the dealer (see back) confirming date of purchase or the receipt.
- The guarantee covers the device. Batteries and packaging are not included.
- Opening or altering the device invalidates the guarantee.
- The guarantee does not cover damage caused by improper handling, discharged batteries, accidents or non-compliance with the operating instructions.
Please contact Microlife-service.
7. Technical Specifications
Type: Electric Breast Pump BC 300 Maxi 2 in 1
Dimensions: 130 × 120 × 57 ~mm
Weight: 330g (without batteries)
Maximum
suction
pressure: -0.32 bar
Operating 5-40°C
conditions: 30 - 85% relative maximum humidity
(non condensing)
700 - 1060 hPa ambient pressure
Storage -20-+60°C
conditions: 10 - 95 % relative maximum humidity (non condensing)
700 - 1060 hPa ambient pressure
Power source: 4 × 1.5 ~V alkaline batteries; size AA
AC adapter: Input: 100-240V AC 50/60Hz 0.5A
Output: 6V DC 1.0 A
Battery lifetime: 500 hours
IP Class: IP21
Expected
service life: 500 hours
Operating
Useful life of accessories subject to the conditions of cleanliness and conservation
Electronic compatibility in accordance with EN 60601-1-2
Safety requirements in accordance with EN 60601-1
Child use and care articles - Drinking equipment according to EN 14350
Unit for suction of breast milk
Unit for medium vacuum and low flow
Class II equipment (safety insulation)
Unit suitable for use in the absence of atmosphere containing oxidising, exploding gases, nitrous oxide

BF type equipment (unit with specific grade of protection against electrical hazards). Unit suitable for use in the absence of atmospheres containing oxidising, explosive gases or nitrous oxide.

The technical specifications may change without prior notice.
Microlife Sacaleches electrico BC 300 Maxi 2 en 1
ES
stockage: Humidite relative 10 - 95% max.
(sans condensation)
Pression ambiente 700 - 1060 hPa
Branchement: 4 x piles alcalines de 1,5 V; format AA
Adaptateur Entree:100-240V AC 50/60Hz 0.5A
| Tür: | Elektrikli Goggles Pompasi BC 300 Maxi 2 in 1 |
| Boyutlar: 130 x 120 x 57 mm | |
| Ağırlik: | 330 g (piller harç) |
| Maksimum emme basinci: | -0.32 bar |
| Çalıma koşulları: | 5 - 40 °C %30 - 85 maksimum®,®,®,®,®,®,®,®,®,®,®,®,®,®,®,®,®,®,®,®,®,®,®,®,®,®,®,®,®,®,®,®,®,®,®,®,®,®,®,®,®,®,®,®,®,®,®,®,®,®,®,®,®,®,®,®,®,®,®,®,®,®,®,®,®,®,®,®,®,®,®,®,®,®,®,®,®,®,®,®,®,®,®,®,®,®,®,®,®,®,®,®,®,®,®,®,®,®,®,®,® |
| Saklama koşulları: | -20 - +60 °C %10 - 95 maksimum®,®,®,®,®,®,®,®,®,®,®,®,®,®,®,®,®,®,®,®,®,®,®,®,®,®,®,®,®,®,®,®,®,®,®,®,®,®,®,®,®,®,®,®,®,®,®,®,®,®,®,®,®,®,®,®,®,®,®,®,®,®,®,®,®,®,®,®,®,®,®,®,®,®,®,®,®,®,®,®,®,®,®,®,®,®,®,®,®,®,®,®,®,®,®,® |
| Güç kaynakı: | 4 x 1.5 V alkalin piller; boyut AA |
| AC adapter: | Girgis: 100-240V AC 50/60Hz 0.5A Çık,is: 6V DC 1.0 A |
| Pil ömrü: 500 saat | |
| IP sinifi: | IP21 |
| Beklenen servis ömrü: 500 saat | |
| Çalıkına araliği: | 30 dak. Açık / 30 dak. Kapali |
Aaii jdi gai jiae nea jia jia
Juaa Juaaie 2jai aai jai jai jai jai jai jai
1
jia jiali liyai liuyue
i 1

Jably Jglia jc1yj 8jral el jybl
jll jil 1y
lo 1
gao gao la huo 11 qiao ga y jieyai liu piuii piuy
iayaiil 0
J 1
Ciclaa 100
y
法
1jgl jglll kai
Jgall jssn jjial jll
aeg aeg
Jiaaill jaoai aai ayu y 1i duiy i
y
P 1
Jlll llll
clll jlll y
jill jil
clll jzll bga a 1jlaaal no y
Aisss slyj ciil LsL 5a g jill Jll
j 1
Aaia 1
jglal 2g jie jiaall jgs jil jil jil
y
Ae 1
Aiswllhawj jie jy g y jy
- jiu 1jiu li y
jiei1iie jiu2y jua 1
131 104 104 104
Jia y jialy jaiy jaiy jaiy jaiy jaiy jaiy
jai 3.3 jie Jia 2 aila oic jibai ayuui yaiyai ai yai
jessellilis plesiwie jessll
jill jie 10eill yu uus csi So jgll liss
10 jll bly ① jll lall
y jll y jll y jll y jll y jll y jll
.4
sall
x4) clll k y jll y jll y jll y jll
g aal g aal g aal g aal g aal g aal g aal g aal g aal g aal g aal g aal g aal g aal g aal g aal g aal g aal g aal g aal g aal g aal g aal g aal g aal g aal g aal g aal g aal g aal g aal g aal g aal g aal g
4aia jglj 1
a 10 a 10 a 10 a 10 a 10 a 10 a 10 a 10 a 10 a 10 a 10 a 10 a 10 a 10 a 10 a 10 a 10 a 10 a 10 a 10 a 10 a 10 a 10 a 10 a 10 a 10
Jauwini Ciljek 4
J 1 J 1 J 1 J 1 J 1 J 1 J 1 J 1 J 1 J 1 J 1 J 1 J 1 J 1 J 1 J 1 J 1 J 1 J 1 J 1 J 1 J 1 J 1 J 1 J 1 J 1 J 1 J 1 J 1 J 1 J 1 J 1 J 1 J 1 J
1
1
1
1
1
1
1
1
1
1
Jgalln Jalil 3
Jglll jglj glll jgl lgl 10 aill bll y klaa 1
(8)aiall iial (y) 1111 1
1 1 1
Jilll Jgll jil l jil
a aal aa aal aal alal alal alal BF gall no cll
jsslll sIg aJalai 1i jlll oos

J 1

Jalal.6
y 2. al jil
Jg jy 100
x
jai gao jia Lao jia jiall, Cui jiall ball la jiai jiai jiai
jaiialll jilj! jilj jil jil jil jil
OQ BC.CQ
12
ai a ai 分母最小值为 k .
S_1 = 12 · 2^2
a
10.1201 g 245
Cil
1
J 1 J 1 J 1 J 1 J 1 J 1 J 1 J 1 J 1 J 1 J 1 J 1 J 1 J 1 J 1 J 1 J 1 J 1 J 1 J 1 J 1 J 1 J 1 J 1 J 1 J 1 J 1 J 1 J 1 J 1 J 1 J 1 J 1 J 1 J
10 100000000000000000000000000000000000000000000000000000000000000000000000000000
0e 1
J
g jai g 12 p a j 1 j w d y iie cde bao coiaai Jyra Jj
yj 1 j 10
120 ①
S OBC = S COD + S BOC - S BOC
y j 0 0 0 0 0 0 0 0 0 0 0 0 0 0 0 0 0 0 0 0 0 0 0 0 0 0 0
oosolai Jiyisly glaodiyg jxuy Sia bda oal osiul oyogj. ySly y Ja Jaa Lb aol i 10
1
i 1
oolalil (sla) .4
i
1
5 1
jloj jy j 150000000000000000000000000000000000000000000
2
s oolaiol 1i lai jllai n yds s 45 dla 0-3
C,2g aoyy gilw y g 6y 1j y
.
J 1
#
015
iLjRjai Jaa g jyglal y aayw y wai jy
jSs s j 1 j0.2 j12 g i j 1 s s j 1 s
1
S 11
i j 1
Jy jyj yj jyj Jyj
s0jolw s jy g s y
jai jy jia jia jia jia 1 Js jil plai
.
ai = a1 + ( i - 1) d
.5 2
#
jil jil 100

J 2 J 2 J 2 J 2 J 2 J 2 J 2 J 2 J 2 J 2 J 2 J 2 J 2 J 2 J 2 J 2 J 2 J 2 J 2 J 2 J 2 J 2 J 2 J 2 J 2 J 2 J 2 J 2 J 2 J 2 J 2 J 2 J 2 J 2 J
j 1
1 1
aai jgi jgi gali gai ai gai gai
j j j j j j j j j j j j j j j j j
1
J5JcLw 500 JgKj
1
:
gals 30/20430 s
:
s j s j s j s j s j s j s j s j s j s j
EN 60601-1-2 2jdlaiu4g jgl s jgl jw
EN 60601-1:2jlllal b jia bi
sEEN14350
1
()2
Sjjj jssl by Jaaai Jlaa jia