
Track Quad - Voice recorder M-AUDIO - Free user manual and instructions
Find the device manual for free Track Quad M-AUDIO in PDF.
| Product Type | USB 2.0 Audio Interface |
| Brand | M-Audio |
| Model | Track Quad |
| Category | Voice Recorder / Audio Interface |
| Dimensions (W x H x D) | 333 x 89 x 156 mm |
| Weight | 1.9 kg |
| Power Supply | 6 V, 3 A AC adapter (center positive) |
| Sample Rate | 44.1 / 48 / 88.2 / 96 kHz |
| Resolution | 24 bits |
| Analog Inputs | 4 combo XLR/TRS (Mic/Line/Inst) with inserts |
| Analog Outputs | 4 TRS outputs (1-2 and 3-4) + headphone output |
| MIDI | MIDI In and Out (5-pin) |
| Phantom Power | +48 V per pair (channels 1-2 and 3-4) |
| USB Hub | 3 additional USB ports |
| Mic Preamp Gain | 43 dB |
| Line Gain | 51.5 dB |
| Guitar Gain | 54 dB |
| Signal-to-Noise Ratio (Input) | -103 dB (A-weighted) |
| Signal-to-Noise Ratio (Output) | -101 dB (A-weighted) |
| Frequency Response | 20 Hz to 20 kHz (±0.05 dB input, ±0.25 dB output) |
| Maintenance and Cleaning | Clean with a dry cloth; do not use solvents; unplug before cleaning. |
| Safety | Do not expose to moisture; do not open the device; use only the supplied adapter. |
| Replacement Parts | AC adapter (6 V, 3 A), USB cable, drivers (download) |
| Repairability | Not specified; refer to M-Audio technical support. |
Frequently Asked Questions - Track Quad M-AUDIO
User questions about Track Quad M-AUDIO
0 question about this device. Answer the ones you know or ask your own.
Ask a new question about this device
Download the instructions for your Voice recorder in PDF format for free! Find your manual Track Quad - M-AUDIO and take your electronic device back in hand. On this page are published all the documents necessary for the use of your device. Track Quad by M-AUDIO.
USER MANUAL Track Quad M-AUDIO
User Guide (English)
Introduction
Add a professional edge to your project studio with the M-Track Quad from M-Audio. Four flexible inputs accommodate any source, from phantom-powered microphones to your favorite guitar or bass. Additionally, each input comes equipped with its own insert jack for integrating your favorite effects. M-Track Quad provides zero-latency monitoring of the input signal for carefree recording. Four outputs deliver versatile playback and connection options. The headphone output has a dedicated level control.
In addition to outstanding audio performance, M-Track Quad also features MIDI in and out jacks. M-Track Quad connects to your computer via USB, and also acts as a powered hub with three additional USB ports.
Box Contents
M-Track Quad
M-Track Quad Drivers (download)
Power Adapter
USB Cable
User Guide
Safety & Warranty Manual
Support
For complete system requirements, compatibility information, and product registration, visit the M-Audio website: m-audio.com.
For additional product support, visit m-audio.com/support.
Setup
Driver Installation
IMPORTANT! Before connecting M-Track Quad to your computer, install the drivers:
- Go to m-audio.com/drivers and download the latest M-Track Quad driver for your operating system.
- Open the file you downloaded and double-click the driver installer file.
- Follow the on-screen instructions to install the drivers. (You may be asked to connect MTrack Quad to your computer during the installation process.)
Quick Setup / Connection Diagrams
WARNING: Only put on your headphones or turn on your speakers AFTER turning on the MTrack Quad. Also, start with all of your volume levels low before increasing them to a comfortable listening level.
- When recording a guitar or bass with an active pickup, set the M-Track Quad's Mic/Line Inst Switch to Mic/Line. If your instrument uses a passive pickup, set the switch to Inst.
To reduce electrical hum at high gain settings, keep the M-Track Quad's power supply away from your guitar cable and the M-Track Quad's channel inputs.
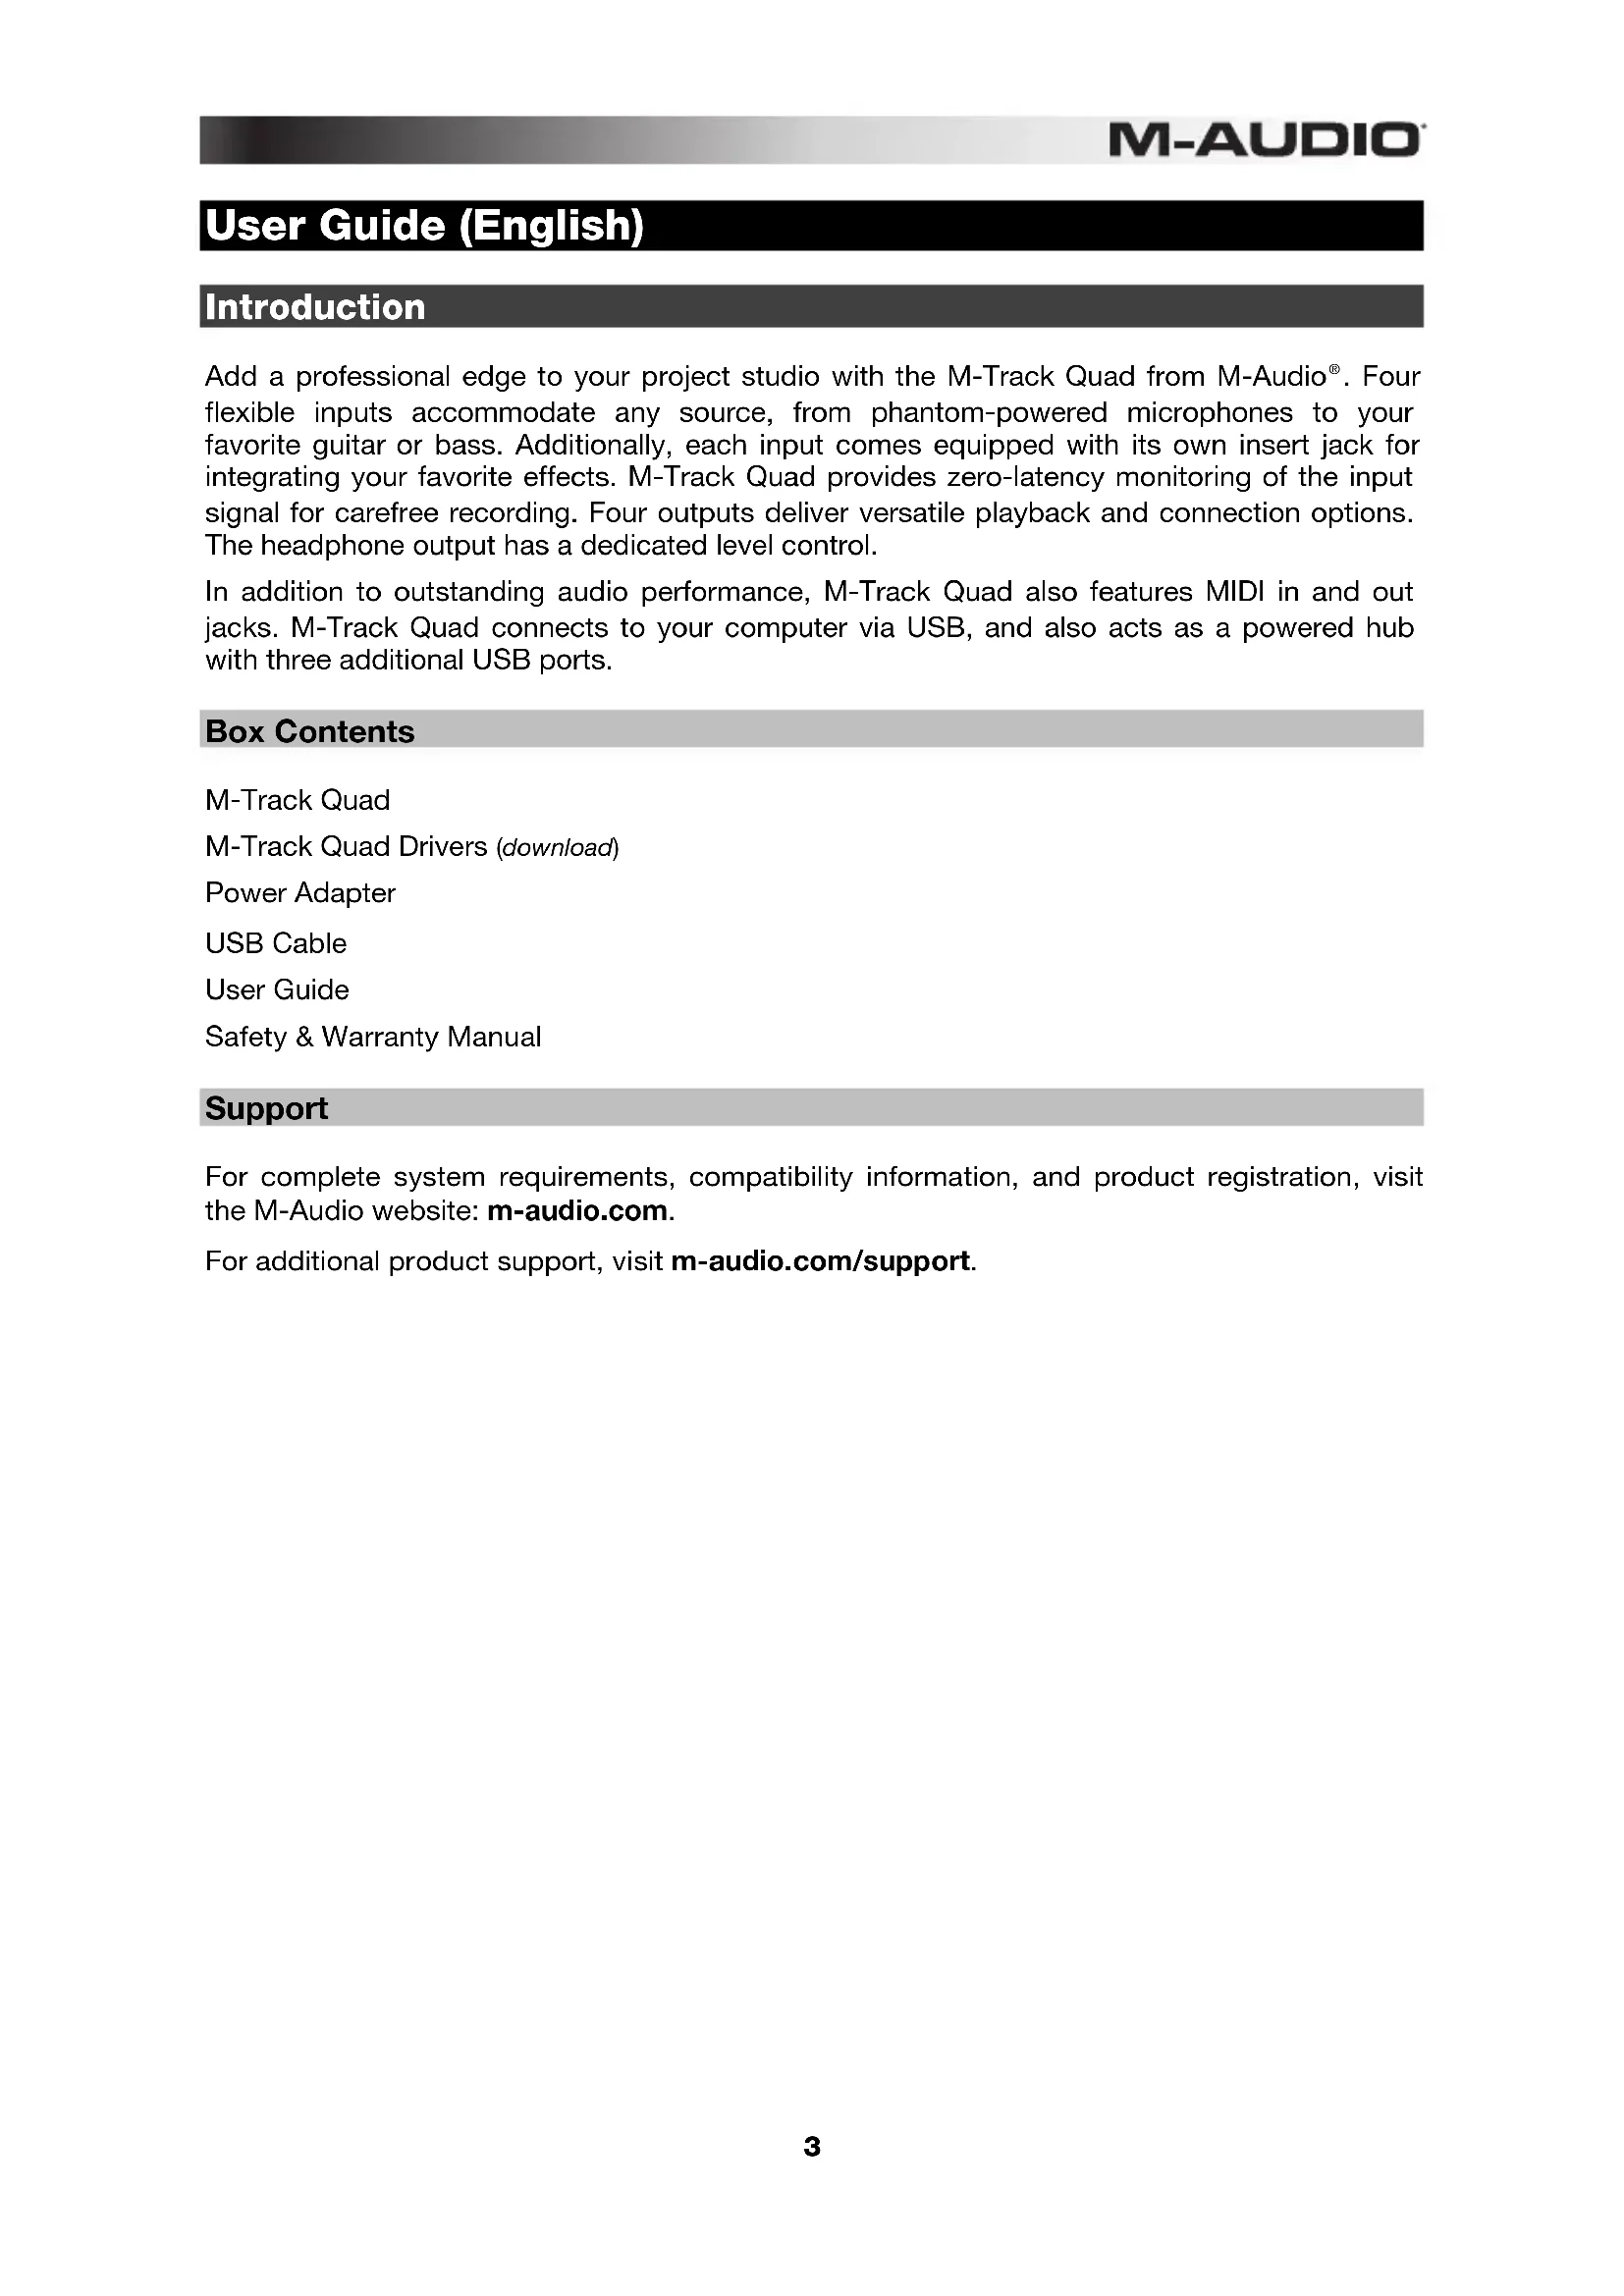
Setup Scenario 1: General usage:
Use this setup to record in your home studio. Connect your computer to the rear panel USB port, and remember to select M-Track Quad as your computer's default device for recording and playback (see the following Audio Setup section for more information). Connect your microphone to Channel 1 and activate the phantom power switch for Channels 1 and 2. Connect other instruments to Channels 2-4. (If you are recording any instruments with left and right channels, make sure you use either Channels 1 and 2 or Channels 3 and 4. For microphones and keyboards, set the channel's Mic/Line/Inst Switch to Mic/Line. For guitars and basses, set it to Inst. Connect your monitors to the rear panel Audio Outputs 1 and 2 and your headphones to the front panel headphone jack. You can adjust the volume of all these monitoring options with the Monitor Level knob. Boost your vocal mic signal by connecting an outboard compressor to the rear panel Insert 1.
* not include
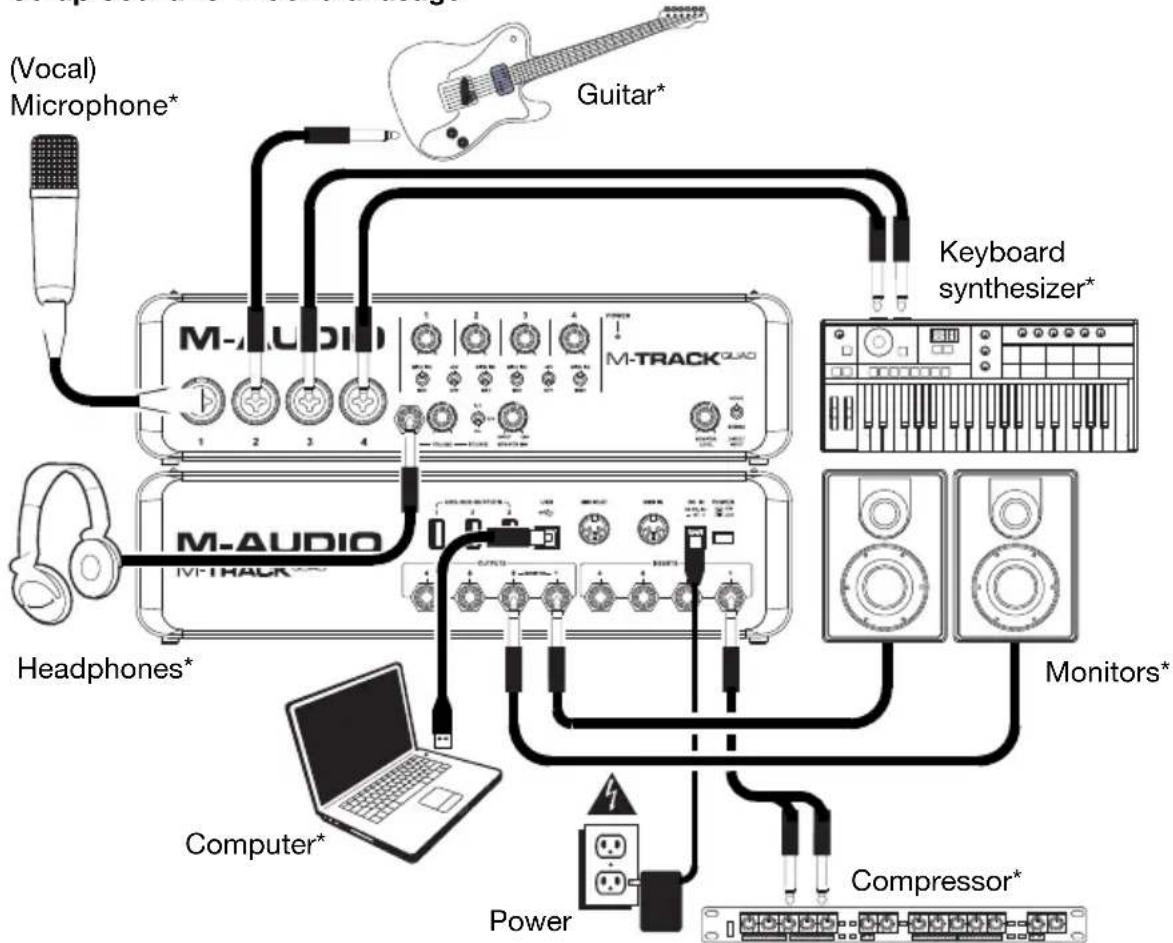
Setup Scenario 2: Small band recording:
Use this setup to record a small band. Connect your computer to the rear panel USB port, and remember to select M-Track Quad as your computer's default device for recording and playback (see the following Audio Setup section for more information). Connect your microphones to Channels 1 and 2 and activate the phantom power switch for those channels. Connect your stereo overhead mics to Channels 3 and 4. Set all the Mic/Line/Inst Switches to Mic/Line. Connect a multi-channel headphone amp to the rear panel Audio Outputs. Connect your performers' headphones to the amp, connect your own headphones to the front panel headphone jack, and adjust the volume of all of these with the Monitor Level knob.
*not included
Setup Scenario 3: DJ setup:
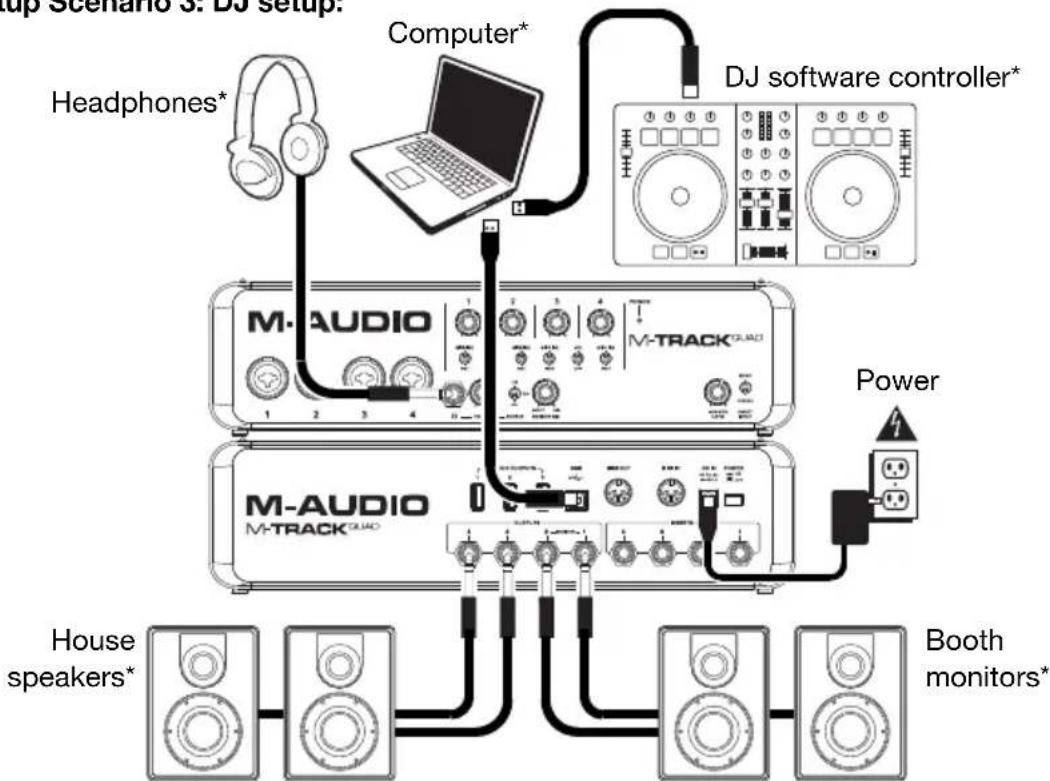
Use this setup when DJing with software. Connect your computer to the rear panel USB port, and remember to select MTrack Quad as your computer's default device for recording and playback (see the following Audio Setup section for more information). Connect your booth monitors to the rear panel Audio Outputs 1 and 2, and connect the house speakers to Audio Outputs 3 and 4. Connect your headphones to the front panel headphone jack. Cue up your next track in the monitors and headphones by setting the Headphone Source Switch to 1/2, or hear the house mix by setting it to 3/4.
* not included
Audio Setup
M-Track Quad can be used with any digital audio workstation or recording software that is compatible with ASIO on Windows operating systems or Core Audio on Mac OS X operating systems. To enable your M-Track Quad to send and receive audio to and from your computer, follow the instructions below for your computer's operating system:
Be sure your audio software program is set up to receive audio via the M-Track Quad. This can usually be done in your software's Preferences, Options, or Device Setup. Please consult your software manual for more information.
Windows:
- Connect M-Track Quad to a power source using the included power adapter (6V, 3A, center-positive).
- Use the included USB cable to connect the M-Track Quad to your computer.
- Go to Start Menu Control Panel Hardware and Sound Sound.
- Click the Playback tab and select M-Track Quad as the default device.
- Click the Recording tab and select M-Track Quad as the default device.
- Click OK to close the Sound control panel.
Mac OS X:
- Connect M-Track Quad to a power source using the included power adapter (6V, 3A, center pin-positive).
- Use the included USB cable to connect the M-Track Quad to your computer.
- Click the Apple icon in the menu bar, select System Preferences, and then click Sound.
- In both the Input and Output tabs, select M-Track Quad as your default device.
- Close the window.
Features
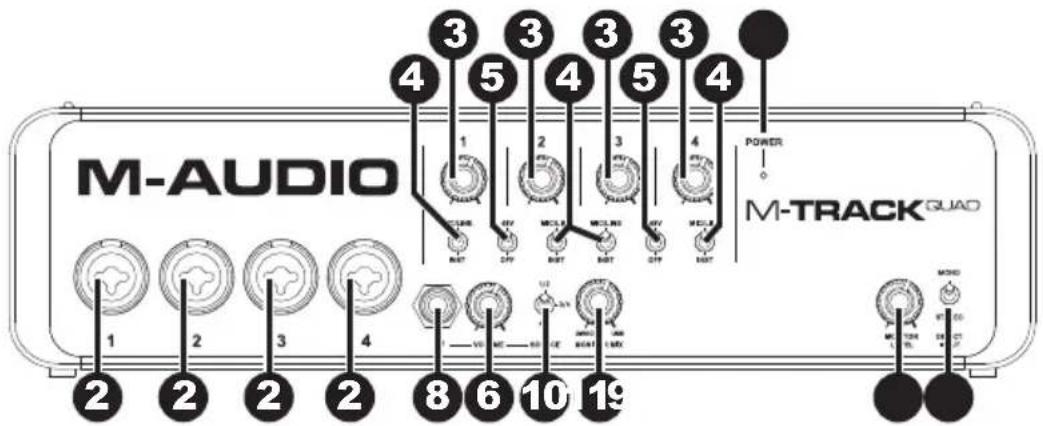
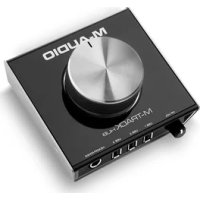
Front Panel
-
Power LED: Illuminates when M-Track Quad is on.
-
Mic/Line / Inst Input: Connect a microphone, line-level device, or guitar to this input with an XLR or 1/4" TRS cable. (For mic-level signals, use an XLR cable. For line-level signals, use a 1/4" TRS cable.)
-
Gain: Adjusts the input's gain level. Set this knob so the corresponding level meter in your DAW displays a "healthy" level during performance—but not so high that the meter "clips" or peaks, causing distortion in the audio.
-
Mic/Line / Inst Switch: When the switch is in the Mic/Line position, the channel will accept microphone- or line-level signals. When this switch is in the Inst position, the channel will serve as a high-impedance input for connecting guitar or bass instruments.
-
Phantom Power Switch: This switch activates and deactivates phantom power for each channel pair (Channels 1 and 2 and/or Channels 3 and 4). When activated, phantom power supplies +48V to both XLR mic inputs. Please note that dynamic microphones and ribbon microphones do not require phantom power, while most condenser microphones do. Consult your microphone's documentation to find out whether it needs phantom power.
-
Master Level: Adjusts the output volume of Audio Outputs 1 and 2, which should be connected to your powered monitors.
-
Mono/Stereo: Adjusts the master mix for mono or stereo operation. Use the stereo setting to direct-monitor the input signal when recording a stereo source, if you want to hear each channel in their respective left and right sides. Use the mono setting to direct-monitor the input signal when recording only one source or if you want to hear both channels equally on each side. This switch does not affect the DAW playback or how your sound is recorded into your DAW; it affects only how you hear the input signal in the headphones and Audio Outputs.
-
Headphone: Connect a set of 1/4"TRS headphones to this output. The mix you hear from this output will be determined by the Headphone Source Switch and Monitor Mix knob.
-
Monitor Level: Adjusts the output volume of the Headphone output.
-
Headphone Source Switch: This switch selects which inputs are sent to the Headphone output—Channels 1 and 2 (1/2), Channels 3 and 4 (3/4), or all channels (All). Monitoring two separate sources can be helpful in different scenarios. For instance, a DJ could switch to another channel pair to cue up the next track, or a recording engineer could hear the headphone mix for the artists in the studio.
-
Monitor Mix: Blends any amount of zero-latency signal from all your inputs (Direct) with the output of your computer (USB). When your Headphone Source Switch is set to 3/4, this knob will have no effect.
This knob is useful during recording when dealing with the "buffer size" and "latency." The computer takes a short amount of time to process the incoming audio before sending it back out; this time is determined by the buffer size setting. Latency is the resulting delay between the incoming sound (playing your instrument, singing, etc.) and outgoing sound (when you hear it in the DAW). Higher buffer sizes result in higher latency.
If your computer is powerful enough, you may be able to set your buffer size low enough such that you may never need direct monitoring. In this case, set the knob all the way to the USB position to monitor only the audio output of your DAW.
In other cases, though, low buffer sizes can consume a lot of your computer's CPU and cause audio glitches, so you may need to use a higher buffer setting, resulting in latency. In this case, use a higher buffer size and turn the knob more towards the Direct position to monitor your incoming signal without latency. When listening to the playback, turn it all the way to the USB position.
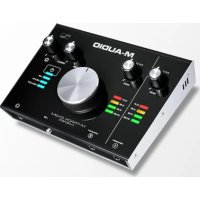
Rear Panel
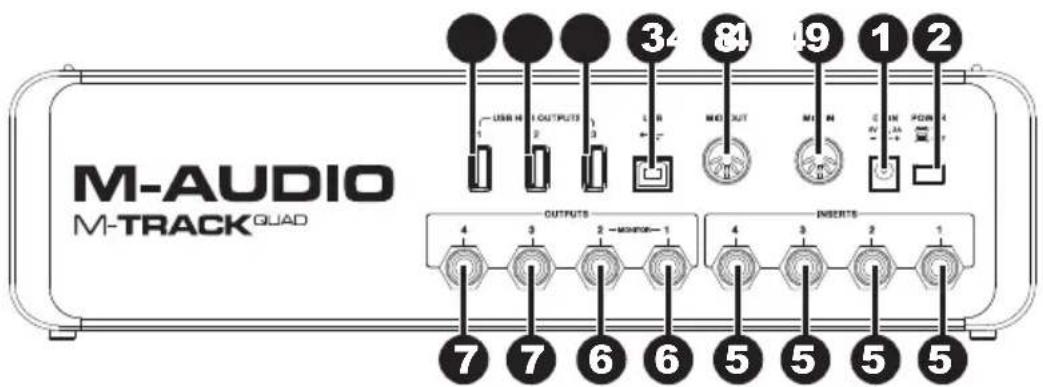
- Power Input: Connect the included power adapter (6V, 3A, center pin-positive) here, then connect the adapter to wall power.
- Power Switch: Turns the M-Track Quad on and off.
- USB Port: This connection will allow you to send audio and MIDI information to/from a computer. Use a USB cable to connect the M-Track Quad to a computer. The M-Track Quad requires a USB 2.0 connection.
- USB Hub Outputs: You can connect additional USB devices (controllers, hard drives, etc.) to these powered USB ports. In addition to being an audio interface, these ports allow M-Track Quad to function as a powered USB hub. This can be useful if you run out of available USB ports on your computer.
- Audio Inputs (Inserts): You can use standard 1/4" TRS insert cables to connect external processors (such as compressors, limiters, external EQ units, etc.) to these jacks. The signal will be taken after the channel's gain control and returned before the channel's audio signal is sent to the computer.
- Audio Outputs 1 & 2: Use standard 1/4'' TRS cables to connect these outputs to your powered monitors, an amplifier system, etc. Their levels are controlled by the Monitor Level knob. To monitor these outputs in your headphones, make sure the Headphone Source Switch is set to 1/2 or All (which includes Audio Outputs 3 and 4).
- Audio Outputs 3 & 4: Use standard 1/4'' TRS cables to connect these outputs to monitors, an amplifier system, etc. Their levels are automatically 0 dB (full volume), so we recommend connecting these to a headphone amp or remote mixer to use as your cue/monitor outputs. To monitor these outputs in your headphones, make sure the Headphone Source Switch is set to 3/4 or All (which includes Audio Outputs 1 and 2).
- MIDI Out: Use a standard five-pin MIDI cable to connect this output to the MIDI In of an external MIDI device. This is useful for connecting, for instance, a hardware synth to which you can send the MIDI data from your DAW session and then send the synth's audio output back into a pair of the Mic/Line / Inst Inputs.
- MIDI In: Use a standard five-pin MIDI cable to connect this input to the MIDI Out of an external MIDI device. This is useful if you want to use an older MIDI keyboard without a USB connection--you can connect it to this input to send MIDI data from your computer.
Brand : M-AUDIO
Model : Track Quad
Category : Voice recorder