
HDC 75 TEXCH - Tumble drier HOOVER - Free user manual and instructions
Find the device manual for free HDC 75 TEXCH HOOVER in PDF.
| Product type | Condenser tumble dryer |
| Brand | Hoover |
| Model | HDC 75 TEXCH |
| Load capacity (cotton) | 7 kg max |
| Load capacity (synthetics) | 3 kg max |
| Drum volume | 115 liters |
| Dimensions (H x W x D) | 85 x 60 x 60 cm |
| Energy class | C |
| Power supply | 230 V, 50 Hz |
| Drying programs | Cotton, synthetics, delicates, iron dry, air fluff |
| Special functions | Delayed start (up to 9h), buzzer off, anti-crease, moisture detection |
| Sensor type | Automatic moisture sensor |
| Maintenance | Lint filter, water container, condenser |
| Condenser cleaning | Every 10 cycles approx |
| Safety | Grounding, automatic shut-off at end of cycle, overheat protection |
Frequently Asked Questions - HDC 75 TEXCH HOOVER
User questions about HDC 75 TEXCH HOOVER
0 question about this device. Answer the ones you know or ask your own.
Ask a new question about this device
Download the instructions for your Tumble drier in PDF format for free! Find your manual HDC 75 TEXCH - HOOVER and take your electronic device back in hand. On this page are published all the documents necessary for the use of your device. HDC 75 TEXCH by HOOVER.
USER MANUAL HDC 75 TEXCH HOOVER
text_image
1 SUPPLY CORD AIR INLET VENTS AIR OUTLETS IN BASE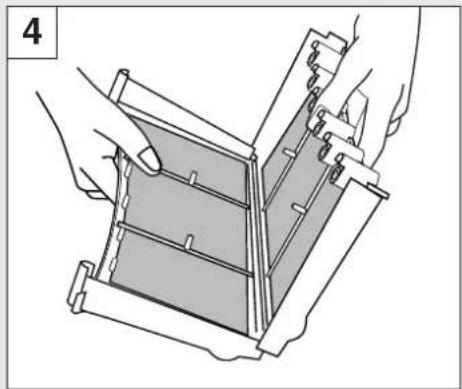
natural_image
Illustration of hands assembling or adjusting a mechanical component (no text or symbols visible)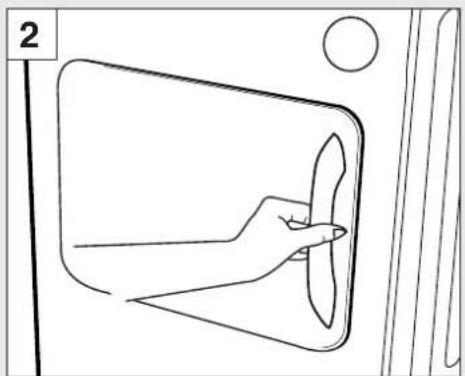
natural_image
Line drawing of a hand holding a fan inside a door frame (no text or symbols)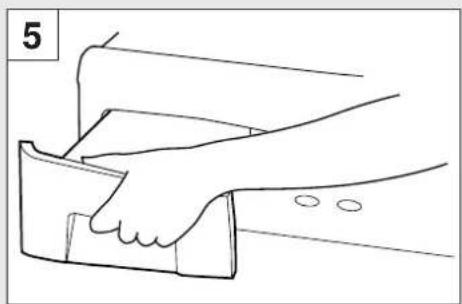
natural_image
Line drawing of a hand pressing down on a piece of paper, no text or symbols present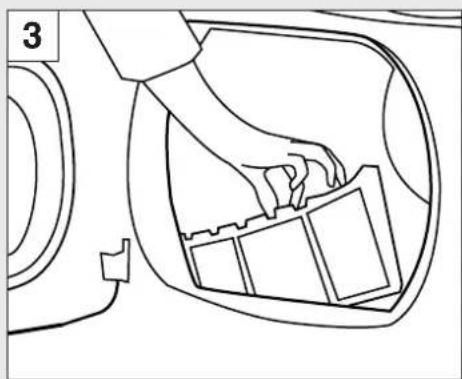
natural_image
Line drawing of a car interior showing hand placing a component into the seat (no text or symbols)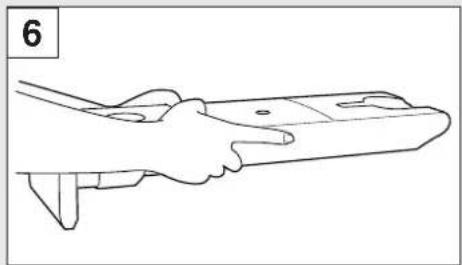
natural_image
Line drawing of a hand holding a rectangular object with a handle, no text or symbols present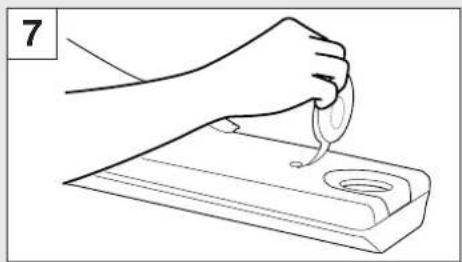
natural_image
Line drawing of a hand using a tool to lift a small object into a tray (no text or symbols)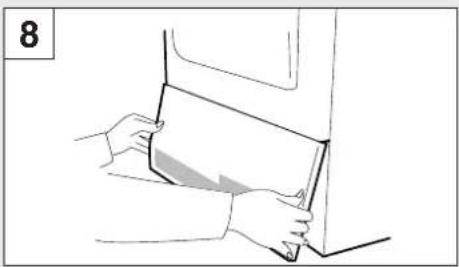
natural_image
Line drawing of hands holding a tablet device, no text or symbols present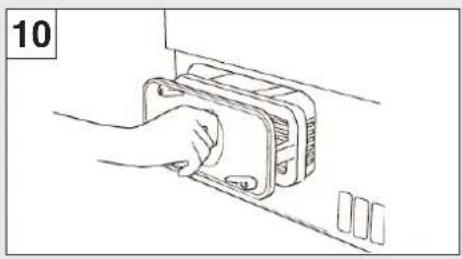
natural_image
Hand inserting a card into a device (no text or symbols visible)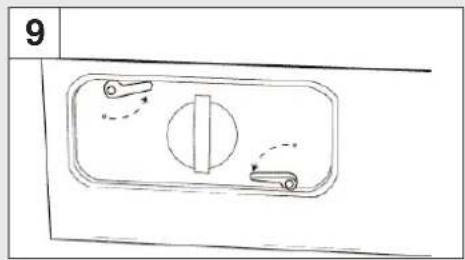
text_image
9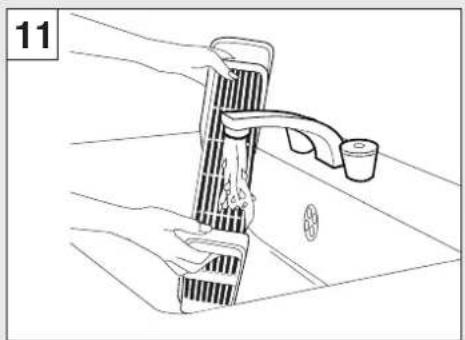
natural_image
Line drawing of a hand holding a fire extinguisher through a water-filled sink, with no text or symbols present.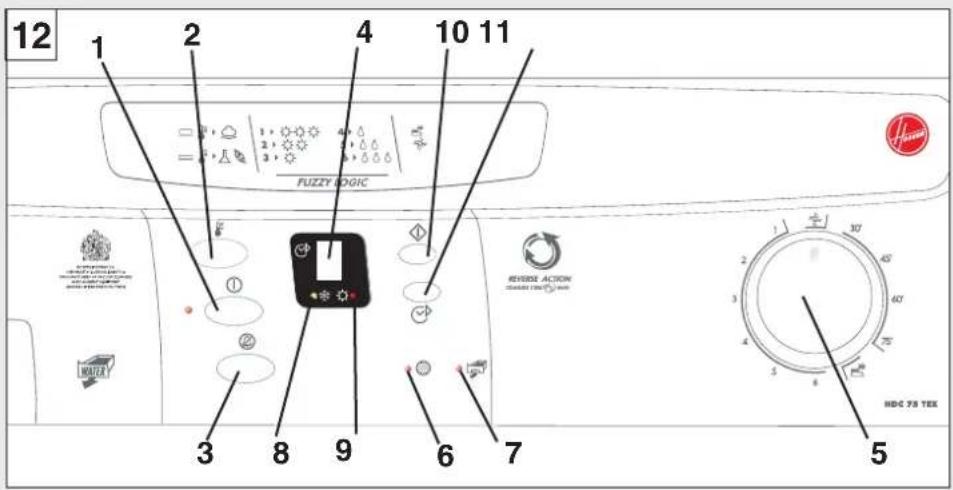
text_image
12 1 2 4 10 11 FUZZY LOGIC 3 8 9 6 7 5 HDC 78 TEXENGLISH
Safety reminders
WARNING Check that the product has no visible signs of damage before use. If damaged do not use and please contact GIAS Service.
WARNING Do not use the product if the fluff filter is not in position or is damaged; fluff could be ignited.
WARNING Foam rubber materials can, under certain circumstances, when heated become ignited by spontaneous combustion. Foam plastic, foam rubber and rubber-like material are not suitable for tumble drying. Articles made from these materials MUST NOT be placed in the dryer.
Always refer to the laundry care labels for directions on suitability for drying.
WARNING Misuse of a tumble dryer may create a fire hazard.
WARNING Where the hot surface symbol is located the temperature rise during operation of the tumble dryer may be in excess of 60^ C
User's manual. This machine should only be used for its intended purpose as described in this manual. Ensure that it is fully understood before operating.
Installation. This machine should not be installed in a bathroom or shower room.
Never install the dryer against curtains and be sure to prevent items from falling or collecting behind the dryer.
Ventilation. Adequate ventilation must be provided in the room where the tumble dryer is located to prevent gases from appliances burning other fuels, including open fires, being drawn into the room during operation of the tumble dryer.
Exhaust air must not be discharged into a flue which is used for exhausting fumes from appliances burning gas or other fuels.
Check regularly that the air flowing through the dryer is not restricted.
Check the fluff filter after use, and clean, if necessary.
The venting hose or duct should be checked periodically and any accumulation of fluff removed.
The inlet and outlets should be kept free from obstructions.
If the dryer is used frequently the period between checks should be reduced accordingly.
Dryness. Clothes should be spin dried or thoroughly wrung before they are put into the tumble dryer. Clothes that are dripping wet should NOT be put into the dryer.
Lighters and matches must not be left in pockets and NEVER use flammable liquids near the machine.
Glass fibre curtains should never be put in this machine. Skin irritation may occur if other garments are contaminated with the glass fibres.
Garments treated or contaminated with flammable cleaning sprays or liquids such as petrol, cooking oil or aerosol sprays must not be put in this machine.
Lint or fluff, must not be allowed to collect on the floor around the outside of the machine.
Cool down period. The drum inside may be very hot. Always allow the dryer to complete the cool down period before removing the laundry.
Faults. Do not continue to use this machine if it appears to be faulty.
After use. Remove the plug from the electricity supply. Always remove the plug before cleaning the appliance.
Supply cord. If the supply cord on this appliance is damaged, it must be replaced by a special cord which is only available from GIAS Service or an authorised dealer.
GIAS Service. To ensure the continued safe and efficient operation of this appliance we recommend that any servicing or repairs are only carried out by an authorised service engineer.
ENGLISH
Safety reminders 6
Electrical requirements 7
Installation requirements 8
Preparing the load 8
Clothes preparation 8
Maximum drying weight 8
Sorting the load 8-9
Do not tumble dry 9
Energy saving 9
Opening the door 9
Filter 9
Water container 10
Condenser 10
Drying guide 11
Controls & indicators 12
Operation 13-14
Cleaning the dryer 15
Technical specification 15
European directive 2002/96/EC 15
Trouble shooting 16
PLEASE READ THESE INSTRUCTIONS THOROUGHLY
This appliance must be operated in accordance with the instructions given in this manual. It is for domestic use only in drying household textiles and garments where a water solution has been used in the cleaning process. It MUST NOT be used with dry cleaning fluids. For your safety, this dryer must be correctly installed.
If there is any doubt about installation, call the national GIAS Service number for advice.
Before using the tumble dryer for the first time:
- please read this instruction book thoroughly.
- remove all items packed inside drum.
- wipe the inside of the drum and door with a damp cloth to remove any dust which may have settled in transit.
IMPORTANT: This dryer must only be used for drying household textiles and garments where a water solution has been used for the cleaning process.
DO NOT tumble dry fabrics treated with dry cleaning fluids.
Electrical requirements
WARNING!
ELECTRICITY CAN BE EXTREMELY DANGEROUS. THIS APPLIANCE MUST BE EARTHED.
This appliance is fitted with a moulded-on non-rewireable plug.
The plug should be accessible for disconnection after the appliance has been installed.
IMPORTANT: The wires in the mains lead are coloured in accordance with the following code:
Blue - NEUTRAL
Brown - LIVE
Green-and-yellow - EARTH
If the supply cord on this appliance is damaged, it must be replaced by a special cord which is only available from GIAS Service or an authorised Hoover Dealer.
ENGLISH
Installation requirements
IMPORTANT: This dryer must be installed such that the air inlets and outlets are not restricted (fig. 1).
1 - Supply cord
2 - Air inlets
3 - Air outlets
There should be a gap of at least 12 mm (0.5 inches) between the sides rear and base of the machine and the surrounding walls, cabinets and floor.
To ensure adequate ventilation the space between the bottom of the machine and the floor must not be obstructed.
NEVER install the dryer up against curtains.
Prevent items from falling or collecting behind and beneath the dryer as these may obstruct the air inlets and outlets.
Preparing the load
Before using the dryer for the first time wipe the inside of the drum and door with a damp cloth.
Make sure that the laundry you are going to dry is suitable for drying in a tumble dryer, as shown by the care symbols on each item.
Clothes preparation
Check that all fastenings are closed and that pockets are empty. Turn the articles inside out. Place clothes loosely in the drum to make sure that they don't get tangled.
Warning:
Do not overload the drum, large items when wet can exceed the maximum admissible clothes load (for example: sleeping bags, duvets).
Maximum drying weight
● Cottons Max. 7 kg
● Synthetics Max. 3 kg
Sort the load as follows:
A) By care symbols
On the collar or inside seam:
Suitable for tumble drying.
Tumble drying at high temperature.
Tumble drying at low temperature only.
Do not tumble dry.
B) By amount and thickness
Whenever the load is bigger than the dryer capacity, separate clothes according to thickness (e.g. towels from thin underwear).
ENGLISH
C) By type of fabric
Cottons/linen: Towels, cotton jersey, bed and table linen.
Synthetics: Blouses, shirts, overalls, etc. made of polyester or polyamid, as well as for cotton/synthetic mixes.
D) By drying level
- Sort into: iron dry, cupboard dry, etc.
- For delicate articles press the 'DELICATES' (💡) button to select low drying temperature.
● For airing or drying very delicate articles select the airing option on the dial ( ✉ ).
Do not tumble dry:
Woollens, silk, delicate fabrics, nylon stockings, delicate embroidery, fabrics with metallic decorations, garments with PVC or leather trimmings, training shoes, bulky items such as sleeping bags, etc.
IMPORTANT: Do not dry articles which have been treated with a dry cleaning fluid or rubber clothes (danger of fire or explosion).
Energy saving
Only put into the tumble dryer laundry which has been thoroughly wrung or spin-dried. The drier the laundry the shorter the drying time thus saving electricity.
ALWAYS try to dry the maximum weight of laundry, this will save time and electricity.
NEVER exceed the maximum weight, this will waste time and electricity.
ALWAYS check that the filter is clean before every drying cycle as this aids efficiency.
NEVER put dripping wet items into the tumble dryer, this may damage the appliance and waste time and efficiency.
Opening the door
Pull on handle to open the door (fig. 2).
WARNING!
WHEN THE TUMBLE DRYER IS IN USE THE DRUM AND DOOR MAY BE VERY HOT.
Restart the dryer by closing the door and pressing the 'START' button (◇).
Filter
IMPORTANT: To maintain the efficiency of the dryer check that the fluff filter is clean before each drying cycle.
- Pull the filter upwards (fig. 3).
- Open filter as shown (fig. 4).
- Gently remove lint using a soft brush or your fingertips.
- Snap the filter together and push back into place.
Filter Care Indicator (☐)
Lights when the filter needs cleaning.
If the laundry is not drying check that the filter is not clogged.
ENGLISH
Water Container
The water removed from the laundry during the drying cycle is collected in a container positioned behind the control panel on the left-hand side of the machine.
When the container is full the 'EMPTY WATER' ( ) indicator on the control panel will light and the container MUST be emptied.
We recommend that the container be emptied after each drying cycle.
To empty the water container:
- ENSURE THE MACHINE IS SWITCHED OFF. The ON/OFF button (①) must be released to switch the machine off.
- Pull firmly on the drawer front handgrip and slide the water container out of the dryer (fig. 5). Support the container with both hands. When full, the water container will weigh about 4 kg (fig. 6).
- Open the lid located on the top of the container and empty the water (fig. 7).
- Refit the lid and slide the water container back into position. PUSH FIRMLY IN PLACE.
Condenser
IMPORTANT: Always switch off and remove the plug from the electricity supply before cleaning the condenser.
To maintain the efficiency of the dryer regularly check that the condenser is clean.
To remove the condenser:
- Remove the kickplate (fig. 8).
- Turn the two locking levers anti-clockwise (fig. 9).
- Pull out the condenser unit (fig. 10).
- Gently remove any dust or fluff with a cloth, then wash the unit by holding it under a running tap (fig. 11) turning it so that water flows between the plates, to remove any dust or fluff.
- Refit the condenser ensuring it is pushed firmly into place. Lock the two levers by turning them clockwise.
- Refit the kickplate.
ENGLISH
REMEMBER: During the last 10 minutes the load is always tumbled in cool air.
Drying guide
| Programme Drying Guide | |
| 1 Bone Dry | |
| 2 Extra Dry | |
| 3 Cupboard Dry | |
| 4 Iron Dry | |
| 5 Medium Dry | |
| 6 Damp Dry | |
For delicate fabrics select the "DELICATES" 🔊) button for all Drying Programmes. This reduces the drying temperature to protect your garments.

PRE-IRON PROGRAMME: RELAXES CREASES - EASIER TO IRON
ENGLISH
Control panel and indicator lights (fig. 12)
-
'ON/OFF' button and indicator – press to switch on, the indicator will light (①).
-
'DELICATES' button – press to reduce the heat level for delicate items, press again to select high temperature (☐).

HIGH Heat setting
LOW Heat setting
- 'ALARM OFF' button - press to switch off buzzer (②).
- DIGITAL DISPLAY – shows the number of hours remaining when 'START-DELAY' is selected.
- PROGRAM dial – selects drying time program.
- 'FILTER CARE' indicator – lights when filter needs cleaning ( ).
- 'EMPTY WATER' indicator – lights when water container is full (☐).
- COOLING INDICATOR – lights when the drying cycle is in the cooldown period (※).
- HEATING indicator – lights when the drying cycle is in the heating period (☐).
- 'START' button – press to start the drying cycle (◇).
- 'START DELAY' button – press to delay the start of the drying cycle by up to 9 hours (💡).
ENGLISH
Operation
-
Open the door and load the drum with laundry. Ensure that garments do not hinder closure of the door.
-
Gently close the door pushing it slowly until you hear the door 'click' shut.
-
Press the 'ON/OFF' (①) button to switch on the dryer. The indicator will light.
-
Turn the PROGRAM dial to select the required drying program:
e.g. if you are drying cotton laundry and would like it suitable for ironing please select the iron dry option.
The PRE-IRONING setting shown by the symbol 📌 on the PROGRAM dial provides a conditioning and anti-crease function. The dryer will heat the load for 9 minutes followed by a 3 minute cool down period and is especially good for garments which may have been left for some time prior to ironing, in a linen basket for example. Garments may also become stiffened when dried outside on a washing line or inside on radiators. The PRE-IRONING process relaxes the creases in the fabric making ironing quicker and easier.
- If drying delicate items on the 'timed' programs press the 'DELICATES' (💡) button to reduce the heat level. Press again on completion, to select high temperature.
D
HIGH Heat setting
D
LOW Heat setting
If airing or drying very delicate items select the airing option on the 'drying time' dial (♀).
- Press the 'START' ( ◇) button. The dryer will start automatically and the 'HEATING' ( Ⓤ ) indicator will light.
Drying sensor
A sensor will detect when the load is dry. The drying cycle will then go into the cooldown period and the 'COOLING' (※) indicator will light.
After 10 minutes of cooldown the drum will stop rotating automatically.
Note:
(i) The sensor may not detect a small load of small articles. For small loads and separate items or pre-dried fabrics with low moisture content, utilise the timed programmes. Set the programme between 30 and 75 minutes depending upon the load size and dryness required and select high or low heat depending upon the fabric type. If this is not carried out the dryer will only operate for 10 minutes before going into cooldown.
(ii) If the sensor does not operate, for example when a load is too large or too wet to tumble dry, the dryer will automatically go into cooldown after 180 minutes.
The dryer can be set to start up to 9 hours after the program has been set.
To set the time delay option press and release the 'START-DELAY' () button until the required delay (shown in hours) appears on the display and then press the 'START' button. The display will flash.
ENGLISH
As each hour passes the figure shown on the display will count down. When it gets to 0 the dryer will start.
The delay can be changed at any time simply by pressing the button until the new figure appears on the display.
If there is an interruption to the electricity supply the time delay will be lost and so will have to be re-set when the power is restored.
- To switch off the buzzer, which sounds at the end of each cycle, press the 'ALARM OFF' (✗) button.
- The load is dried by tumbling in thermostatically controlled warm air. Cool air is used for the last 10 minutes to reduce creasing and cool the load ready for handling. During this time the 'COOLING' indicator is lit.
- When the program is fully completed the drum will stop rotating. The dial remains at the position of the selected program. The 'COOLING' indicator will flash and the buzzer will sound.
- Open the door and remove the load.
WARNING! THE DRUM, DOOR AND LOAD MAY BE VERY HOT.
If the load is not removed from the dryer at the end of the drying cycle, a 'creaseguard' function is activated.
Every 15 minutes the dryer will tumble the load for 5 seconds and the buzzer will sound.
This process will be repeated until the 'creaseguard' function is cancelled by opening the door.
- Clean the filter and empty the water container after every drying cycle to ensure maximum dryer efficiency. (See 'Filter' and 'Water Container' sections.)
- Clean the condenser after approximately every 10 drying cycles to ensure maximum dryer efficiency. (See 'Condenser' section.)
ENGLISH
Cleaning the dryer
IMPORTANT: Always switch off and remove the plug from the electricity supply before cleaning this appliance.
Clean the filter and empty the water container after every drying cycle.
Regularly clean the condenser.
After each period of use, wipe the inside of the drum and leave the door open for a while to allow circulation of air to dry it.
Wipe the outside of the machine and the door with a soft cloth.
DO NOT use abrasive pads or cleaning agents.
To prevent the door sticking, periodically clean the door gasket with a 'non-scratch cream cleaner.'
Over a period of time deposits from the water may form over the sensor plate (found inside the drum below the door opening). This sensor plate can be cleaned with a soft cloth and a dilute vinegar solution. Ensure that any excess is removed or the vinegar solution may stain clothing.
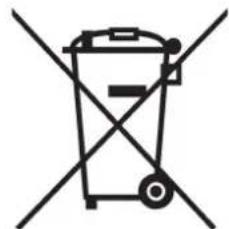
European directive 2002/96/EC
This appliance is marked according to the European directive 2002/96/EC on Waste Electrical and Electronic Equipment (WEEE).
By ensuring this product is disposed of correctly, you will help prevent potential negative consequences for the environment and human health, which could otherwise be caused by inappropriate waste handling of this product.
The symbol on the product indicates that this product may not be treated as household waste. Instead it shall be handed over to the applicable collection point for the recycling of electrical and electronic equipment
Disposal must be carried out in accordance with local environmental regulations for waste disposal.
For more detailed information about treatment, recovery and recycling of this product, please contact your local city office, your household waste disposal service or the shop where you purchased the product.
Technical specifications
Drum capacity 115 litres
Maximum load 7 kg
Height 85 cm
Width 60 cm
Depth 60 cm
Energy Label Band C
Note: For electrical data refer to the rating label on the front of the dryer cabinet (with the door open).
natural_image
Symbol of a trash bin crossed out by two diagonal lines (no text or labels)
ENGLISH
Trouble shooting
Should your dryer operate incorrectly, check the following points before calling for a service engineer.
Drying time is too long/clothes are not dry enough:
● Have you selected the correct drying time/programme? Go to page 11.
● Were the clothes too wet? Were the clothes thoroughly wrung or spin-dried?
- Does the filter need cleaning? Go to page 9.
- Does the condenser need cleaning? Go to page 10.
● Is the dryer overloaded? Go to page 8.
● Are the inlets, outlets and base of the dryer free from obstructions?
● Is the load too small? Go to page 13.
- Has the 'DELICATES' button been selected from a previous cycle? Go to page 12.
- Is the sensor system clean? Deposits from the water may form over the sensor plate. Go to page 15 ‘Cleaning the dryer’.
The dryer does not operate:
● Is there a working electricity supply to the dryer? Check using another appliance such as a table lamp.
● Is the plug properly connected to the mains supply?
● Is there a power failure?
● Has the fuse blown?
● Is the door fully closed? Go to pages 13/14.
● Is the dryer switched on, both at the mains supply and at the machine? Go to page 12.
● Has the drying time or the programme been selected? Go to page 12.
- Has the 'START' button been pressed after opening the door? Go to page 9.
● Have you pressed the 'START' button to begin the program? Go to page 13.
- Has the 'START DELAY' option been set and is there still time remaining? Go to page 13.
● Has the dryer stopped operating because the water tray is full and needs emptying? Go to page 10.
Filter Care Indicator on
- Does the filter need cleaning? Go to page 9.
Empty Water Indicator on
● Does the water container need emptying? Go to page 10.
If the supply cord on this appliance is damaged, it must be replaced by a special cord which is only available from GIAS Service or an authorised GIAS Dealer.
Should there still be a problem with your dryer after completing all the recommended checks, please call Hoover Service for advice. They may be able to assist you over the telephone or arrange for a suitable appointment for an engineer to call under the terms of your guarantee. However, a charge may be made if any of the following applies to your machine:
● Is found to be in working order.
● Has not been installed in accordance with the installation instructions.
● Has been used incorrectly.
DEUTSCH
Sicherheitshinweise
natural_image
Symbol of a trash bin crossed with two crossed lines, no text or numbers presentDEUTSCH
Marron - SOUS TENSION
natural_image
Symbol of a trash bin crossed with no signage or text (no readable text or numbers)FRANÇAIS
Dépistage de pannes
natural_image
Simple line drawing of a trash bin with two crossed lines indicating no waste or prohibition (no text or symbols)
ITALIANO
Ricerca guasti
●Have you pressed the 'AVVIO' button to begin the program? Go to page 46.
natural_image
Symbol of a trash bin crossed with two crossed lines, no text or numbers presentPOLSKI
natural_image
Symbol of a trash bin crossed with two crossed lines, no text or numbers presentDANSK
Fejlfinding
Installationskrav 74
Förbereda lasten 74
Förbereda plagg 74
Maximal torkvikt 74
Sortera lasten 74-75
Torktumlas ej 75
Energibesparing 75
Öppna luckan 75
73
Filter 75
Vattenbehållare 76
Kondensor 76
Torkguide 77
Kontroller & indikatorer 78
Funktion 79-80
natural_image
Symbol of a trash bin crossed with a diagonal line, no text or numbers presentSVENSKA
Felsökning
natural_image
Symbol of a trash bin crossed with two crossed lines, no text or numbers presentNORSK
Feilsøking
natural_image
Symbol of a trash bin crossed with two crossed lines and a solid rectangle below (no text or labels)SUOMI
Vianmääritys
natural_image
Simple line drawing of a trash bin with two crossed lines indicating no waste or prohibition (no text or symbols)
PORTUGUÊS
GEVAARLIJK ZIJN. DIT APPARAAT MOET GEAARD WORDEN.
natural_image
Simple line drawing of a trash bin crossed out by two diagonal lines (no text or symbols)
NEDERLANDS
Problemen oplossen
natural_image
Empty white rectangle with corner markers, no text or symbols present40000556-cover -Pics-Blanks.qxd 12/01/2005 19:09 Page 1
ENGLISH. GERMAN. FRENCH. ITALIAN. POLISH. DANISH
SWEDISH. NORWEGIAN. FINNISH. PORTUGUESE. DUTCH
40000556 © 2001 Printed in UK