
SWD 250 A1 - Radio SILVERCREST - Free user manual and instructions
Find the device manual for free SWD 250 A1 SILVERCREST in PDF.
| Product type | World receiver (World Receiver) |
| Brand | SilverCrest |
| Model | SWD 250 A1 |
| Dimensions (W x H x D) | 129 x 80 x 34 mm |
| Weight (without batteries) | 160 g |
| Power supply | 2 AA 1.5 V batteries or 5 V adapter (optional) |
| Frequency ranges | FM (87.5-108 MHz), MW (522-1620 kHz), SW1-6 (5.5-18.2 MHz) |
| Number of presets | 80 (10 per band) |
| Output power | 250 mW |
| Display | Digital display with backlight |
| Main features | Clock, alarm (buzzer/radio), sleep timer, key lock, manual/automatic tuning, adjustable DX sensitivity |
| Included accessories | 2 AA batteries, SWD 250 A1 earphones, case, instruction manual |
| Care and cleaning | Dry cloth, do not use corrosive liquids |
| Safety | Do not open the casing, observe battery polarity, listen at moderate volume |
| Warranty | 3 years (from date of purchase) |
| Technical support | FR: 01-712 302 83, BE: 02-700 16 43, CH: 044-511 82 91 |
| Operating temperature | 5 °C to 35 °C |
| Operating humidity | 85% relative humidity max. |
Frequently Asked Questions - SWD 250 A1 SILVERCREST
User questions about SWD 250 A1 SILVERCREST
0 question about this device. Answer the ones you know or ask your own.
Ask a new question about this device
Download the instructions for your Radio in PDF format for free! Find your manual SWD 250 A1 - SILVERCREST and take your electronic device back in hand. On this page are published all the documents necessary for the use of your device. SWD 250 A1 by SILVERCREST.
USER MANUAL SWD 250 A1 SILVERCREST
User manual and service information
IAN 93836
IAN 93836
CH
Deutsch 2
Français....33
Italiano 65
English....96
Inhalt
Einleitung....3
natural_image
Warning symbol with exclamation mark inside a triangle (no text or numbers)natural_image
Warning symbol with exclamation mark inside a triangle (no text or numbers)natural_image
Warning symbol with a sine wave inside a triangle (no text or numbers)natural_image
Warning symbol with exclamation mark inside a triangle (no text or numbers)natural_image
Warning symbol with exclamation mark inside a triangle (no text or numbers)natural_image
Warning symbol with exclamation mark inside a triangle (no text or numbers)Wartung / Reinigung
natural_image
Warning symbol with exclamation mark inside a triangle (no text or numbers)natural_image
Warning symbol with exclamation mark inside a triangle (no text or numbers)natural_image
Warning symbol with a sine wave inside a triangle (no text or numbers)natural_image
Symbol of a trash bin crossed with diagonal lines, no text or numbers presentIntroduction......34
Maintenance/nettoyage....42
Droits d'auteur 43
natural_image
Warning symbol with exclamation mark inside a triangle (no text or numbers)natural_image
Simple line drawing of a sound wave inside a triangle (no text or symbols)natural_image
Warning symbol with exclamation mark inside a triangle (no text or numbers)natural_image
Warning symbol with exclamation mark inside a triangle (no text or numbers)Piles
natural_image
Warning symbol with exclamation mark inside a triangle (no text or numbers)natural_image
Warning symbol with exclamation mark inside a triangle (no text or numbers)natural_image
Warning symbol with exclamation mark inside a triangle (no text or numbers)natural_image
Warning symbol with exclamation mark inside a triangle (no text or numbers)natural_image
Warning symbol with exclamation mark inside a triangle (no text or numbers)natural_image
Warning symbol with a sine wave inside a triangle (no text or numbers)natural_image
Symbol of a trash bin crossed with no text or numbers, representing waste sorting or disposal (no text present)natural_image
Warning symbol with a triangle containing an ear and sound waves (no text or numbers)natural_image
Warning symbol with exclamation mark inside a triangle (no text or numbers)Attenzione:
natural_image
Warning symbol with exclamation mark inside a triangle (no text or numbers)Batterie
natural_image
Warning symbol with exclamation mark inside a triangle (no text or numbers)
natural_image
Warning symbol with exclamation mark inside a triangle (no text or numbers)natural_image
Warning symbol with exclamation mark inside a triangle (no text or numbers)natural_image
Warning symbol with exclamation mark inside a triangle (no text or numbers)natural_image
Warning symbol with a triangle containing a stylized ear and sound waves (no text or numbers)natural_image
Simple line drawing of a trash bin with crossed lines indicating no waste or restriction (no text or symbols)Supplied items....99
Technical data....100
Safety instructions 101
Health risks due to high volume.... 102
Operating environment 102
Batteries 103
Children and persons with disabilities.... 104
Cleaning / maintenance 105
Copyright 105
Overview of the controls 106
Display.... 108
Stand....108
Prior to use....109
Inserting the batteries.... 110
Connecting a mains adapter 111
First use 112
Switching the device on and off 112
Setting the time.... 112
Selecting a station.... 113
Saving a station 114
Selecting a saved station 115
Alarm function 115
Switching off the alarm 117
Sleep timer....117
Connecting the headphones.... 118
Backlight 119
Keypad lock.... 119
Setting the reception sensitivity 120
Disposal of the packaging 122
Disposal of batteries.... 122
Troubleshooting 121
Environmental and disposal information.... 122
Conformity information.... 123
Warranty and servicing advice 123
Introduction
Thank you for purchasing a SilverCrest product.
The SilverCrest world receiver SWED 250 A1 allows you to receive stations from 6 different shortwave bands, the FM band and the AM band. The device is also equipped with a digital clock, which you can programme as an alarm clock.
Read how to use the device on the following pages.

WARNING! This symbol indicates important information for safe operation of the device and the safety of the user.
This symbol indicates other important information on the topic.
Intended use
This is a consumer electronics device which is used to receive and play radio stations. The device can also be used as an alarm clock. It is only designed for private use and not for industrial or commercial purposes. Furthermore, the device may not be used manufacturer does not accept any liability for any resulting damage or faults in the event of unauthorised modifications to the device. Only use accessories specified by the manufacturer. Please observe the regulations and laws in the country of use.
Please note that different countries may have different national regulations regarding free-to-air frequency ranges. Information received outside of the permitted frequency ranges must not be exploited nor its content or the fact of its reception forwarded to third parties.
Supplied items
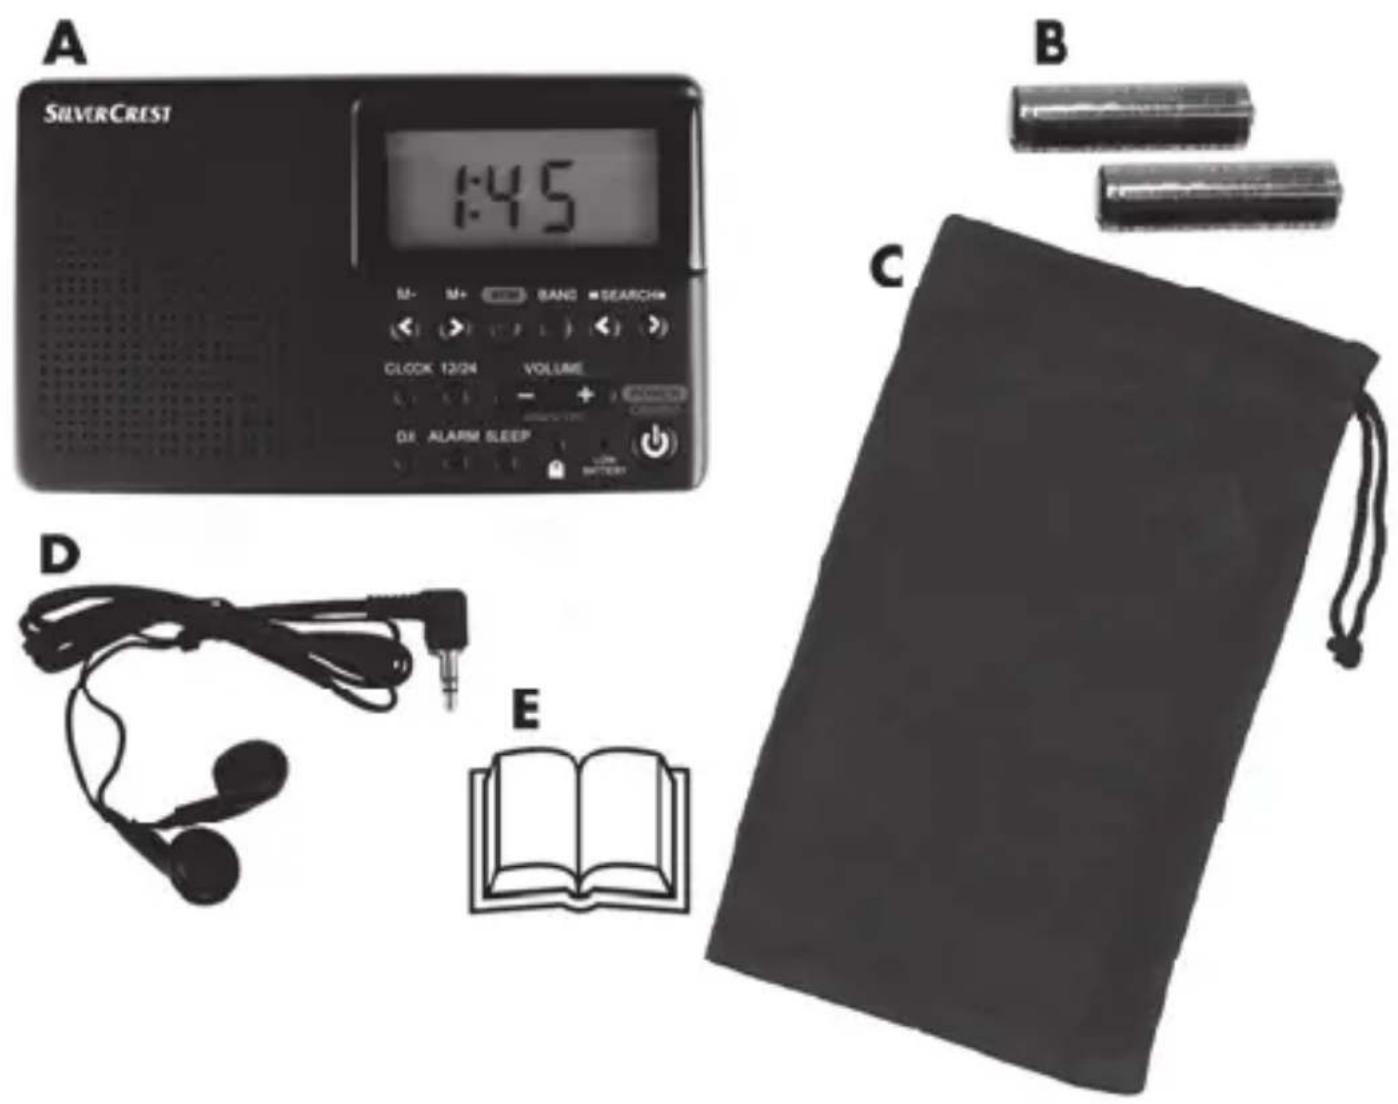
A World receiver SWED 250 A1
B 2 batteries of type AA, 1.5V
C Pouch
D Earphones SWED 250 A1
E These instructions (symbolic representation)
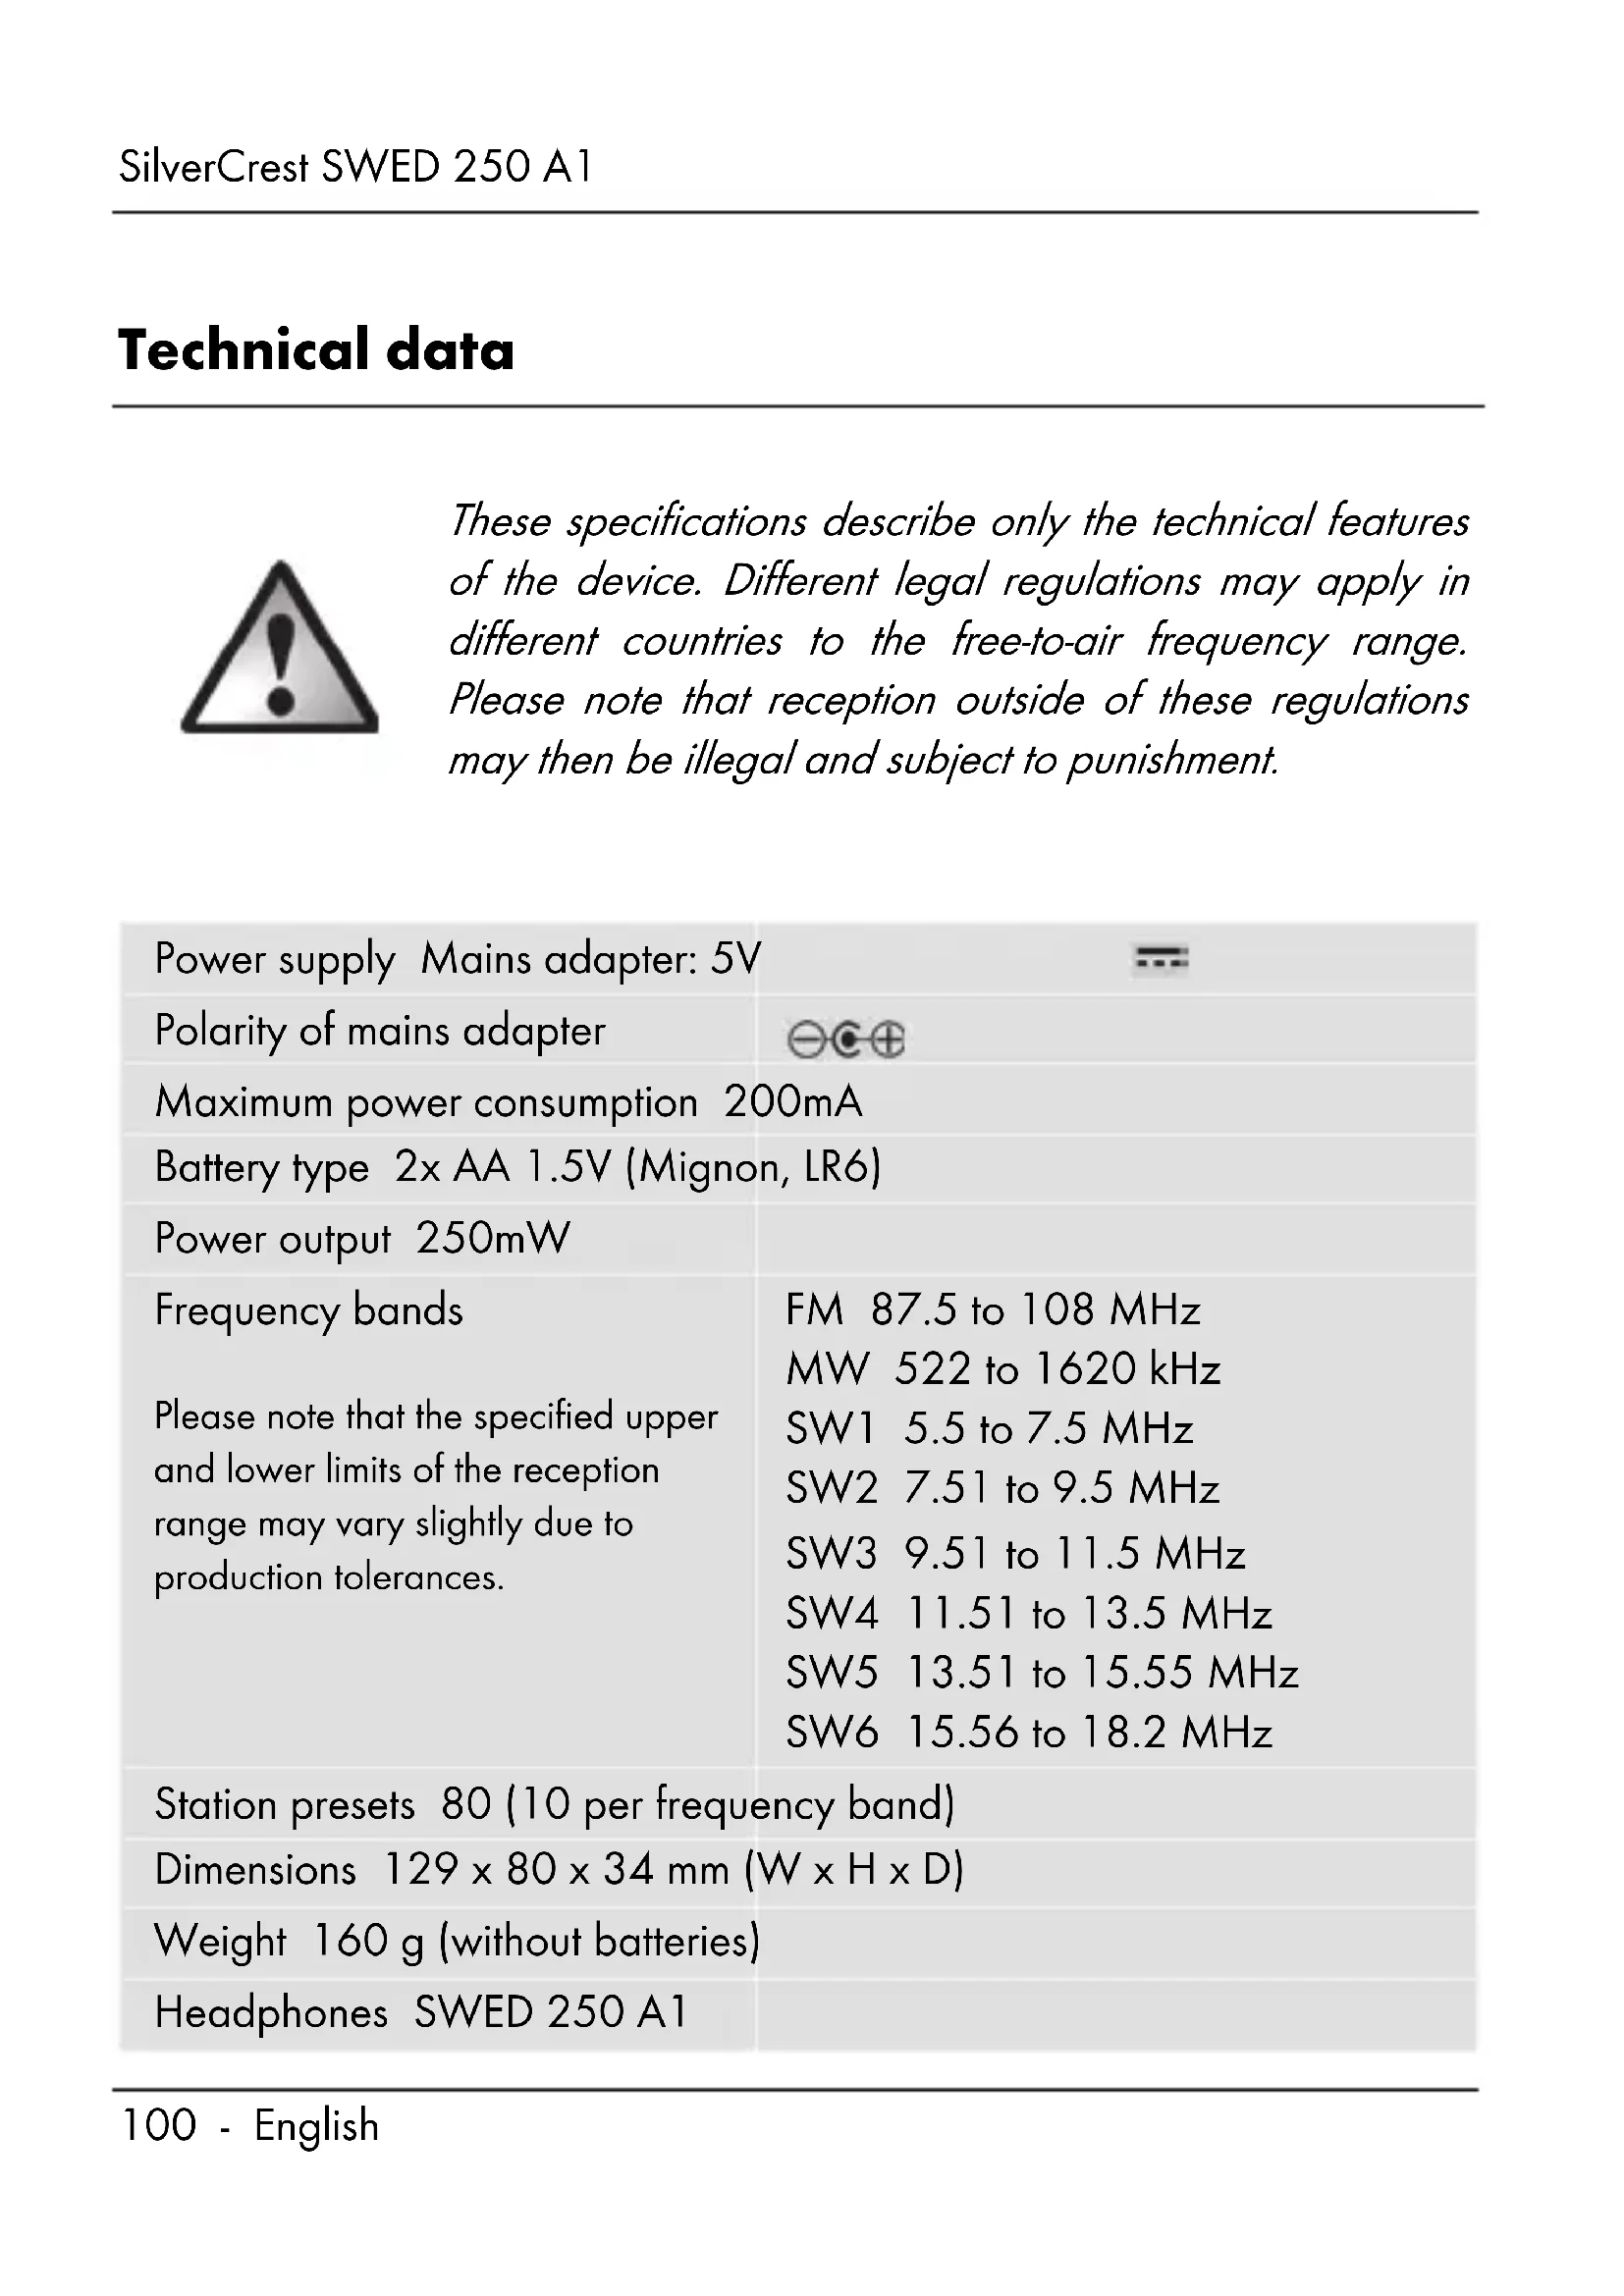
Technical data

natural_image
Warning symbol with exclamation mark inside a triangle (no text or numbers)These specifications describe only the technical features of the device. Different legal regulations may apply in different countries to the free-to-air frequency range. Please note that reception outside of these regulations may then be illegal and subject to punishment.
| Power supply Mains adapter: 5V | |
| Polarity of mains adapter | ⊖⊖⊖ |
| Maximum power consumption 200mA | |
| Battery type 2x AA 1.5V (Mignon, LR6) | |
| Power output 250mW | |
| Frequency bands | FM 87.5 to 108 MHz |
| MW 522 to 1620 kHz | |
| Please note that the specified upper and lower limits of the reception range may vary slightly due to production tolerances. | SW1 5.5 to 7.5 MHz |
| SW2 7.51 to 9.5 MHz | |
| SW3 9.51 to 11.5 MHz | |
| SW4 11.51 to 13.5 MHz | |
| SW5 13.51 to 15.55 MHz | |
| SW6 15.56 to 18.2 MHz | |
| Station presets 80 (10 per frequency band) | |
| Dimensions 129 x 80 x 34 mm (W x H x D) | |
| Weight 160 g (without batteries) | |
| Headphones SWED 250 A1 | |
| Impedance 32 Ohm | |
| Wideband characteristic voltage (WBCV) approx. 80mV | |
| Maximum sound pressure with the enclosed headphones approx. 85 dB(A) | |
| Maximum output voltage at the headphone jack approx. 27mV | |
| Operating temperature 5°C to 35°C | |
| Storage temperature -10°C to 50°C | |
| Operating air humidity 85% rel. air humidity | |
The technical data and design may be changed without notification.
Safety instructions
Before using this device for the first time, please read the following instructions carefully and take note of the safety warnings, even if you are familiar with the use of electronic devices. Store these instructions in a safe place for future reference. If you sell the device or pass it on, always include this manual.
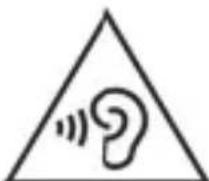
Health risks due to high volume
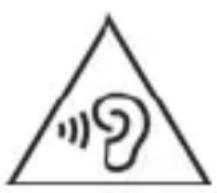
natural_image
Warning symbol with a triangle containing an ear and sound waves (no text or numbers)Take care when using the enclosed headphones. Listening at high volume for prolonged periods of time can damage your hearing. Only use the enclosed headphones.
Operating environment
The device is not designed for use in environments with a high temperature or humidity (e.g. bathrooms) or in extremely dusty conditions. Operating temperatures and operating air humidity: 5°C to 35°C, max. 85% rel. air humidity.

Ensure that
■ air can always circulate freely (do not place the device on shelves, on a carpet or a bed or anywhere where ventilation slots are covered, and always leave at least 10 cm clearance on all sides);
- no direct heat sources (e.g. heating) can affect the device;
■ no direct sunlight or bright artificial light reaches the device;
- any contact with splashed and dripping water and corrosive liquids is avoided and the device is not operated in the vicinity of water. In particular, the device should never be submerged in liquid (do not place any items filled with liquid, e.g. vases or drinks, on or near the device);
■ the device is not in the immediate vicinity of magnetic fields (e.g. speakers);
■ no fire sources (e.g. burning candles) are placed on or near the device;
■ no foreign objects penetrate the device;
■ the device is never subjected to extreme temperature fluctuations as this could result in condensation and electrical short circuits. If the device was subjected to extreme temperature fluctuations, however, wait (approx. 2 hours) until the device has reached ambient temperature before use;
■ the device is never subjected to excessive shocks and vibrations;
- the device or an optional mains adapter is not used during a thunderstorm with lightning and remove an optional mains adapter from the mains socket;
■ when using a mains adapter, the mains socket to which the device is connected is easily accessible at all times. Always lay cables in such a manner that nobody can trip over them.

natural_image
Warning symbol with exclamation mark inside a triangle (no text or numbers)Batteries
Always ensure correct polarity of the batteries. Please note the markings next to the battery compartment. Never try to recharge batteries and never throw them into an open fire. Never mix batteries (old and new, alkaline and carbon, etc.) at the same time. Remove the batteries if you will not be
using the device for an extended period of time. In the event of improper use, there is a risk of explosion and leakage.
Batteries may not be deformed or opened as leaking chemicals can cause injuries. In the event of skin or eye contact with chemicals, they must be immediately rinsed with generous amounts of water and a doctor must be consulted.

Children and persons with disabilities
Electrical devices do not belong in the hands of children. Persons with limited physical, sensory or mental abilities should also only use electrical devices appropriately. Never allow children or persons with disabilities to use electrical devices unsupervised unless they have been instructed accordingly or are supervised by a person responsible for their safety. Children should always be supervised to ensure that they do not play with this device. Batteries and small parts may cause choking resulting in death or serious injury. Store the batteries in a safe place. If a battery is swallowed, seek medical help immediately. Always keep plastic packaging out of reach also.

It poses a suffocation risk!

natural_image
Warning symbol with exclamation mark inside a triangle (no text or numbers)Cleaning / maintenance
It is necessary to repair the device if it has been damaged in any way, for example, if the mains adapter or housing is damaged, if liquid or objects have penetrated the device or if the product has been exposed to rain or moisture. Repair work is also required if the device is not working properly or has been dropped. If you notice any smoke, unusual noises or strange odours, switch off the device immediately and remove the batteries or remove the mains adapter from the mains socket. In these cases, the device should not be used until it has been inspected by authorised service personnel. Only have the device repaired by qualified personnel. Never open the housing of the device. Only use a clean, dry cloth for cleaning and never use any corrosive liquids. Never try to open the housing of the device as this would void your warranty.
If the batteries have leaked, the device must be cleaned by authorised service personnel.
Copyright
All information contained in these instructions is subject to copyright and is provided for information purposes only.
It is only permitted to copy or duplicate data and information express and written consent of the author. This also includes commercial use of the content and data.
The text and illustrations are based on the state of the art at the time of printing.
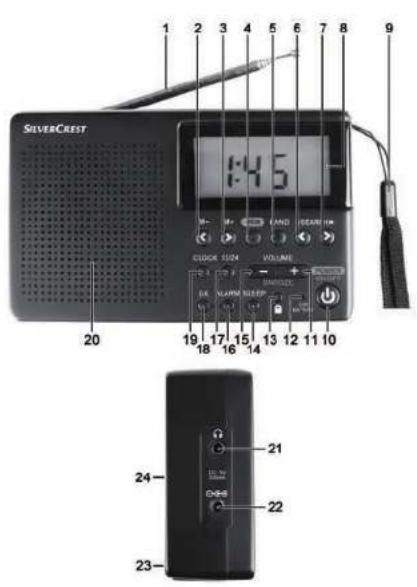
Overview of the controls
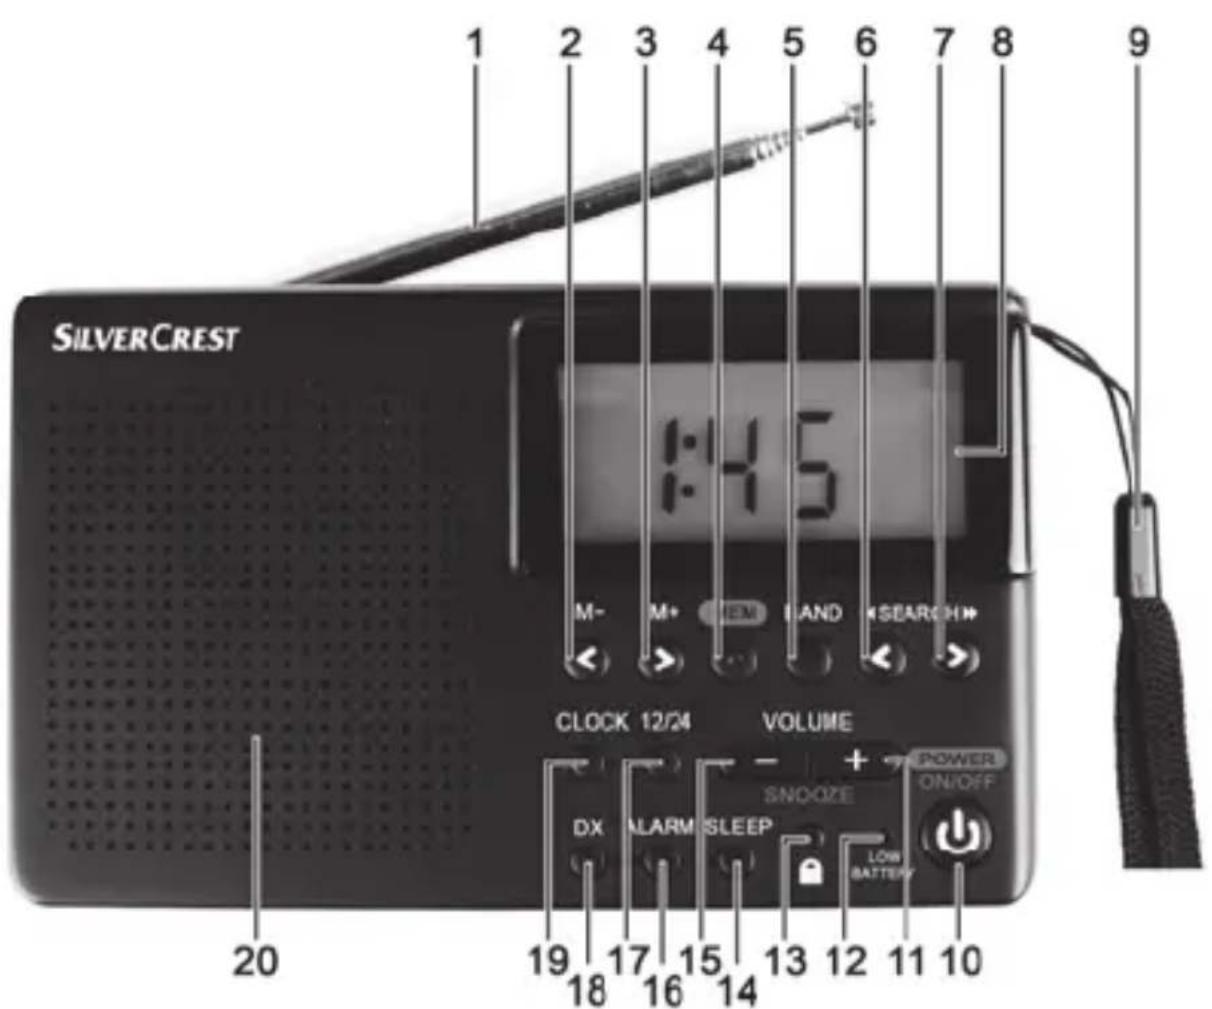
| 1 | Telescopic aerial |
| 2 | M- (call previous preset, - hour setting) |
| 3 | M+ (call next preset, + hour setting) |
| 4 | MEM (save station) |
| 5 | BAND (select frequency band) |
| 6 | < SEARCH (tune down, - minute setting) |
| 7 | SEARCH > (tune up, + minute setting) |
| 8 | Display |
| 9 | Strap |
| 10 | POWER ON/OFF (turn on/off) |
| 11 | VOLUME +/SNOOZE (increase volume/postpone alarm for approx. 9 minutes) |
| 12 | LOW BATTERY indicator (low battery) |
| 13 | (keypad lock) |
| 14 | SLEEP (activate SLEEP timer) |
| 15 | VOLUME -/SNOOZE (reduce volume/postpone alarm for approx. 9 minutes) |
| 16 | ALARM (set or activate/deactivate alarm) |
| 17 | 12/24 (switch between 12-hour/24-hour display) |
| 18 | DX (set reception sensitivity) |
| 19 | CLOCK (set time) |
| 20 | Loudspeaker |
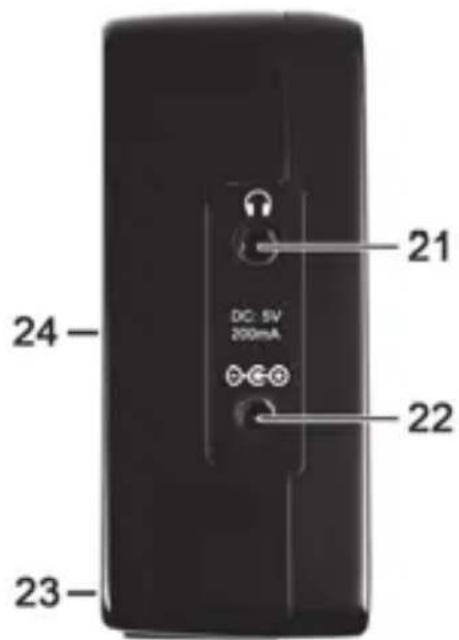
| 21 | (socket for headphones) |
| 22 | (socket for mains adapter/optional) |
| 23 | Battery compartment (at the back) |
| 24 | Stand (at the back) |
Display
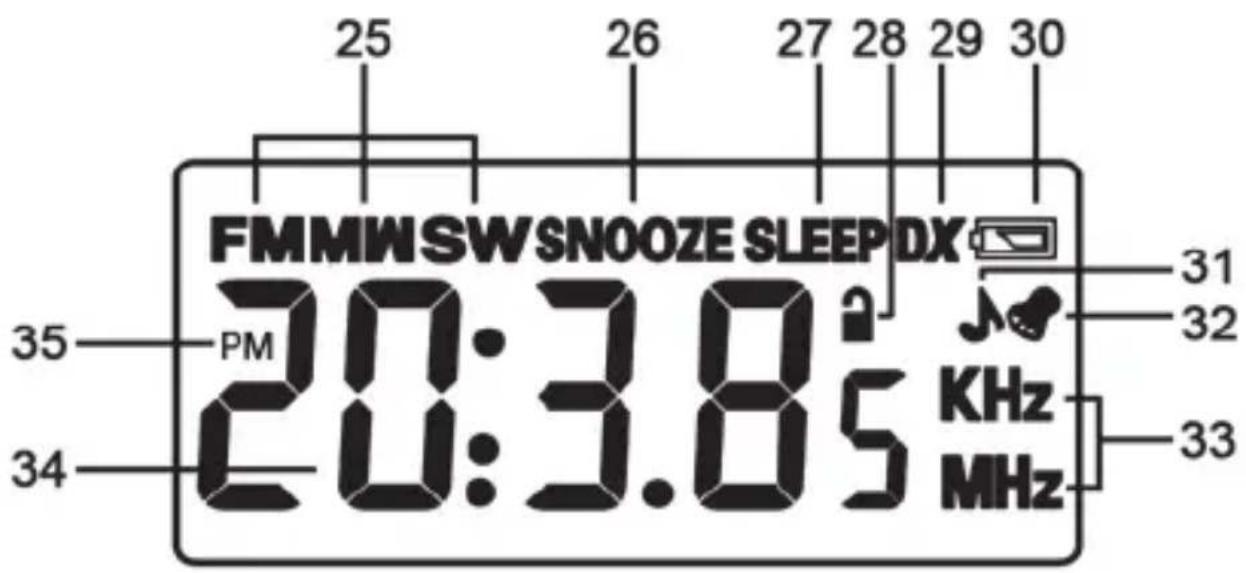
25 Frequency band
26 Snooze
27 Sleep timer
28 Keypad lock
29 Reception sensitivity
30 Battery low
31 Alarm function with radio
32 Alarm function with alarm tone
33 Unit of frequency
34 Time/frequency display
35 PM display
Stand
A stand [24], with which you can position the world receiver at an angle, is located at the back of the device. Simply open out the stand [24] and close it again after use.
Prior to use
You can use the device either with the enclosed batteries of type AA (Mignon) or with an optional mains adapter (not supplied). Ensure correct polarity when using batteries! The mains adapter must have a suitable DC voltage plug and have an operating voltage of 5V.

natural_image
Warning symbol with exclamation mark inside a triangle (no text or numbers)Do not use both operating options at the same time. Remove the batteries before you connect the device with the mains adapter because the batteries may leak when not in use.
Inserting the batteries
Remove the connection cable of the mains adapter if such a cable is connected. Then open the battery compartment [23] at the back of the device by sliding its cover downwards in the direction of the imprinted arrow. Insert the batteries with the correct polarity (note + and -) as shown in the following illustration. The polarity is illustrated on the batteries and next to the battery compartment. Replace the battery compartment cover and slide it back in the opposite direction to the arrow.
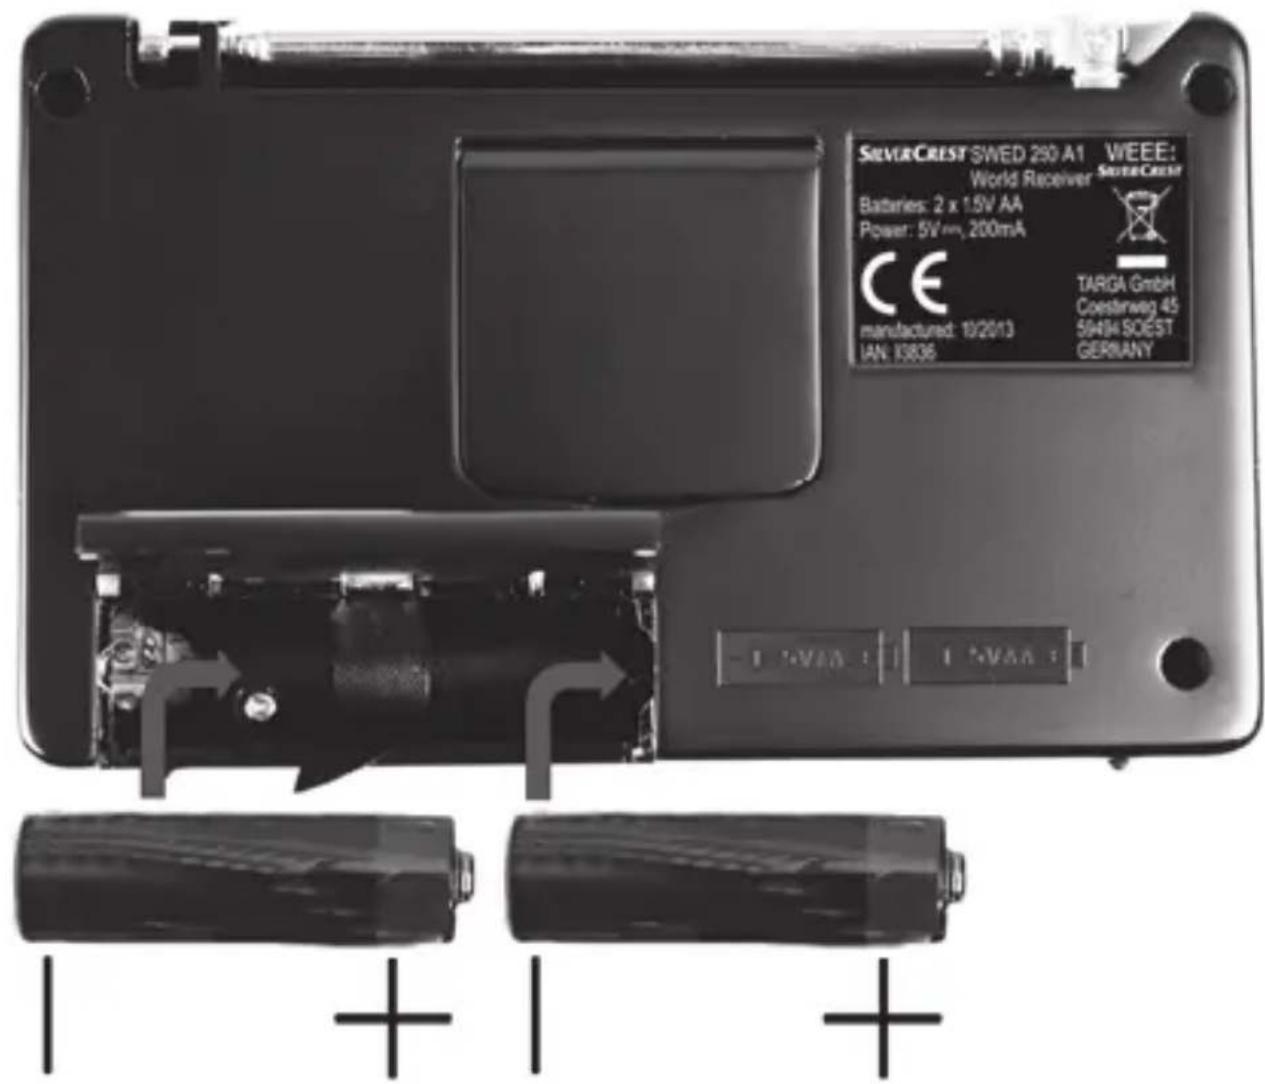

Saved radio stations are preserved when batteries are changed.
The device has a LOW BATTERY indicator [12] warning light for the energy level of the batteries. If this indicator lights up yellow and the symbol 📄 [30] is indicated on the display [8], the batteries are weak. Then replace the batteries shortly with new batteries of the same type.

Remove the batteries if you will not be using the device for an extended period of time.
Connecting a mains adapter
Remove the batteries from the battery compartment [23] at the back of the device if you have previously inserted them. Insert the plug of the mains adapter into the socket ⊖⊕[22] of the world receiver. Then insert the mains adapter into an easily accessible mains socket.

natural_image
Warning symbol with exclamation mark inside a triangle (no text or numbers)When laying the cable, make sure that nobody can trip over it.
First use
Switching the device on and off
To switch on the device, press the POWER ON/OFF button [10] once briefly. When it is switched on, the device shows the tuned frequency and the frequency band (FM, MW, SW) on the display [8].
To switch off the device, press the POWER ON/OFF button [10] again. When it is switched off, the display [8] shows the time that is currently set.

When you press a button, please note that the backlight of the display is always switched on device performs the function (except for switching on and off). This function is useful in the dark, for example, for reading the time on the display without inadvertently using another function.
Setting the time
You can set the time only when the device is switched off. Switch off the device with the POWER ON/OFF button [10] if it is switched on.

You can use the 12/24 button [17] to switch between the 12-hour and 24-hour display. For the 12-hour display, the symbol "PM" [35] is indicated on the display once it is past noon.
- Press the CLOCK button [19] once so that the time starts to flash on the display. If only the backlight was switched on when you pressed the button, you must press the CLOCK [19] button again. You can set the time while it is flashing.
- Set the hours with the M- [2] or M+ [3] button. You can also keep the M- [2] or M+ [3] button pressed to speed up the progress of the numbers.
- Set the minutes with the < SEARCH [6] or SEARCH > [7] button. You can also keep the < SEARCH [6] or SEARCH > [7] button pressed to speed up the progress of the numbers.
- Wait until the set time stops flashing on the display [8] or briefly press the CLOCK button [19].

Note that you can only adjust the time as long as the time is flashing on the display [8]. If no entry has been made for a few seconds, the time on the display [8] stops flashing and the process must be repeated.
Selecting a station

natural_image
Warning symbol with exclamation mark inside a triangle (no text or numbers)The telescopic aerial can only be swivelled and cannot be inserted into the device housing. Otherwise, the device could be damaged.
- Switch on the device by pressing the POWER ON/OFF button [10].
-
Set the desired volume using the VOLUME - [15] or VOLUME + [11] buttons.
-
First, select the desired frequency band. To do so, repeatedly press the BAND button [5] to go from one frequency band to another in succession. The tuned frequency is shown on the display [8].
■ Pull out the telescopic aerial [1] completely. - Press the < SEARCH [6] or SEARCH > [7] button briefly or repeatedly to tune in the desired frequency manually. To search automatically for a station, press the < SEARCH [6] or SEARCH > [7] button a little longer. The frequency is shown on the display in MHz (FM and SW) or in kHz (MW). If necessary, move the telescopic aerial in a different direction, or change the position of the device to improve the reception.
Saving a station
After you have selected a station, you can save it as follows:
- Press the MEM button [4].
■ "P" then flashes on the display [8], followed by 01 to 10. - Select the desired programme preset using the M- [2] or M+ [3] button.
- Press the MEM button [4] again briefly to save the station to the currently selected programme preset.
- The station is saved and the frequency of the station is then indicated on the display [8].
Selecting a saved station
- In order to select a saved station, the device must be in use. Switch on the device with the POWER ON/OFF button [10] if it is switched off.
- Press the M- [2] or M+ [3] button to select another station (programme preset).
Alarm function

With the radio alarm function, the device automatically switches itself on at the set alarm time with the last set volume, the established frequency and the last tuned frequency band.
Make sure that the time is set correctly (see page 112 - Setting the time). You can set the alarm function only when the device is switched off. Switch off the device with the POWER ON/OFF button [10] if it is switched on.
- Press the ALARM button [16] once to activate the alarm function with alarm tone. If only the backlight was switched on when you pressed the button, you must press the ALARM button [16] again. The alarm time and the symbol 📋 [32] then flash on the display [8].
-
Press the ALARM button [16] twice to activate the alarm function with radio. If only the backlight was switched on when you first pressed the button, you must press the ALARM button [16] again. The alarm time and the symbol ⏻[31] then flash on the display [8].
■ While the alarm time is flashing, you can set it. -
Set the hours with the M- [2] or M+ [3] button. You can also keep the M- [2] or M+ [3] button pressed to speed up the progress of the numbers.
- Set the minutes with the < SEARCH [6] or SEARCH > [7] button. You can also keep the < SEARCH [6] or SEARCH > [7] button pressed to speed up the progress of the numbers.
- Then wait until the set alarm time stops flashing on the display [8]. The alarm time is then saved automatically.
- The display [8] then indicates the time and the symbol 🎨 [32] again for the alarm function with alarm tone or the symbol 🎨 [31] for the alarm function with radio.
■ To deactivate the alarm function, press the ALARM button [16] repeatedly until the symbols 🎨 [32] and ⌘[31] are deleted from the display [8].

Note that you can only adjust the alarm time as long as the alarm time is flashing on the display [8]. If no entry has been made for a few seconds, the alarm time on the display [8] stops flashing and the process must be repeated.

Even if the alarm function is activated, you can use the device as usual.
Switching off the alarm
When the alarm sounds, you can deactivate it as follows:
- Press the POWER ON/OFF button [10] to stop the alarm. The alarm is switched off until the next day.
or - Press the SNOOZE button [11/15] to postpone the alarm for about 9 minutes. The alarm sounds again after this time.

During snooze, "SNOOZE" [26] is indicated on the display [8] and the symbol 🎨 [32] or ⬆[31] flashes.
Sleep timer
You can use the sleep timer to switch on the device and switch it off automatically after a selected time.
- Press the SLEEP button [14] when the device is switched on or off. If only the backlight was switched on when you pressed the button, you must press the SLEEP [14] button again. The display then shows "SLEEP" [27] and the number "90" and thus indicates that the device will switch off after 90 minutes.
■ Repeatedly press the SLEEP button [14] to reduce the switch-off time. Each time you press the button, the time is reduced by a further 10 minutes.
- If you have reached the switch-off time "10" and you press the SLEEP button [14] again, the sleep timer is deactivated, but the device remains switched on. You can press the SLEEP button [14] again to select the time settings once again.

When the sleep timer is activated, you can switch it and the device off at any time using the POWER ON/OFF button [10].

If you press the SLEEP button [14] while the timer is on, the remaining time of the timer appears on the display [8].
Connecting the headphones

To avoid hearing damage, you must set the volume to the lowest level before connecting the headphones. You can then adjust the volume to the desired level.

Do not use any other headphones than the supplied SWED 250 A1 headphones. Other headphones can create harmful sound pressure.
Take care when using the headphones Listening at high volume for prolonged periods of time can damage your hearing.
You can connect the supplied headphones SWED 250 A1 to the socket [21]. When the headphones are connected, the loudspeaker [20] is automatically switched off.
Backlight
The backlight is switched on automatically for approx. 3 seconds when a button is pressed (except when switching the device off).
Keypad lock
Press the 🔔 button [13] once so that the symbol 🔔 [28] is indicated on the display [8] to lock the buttons against accidental entries. If only the backlight was switched on when you pressed the button, you must press the 🔔 button [13] again.
Press the 🔔 button [13] once so that the symbol 🔔[28] is no long indicated on the display [8] to release the keypad lock. If only the backlight was switched on when you pressed the button, you must press the 🔔 button [13] again.
If the keypad lock is activated, this is indicated by the symbol 🔒[28] on the display [8].
Setting the reception sensitivity
The DX function is activated in the original condition of the device. This is indicated by "DX" [29] on the display [8] when the device is switched on. Use the DX function if you would like to use the device in normal operation.
Switch off the DX function if only stations with a high field strength be received. This is recommended, for example, if a desired weak local station is superimposed by stronger national channels.
To switch off the DX function, press the DX button [18] when the device is switched on. The "DX" indicator [29] then fades out from the display [8]. Press the DX button [18] again to switch on the DX function again.
Troubleshooting
The device cannot be switched on
- The batteries may be empty, therefore, replace the batteries.
- Check whether the batteries have been inserted with the correct polarity. Please note the markings next to the battery compartment and on the batteries. Also refer to the description on page 110.
No radio reception, poor radio reception
- Pull out the telescopic aerial [1] completely and make sure that it is oriented correctly.
- Tune in the station correctly using the BAND button [5] and the < SEARCH [6] or SEARCH > [7] buttons.
- Check the set reception sensitivity. Please pay particular attention to the section "Setting the reception sensitivity" on page 120.
No sound although device is switched on
- Check the volume setting.
- Check if headphones are connected and remove them if necessary.
Environmental and disposal information

natural_image
Symbol of a trash bin crossed with diagonal lines and a horizontal bar below (no text or labels)When the crossed out wheelie bin symbol appears on a product, this indicates that the product is subject to the European Directive 2012/19/EU. All old electrical and electronic devices must be separated from normal household waste and disposed of at designated state facilities. The correct disposal of old/defective devices in this manner will prevent environmental pollution and human health hazards. For further information about proper disposal of old/defective devices, contact your local authorities, waste disposal office or the shop where you bought the device.
Disposal of the packaging
Dispose of the packaging in an environmentally compatible manner. Cardboard can be put out for municipal paper collections or brought to public collection points for recycling. Films and plastic used for packaging the device are collected by your local disposal services and disposed of in an environmentally compatible manner.
Disposal of batteries
Remember to protect the environment. Used batteries should not be disposed of in domestic waste. They must be taken to a collection point for old batteries. Please note that only discharged batteries may be deposited
in collection bins for portable batteries. Care must be taken to ensure that batteries that are not fully discharged do not short circuit.
Conformity information
CE This device meets the basic requirements and other relevant regulations of the EMC Directive 2004/108/EC as well as the RoHS Directive 2011/65/EU.
Warranty and servicing advice
Warranty of TARGA GmbH
This device is sold with three years warranty from the date of Please keep the original receipt in a safe place as proof of purchase. Before using your product for the first time, please read the enclosed documentation or online help. Should any problems arise which cannot be solved in this way, please call our hotline. Please have the article number and, if available, the serial number to hand for all enquiries. If it is not possible to solve the problem on the phone, our hotline support staff will initiate further servicing procedures depending on the fault. Within the warranty period the product will be repaired or replaced free of charge as we deem appropriate. No new warranty period commences if the product is repaired or replaced. Consumables such as batteries, rechargeable batteries and lamps are not covered by the warranty.
Your statutory rights towards the seller are not affected or restricted by this warranty.

Service

Phone: 0207 - 36 50 744
E-Mail: service.GB@targa-online.com

Phone: 01 - 242 15 83
E-Mail: service.IE@targa-online.com

Phone: 800 - 62 175
E-Mail: service.MT@targa-online.com

Phone: 800 - 92 496
E-Mail: service.CY@targa-online.com
IAN: 93836

Manufacturer
TARGA
GmbH
Coesterweg 45
59494 SOEST
GERMANY
C€
EU-Declaration of Conformity
Address:
Targa GmbH
Coesterweg 45
59494 Soest, Germany
Product:
Digital Multi-Band Radio
Model:
SilverCrest SWED 250 A1
Identification number:
93836
The product complies with the requirements of the following European directives:
2004/108/EC
Electromagnetic Compatibility
2011/65/EU
Restriction of the use of certain hazardous substances in electrical and electronic equipment
Compliance was proved by the application of the following standards:
EMC:
EN 55013.2001+A1.2003+A2.2006
EN 55020: 2007+A11:2011
RoHS:
EN 50581:2012
Year of CE marking: 2014
Soest, 15 ^th of January 2014

natural_image
Abstract curved line drawing with no text or symbolsMatthias Klauke, Managing Director