
SKR D1 A1 - Radio SILVERCREST - Free user manual and instructions
Find the device manual for free SKR D1 A1 SILVERCREST in PDF.


| Product Type | Portable Radio |
| Brand | SilverCrest |
| Model | SKR D1 A1 |
| Radio Bands | DAB+, FM (87.5-108 MHz) |
| Preset Stations | 20 DAB+ / 20 FM |
| Dimensions (W x H x D) | 180 x 120 x 75 mm |
| Weight | Approx. 570 g (without batteries) |
| Power Supply | DC 5V 1A (via micro-USB) or 3x AA batteries (not included) |
| Audio Power | 2 x 3 W RMS (stereo) |
| Speaker | Built-in stereo speakers, 10 cm driver |
| Headphone Jack | 3.5 mm stereo |
| Alarm Functions | 2 independent alarms (wake to radio or buzzer), snooze |
| Sleep Timer | Yes, adjustable 15/30/45/60/90 minutes |
| Display | LCD with backlight, shows station info, clock |
| Clock | Auto-set via DAB/FM (RDS), manual setting possible |
| Additional Functions | Bluetooth reception for audio streaming |
| Antenna | Built-in ferrite rod for AM; telescopic rod for DAB/FM |
| Cleaning | Use a dry, soft cloth; do not use solvents |
| Safety Features | Overheat protection, battery compartment polarity indicator |
| Spare Parts / Reparability | Replacement battery compartment cover available; professional repair only for internal parts |
| General Information | CE certified, eco-friendly standby consumption <1W |
Frequently Asked Questions - SKR D1 A1 SILVERCREST
User questions about SKR D1 A1 SILVERCREST
0 question about this device. Answer the ones you know or ask your own.
Ask a new question about this device
Download the instructions for your Radio in PDF format for free! Find your manual SKR D1 A1 - SILVERCREST and take your electronic device back in hand. On this page are published all the documents necessary for the use of your device. SKR D1 A1 by SILVERCREST.
USER MANUAL SKR D1 A1 SILVERCREST

DAB+ KITCHEN RADIO SKR D1 A1
GB IE NI
DAB+ KITCHEN RADIO
Operation and safety notes


Warnings and symbols used .... Page 7
Introduction Page 8
Intended use Page 8
Scope of delivery Page 8
Trademark notice....Page 8
Description of parts....Page 8
Technical data....Page 9
Safety notes....Page 10
Safety instructions for batteries....Page 12
Before use....Page 12
Unpacking....Page 12
Inserting / Replacing the power reserve....Page 12
Requirements for the set-up location....Page 12
Installation under a wall cupboard....Page 13
Dismantling Page 13
Initial operation....Page 14
Switching the product on/off. Page 14
Mode selection Page 14
Volume adjustment Page 14
System settings Page 14
FM operation....Page 16
Searching stations....Page 16
Search functions ...... Page 16
Audio settings Page 16
FM display modes....Page 16
DAB operation....Page 17
Full scan....Page 17
Manual tuning....Page 17
Deleting unavailable stations. Page 17
DAB display modes....Page 18
Presetting currently active station....Page 18
Recalling a preset station Page 18
Sleep timer Page 18
Alarm setting....Page 19
Snooze function....Page 19
Kitchen timer Page 19
Setting and operating the kitchen timer....Page 19
Cancelling the kitchen timer Page 20
Power reserve....Page 20
Insert / change batteries....Page 20
Cleaning and care Page 20
Storage Page 20
Troubleshooting Page 21
Glossary Page 21
Simplified EU declaration of conformity ...... Page 21
Disposal Page 21
Warranty Page 22
| Warnings and symbols usedThe following warnings are used in this user manual and on the packaging: | |||
 | DANGER! This symbol in combination with the signal word “Danger” marks a high-risk hazard that if not prevented could result in death or serious injury. |  | WARNING! This symbol in combination with the signal word “Warning” marks a medium-risk hazard that if not prevented could result in death or serious injury. |
 | CAUTION! This symbol in combination with the signal word “Caution” marks a low-risk hazard that if not prevented could result in minor or moderate injury. |  | ATTENTION! This symbol with the signal word “Attention” indicates a possible property damage. |
 | NOTE: This symbol in combination with “Note” provides additional useful information. |  | Protection class III. The radio (excluding the power adaptor) is to be supplied from a safety extra-low voltage (SELV) power source. |
 | Use the product in dry indoor spaces only. |  | Symbol for a Protection Class II product. |
 | WARNING! EXPLOSIONHAZARD! A warning with this symbol and word “WARNING! EXPLOSION HAZARD” indicates the potential threat of explosion. Failure to observe this warning may result in serious or fatal injuries and potential property damage. Follow the instructions in this warning to prevent serious injuries, a danger to life or property damage! |  | This mandatory sign indicates to wear suitable protective gloves! Follow the instructions of this warning to avoid hand injuries caused by objects or contact with hot or chemical materials. |
 | This symbol means that the operating instructions must be observed before using the product. | ||
| Alternating current / voltage Direct current |  | ||
 | This symbol refers to the special rules of conduct associated with children. |  | Polarity of barrel connector |
DAB+ KITCHEN RADIO
● Introduction
We congratulate you on the purchase of your new product. You have chosen a high quality product. The instructions for use are part of the product. They contain important information concerning safety, use and disposal. Before using the product, please familiarise yourself with all of the safety information and instructions for use. Only use the product as described and for the specified applications. If you pass the product on to anyone else, please ensure that you also pass on all the documentation with it.
Intended use
The DAB+ kitchen radio (hereinafter called "product") is a consumer electronics device. It is used for the reception and playback of analogue and digital radio programs. This product may only be used privately and not for industrial or commercial purposes. This product may not be used in tropical climates. Any other use is considered improper. Any claims resulting from improper use or due to unauthorised modification of the product will be considered un-warranted. Any such use is at your own risk.
- Scope of delivery
After unpacking the product, check if the delivery is complete and if all parts are in good condition. Remove all packing materials before use.
1x DAB+ kitchen radio 1x Power adaptor 1x Mounting plate (pre-assembled)
4x Spacers 4x Mounting screws (long) 4x Mounting screws (short) 2x Battery (AA) 1x Instructions for use
Trademark notice
The SilverCrest trademark and trade name are the property of their respective owners. Any other names and products are trademarks or registered trademarks of their respective owners.
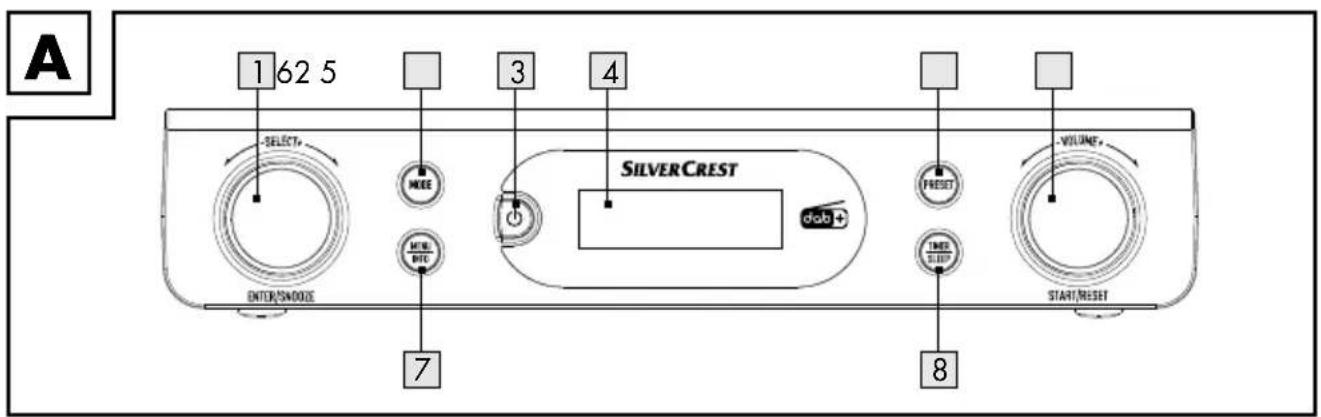
Description of parts
Please refer to the fold-out page.
1 Selection control 2 MODE button 3 Standby 4 Display 5 PRESET Preset button 6 VOLUME I START/RESET Volume/Start/Reset 7 MENU INFO Menu/Info 8 TIMER/SLEEP Timer/Sleep 9 Mounting plate 10 DC 5V Power adaptor connection socket
11 Wire aerial for radio reception 12 Fold-out foot 13 Loudspeaker 14 Battery compartment 15 Spacer (for under-cabinet installation) 16 Mounting screw (long) 17 Mounting screw (short) 18 Power adaptor 19 Instructions for use
Technical data
Radio
| Input voltage / current: 5 V / 1 A | --- |
| Power reserve: 2 batteries (AA/LR6, 1.5 V | ---) |
| DAB reception range: 174 to 240 MHz | |
| FM reception range: 87.5 to 108 MHz | |
| Preset stations (storage): 30 (DAB), 30 (FM) | |
| Speaker output power: 2 x 0.8 W RMS | |
| Operating conditions: +10 to +35 °C | 40 to 85 % (rel. humidity) |
| Storage temperature: -20 to +60 °C | |
| Dimensions (W x H x D): | approx. 260 x 53 x 163 mm |
| Weight: | approx. 460 g |
| Protection class (radio): | III / ◇ |
Power adaptor
| Description | Value |
| OWIM GmbH & Co. KG | |
| District court Stuttgart: HRA 721742 | |
| Distributor: | Stiftsbergstraße 174167 NeckarsulmGermany |
| Manufacturer's name: | Xiamen Innov Electronics Tech Co., Ltd. |
| Model identifier: | EU version: IVP0500-1000WGUK version: IVP0500-1000WB |
| Input voltage: | 100-240 V~ |
| Input AC frequency: | 50/60 Hz |
| Input current: | 0.5 A |
| Output voltage: | 5.0 V --- |
| Output current: | 1.0 A |
| Output power: | 5.0 W |
| Average active efficiency: | 73.6 % |
| No-load power consumption: | 0.10 W |
| Polarity of barrel connector at output: | ◇◇◇ |
| Protection class: | II / ☐ |

Safety notes
In the case of damage resulting from non-compliance with these operating instructions, the guarantee claim becomes invalid! No liability is accepted for consequential damage! In the case of material damage or personal injury caused by incorrect handling or non-compliance with the safety instructions, no liability is accepted! Inspect all products for visible damage before use. Never use a damaged product. The frequency ranges specified in the technical data chapter represent the technical possibilities of the product. Please note that different regulations may exist for freely available frequencies in different countries. Receiving and/or using the information may be illegal and possibly punishable.

DANGER! RISK OF DEATH AND ACCIDENTS FOR TODDLERS AND CHILDREN!
Packaging materials are not a toy. Never leave children unsupervised with the packaging material. The packaging material represents a danger of suffocation. Children frequently underestimate the dangers. Always keep children away from the packaging material.
This product can be used by children aged from 8 years and above and persons with reduced physical, sensory or mental capabilities, or lack of experience and knowledge if they have been given supervision or instruction concerning use of the product in a safe way and understand the hazards involved. Cleaning and user maintenance shall not be made by children without supervision. Children shall not play with the product. The product is not a toy.
Risk of electric shock!
⚠ WARNING! Risk of electric shock!
Never open the housing of the product or of the power adaptor. In case of malfunction, repairs are to be conducted by qualified personnel only. ⚠ WARNING! Protect the product and the power adaptor from dripping and splashing water. Do not place containers filled with liquids (such as vases or drinks) on or near the product or the power adaptor. Do not immerse any product components in liquids. Never hold the product under running water. To avoid fire, do not place burning candles on or near the product. ⚠ WARNING! Do not touch the power adaptor with wet hands.
⚠️ CAUTION! Never use a damaged product. If you notice any damage, disconnect the power adaptor immediately from the mains network. Remove the battery from the product. Contact your retailer if the product is damaged.
■ Always turn the product off before disconnecting it from the power supply. Only use this product with the supplied power adaptor. Contact your retailer if the power adaptor is damaged. Refer to the technical data of this product. To avoid damaging the cord, do not place any objects on it or chafe it on sharp edges. Keep it away from hot surfaces and open flames as well. Lay out the cord in such a way that no unintentional pulling or tripping over is possible. Keep the power adaptor and its cord out of reach of children. When disconnecting the power adaptor from the electrical outlet, do not pull by the connection cord but by the power adaptor. - Do not wrap the connection cord around the product. Connect the power adaptor to an electrical outlet that is always easily reachable so that in case of an emergency the product can be unplugged immediately.
Pull the power adaptor out of the power supply to completely disconnect the product from the mains network. The power adaptor continues to draw a small amount of electricity, even without the radio being operated, as long as the power adaptor is connected to the power supply. To completely switch off the power adaptor, it must be disconnected from the mains network. - Do not subject the product to physical shock or strong vibrations. If smoke or unusual sounds are observed, immediately unplug the power adaptor from the power supply. Remove the battery from the product. The power adaptor shall not be covered. - Disconnect the power adaptor from the power supply and remove the battery / batteries from the product when not in use and before cleaning. - Let the product dry completely before connecting it to the mains supply and before storage. Allow the product to cool down completely before storage.
NOTE: This product is equipped with rubber feet to protect delicate surfaces. It cannot be ruled out that furniture care agents will attack or damage the rubber feet.

Safety instructions for batteries
⚠️ DANGER TO LIFE! Keep batteries out of reach of children. If accidentally swallowed seek immediate medical attention.
Swallowing may lead to burns, perforation of soft tissue, and death. Severe burns can occur within 2 hours of ingestion.

DANGER OF EXPLOSION!
Never recharge non-rechargeable batteries. Do not short-circuit
batteries and open them. Overheating, fire or bursting can be the result.
■ Never throw batteries into fire or water. - Do not exert mechanical loads to batteries.
Risk of leakage of batteries
- Avoid extreme environmental conditions and temperatures, which could affect batteries, e.g. radiators / direct sunlight. If batteries have leaked, avoid contact with skin, eyes and mucous membranes with the chemicals! Flush immediately the affected areas with fresh water and seek medical attention!

WEAR PROTECTIVE GLOVES!
Leaked or damaged batteries can cause burns on contact with the skin.
Wear suitable protective gloves at all times if such an event occurs.
In the event of a leakage of batteries, immediately remove them from the product to prevent damage.
■ Remove batteries if the product will not be used for a longer period.
Risk of damage of the product
■ Only use the specified type of battery! - Insert batteries according to polarity marks (+) and (−) on the battery and the product. Use a dry lint-free cloth or cotton swab to clean the contacts on the battery before inserting! ■ Remove exhausted batteries from the product immediately.
Before use
Unpacking
Remove all packaging materials (including foils). Check if all parts are present.
Inserting / Replacing the power reserve
NOTE: This product uses a battery to backup the time of the clock, alarm times and the radio stations.
Open the battery compartment. Insert 2 batteries (type: 1.5 V, AA/LR6) into the battery compartment [14], following the polarity marks. Close the battery compartment.
Requirements for the set-up location
For the safe and trouble-free operation of the product, the set-up location must fulfill the following requirements:
When setting up the product, place it on a firm, flat and horizontal surface. Use the fold-out foot 12.
The surfaces of some items of furniture might contain components that can soften the rubber feet of the product. If necessary, place a mat under the product's rubber feet. Set up or mount the product in such a way that the provided ventilation openings and the loudspeaker 13 are not covered. Do not operate the product in a hot, wet or extremely damp environment or in the vicinity of flammable materials. The mounting location must be selected so that the product is not exposed to vapours. Do not install the product directly over a hotplate.
Installation under a wall cupboard

Using the supplied mounting plate 9, you can install the product e.g. under a wall cupboard. Proceed as follows to mount the product:
Slide the mounting plane to the rear and remove it from the product.
Find a suitable installation location for the product (see "Requirements for the set-up location"). Hold the mounting plate under the installation location. Ensure that the front edge of the mounting plate is approx. 3 cm behind the front of the cupboard so that the product is flush with the cupboard after installation. The side edges of the mounting plate 9 must be spaced approx. 6 cm away from adjacent cabinets or walls. Mark the 4 mounting points with a pencil. Using a pin or nail, make a small depression at the respective marking points. In hardwoods, drill a shallow hole in the markings using a ∅ 2.5 mm wood drill bit. If required, place the supplied spacers 15 between the cupboard and the mounting plate. If you are using the spacers 15, you will need the long mounting screws 16. Screw the mounting plate tight using the mounting screws (16 or 17). With the top of the product against the mounting plate 9, push the product back until it clicks into place. Check to ensure that the product is firmly in position and safely route the power cable and the wire aerial.
Dismantling
Pull the product forwards off the mounting plate 9. Unscrew the screw (or 17) on the mounting plate and remove the mounting plate 9 from the wall cupboard.
- Initial operation
You can also set up the product on a level surface. To avoid covering the ventilation slots and loudspeaker 13 on the bottom of the product, you must fold out the adjustable foot 12 of the product.
Connect the power adaptor to the power socket 10 and a suitable socket-outlet. The product enters standby mode. The time is constantly displayed.
- Switching the product on/off
Press 3 to switch the product on/off (off = standby mode).
Mode selection
In power on mode, press MODE shortly to select from the following modes: FM or DAB.
Volume adjustment
Increase volume: Turn VOLUME/START/RESET 6 in a clockwise direction.
Reduce volume: Turn VOLUME/START/RESET 6 in a counter-clockwise direction.
System settings
Press and hold MENU/INFO to display the menu. Turn SELECT/ENTER/SNOOZE to select.
Push SELECT/ENTER/SNOOZE 1 to confirm.
Turn SELECT/ENTER/SNOOZE to select from:
System settings
- Time
| →Set Time/Date | |
| →Set time | |
| →00:00 | |
| →Set date | |
| →Auto Update (Automatic time update) | |
| →No Update (No automatic time update) | |
| →Update from FM (Automatic time update from FM) | |
| →Update from DAB (Automatic time update from DAB) | |
| →Update from Any | (Automatic time update from FM or DAB) |
| →Set 12 / 24 hour | (12 or 24 hour display) |
| →Set 24 hour | (24 hour display) |
| →Set 12 hour | (12 hour display) |
| →Set date format | |
| →DD-MM-YYYY | ("Day-Month-Year") |
| →MM-DD-YYYY | ("Month-Day-Year") |
Turn SELECT/ENTER/SNOOZE 1 = amend values | Push SELECT/ENTER/SNOOZE 1 = confirm value or selection | MENU/INFO 7 = 1 level back
System settings
- Double alarm setting
→Alarm 1 setup - Alarm 2 setup (Choose alarm 1 or alarm 2 to setup)
→ Alarm 1 Setup
→00:00 (To set the alarm time)
Alarm 1 Wizard
→Duration 15-30-45-60-90 (To set the duration time)
→Buzzer - DAB - FM (To set the alarm source)
→ Channel select (Only available for DAB or FM)
Once - Daily - Weekends -
Weekdays (To set repeat frequency)
→ Alarm off - Alarm on
- LCD backlight setting
On level
→High - Medium - Low (Light level)
→Night dimmer
NO - YES
- Language
→ German, English, Croatian, Slovenian, Slovak, Czech, Lithuanian, Polish, Spanish, Dutch, French.
- Factory Reset (Reset to factory settings)
→NO (No reset to factory settings)
→ YES (Reset to factory settings)
NOTE: All the previously saved stations will be lost after factory reset.
- SW version
→ Version number
Turn SELECT/ENTER/SNOOZE 1 = amend values | Push SELECT/ENTER/SNOOZE 1 = confirm value or selection | MENU/INFO 7 = 1 level back
● FM operation
To toggle between DAB/FM modes, press MODE 2 1x.
- Searching stations
■ Press and hold MENU/INFO for 2 seconds. Turn SELECT/ENTER/SNOOZE to select. Push SELECT/ENTER/SNOOZE to confirm. Turn SELECT/ENTER/SNOOZE to set:
Setting Function
Strong station: Sets the product to search for stations with strong signal only.
All stations: Sets the product to search for all stations.
■ Push SELECT/ENTER/SNOOZE to confirm.
Search functions
Choose from 2 scanning functions to select a radio station.
Setting Function
Auto scan
Fast turn SELECT/ENTER/SNOOZE to start scanning in the desired direction.
Setting Function
Manual scan
Slowly turn SELECT/ENTER/SNOOZE to search for FM stations manually (each press changes the frequency by 0.05 MHz).
Slowly turn SELECT/ENTER/SNOOZE 1 to search for FM stations manually (each press changes the frequency by 0.05 MHz).
Audio settings
Press and hold MENU/INFO to display the menu. Turn SELECT/ENTER/SNOOZE to select. Push SELECT/ENTER/SNOOZE to confirm. Turn SELECT/ENTER/SNOOZE to set:
Setting Function
Stereo allowed
Product searches for Mono and Stereo stations. Audio out: Combine Stereo or Stereo.
Forced mono
Product searches for Mono and Stereo stations. Audio out: Combine Stereo.
FM display modes
Press MENU/INFO briefly to choose from:
Display Function
Signal strength
Shows a bar indicating the signal strength.
Display Function
| Program Type | Shows the genre of the programme that is being broadcasted. |
| Audio info | Shows if the station being received is in mono or stereo mode. |
| Time | Displays the current time provided automatically by the broadcaster. |
| Date | Displays the current date provided automatically by the broadcaster. |
| Radio text | Sets a scrolling message giving real-time information, e.g song title, news headlines, etc. |
■ Each time MENU/INFO is pressed, the next item is displayed.
● DAB operation
Switching to DAB mode: Press MODE 2 briefly.
Full scan
Perform a complete station search in the DAB frequency range III:
Press and hold MENU/INFO. Turn SELECT/ENTER/SNOOZE to select .
Push SELECT/ENTER/SNOOZE to confirm. All detected stations are stored automatically. To choose from the stations, press PRESET 5. Turn SELECT/ENTER/SNOOZE 1, then push to confirm.
- Manual tuning
The signal strength is displayed. No sound is emitted by the product while manually tuning. The newly tuned station can be found in the Station list.
- Deleting unavailable stations
Press and hold MENU/INFO. Turn SELECT/ENTER/SNOOZE to select .
- Push SELECT/ENTER/SNOOZE to confirm.
Turn SELECT/ENTER/SNOOZE to select .
Push SELECT/ENTER/SNOOZE to confirm.
NOTE: Unavailable stations can only be detected after another complete search (e.g. at a different location). In this case, the affected station is preceded by a question mark. After the "Delete" function has been performed, the correspondingly marked stations are no longer available in the station list.
DAB display modes
Press MENU/INFO 7 briefly to choose from:
Setting Function
| Signal strength | Shows a bar indicating the signal strength. |
| Program Type | Shows the genre of the programme that is being broadcasted. |
| Frequency | Displays the frequency of the currently set station. |
| Ensemble | Displays the name of the multiplex containing the station you are listening to. |
| Signal error: | Displays the signal error rate. |
| Bitrate and Codec | Displays the radio mode and the received audio bit rate. |
| Time | Displays the current time provided automatically by the broadcaster. |
| Date | Displays the current date provided automatically by the broadcaster. |
| Radio text | Sets a scrolling message giving real-time information, e.g song title, news headlines, etc. |
Each time MENU/INFO is pressed, the next item is displayed.
Presetting currently active station
You can store up to 60 stations (30 FM and 30 DAB).
Press and hold PRESET.
Preset store<#:(Empty)> appears on the display 4.
Turn SELECT/ENTER/SNOOZE to select a desired station number.
Press SELECT/ENTER/SNOOZE to confirm.
The station is stored. Preset # stored appears on the display 4.
NOTE: Station numbers under which stations are already stored will be overwritten.
Recalling a preset station
You can recall a previously saved station by pressing PRESET 5.
Turn SELECT/ENTER/SNOOZE to select the desired preset station number.
Push SELECT/ENTER/SNOOZE to confirm.
NOTE: Preset Empty is displayed if the preset number is unoccupied.
Sleep timer
In operation mode:
Press and hold TIMER/SLEEP repeatedly to choose the sleep time: Sleep off/15/30/45/60/90/120 minutes.
After the selected time has elapsed, the product switches into standby mode.
Checking the remaining sleep time: The remaining time is shown in the display.
Cancelling the sleep timer: Press and hold TIMER/SLEEP 8 repeatedly until Sleep off appears in the display.
Alarm setting
In STANDBY or ON mode, press and hold MENU/INFO 7 for 2 seconds.
Turn SELECT/ENTER/SNOOZE to select .
Push SELECT/ENTER/SNOOZE to confirm.
Turn SELECT/ENTER/SNOOZE to select .
Push SELECT/ENTER/SNOOZE to select Alarm 1 or Alarm 2.
Push SELECT/ENTER/SNOOZE to set the hours.
Push SELECT/ENTER/SNOOZE repeatedly to set the minutes.
Push SELECT/ENTER/SNOOZE 1 repeatedly to select the alarm duration (options: 15/30/45/60/90/120 minutes).
■ Push SELECT/ENTER/SNOOZE repeatedly to select the alarm sound (options: , , ).
■ Push SELECT/ENTER/SNOOZE to set the alarm repetition (options: , , , ).
- Push SELECT/ENTER/SNOOZE to select or .
When the alarm is successfully set, appears on the display 4.
NOTES:
When the alarm sounds, press 3 to turn the alarm off.
When Alarm 1 sounds, flashes on the display 4.
■ The volume gradually increases.
■ After the alarm duration has elapsed, the product will return to standby mode automatically.
or alarm: When the alarm sounds, the radio station appears on the display 4.
- Snooze function
In ON mode, press and hold SELECT/ENTER/SNOOZE 1 while the alarm is ringing. The alarm reactivates after approx. 9 minutes.
● Kitchen timer
The product has a practical kitchen timer with which you can monitor cooking and baking times, for example. You can set 2 kitchen timers.
- Setting and operating the kitchen timer
■ Press TIMER/SLEEP to toggle between Timer 1 and Timer 2.
■ Turn VOLUME/START/RESET 6 to select the countdown time.
■ Push VOLUME/START/RESET 6 to confirm. T1 or T2 appears on the display 4. The countdown starts immediately.
- Press TIMER/SLEEP to check the countdown time.
A warning signal sounds at 30, 15, 10 and 5 seconds before the countdown elapses.
At the end of the countdown, an alarm signal sounds at maximum volume. Press any key to turn the alarm off. T1 or T2 disappears from the display 4.
i NOTES:
Timer 1 can be set from 1 minute up to 3 hours 59 minutes in increments of 1 minute. If you set the countdown between 1 and 4 minutes, the time will be shown in "mm:ss" format. If you set the countdown to 5 minutes or more, the time will be shown in "hh:mm" format. Timer 2 can be set from 5 minutes up to 3 hours 55 minutes in increments of 5 minutes. The time will be shown in "hh:mm" format. If you do not make any changes to the settings for about 15 seconds, the product will switch back to the previous operating mode without saving the settings.
- Cancelling the kitchen timer
Briefly press TIMER/SLEEP to select the timer you wish to cancel (T1 or T2). ■ Push and hold VOLUME/START/RESET for 2 seconds until T1 or T2 disappears from the display 4.
● Power reserve
The power reserve is used to store data / settings if the product has been accidentally disconnected from the power supply. In the event of a power failure, the display will extinguish, the clock will continue working, but there will be no alarm.
Insert / change batteries
The battery compartment is located on the bottom of the product. Open the battery compartment. - Insert 2 batteries (type: 1.5 V, AA/LR6) into the battery compartment according to the polarity marks. - Close the battery compartment.
● Cleaning and care
Before cleaning: Unplug the product from the power supply and remove the batteries.
⚠ WARNING! Never immerse the product nor the power adaptor in water or other liquids for cleaning purposes. Never immerse any of the product's components under running water.
- Clean the product with a slightly moistened cloth. Do not allow any water or other liquids to enter the product's interior. Do not use solvent-based cleaning agents, abrasives, harsh cleaning solutions, or hard brushes for cleaning. Let all parts dry afterwards.
Storage
Before storing the product: Remove the batteries. Store the product in its original packaging. Store the product in a dry, secure location away from children.
● Troubleshooting
Cause
Solution
■ The product will not turn on
- Check if the power adaptor is properly plugged into the socket.
No sound
Adjust the volume.
■ Static sound
Signal reception is too low. Adjust the aerial or move the unit to a stronger signal location.
■ FM station not found
■ Weak signal. Search manually.
■ DAB station not found
No DAB coverage in your area or poor reception. Adjust the position of the aerial.
■ The display is blank
This may occur if the broadcaster changes the label of a service or removes a label while tuned.
Glossary
Multiplex: In DAB and DAB+ several radio programmes can be transmitted on each frequency. These radio stations are combined in a so-called multiplex. In this multiplex, additional services, such as pictures and text information, can also be transmitted.
Signal error: The greater the number of signal errors, the more distorted the audio signal arrives at the product. The built-in error protection can compensate for this to a certain extent without deteriorating the audio quality. Displaying the number of signal errors can be helpful in finding a better location to place the product.
● Simplified EU declaration of conformity
Hereby, OWIM GmbH & Co. KG, Stiftsbergstraße 1, 74167 Neckarsulm, GERMANY, declares that the product (DAB+ kitchen radio HG06060A-BS / HG06060B-BS) is in compliance with Directives 2014/53/EU, 2011/65/EU and 2009/125/EC.
The full text of the EU declaration of conformity is available at the following internet address: www.owim.com
● Disposal
Packaging:
The packaging is made of environmentally friendly materials, which may be disposed of through your local recycling facilities.
Product:
Contact your municipality for information on how to dispose of your worn-out product.

The adjacent symbol of a crossed-out dustbin on wheels indicates this product is subject to directive 2012/19/EU. This directive states that at the end of its life, this product must not be disposed of through regular household refuse but must be returned to special collection sites, recycling depots, or waste management companies.
This disposal is free of charge to you.
Protect the environment and dispose of properly.
Batteries:
Think about the environment and your personal health. Dispose of empty batteries in separate collecting boxes. These can be found in many public buildings or in shops where batteries are sold.

Improper disposal of batteries can harm the environment!
Never dispose of batteries in your household waste. They may contain toxic heavy metals and are subject to hazardous waste regulations. The chemical symbols of the heavy metals are: Cd = cadmium, Hg = mercury, Pb = lead. Therefore, dispose of used batteries through your local collection site.
● Warranty
The product has been manufactured to strict quality guidelines and meticulously examined before delivery. In the event of product defects, you have legal rights against the retailer of this product. Your legal rights are not limited in any way by our warranty detailed below.
The warranty for this product is 3 years from the date of purchase. Should this product show any fault in materials or manufacture within 3 years from the date of purchase, we will repair or replace it - at our choice - free of charge to you.
The warranty period begins on the date of purchase. Please keep the original sales receipt in a safe location. This document is required as your proof of purchase. This warranty becomes void if the product has been damaged, or used or maintained improperly.
The warranty applies to defects in material or manufacture. This warranty does not cover product parts subject to normal wear, thus possibly considered consumables (e.g., batteries) or for damage to fragile parts, e.g., switches, rechargeable batteries, or glass parts.
Warranty claim procedure
To ensure quick processing of your case, please observe the following instructions:
Please have the till receipt and the item number (e.g. IAN 123456_7890) available as proof of purchase.
You will find the item number on the rating plate, an engraving, on the front page of the instructions for use (bottom left), or as a sticker on the rear or bottom of the product.
If functional or other defects occur, please contact the service department listed either by telephone or by e-mail.
You can return a defective product to us free of charge to the service address that will be provided to you. Ensure that you enclose the proof of purchase (till receipt) and information about what the defect is and when it occurred.
Service
GB Service Great Britain
Tel.: 0800 404 7657
E-Mail: owim@lidl.co.uk
IE Service Ireland NI Service Northern Ireland
Tel.: 1890 930 034
(0,08 EUR/Min., (peak))
(0,06 EUR/Min., (off peak))
E-Mail: owim@lidl.ie

OWIM GmbH & Co. KG
Stiftsbergstraße 1
74167 Neckarsulm
GERMANY
Model No.: HG06060A-BS / HG06060B-BS
Version: 04/2020
IAN 341159_1910


- DAB+ KITCHEN RADIO SKR D1 A
- WARNINGS AND SYMBOLS USED .... PAGE
- INTRODUCTION PAGE
- SAFETY NOTES....PAGE
- BEFORE USE....PAGE
- INITIAL OPERATION....PAGE
- FM OPERATION....PAGE
- DAB OPERATION....PAGE
- PRESETTING CURRENTLY ACTIVE STATION....PAGE
- RECALLING A PRESET STATION PAGE
- KITCHEN TIMER PAGE
- POWER RESERVE....PAGE
- CLEANING AND CARE PAGE
- TROUBLESHOOTING PAGE
- SIMPLIFIED EU DECLARATION OF CONFORMITY ...... PAGE
- WARRANTY PAGE
- DAB+ KITCHEN RADIO
- ● INTRODUCTION
- INTENDED USE
- SCOPE OF DELIVERY
- TRADEMARK NOTICE
- DESCRIPTION OF PARTS
- TECHNICAL DATA
- SAFETY NOTES
- DANGER! RISK OF DEATH AND ACCIDENTS FOR TODDLERS AND CHILDREN
- RISK OF ELECTRIC SHOCK
- ⚠ WARNING! RISK OF ELECTRIC SHOCK
- SAFETY INSTRUCTIONS FOR BATTERIES
- DANGER OF EXPLOSION
- RISK OF LEAKAGE OF BATTERIES
- WEAR PROTECTIVE GLOVES
- RISK OF DAMAGE OF THE PRODUCT
- BEFORE USE
- UNPACKING
- INSERTING / REPLACING THE POWER RESERVE
- REQUIREMENTS FOR THE SET-UP LOCATION
- INSTALLATION UNDER A WALL CUPBOARD
- DISMANTLING
- INITIAL OPERATION
- SWITCHING THE PRODUCT ON/OFF
- MODE SELECTION
- VOLUME ADJUSTMENT
- SYSTEM SETTINGS
- ● FM OPERATION
- SEARCHING STATIONS
- SETTING FUNCTION
- SEARCH FUNCTIONS
- MANUAL SCAN
- AUDIO SETTINGS
- STEREO ALLOWED
- FORCED MONO
- FM DISPLAY MODES
- DISPLAY FUNCTION
- ● DAB OPERATION
- FULL SCAN
- MANUAL TUNING
- DELETING UNAVAILABLE STATIONS
- DAB DISPLAY MODES
- PRESETTING CURRENTLY ACTIVE STATION
- RECALLING A PRESET STATION
- SLEEP TIMER
- ALARM SETTING
- NOTES
- SNOOZE FUNCTION
- ● KITCHEN TIMER
- SETTING AND OPERATING THE KITCHEN TIMER
- I NOTES
- CANCELLING THE KITCHEN TIMER
- ● POWER RESERVE
- INSERT / CHANGE BATTERIES
- ● CLEANING AND CARE
- STORAGE
- ● TROUBLESHOOTING
- GLOSSARY
- ● SIMPLIFIED EU DECLARATION OF CONFORMITY
- ● DISPOSAL
- PACKAGING
- PRODUCT
- THIS DISPOSAL IS FREE OF CHARGE TO YOU
- BATTERIES
- IMPROPER DISPOSAL OF BATTERIES CAN HARM THE ENVIRONMENT
- ● WARRANTY
- WARRANTY CLAIM PROCEDURE
- SERVICE
Brand : SILVERCREST
Model : SKR D1 A1
Category : Radio