HCAS2B - Vacuum Cleaner TELEFUNKEN - Free user manual and instructions
Find the device manual for free HCAS2B TELEFUNKEN in PDF.

| Product type | Canister vacuum cleaner |
| Brand | Telefunken |
| Model | HCAS2B |
| Energy efficiency class | A |
| Annual energy consumption | 28.0 kWh/year |
| Rated input power | 800 W |
| Acoustic power level | 82 dB |
| Carpet cleaning performance class | C |
| Hard floor cleaning performance class | A |
| Dust emission class | D |
| Filter type | Motor protection filter and motor exhaust filter |
| Filter replacement frequency | Every 6 months |
| Included accessories | Universal nozzle, 2-in-1 brush (upholstery nozzle and crevice tool), flat nozzle and round brush |
| Features | Power adjustment, dust sensors, overheat protection |
| Safety | Automatic shut-off in case of overheating, circuit breaker |
| Maintenance | Replacing the dust bag, cleaning filters (not washable), cleaning the body with a damp cloth |
| Usage | Hard floors, carpets, rugs, curtains |
| Cable length | Approx. 6 m (estimate) |
Frequently Asked Questions - HCAS2B TELEFUNKEN
User questions about HCAS2B TELEFUNKEN
0 question about this device. Answer the ones you know or ask your own.
Ask a new question about this device
Download the instructions for your Vacuum Cleaner in PDF format for free! Find your manual HCAS2B - TELEFUNKEN and take your electronic device back in hand. On this page are published all the documents necessary for the use of your device. HCAS2B by TELEFUNKEN.
USER MANUAL HCAS2B TELEFUNKEN
3.1 Vacuum Cleaning. 14
3.2 Setting the Suction Power 15
3.3 Switching Off/Retracting Power Cord 15
3.4 Transport & Storage 15
4 Maintenance 16
4.1 Changing the Dust Filler Bag 16
4.2 Changing Filtres 16
4.3 Changing the Hygienic Exhaust Filler 17
4.4 Changing the Motor Protection Filler 17
4.5 Cleaning the Housing 18
5 Troubleshooting 19
6 ENVIRONMENT 20
1 Safety Notes
1.1 Operation Manual
Read this operating manual carefully before using the appliance.
Keep the operating manual for reference. Include the operating manual if you pass the appliance to third parties.
Violations of the operating instructions can lean to severe injuries as well as damages to the appliance.
We tank no responsibility for damages due to violations of these operating instructions.
1.2 The Notices Given
Notices for your safety are especially marked. Always observe these notices to avoid accidents and damages to the appliance:
WARNING:
Warnings concerning health hazards describing possible risks of injury.
ATTENTION:
Warnings concerning possible dangers to the appliance or other objects.
NOTE:
Highlights,tips and other useful information.
1.3 Children
Never leave the appliance unattended and use it with special precaution if children or persons who cannot judge dangers are nearby.
People(including children) who are unable to safely operate the appliance on account of their physical, sensory or mental abilities or their lack of experience or knowledge should only
use this appliance under surveillance or instruction of a responsible person. Keep the appliance out of reach of people of these groups.
Packing materials are not toys.There is danger of suffocation.
1.4 Appropriate Use
Use the vacuum cleaner only for cleaning normally soiled floors, rugs and curtains.
The appliance is intended for home use only. It may not be used commercially. Any
other use is considered inappropriate and is prohibited.
It is especially forbidden to vacuum:
-
Hair, fingers and other parts of the body. They could be sucked in and injured.
-
Pieces of clothing(e.g. shoelaces, scarves, etc.). They could be sucked in and cause injuries.
-
Water and other liquids, especially moisture from carpet-cleaning agents. Moisture inside the appliance can lead to short-circuiting.
-
Toner dust(for laser printers, copying-machines, etc.) There is danger of fire or explosion.
-
Hot ash, burning cigarettes or matches. This could cause a fire.
-
Sharp, objects such as glass shards, nails, etc. Such objects destroy the filters.
-
Plaster, cement, finest drilling-dust, makeup, etc. The filters may become clogged damage to the appliance.
-
To use appliance near inflammable or explosive materials; there is danger of
fire or explosion.
- To use appliance outdoors; there is danger of rain and dirt destroying the appliance.
- To insert any object into the appliance openings; it could overheat.
1.5 Mains Connection
-
The appliance runs on electricity, that means there is always danger of electric shock. Please especially observe the following;
-
Never touch the plug with wet hands.
-
Always pull directly at the plug if you want to disconnect the appliance from the mains. Never pull the mains lead, it might break.
-
Take care that the power cord is not bent, pinched, rolled over or gets in contact with heat sources.
-
Use only extension cords suited to the power requirements of the appliance.
-
Never immerse the appliance in water or other liquids.
-Only operate the appliance if your mains voltage is the same as that indicated on the rating label. Wrong voltage can destroy the appliance.
-If the power cord of this appliance is damaged it must be replaced by the manufactures, their authorized service representative or a
similarly qualified person to avoid danger to the user.
1.6 If the Appliance Malfunctions
Never use a defective appliance or operate an appliance with a defective power cord. There is a major risk of injury.
Refer a defective appliance to an authorized dealer according to warranty.
2 Assembly
2.1 Unpacking
- Unpack the appliance and all its accessories.
- Check that the contents are complete.

ATTENTION:
Always transport or ship the appliance in its original packaging to avoid damage. Keep the packaging for such an event.
Dispos of no longer needed packaging material according to the applicable regulations of your country.
NOTE:
Immediately contact your dealer if you have found damage resulting from transportation.
2.2 Assembly

Figure 2
Only assemble the appliance if it is not connected to the mains.
The appliance could be switched on by accident.
- Insert the end of the suction hose (Fig. 2/1) in the intake opening (Fig. 2/2) until it locks with an audible click.
- Insert the handle (Fig. 3/1) into the upper end of the telescopic tube (Fig.3/2).
- Attach the floor nozzle (Fig. 3/3) to the bottom end of the telescopic tube (Fig. 3/4).
NOTE:
It might be necessary to push a bit harder.
4. Adjust the length of the telescopic tube by pressing down the release latch on the tube (Fig. 4/1). Then pull the handle of the telescopic tube to extend (Fig. 3/1) it to your desired length. Let go of the release catch while pulling until it locks in place. You will hear a distinct click. Your vacuum cleaner is now ready for use.
2.3 Using Accessories
Besides the floor nozzle you just attached, you may extend the functions of your vacuum cleaner with other nozzles.
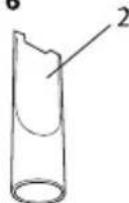
- The combi brush and the crevice nozzle are included in the package as accessories. You can store them in the accessory compartment when not in use (Fig. 5).
Combi Brush (Fig. 6/1)
Use this to remove dust from objects with delicate surfaces (e.g. cupboards and tables)
Crevice Nozzle (Fig. 6/2)
Use this to suck dust out of hard to reach places.

WARNING: Only attach nozzles when the vacuum cleaner is not connected to the mains. The appliance could be switched on by accident.
How to Attach Accessories
- Switch off the vacuum cleaner and pull the plug from the mains socket.
- Pull the attached nozzle off of the telescopic tube.
- Attach the required nozzle to the bottom end of the telescopic tube or if necessary directly to the handle.

ATTENTION: Using the vacuum cleaner without a nozzle attached increases the danger of accidentally sucking in objects.
- If possible, store nozzles no longer in use on the accessory bracket.
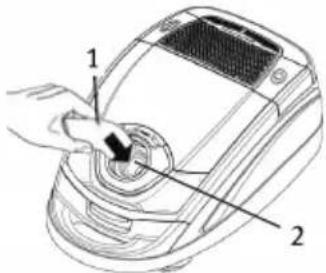
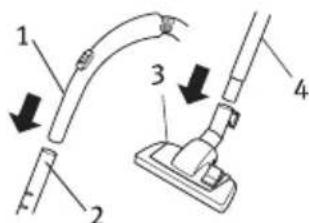
Figure 3
Figure 4
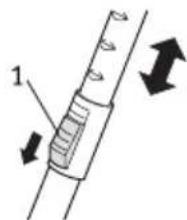
Figure 5
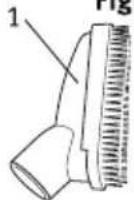
Figure 6
3 Operation
3.1 Vacuum Cleaning

WARNING:
Check the vacuum cleaner and the power cord each time before using it. A damaged appliance must not be used as there is danger of injury.

ATTENTION:
Only use the vacuum cleaner with all filters intact, in dry condition and correctly placed. Make sure that the openings of the vacuum cleaner are not clogged or obstructed. This could cause damage to the vacuum cleaner.
NOTE:
Your vacuum cleaner is equipped with a safety switch to prevent overheating. It automatically cuts off the power supply if the motor is overheated. In this case switch off the vacuum cleaner and disconnect it from the mains.
Remove the cause of the overheating. Wait for about 45 minutes. After it has cooled off, you may use the vacuum cleaner again.
- Attach the desired nozzle (See page 4-5 "Assembly", "Using Accessories".
- Or pull out the power cord until the yellow marking is visible (Fig. 10/1)

WARNING:
If the red marking shows (Fig. 10/2) to retract the cord by pressing the retract button to pull in the cable (Fig. 11/2) up to the yellow mark again. Otherwise the cord might break causing danger of an electric shock.
- Switch on the vacuum cleaner with the on/off switch (Fig. 11/1).
- Set the nozzle switch to "carpet" or "hard floor" according to the floor (Fig. 12) to be cleaned:
Hard floor (Fig. 12/A) Laminate, Tiles, PVC, etc.
- Carpet (Fig. 12/B) Short and deep pile carpets, rugs, etc.
- When working with the vacuum cleaner, pull it after you like a sleigh. Follow the respective recommendations of the flooring manufacturers.
NOTE:
With the bypass vent (Fig. 13/1) you can quickly reduce the suction power if less power is needed, or to release objects accidentally sucked in.
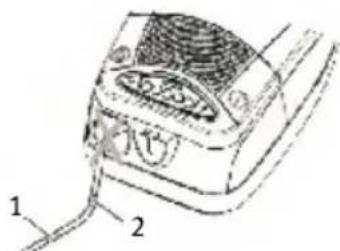
Figure 10
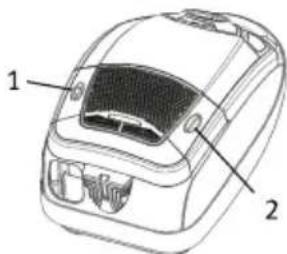
Figure 11
Figure 12
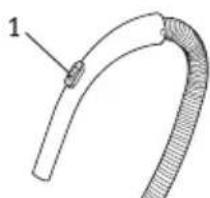
Figure 13
3.2 Setting the Suction Power
You can adjust the suction power to suit the type of floor being cleaned. Use the symbols on the suction power display as a guideline (Fig. 14):
Curtains, Textiles (lowest setting)
Upholstery, Cushions
Carpets, Rugs and Runners
slightly soiled carpets and hard floors
Heavily soiled carpets and hard floors with coarse dirt (highest setting)
- To set the desired power setting, press the + button or the - button several times until the desired setting lights up on the suction power display.
+Button(Fig.14/2) Increases suction power
-Button(Fig.14/1)Reduces suction power
3.3 Switching Off/Retracting Power Cord
- Switch off the vacuum cleaner with the on/off switch (Fig. 15/1) and pull the plug from the mains socket.
- Keep the plug in your hand.
- To retract the power cord, push the cord retracting button (Fig. 15/2).

WARNING:
During retraction the power cord can whip around, be come an obstacle or overthrow objects. Proceed with caution!

WARNING:
When leaving your work area, switch off the appliance and mind the notices at Chapter 3.3, "Switching Off/Retracting Power Cord".
3.4 Transport & Storage
To transport the vacuum cleaner you can carry it by the handle (Fig. 1/21).
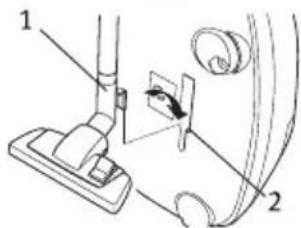
To store it or when interrupting your work, you can hook the park/ storage hook (Fig. 16/1) into the parking (Fig. 16/2) bracket.
- To store the vacuum cleaner you can hook the park/storage hook (Fig. 17/1) into the storage (Fig. 17/2) bracket on the bottom of the appliance.
If you want to store the appliance for a prolonged period, remove the dust filter bag and dispose of it properly. Also clean the filters.
Always store the appliance in a cool, dry place.

ATTENTION:
Never store the appliance next to heat sources (e.g. stoves or adiators).
Avoid exposing it to direct sunlight.
The heat might damage the appliance.
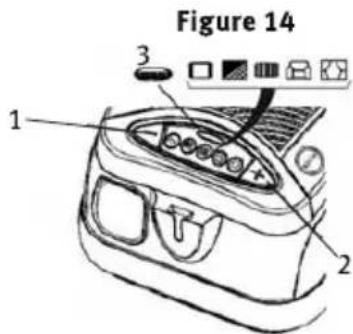
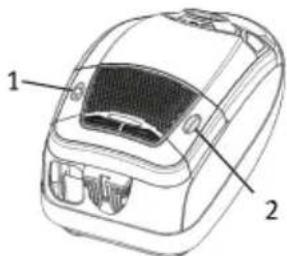
Figure 15

Figure 16
Figure 17
4 Maintenance
4.1 Changing the Dust Filter Bag
-
Change the dust filter bag at the latest when the electronic dust filter bag change indicator (Fig. 114/3 shows "red" or the suction power has decreased.
-
Open the dust compartment cover by unlatching and subsequently raising it (Fig. 18).
- Raise the dust compartment cover until it locks in the highest position and remains open by itself. Pull the dust filter bag up and out of the dust filter holder (Fig. 19).
- Remove any dust that may have collected in the dust compartment. Push the new dust filter bag in the filter bag holder.
- Close the dust compartment cover. It will click into place with an audible click.
NOTES:
- Be careful when removing the dust filter bag so that no dust escapes.
- The dust compartment cover can only be closed with a dust filter bag in place.
- You can dispose of the dust filter bag with your regular domestic trash if it contains no prohibited waste materials.

ATTENTION:
When leaving your working-area, switch off the appliance and mind the notices at Chapter 3.3, "Switching Off/Retracting Power Cord". In this way you avoid dust damaging the appliance.
4.2 Changing Filters
Your vacuum cleaner is equipped with the following filters:
- Motor Protection Filter (Fig. 20/1) prevents larger particles from destroying the motor in case the dust filter bag is defective. When to Change: Every time you open a new box of dust filter bags, as they always contain a new motor protection filter, but at least every 6 months.
Hygienic Exhaust Filter (Fig. 20/2) removes microscopic particles from the exhaust air stream. When to Change: Every 6 months The filters can become clogged with time and reduce the appliance performance. Therefore it is important to adhere to the above changing intervals.
Damaged filters must be removed immediately.
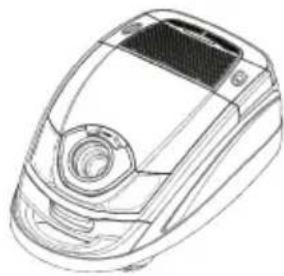
Figure 18
Figure 19
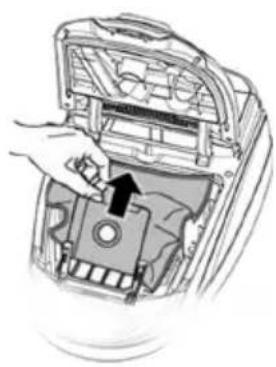
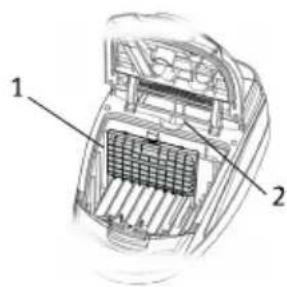
Figure 20

ATTENTION:
These filters are not washable. The exhaust filter may not be re-used.
NOTE:
If the motor protection filter is only slightly dirty, it can help to beat out the dust over a dustbin. However, we recommend to change the motor protection filter each time you open a new box of dust filter bags.
4.3 Changing the Hygienic Exhaust Filter
- Switch off the vacuum cleaner and remove the dust filter bag as described in page 7, "Changing the Dust Filter Bag", steps 1-4.
- Remove the exhaust filter (Fig. 21/1). Unlatch the lock and slightly lift the filter. Now you can pull out the filter towards the front.
- Insert a new exhaust filter and push it down slightly until it locks into the holder.
- Replace the dust filter bag and close the dust compartment cover. The cover clicks into place audibly.
NOTE: Make sure that that the exhaust filter is always properly locked into position, otherwise the exhaust air will not be properly filtered.
4.4 Changing the Motor Protection Filter
- Switch off the vacuum cleaner and remove the dust filter bag as described in page 7, "Changing the Dust Filter Bag", steps 1-4.
- Remove the filter holder with motor protection filter (Fig. 22/1). You must first flip the filter holder forwards and then pull the filter up and out.
- Remove the motor protection filter (Fig. 23/1) from the filter holder (Fig. 23/2) over a dustbin.
- Clean the filter holder.
- Insert the new motor protection filter into the filter holder.
- Insert the filter holder with the new filter into its bracket from above and push it down until it audibly locks into place.
- Replace the dust filter bag and close the dust compartment cover. The cover clicks into place audibly.
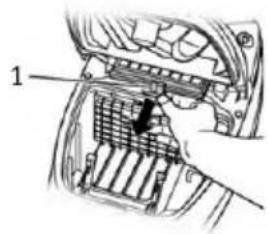
Figure 21
Figure 22
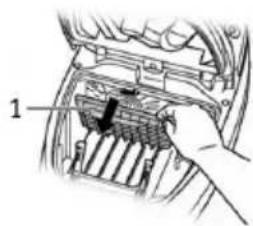
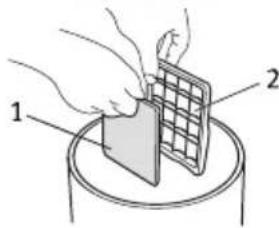
Figure 23
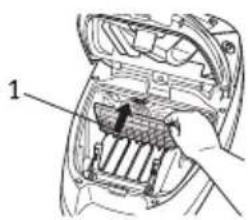
Figure 24
4.5 Cleaning the Housing

WARNING:
Always switch off the appliance and disconnect it from the mains before cleaning it page 6, "Switching Off/Retracting Power Cord".

ATTENTION: Do not use cleaning or scouring agents or alcohol, as these might damage the appliance.
Clean the outside of the housing using a slightly damp cloth only.
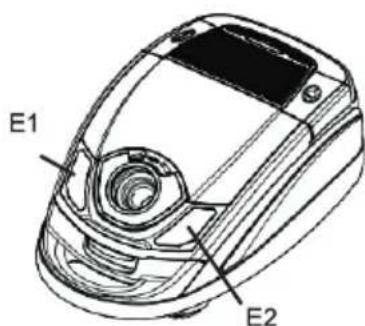
Additional Feature(only for dust sensor model):
2 Dust sensor lights are inserted in the front of the machine as "Eyes". See E1 & E2. When the machine is powered on, the "Eyes" turns green.
When the machine is operated undering cleaning dirt, the "Eyes" turns red while the dirt are crossing the hose inlet.
Function: it will be easy for operator to know whether there is any dirt or not in the dark places which are not easy to check, such as under bed.
5 Troubleshooting
Before sending the appliance to customer service, check if you might be able to correct the malfunction yourself following the list below:

WARNING:
Never use a defective appliance. Always switch off the appliance and disconnect it from the mains before starting troubleshooting "Switching Off/Retracting Power Cord".
| Fault | Possible Cause | Solution |
| The appliance doesn’t run | The plug is not connected to the mains or the appliance is not switched on | Insert the plug into a mains socket and switch on the appliance - see page 5, operation |
| Socket does not carry current | Test the vacuum cleaner on another socket that you are sure is carrying current | |
| The power cord is damaged | Have the cord replaced according to Warranty | |
| The cleaning result is unsatisfactory | The dust filter bag is full or clogged | Empty/clean the dust filer bag |
| Nozzle, telescopic tube or suction hose are clogged | Remove the obstacle. If necessary, use a long wooden stick (e.g. a broomstick) to do this. | |
| The power setting does not fit the flooring | Set the power to the setting suggested for the flooring, “Setting the Suction Power” | |
| The “carpet/hard floor” switch (FIGURE 1/10) is the wrong position for the particular type of floor | Set the “carpet/hard floor” switch to the correct position for the particular type of floor, step 4 | |
| The attached nozzle does not fit the flooring | Attach the correct nozzle “Using Accessories” | |
| The filter is dirty | Change/clean the respective filter - see “Maintenance” | |
| The appliance makes unusual noises | Sucked in objects are obstructing the air stream | Remove the objects. If necessary, use a long wooden stick (e.g. a broomstick) to do this. |

6 ENVIRONMENT
The European Directive 2012/19 / EU on Waste Electrical and Electronic Equipment (WEEE), requires that household appliances uses are not discarded in the normal municipal waste stream. Old appliances must be collected separately to optimize the recovery and recycling of the materials they contain and reduce the impact on human health and the environment. The symbol of the crossed out dustbin is marked on all products to remind separate collection obligations. Consumers should contact their local authority or retailer for information concerning the correct disposal of their old appliance.
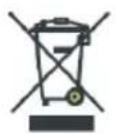
When no longer work, do not throw the device in household waste but hand it in an official collection point so that it can be recycled. You will help to protect the environment.
Imported by Vestel France, 17 rue de la Couture - 94563 Rungis CEDEX