
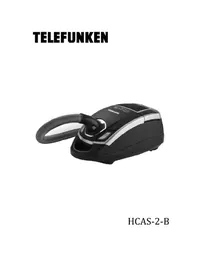
HCTB5 - Vacuum Cleaner TELEFUNKEN - Free user manual and instructions
Find the device manual for free HCTB5 TELEFUNKEN in PDF.
| Product Type | Cordless stick vacuum with handheld function |
| Brand | Telefunken |
| Model | HCTB5 |
| Power Supply | Lithium battery 29.6 V, 2150 mAh; charger 100-240 V ~ 50/60 Hz |
| Battery Life | Approximately 30 minutes in standard mode (estimated) |
| Charging Time | 8 h for the first charge, 4 h for subsequent charges |
| Operating Modes | Eco, Standard, Turbo |
| Brush Type | Motorized brush (turbo brush), upholstery brush, crevice tool |
| Dust Container Capacity | Approximately 0.5 L (estimated) |
| Filtration | Washable filter in dust container |
| Noise Level | Less than 76 dB(A) |
| Weight | Approximately 2.5 kg (estimated) |
| Dimensions (L x W x H) | Approximately 25 x 20 x 110 cm (estimated) |
| Maintenance | Empty the container after each use; clean the filter regularly; clean the exterior with a soft cloth and mild cleaner |
| Safety | Do not use toxic or abrasive products; do not immerse the appliance in water; unplug before cleaning |
| Included Accessories | Wall charging dock, motorized brush, crevice tool, upholstery brush, charger |
| Recycling | Do not dispose of with household waste; lithium battery must be recycled separately |
Frequently Asked Questions - HCTB5 TELEFUNKEN
User questions about HCTB5 TELEFUNKEN
0 question about this device. Answer the ones you know or ask your own.
Ask a new question about this device
Download the instructions for your Vacuum Cleaner in PDF format for free! Find your manual HCTB5 - TELEFUNKEN and take your electronic device back in hand. On this page are published all the documents necessary for the use of your device. HCTB5 by TELEFUNKEN.
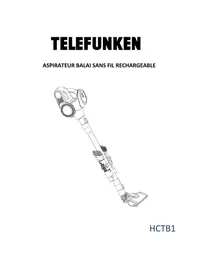
USER MANUAL HCTB5 TELEFUNKEN
natural_image
Telefunk ultrasonic vacuum cleaner with blue and white body (no visible text or symbols on body)HCTB5
CONSIGNES DE SÉCURITÉ

MISE EN GARDE
- LIRE IMPÉRATIVEMENT CE MODE D'EMPLOI ET LE CONSERVER AFIN DE POUVOIR LE CONSULTER ULTÉRIEUREMENT. DANS LE CAS OÙ VOUS CÉDEZ CET APPAREIL Á UN TIERS, N'OUBLIEZ PAS DE FOURNIR CETTE NOTICE AVEC L'APPAREIL.
- CET APPAREIL EST DESTINÉ Á ETRE UTILISÉ DANS DES APPLICATIONS DOMESTIQUES ET ANALOGUES TELLES QUE:
○ DES COINS CUISINES RÉSERVÉS AU PERSONNEL DANS
○ DES MAGASINS, BUREAUX ET AUTRES ENVIRONNEMENTS PROFESSIONNELS;
○ DES FERMES;
○ L'UTILISATION PAR LES CLIENTS DES HÔTELS, MOTELS ET AUTRES ENVIRONNEMENTS Á CARACTERE RÉSIDENTIEL;
○ DES ENVIRONNEMENTS DE TYPE CHAMBRES D'HÔTES.
- TOUTE UTILISATION AUTRE QUE CELLE PRÉVUE POUR CET APPAREIL, PAR EXAMPLE UNE UTILISATION COMMERCIALE, EST INTERDITE. UNE UTILISATION NON CONFORME AU MODE D'EMPLOI DÉGAGERAIT LA MARQUE DE TOUTE RESPONSABILITÉ ET ENTRAÎNERAIT LA PERTE DE LA GARANTIE.
- APRÈS AVOIR DEBALLÉ VOTRE APPAREIL, ASSUREZ-VOUS D'ABORD QU'IL N'A PAS ÉTÉ ABIMÉ. SI VOUS AVEZ UN DOUTE, N'UTILISEZ PAS VOTRE APPAREIL, ET CONSULTEZ UNE PERSONNE COMPÉTENTE.
-
ENLEVEZ BIEN TOUS LES ÉLÉMENTS DE L'EMBALLAGE, ET NE LAISSEZ PAS LES ÉLÉMENTS TELS QUE LES SACS PLASTIQUES, DU POLYSTYRÈNE OU DES ÉLASTIQUES À PORTÉE DES ENFANTS. CES ÉLÉMENTS POURRAIENT ÊTRE DANGEREUX POUR EUX.
-
L'APPAREIL DOIT ÊTRE UTILISÉ UNIQUEMENT AVEC L'ALIMENTATION FOURNIE AVEC L'APPAREIL.
- L'APPAREIL DOIT ÊTRE ALIMENTÉ UNIQUEMENT SOUS LA TRÈS BASSE TENSION DE SÉCURITÉ CORRESPONDANT AU MARQUAGE DE L'APPAREIL.
- LA FICHE DE PRISE DE COURANT DU CÂBLE D'ALIMENTATION DOIT ÊTRE ENLEVÉE DU SOCLE AVANT DE NETTOYER L'APPAREIL OU D'ENTREPRENDRE LES OPÉRATIONS D'ENTRETIEN.
- N'UTILISEZ JAMAIS D'ACCESSOIRES OU DE PIÈCES D'UN AUTRE FABRICANT. L'UTILISATION DE CE TYPE D'ACCESSOIRES OU DE PIÈCES ENTRAÎNE L'ANNULATION DE LA GARANTIE.
- L'APPAREIL NE DOIT PAS ÊTRE UTILISÉ S'IL A CHUTÉ, S'IL PRÉSENTE DES DOMMAGES APPARENTS, S'IL FUIT OU PRÉSENTE DES ANOMALIES DE FONCTIONNEMENT.
- DÉBRANCHEZ TOUJOURS LE PRODUIT EN CAS DE LONGUE PÉRIODE SANS UTILISATION.
-
CET APPAREIL PEUT ÊTRE UTILISÉ PAR DES ENFANTS D'AU MOINS 8 ANS ET PAR DES PERSONNES AYANT DES CAPACITÉS PHYSIQUES, SENSORIELLES OU MENTALES RÉDUITES OU DÉNUÉES D'EXPÉRIENCE OU DE CONNAISSANCE, S'ILS (SI ELLES) SONT CORRECTEMENT SURVEILLÉ(E)S OU SI DES INSTRUCTIONS RELATIVES À L'UTILISATION DE L'APPAREIL EN TOUTE SÉCURITÉ LEUR ONT ÉTÉ DONNÉES ET SI LES RISQUES ENCOURUS ONT ÉTÉ APPRÉHENDÉS. LES ENFANTS NE DOIVENT PAS JOUER AVEC L'APPAREIL. LE NETTOYAGE ET L'ENTRETIEN PAR L'USAGER NE DOIVENT PAS ÊTRE RÉALISÉS PAR DES ENFANTS SANS SURVEILLANCE.
-
SI LE CÂBLE D'ALIMENTATION EST ENDOMMAGÉ, IL DOIT ÊTRE REMPLACÉ PAR LE FABRICANT, SON SERVICE APRÈS-VENTE OU DES PERSONNES COMPÉTENTES DE QUALIFICATION SIMILAIRE AFIN D'ÉVITER TOUT DANGER.
- MAINTENEZ L'APPAREIL ET SON CORDON HORS DE PORTÉE DES ENFANTS DE MOINS DE 8 ANS LORSQU'IL EST SOUS TENSION. L'APPAREIL NE DOIT PAS ÊTRE LAISSÉ SANS SURVEILLANCE LORSQU'IL EST RELIÉ Á L'ALIMENTATION.
- LES ENFANTS NE DOIVENT PAS JOUER AVEC L'APPAREIL.
- NE PAS UTILISER L'APPAREIL SI SON OU SES FILTRE(S) NE SONT PAS INSTALLÉS CORRECTEMENT.
- NE PAS UTILISER L'APPAREIL SI SES ACCESSOIRES NE SONT PAS DUMENT ACCOUPLÉS.
- NE PAS UTILISER L'APPAREIL SI LES ACCESSOIRES QUI LUI SONT ASSEMBLÉS PRÉSENTENT DES DÉFAUTS. LES REMPLACER IMMÉDIATEMENT.
- NE PAS UTILISER L'APPAREIL SI SON DISPOSITIF DE MISE EN MARCHE/ARRET NE FONCTIONNE PAS.
- UTILISER LES POIGNÉES POUR PRENDRE OU TRANSPORTER L'APPAREIL.
- NE PAS FORCER LA CAPACITÉ DE TRAVAIL DE L'APPAREIL.
- GARDER ET RANGER L'APPAREIL EN LIEU SEC, SANS POUSSIERE ET LOIN DES RAYONS SOLAIRES.
- VÉRIFIER QUE LES GRILLES DE VENTILATION DE L'APPAREIL NE SONT PAS OBSTRUÉES PAR DE LA POUSSIERE, DE LA SALETE OU TOUT OBJET.
-
NE PAS TRAVAILLER SUR DES ZONES CONTENANT DES OBJETS MÉTALLIQUES TELS QUE DES CLOUS ET (OU) DES VIS.
-
NE JAMAIS ASPIRER D'OBJETS INCANDESCENTS OU COUPANTS (MÉGOTS, CENDRES, CLOUS...).
- EN CE QUI CONCERNE LA FAÇON DE NETTOYER L'APPAREIL, RÉFÉREZ-VOUS AU CHAPITRE « NETTOYAGE ET ENTRETIEN ».
- EN CE QUI CONCERNE LE FONCTIONNEMENT DE L'APPAREIL, RÉFÉREZ-VOUS AU PARAGRAPHE CI-APRÈS DE LA NOTICE.

DANGER D'ÉLECTROCUTION !
- CET APPAREIL DOIT ÊTRE CONNECTÉ Á UNE PRISE RELIÉE Á LA TERRE. SI VOUS DEVEZ UTILISER UNE RALLONGE, UTILISEZ IMPÉRATIVEMENT UN MODÈLE EQUIPÉ D'UNE PRISE DE TERRE.
- VÉRIFIEZ QUE LE VOLTAGE MARQUÉ SUR LA PLAQUE SIGNALÉTIQUE CORRESPOND BIEN Á CELUI DE VOTRE INSTALLATION. SI CE N'EST PAS LE CAS, N'UTILISEZ PAS VOTRE APPAREIL, ET CONSULTEZ UNE PERSONNE COMPÉTENTE.
- PRENEZ TOUTES LES PRÉCAUTIONS NÉCESSAIRES POUR ÉVITER QU'UNE PERSONNE NE SE PRENNE LES PIEDS DANS LE CÂBLE OU SA RALLONGE.
- NE JAMAIS PLONGER L'APPAREIL DANS L'EAU.
- POUR VOTRE SECURITÉ, NOUS VOUS RECOMMANDONS DE NE JAMAIS LAISSER VOTRE APPAREIL DANS UN ENDROIT EXPOSÉ AUX INTEMPÉRIES ET A L’HUMIDITÉ.
- NE LAISSEZ PAS VOTRE APPAREIL BRANCHÉ SANS L'UTILISER.
- IL EST CONSEILLÉ D'EXAMINER RÉGULIÈREMENT LE CÂBLE D'ALIMENTATION POUR DÉCELER TOUT SIGNE DE DÉTÉRIORATION ÉVENTUELLE, ET L'APPAREIL NE DOIT PAS ÊTRE UTILISÉ SI LE CABLE EST ENDOMMAGÉ.
- NE BRANCHEZ PAS LE PRODUIT ET N'APPUYEZ PAS SUR LES BOUTONS DU PANNEAU DE COMMANDE SI VOS MAINS SONT MOUILLÉES.
- N'UTILISEZ PAS L'APPAREIL LES PIEDS NUS OU MOUILLÉS.
- AVANT TOUTE OPÉRATION DE NETTOYAGE OU D'ENTRETIEN, DÉBRANCHEZ L'APPAREIL POUR COUPER L'ALIMENTATION ÉLECTRIQUE.
NORMES DE SÉCURITÉ
CET APPAREIL EST CONFORME AUX DIRECTIVES ET NORMES EN VIGUEURS.
SOMMAIRE
DESCRIPTION 1
MISE EN SERVICE ET UTILISATION ....2
natural_image
Line drawing of a hand holding a tool with an arrow pointing to it, no text or symbols present1.
natural_image
Line drawing of a handheld device with handle and internal components (no text or symbols)2.
natural_image
Line drawing of a handheld vacuum cleaner (no text or symbols)3.
natural_image
Line drawing of a single vacuum cleaner (no text or symbols present)
natural_image
Line drawing of a mechanical tool or device with a circular annotation highlighting a feature (no text or symbols present)NETTOYAGE ET ENTRETIEN
natural_image
Line drawing of a laboratory pipette with a pointed tip and internal granular structure (no text or symbols)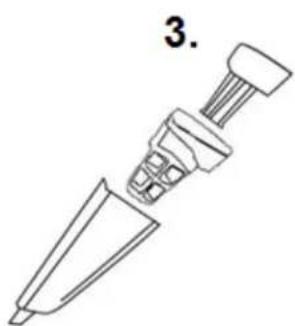
natural_image
Line drawing of a mechanical component with a pointed tip and threaded end (no text or symbols)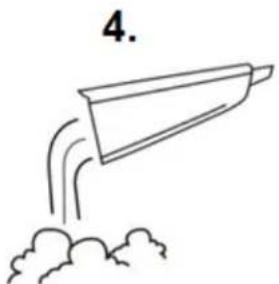
natural_image
Simple line drawing of a paper airplane launching from clouds, labeled with number 4 (no text or symbols on the diagram itself)natural_image
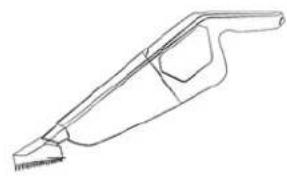
Telefunker vacuum cleaner with blue and white body, no visible text or symbols on the device itself.HCTB5
SAFETY ADVICES AND WARNINGS

WARNING
- READ CAREFULLY THE INSTRUCTIONS BEFORE INSTALLING AND USING THIS APPLIANCE. IN THE CASE YOU RESELL THIS APPLIANCE, PLEASE MAKE SURE TO PROVIDE THIS INSTRUCTION MANUAL TO YOUR BUYER.
- THIS APPLIANCE IS INTENDED TO BE USED IN HOUSEHOLD AND SIMILAR APPLICATIONS SUCH AS:
○ STAFF KITCHEN AREAS IN SHOPS, OFFICES AND OTHER WORKING ENVIRONMENTS;
○ FARM HOUSES;
○ BY CLIENTS IN HOTELS, MOTELS AND OTHER RESIDENTIAL TYPE OF ENVIRONMENTS;
○ BED AND BREAKFAST TYPE ENVIRONMENTS.
- IT SHOULD NOT BE USED FOR ANY OTHER PURPOSE OR IN ANY OTHER APPLICATION, SUCH AS FOR NON-DOMESTIC USE OR IN A COMMERCIAL ENVIRONMENT. ANY COMMERCIAL USE, INAPPROPRIATE USE OR FAILURE TO COMPLY WITH THE INSTRUCTIONS, THE MANUFACTURER ACCEPTS NO RESPONSIBILITY AND THE GUARANTEE WILL NOT APPLY.
- AFTER UNPACKING THE APPLIANCE, MAKE SURE IT IS NOT DAMAGED. THE APPLIANCE MUST NOT BE USED IF IT HAS BEEN DROPPED, IF THERE IS VISIBLE SIGNS OF DAMAGE, IF IT LEAKS OR IF IT FUNCTIONS ABNORMALLY IN ANY WAY. IN CASE OF DOUBT, DO NOT USE THE APPLIANCE AND CONTACT YOUR SUPPLIER OR A QUALIFIED TECHNICIAN OR THE NEAREST AUTHORIZED SERVICE CENTER FOR EXAMINATION, REPAIR OR ELECTRICAL OR
MECHANICAL ADJUSTMENT.
- REMOVE ALL PACKAGING AND DO NOT LEAVE THE PACKAGING MATERIAL SUCH AS PLASTIC BAGS, POLYSTYRENE AND ELASTIC BANDS IN EASY REACH OF CHILDREN AS THEY MAY CAUSE SERIOUS INJURIES.
- THE APPLIANCE SHALL ONLY BE USED WITH ITS SUPPLIED BATTERY.
- THE APPLIANCE SHALL BE SUPPLIED WITH THE VOLTAGE MARKED ON THE RATING PLATE.
- ALWAYS UNPLUG THE CABLE ADAPTOR BEFORE STARTING ANY CLEANING OPERATIONS.
- THE USE OF ACCESSORY AND ATTACHMENTS NOT RECOMMENDED BY THE MANUFACTURER MAY CAUSE INJURIES.
- ALWAYS UNPLUG THE APPLIANCE IF NOT USING IT FOR A PERIOD OF TIME.
- THE APPLIANCE CAN BE USED BY CHILDREN AGED FROM 8 YEARS AND ABOVE AND PERSONS WITH REDUCED PHYSICAL, SENSORY OR MENTAL CAPABILITIES, OR LACK OF EXPERIENCE AND KNOWLEDGE, UNLESS THEY HAVE BEEN GIVEN SUPERVISION OR INSTRUCTION CONCERNING USE OF THE APPLIANCE IN A SAFE WAY AND UNDERSTAND THE HAZARDS INVOLVED BY A PERSON RESPONSIBLE FOR THEIR SAFETY. CHILDREN SHALL NOT PLAY WITH THE APPLIANCE. CLEANING AND MAINTENANCE SHALL NOT BE MADE BY CHILDREN WITHOUT SUPERVISION.
- KEEP AWAY THIS APPLIANCE AND ITS ELECTRIC PLUG AWAY FROM CHILDREN UNDER 8 YEARS OLD WHEN IT'S ENERGIZED.
- CHILDREN SHALL NOT PLAY WITH THE APPLIANCE.
- DO NOT USE THE APPLIANCE IF ITS FILTER(S) ARE NOT
CORRECTLY IN PLACE.
- DO NOT USE THE APPLIANCE IF ITS ACCESSORIES ARE NOT PROPERLY FITTED.
- DO NOT USE THE APPLIANCE IF THE ACCESSORIES ATTACHED TO IT ARE DEFECTIVE. REPLACE THEM IMMEDIATELY.
- DO NOT USE THE APPLIANCE IF THE ON/OFF SWITCH DOES NOT WORK.
- USE THE APPLIANCE HANDLE/S, TO CATCH OR MOVE IT.
- DO NOT FORCE THE APPLIANCE'S WORK CAPACITY.
• RESPECT THE MAX LEVEL INDICATION. - KEEP THE APPLIANCE IN A DRY, DUST-FREE PLACE, OUT OF DIRECT SUNLIGHT.
- MAKE SURE THAT DUST, DIRT OR OTHER FOREIGN OBJECTS DO NOT BLOCK THE FAN GRILL ON THE APPLIANCE.
- DO NOT OPERATE OVER AREAS WHICH CONTAIN METAL OBJECTS SUCH AS NAILS AND/OR SCREWS.
- NEVER VACUUM HOT OR SHARP OBJECTS (CIGARETTE BUTTS, ASH, NAILS, ETC.).
- FOR THE DETAILS ON HOW TO CLEAN SURFACES, PLEASE SEE SECTION “CLEANING AND MAINTENANCE”.
- REGARDING THE INFORMATION FOR OPERATING THE APPLIANCE, THANKS TO REFER TO THE BELOW PARAGRAPH OF THE MANUAL.

DANGER OF ELECTROCUTION!
- THIS APPLIANCE MUST BE EARTHED. IF YOU NEED TO USE AN EXTENSION LEAD, IT IS IMPORTANT THAT YOU USE A MODEL FITTED WITH AN EARTH PLUG.
- ENSURE TO CHECK THAT THE VOLTAGE MARKED ON THE RATING PLATE MATCHES TO YOUR LOCAL SUPPLY. IF NOT THE CASE, DO NOT USE THE APPLIANCE AND SEEK FOR EXPERT ADVICE.
- TAKE ALL NECESSARY MEASURE WITH CORDS AND EXTENSIONS TO AVOID ANY INJURIES WHILE IN USE.
- FOR YOUR OWN SAFETY, WE RECOMMEND YOU NEVER LEAVE THE APPLIANCE IN A PLACE THAT IS EXPOSED TO HUMIDITY OR INCLEMENT WEATHER CONDITION.
- NEVER LEAVE APPLIANCE PLUGGED IN WHEN NOT IN USE.
- IF THE SUPPLY CORD IS DAMAGED, IT MUST BE REPLACED BY THE MANUFACTURER, ITS SERVICE AGENT OR SIMILARLY QUALIFIED TECHNICIANS IN ORDER TO AVOID A HAZARD. THE SUPPLY CORD SHOULD BE REGULARLY EXAMINED FOR SIGNS OF DAMAGE AND THE APPLIANCE IS NOT TO BE USED IF THE CORD IS DAMAGED.
- THE APPLIANCE IS NOT INTENDED TO BE OPERATED BY MEANS OF AN EXTERNAL TIMER OR SEPARATE REMOTE-CONTROL SYSTEM.
- NEVER PLUG THE APPLIANCE WITH WET HANDS.
- NEVER USE THE APPLIANCE WITH BARE OR WET FEET.
- NEVER UNPLUG THE APPLIANCE BY PULLING THE POWER CABLE OR THE APPLIANCE ITSELF.
- NEVER USE THE ELECTRIC WIRE TO LIFT UP, CARRY OR UNPLUG THE APPLIANCE.
CONFORMITY
THIS APPLIANCE IS CONFORMED TO CURRENT DIRECTIVES AND STANDARDS.
TABLE OF CONTENTS
DESCRIPTION 1
SET-UP AND USE 2
Before rst use....2
Using your appliance....4
CLEANING AND MAINTENANCE....5
TECHNICAL INFORMATION......6
ENVIRONMENT AND RECYCLING....6
DESCRIPTION
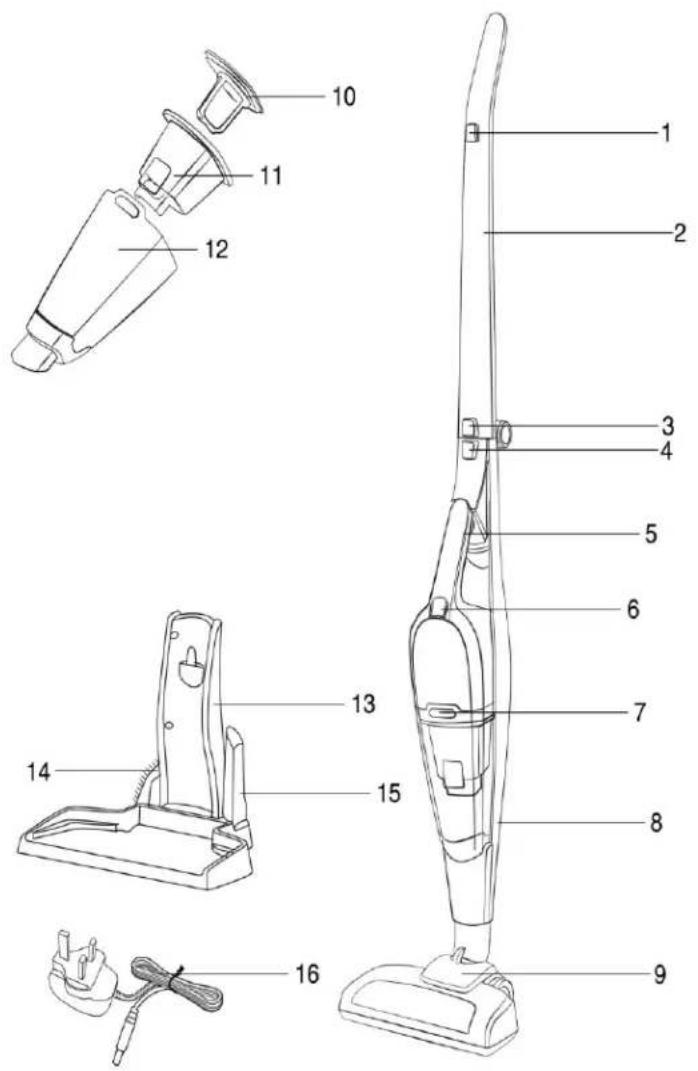
- ON/OFF buon
- Handle
- Buon to fold the handle
- Release buon for handheld unit
- Handheld unit handle
- Handheld unit ON/OFF buon
- Release buon for dust cup
- Main body
- Turbo brush
- Filter
- Filter protector
- Dust cup
- Charging base
- Brush
- Nozzle
- Charging adaptor
SET-UP AND USE
Before rst use
Remove any scker, protective foil or storage cover on and inside the oven
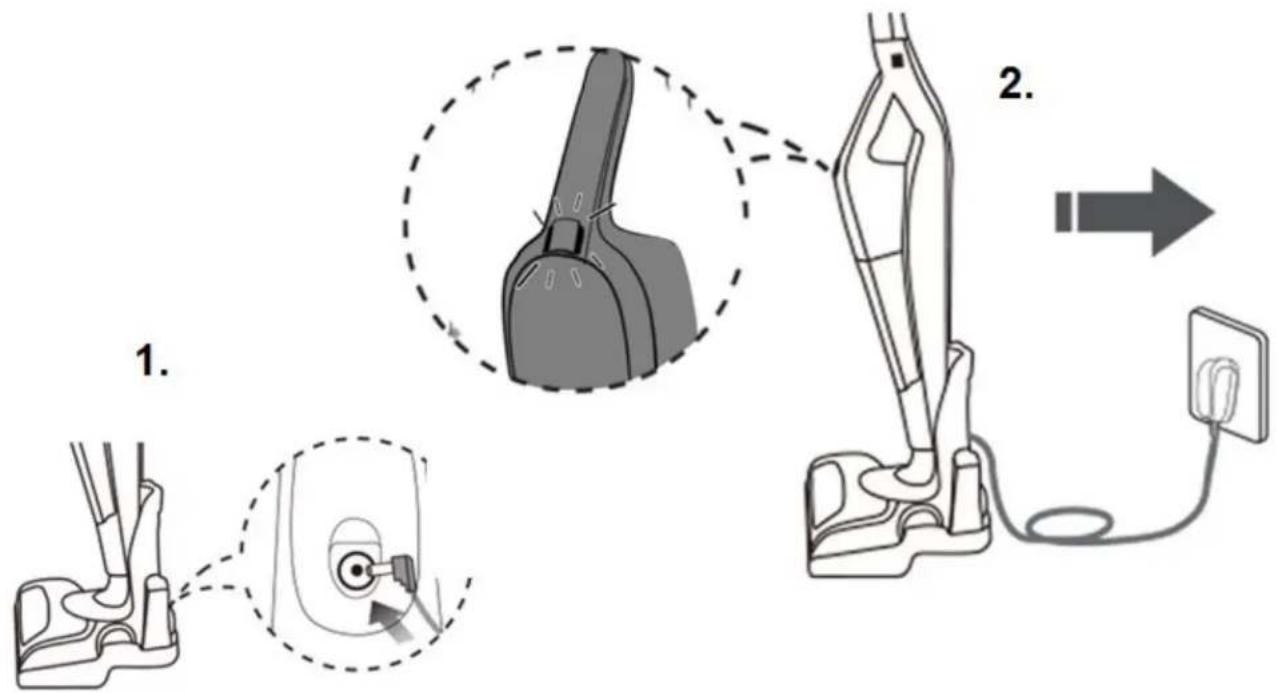
1. Assembling the charging base
1) Insert the horizontal part of the charging base into the main part of the charging base as shown in step 1.
2) Insert the vercal part base into the horizontal part of the charging as shown in step 2.
Ensure that all parts are well assembled and locked into each other.
3) The charging base must be xed to the wall using two screws (not provided). Screw the 2 screws with a 2.5cm distance from each other then insert the charging base onto them to secure.
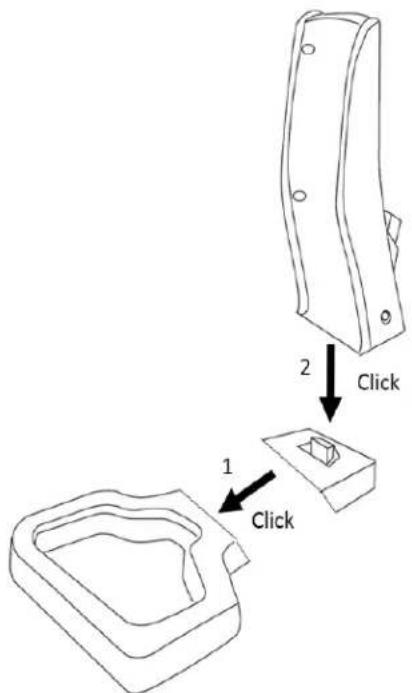
2. Assembling the turbo brush into the main body
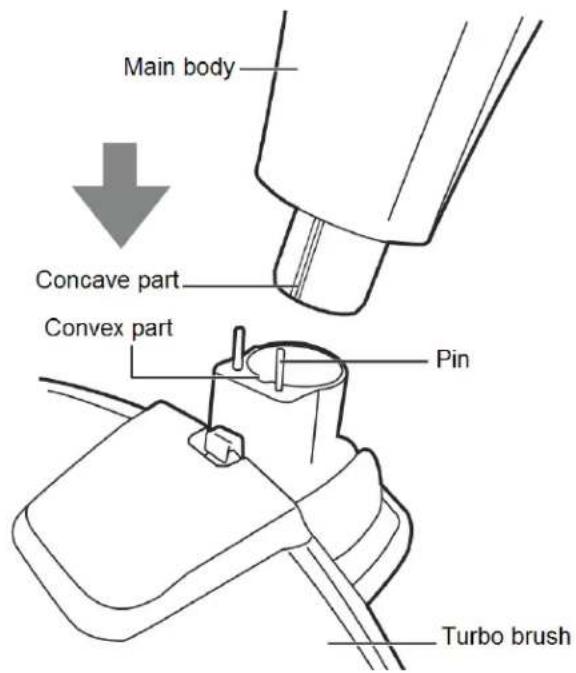
- Put the turbo brush on the ground.
- Hold the turbo brush with one hand.
- Hold the main body with the other hand.
- Insert the concave part of the main body into the convex part of the turbo brush.
- The 2 pins shall insert themselves into the 2 holes of the main body.
- Push downwards the main body until you hear a click.
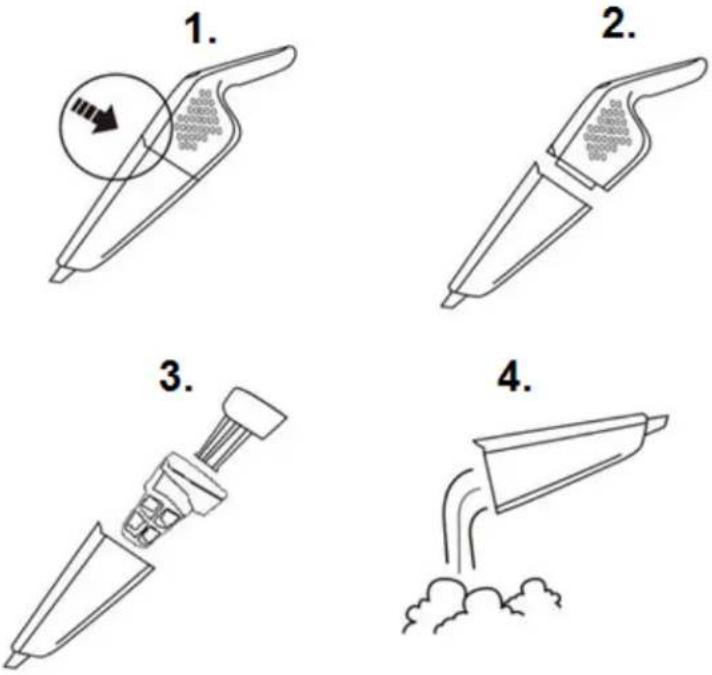
3. Assembling the handheld and accessories into the main body
natural_image
Line drawing of a hand holding a tool with an arrow indicating direction (no text or symbols)1.
natural_image
Line drawing of a handheld device with handle and spout (no text or symbols)2.
natural_image
Line drawing of a handheld vacuum cleaner (no text or symbols)3.
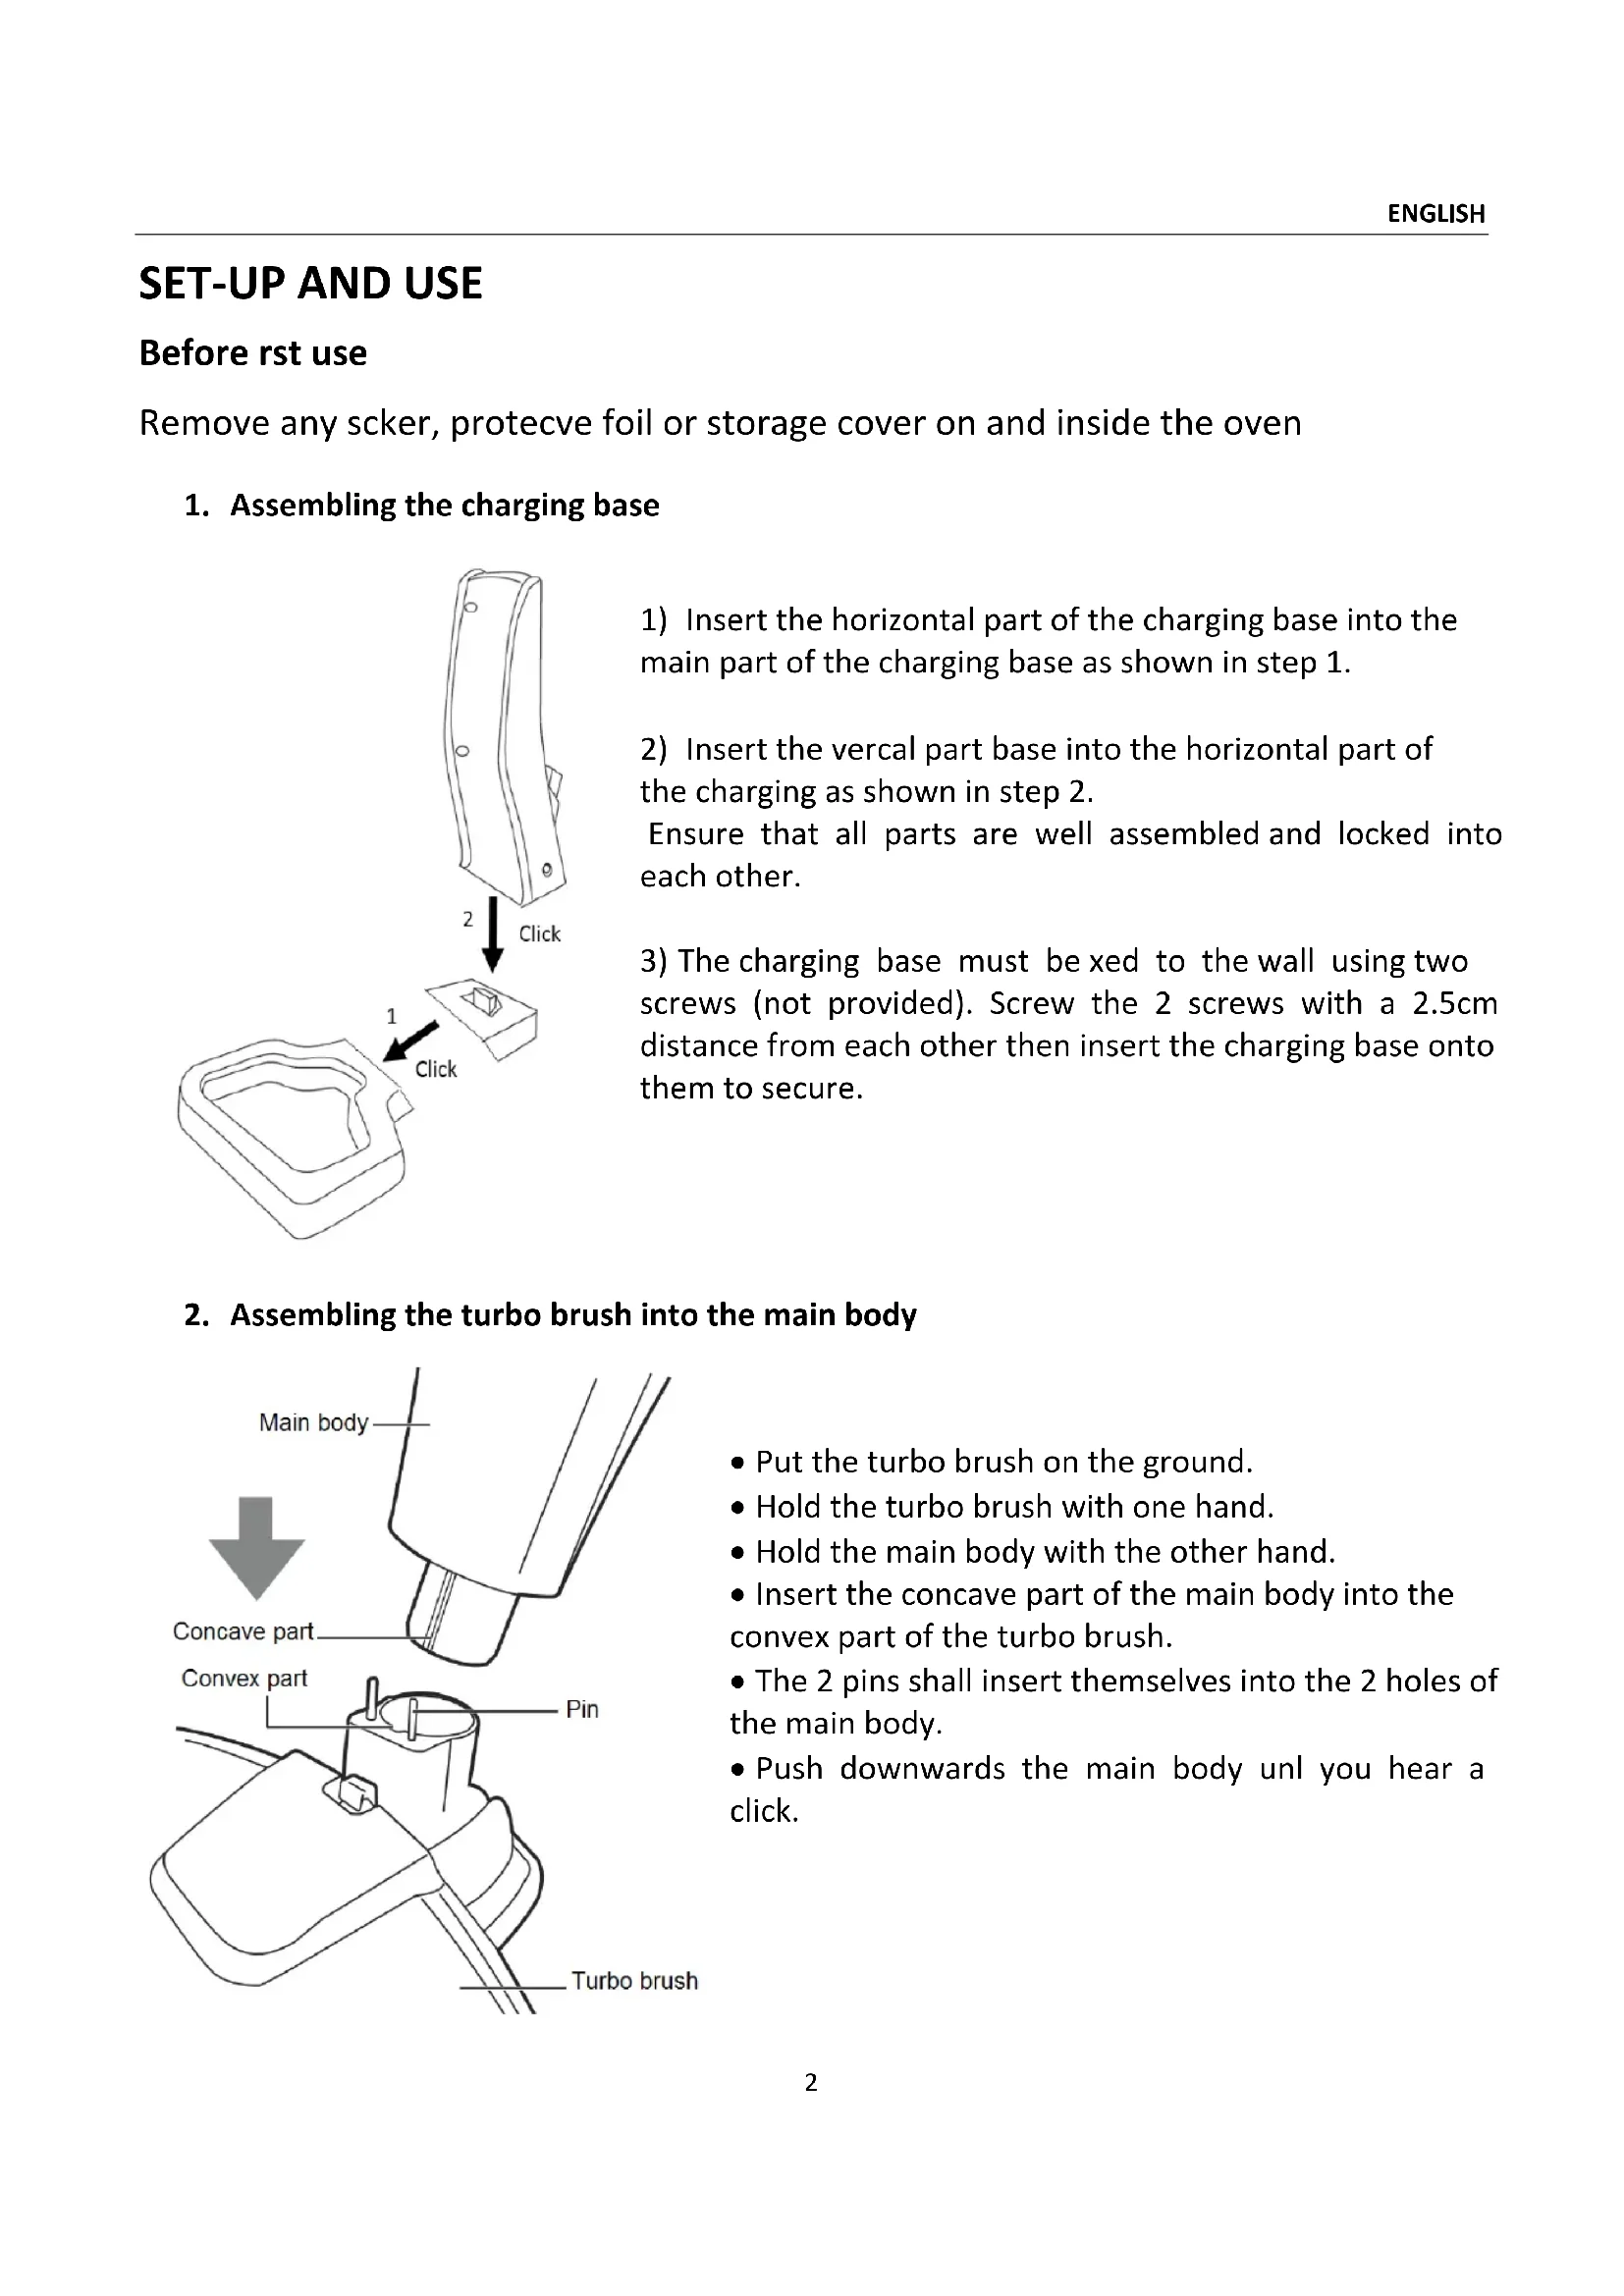
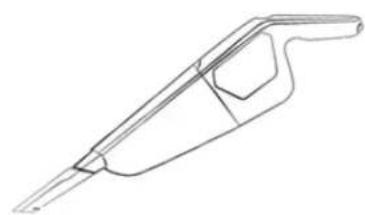
1) Take the nozzle, insert it into the sucon mouth of the handheld unit then push.
2) Ensure that all parts are well assembled and locked into each other.
3) Do the same when using the brush accessory.
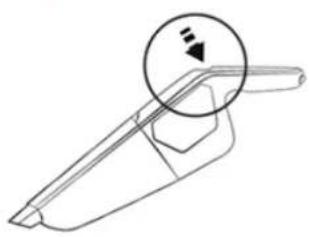
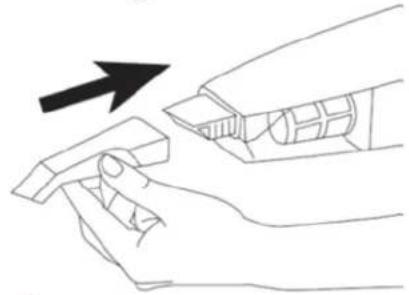
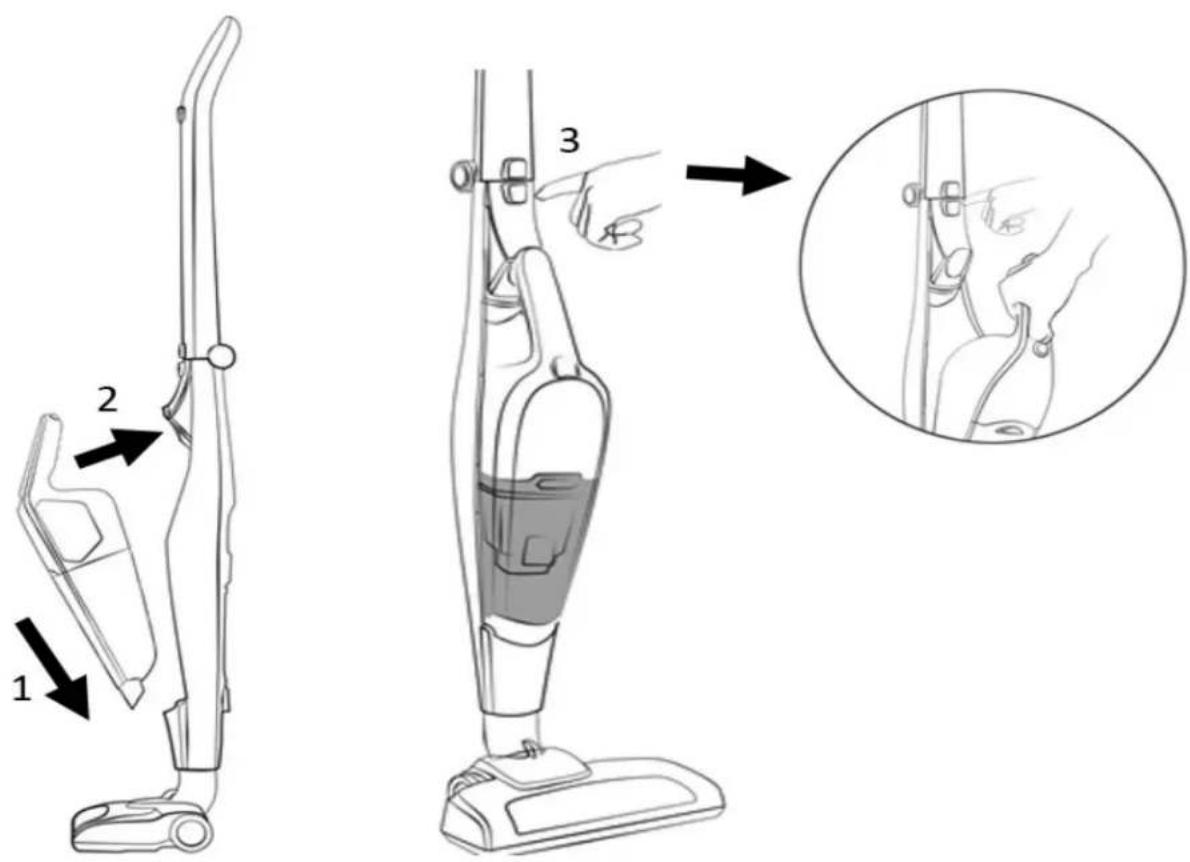
How to assemble and retrieve the handheld unit :
1) Insert the handheld downwards to the main body locaon, see step 1 below.
2) Push the top of the handheld unit into its locaon unl you hear a click, see step 2.
3) To retrieve the handheld unit, push on the handheld unit release buon. Hold onto the handheld unit while pushing the buon to ensure the unit is not falling.
4. Charging your unit before rst use
Aer assembling your unit, ensure to fully charge the new baery before rst use.
1) Insert the battery charger plug into the charging hole of the charging base, see picture 1.
2) The light indicator located around the handheld unit ON/OFF will ash blue to indicate the unit is charging.
3) The charging me for the rst me is around 8 hours for a new baery. In connuous use, the charging me is around 4h.
4) When the baery is 5% full, the light indicator will ash red to indicate the appliance has to be put on charge.
5) When the baery is fully charged, ensure to disconnect the charging adaptor from the power socket.
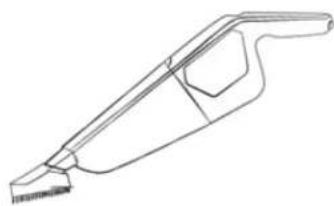
Using your appliance
-
Retrieve your appliance from its charging base.
-
Using your appliance as a sck vacuum cleaner:
a. Let the handheld unit into the main body.
b. Push on the main body unit ON/OFF buon as shown on picture 2.
c. Selecon of eco mode: push one me on the main body unit ON/OFF buon.
d. Selecon of Turbo mode : push two mes on the main body unit ON/OFF buon.
- Using the handheld unit:
a. Retrieve the handheld unit from its locaon.
b. Insert the desired accessory : nozzle or brush.
c. Push on the handheld unit ON/OFF buon as shown on picture 3.
d. Selecon of eco mode: push one me on the handheld unit ON/OFF buon.
e. Selecon of Turbo mode: push two mes on the handheld unit ON/OFF buon.

natural_image
Line drawing of a single vacuum cleaner (no text or symbols)
natural_image
Line drawing of a mechanical component with a circular annotation and three arrows indicating features (no text or symbols present)CLEANING AND MAINTENANCE
√ Unplug the appliance.
√ When cleaning, use a so cloth (or sponge) and neutral cleaner on the exterior surfaces of the appliance.
√ Never put the appliance under the water.
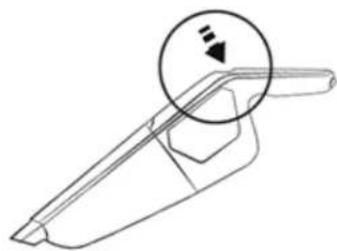
To empty the dust cup :
- Retrieve the handheld unit from its locaon.
- Push on the dust cup release buon, see picture 1.
- Uncouple the 2 parts of the handheld unit, see picture 2.
- Remove the Iter and the Iter protector from the dust cup, see picture
- Empty the dust cup.
- Follow the reverse step to assemble the handheld unit.
⚠ WARNING: Do not use any toxic, solvent, industrial or harsh cleaning products to avoid damaging your appliance.
TECHNICAL INFORMATION
| Model | HCTB5 |
| Rated voltage | 100-240V ~ 50Hz/60Hz |
| Sound level | <76Db(A) |
| Voltage | 29.6V =2150mAh |
ENVIRONMENT AND RECYCLING
Disposal of old electrical appliances
The European Directive 2012/19/EU on Waste Electrical and Electronic Equipment (WEEE) requires that old household electrical appliances must not be disposed of in the normal unsorted municipal waste stream. Old appliances must be collected
separately in order to optimize the recovery and recycling of the materials they contain, and reduce the impact on human health and the environment.
The crossed out “wheeled bin” symbol on the product reminds you of your obligaon, that when you dispose of the appliance, it must be separately collected.
Consumers should contact their local authority or retailer for informaon concerning the correct disposal of their old appliance.
Li
Baery handling
The appliance is supplied with one rechargeable Lithium 22.2V 2200mAh baery incorporated into the product which cannot be repaired. Therefore the baery should be removed from the product before disposal of the product. At the end of the baery lifecycle, dispose of or recycle the baery in accordance with local ordinances or regulaons.


Imported by Vestel France, 17 rue de la Couture – 94563 Rungis CEDEX

- CONSIGNES DE SÉCURITÉ
- MISE EN GARDE
- DANGER D'ÉLECTROCUTION !
- NORMES DE SÉCURITÉ
- SOMMAIRE
- NETTOYAGE ET ENTRETIEN
- SAFETY ADVICES AND WARNINGS
- WARNING
- DANGER OF ELECTROCUTION!
- CONFORMITY
- TABLE OF CONTENTS
- DESCRIPTION
- SET-UP AND USE
- Before rst use
- Assembling the charging base
- Assembling the turbo brush into the main body
- Assembling the handheld and accessories into the main body
- Charging your unit before rst use
- Using your appliance
- CLEANING AND MAINTENANCE
- TECHNICAL INFORMATION
- ENVIRONMENT AND RECYCLING
- Baery handling
Brand : TELEFUNKEN
Model : HCTB5
Category : Vacuum Cleaner