Bread BM2S - Bread maker WILFA - Free user manual and instructions
Find the device manual for free Bread BM2S WILFA in PDF.

| Product Type | Bread Machine |
| Brand | Wilfa |
| Model | Bread BM2S |
| Maximum flour capacity | 550 g |
| Maximum yeast capacity | 9 g |
| Available bread sizes | 500 g, 750 g, 1000 g |
| Number of programs | 13 (White, Quick White, Whole Wheat, Quick Whole Wheat, French, Sweet, Cake, Gluten-Free, Dough, Artisan Dough, Jam, Extra Bake, Super Rapid) |
| Adjustable crust color | Light, Medium, Dark |
| Delay timer | Up to 12 hours |
| Keep warm | 60 minutes |
| Memory in case of power outage | Up to 7 minutes |
| Power supply | 220-240 V, 50/60 Hz (typical estimate) |
| Power | Approximately 600 W (estimate) |
| Dimensions (L x l x H) | Approximately 30 x 25 x 35 cm (estimate) |
| Weight | Approximately 5 kg (estimate) |
| Pan material | Steel with non-stick coating |
| Included accessories | Rectangular pan, kneading paddles, removal hook, measuring cup, measuring spoon |
| Maintenance and cleaning | Hand wash pans and paddles (not dishwasher safe), do not immerse the housing, removable lid |
| Safety | Overheat protection, temperature sensor, automatic shut-off |
| Certifications | CE, food contact approved |
| Intended use | Household use only |
Frequently Asked Questions - Bread BM2S WILFA
User questions about Bread BM2S WILFA
0 question about this device. Answer the ones you know or ask your own.
Ask a new question about this device
Download the instructions for your Bread maker in PDF format for free! Find your manual Bread BM2S - WILFA and take your electronic device back in hand. On this page are published all the documents necessary for the use of your device. Bread BM2S by WILFA.
USER MANUAL Bread BM2S WILFA
Operating Instructions
BM-2S
LESALLEANVISNINGERFORBRUK
LASIGENOMALLAINSTRUKTIONERINNAN PRODUKTENANVANDS
LAES ALLE VEJLEDNINGER INDEN BRUG
LUE OHJEET HUOLELLISESTI ENNEN KAYTTÖA
READ ALL INSTRUCTIONS BEFORE USING
BACK-UP AV MINNE/STRØMBRUDD
BACKUPMINNE FÖR STROMAVBROTT
| deks | Type Skope | Star- | FORV | KR 1 | KR 2 | RS1 | R3 | R5 | R4 | R5 | BAG Total | Ekstra Verm | |||||||||||||||||||||||||||||||||||||||||||||||||||||||||||||||||||||||||||||||||||||||||||||||||||||||||||||||||||||||||||||||||||||||||||||||||||||||||||||||||||||||||||||||||||||||||||||||||||||||||||||||||||||||||||||||||||||||||||||||||||||||||||||||||||||||||||||||||||||||||||||||||||||||||||||||||||||||||||||||||||||||||||||||||||||||||||||||||||||||||||||||||||||||||||||||||||||||||||||||||||||||||||||||||||||||||||||||||||||||||||||||||||||||||||||||||||||||||||||||||||||||||||||||||||||||||||||||||||||||||||||||||||||||||||||||||||||||||||||||||||||||||||||||||||||||||||||||||||||||||||||||||||||||||||||||||||||||||||||||||||||||||||||||||||||||||||||||||||||||||||||||||||||||||||||||||||||||||||||||||||||||||||||||||||||||||||||||||||||||||||||||||||||||||||||||||||||||||||||||||||||||||||||||||||||||||||||||||||||||||||||||||||||||||||||||||||||||||||||||||||||||||||||||||||||||||||||||||||||||||||||||||||||||||||||||||||||||||||||||||||||||||||||||||||||||||||
| 1 Hildt | Medium | 500g | 500g | Medium | 500g | 500g | 500g | 500g | 500g | 500g | 500g | 500g | 500g | 500g | 500g | 500g | 500g | 500g | 500g | 500g | 500g | 55M | 55M | 55M | 55M | 55M | 55M | 55M | 55M | 55M | 55M | 55M | 55M | 55M | 55M | 55M | 55M | 55M | 55M | 55M | 55M | 55m | 55m | 55m | 55m | 55m | 55m | 55m | 55m | 55m | 55m | 55m | 55m | 55m | 55m | 55m | 55m | 55m | 55m | 55m | 55m | 55M | 55m | 55m | 55m | 55m | 55m | 55m | 55m | 55m | 55m | 55m | 55m | 55m | 55m | 55m | 55m | 55m | 55m | 55m | 55M | 55M | 55m | 55m | 55m | 55m | 55m | 55m | 55m | 55m | 55m | 55m | 55m | 55m | 55m | 55m | 55m | 55m | 55m | 55M | 55m | 55M | 55m | 55m | 55m | 55m | 55m | 55m | 55m | 55m | 55m | 55m | 55m | 55m | 55m | 55m | 55m | 55m | 55m | 55M | 55M | 55M | 55m | 55m | 55m | 55m | 55m | 55m | 55m | 55m | 55m | 55m | 55m | 55m | 55m | 55m | 55m | 55m | 55M | 55M | 55m | 55M | 55m | 55m | 55m | 55m | 55m | 55m | 55m | 55m | 55m | 55m | 55m | 55m | 55m | 55m | 55m | 55m | 55M | 55M | 55M | 55M | 55m | 55m | 55m | 55m | 55m | 55m | 55m | 55m | 55m | 55m | 55m | 55m | 55m | 55m | 55m | 55M | 55M | 55M | 55m | 55M | 55m | 55m | 55m | 55m | 55m | 55m | 55m | 55m | 55m | 55m | 55m | 55m | 55m | 55m | 55m | 55M | 55M | 55M | 55M | 55M | 55m | 55m | 55m | 55m | 55m | 55m | 55m | 55m | 55m | 55m | 55m | 55m | 55m | 55m | 55M | 55M | 55M | 55m | 55m | 55M | 55M | 55m | 55m | 55m | 55m | 55m | 55m | 55m | 55m | 55m | 55m | 55m | 55m | 55m | 55m | 55m | 55M | 55M | 55m | 55M | 55M | 55m | 55m | 55m | 55m | 55m | 55m | 55m | 55m | 55m | 55m | 55m | 55m | 55m | 55m | 55m | 55m | 55M | 55m | 55M | 55M | 55m | 55m | 55m | 55m | 55m | 55m | 55m | 55m | 55m | 55m | 55m | 55m | 55m | 55m | 55m | 55M | 55m | 55M | 55M | 55M | 55m | 55m | 55m | 55m | 55m | 55m | 55m | 55m | 55m | 55m | 55m | 55m | 55m | 55m | 55m | 55M | 55m | 55m | 55M | 55M | 55m | 55m | 55m | 55m | 55m | 55m | 55m | 55m | 55m | 55m | 55m | 55m | 55m | 55m | 55M | 55m | 55M | 55m | 55m | 55M | 55m | 55m | 55m | 55m | 55m | 55m | 55m | 55m | 55m | 55m | 55m | 55m | 55m | 55m | 55m | 55m | 55M | 55m | 55m | 55M | 55m | 55m | 55m | 55m | 55m | 55m | 55m | 55m | 55m | 55m | 55m | 55m | 55m | 55m | 55M | 55m | 55m | 55m | 55m | 55M | 55m | 55m | 55m | 55m | 55m | 55m | 55m | 55m | 55m | 55m | 55m | 55m | 55m | 55m | 55M | 55m | 55M | 55m | 55M | 55m | 55m | 55m | 55m | 55m | 55m | 55m | 55m | 55m | 55m | 55m | 55m | 55m | 55m | 55m | 55M | 55m | 55m | 55m | 55M | 55m | 55m | 55m | 55m | 55m | 55m | 55m | 55m | 55m | 55m | 55m | 55m | 55m | 55m | 55m | 55M | 55m | 55M | 55m | 55M | 55M | 55m | 55m | 55m | 55m | 55m | 55m | 55m | 55m | 55m | 55m | 55m | 55m | 55m | 55m | 55M | 55m | 55m | 55M | 55m | 55M | 55m | 55m | 55m | 55m | 55M | 55m | 55m | 55m | 55M | 55m | 55m | 55M | 55m | 55m | 55M | 55m | 55m | 55M | 55m | 55M | 55m | 55m | 55M | 55m | 55M | 55m | 55M | 55m | 55M | 55m | 55M | 55m | 55M | 55m | 55M | 55m | 55M | 55m | 55M | 55m | 55M | 55m | 55m | 55M | 55m | 55M | 55m | 55M | 55m | 55M | 55m | 55M | 55m | 55M | 55m | 55M | 55M | 55m | 55M | 55m | 55M | 55m | 55M | 55m | 55M | 55m | 55M | 55m | 55M | 55m | 55M | 55m | 55M | 55m | 55M | 55M | 55m | 55M | 55m | 55M | 55M | 55m | 55M | 55m | 55M | 55m | 55M | 55m | 55M | 55m | 55M | 55m | 55M | 55m | 55m | 55M | 55m | 55M | 55m | 55m | 55M | 55m | 55M | 55m | 55M | 55m | 55M | 55m | 55M | 55m | 55m | 55M | 55m | 55M | 55m | 55M | 55m | 55M | 55M | 55m | 55M | 55m | 55M | 55m | 55M | 55m | 55M | 55m | 55M | 55M | 55m | 55M | 55m | 55M | 55m | 55M | 55m | 55m | 55M | 55m | 55M | 55m | 55M | 55m | 55M | 55m | 55M | 55m | 55m | 55M | 55m | 55m | 55M | 55m | 55M | 55m | 55M | 55m | 55M | 55m | 55M | 55m | 55M | 55m | 55M | 55m | 55M | 55M | 55m | 55M | 55M | 55m | 55M | 55m | 55M | 55m | 55M | 55m | 55M | 55m | 55M | 55m | 55M | 55m | 55M | 55m | 55m | 0.3467660000000000000000000000000000000000000000000000000000000000000000000000000000000000000000000000000000 | ||||||||||||||||||||||||||||||||||||||||||||||||||||||||||||||||||||||||||||||||||||||||||||||||||||||||||||||||||||||||||||||||||||||||||||||||||||||||||||||||||||||||||||||||||||||||||||||||||||||||||||||||||||||||||||||||||||||||||||||||||||||||||||||||||||||||||||||||||||||||||||||||||||||||||||||||||||||||||||||||||||||||||||||||||||||||||||||||||||||||||||||||
| 6 Sect | ||||||||||||||||||||
| Brod | ||||||||||||||||||||
| 500g | ||||||||||||||||||||
| 500g | ||||||||||||||||||||
| 500g | ||||||||||||||||||||
| 500g | ||||||||||||||||||||
| 500g | ||||||||||||||||||||
| 500g | ||||||||||||||||||||
| 500g | ||||||||||||||||||||
| 500g | ||||||||||||||||||||
| 500g | ||||||||||||||||||||
| 500g | ||||||||||||||||||||
| 500g | ||||||||||||||||||||
| 500g | ||||||||||||||||||||
| 500g | ||||||||||||||||||||
| 500g | ||||||||||||||||||||
| 500g | ||||||||||||||||||||
| 500g | 12 | Extra- | tiggen- | tiggen- | OM OM OM OM OM OM OM OM OM OM OM OM OM OM OM OM OM OM OM OM OM OM OM OM OM OM OM OM OM OM OM OM OM OM OM OM OM OM OM OM OM OM OM OM OM OM OM OM OM OM OM OM OM OM OM OM OM OM OM OM OM OM OM OM OM OM OM OM OM OM OM OM OM OM OM OM OM OM OM OM OM OM OM OM OM OM OM OM OM OM OM OM OM OM OM OM OM OM OM OM OM ON OM ON OM ON OM ON OM ON OM ON OM ON OM ON OM ON OM ON OM ON OM ON OM ON OM ON OM ON OM ON OM ON OM ON OM ON OM ON OM ON OM ON OM ON OM ON OM ON OM ON OM ON OM ON OM ON OM ON OM ON OM ON OM ON OM ON OM ON OM ON OM ON OM ON OM ON OM ON OM ON OM ON OM ON OM ON OM ON OM ON OM ON OM ON OM ON OM ON OM OM ON OM ON OM ON OM ON OM ON OM ON OM ON OM ON OM ON OM ON OM ON OM ON OM ON OM ON OM ON OM ON OM ON OM ON OM ON OM ON OM ON OM ON OM ON OM ON OM ON OM ON OM ON OM ON OM ON OM ON OM ON OM ON OM ON OM ON OM ON OM ON OM ON OM ON OM ON OM ON OM ON OM ON OM ON OM ON OM ON OM ON OM ON OM ON OM ON ON OM ON OM ON OM ON OM ON OM ON OM ON OM ON OM ON OM ON OM ON OM ON OM ON OM ON OM ON OM ON OM ON OM ON OM ON OM ON OM ON OM ON OM ON OM ON OM ON OM ON OM ON OM ON OM ON OM ON OM ON OM ON OM ON OM ON OM ON OM ON OM ON OM ON OM ON OM ON OM ON OM ON OM ON OM ON OM ON OM ON OM ON OM ON OM ON OM ON ONOM ON ONOM ON ONOM ON ONOM ON ONOM ON ONOM ON ONOM ON ONOM ON ONOM ON ONOM ON ONOM ON ONOM ON ONOM ON ONOM ON ONOM ON ONOM ON ONOM ON ONOM ON ONOM ON ONOM ON ONOM ON ONOM ON ONOM ON ONOM ON ONOM ON ONOM ON ONOM ON ONOM ON ONOM ON ONOM ON ONOM ON ONOM ON ONOM ON ONOMONONONONONONONONONONONONONONONONONONONONONONONONONONONONONONONONONONONONONONONONONONONONONONONONONONONONONONONONONONONONONONONONONONONONONONONONONONONONONONONONONONONONONONONONONONONONONONONONONONONONNONONONONONONONONONONONONONONONONONONONONONONONONONONONONONONONONONONONONONONONONONONONONONONONONONONONONONONONONONONONONONONONONONONONONONONONONONONONONONONONONONONONONONONONONONONONONONONONONONONONONNONONONONONONONONONONONONONONONONONONONONONONONONONONONONONONONONONONONONONONONONONONONONONONONONONONONONONONONONONONONONONONONONONONONONONONONONONONONONONONONONONONONONONONONONONONONONONONONONONONONDONONONONONONONONONONONONONONONONONONONONONONONONONONONONONONONONONONONONONONONONONONONONONONONONONONONONONONONONONONONONONONONONONONONONONONONONONONONONONONONONONONONONONONONONONONONONONONONONONONONONNNONNNNNNNNNNNNNNNNNNNNNNNNNNNNNNNNNNNNNNNNNNNNNNNNNNNNNNNNNNNNNNNNNNNNNNNNNNNNNNNNNNNNNNNNNNNNNNNNNNNNNNNNNNNNNNNNNNNNNNNNNNNNNNNNNNNNNNNNNNNNNNNNNNNNNNNNNNNNNNNNNNNNNNNNNNNNNNNNNNNNNNNNNNNNNNNNNNNNNNNNN NNNNNNNNNNNNNNNNNNNNNNNNNNNNNNNNNNNNNNNNNNNNNNNNNNNNNNNNNNNNNNNNNNNNNNNNNNNNNNNNNNNNNNNNNNNNNNNNNNNNNNNNNNNNNNNNNNNNNNNNNNNNNNNNNNNNNNNNNNNNNNNNNNNNNNNNNNNNNNNNNNNNNNNNNNNNNNNNNNNNNNNNNNNNNNNNNNNNNNNNNNNNNNNNNNNNNNNNNNNNNNNNNNNNNNNNNNNNNNNNNNNNNNNNNNNNNNNNNNNNNNNNNNNNNNNNNNNNNNNNNNNNNNNNNNNNNNNNNNNNNNNNNNNNNNNNNNNNNNNNNNNNNNNNNNNNNNNNNNNNNNNNNNNNNNNNNNNNNNNNNNNNNNNNNNNNNNNNNNNNNNNNNNNNNNNNNNNNNNNNSNNNNNNNNNNNNNNNNNNNNNNNNNNNNNNNNNNNNNNNNNNNNNNNNNNNNNNNNNNNNNNNNNNNNNNNNNNNNNNNNNNNNNNNNNNNNNNNNNNNNNNNNNNNNNNNNNNNNNNNNNNNNNNNNNNNNNNNNNNNNNNNNNNNNNNNNNNNNNNNNNNNNNNNNNNNNNNNNNNNNNNNNNNNNNNNNNNNNNNNENNNNNNNNNNNNNNNNNNNNNNNNNNNNNNNNNNNNNNNNNNNNNNNNNNNNNNNNNNNNNNNNNNNNNNNNNNNNNNNNNNNNNNNNNNNNNNNNNNNNNNNNNNNNNNNNNNNNNNNNNNNNNNNNNNNNNNNNNNNNNNNNNNNNNNNNNNNNNNNNNNNNNNNNNNNNNNNNNNNNNNNNNNNNNNNNNNNNNNNO NNNNNNNNNNNNNNNNNNNNNNNNNNNNNNNNNNNNNNNNNNNNNNNNNNNNNNNNNNNNNNNNNNNNNNNNNNNNNNNNNNNNNNNNNNNNNNNNNNNNNNNNNNNNNNNNNNNNNNNNNNNNNNNNNNNNNNNNNNNNNNNNNNNNNNNNNNNNNNNNNNNNNNNNNNNNNNNNNNNNNNNNNNNNNNNNNNNNNNNANNNNNNNNNNNNNNNNNNNNNNNNNNNNNNNNNNNNNNNNNNNNNNNNNNNNNNNNNNNNNNNNNNNNNNNNNNNNNNNNNNNNNNNNNNNNNNNNNNNNNNNNNNNNNNNNNNNNNNNNNNNNNNNNNNNNNNNNNNNNNNNNNNNNNNNNNNNNNNNNNNNNNNNNNNNNNNNNNNNNNNNNNNNNNNNNNNNNNNNNRRNNGGNGGNGGNGGNGGNGGNGGNGGNGGNGGNGGNGGNGGNGGNGGNGGNGGNGGNGGNGGNGGNGGNGGNGGNGGNGGNGGNGGNGGNGGNGGNGGNGGNGGNGGNGGNGGNGGNGGNGGNGGNGGNGGNGGNGGNGGNGGNGGNGGNGGNG | |||||||||||||||
Safety operation instructions. 5
Technical parameters 9
Appliance features 9
Before first use. 10
Operating instructions 11
Description of functions 12
Cleaning and maintenance 13
Troubleshooting 14
Remarks on recipes 18
Ecology - environment protection. 19
Please read these instructions carefully. Pay special attention to important safety instructions in order to prevent accidents and/or avoid damage. Keep this User's Guide for future reference.
Safety operation instructions
Before starting to use the appliance, become familiar with the whole content of this user manual. Make sure that you understand the instructions given below.
Importen safety instructions
-
This appliance can be used by children aged from 8 years and above and persons with reduced physical, sensory or mental capabilities or lack of experience and knowledge if they have been given supervision or instruction concerning use of the appliance in a safe way and understand the hazards involved. Children shall not play with the appliance. Cleaning and user maintenance shall not be made by children unless they are older than 8 and supervised. Keep the appliance and its cord out of reach of children less than 8 years.
-
Do not operate the appliance if it has a damaged cord or if the housing is visibly damaged.
- If the supply cord is damaged, it must be replaced by the manufacturer, its service agent or similarly qualified persons in order to avoid a hazard.
- The appliance can only be repaired by qualified service personnel. Improper servicing may cause a serious hazard to the user. In case of defects please contact a qualified service center.
-
The appliance is not intended to be operated by means of an external timer or separate remote-control system.
-
Unplug the appliance when not in use and before cleaning.
- Switch off the appliance before handling movable parts.
- The cord cannot hang over the edge of the table or counter and cannot touch hot surfaces.
- Use special pot holders or a protective cloth while removing the baking tin with the bread from the appliance. The baking tin and the bread are very hot.
- Do not touch hot surfaces of the appliance. Use pot holders. The appliance is very hot after the end of the baking process.
- The temperature of accessible surfaces may be high when the appliance is operating.
- Allow the appliance to cool before dismantling and cleaning. The appliance has a heat-insulated cool touch housing. The metal parts become hot during use.
- Pay special attention while handling the appliance, especially if it is full of hot substances.
WARNING
Risk of property damage
- Plug the appliance only to a grounded electrical outlet with the voltage corresponding to the voltage indicated on the rating plate.
- Always place the appliance on a flat, even surface so it does not fall during the kneading process of thick dough. It is especially important while using the programmed functions and when the appliance is left unattended. In case of extremely smooth surfaces, place the appliance on a thin rubber pad.
- When in operation, the unit should be placed at least 10cm from other objects.
- Never place the appliance near a gas or electric cooker or hot oven.
- Never remove the baking tin while the appliance is working.
- Never put any aluminium foil or any materials other than baking products into the unit, as this can cause a fire or short circuit.
- Never cover the appliance with towels or other materials during use. The heat and steam must be free to escape. Danger of fire arises if the appliance is covered with flammable materials or comes in contact with curtains, etc.
- Do not wash under running water. Do not immerse the appliance and the cord into water.
- Do not use abrasive detergents such as emulsions, cream cleaners, polishes, etc. to clean the housing. They may remove the graphic information symbols such as: scales, marks, warning signs etc.
- Do not wash metal parts in the dishwasher. Aggressive detergents used in the dishwasher
cause these parts to darken. Wash them manually using traditional dishwashing liquids.
- The use of accessories not recommended by the manufacturer may cause damage to the appliance.
- Bread can catch fire, therefore never use the unit near any inflammable materials or beneath anything that can catch fire (for example curtains).
- Do not unplug by pulling the cord.
Information on the product and hints on its use
- The appliance is intended for household use only. The warranty conditions change if the appliance is used in gastronomic business.
- Never use more ingredients than given in the recipes provided in these instructions. Otherwise bread will be baked unevenly or dough will spill over. Follow the recommendations in these instructions.
- Before trying to bake a given type of bread overnight, first try the recipe while keeping an eye on the appliance to make sure that the doses of ingredients are correct, the dough is not too thick or thin, its quantity is appropriate and the dough does not overflow.
- When finished baking, unplug the unit from the mains socket.
Technical parameters
The unit is approved for contact with food.
Maximum amount of flour: 550g
Maximum amount of raising agent: 9 g.
The appliance was marked by the CE sign on the rating label.
Appliance features
UNIT FEATURES
0 Lid
2 Handle
Control panel
Baking chamber with locks for attaching bread pan
Air vents
6 Rectangular bread pan
7 Kneading paddle for rectangular bread pan
ACCESSIONS
1 Measuring cup
2 Measuring spoon
Hook for taking out kneading paddle
TOUCH CONTROL PANEL
LCD display
0 一 _ 1 ,TIMERetcontrolbuttons
bUAF-for setting loaf size
4 buffAST-BREADting the 13 SUPER RAPID program
outbust forgetcrust color
6 EbuMNUfor selecting a baking program
1 ▷□- STARTSTOP starting and stopping the selected baking program
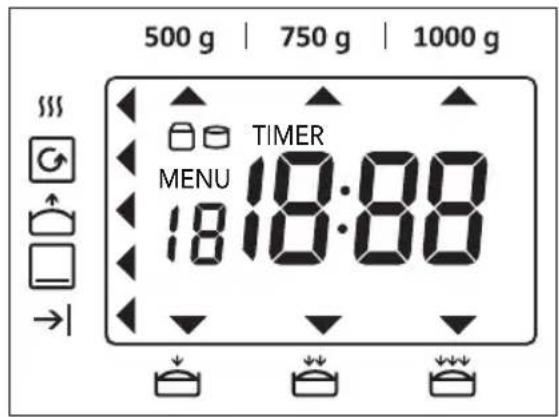
LCD DISPLAY - SYMBOLS
Heating
Kneading
Raising
Baking
Keep warm
Light colored crust
Medium colored crust
Dark colored crust
500 g Small-sized loaf (up to 500 g)
750 g Medium-sized loaf (up to 750 g)
1000 g Large-sized loaf (up to 1000 g)
Unit is in operation
Before first use
- Before first use, remove all packaging materials (foil, any materials in the baking chamber, etc.).
- Before first use, wash the bread pans, kneading paddles, measuring spoon and measuring cup in warm soapy water (see "Cleaning and Maintenance").
- Place the unit on a dry even and stable surface, such as a kitchen table or worktop. Keep the unit away from worktop edges. Make sure that there is enough room around air vents to ensure appropriate ventilation.
Operating instructions
1 Place a bread pan centrally in the baking chamber.
2 Click it into place in the locks located in the upper part of the baking chamber.
Attach an appropriate kneading paddle onto the drive shaft of the bread pan.
NOTE: Make sure that the kneading paddle is positioned correctly on the drive shaft.
Put all ingredients into the bread pan in the order given in the recipe. Sample recipes are included on following pages (see SAMPLE RECIPIES).
Close the lid.
Plug the unit into a mains socket.
Select a baking program using the button.
Available programs:
- WHITE BREAD
- WHITE RAPID
- WHOLE WHEAT
- WHOLE WHEAT RAPID
- FRENCH
- SWEET BREAD
- CAKE
- GLUTEN FREE
- DOUGH
- ARTISAN DOUGH
- JAM
- EXTRA BAKE
- SUPER RAPID
Using the button select the desired loaf size for the respective program.
Next, using the button select the desired crust color.
If you want baking to start at a later time, set the desired delay time using the + buttons.
For example:
If it is 8:30 pm and you want the bread to be ready to serve at 7:00 am the next day, the delay time should be 10 hours and 30 minutes. Press the + or - button continuously until 10:30 appears on the display. It indicates the time between the current time (20:30) and your desired completion time.
WARNING: Never use perishable ingredients such as milk, fruit, yoghurt, onion, eggs, etc. with the delay function.
Press and hold the button for 2 seconds to start baking. The unit will automatically set the baking time and temperature.
NOTE: The current program cycle will be indicated by an arrow next to appropriate icons on the left side of the LCD display.
NOTE: You can stop baking at any time. To do so, press and hold the button until you hear a beep. The selected baking program will be cancelled. If you want to use a different program, select it using the MENU button
When baking is finished the unit will beep. The bread is now ready and you can remove it from the unit.
Unplug the unit from the mains socket.
Open the lid.
Remove the bread pan using an oven glove.
Turn the pan upside down to remove the bread from the pan.
NOTE: If the bread is difficult to remove, shake the pan gently several times to release the bread.
WARNING: If the kneading paddle remains in the loaf, you can cut the loaf slightly and remove the paddle or use the provided hook to remove it.
WARNING: The bread pans are covered with a non-stick layer. Never use any metal utensils as they will scratch the non-stick layer.
Description of functions
If the power supply is interrupted for not more than 7 minutes, the selected program will be remembered and continued automatically until power is back. If the interruption time exceeds 7 minutes, you must start the whole process from the beginning.
SAFETY/WARNING MESSAGES
The unit has several protections against malfunction. If faults occur, the unit will beep and the display will show appropriate information messages. The messages are described below.
- "E00" indicates that temperature in the baking chamber is too low (below -10^ ). If this occurs, unplug the unit from the mains socket and allow it to reach room temperature. The unit cannot operate at a temperature below -10^ .
- "E01" indicates that the baking chamber is too hot (above 50^ ). If this occurs, unplug the unit from the mains socket and allow it to cool down for approximately 30 minutes.
- "EEE" indicates that the sensor is open circuit. If this occurs, contact your local service centre.
- "HHH" indicates that the sensor is short circuit. If this occurs, contact your local service centre.
Cleaning and maintenance
WARNING: Before cleaning unplug the unit from the mains socket and allow it to cool down.
- Before first use, wash the bread pans, kneading paddles, measuring spoon and measuring cup in warm soapy water.
- Before first use, it is recommended that you give the bread pans and kneading paddies a light coating with heat-resistant fat and heat them in an oven at 180^ for approximately 10 minutes. After cooling down, remove the fat using a paper towel. This will give the non-stick layer extra protection. You may repeat this procedure from time to time.
- Before storing or cleaning, allow the unit to cool down.
- Allow the unit to cool down for approximately 30 minutes before starting another kneading and baking process.
NOTE: Never use any chemical cleaning products, benzine, oven cleaning products or any other abrasive cleaners.
- Use a wet towel to remove ingredients and crumbs from the lid, body and baking chamber.
WARNING: Never immerse the unit in water or pour water into the baking chamber!
- For easy cleaning, you may remove the lid by turning it at a 90^ angle and pulling it off.
- Wipe the outside of the bread pan with a wet cloth. Wash the inside of the bread pan with dishwashing liquid. Do not immerse the bread pan in water.
- Clean the kneading paddles and the drive shaft as soon as baking is complete. If you leave the kneading paddle in the bread pan, it will be more difficult to remove later. If this occurs, fill the bread pan with warm water and allow the kneading paddle to soak for 30 minutes. Remove the kneading paddle.
- The bread pans are covered with a non-stick layer. Never use any metal utensils as they will scratch the non-stick layer. The colour of the non-stick layer will change after long use. This is normal and does not affect the performance of the non-stick layer.
- Do not wash the pan or kneading paddles in a dishwasher.
- Before storing, make sure that the unit has cooled down completely and that it is dry. Store the unit with the lid closed.
Troubleshooting
Problems that seem serious at the first glance can be solved easily. Before you contact our service point, check if your problem is mentioned in the chart below. If you still cannot find the solution, please contact our service point.
WARNING: Never undo the appliance and try to repair it on your own as it may be dangerous for the user and may cause damage to the appliance.
| PROBLEM POSSIBLE CAUSE | SOLUTION | |
| Baking chamber or air vents give out smoke. | Ingredients stick to the baking chamber or to the outside of the bread pan. | Unplug the unit from the mains socket and clean the baking chamber or the outside of the bread pan. |
| Ingredients not mixed or bread not baked. | Inappropriate program. Check selected menu and other settings. | |
| Button pressed when the unit was in operation. | Start baking from the beginning.Use different ingredients! | |
| Lid was lifted several times when the unit was in operation. | Lid may be opened only after the raising process is finished. | |
| Long power shortage when the unit was in operation. | Use different ingredients and start baking from the beginning. | |
| Kneading paddle rotation is blocked. | Check if the kneading paddle is not blocked by grains. Remove the bread pan and check if drive elements turn. If not, contact your local service centre. | |
| Bread caves in and moist bottom. | Bread stayed in the bread pan for too long after baking and the keep warm period. | Remove the bread from the bread pan shortly after baking. Do not let it stay in the bread pan for too long. |
| Bread sticks to pan / difficult to shake out. | Bread bottom sticks to the kneading paddle. | Next time before baking, clean the kneading paddle and paddle shaft. In necessary, fill the pan with warm water and leave the kneading paddle to soak for 30 minutes for easy removal and cleaning. |
Sample recipes
| WHITE BREAD Program: 1. | WHITE BREAD / 2. WHITE RAPID | ||
| 1000 g 750 g 500 g | |||
| Ingredients: | |||
| Water | 3,5 dl | 3 dl | 1,75 dl |
| Oil | 1 tablespoons | ¾ tablespoons | ½ tablespoons |
| Salt | 1½ teaspoon | 1 teaspoon | ¾ teaspoon |
| Sugar | 2 teaspoons | 1½teaspoon | 1 teaspoon |
| Wheat flour | 9 dl | 8 dl | 4,5 dl |
| Dry yeast | 1 teaspoon | ¾ teaspoon | ½ teaspoon |
| WHOLE WHEAT BREAD Program: 3. WHOLE WHEAT / 4. WHOLE WHEAT RAPID | |||
| 1000 g 750 g 500 g | |||
| Ingredients: | |||
| Water | 3,5 dl | 3 dl | 1,75 dl |
| Oil | 2 tablespoons | 1½ tablespoons | 1 tablespoon |
| Salt | 1½ teaspoons | 1 teaspoons | ¾ teaspoon |
| Sugar | 2 teaspoons | 2 teaspoons | 1 teaspoon |
| Whole wheat flour | 4 dl | 3 dl | ½ cup |
| Wheat flour | 3 cups | 2 cups | 1½ cups |
| Dry yeast | 1 teaspoon | 1 teaspoons | 1 teaspoon |
| CAKE Program: 7. CAKE | ||
| 500 g | ||
| Ingredients: | ||
| Margarine (melted) | 120g | |
| Salt | ¼ teaspoon | |
| Sugar | 300 g | |
| Eggs | 4 eggs | |
| Wheat flour | 450 g | |
| Lemon | 1 pcs zest and juice | |
| Baking soda | 3½ teaspoon | |
| GLUTEN FREE BREAD Program | 1000 g | |
| Ingredients: | ||
| Water | 4,5 dl | |
| Oil | ½ dl | |
| Salt | ½ teaspoon | |
| Semper mix with fiber | 1 pkg. | |
| Dry yeast | 1 ¼teaspoons |
The tables include examples of recipes and approximate amounts of ingredients. These information should not be treated as a cookery book. While baking we encourage everyone to use their own recipes or these found in specialist literature, and stick to one's likings.
| Index | Type | Crust | Size | PREH | KND 1 | KND2 | RISE1 | KND3 | RISE2 | KND4 | RISE3 | BAKE | Total | Extras | Warm | Delay | |
| 1 White | Light | Medium | 1.0LB | 40M 3:00 | 2:40 | 60 | 12:00 | 37M | 2:57 | 2:37 | 60 | 12:00 | |||||
| 1.5LB | 43M 3:03 | 2:43 | 60 | 12:00 | |||||||||||||
| 2.0LB | 45M 3:05 | 2:45 | 60 | 12:00 | |||||||||||||
| 1.0LB | 50M/3:3M | 32M/026M | 60 | 158:08 | |||||||||||||
| 1.5LB | 55M 3:15 | 2:55 | 60 | 12:00 | |||||||||||||
| 2.0LB | 60M 3:20 | 3:00 | 60 | 12:00 | |||||||||||||
| 1.0LB | 65M 3:25 | 3:05 | 60 | 12:00 | |||||||||||||
| 2.0LB | 70M 3:30 | 3:10 | 60 | 12:00 | |||||||||||||
| 2 White Rapid | Light | Medium | 1.0LB | 40M 2:35 | 2:15 | 60 | 12:00 | 37M | 2:32 | 2:12 | 60 | 12:00 | |||||
| 1.5LB | 43M 2:38 | 2:18 | 60 | 12:00 | |||||||||||||
| 2.0LB | 45M 2:40 | 2:20 | 60 | 12:00 | |||||||||||||
| 1.5LB | 50M/2:3M | 32M/26M | 60 | 158:08 | |||||||||||||
| 2.0LB | 55M 2:50 | 2:30 | 60 | 12:00 | |||||||||||||
| 1.0LB | 60M 2:55 | 2:35 | 60 | 12:00 | |||||||||||||
| 1.5LB | 65M 3:00 | 2:40 | 60 | 12:00 | |||||||||||||
| 2.0LB | 70M 3:03 | 2:45 | 60 | 12:00 | |||||||||||||
| 3 Whole Wheat | Light | Medium | 1.0LB | 44M 4:19 | 3:35 | 60 | 12:00 | 40M | 4:15 | 3:31 | 60 | 12:00 | |||||
| 1.5LB | 48M 4:23 | 3:39 | 60 | 12:00 | |||||||||||||
| 2.0LB | 45M 4:20 | 3:36 | 60 | 12:00 | |||||||||||||
| 1.0LB | 50M/4:25M | 2:5M | 80M | 115:00 | |||||||||||||
| 2.0LB | 55M 4:30 | 3:46 | 60 | 12:00 | |||||||||||||
| 1.0LB | 54M 4:29 | 3:45 | 60 | 12:00 | |||||||||||||
| 1.5LB | 60M 4:35 | 3:51 | 60 | 12:00 | |||||||||||||
| 2.0LB | 64M 4:39 | 3:55 | 60 | 12:00 | |||||||||||||
| 4 Whole Wheat Rapid | Light | Medium | 1.0LB | 44M 2:33 | 2:14 | 60 | 12:00 | 40M | 2:29 | 2:10 | 60 | 12:00 | |||||
| 1.5LB | 48M 2:37 | 2:18 | 60 | 12:00 | |||||||||||||
| 2.0LB | 45M 2:34 | 2:15 | 60 | 12:00 | |||||||||||||
| 1.0LB | 50M/2:3M | 2:20 | 60M | 12:00 | |||||||||||||
| 1.5LB | 55M 2:44 | 2:25 | 60 | 12:00 | |||||||||||||
| 2.0LB | 54M 2:43 | 2:24 | 60 | 12:00 | |||||||||||||
| 1.0LB | 60M 2:49 | 2:30 | 60 | 12:00 | |||||||||||||
| 1.5LB | 64M 2:53 | 2:34 | 60 | 12:00 | |||||||||||||
| 2.0LB | 70M 3:40 | 3:21 | 60 | 12:00 | |||||||||||||
| Dark | 55M 3:35 | 3:16 | 60 | 12:00 | |||||||||||||
| 1.0LB | 72M 3:42 | 3:23 | 60 | 12:00 | |||||||||||||
| 1.5LB | 74M 3:44 | 3:25 | 60 | 12:00 |
| 6 | Sweet Bread | Light | 1.0LB | 54M 3:19 2:59 60 12:00 | 52M 3:17 2:57 60 12:00 | |||||||||||||
| 1.5LB | 56M 3:21 3:01 60 12:00 | |||||||||||||||||
| 2.0LB | 54M 3:19 2:59 60 12:00 | |||||||||||||||||
| Medium | 1.0LB | 570M/330M 3:02 60 M2:05 30M 60 12:00 | ||||||||||||||||
| 1.5LB | 58M 3:23 3:03 60 12:00 | |||||||||||||||||
| 2.0LB | 60M 3:26 3:06 60 12:00 | |||||||||||||||||
| Dark | 1.0LB | 54M 3:29 3:09 60 12:00 | ||||||||||||||||
| 1.5LB | 61M 3:26 3:06 60 12:00 | |||||||||||||||||
| 2.0LB | 64M 3:29 3:09 60 12:00 | |||||||||||||||||
| 7 Cake N/A 1.0LB 0M 3M 4M 0M 0S 0M 0S 0M 75M 1:22 N/A 22 12:00 | ||||||||||||||||||
| 8 | Gluten Free | Medium | 1.5LB | 8M 4M 19M 4M 0S 0M 0S 0M 0S 0M 0S 0M 0S 0M 0S 0M 0S 0M 0S 0M 0S 0M 0S 0M 0S 0M 0S 0M 0S 0M 0S 0M 0S 0M 0S 0M 0S 0M 0SM 1:25 N/A 20 12:00 | 95M 2:54 2:37 60 12:00 | |||||||||||||
| 2.0LB | 100M 2:59 2:42 60 12:00 | |||||||||||||||||
| 9 | Dough | N/A | N/A | 0M | 3M | 27M | 60M | OS | 0M | OS | 0M | 0M | 1:30 | 1:14 | N/A | 12:00 | ||
| 10 | Artisan Dough | N/A N/A | N/A 0M | 5M 45M | 70M 1 | OS 85M | 10S 11 | 0M 0M | 5:15 4:39 N/A | 12:00 | ||||||||
| 11 | Jam | N/A N/A | N/A 0M | 0M 15M | 0M 0S | 0M 0S | 0M 70M | 1:25 N/A 20 | ||||||||||
| 12 | ExtraBake | N/A N/A | 0M 0M | 0M 0M | OS 0M | OS 0M | 10M | 0:10 (0:10-1:30) | N/A | 60 N/A | ||||||||
| 13 | Super-Rapid | Medium | 1.5LB | 0M 3M | 9M 0M | OS 0M | 6S 16M | 30M 0:58 N/A | ||||||||||
Remarks on recipes
1. Ingredients
- Since each ingredient plays a specific role for the successful baking of the bread, the correct measuring is just as important as the order in which the ingredients are added.
- The most important ingredients such as the liquid flour, salt, sugar and yeast (either dry or fresh yeast can be used) influence the successful outcome of the preparation of the dough and the bread. Always use the right quantities in the right proportions.
- Use lukewarm ingredients if the dough needs to be prepared immediately. If you wish to set the program phase timing function, it is advisable to use cold ingredients to avoid the yeast to start rising too soon.
- Margarine, butter and milk have an influence on the flavor of the bread.
- Sugar can be reduced by 20% to make the crust lighter and thinner without affecting the successful outcome of the baking. You can replace sugar with honey if you want the crust to be softer and lighter.
- Gluten which is produced in the flour during the kneading provides the structure of the bread. The ideal flour mixture is composed of 40% wholemeal flour and 60% of white flour.
- If you wish to add cereals grains, leave them to soak overnight. Reduce the quantity of flour and liquid (up to 1/5 less).
- You can add wheat bran to the dough if you want the bread to be lighter and richer in roughage. Add one tablespoon of bran for 500g of flour and increase the amount of liquid by 12 tablespoons.
- Wheat gluten is a natural additive obtained from wheat proteins. It makes the bread lighter, the bread also has more volume. The bread falls more rarely and is easier to digest. The effect can be easily appreciated when baking whole meal and other bakery products made of home-milled flour.
- Pure lecithin powder is a natural emulsifier which improves the bread volume, makes the soft part softer and lighter. The bread retains its freshness for longer.
2. Adjusting the amount of the ingredients
If the doses need to be increased or reduced, make sure that the proportions of the original recipe are maintained.
3. Adding and measuring the ingredients and quantities
- Always add the liquid first. Add yeast at the end. Do not allow the yeast to come into contact with liquid to avoid fast rising of the yeast (especially when using the timing function).
- When measuring ingredients, always use exact measurements, i.e. measure ingredients using the measuring spoon provided with the unit or spoons used at home, if according to recipes measurements should be made in tablespoons or teaspoons.
- Measure the ingredients given in grams correctly.
-
To measure liquid ingredients (in dl), use the provided measuring cup.
-
Recipes for the bread baking machine
The above-mentioned recipes are for various bread sizes. The total weight should not exceed 1000 grams. If no specific instructions concerning the weight are given, it means that both a small and a large amount of the ingredients may be used for the given program.
-
Bread weight and volume
-
The weight of the bread is precisely indicated in the recipes. It is easy to see, that the weight of the pure weight bread is lower than the weight of whole meal bread. This is because white flour rises more quickly, therefore it is necessary to control the bread during the baking process.
- Despite the precise weight indications there may be slight differences. The actual weight of the bread depends to a large extent on the air humidity in the room at the moment of preparation.
-
Breads with a large wheat content always have a large volume and they exceed the container edge after the last rising phase even if the ingredients are precisely measured. The bread does not spill over. The part of the bread outside the tin is more easily browned than the bread inside the tin.
-
Baking results
-
The result of the baking depends on the conditions (the hardness of the water, air humidity, altitude, the consistency of the ingredients, etc.). Therefore, the recipe indications should serve rather as a reference point, which can be modified depending on the given conditions. Do not get discouraged in case of unsuccessful baking attempts. Try to find the cause of the failure and try once again with changed proportions.
- If the bread is not brown enough after baking, you can leave it in the appliance and use the browning program.
- It is recommended to bake a test bread before setting the timing function for baking overnight to make the necessary adjustments if needed.
Ecology - environment protection
Each user can protect the natural environment. It is neither difficult nor expensive.
In order to do it: put the cardboard packing into recycling paper container; put the polyethylene (PE) bags into container for plastic.
When worn out, dispose the appliance to particular disposal centre, because of the dangerous elements of this appliance, which can be hazardous for natural environment.

Do not dispose the appliance with the municipal waste!
The manufacturer/importer does not accept any liability for any damages resulting from or unintended use or improper handling.
The manufacturer/importer reserves his rights to modify the product any time in order to adjust it to law regulations, norms, directives, or due to construction, trade, aesthetic or other reasons, without notifying in advance.
Under the Waste Electrical and Electronic Equipment Directive (WEEE), such waste must be collected separately and processed. If in future you need to discard this product, please do not throw it out with your normal rubbish. Please send this product to a collection point where one is available.