EU — Cooker — Mode d'emploi PDF")
I5V7H6A(X)EU - Cooker INDESIT - Free user manual and instructions
Find the device manual for free I5V7H6A(X)EU INDESIT in PDF.
| Brand | Indesit |
| Model | I5V7H6A(X)EU |
| Product type | Freestanding electric cooker |
| Hob type | Ceramic glass |
| Number of cooking zones | 4 (radiant and/or extendable hilite) |
| Oven type | Electric multifunction |
| Oven cooking programs | Traditional, Pastry, Pizza, Fan, Grill, Fan Grill, Rotisserie |
| Oven capacity | Not specified (standard approx 70 L) |
| Power supply | 230 V single-phase or 400 V three-phase (depending on connection) |
| Maximum power | Variable depending on configuration (up to 2700 W for pizza oven) |
| Special features | Residual heat indicator, door lock, anti-tilt chain |
| Included accessories | Rack, drip tray, rotisserie (depending on model) |
| Door glass type | Removable glass for cleaning |
| Oven lighting | 25 W bulb, E14 socket |
| Recommended cleaning | Non-abrasive products, scraper for ceramic glass |
| Child safety | Door lock (depending on model) |
| Installation | Requires a professional, safety chain mandatory |
| Country of manufacture | Not specified |
| Repairability | Replaceable bulb, original spare parts available |
| Documentation | Downloadable user manual (PDF) |
Frequently Asked Questions - I5V7H6A(X)EU INDESIT
User questions about I5V7H6A(X)EU INDESIT
0 question about this device. Answer the ones you know or ask your own.
Ask a new question about this device
Download the instructions for your Cooker in PDF format for free! Find your manual I5V7H6A(X)EU - INDESIT and take your electronic device back in hand. On this page are published all the documents necessary for the use of your device. I5V7H6A(X)EU by INDESIT.
USER MANUAL I5V7H6A(X)EU INDESIT
Operating Instructions COOKER AND OVEN
Contents
Operating Instructions,1
WARNING,2
Description of the appliance-Overall view,5
Description of the appliance-Control Panel,6
Installation,19
Start-up and use,21
Cooking modes,21
Using the hob,26
Precautions and tips,27
Care and maintenance,28
Assistance,28
BG
Блгарскn
Hnctpykun 3a ynoTpe6a ENEKTPNueCKA NUEKA N FYPHA
Pe3HMe
INCTpykun 3a ynoTpe6a,1
BHIMAHNE,2
OnncanHe Ha ypeDa-Obu npereJe,5
Oncanhe Ha ypea- Ynpabraaapanen,6
HCTaInpaHe,30
Iyckn ekcnloatauia,32
N3no3BaHe Ha cyphata,32
KOTJOHn,37
Ipepa3Hm MepKn npenopbkn,39
IopdpbXka n nouchTbaHe,40
Texnuecko o6cnykBaHe,41
DE
DeutschDeutsch
WARNING: The appliance and its accessible parts become hot during use. Care should be taken to avoid touching heating elements.
Children less than 8 years of age shall be kept away unless continuously supervised. This appliance can be used by children aged from 8 years and above and persons with reduced physical, sensory or mental capabilities or lack of experience and knowledge if they have been given supervision or instructi on concerning use of the appliance in a safe way and understand the hazards involved. Children shall not play with the appliance. Cleaning and user maintenance shall not be made by children without supervision.
WARNING: Unatt ended cooking on a hob with fat or oil can be dangerous and may result in fire.
NEVER try to extinguish a fire with water, but switch off the appliance and then cover flame e.g. with a lid or a fire blanket.
WARNING: Danger of fire: do not store items on the cooking surfaces.
WARNING: If the surface in glass-ceramic is cracked, switch off the appliance to avoid the possibility of electric shock. Do not use harsh abrasive cleaners or sharp metal scrapers to clean the oven door glass since they can scratch the surface, which may result in shatt ering of the glass.
The internal surfaces of the compartment (where present) may become hot.
Never use steam cleaners or pressure cleaners on the appliance.
Remove any liquid from the lid before opening it.
Do not close the glass cover (if present) when the gas burners or electric hotplates are still hot.
WARNING: Ensure that the appliance is switched off before replacing the lamp to avoid the possibility of electric shock.
! When you place the rack inside, make sure that the stop is directed upwards and in the back of the cavity.
BHIMAHNE: YpeT n HeorBnTe OTKpTN qactn Ce HaPraBaT MHOrO npN VNOTpeBa.
Бьдete OCObeHO BHNMaTeJHn H He DOKOCBaIte HaRpeBaTeJHnTE eJeMeHTn. He DonyckaIte Deca NOD 8 rOduHn 6bni3o Do ypeDa,OCBeH aKO He ca nOd NOCTOARHHo HAbJIODeHne.
To3n ypeM MoKe Da ce NOJ3Ba OT
Deua, HABbpHnn 8 rOdHH, n OT JNuCA
C HaMaJIeHN cN3UYeCKN, CETNBHI
HIn YMCTBeHn Bb3MOXHOCTN, KaKTO n
Pn JINnCa Ha ONIT N NO3HaHnA, aKO
BbIPOCHNTe JNuCA ca NOD NOxOJaIO
HaONIOHe Hne INn Ca INHCTpyKTnpaHn
3a Be3OnaCHO TO BopabeHc C ypeDa
N OCB3HaBAT CBbp3aHnTe C TOBa
ONaCHOCTN. DeuTa He Tp6Ba Da
CN IrpaT C ypeDa. NOpICTBaHeto
N NODpbKkata He Tp6Ba Da ce
I3BbPbBaT OT Deca Be3 HabJIOHeHne. BHIMAHHE: Be3KoHTpOJIHOTO OCTaBnHa CbIOBe C Ma3HnHa IIN OJNO Ha KOTJIOHa MOKe Da 6bDe ONaCHO N da IOBene lo NOxap.
HIKOHA He ce ONTBaIte Da yracnte PnAmbK / NOxap C BODa, a N3KJIIOUeTe UpeDa nOKpNITE PnAmbKa HAnpIMep C KanaK NJN ORHeVNoPHO ODeJeNO.
BHIMAHHE: Onachnoct ot noxap: He octabrayte npedmetn NO rotbapcknte IOBbpxHOCTN.
BHIMAHHE: Ako NOBbpxHocTTa Ha CTbKIOKepaMmUHnI NNOT e NyKHata, IN3KIIouTe ypeDa, 3a Da n36eHHeTe EBeHTyaJIHn TOKOBu ydApn.
He n3no13BaIte a6pa3nBHN npOdykTN
IOCTPN MeTaNH NnATyN 3a
NouNCtBAHe Ha CTbKNeHaTa BpATNuKa Ha
CyPhaT, 3aUTo MOKe Da HApackaT
IOBbPxHOCTTa, KOEt O da Do
ChyINBaHe Ha CTbKJOTO.
BbtpeHaTa NOBbpXHocT Ha YeKMeJxKeTo (aKO TaKOba e HaNuHo) MOKe Da Ce HarOpEuN.
B HnKaKbB CnyaH He n3NoJ3BaHTe napOuNCTaUKN IIN MaUHN NOB BNCOKo HaJraHe 3a NoUcTBAHe Ha ypeDa. NocHTe eBEHTyaJIHNTe TeUHOCTn NO KanaKa, npEn Da rO TBOpnte. He 3aTBaprIte CTbKJIeHn KaNAK (aKO mTaKbB) pRn BCE OSe 3arPEN Ra3OBN KOTIOHN IIN eNEKTpUYeCKa IILOyA. BHIMAHHE: YBepete Ce, ye ypeBt e I3KJIoueh, npEn Da CMeHNTe JAmnata, 3a Da I36ErHete ONaCHOCTTA OT TOKOB ynap.
!Пи NOCTABRHe Ha peWetkata BHIMaBauTe OIKCaTOPbT Da e Ha 3aHaTa CTpaHa Ha rHe3IoTO
I da e o6bphat harope .
Description of the appliance
Overall view
Description of the appliance Control panel
- Electronic cooking programmer
2.THERMOSTAT knob
3.THERMOSTAT indicator light
4.SELECTIONR knob
5.ELECTRIC HOTPLATE indicator light
6.Electric HOTPLATE control knob
BG
OnncHne Ha ypeDa UnpablaBaun nahen
- EJektpoHa roTbeHe nporpaMnCT
- Byuka tepmoctat
- CBeTnHEn HnDnKaTOp Ha TepMoCTata
- KIIOUa 3a n36Op
5.CBETINHEH INDIAKATOP Ha eJeKTPnueckn KOTIOH - KonyuTo 3a ynpabneHne Ha eneKtpueckn KOTIOH
DE
| PLAQUE SIGNALETIQUE | |
| Dimensions du four HxLXP | 34x42,4x41 cm |
| Volume | 160 |
| Dimensions utiles du tiroir chauffe-plats | largeur 42 cm profondeur 44 cm hauteur 8,5 cm |
| Tension et fréquence d'alimentation | voir plaque signalétique L'étiquette collée est à l'intérieur du portillon ou sur la paroi intérieure gauche (visible après avoir sorti le tiroir chauffe-plats). |
| Plan de cuisson vitrocéramique | |
| Avant gauche | 1.200 W |
| Arrière gauche | 1.700 W/ 1800W* |
| Arrière droit | 1.200 W |
| Avant droit | 1.700/ 700* W |
| Absorption Max. plans de cuisson vitrocéramique | 5.800- 5.900 W |
| ETIQUETTE ENERGIE et ECODESIGNET ECODESIGNETECODESIGNETECODESIGNETECODESIGNETECODESIGNETECODESIGNETECODESIGNETECODESIGNETECODESIGNETECODESIGNETECODESIGNETECODESIGNETECODESIGNETECODESIGNETECODESIGNETECODESIGNETECODESIGNETECODESIGNETECODESIGNETECODESIGNETECODESIGNETECODESIGNETECODESIGNETECODESIGNETECODESIGNETECODESIGNETCIDESIGNETCIDESIGNETCIDESIGNETCIDESIGNETCIDESIGNETCIDESIGNETCIDESIGNETCIDESIGNETCIDESIGNETCIDESIGNETCIDESIGNETCIDESIGNETCIDESIGNETCIDESIGNETCIDESIGNETCIDESIGNETCIDESIGNETCIDESIGNETCIDESIGNETCIDESIGNETCIDESIGNETCIDESIGNETCIDESIGNETCIDESIGNETCIDESIGNETCIRESIGNETCIDESIGNETCIDESIGNETCIDESIGNETCIDESIGNETCIDESIGNETCIDESIGNETCIDESIGNETCIDESIGNETCIDESIGNETCIDESIGNETCIDESIGNETCIDESIGNETCIDESIGNETCIDESIGNETCIDESIGNETCIDESIGNETCIDESIGNETCIDESIGNETCIDESIGNETCIDESIGNETCIDESIGNETCIDESIGNETCIDESIGNETCIDESIGNETCideSIGNETCIDESIGNETCIDESIGNETCIDESIGNETCIDESIGNETCIDESIGNETCIDESIGNETCIDESIGNETCIDESIGNETCIDESIGNETCIDESIGNETCIDESIGNETCIDESIGNETCIDESIGNETCIDESIGNETCIDESIGNETCIDESIGNETCIDESIGNETCIDESIGNETCIDESIGNETCIDESIGNETCIDESIGNETCIDESIGNETCIDESIGNETCIDESIGNETC IDESIGNETCIDESIGNETCIDESIGNETCIDESIGNETCIDESIGNETCIDESIGNETCIDESIGNETCIDESIGNETCIDESIGNETCIDESIGNETCIDESIGNETCIDESIGNETCIDESIGNETCIDESIGNETCIDESIGNETCIDESIGNETCIDESIGNETCIDESIGNETCIDESIGNETCIDESIGNETCIDESIGNETCIDESIGNETCIDESIGNETCIDESIGNETCIDESIGNETCOTE SIGNET CIDE SIGNET CIDE SIGNET CIDE SIGNET CIDE SIGNET CIDE SIGNET CIDE SIGNET CIDE SIGNET CIDE SIGNET CIDE SIGNET CIDE SIGNET CIDE SIGNET CIDE SIGNET CIDE SIGNET CIDE SIGNET CIDE SIGNET CIDE SIGNET CIDE SIGNET CIDE SIGNET CIDE SIGNET CIDE SIGNET CIDE SIGNET CIDE SIGNET CIDE SIGNET CIDE SIGNET CIDE SIGNET COTE SIGNET COTE SIGNET COTE SIGNET COTE SIGNET COTE SIGNET COTE SIGNET COTE SIGNET COTE SIGNET COTE SIGNET COTE SIGNET COTE SIGNET COTE SIGNET COTE SIGNET COTE SIGNET COTE SIGNET COTE SIGNET COTE SIGNET COTE SIGNET COTE SIGNET COTE SIGNET COTE SIGNET COTE SIGNET COTE SIGNET COTE SIGNET COTE SIGNET CUTE SIGNET COTE SIGNET COTE SIGNET COTE SIGNET COTE SIGNET COTE SIGNET COTE SIGNET COTE SIGNET COTE SIGNET COTE SIGNET COTE SIGNET COTE SIGNET COTE SIGNET COTE SIGNET COTE SIGNET COTE SIGNET COTE SIGNET COTE SIGNET COTE SIGNET COTE SIGNET COTE SIGNET COTE SIGNET COTE SIGNET COTE SIGNET COTE SIGNET Côte SIGNET Côte SIGNET Côte SIGNET Côte SIGNET Côte SIGNET Côte SIGNET Côte SIGNET Côte SIGNET Côte SIGNET Côte SIGNET Côte SIGNET Côte SIGNET Côte SIGNET Côte SIGNET Côte SIGNET Côte SIGNET Côte SIGNET Côte SIGNET Côte SIGNET Côte SIGNET Côte SIGNET Côte SIGNET Côte SIGNET Côte SIGNET Côte SIGNET COTE SIGNET COTE SIGNET COTE SIGNET COTE SIGNET COTE SIGNET COTE SIGNET COTE SIGNET COTE SIGNET COTE SIGNET COTE SIGNET COTE SIGNET COTE SIGNET COTE SIGNET COTE SIGNET COTE SIGNET COTE SIGNET COTE SIGNET COTE SIGNET COTE SIGNET COTE SIGNET COTE SIGNET COTE SIGNET COTE SIGNET COTE SIGNET COTEG SIGNET COTE SIGNET COTE SIGNET COTE SIGNET COTE SIGNET COTE SIGNET COTE SIGNET COTE SIGNET COTE SIGNET COTE SIGNET COTE SIGNET COTE SIGNET COTE SIGNET COTE SIGNET COTE SIGNET COTE SIGNET COTE SIGNET COTE SIGNET COTE SIGNET COTE SIGNET COTE SIGNET COTE SIGNET COTE SIGNET COTE SIGNET COTE SIGNET COTAISANCE COTE SIGNET COTE SIGNET COTE SIGNET COTE SIGNET COTE SIGNET COTE SIGNET COTE SIGNET COTE SIGNET COTE SIGNET COTE SIGNET COTE SIGNET COTE SIGNET COTE SIGNET COTE SIGNET COTE SIGNET COTE SIGNET COTE SIGNET COTE SIGNET COTE SIGNET COTE SIGNET COTE SIGNET COTE SIGNET COTE SIGNET COTE SIGNET COTE SIGNNET COTE SIGNET COTE SIGNET COTE SIGNET COTE SIGNET COTE SIGNET COTE SIGNET COTE SIGNET COTE SIGNET COTE SIGNET COTE SIGNET COTE SIGNET COTE SIGNET COTE SIGNET COTE SIGNET COTE SIGNET COTE SIGNET COTE SIGNET COTE SIGNET COTE SIGNET COTE SIGNET COTE SIGNET COTE SIGNET COTE SIGNET COTE SIGNET COTE SIGNMETCOTE SIGNET COTE SIGNET COTE SIGNET COTE SIGNET COTE SIGNET COTE SIGNET COTE SIGNET COTE SIGNET COTE SIGNET COTE SIGNET COTE SIGNET COTE SIGNET COTE SIGNET COTE SIGNET COTE SIGNET COTE SIGNET COTE SIGNET COTE SIGNET COTE SIGNET COTE SIGNET COTE SIGNET COTE SIGNET COTE SIGNET COTE SIGNET COTE SIGNETCOTE SIGNET COTE SIGNET COTE SIGNET COTE SIGNET COTE SIGNET COTE SIGNET COTE SIGNET COTE SIGNET COTE SIGNET COTE SIGNET COTE SIGNET COTE SIGNET COTE SIGNET COTE SIGNET COTE SIGNET COTE SIGNET COTE SIGNET COTE SIGNET COTE SIGNET COTE SIGNET COTE SIGNET COTE SIGNET COTE SIGNET COTE SIGNET COTE SIGNNETCOTE SIGNET COTE SIGNET COTE SIGNET COTE SIGNET COTE SIGNET COTE SIGNET COTE SIGNET COTE SIGNET COTE SIGNET COTE SIGNET COTE SIGNET COTE SIGNET COTE SIGNET COTE SIGNET COTE SIGNET COTE SIGNET COTE SIGNET COTE SIGNET COTE SIGNET COTE SIGNET COTE SIGNET COTE SIGNET COTE SIGNET COTE SIGNET COTE SIGNMETCESIGNET COTE SIGNET COTE SIGNET COTE SIGNET COTE SIGNET COTE SIGNET COTE SIGNET COTE SIGNET COTE SIGNET COTE SIGNET COTE SIGNET COTE SIGNET COTE SIGNET COTE SIGNET COTE SIGNET COTE SIGNET COTE SIGNET COTE SIGNET COTE SIGNET COTE SIGNET COTE SIGNET COTE SIGNET COTE SIGNET COTE SIGNET COTE SIGNET COTE SIGNTCOTE SIGNET COTE SIGNET COTE SIGNET COTE SIGNET COTE SIGNET COTE SIGNET COTE SIGNET COTE SIGNET COTE SIGNET COTE SIGNET COTE SIGNET COTE SIGNET COTE SIGNET COTE SIGNET COTE SIGNET COTE SIGNET COTE SIGNET COTE SIGNET COTE SIGNET COTE SIGNET COTE SIGNET COTE SIGNET COTE SIGNET COTE SIGNET COTE SIGNSETCOTE SIGNET COTE SIGNSETCOTE SIGNSETCOTE SIGNSETCOTE SIGNSETCOTE SIGNSETCOTE SIGNSETCOTE SIGNSETCOTE SIGNSETCOTE SIGNSETCOTE SIGNSETCOTE SIGNSETCOTE SIGNSETCOTE SIGNSETCOTE SIGNSETCOTE SIGNSETCOTE SIGNSETCOTE SIGNSETCOTE SIGNSETCOTE SIGNSETCOTE SIGNSETCOTE SIGNSETCOTE SIGNSETCOTE SIGNSETCOTE SIGNSETCOTE SIGNSETCOTE SIGNSET | |
! Before operating your new appliance please read this instruction booklet carefully. It contains important information concerning the safe installation and operation of the appliance.
Please keep these operating instructions for future reference. Make sure that the instructions are kept with the appliance if it is sold, given away or moved.
The appliance must be installed by a qualified professional according to the instructions provided.
! Any necessary adjustment or maintenance must be performed after the appliance has been disconnected from the electricity supply.
Positioning and levelling
It is possible to install the appliance alongside cupboards whose height does not exceed that of the hob surface.
! Make sure that the wall in contact with the back of the appliance is made from a non-flammable, heat-resistant material (T 90^ ).
To install the appliance correctly:
- Place it in the kitchen, the dining room or the bed-sit (not in the bathroom).
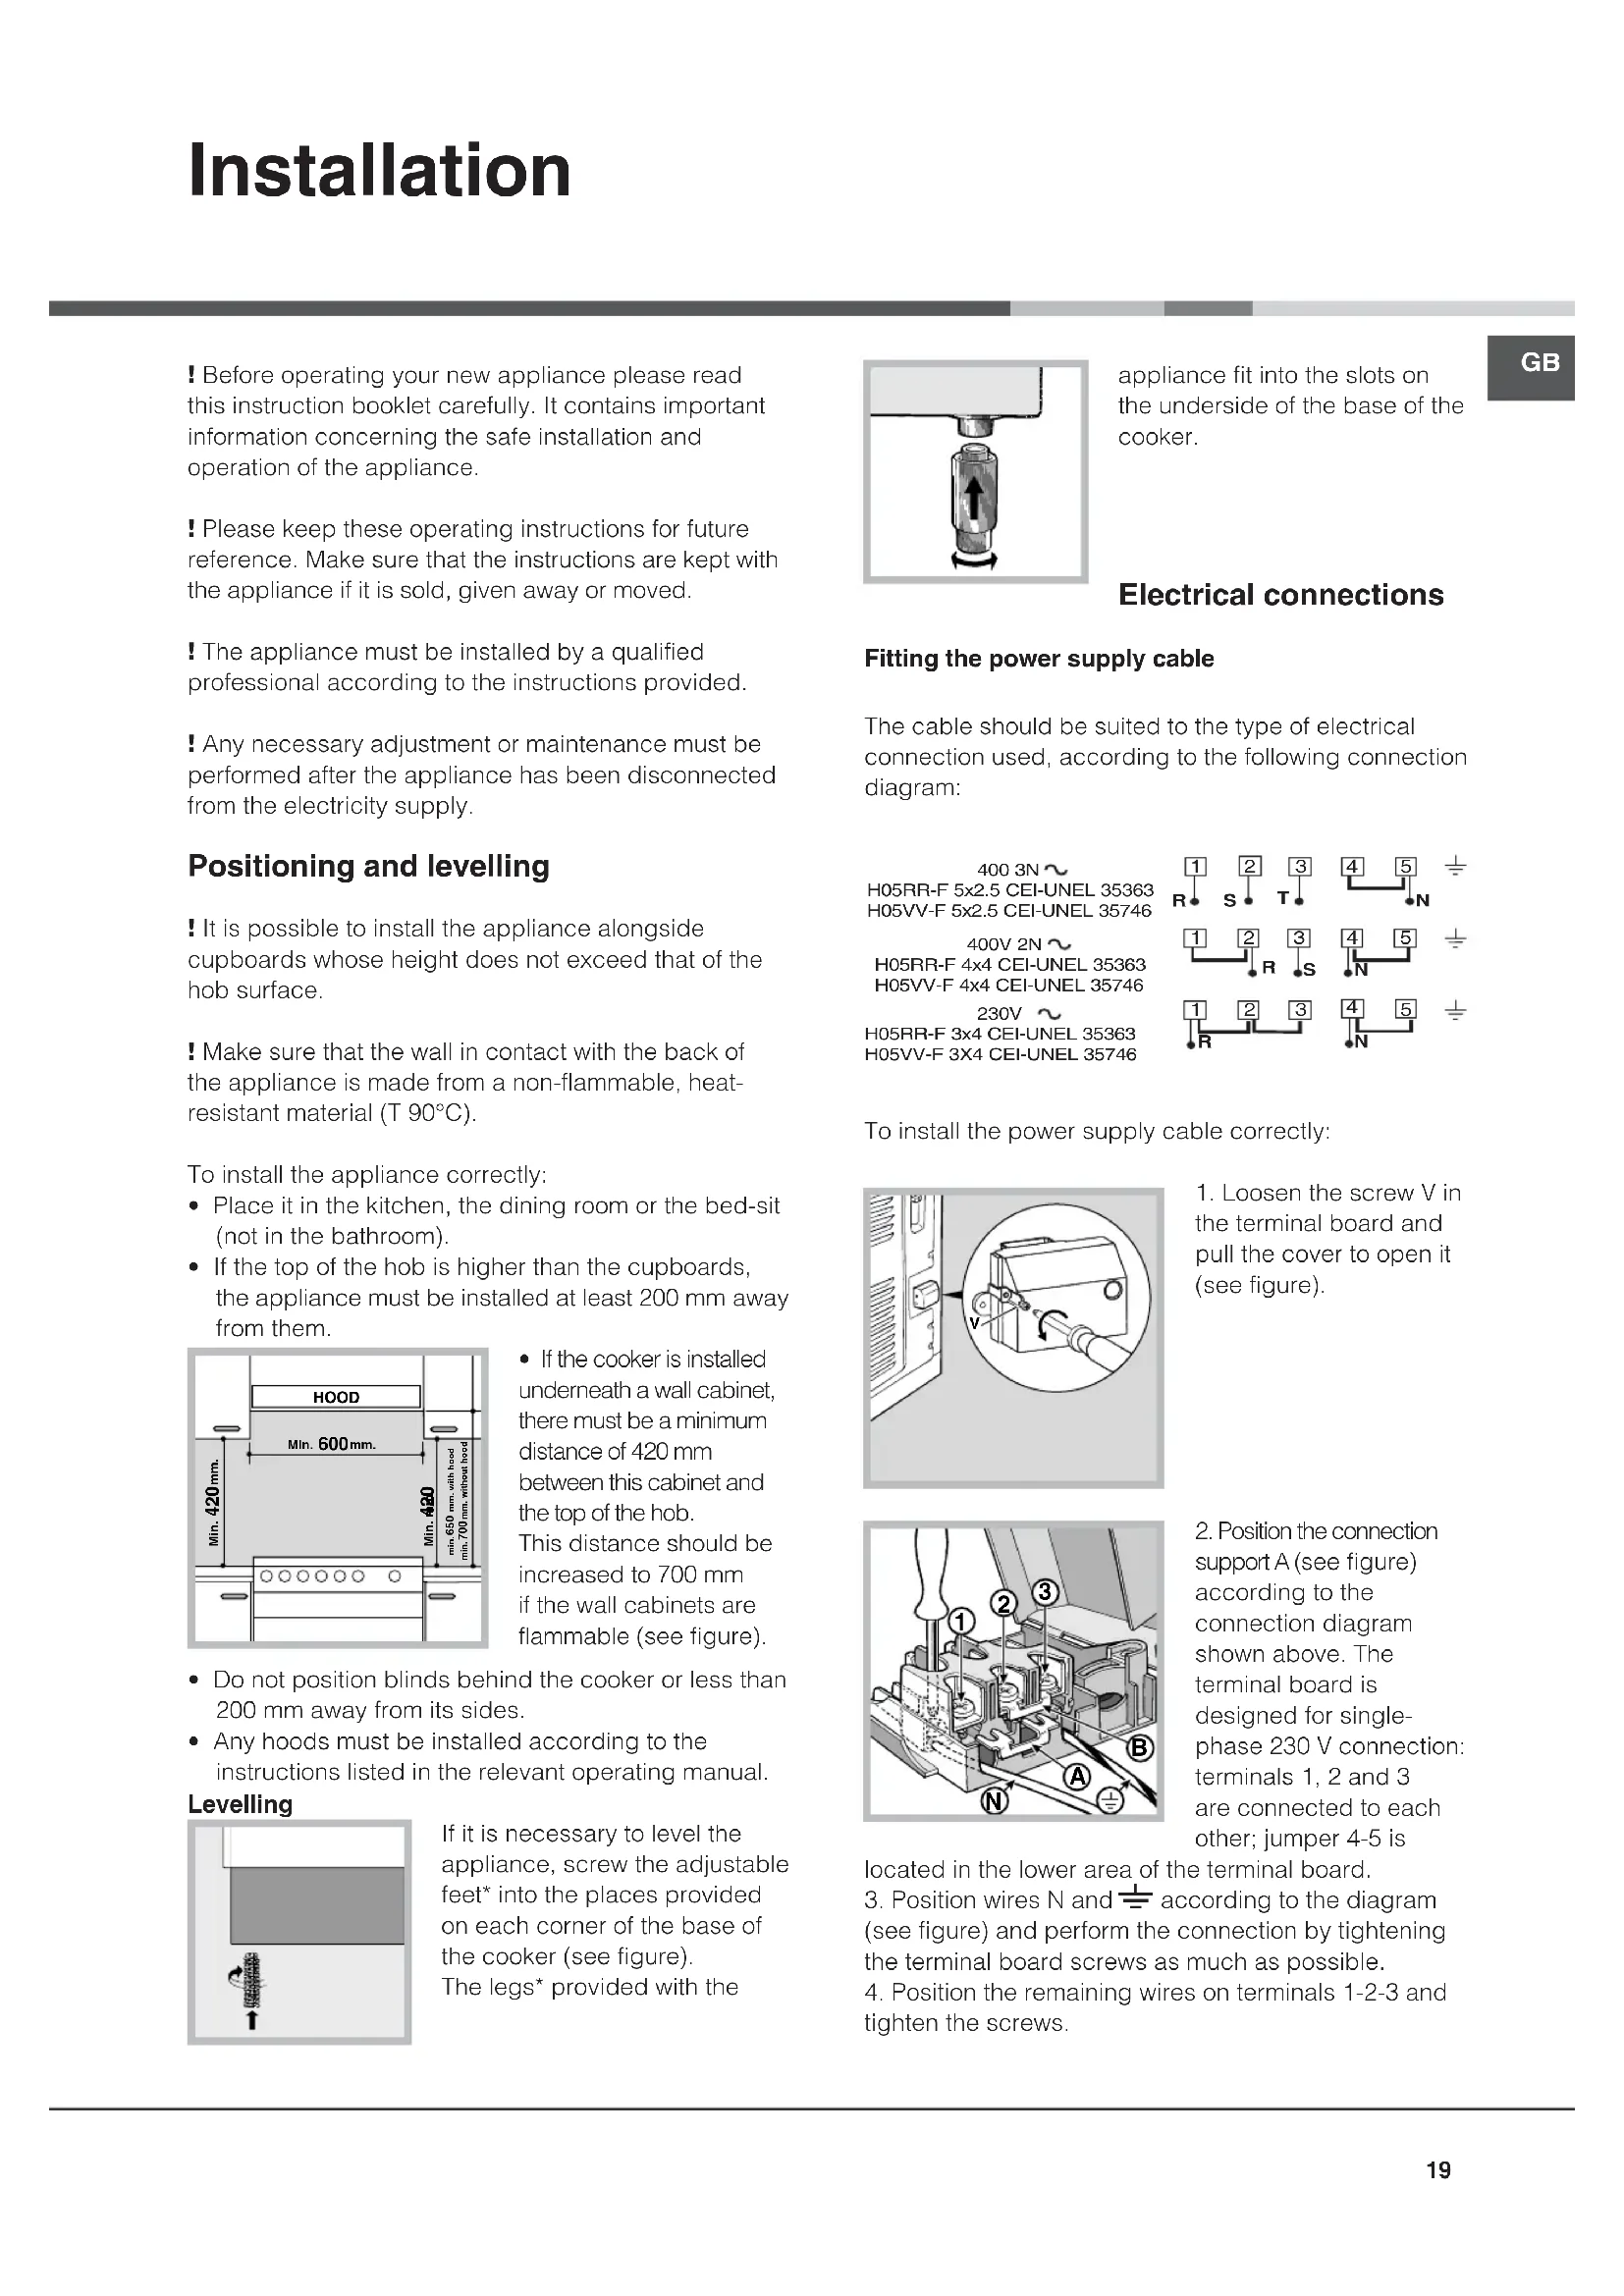
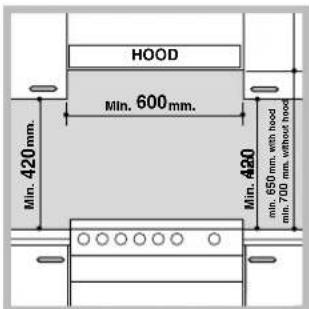
- If the top of the hob is higher than the cupboards, the appliance must be installed at least 200mm away from them.
-
If the cooker is installed underneath a wall cabinet, there must be a minimum distance of 420mm between this cabinet and the top of the hob. This distance should be increased to 700mm if the wall cabinets are flammable (see figure).
-
Do not position blinds behind the cooker or less than 200mm away from its sides.
- Any hoods must be installed according to the instructions listed in the relevant operating manual.
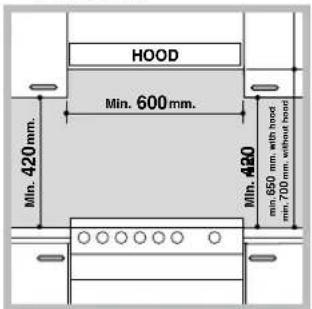
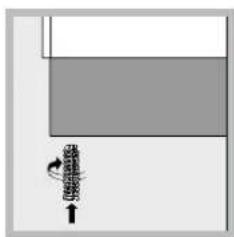
Levelling
If it is necessary to level the appliance, screw the adjustable feet into the places provided on each corner of the base of the cooker (see figure).
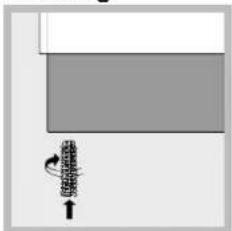
The legs* provided with the
appliance fit into the slots on the underside of the base of the cooker.
Electrical connections
Fitting the power supply cable
The cable should be suited to the type of electrical connection used, according to the following connection diagram:
4003N H05RR-F 5x2.5 CEI-UNEL 35363 H05VV-F 5x2.5 CEI-UNEL 35746
400V2N H05RR-F 4x4 CEI-UNEL 35363 H05VV-F 4x4 CEI-UNEL 35746
230V H05RR-F 3x4 CEI-UNEL 35363 H05VV-F 3X4 CEI-UNEL 35746

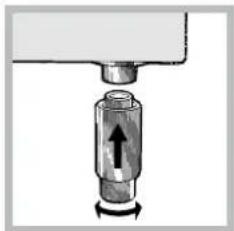
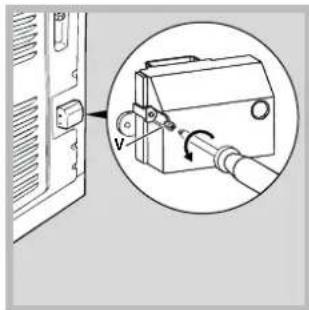
To install the power supply cable correctly:
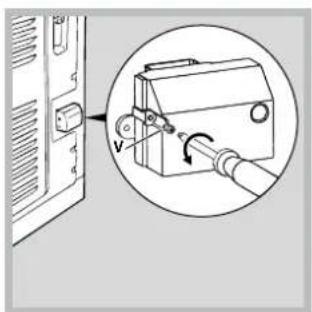
- Loosen the screw V in the terminal board and pull the cover to open it (see figure).
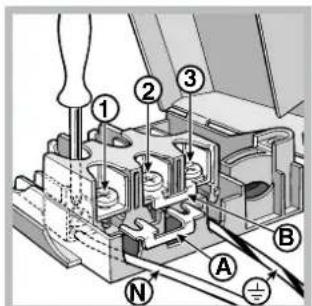
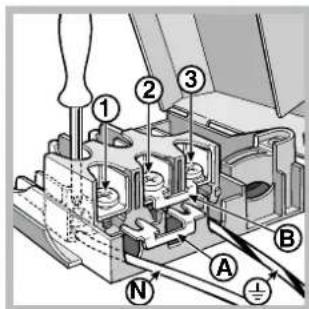
- Position the connection support A (see figure) according to the connection diagram shown above. The terminal board is designed for single-phase 230 V connection: terminals 1, 2 and 3 are connected to each other; jumper 4-5 is
located in the lower area of the terminal board.
3. Position wires N and 12 according to the diagram (see figure) and perform the connection by tightening the terminal board screws as much as possible.
4. Position the remaining wires on terminals 1-2-3 and tighten the screws.
- Fix the power supply cable in place by fastening the cable clamp screw.
- Close the terminal board cover by tightening the screws V.
Connecting the supply cable to the mains
Install a standardised plug corresponding to the load indicated on the data plate located on the appliance. The appliance must be directly connected to the mains using an omnipolar circuit-breaker with a minimum contact opening of 3mm installed between the appliance and the mains. The circuit-breaker must be suitable for the charge indicated and must comply with current electrical regulations (the earthing wire must not be interrupted by the circuit-breaker). The supply cable must be positioned so that it does not come into contact with temperatures higher than 50^ at any point.
Before connecting the appliance to the power supply, make sure that:
- The appliance is earthed and the plug is compliant with the law.
- The socket can withstand the maximum power of the appliance, which is indicated by the data plate.
- The voltage is in the range between the values indicated on the data plate.
- The socket is compatible with the plug of the appliance. If the socket is incompatible with the plug, ask an authorised technician to replace it. Do not use extension cords or multiple sockets.
! Once the appliance has been installed, the power supply cable and the electrical socket must be easily accessible.
! The cable must not be bent or compressed.
! The cable must be checked regularly and replaced by authorised technicians only.
! The manufacturer declines any liability should these safety measures not be observed.
42,4cm×34,0cm×41,0cm
601
Regulation (EU) No 65/2014
supplementing Directive 2010/30/EU.
Regulation (EU) No 66/2014
implementing Directive 2009/125/EC.
Standard EN 60350-1
Standard EN 50564
Standard EN 60350-2.
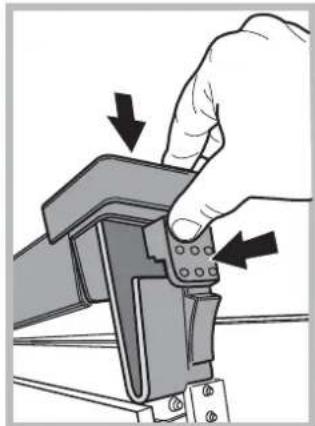
Safety Chain
! In order to prevent accidental tipping of the appliance, for example by a child climbing onto the oven door, the supplied safety chain MUST be installed!
The cooker is fitted with a safety chain to be fixed by means of a screw (not
supplied with the cooker) to the wall behind the appliance, at the same height as the chain is attached to the appliance.
Choose the screw and the screw anchor according to the type of material of the wall behind the appliance. If the head of the screw has a diameter smaller than 9mm , a washer should be used. Concrete wall requires the screw of at least 8mm of diameter, and 60mm of length.
Ensure that the chain is fixed to the rear wall of the cooker and to the wall, as shown in figure, so that after installation it is tensioned and parallel to the ground level.
! The first time you use your appliance, heat the empty oven with its door closed at its maximum temperature for at least half an hour. Ensure that the room is well ventilated before switching the oven off and opening the oven door. The appliance may emit a slightly unpleasant odour caused by protective substances used during the manufacturing process burning away.
! Before operating the product, remove all plastic film from the sides of the appliance.
Starting the oven
- Select the desired cooking mode by turning the SELECTOR knob.
- Select the recommended temperature for the cooking mode or the desired temperature by turning the THERMOSTAT knob.
A list detailing cooking modes and suggested cooking temperatures can be found in the relevant table (see Oven cooking advice table).
During cooking it is always possible to:
- Change the cooking mode by turning the SELECTOR knob.
- Change the temperature by turning the THERMOSTAT knob.
- Set the total cooking time and the cooking end time (see below).
- Stop cooking by turning the SELECTOR knob to the "0" position.
! Never put objects directly on the bottom of the oven; this will avoid the enamel coating being damaged. Only use position 1 in the oven when cooking with the rotisserie spit.
! Always place cookware on the rack(s) provided.
THERMOSTAT indicator light
When this is illuminated, the oven is generating heat. It switches off when the inside of the oven reaches the selected temperature. At this point the light illuminates and switches off alternately, indicating that the thermostat is working and is maintaining the temperature at a constant level.
Oven light
This is switched on by turning the SELECTOR knob to any position other than "0". It remains lit as long as the oven is operating. By selecting with the knob, the light is switched on without any of the heating elements being activated.
Cooking modes
Convection Mode
temp. between 50^ and Max
On this setting, the light comes on and the top and bottom heating elements are activated. This is the classic, traditional type oven which has perfected, with exceptional heat distribution and reduced energy consumption. The convection oven is still unequalled when it comes to cooking dishes made up of several ingredients, e.g. cabbage with ribs, stews, etc.
Excellent results are achieved when preparing meat-based dishes as well (braised meats, stew, goulash, wild game, ham etc.) which need to cook slowly and require basting or the addition of liquid. It still remains the best system for cooking pastries and fruit in general and when using specific covered containers for oven cooking. When cooking in convection mode, only use one dripping-pan or cooking rack at a time, otherwise the heat distribution will be uneven. Select from among the various rack heights based on whether the dish needs more or less heat from the top or bottom.

Pastry Mode
temp. between 50^ and Max
The fan will start and all of the heating elements will turn on. This provides a delicate heating process with a prevalence of heat from the bottom. This mode is ideal for baking and cooking delicate foods - especially pastries that need to rise because the heat coming from the bottom helps the leavening process. Some advice:
Always preheat the oven;
- Never place more than one dish in the oven at a time;
- The rack (unless cooking directly on the dripping-pan) should be used because it allows for better air circulation; In any case, do not leave unused dripping-pans in the oven;
- Position the rack at the third or second height from the bottom in order to take full advantage of the heat rising from the bottom of the oven; Place the pastry pan in the centre of the rack;
- Do not open the door when cooking pastries in order to prevent rapid temperature changes that could impede the cooking process and make the pastry drop.

Pizza Mode
temp: between 50^ and Max
The bottom and circular heating elements, as well as the fan, will come on. This combination rapidly heats
GB
the oven due to the large amount of power used by the appliance (2700 W), which results in the production of considerable heat coming prevalently from the bottom and from forced air circulation. The pizza mode is ideal for foods which need high temperatures to cook, like pizza and large roasts. Use only one dripping-pan or rack at a time. However, if more than one is used, they must be switched half way through the cooking process.

Ventilation Mode
temp: between 50^ and Max
Since the heat remains constant and uniform throughout the oven due to the fan at the bottom, the air cooks and browns food uniformly over its entire surface. With this mode, you can also cook various dishes at the same time, as long as their respective cooking temperatures are the same. A maximum of 2 rack levels can be used at the same time, following the instructions in the section entitled, "Cooking On More Than One Rack". This cooking mode is ideal for au gratin dishes or those which require an extended cooking time like lasagne etc...
Moreover, the excellent heat distribution makes it possible to use lower temperatures when cooking roasts. This results in less loss of juices, meat which is more tender and a decrease in the loss of weight for the roast. The ventilated mode is especially suited for cooking fish, which can be prepared with the addition of a limited amount of condiments, thus maintaining their flavour and appearance. Excellent results can also be attained when cooking vegetable like courgettes, aubergines, peppers, tomatoes, etc. Desserts: leavened cakes are also perfect for the ventilated mode. Moreover, this mode can also be used to thaw meat, fish and bread by setting the temperature to 80^ - 100^ . To thaw more delicate foods, set the thermostat to 50^ or use only the cold air circulation feature by setting the thermostat to 0^ .

Top element
temp: between 50^ and Max
The extremely high and direct temperature of the grill makes it possible to brown the surface of meats and roasts while locking in the juices to keep them tender. The grill is also highly recommended for dishes that require high temperature on the surface: beef steaks, veal, entrecôte, filets, hamburger etc...

The "Grill"
temp: between 50^ and Max
This oversized grill has a completely new design, increasing cooking efficiency by 50% . The double grill also eliminates pockets of unheated air in the corners
of the oven.
Important: Always leave the oven door closed when using the grill setting in order to achieve the best results and save on energy (about 10% ).
When using the grill, place the rack at the top rack heights (see cooking table) and place the dripping-pan beneath the oven rack to prevent grease from falling
onto the bottom of the oven.

Ventilated Grill
temp: between 50^ and Max
This combination of features increases the effectiveness of the unidirectional thermal radiation of the heating elements through forced air circulation of the air throughout the oven. This helps prevents foods from burning on the surface, allowing the heat to penetrate into the food. Excellent results are achieved with kebabs made with meats and vegetables, sausages, ribs, lamb chops, chicken, quail, pork chops, etc. This mode is also ideal for cooking fish steaks, like swordfish, tuna, grouper etc. In this function, the rotisserie motor will also turn on (where present). Cooking with this function is especially recommended for meat dishes such as loins, poultry, etc.... Note: When using the grill, the oven door must be closed.
Spit roast (only available in certain models)
To operate the spit roast function (see diagram) proceed as follows:
- Place the dripping pan in position 1.
- Place the rotisserie support in position 3 and insert the spit in the hole provided on the back panel of the oven.
- Start the rotisserie using the
knob to select MODE|or
! When the mode is activated, the spit will stop if the door is opened.
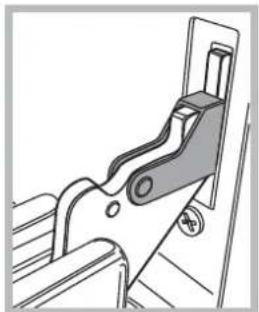
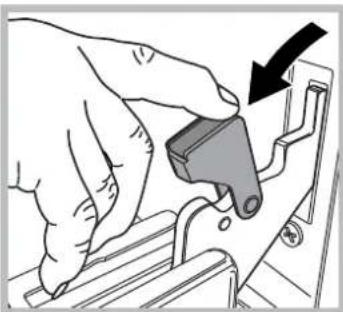
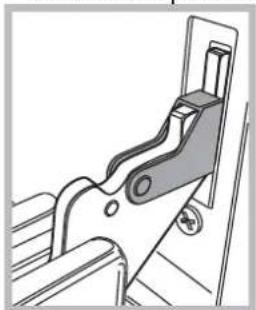
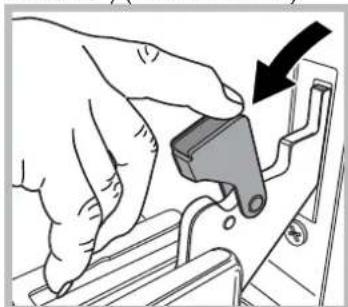
Door lock device
Some models are equipped with a "door lock" device
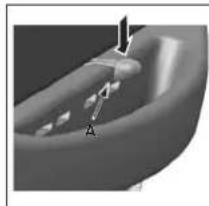
situated between the control panel and the oven door. To open the door, push down device "A" indicated in the figure.
Practical Cooking Advice
Preheating
If the oven must be preheated (this is generally the case when cooking leavened foods), the "pizza mode" (setting three) can be used to reach the desired temperature as quickly as possible in order to save on energy. Once the food has been placed in the oven, the most appropriate cooking mode can then be selected.
Cooking on More Than One Rack
If you have to cook on more than one rack at the same time, use only setting "ventilated mode," which is the only one that is appropriate for this type of cooking. The rack heights used should be the three centre ones, as the bottom and top racks receive too much direct heat, which could burn more delicate foods. If three racks are used at the same time, the food on the middle rack will take a little longer to cook. Therefore, leave it in the oven for an additional few minutes. If you are preparing a complete meal with all three racks at the same time, place the dish that calls for a lower cooking temperature (generally pastries) on the middle rack.
Using the Grill
The oven allows you to use two different grilling methods.
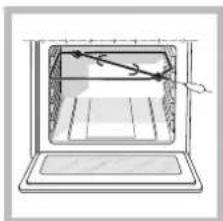
Use the setting "Top Element" for small portions. Energy consumption for this feature is only 1200W ; however, it is ideal for grilling small dishes or portions, e.g. toast, frankfurters, etc.
Place the food in the centre of the grill, as only the centre of the heating element is turned on. Food in the corners of the oven will not be cooked.
The setting | | "Grill" allows you to grill along the entire surface area of the grill itself. Use this feature when you have food distributed uniformly beneath the grill and you want it to be browned evenly.
Important: Always leave the oven door closed when using the grill setting in order to achieve the best results and save on energy (about 10% ).
When using the grill settings, it is recommended that the thermostat be set to maximum, as this is the optimal setting for the grill, which utilizes radiation produced by infrared rays. However, this does not mean that lower temperature settings cannot be used when necessary by simply turning the control knob.
When using the grill, place the rack at the 4 rack heights (see cooking table) and place the dripping-pan beneath the oven rack to prevent grease from falling onto the bottom of the oven.
Setting "Ventilated Grill", is extremely useful for grilling foods rapidly, as the distribution of heat makes it possible not only to brown the surface, but also to cook the bottom part. It can also be used to grill large
pieces of meat or fowl. Moreover, it can also be used for browning foods at the end of the cooking process. When using this function, place the grid on the 2nd or 3rd oven rack from the bottom (see cooking table) then, to prevent fat and grease from dripping onto the bottom of the oven and thus smoke from forming, place a dripping-pan on the 1st rack from the bottom. When using this function together with the spit (only on some models), you can also cook dishes on the dripping-pan situated on the 1st rack, for example: potatoes, etc....
Baking Pastries
When baking pastries, always place them in the oven after it has been preheated. Make sure you wait until the oven has been preheated thoroughly (the red "O" light will turn off). The temperature is normally around 160^ . Do not open the door while the pastry is cooking in order to prevent it from dropping. Batters must not be too runny,
Cooking Pizza
For best results when cooking pizza, use setting 3 "The Pizza Oven":
- Preheat the oven for at least 15 minutes;
- Use a light aluminium pizza pan, placing it on the broiler supplied with the oven. If the dripping-pan is used, this will extend the cooking time, making it difficult to get a crispy crust;
- Do not open the oven door frequently while the pizza is cooking;
- If the pizza has a lot of toppings (three of four), it is recommended that the mozzarella cheese be placed on top halfway through the cooking process.
Cooking fish and meat
When cooking white meat, fowl and fish use low temperatures. (150^ - 175^) . When red meat must be superficially well-cooked but succulent inside, it is advisable to start with a high temperature (200 - 220^) for a short time, and then to reduce it at a later point. Generally speaking, the more meat there is, the lower the temperature and the longer the cooking time should be. Place the meat in the centre of the grid and put a spill-tray underneath to catch grease drips. Insert the grid so that it is in the middle of the oven. If more heat from below is required,
GB
Planning cooking with the electronic programmer
Setting the clock
After the appliance has been connected to the power supply, or after a powercut, the clock display will automatically reset to 0:00 and begin to blink.
To set the time:
- Press the COOKING TIME button and the COOKING END TIME simultaneously.
- Within 4 seconds of having pressed these buttons, set the exact time by pressing the + and - buttons.
The + button advances the hours and the - button decreases the hours.
Once the time has been set, the programmer automatically switches to manual mode.
Setting the timer
The timer enables a countdown to be set, when the time has elapsed a buzzer sounds.
To set the timer proceed as follows:
- press the TIMER button. The display shows:
030
2. Press the + and = buttons to set the desired time.
3. When the buttons are released the timer begins counting down and the current time appears on the display.
10:00
- After the time has elapsed a buzzer will sound, and this can be switched off by pressing any button (except the + and - buttons). The symbol will switch off.
! The timer does not switch the oven on or off.
Adjusting the volume of the buzzer
After selecting and confirming the clock settings, use the button to adjust the volume of the alarm buzzer.
Setting the cooking time with a delayed start
First decide which cooking mode you wish to use and set a suitable temperature using the SELECTOR and THERMOSTAT knobs on the oven.
At this point it is possible to set the cooking time:
- Press the COOKING TIME button
- Within 4 seconds of having pressed this button, set the desired amount of time by pressing the + and 0 buttons. If, for example, you wish to set a cooking time of 30 minutes, the display will show:
030
- 4 seconds after the buttons are released, the current time (for example 10.00) reappears on the display with the symbol and the letter A (AUTO).
Next the desired cooking end time must be set:
- Press the END COOKING TIME button
- Within 4 seconds of having pressed this button, adjust the cooking end time by pressing the + and = buttons. If, for example, you want cooking to end at 13.00, the display shows:
13·00
- 4 seconds after the buttons are released, the current time (for example 10.00) reappears on the display with the letter A (AUTO).
10.00
At this point, the oven is programmed to switch on automatically at 12:30 and switch off after 30 minutes, at 13.00.
Setting the cooking time with an immediate start
Follow the above procedure for setting the cooking time (points 1-3).
When the letter A appears, this indicates that both the cooking time and the end cooking time have been programmed in AUTO mode. To restore the oven to manual operation, after each AUTO cooking mode press the COOKING TIME and END COOKING TIME buttons simultaneously.
The symbol will remain lit, along with the oven, for the entire duration of the cooking programme.
The set cooking duration can be displayed at any time by pressing the COOKING TIME button, and the cooking end time may be displayed by pressing the END COOKING TIME button. When the cooking time has elapsed a buzzer sounds. To stop it, press any button apart from the + and - buttons.
Cancelling a previously set cooking programme
Press the COOKING TIME button and the COOKING END TIME simultaneously.
Correcting or cancelling previously set data
The data entered can be changed at any time by pressing the corresponding button (TIMER, COOKING TIME or COOKING END TIME) and the + or - button. When the cooking time data is cancelled, the cooking end time data is also cancelled automatically, and vice versa.
If the oven has already been programmed, it will not accept cooking end times which are before the start of the programmed cooking process.
Oven cooking advice table
| Selection Knob Setting | Type of Food | Wt. (Kg) | Rack Position From Oven Bottom | Preheating Time (minutes) | Thermostat Knob Setting | Cooking Time (minutes) |
| 1 Covection Mode | Duck | 1 | 3 | 15 | 200 | 65-75 |
| Roast beef | 1 | 3 | 15 | 200 | 70-75 | |
| Roast pork | 1 | 3 | 15 | 200 | 70-80 | |
| Biscuits | - | 3 | 15 | 180 | 15-20 | |
| Tarts | 1 | 3 | 15 | 180 | 30-35 | |
| 2 Pastry Mode | Cakes | 0.5 | 3 | 15 | 180 | 20-30 |
| Pies | 1 | 2/3 | 15 | 180 | 45-50 | |
| Plum cake | - | 3 | 15 | 180 | 40-50 | |
| Sponge cake | - | 3 | 15 | 160 | 25-30 | |
| 3 Pizza Mode | Pizza | 0.5 | 3 | 15 | 220 | 15-20 |
| Roast beef | 1 | 2 | 10 | 220 | 25-30 | |
| Chicken | 1 | 2/3 | 10 | 180 | 60-70 | |
| 4 Ventilation Mode | Pizza (on 2 racks) | 1 | 2-4 | 15 | 230 | 15-20 |
| Lasagne | 1.8 | 3 | 10 | 180 | 30-35 | |
| Pasta bakes au gratin | 1.5 | 3 | 10 | 180 | 20-30 | |
| Baked Pasta | 1.5 | 2 | 10 | 180 | 20-30 | |
| Lamb | 1 | 2-4 | 15 | 200 | 40-45 | |
| Chicken + potatoes | 1 | 2 | 10 | 180 | 60-70 | |
| Mackerel | 1.5 | 2 | 10 | 180 | 30 | |
| Sea Bream | 1 | 3 | 10 | 180 | 55-60 | |
| Plum cake | 0.5 | 2-4 | 10 | 160 | 40-50 | |
| Cream puffs (on 2 racks) | 0.5 | 2-4 | 10 | 190 | 20-25 | |
| Biscuits (on 2 racks) Sponge cake (on 2 racks) | 1 | 2-4 | 10 | 180 | 10-15 | |
| Pasta bakes au gratin (on 2 racks) | 2.5 | 2-4 | 15 | 200 | 20-25 | |
| 35-40 | ||||||
| 5 Top heating element | Sole and squid | 1 | 4 | 5 | Max | 8 |
| Squid and shrimp on spits | 1 | 4 | 5 | Max | 4 | |
| Cod fillets | 1 | 4 | 5 | Max | 10 | |
| Grilled vegetables | 1 | 3/4 | 5 | Max | 8-10 | |
| 6 Grill | Veal steaks | 1 | 4 | 5 | Max | 15-20 |
| Cutlets | 1.5 | 4 | 5 | Max | 20 | |
| Hamburgers | 1 | 3 | 5 | Max | 7 | |
| Caballas | 1 | 4 | 5 | Max | 15-20 | |
| Toasted sandwiches | n.° 4 | 4 | 5 | Max | 5 | |
| With rotisserie | ||||||
| Veal on the spit | 1.0 | - | 5 | Max | 70-80 | |
| Chicken on the spit | 2.0 | - | 5 | Max | 70-80 | |
| 7 Ventilated Grill | Grilled chicken | 1.5 | 2 | 5 | 200 | 55-60 |
| Cuttle-fish | 1.5 | 2 | 5 | 200 | 30-35 | |
| Chicken (inserted on the spit) + potatoes (on the dripping-pan) | 1.5 | - | 5 | 200 | 70-75 | |
| - | 2 | 5 | 200 | 70-75 | ||
| With rotisserie | ||||||
| Veal on the spit | 1.5 | - | 5 | 200 | 70-80 | |
| Chicken on the spit | 1.5 | - | 5 | 200 | 70-80 | |
| Lamb on the spit | 1.5 | - | 5 | 200 | 70-80 | |
| With multi-skewer rotisserie | ||||||
| (only a few models) | ||||||
| Meat kebabs | 1.0 | - | 5 | Max | 40-45 | |
| Vegetable kebabs | 0.8 | - | 5 | Max | 25-30 |
NB: cooking times are approximate and may vary according to personal taste. When cooking using the grill or double grill or ventilated double grill, the dripping-pan must always be placed on the 1st oven rack from te bottom.
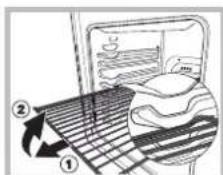
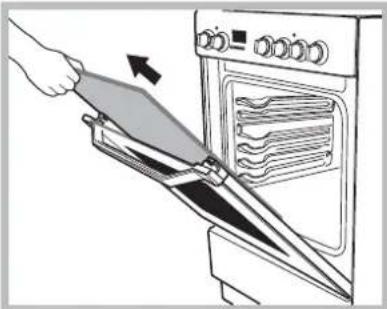
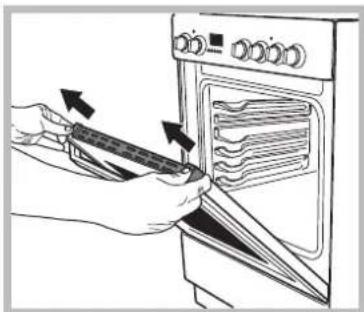
WARNING! The oven is provided with a stop system to extract the racks and prevent them from coming out of the oven.(1) As shown in the drawing, to extract them completely, simply lift the racks, holding them on the front part, and pull (2).
GB
! The glue applied on the gaskets leaves traces of grease on the glass. Before using the appliance, we recommend you remove these with a special non-abrasive cleaning product. During the first few hours of use there may be a smell of rubber which will disappear very quickly.
Switching the cooking zones on and off
To switch on a cooking zone, turn the corresponding knob in a clockwise direction.
To switch it off again, turn the knob in an anticlockwise direction until it is in the "0" position.
If the ELECTRIC HOTPLATE ON indicator light is lit, this shows that at least one hotplate on the hob is switched on.
Cooking zones
The hob is equipped with electric radiant heating elements. When they are in use the following items on the hob become red.
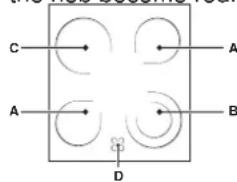
A. The cooking zone with radiant heating elements.
B. The cooking zone with a hilite extensible heating element.
C.The cooking zone with a hilite heating element
D. The residual heat indicator
light: this indicates that the temperature of the corresponding cooking zone is greater than 60^ even when the heating element has been switched off but is still hot.
Cooking zones with hilite heating elements
These emit heat via radiation from the hilite elements they contain. They have similar properties to gas burners: they are easy to control and reach set temperatures quickly, allowing you to actually see the power they are providing.
Description of the heating elements
The circular radiant/hilite heating elements become red 10 - 20 seconds after they have been switched on.
The circular radiant/hilite heating elements guarantee even heat distribution in addition to the usual
advantages that radiant/hilite heating elements bring.
Hilite/radiant elements emit high levels of heat and light as soon as they are switched on, offering the following practical advantages:
rapid heating (in relation to a gas burner)
rapid cooling
- even temperature across the whole surface (due to the circular heating elements)
| Setting | Normal or Fast Plate |
| 0 | Off |
| 1 | Cooking vegetables, fish |
| 2 | Cooking potatoes (using steam) soups, chickpeas, beans. |
| 3 | Continuing the cooking of large quantities of food, minestrone |
| 4 | For roasting (average) |
| 5 | For roasting (above average) |
| 6 | For browning and reaching a boil in a short time. |
Practical advice on using the hob
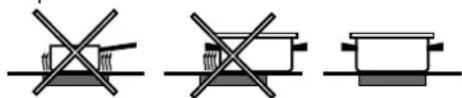
- Use pans with a thick, f1 at base to ensure that they adhere perfectly to the cooking zone.
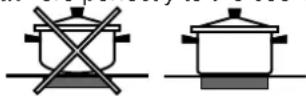
Always use pans with a diameter that is large enough to cover the hotplate fully, in order to use all the heat produced.
Always make sure that the base of the pan is completely clean and dry: this ensures that the pans adhere perfectly to the cooking zones and that both the pans and the hob last for a longer period of time.
- Avoid using the same cookware that is used on gas burners: the heat concentration on gas burners may have warped the base of the pan, causing it not to adhere to the surface correctly.
- Never leave a cooking zone switched on without a pan on top of it, as doing so may cause the zone to become damaged.
! This appliance has been designed and manufactured in compliance with international safety standards. The following warnings are provided for safety reasons and must be read carefully.
General safety
- The glass ceramic hob is resistant to temperature fluctuations and shocks. It is, however, wise to remember that blades or cooking utensils may ruin the surface of the hob. If this happens, remove the plug of the cooker from the electricity socket and contact an authorised Technical Assistance Centre in order to request original spare parts. Failure to comply with the above may compromise the safety of the appliance.
- If the surface of the hob is cracked, switch off the appliance to prevent electric shocks from occurring.
- The appliance was designed for domestic use inside the home and is not intended for commercial or industrial use.
- The appliance must not be installed outdoors, even in covered areas. It is extremely dangerous to leave the appliance exposed to rain and storms.
- Do not touch the appliance with bare feet or with wet or damp hands and feet.
- The appliance must be used by adults only for the preparation of food, in accordance with the instructions outlined in this booklet. Any other use of the appliance (e.g. for heating the room) constitutes improper use and is dangerous. The manufacturer may not be held liable for any damage resulting from improper, incorrect and unreasonable use of the appliance.
- The instruction booklet accompanies a class 1 (insulated) or class 2 - subclass 1 (recessed between 2 cupboards) appliance.
- When the appliance is in use, the heating elements and some parts of the oven door become extremely hot. Make sure you don't touch them and keep children well away.
- Make sure that the power supply cables of other electrical appliances do not come into contact with the hot parts of the oven.
- The openings used for the ventilation and dispersion of heat must never be covered.
Always use oven gloves when placing cookware in the oven or when removing it. - Do not use flammable liquids (alcohol, petrol, etc...) near the appliance while it is in use.
- Do not place flammable material in the lower storage compartment or in the oven itself. If the appliance is switched on accidentally, it could catch fire.
- Always make sure the knobs are in the position when the appliance is not in use.
- When unplugging the appliance, always pull the plug from the mains socket; do not pull on the cable.
- Never perform any cleaning or maintenance work
without having disconnected the appliance from the electricity mains.
- If the appliance breaks down, under no circumstances should you attempt to repair the appliance yourself. Repairs carried out by inexperienced persons may cause injury or further malfunctioning of the appliance. Contact Assistance.
- Do not rest heavy objects on the open oven door.
- If the cooker is placed on a pedestal, take the necessary precautions to prevent the cooker from sliding off the pedestal itself.
Disposal
- When disposing of packaging material: observe local legislation so that the packaging may be reused.
- The European Directive 2002/96/EC relating to Waste Electrical and Electronic Equipment (WEEE) states that household appliances should not be disposed of using the normal solid urban waste cycle. Exhausted appliances should be collected separately in order to optimise the cost of re-using and recycling the materials inside the machine, while preventing potential damage to the atmosphere and to public health. The crossed-out dustbin is marked on all products to remind the owner of their obligations regarding separated waste collection.
Exhausted appliances may be collected by the public waste collection service, taken to suitable collection areas in the area or, if permitted by current national legislation, they may be returned to the dealers as part of an exchange deal for a new equivalent product.
All major manufacturers of household appliances participate in the creation and organisation of systems for the collection and disposal of old and disused appliances.
Respecting and conserving the environment
Always keep the oven door closed when using the GRILL, DOUBLE GRILL and FAN-ASSISTED DOUBLE GRILL modes: This will achieve better results while saving energy (approximately 10% ).
- Whenever possible, avoid pre-heating the oven and always try to fill it. Open the oven door as little as possible because heat is lost every time it is opened. To save a substantial amount of energy, simply switch off the oven 5 to 10 minutes before the end of your planned cooking time and use the heat the oven continues to generate.
- Keep gaskets clean and tidy to prevent any door energy losses
- If you have a timed tariff electricity contract, the "delay cooking" option will make it easier to save money by moving operation to cheaper time periods.
Care and maintenance
GB
- Make the most of your hot plate's residual heat by switching off cast iron hot plates 10 minutes before the end of your cooking time and glass ceramic hot plates 5 minutes before the end of cooking time.
- The base of your pot or pan should cover the hot plate. If it is smaller, precious energy will be wasted and pots that boil over leave encrusted remains that can be difficult to remove.
Cook your food in closed pots or pans with well-fitting lids and use as little water as possible. Cooking with the lid off will greatly increase energy consumption - Use purely flat pots and pans
If you are cooking something that takes a long time, it's worth using a pressure cooker, which is twice as fast and saves a third of the energy.
Switching the appliance off
Disconnect your appliance from the electricity supply before carrying out any work on it.
! Never use steam cleaners or pressure cleaners on the appliance.
Cleaning the oven
- The stainless steel or enamel-coated external parts and the rubber seals may be cleaned using a sponge that has been soaked in lukewarm water and neutral soap. Use specialised products for the removal of stubborn stains. After cleaning, rinse and dry thoroughly. Do not use abrasive powders or corrosive substances.
- The inside of the oven should ideally be cleaned after each use, while it is still lukewarm. Use hot water and detergent, then rinse well and dry with a soft cloth. Do not use abrasive products.
- Clean the glass part of the oven door using a sponge and a non-abrasive cleaning product, then dry thoroughly with a soft cloth. Do not use rough abrasive material or sharp metal scrapers as these could scratch the surface and cause the glass to crack.
The accessories can be washed like everyday crockery, and are even dishwasher safe. - Dirt and grease should be removed from the control panel using a non-abrasive sponge or a soft cloth.
Inspecting the oven seals
Check the door seals around the oven regularly. If the seals are damaged, please contact your nearest After-sales Service Centre. We recommend that the oven is not used until the seals have been replaced.
Replacing the oven light bulb
- After disconnecting the oven from the electricity mains, remove the glass lid covering the lamp socket (see figure).

- Remove the light bulb and replace it with a similar one: voltage 230 V, wattage 25 W, cap E 14.
- Replace the lid and reconnect the oven to the electricity supply.
! Do not use the oven lamp as/for ambient lighting.
Cleaning the glass ceramic hob
! Do not use abrasive or corrosive detergents (for example, products in spray cans for cleaning barbecues and ovens), stain removers, anti-rust products, powder detergents or sponges with abrasive surfaces: these may scratch the surface beyond repair.
- It is usually sufficient simply to wash the hob using a damp sponge and dry it with absorbent kitchen roll.
- If the hob is particularly dirty, rub it with a special glass ceramic cleaning product, then rinse well and dry thoroughly.
- To remove more stubborn dirt, use a suitable scraper (this is not supplied with the appliance). Remove spills as soon as possible, without waiting for the appliance to cool, to avoid residues forming crusty deposits. You can obtain excellent results by using a rustproof steel wire sponge - specifically designed for glass ceramic surfaces - soaked in soapy water.
- If plastic or sugary substances have accidentally been melted on the hob, remove them immediately with the scraper, while the surface is still hot.
- Once it is clean, the hob may be treated with a special protective maintenance product: the invisible film left by this product protects the surface from drips during cooking. This maintenance should be carried out while the appliance is warm (not hot) or cold.
- Always remember to rinse the appliance well with clean water and dry it thoroughly: residues can become encrusted during subsequent cooking processes.
| Glass ceramic hob cleaners | Available from |
| Window scraper Razor blade scrapers | DIY Stores |
| Replacement blades | DIY Stores, supermarkets, chemists |
| COLLO lunetaHOB BRITEHob CleanSWISSCLEANER | Boots, Co-op stores,department stores, Regional Electricity Company shops,supermarkets |
Cleaning stainless steel
Stainless steel can be marked by hard water that has been left on the surface for a long time, or by aggressive detergents that contain phosphorus. We recommend that the steel surfaces are rinsed well then dried thoroughly.
Assistance
Please have the following information handy:
The appliance model (Mod.).
The serial number (S/N).
This information can be found on the data plate located on the appliance and/or on the packaging.
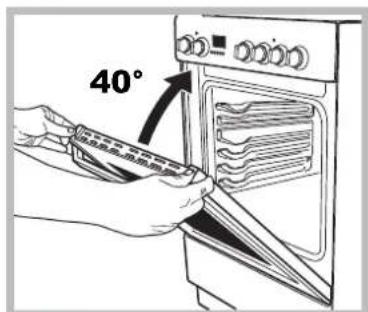
Removing and fitting the oven door:
1.Open the door
2.Make the hinge clamps of the oven door rotate backwards completely (see photo)
3.Close the door until the clamps stop (the door will remain open for 40^ approx.) (see photo)
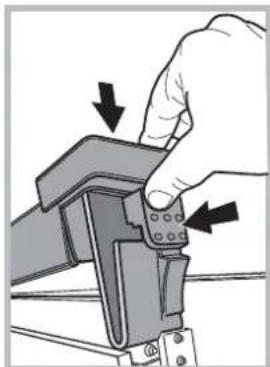
- Press the two buttons on the upper profile and extract the profile (see photo)
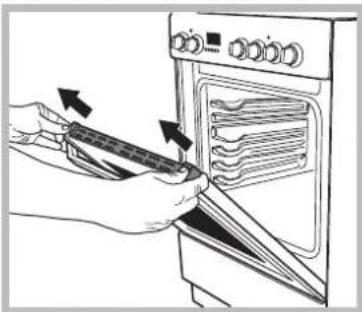
5.Remove the glass sheet and do the cleaning as indicated in chapter: "Care and maintenance".
- Replace the glass.
WARNING! Oven must not be operated with inner door glass removed!
WARNING! When reassembling the inner door glass insert the glass panel correctly so that the text written on the panel is not reversed and can be easily legible.
- Replace the profile, a click will indicate that the part is positioned correctly.
8.Open the door completely.
9.Close the supports (see photo).
- Now the door can be completely closed and the oven can be started for normal use.
BG
!BaxHo e da cbxpaHraBaTe Ta3n KnHexKa, 3a da MoKe Da ra n3non3BaTe 3a cnpaBka BbB BCEKN MomeHT. Pnp npdaX6ha Ha ypeHa, npn npekpTaBAHe Ha n3non3BaHETo My IINn npn npmeCtBaHe ce yBepeTe, ye KNHexKaTa C nHCTpyKuNTe e 3aeHc Hero.
!PpOeTeBnHMaTeHNO HNCTpyKunTE:B TAX NMA BaxHN CBeDeHn 3a INHCTaINpaHETo, IN3NON3BaHeTO IN Be30NaCHOCTTa npn pa6oTa cypeda.
!HCTaInpaHToHaypedaTp6BaDaceN3BbpwnOT KBaIINΦuPah CneuaJIInCT cbrrAcho HaCTOaUNTe HnCTpyKUIN.
!BcKa Oepaunno HacpounKa nn noDpBkKa Tpa6Ba Da ce n3BbPwBa, KOrato neKaTa e N3KNoyeHa OT eNEKtpnueckoto 3axpaHbaHe.
IOnznoHnpaHe HnBeJInpaHe
!Neukata Moke da ce nHctaInpa do Me6eJn,yraTO BnCOuHa He HaDbNwaba Ta3n Ha rotBapckn Inot.
!Tp6Ba da ce yBepnte, ye cTeHaTa, KOTo e B KOHTaKt CbC 3aHaTa Yact Ha ypeJa, e n3pa6oTeHa OT He3aNaIM N yCTOnHb HA TOnnHa MaTepnan (T 90^)
3a npabunno nHctanypane:
- nocTaBeTe ypeDa B KxHraTa, Tpane3apnTa NIn B eHocTaHNO XnNtue (He B SaHrTa);
aKo IIOtBHa NeyKaTa e NO-BuCOK OT NIOta Ha
Me6eJIte,Te Tp8Ba
da 6bDat NocTaBEN Ha
none 200 mm otypea;
aKo neykaTa ce MOHTnpa NOD OKaueH WkaΦ, NocneHnT Tpr6Ba Da 6bDe Ha MNHMAnHO pa3CTOHNe ot 420 mm ot rotBapcknI Pnot. TOBa pa3CTOHNe Tpr6Ba
da 6bde 700 mm, ako okayehnte ukafobe ca ot 3anaJIM MaTePnAn (eux fuuypa);
- He Tp6Ba Da noCTaBTe nepDeTa 3aD neyKaTa nnHa pa3cTOrHHe OT CTpaHnUHnTe n CTeHN, No-MaNko ot 200 mm;
eBENTyaHn acnpaTop np Ta 6bDat HCTaHpaHN B CbOTBeTCTBne C yKa3aHnraTa OT CbOTBEHTOPOKOBODCTBO NHCPTyKUH.
HnBcIpaHe
Ako ypeBt Tp86Ba da
6bDe HnBeJIpaH, 3aBnITE
peryaOnOHnTe Kpaeta,
KoNTO CE DoCTABRT B KomIeKT,
B npEHa3HaueHnTE 3a TIX
nerla, pa3noJoxKeH N BbrnTE
BOCHOBATA Ha neYkata (6ux
fuzypa).

Kpaetyata* ce MOHTnpaT B crno6ka noD oCHObata Ha neykata.
EneKtpnuecko CBpb3BaHe
HcTaIpaHa He 3aXpaHbuaKa6eI
Ka6eBt ce opa3MepraBa B 3aBnCmOcT OT BnDa Ha n3No13BaHOT eNEKtpnuecko Cbbp3BaHe cbrnaCHO daDeHaTa CXema Ha CBbp3BaHe.
400V 3N-H05RR-F 5x2.5 CEI-UNEL 35363 H05VV-F 5x2.5 CEI-UNEL 35746

400V 2N~ H05RR-F 4x4 CEI-UNEL 35363 H05VV-F 4x4 CEI-UNEL 35746
230V 1N~ H05RR-F 3x4 CEI-UNEL 35363 H05VV-F 3x4 CEI-UNEL 35746
3a noctabhe Ha 3axpaHbau n Ka6eJ:
- Pa3Bnnte BnHTa V OT KIeMHATA KyTna N n3DbpNaTe KaNaYeTo, 3a Da MoKe T Ta ce OTBOpN (BuX fueypa).
- noctabete CBbp3Baun HAkpanHnA (Bux fuaypa) B CbOTBETCTBNE C npBedeHaTnO-rope CXema Ha CBbp3BaHe. KEmHaTa Kytna e C BB3MOxHOCT 3a MOHOa3HO CBp3BaHe ot 230V:KemTe 1,
2n3caCbbp3aHEnEdHaKbMdpyra;MoCTbT4-5epa3noJIOXKeH BdoHaTa 3OHa Ha KEmHaTa KyTna.
3. NocTabete npoBOnHnUte N n CbIpaCHO cxemata (eux queypa) u CbbpXeTe, KaTO 3aTeHete DOKpan BnHTOBETe Ha KJIEMITE.
4.ФИКСИРАТЕ OCTAHAJIТЕ ПОВODHIN KbM KIEMN
1-2-3 n 3aTeHHe TE BnHTOBeTe.
5.ФИКСИРАТЕЗAXPAHBAUINKAБЛВСпЕЦАЛHAТApnDbPkaaSCko6a.
6. 3aTbOpTe KaNaYeTo Ha KIeMHaTa KyTnA Ype3 3aBnBaHe Ha BnHTa V.
Cbbp3BaHe Ha 3axpaHbauia Ka6eI KbMeIeKtpueckkaT Mpeka
MOnTnpaIe BbpyKa6eJa HopMaJIu3IpaH ⅢeIeKtpnuecko HaTOBapBaHe, NocOyeHo Ha Ta6JIkaTa c XapaKtepnCTnK, KOrTo e NoCTaBeHa Na ypeDa (Euk ma6Nuca ,TexHuCeCKu daHnu").
Cbpxe Te ypea dIpeKTHO KbM MPekaT, KaTO 3a ceNTa N3NOJ3BaHTe MHORONIOHcEH pekcbau C MNHMAnHO OTBapHe MEXdy KOHTaKNTte OT 3 mm, NOCTabEH MeJy ypea H MPekaTA. MHORONIOHcHnT IpeKcbvau Tp6Ba Da 6bJe opa3MepeH 3a NocOeHOTo HatoBapBaHe n da OTROBapHa HopmTe NFC 15-100 (3a3EMtENHnT Ka6en He Tpr6Ba Da ce N3KnUoyBa OT pekcba). 3axpaHbauNr Ka6en Tpr6Ba Da 6bDe pa3NoJoxKeH Taka, Ye B HnTo eHa ToUka Da He BnI3a B KOHTAe TcempeaTypa, No-BnCoka O T 50^
Ipei Da n3BbpwnTe CBbp3BaHTo, yBepTe ce, ye:
KoHTaKTbTe 3a3eMeH n E B CbOTBETCTBnE CbC 3aKOHOBtpe pa3npope6n;
- KOHTaKTb MÖke Da N3dbpKm MaKcMaJIHOTo HaTOBapBaHe Ha MoUHocCTTa Ha MaUHaHa, O3HaueHO Ha TaBeKata C xapaKtepeNCTKNITE
3axpaHbAaTOHa npEkeHne E BrpaHnUte Ha cTOnHocHTNe, O3NaueHn Ha TaBeIkata C xapakTeepNCTKNTe;
KoHTaKTbT e CbBMeCTM C cIeCenHa hypeHa.Ako KOHTaKTbT He e CbBMeCTM C cIeCenHa,ObbpHete Ce KbM OTOpN3nPaH CneuAniNCT 3a noDmHaHa My.He n3NoJ3BaNTeYdJIxNtTeNn pa3KIOHntTeN.
!UpeBbT Tpr6Ba Da 6bIe INHCTaIIpaH TaKa,Ye Ka6eJIbT N KOHTaKTbT 3a ENEKtpueeCKn TOK Da ca JieCHO doCTbNHi.
!Ka6eBt He Tp86Ba Da 6bJe npereBbaH nn npuTnCKaH.
!Ka6bIbT Tp8Ba nepnoDnHo Da ce npOBepBa nIOMeHr OT OTOPI3npaHn CNEuaJIncTn.
!PpeepnptneTo-npon3BODHTe He Hocn HkaKBa OTROBOPHOCT npn Hecna3BaHe Ha nocooyHte HopMN.
Pbeyen pekm Ha pa6oTa Ha ypHaTa
Cnei CbepeBaHe Ha BpEmTo, nporpaMaTOpbT aBtOMaTuHc Ce npEeKnOuBa Ha pbueH peKIM.
BHHMaHHe:3a da BKNIOHTe pByeH peXmHa pa6Ota CneI KaTo e N3NoJ3BaH "ABTomATuEH"peXm, HATnCHTe 6yTOHnTe n eHOBpemHo.
Kak da nporpaMPaTe cypHata
PpOdbnKInTeHocCTTa Ha npPorpaMaTa 3a neyeHe, BpeMeTo KOrato 3aBbPsN Tpr6Ba Da 6bDat 3aJaDeHH. Ako npEpanoJoxm, Ye BpeMeTo n3ncaHo Ha TaIeMa e 10:00:
- 3aBbptete KIOUOBTe 3a ynpabJIeHne Ha cypHaTa, 3aIaBaJ XeIaHaTa FyHKuN TEmpePaTypa (Hanp. cTaTuHa FyPhA, 200^)
- HatncheTe 6yToH n HaJIacete BpeMeTO 3a ne paMKInTe Ha YeTnpi CeKHyDn) N3NoI3BaIKN 6yToHInTe H. Heka npednoJoxM, ye HaJIaceHOTo BpeMe 3a neueHe e 30 MInHyTu. Ha DnCIIeJe ce n3PiWe KaKTo CneDbA:
0:30
CneI KaTo 6yToHbT 6bJe OCBO6oJEn, TeKyuTO BpeMe ce n3nIwe Ha nCnIeR cJeI OKOJI 4 cekHyn 3aEJHO Cbc CmB0Na U n 6yKBata“A” (AUTO);
- HatncheTe 6yToHa n 13no3BaIte 6yToHnTe -n + 3a Da Harnacnte BpeMeTO, KORA TO nporpaMaTa 3a neueHe Tp86Ba Da cBbpiu. HeKa npednoJoxm ToBa BpeMe e 13:00.
БукваТ“A”и ceNi n3ncaHa, 3a Da Bn HAnOMH, Ye npOdbJnxIeJIHoCTTЯ KpaT Ha neYeHTo ca 6NIn npOrpamnpaHb ABTOMaTHueH peXm. B To3n cIyuaH cyPhaTse CBKIOuH ABTOMaTHUHO B 12:30 n Ie ce N3KnIOu CneD 30 MInHyT.N CneD KaTO cyPhaTa ce
BKNIOH, CIMBOJbT U 111e CeDN N3NcAn Ipe3 ZIJNOTO BpeMe Ha neueHe. Ppe3 KOeTo N da e BpeMe Ha neueHeTo npOdbJIKHTENHOCTTa Ha npOceCa MOKe Da ce N3NIse Ype3 Ka HATnCKaHe Ha 6yToHa a NbK KpaT - Ype3 HATnCKaHe Ha 6yToHa
CneKaTo n3Tee BpeMeTo Ha neueHe, TaMepbT ue 3a3BbHN B npOdbJnxEHne Ha HAKoNko MNHyTN; 3a Da rO n3KlIOuHTe, npocTo HATnCHete KOHTo N da e OT 6yTOHNTe, c N3KlIOUeHne Ha 6yTOHNTe -n+
He3a6aBEN cTap 3a onpeJeNo BpeMe
Ako e nporpamnpaHO camo npoIbJnxTeHocTtHa n6 (ToUKn 1 n 2 ot "Kak da nporpamnpate cyphata" cyphata uce Ce BKJIouy BeDHaRa.
HynipaneHaBeue3aadena nporpama
HaTnCHeTe 6byToHn n eHOBpeMeHHo.
Taimep
TaimepbTa60n KaTo OT6pOraBa 3aJaDeH nepoOd OT BpeMe. Ta3n FyHKuHa Ha TaIMepa He BKIOUcBA N3KIOUcBA FpyHaTa. ToI camo I3daBa 3ByKOB cINHan, KOrato BpeMeTo e IN3TeKIO. Korato 6yTOhBt e HATNCHaT Ha DInCJIe Ce IN3NcBA:
000
Toraba 3noJ3BaTe 6yToHnte 3a Da Hargncte JxelaHOTo BpeMe. CneI ocboKdAbaHeTO Ha 6yToHa, TaMepbT 1e 3aoHe da O6pOraBa n TekyuTo BpeMe 1e Ce n3nIe.
10 00
CneI KaTo n3Teue BpeMeTo 1e npo3Byu 3ByKOB cnHaKoITo MoKe Da 6bJe CnpaH Upe3 HaTuCKaHe Ha KoITo N da eOT 6yToHInTe (cN3KJIIOUeHHe Ha 6yToHInTe +n -).PpT TOBaNOJoxE HcMBOJbT CbIo 1e 3arache.
Kopekua/HynpaHe Ha HOpMaunra
BbBeHeHaTnHΦopMauM MoKe Da 6bDe npomeHa no BcRAKO BpeMe Ype3 HAtNCKaHe Ha CbOTBETnHa ByToHnHa 6yToHnTe+ n-
Korato INHOpMaunraTa 3a npOdbJnxHTHeHocTHa Na neyeHTo
Използване на
CTbKlOKepaMnUHnRAOTBapcKn PLOT
e HynipaHa, INHOpMaunra3a KpaH Na neueHe CbIc Ce Hynpa aBtOMaTuH No obaTHO.
AkoФунatae6иla npoPamnpaHa HЯMa Bb3npIeKpaHaNueHeTo,akoToe npeDiHauanoto Ha npoceca.
PerynnpaHHeHBOTHa3ByKOBnCnHn
CneKaTo N36peTe n IOTbPnTe 3aJaDeHoTo Ha
YacOBHnKa c 6yToHa MOKeTe Da peryIuPaTe HNBOTo Ha 3Byka Ha aIapMaTa.
!IeHnIOTo,m3NoJ3BaHO npn noCTaBHe Ha
ynTbTheHnra,OctaMaCneHn CneBvBpxy
CTbKJIoTO.IpnOpbUBaCe, npedn da n3noJ3BaTe
yepa,daOTcpanHe Te3n Cneu Cbc CneunuueH
IpoodykT3aNoDlbpkaHe,KOITo Hee a6pa3nBHe.Ipe3
NpBNTe HrKOIO qaca Ha paOTo MoKe da ce ycetn
MnHMa Ha rMa, KOrTO Bce NaK 6b30 Oe N3ue3He.
BkIIOUbaHe n N3KIOUbaHe Ha 3OHNTe 3a roTBeHe
3aДаВКЛIOHTe 3OHa 3a NeueHe,3aBbPTeTe
CbOTBeTHN IpeBkIIOvBaTeI NO NocOka Ha YacOBaTaCTpeJIka.
3a da n3KnIOUHTe, Tp86Ba Da 3aBbptnte
npeBknIyBaTeNa B nocoka, obaPaHa Ha yacobata CTpeJIka,do DoCTnraHe Ha noLoKeHne "0".
3anaBaeHoHa CneJauCBeTnHEn HndkaTOp 3a
pa6oTa Ha EJEKTPNUECKNTE NLOUH noka3Ba, Ye
Nohe eHa OT IIOuHte 3a rotBeHe E BKNIOUeHa.
C3ohn 3a rotBeHe
IIObTe o6OpyDbaH c eJeKtpnueckn n3JIbYBaun

hi-lite harpebaTeJn. Korato Te pa6oT, cJeHnTe oBnactn Bbpxy nToA CTaBAT cepBeHn:
A. 3oHaTa 3a roTbeHe C
n3bYBaunHarpeBaTeJI.
B. 3ohata 3a roTbeHe C
pa3uiprem hi-lite HarpeBaTeJ.
B. 3oHaTa 3a roTbeHe c hi-lite HarpeBaTeJ.
F.CBETJINHHNATNHDNKATOP3aOCTaTbUHaTOnJIInHa:
Toi noka3Ba, Ye TemnepaTypaHa cBOTBeTHaTa
30Ha 3a rotBeHe e HAd 60^ ,Dopn I KOraTo
HarpeBaTeTReIeN3KIIuOeH,HOeOuE ropeu.
30n 3a roTbeHe c hi-lite/n3JIbYBaun HarpeBaTei
Te otdenrT tonnna hye3 n3nbvahe ot hi-lite/
n3JbYBaUNTe HArpeBaTeN, KOnTo NmAt. Te
IMAT CBOICTBA, NOIO6Hn Ha rA3OBNTe KOTIOHN:
ynpabnbaT ce Iecno Ib3o DoCTurat 3aadaeHaTa
TemnepaTypa, a Bne npakTnueckn BnKdaTe
MOUHOCTTAIM.
da
HanpexeHne 230V,MOUHOCT 25W, CBpb3BaHe E 14.
- NocTabete OTHOBOKanaueTo n CbpxKeTe fypHaTa KbM eJIeKtpnueckaTamapeka.
! He n3non3BaIte Iamnata Ha cyphata 3a OCBETBAHe Ha NOMeueHneTO.
NouchTaBHe Ha CTbKIOKepaMnHnroTbapcN nnot
!N36raBte n3non3BaHeTo Ha a6pa3nBn nn
Kopo3noHH npenapaTn 3a noHCTBaHe, KaTO cnpen
ФлakOHn 3a 6ap6ekIO n cyprHn, pOdyKTn 3a noHCTBaHe Ha
NETHa n pOdykTN nPoTnB pBXJa, NOChCTBaUm npenapaTH
Ha npax I b6n c a6pa3uBHa NOBbpxHOCT: Te MoRaT da
H3dpaKaT HeNoPpABIMo NOBbPxHOCTTa.
- DocTaBtuHo e cAmo Da n3MnTe roTbapcknI IIOCTBnAxAHa Tb6a N da rO n3CyuHInTe C DoMaKnHcKa a6cop6upaasa xaptnia.
AkoIIObTe cINHO 3aMbpcEn, n3TbPkAnTE rO cbcneuaJIe HnpeNapat 3a NoCHCTBaHe Ha NOBbpXHOCTOn OTKepaMnuH0 CTbKnIO, n3IIaKaHETe rIO rO n3CyWeTe.
3aOTcpanhahe HaHaTPynha HeHnCTOTnB NO-FOJMO KOINHECTBO Ce n3NON3Ba CNEuHa HCTbprAknA (He e B KOMNKeT C DoCTaBkata).IOnHCBAnte BeDHa Cnei KaTo E Bb3MOxHO,63 Da YaKaATE ypeBt Da n3CTnHe,3a Da n36erHHe TBTbPdRAHbETO Ha OCTaTbCn OT 3aMbpcBaHe. Morat Da ce NoCTnHAT OTnHyPe3nON3BaHe Ha Tb6a OT TeN OT HepXJaMa CTOMHa-CNEUΦnHa 3a NIOTOBE OT KepaMnHo CTbkNo - HanoEHa C BOda n canyH.
AkoBbpxy roTbapcknna Inot ca ce CTOnnnn npedmetn nn MaTepnn KaTO nlaCTMaCa nnn 3axap, Te Tpr6Ba He3a6abHo da ce OTcPaHr cbc CTbprAnKaTa, DOKaTo NOBbpxHOCTTa e OSe TOIIa.
Cnei nouctbahe nnotbT moke da ce o6pa6oTn cbc cneuΦuueh npOdyKT 3a noDpBxka nn 3auNTa: HeuIMMRT fNIM, OCTaBEH OT TO3n npOdyKT ppeNa3Ba NOBbpxHOCTTA O TcnyaHIO N3JeHb BeUeCTBA NO Bpeme Ha neeHe. IpenOpbYBa ce Te3n onepaunn NO noDpBxKkata da ce H3BbPwBaT, DOKaTO ypeT e OSe Jeko ToNbI (He ropeu) nn CTyDen.
BHHaHn NOMHeTe,Ye NIOITbT Tp6Ba Da ce n3nnakBa c HCTa BODa N BHIMATEHNO Da ce n3cuyaba: OCTaTBuNTe OT npOdykTN 6nxMa MOrJN BCbUHOCT Da o6pa3yBaT Harap npn CneDbaUOTo rotBeHe.
| Почuctваши рpenapати за керамчимя плот | Налочни в: |
| Сnéшална ушатул ти Ceran | Магашини Нарравс си Cam |
| Рezерangs остриета за шатули | Магашини Нарравс си Cam, Cynepмаркети, дрогери. |
| COLLO luneta HOB BRITE Hob Clean SWISSCLEANER | Cynepмаркети, Xинермаркети, Магашини за лени рpenapати. |
NouchBaHe Ha HepbXkaeMaTa CTOMHa
HepbKaJaemata CTomHaMoKe Da cTaHe Ha nTeHa, aKo npOdbJnxIeNHO BpeMe E B KOHTaKT CbC cnHObBapOBnTa BOda nIN C npenapaTn 3a NouchTbaHe, CdbpKaun φocφop. PpenOpbUba ce da ce n3nnakBa oBnHo n BHIMATEJIHO da ce n3CywaBa.
TexHnuecko 06cnykBaHe
Cbo6eTe:
- MoDena Ha MaunHata (Mod.)
- CepinHnHn HOpE (S/N)
Te3n nocneHn cBeDeHnCe HAMnpaT B Ta6eKkata C xapaKTepnCTnKeTe, NoCTaBeHa Bbpxu ypeDa nnBbpxy onakOBkata.
ДемоHTaxи MOHTax Ha BpaTaTa Ha Фурнata:
1.OTbopeTe BpaTaTa
2.HanbJHo 3aBbPTeTe Ha3aJ WapHnPHnte cKo6n Ha BpaTata Ha cyphHata (BIX CHIMKaTata)
3.3aTBopete BpataTao DOkato Cko6ata cnpe (BpataTaa 0ctaHe OTBopeHa Ha OKONo 40^ (BIX CHIMKata)

4.HaTnchete6yToHaHa rohpHna npoHn n3dbpnaTe npoHna(BNK CHIMKaTa)
5.n3BaTe cTbKIOTo n NOuHCTe KaKTo e NocOueHo rnaBa: "NoDpBkKa n NooHCTBaHe"

6.Cmehete CbKJIOTO.
PNEyPEXKDEHNE! FypHaTa He Tp86Ba Da ce n3no3Ba npn CbaNeHO BbTpewHo CTbkNo! PNEyPEXKDEHNE! Pn NOBtOpHO MOHTnpaHe Ha BbTpewHOTo CTbkNo Ha BpaTata, NoCTaBeTe npabHHO CTbkNHeHnaHEn, Taka Ye TEkCTbT Bbpxy naHena da He o6bpHaT 06paTHo N da MoKe JneCHO da ce yeTe.
7.CmeHe Te npoHna, eHNO KNIKBaHe ige nokaxe, Ye. qactTa e npaBnHO pa3noIoxKeHa.
8. OToBopeTe BpaTata DOKpaN.
9.3aTBopTe onOpnte (BnK fOToTO).
10.Cera BpaTaMoKeJa ce 3aTbOpn DOKpaN nФурHaTa MoKeJa 3aNoUHe Da pa6Otn HopMaJIHo.